
 |  |
4.3. Creating and Editing Files
One easy way to create a file is with a Unix feature called input/output redirection, as Chapter 5 explains. This sends the output of a program directly to a file, to make a new file or add to an existing one.
You'll usually create and edit a plain-text file with a text editor program. Text editors are somewhat different than word processors.
4.3.1. Text Editors and Word Processors
A text editor lets you add, change, and rearrange text easily. Two common Unix editors are vi (pronounced "vee-eye") and emacs ("ee-macs"). Pico ("pea-co") is a simple editor that has been added to many Unix systems.
Since there are several editor programs, you can choose one you're comfortable with. vi is probably the best choice because almost all Unix systems have it, but emacs is also widely available. If you'll be doing simple editing only, pico is a great choice. Although pico is much less powerful than emacs or vi, it's also a lot easier to learn.
None of those editors has the same features as popular word processing software on personal computers. vi and emacs are sophisticated, extremely flexible editors for all kinds of plain text files: programs, email messages, and so on.
By "plain text," we mean a file with only letters, numbers, and punctuation characters in it. Unix systems use plain text files in many places: redirected input and output of Unix programs (Chapter 5), as shell setup files (see Section 3.7 in Chapter 3), for shell scripts (shown in Section 8.3 of Chapter 8), for system configuration, and more. Text editors edit these files. When you use a word processor, though, although the screen may look as if the file is only plain text, the file probably also has hidden codes (nontext characters) in it. That's often true even if you tell the word processor to "Save as plain text." One easy way to check for nontext characters in a file is by reading the file with less; look for characters in reversed colors, codes like <36>, and so on.
If you need to do word processing--making documents, envelopes, and so on--most Unix systems also support easy-to-use word processors such as WordPerfect and StarOffice (which are compatible, more or less, with Microsoft word processors). Ask your system staff what's available or can be installed.
4.3.2. The Pico Text Editor
The Pico editor, from the University of Washington, is easy to use. If you send email with Pine, you already know how to use Pico; it's Pine's message editor. Like Pine, Pico is still evolving; if you use an older version than we did here (Version 3.7), yours may have some different features.
Start Pico by typing its name; the argument is the filename you want to create or edit. If you're editing a Unix shell setup file or shell script, you'll also want the -w option; it tells Pico not to break ("wrap") lines at the right margin, but only when you press the RETURN key. If a line is longer than the right margin, like the line starting with PATH= in Figure 4-1, pico -w marks the right end with a dollar sign ($). When you move the cursor over the dollar sign, the next 80 characters of that one line are displayed. For instance, to edit my .profile setup file, I cd to my home directory and enter:
$ pico -w .profile
My terminal fills with a copy of the file (and, because the file is short, some blank lines too), as shown in Figure 4-1.
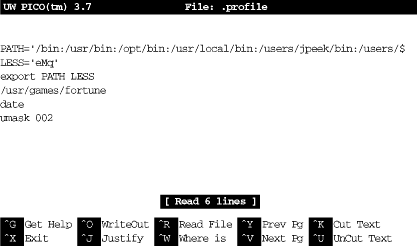
Figure 4-1. Pico display while editing
The bottom two rows of the window list some Pico commands. For example, CTRL-J justifies the paragraph you're editing, making the lines fit neatly between the margins. For a complete list of commands, use CTRL-G, the "Get Help" command.
4.3.2.1. Pico tour
Let's take a tour through Pico. In this example, you'll make a new file with wrapped lines. So (unlike what you'd do when editing a system setup file) we won't use the -w option. You can call the file anything you want, but it's best to use only letters and numbers in the filename. For instance, to make a file named sample, enter the command pico sample. Let's start our tour now.
-
Your screen should look something like the previous example, but the middle of the screen should be blank, ready for you to enter text.
-
Enter some lines of text. Make some lines too short (press RETURN before the line gets to the right margin). Make others too long; watch how Pico wraps long lines. If you're using a window system and you have another terminal window open with some text in it, you can also use your mouse to copy text from another window and paste it into the Pico window. (Chapter 2 includes Section 2.4.2, which has instructions for copying and pasting between xterm windows.) To get a lot of text quickly, paste the same text more than once.
-
Let's practice moving around the file. Pico works on all terminals, with or without a mouse, so it will probably ignore your mouse if you try to use it to move the cursor. Instead, use the keyboard to move the cursor. If your keyboard has arrow keys, they'll probably move the cursor. Otherwise, try the cursor-moving commands listed in the help page, such as CTRL-F to move forward a character, CTRL-E to move to the end of a line, and CTRL-A to go to the start of a line. If your PAGE UP and PAGE DOWN keys don't work, use CTRL-Y and CTRL-V, respectively.
Pico's search or "where is" command, CTRL-W, can help you find a word quickly. It's handy even on a short file, where it can be quicker to type CTRL-W and a word than to use the cursor-moving commands. The search command is also a good example of the way that pico can change its display momentarily. Let's try it. Type CTRL-W; you should see a display like Figure 4-2.
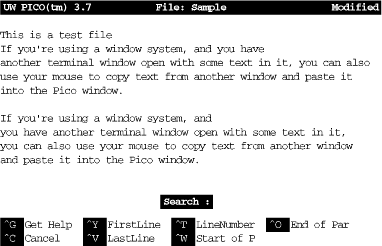
Figure 4-2. Pico display while searching
Notice that the command list at the bottom of the display has changed since you started Pico (Figure 4-1). The cursor sits after the word "Search:". You can type a word or characters to search for, then press RETURN to do the search. You also can do any other command listed, such as CTRL-T to go to a particular line number. Type CTRL-G to get a help display. Notice that if you type CTRL-W while the search command is active, it doesn't start another search; it goes to the start of the current paragraph. After a search finishes, you can type CTRL-W again, then press RETURN to repeat the search.
-
If your text isn't in paragraphs separated by blank lines, break some of it into paragraphs. Put your cursor at the place you want to break the text and press RETURN twice (once to break the line, another to make a blank line).
Now justify one paragraph. Put the cursor somewhere in it and press CTRL-J. Now the paragraph's lines should flow and fit neatly between the margins.
-
Because pico doesn't use a mouse, cutting/copying and pasting text works differently than it does with mouse-based editors you might have used before. Please choose some text to copy or cut, then paste.
The first step is to select the text to cut or copy. Move the cursor to the first character, then press CTRL-^ (control followed by the caret key, ^).
Move the cursor to the last character you want and press CTRL-K. That cuts the text. Pico will "remember" the text you cut and let you paste it back as many times as you want until you cut some other text (or until you quit your pico session).
If you only wanted to copy the text, not to cut it, you can paste the text back where you cut it. Press CTRL-U to `'uncut''--that is, paste--the text at current cursor position.
Or, if you wanted to move the text somewhere else, move the cursor to that spot and press CTRL-U there.
-
As with any text editor, it's a good idea to save your work from pico every few minutes. That way, if something goes wrong on the computer or network, you'll only lose the work since the last time you saved it. (Pico saves interrupted work in a file named pico.save or filename.save, where filename is the name of the file you were editing. But I like to save by hand when I know that the file is in a good state.)
Try writing out your work with CTRL-O. The bottom of the display will look like Figure 4-3. The cursor sits after the name of the file you're editing.
This part confuses some pico beginners. If you want to save the file with the same name it had as you started, just press RETURN; that's all! You can also choose a different filename.
One way to use a different filename is to edit the filename in place. For instance, if you want to call the backup copy sample1, simply press the 1 key to add a 1 to the end of the filename before you press RETURN to save it.
You can backspace over the name and type a new one. Or move to the start or middle of the name by using the arrow keys, CTRL-B and CTRL-F, then add or delete characters in the name. As an example, you could edit the filename to be an absolute pathname such as /home/carol/backups/sample.
If you choose CTRL-T, "To Files," you'll go to a file browser where you can look through a list of your files and directories. You also can type part of an existing filename and use filename completion (see Section 3.5 in Chapter 3). By default, filename completion assumes that you started Pico from your home directory--even if you didn't. (You can change this with the use-current-dir preference setting for Pine--which also affects Pico. See Section 6.5.5 in Chapter 6.)
-
Make one or two more small edits. Then exit with CTRL-X. Pico prompts you to save the file; see the explanation of CTRL-O earlier.
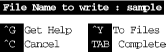
Figure 4-3. Bottom of Pico display while saving work
|  | |
| 4.2. File and Directory Wildcards |  | 4.4. Managing Your Files |

Copyright © 2003 O'Reilly & Associates. All rights reserved.