
 |  |
18.4. The HList Family of Widgets
The HList widget is the basis for the two other Tix widgets we are examining: Tree and DirTree. The HList widget is a hierarchical list that uses the idea of paths to create the hierarchy it displays. You could also display a flat hierarchy and use HList as a type of Listbox that can have columns and column headings. Tree and DirTree are specialized versions of HList. DirTree is used to display a directory structure from a given starting point. All three of the widgets use display items.
The simplest way to use the HList widget is similar to a Listbox or TList. Create it and then add items to it:
use Tk;
use Tk::HList;
my $mw = MainWindow->new(-title => 'HList');

my $hlist = $mw->HList->pack;
foreach (qw/one two three four five/) {
  $hlist->add($_, -text => $_);
}
MainLoop;
Looking at this example, it isn't obvious at all that you can have display items or styles with an HList. The only non-self-explanatory item (given that you understand Listbox) is the first argument to the add method, which is a path. Since this example doesn't take advantage of any of the special hierarchical features of the HList, we're not going to bother showing a screenshot yet.
Just like a Listbox, the HList contains a list of entries. Each time you call the add method, you create another entry in the list. Each entry can contain one or more display items. If you want more than one display item with each entry, use the -columns option. Unlike TList, which automatically manages multiple columns based on its orientation, you need to manage columns manually for the HList. A later example will make this clear.
You need to give each entry in the HList a path (the first argument to the add method). The path for each entry must be unique; if it isn't, an immediate error will result.
A hierarchy results when you use the separator character in a path. Here is a simple hierarchy of colors using the separator character of .:
orange
orange.red
orange.yellow
green
green.blue
green.yellow
purple
purple.red
purple.blue
Changing our previous code to use these paths instead of one two three four five, we get the screen shown in Figure 18-5.
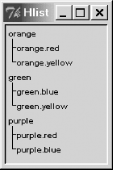
Figure 18-5. Simple hierarchy in an HList
The branches drawn on the left indicate which entries are below the others. orange is the parent of both orange.red and orange.yellow. If we tried to use a path of orange.green.blue, the call to add would fail, because we haven't set up the intermediate path of orange.green yet.
Another way to think of paths is like directory paths. If you don't have the parent directory of /home created, you can't create /home/nwalsh.
If you don't like the branch lines drawn between each parent and its children, you can always turn them off using the -drawbranch option with a value of 0. An empty space will be left in front of each child entry instead of the drawn branch. The amount of space or branch shown in front of each child entry is determined by the -indent option.
One advantage HList offers over Listbox is that it simplifies assigning a callback to be invoked when one of the entries in the list is double-clicked or when the Return key is pressed while one of the entries is active. To utilize this functionality, use the -command option to the HList constructor.
18.4.1. Using Indicators with HList
The information displayed in Chapter 18, " A Tk Interface Extension Tour" is static, meaning you can't manipulate the hierarchy (opening and closing various branches) without doing a lot of coding first. The most common feature people want in a hierarchical list is the ability to expand and collapse subtrees by clicking an indicator in the parent item. We don't see the indicators in Chapter 18, " A Tk Interface Extension Tour" because we haven't created any for the items in the list. The indicator can be any display item, and it is displayed to the left of the entry, on top of the branch line. Typical indicators are plus and minus signs, or open and closed folders.
The easiest way to create and use indicators with an HList is to use the Tree widget, because it's already coded internally in the widget. For example, if you don't mind thumbing ahead a few pages, you'll see that we used the Tree widget to create the screenshot shown in Figure 18-7. The indicators in the figure are the default Tree indicators of plus and minus images, displayed only on the entries that have children.
The work involved in setting up your own indicators with HList goes like this: create your HList with the -indicator option set to 1 and create an -indicatorcmd callback. For each entry in the list you want shown with an indicator, call indicatorCreate. Later, to change the appearance of the indicator inside the callback assigned to -indicatorcmd, you can use indicatorConfigure. Here's a version of our example that creates and uses indicators on every entry in the list:
use Tk;
use Tk::HList;

sub icmd {
  my ($path, $state) = @_;
  print "path is '$path', state is '$state'\n";
}

my $mw = MainWindow->new;
my $list = $mw->HList(-indicator => 1, -indicatorcmd => \&icmd)
              ->pack(qw/-fill both -expand yes/);

foreach (qw/orange orange.red orange.yellow
            green green.blue green.yellow
            purple purple.red purple.blue/) {
  $list->add($_, -text => $_);
  $list->indicator('create', $_,
                   -itemtype => 'image',
                   -image => $mw->Getimage('plus'));
}
MainLoop;
The best example of using indicators is in the source code for the Tree widget, included with every distribution of the Tk module.
So what else might you want to use a HList widget for? You can create a list that has columns and column headings. Let's change our initial code example to do just that:
my $hlist = $mw->HList(-columns => 4, -header => 1)
   ->pack(-expand => 1, -fill => 'both');

$hlist->headerCreate(0, -text => "Color Name");
$hlist->headerCreate(1, -text => "Red value");
$hlist->headerCreate(2, -text => "Green value");
$hlist->headerCreate(3, -text => "Blue value");

foreach (qw/orange red green blue purple/) {
  my ($r, $g, $b) = $mw->rgb($_);
  $hlist->add($_);
  $hlist->itemCreate($_, 0, -text => $_);
  $hlist->itemCreate($_, 1, -text => sprintf "%#x", $r);
  $hlist->itemCreate($_, 2, -text => sprintf "%#x", $g);
  $hlist->itemCreate($_, 3, -text => sprintf "%#x", $b);

}
We specified two options when creating the HList, -columns and -header. We want to display four columns, and we'd like to be able to see the headings we give them as well. After creating the HList, we create the headings, one for each column. The columns are numbered starting at zero. We don't create a hierarchy in this example, so none of our path entries contain separator characters. (You can still create a hierarchy when using columns. The branch lines are drawn to the left of everything at that point.) We want to display the color name in the first column and the RGB values in the subsequent columns.
We still have to call add to create the entry with a path. After that, we can use the itemXXX methods to put a text display item in each column. We call itemCreate with the path to use, the column number, and then the text to display. As you can see in Figure 18-6, a selection selects the whole entry, not just an individual column. There is no way to select a single column entry in an HList.
Since we're using colors, we can change the background color of the HList when double-clicking on an entry. We'll add the -command option and a subroutine to our code:
my $hlist = $mw->HList(-columns => 4, -header => 1,
   -command => \&change_background)
   ->pack(-expand => 1, -fill => 'both');
   .
   .
   .
sub change_background {
  my ($path) = @_;
  print "color = $path\n";
  $hlist->configure(-background => $path);
} 
Figure 18-6. HList using columns and headings
Since we are using the color name as the path of the entry, we don't need to do any additional work, because we are given the pathname as the first argument to the callback. You could also get the text entered at one of the columns by calling itemCget:
$col0 = $hlist->itemCget($path, 0, -text); # Text at column 0
If the text being displayed isn't what you want to retrieve, you can always store a piece of data using the -data option with the entry itself:
$hlist->add($_, -data => 'something else..');
  ...
$data = $hlist->infoData($path);
So now that we've seen some HList examples and how to use a few of the options and methods, here's a list of all the options and methods with short descriptions. HList uses these standard options (which behave as expected): -command, -foreground, -height, -selectbackground, -selectborderwidth, -selectforeground, -selectmode, and -width. The following options are specific to the HList widget:
- -browsecmd => callback
- The callback is called when the user browses through the entries in the HList. Use -command if you want to invoke a callback when a user double-clicks (selects) an item in the HList.
- -columns => amount
- The number of columns to use in the HList. Must be set when creating the HList.
- -drawbranch => 1 | 0
- Determines whether HList shows the branch lines between parents and children.
- -header => 1 | 0
- If set to 1, headers will be shown when created. (See the 'header' method.)
- -indent => amount
- The amount of screen space to indent a child entry from its parent. Default is 10.
- -indicator => 1 | 0
- If true, the indicator will be displayed for each item in the list.
- -indicatorcmd => callback
-
A callback that is invoked whenever the
indicator associated with an entry is pressed. Two additional
arguments are passed to the callback: the entry path and a string
that will be one of <Arm>,
<Disarm>, or
<Activate>. Think of Arm as similar to a
Button Down event, except it is also sent to the callback when the
user moves the mouse over the indicator with the mouse button down.
If the user has the mouse button down and moves out of the indicator,
the callback is invoked with Disarm. Activate happens when the user
lets go of the mouse button while over the indicator. Typically,
you'll see multiple Arm and Disarm calls before you get an
Activate.
If the HList entry doesn't have an indicator created by using the indicator method, this callback will never be invoked for that entry.
- -itemtype => 'text' | 'imagetext' | 'image' | 'window'
- The default type of a display item. You can override the default item type when calling the itemCreate, add, or addchild methods.
- -sizecmd => callback
- This callback will be invoked whenever the HList size changes.
- -separator => character
- The character used to separate pathnames of entries. Default value is '.'.
18.4.2. HList Methods
The following methods can be called on an HList:
- $hlist->add($path, options ...);
-
Adds a list item using one of the
following options:
- -at => position
- Position is an index starting at zero.
- -after => entrypath
- Places the new entry after the given entry path.
- -before => entrypath
- Places the new entry before the given entry path.
- -data => $scalar
- Associates this scalar as data for this entry.
- -itemtype => type
- Uses this type of display item.
- -state => 'normal' | 'disabled'
- 'disabled' makes the entry unselectable.
You can also specify any options that are valid for the item type this entry uses.
- $hlist->addchild($parentpath, options ...)
- Instead of using separators in the path of each entry and calling add, you can build your hierarchy using addchild once the parent is created (the path of '' is the top-level path). All the option/value pairs listed for add are valid with addchild as well.
- $hlist->columnWidth($col, options ...)
- Specifies the width of a column or, with no arguments, return the column's current width. The following options are also recognized:
- $hlist->delete(what, $path)
- Deletes some of the HList entries. what must contain one of the following: 'all', 'entry', 'offsprings', or 'siblings'. If using 'all', $path is optional. The entry at $path is not deleted if specifying 'offsprings' (all children of the entry at $path) or 'siblings' (all entries that have the same parent as $path).
- $hlist->headerCreate($column, ...);
-
Creates
the header for the $column. In addition to the
following option/value pairs, you can specify valid option/values for
the item type being created.
- -itemtype => type
- Specifies what type of item to create.
- -borderwidth => amount
- Specifies the width of the border all around the header item.
- -headerbackground => color
- Specifies the color behind the text of the header item.
- -relief => type
- Specifies the type of relief to use for the edges of the header item.
- $hlist->headerConfigure($column, ...)
- $hlist->headerCget($column, ...)
- You can use headerConfigure to change or query any option that is valid with the headerCreate method and query current settings using headerCget. These methods work just like configure and cget, except they take a $column number as the first argument.
- $hlist->headerDelete($column)
- Deletes the header associated with $column.
- $hlist->headerExists($column)
- Returns 1 if there is a header item for the $column and 0 if there isn't.
- $hlist->headerSize($column)
- Returns a list containing the width and height (in pixels) for that header item.
- $hlist->hide('entry' $path)
- Makes the entry at $path invisible to the user. The $path still exists and can be made visible with the show method.
- $hlist->indicatorCreate($path, ... )
- Creates an indicator and associates it with the entry at $path. The indicator is also a display item, so indicatorCreate accepts the -itemtype option and all valid options for the item type used.
- $hlist->indicatorConfigure($path, ... )
- $hlist->indicatorCget($path, ...)
- These methods allow you to configure the indicator at $path. Both of these methods work the same as configure and cget and, just like headerCget and headerConfigure, they require a $path as the first argument.
- $hlist->indicatorDelete($path)
- Deletes the indicator associated with the entry at $path.
- $hlist->indicatorExists($path)
- Returns a 1 if an indicator exists at $path and 0 if it doesn't.
- $hlist->indicatorSize($path)
- Returns a list with the width and height of the indicator at $path.
- $hlist->infoAnchor
- Returns the path of the current anchor or an empty string if there is no anchor set. The anchor is indicated visually by a dotted line. If selectmode is set to 'single', the anchor is always the same as the selection, but in 'multiple' selectmode, the first item selected is the anchor.
- $hlist->infoBbox($path)
- Returns a list that gives the entry's bounding box coordinates. The list is: $upperleft_x, $upperleft_y, $lowerright_x, $lowerright_y, all in pixels. Only the visible portion of the entry is given; if nothing is visible, an empty string is returned.
- $hlist->infoChildren($path)
- Returns a path list for all children of the given $path. To get a list of all the children, don't specify a $path at all.
- $hlist->infoData($path)
- Returns the data associated with the entry at $path.
- $hlist->infoDragsite
- $hlist->infoDropsite
- Returns the path of the entry at the dragsite or dropsite, or an empty string if those don't exist.
- $hlist->infoExists($path)
- Returns 1 if the entry at $path exists and 0 if it doesn't.
- $hlist->infoHidden($path)
- Returns 1 if the entry at $path is hidden and 0 if it isn't.
- $hlist->infoNext($path)
- Returns the path of the entry immediately below the one at $path. If $path is the last entry in the list, infoNext returns an empty string.
- $hlist->infoParent($path)
- Returns the parent's path, or an empty string if $path is at the top level.
- $hlist->infoPrev($path)
- Returns the path of the entry immediately before the one at $path, or an empty string if $path is at the top of the list.
- $hlist->infoSelection($path)
- Returns a path list of selected entries, or an empty string if nothing is selected.
- $hlist->itemCreate($path, $column, ... )
- Creates an entry at $path and $column. The path must have already been created by a call to add or addchild. You can use the -itemtype option and any option/value pairs that are valid for that option type.
- $hlist->itemConfigure($path, $column, ...)
- $hlist->itemCget($path, $column, ...)
- These methods allow you to configure the entry at $path and $column. Both of these methods work the same as configure and cget, except they require $path and $column as their first arguments.
- $hlist->itemDelete($path, $column)
- Deletes the entry at $path and $column.
- $hlist->itemExists($path, $column)
- Returns 1 if the entry at $path and $column exists and 0 if it doesn't.
- $hlist->nearest($y)
- Returns the path of a visible entry that is nearest the y coordinate specified in $y (a valid screen distance).
- $hlist->see($path)
- Changes the view of the HList so the entry at $path is visible.
- $hlist->selectionClear([from [$to]])
- Given no arguments, selectionClear removes the selection from the HList. Given a $from argument, only the item at the path in $from is taken out. If given $from and $to arguments, it removes the selection from those two paths and anything in between.
- $hlist->selectionGet
- Same as $hlist->infoSelection; returns a list of entries that are currently selected, or an empty string if nothing is selected.
- $hlist->selectionIncludes($path)
- Returns 1 if the entry at $path is included in the selection and 0 if it isn't.
- $hlist->selectionSet([$from [, $to ]])
- Sets the selection to either only the path in $from, or the paths between $from and $to, inclusively.
- $hlist->show('entry', $path)
- Unhides the entry at $path.
18.4.3. The Tree Widget
The Tree widget is based on HList, but it has a lot more built-in functionality. We mentioned earlier that if you want to be able to open and close parts of the heirarchy, you might as well use the Tree widget rather than recoding everything yourself. Here's our color hierarchy example again, but using Tree:
use Tk;
use Tk::Tree;
my $mw = MainWindow->new(-title => 'Tree');

my $tree = $mw->Tree->pack(-fill => 'both', -expand => 1);

foreach (qw/orange orange.red orange.yellow green green.blue
  green.yellow purple purple.red purple.blue/) {
  $tree->add($_, -text => $_);
}

$tree->autosetmode( );
MainLoop;
Figure 18-7 illustrates this.
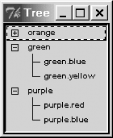
Figure 18-7. Tree using a hierarchy of colors
The only changes in our code are that we replaced HList with Tree and we made an additional call to autosetmode. This call is necessary for the widget to set up all its internal variables so it knows which branches are open. If you forget to make this call, the plus and minus indicators won't appear. Other than those small changes, everything else about a Tree is the same as an HList. All the HList methods and options apply to Trees as well. Here are a few additional options and methods:
- -closecmd => callback
-
Called when
a branch is closed. Assigning this callback overrides the default
callback, so your branch won't actually close unless you add
code to facilitate that. If you need to retain the functionality
currently provided, save the reference to the callback first, then
invoke it in yours:
my $closecmd = [ sub { print "args=@_!\n"; my $tree = shift; my $closecmd_orig = $tree->{'closecmd_orig'}; $tree->$closecmd_orig(@_); }, $tree, ]; $tree->configure(-closecmd => $closecmd); - -ignoreinvoke => 0 | 1
- If set to false, the branch is opened or closed when the user selects the entry (not just the indicator).
- -opencmd => callback
- Called when a branch is opened. If you assign this callback, you are overriding the default callback, so your branch won't actually open unless you add code to facilitate that.
18.4.4. Tree Methods
The following methods are available for the Tree widget:
- $tree->autosetmode
- For the indicators to be created, you must call this after setting up all your entries in the Tree .
- $tree->open($path)
- Invokes the callback associated with the -opencmd option.
- $tree->close($path)
- Invokes the callback associated with the -closecmd option.
- $tree->setmode($path, mode)
- Sets the mode on an individual path. The first argument is the $path to use, and the second argument should be 'open', 'close', or 'none'. A mode of 'none' means the user cannot open or close that branch; a mode of 'open' means the path is ready to be opened by the user (all its children should currently be hidden), and a mode of 'close' means the path is ready to be closed by the user (all its children are currently visible). The meaning of each of these states is counterintuitive at first glance. In brief, the mode you are using is what the path's going to be doing the next time the user interacts with it.
- $tree->getmode($path)
- Returns the current mode of the given $path. The string returned will be one of 'open', 'close', or 'none'.
18.4.5. The DirTree Widget
The DirTree widget extends the Tree widget (which extends the HList widget) and inherits all the methods and options from both Tree and HList. A DirTree is designed to show directories from a given starting point (similar to the lefthand side of an MS Windows Explorer window). Here's a simple example showing DirTree reading the directories off a CD-ROM drive:
use Tk;
use Tk::DirTree;
my $mw = MainWindow->new(-title => 'Tree');
$mw->DirTree(-directory => "D:/")->pack(-fill => 'both', -expand => 1);
MainLoop;
Figure 18-8 shows the outcome.
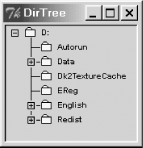
Figure 18-8. The DirTree widget reading my CD-ROM drive
The following options can be used with DirTree:
- -dircmd => callback
- The callback to use when DirTree attempts to read a directory. By default, the DirTree assumes a Unix directory, which works most of the time.
- -showhidden => 0 | 1
- If true, hidden directories are shown (following the Unix convention, any directory starting with a . is considered hidden).
- -directory => directoryname
- The starting directory. For example, C:/apps/perl or D:/.
18.4.6. Adding a Directory
There is only one method specific to a DirTree widget. You can call chdir at any time to add to the directory listing:
$dirtree->chdir($directoryname);
If you take a peek at the actual code in DirTree.pm, you'll see that setting the -directory option calls chdir as well. When you call chdir, the widget doesn't remove any of the previous directory entries. If you want to remove other directories, you must use the delete method first to avoid confusion.
|  | |
| 18.3. The TList Widget |  | 18.5. Tix Images |

Copyright © 2002 O'Reilly & Associates. All rights reserved.