
 |  |
12.2. User Authentication
Good passwords are one of the simplest parts of good network security. Passwords are used to log into systems that use password authentication. Popular mythology says that all network security breaches are caused by sophisticated crackers who discover software security holes. In reality, some of the most famous intruders entered systems simply by guessing or stealing passwords or by exploiting well-known security problems in outdated software. Later in this chapter, we look at guidelines for keeping software up to date and ways to prevent a thief from stealing your password. First, let's see what we can do to prevent it from being guessed.
These are a few things that make it easy to guess passwords:
-
Accounts that use the account name as the password. Accounts with this type of trivial password are called joe accounts.
-
Guest or demonstration accounts that require no password or use a well-publicized password.
-
System accounts with default passwords.
-
User who tell their passwords to others.
Guessing these kinds of passwords requires no skill, just lots of spare time! Changing your password frequently is a deterrent to password guessing. However, if you choose good passwords, don't change them so often that it is hard to remember them. Many security experts recommend that passwords should be changed about every 3 to 6 months.
A more sophisticated form of password guessing is dictionary guessing. Dictionary guessing uses a program that encrypts each word in a dictionary (e.g., /usr/dict/words) and compares each encrypted word to the encrypted password in the /etc/passwd file. Dictionary guessing is not limited to words from a dictionary. Things known about you (your name, initials, telephone number, etc.) are also run through the guessing program. Because of dictionary guessing, you must protect the /etc/passwd file.
Some systems provide a shadow password file to hide the encrypted passwords from potential intruders. If your system has a shadow password facility, use it. Hiding encrypted passwords greatly reduces the risk of password guessing.
12.2.1. The Shadow Password File
Shadow password files have restricted permissions that prevent them from being read by intruders. The encrypted password is stored only in the shadow password file, /etc/shadow, and not in the /etc/passwd file. The passwd file is maintained as a world-readable file because it contains information that various programs use. The shadow file can be read only by root and it does not duplicate the information in the passwd file. It contains only passwords and the information needed to manage them. The format of a shadow file entry on a Solaris system is:
username:password:lastchg:min:max:warn:inactive:expire:flag
username is the login username. password is the encrypted password or, on Solaris systems, one of the keyword values NP or *LK*. lastchg is the date that the password was last changed, written as the number of days from January 1, 1970 to the date of the change. min is the minimum number of days that must elapse before the password can be changed. max is the maximum number of days the user can keep the password before it must be changed. warn is the number of days before the password expires that the user is warned. inactive is the number of days the account can be inactive before it is locked. expire is the date on which the account will be closed. flag is unused.
The encrypted password appears only in this file. Every password field in the /etc/passwd file contains an x, which tells the system to look in the shadow file for the real password. Every password field in the /etc/shadow file contains either an encrypted password, NP, or *LK*. If it contains the keyword NP, it means that there is no password because this is not a login account. System accounts, such as daemon or uucp, are not login accounts, so they have NP in the password field. *LK* in the password field means that this account has been locked and is therefore disabled from any further use. Other systems use different symbols in the password field to indicate these conditions; some Linux systems use * and !!. However, all systems have some technique for differentiating active login accounts from other types of user IDs.
While the most important purpose of the shadow file is to protect the password, the additional fields in the shadow entry provide other useful security services. One of these is password aging. A password aging mechanism defines a lifetime for each password. When a password reaches the end of its lifetime, the password aging mechanism notifies the user to change the password. If it is not changed within some specified period, the password is removed from the system and the user is blocked from using his account.
The lastchg, max, and warn fields all play a role in password aging. They allow the system to know when the password was changed and how long it should be kept, as well as when the user should be warned about his impending doom. Another nice feature of the shadow file is the min field. This is a more subtle aspect of password aging. It prevents the user from changing her favorite password to a dummy password and then immediately back to the favorite. When the password is changed it must be used for the number of days defined by min before it can be changed again. This reduces one of the common tricks used to avoid really changing passwords.
The inactive and expire fields help eliminate unused accounts. Here, "inactivity" is determined by the number of days the account continues with an expired password. Once the password expires, the user is given some number of days to log in and set a new password. If the user does not log in before the specified number of days has elapsed, the account is locked and the user cannot log in.
The expire field lets you create a user account that has a specified "life." When the date stored in the expire field is reached, the user account is disabled even if it is still active. The expiration date is stored as the number of days since January 1, 1970.
On a Solaris system the /etc/shadow file is not edited directly. It is modified through the Users window of the admintool or special options on the passwd command line. This window is shown in Figure 12-1. The username, password, min, max, warn, inactive, and expire fields are clearly shown.
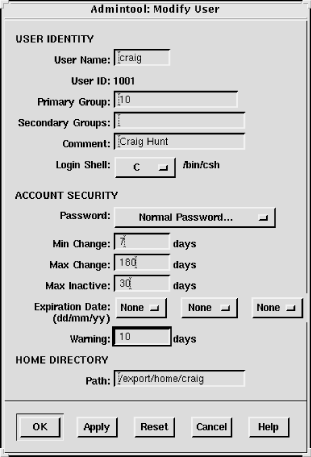
Figure 12-1. Admintool password maintenance
The passwd command on Solaris systems has -n min, -w warn, and -x max options to set the min, max, and warn fields in the /etc/shadow file. Only the root user can invoke these options. Here, root sets the maximum life of Tyler's password to 180 days:
# passwd -x 180 tyler
The Solaris system permits the system administrator to set default values for all of these options so that they do not have to be set every time a user is added through the admintool or the passwd command line. The default values are set in the /etc/default/passwd file.
% cat /etc/default/passwd
#ident  "@(#)passwd.dfl 1.3     92/07/14 SMI"
AXWEEKS=
INWEEKS=
PASSLENGTH=6
The default values that can be set in the /etc/default/passwd file are:
- MAXWEEKS
-
The maximum life of a password defined in weeks, not days. The 180-day period used in the example above would be defined with this parameter as MAXWEEKS=26.
- MINWEEKS
-
The minimum number of weeks a password must be used before it can be changed.
- PASSLENGTH
-
The minimum number of characters that a password must contain. This is set to 6 in the sample file. Only the first eight characters are significant on a Solaris system; setting the value above 8 does not change that fact.
- WARNWEEKS
-
The number of weeks before a password expires that the user is warned.
This section uses Solaris as an example. The shadow password system is provided as part of the Solaris operating system. It is also included with Linux systems. The shadow file described here is exactly the same format as used on Linux systems, and it functions in the same way.
It is very difficult to take the encrypted password and decrypt it back to its original form, but encrypted passwords can be compared against encrypted dictionaries. If bad passwords are used, they can be easily guessed. Take care to protect the /etc/passwd file and choose good passwords.
12.2.2. Choosing a Password
A good password is an essential part of security. We usually think of the password used for a traditional login; however, passwords, passphrases, and keys are also needed for more advanced authentication systems. For all of these purposes, you want to choose a good password. Choosing a good password boils down to not choosing a password that can be guessed using the techniques described above. Some guidelines for choosing a good password are:
-
Don't use your login name.
-
Don't use the name of anyone or anything.
-
Don't use any English or foreign-language word or abbreviation.
-
Don't use any personal information associated with the owner of the account. For example, don't use your initials, phone number, social security number, job title, organizational unit, etc.
-
Don't use keyboard sequences, e.g., qwerty.
-
Don't use any of the above spelled backwards, or in caps, or otherwise disguised.
-
Don't use an all-numeric password.
-
Don't use a sample password, no matter how good, that you've gotten from a book that discusses computer security.
-
Do use a mixture of numbers, special characters, and mixed-case letters.
-
Do use at least six characters.
-
Do use a seemingly random selection of letters and numbers.
Common suggestions for constructing seemingly random passwords are:
-
Use the first letter of each word from a line in a book, song, or poem. For example, "People don't know you and trust is a joke."[130] would produce Pd'ky&tiaj.
[130]Toad the Wet Sprocket, "Walk on the Ocean."
-
Use the output from a random password generator. Select a random string that can be pronounced and is easy to remember. For example, the random string "adazac" can be pronounced a-da-zac, and you can remember it by thinking of it as "A-to-Z." Add uppercase letters to create your own emphasis, e.g., aDAzac.[131]
[131]A password generator created this password.
-
Use two short words connected by punctuation, e.g., wRen%Rug.
-
Use numbers and letters to create an imaginary vanity license plate password, e.g., 2hot4U?.
A common theme of these suggestions is that the password should be easy to remember. Avoid passwords that must be written down to be remembered. If unreliable people gain access to your office and find the password you have written down, the security of your system will be compromised.
However, don't assume that you can't remember a random password. It may be difficult the first few times you use the password, but any password that is used often enough is easy to remember. If you have an account on a system that you rarely use, you may have trouble remembering a random password. But in that case, the best solution is to get rid of the account. Unused and underutilized accounts are prime targets for intruders. They like to attack unused accounts because there is no user to notice changes to the files or strange Last login: messages. Remove all unused accounts from your systems.
How do you ensure that the guidance for creating new passwords is followed? The most important step is to make sure that every user knows these suggestions and the importance of following them. Cover this topic in your network security plan, and periodically reinforce it through newsletter articles and online system bulletins.
It is also possible to use programs that force users to follow specific password selection guidelines. The web page http://csrc.nist.gov/tools/tools.htm lists several programs that do exactly that.
12.2.3. One-Time Passwords
Sometimes good passwords are not enough. Passwords are transmitted across the network as clear text. Intruders can use protocol-analyzer software to spy on network traffic and steal passwords. If a thief steals your password, it does not matter how good the password was.
The thief can be on any network that handles your TCP/IP packets. If you log in through your local network, you have to worry only about local snoops. But if you log in over the Internet, you must worry about unseen listeners from any number of unknown networks.
Commands that use encrypted passwords are not vulnerable to this type of attack. Because of this, telnet has been largely supplanted by secure shell (ssh). However, the secure shell client may not be available at a remote site. Use one-time passwords for remote logins when you cannot use secure shell. Because a one-time password can be used only once, a thief who steals the password cannot use it.
Naturally, one-time password systems are a hassle. You must carry with you a list of one-time passwords, or something that can generate them, any time you want to log in. If you forget the password list, you cannot log in. However, this may not be as big a problem as it seems. You usually log in from your office where your primary login host is probably on your desktop or your local area network. When you log into your desktop system from its keyboard, the password does not traverse the network, so you can use a reusable password. And ssh can be used any time you control both ends of the connection, for example, when logging in with your laptop. One-time passwords are needed only for the occasions when you log in from a remote location that does not offer ssh. For this reason, some one-time password systems are designed to allow reusable passwords when they are appropriate.
There are several one-time password systems. Some use specialized hardware such as "smart cards." OPIE is a free software system that requires no special hardware.
12.2.4. OPIE
One-time Passwords In Everything (OPIE) is free software from the U.S. Naval Research Laboratory (NRL) that modifies a Unix system to use one-time passwords. OPIE is directly derived from Skey, which is a one-time password system created by Bell Communications Research (Bellcore).
Download OPIE from the Internet from http://inner.net/opie. The current version of OPIE is opie-2.4.tar.gz. It is a binary file. gunzip the file and extract it using tar. The directory this produces contains the source files, Makefiles, and scripts necessary to compile and install OPIE.
OPIE comes with configure, an auto-configuration script that detects your system's configuration and modifies the Makefile accordingly. It does a good job, but you still should manually edit the Makefile to make sure it is correct. For example, my Linux system uses the Washington University FTP daemon wu.ftpd. OPIE replaces login, su, and ftpd with its own version of these programs. Using an earlier version of OPIE on my Linux system, configure did not find ftpd, and I did not notice the problem when I checked the Makefile. make ran without errors, but make install failed during the install of the OPIE FTP daemon. The Makefile was easily corrected and the rerun of make install was successful.
The effects of OPIE are evident as soon as the install completes. Run su and you're prompted with root's response: instead of Password:. login prompts with Response or Password: instead of just Password:. The response requested by these programs is the OPIE equivalent of a password. Programs that prompt with Response or Password accept either the OPIE response or the traditional password from the /etc/passwd file. This feature permits users to migrate gracefully from traditional passwords to OPIE. It also allows local console logins with reusable passwords while permitting remote logins with one-time passwords. The best of both worlds -- convenient local logins without creating separate local and remote login accounts!
To use OPIE you must first select a secret password that is used to generate the one-time password list, and then run the program that generates the list. To select a secret password, run opiepasswd as shown:
$ opiepasswd -c
Updating kristin:
Reminder  -  Only use this method from the console; NEVER from remote.
 If you are using telnet, xterm, or a dial-in, type ^C now or exit with
 no password. Then run opiepasswd without the -c parameter.
Using MD5 to compute responses.
Enter old secret pass phrase: 3J5Wd6PaWP
Enter new secret pass phrase: 9WA11WSfW95/NT
Again new secret pass phrase: 9WA11WSfW95/NT
This example shows the user kristin updating her secret password. She runs opiepasswd from the computer's console, as indicated by the -c command option. Running opiepasswd from the console is the most secure. If it is not run from the console, you must have a copy of the opiekey software with you to generate the correct responses needed to enter your old and new secret passwords, because clear text passwords are accepted only from the console. Kristin is prompted to enter her old password and to select a new one. OPIE passwords must be at least 10 characters long. Since the new password is long enough, opiepasswd accepts it and displays the following two lines:
ID kristin OPIE key is 499 be93564
CITE JAN GORY BELA GET ABED
These lines tell Kristin the information she needs to generate OPIE login responses and the first response she will need to log into the system. The one-time password needed for Kristin's next login response is the second line of this display: a group of six short, uppercase character strings. The first line of the display contains the initial sequence number (499) and the seed (be93564) she needs, along with her secret password, to generate OPIE login responses. The software used to generate those responses is opiekey.
opiekey takes the login sequence number, the user's seed, and the user's secret password as input and outputs the correct one-time password. If you have opiekey software on the system from which you are initiating the login, you can produce one-time passwords one at a time. If, however, you will not have access to opiekey when you are away from your login host, you can use the -n option to request several passwords. Write the passwords down, put them in your wallet, and you're ready to go! [132]
[132]Security experts will cringe when they read this suggestion. Writing down passwords is a "no-no." Frankly, I think the people who steal wallets are more interested in my money and credit cards than in the password to my system. But you should consider this suggestion in light of the level of protection your system needs.
In the following example we request five (-n 5) responses from opiekey:
$ opiekey -n 5 495 wi01309
Using MD5 algorithm to compute response.
Reminder: Don't use  opiekey  from  telnet  or dial-in sessions.
Enter secret pass phrase: UUaX26CPaU
491: HOST VET FOWL SEEK IOWA YAP
492: JOB ARTS WERE FEAT TILE IBIS
493: TRUE BRED JOEL USER HALT EBEN
494: HOOD WED MOLT PAN FED RUBY
495: SUB YAW BILE GLEE OWE NOR
First opiekey tells us that it is using the MD5 algorithm to produce the responses, which is the default for OPIE. For compatibility with older Skey or OPIE implementations, force opiekey to use the MD4 algorithm by using the -4 command-line option. opiekey prompts for your secret password. This is the password you defined with the opiepasswd command. It then prints out the number of responses requested and lists them in sequence number order. The login sequence numbers in the example are 495 to 491. When the sequence number gets down to 10, rerun opiepasswd and select a new secret password. Selecting a new secret password resets the sequence number to 499.
The OPIE login prompt displays a sequence number, and you must provide the response that goes with that sequence number. For example:
login: tyler
otp-md5 492 wi01309 Response or Password:
JOB ARTS WERE FEAT TILE IBIS
At the login: prompt, Tyler enters her username. The system then displays a single line that tells her that one-time passwords are being generated with the MD5 algorithm (otp-md5), that this is login sequence number 492, and that the seed used for her one-time passwords is wi01309. She looks up the response for login number 492 and enters the six short strings. She then marks that response off her list because it cannot be used again to log into the system. A response from the list must be used any time she is not sitting at the console of her system. Reusable passwords can be used only at the console.
Secure shell is used for remote logins whenever it is available on the client. Because of this, one-time passwords are needed only in special cases. Generally, it is sufficient to have one small OPIE server on your network. Remote users who are forced to use one-time passwords log into that server and then use a preferred mechanism, such as ssh, to log into your real servers.
12.2.5. Secure the r Commands
Some applications use their own security mechanisms. Make sure that the security for these applications is configured properly. In particular, check the Unix r commands, which are a set of Unix networking applications comparable to ftp and telnet. Care must be taken to ensure that the r commands don't compromise system security. Improperly configured r commands can open access to your computer facilities to virtually everyone in the world. For this reason, use of the r commands is discouraged.
In place of password authentication, the r commands use a security system based on trusted hosts and users. Trusted users on trusted hosts are allowed to access the local system without providing a password. Trusted hosts are also called "equivalent hosts" because the system assumes that users given access to a trusted host should be given equivalent access to the local host. The system assumes that user accounts with the same name on both hosts are "owned" by the same user. For example, a user logged in as becky on a trusted system is granted the same access as the user logged in as becky on the local system.
This authentication system requires databases that define the trusted hosts and the trusted users. The databases used to configure the r commands are /etc/hosts.equiv and .rhosts.
The /etc/hosts.equiv file defines the hosts and users that are granted "trusted" r command access to your system. This file can also define hosts and users that are explicitly denied trusted access. Not having trusted access doesn't mean that the user is denied access; it just means that he is required to supply a password.
The basic format of entries in the /etc/hosts.equiv file is:
[+ | -][hostname] [+ | -][username]
The hostname is the name of a "trusted" host, which may optionally be preceded by a plus sign (+). The plus sign has no real significance, except when used alone. A plus sign without a hostname following it is a wildcard character that means "any host."
If a host is granted equivalence, users logged into that host are allowed access to like-named user accounts on your system without providing a password. (This is one reason for administrators to observe uniform rules in handing out login names.) The optional username is the name of a user on the trusted host who is granted access to all user accounts. If username is specified, that user is not limited to like-named accounts, but is given access to all user accounts without being required to provide a password.[133]
[133]The root account is not included.
The hostname may also be preceded by a minus sign (-). This explicitly says that the host is not an equivalent system. Users from that host must always supply a password when they use an r command to interact with your system. A username can also be preceded by a minus sign. This says that, whatever else may be true about that host, the user is not trusted and must always supply a password.
The following examples show how entries in the hosts.equiv file are interpreted:
- rodent
-
Allows password-free access from any user on rodent to a like-named user account on your local system.
- -rodent
-
Denies password-free access from any user on rodent to accounts on your system.
- rodent -david
-
Denies password-free access to the user david if he attempts to access your system from rodent.
- rodent +becky
-
Allows the user becky to access any account (except root) on your system, without supplying a password, if she logs in from rodent.
- + becky
-
Allows the user becky to access any account (except root) on your system without supplying a password, no matter what host she logs in from.
This last entry is an example of something that should never be used in your configuration. Don't use a standalone plus sign in place of a hostname. It allows access from any host anywhere and can open up a big security hole. For example, if the entry shown above was in your hosts.equiv file, an intruder could create an account named becky on his system and gain access to every account on your system. Check /etc/hosts.equiv, ~/.rhosts, and /etc/hosts.lpd to make sure that none of them contains a + entry. Remember to check the .rhosts file in every user's home directory.
A simple typographical error could give you a standalone plus sign. For example, consider the entry:
+ rodent becky
The system administrator probably meant "give becky password-free access to all accounts when she logs in from rodent." However, with an extraneous space after the + sign, it means "allow users named rodent and becky password-free access from any host in the world." Don't use a plus sign in front of a hostname, and always use care when working with the /etc/hosts.equiv file to avoid security problems.
When configuring the /etc/hosts.equiv file, grant trusted access only to the systems and users you actually trust. Don't grant trusted access to every system attached to your local network. In fact, it is best not to use the r commands at all. If you must use them, only trust hosts from your local network when you know the person responsible for that host, when you know that the host is not available for public use, and when the local network is protected by a firewall. Don't grant trusted access by default -- have some reason for conferring trusted status. Never grant trust to remotely located systems. It is too easy for an intruder to corrupt routing or DNS in order to fool your system when you grant trust to a remote system. Also, never begin your hosts.equiv file with a minus sign as the first character. This confuses some systems, causing them to improperly grant access. Always err on the side of caution when creating a hosts.equiv file. Adding trusted hosts as they are requested is much easier than recovering from a malicious intruder.
The .rhosts file grants or denies password-free r command access to a specific user's account. It is placed in the user's home directory and contains entries that define the trusted hosts and users. Entries in the .rhosts file use the same format as entries in the hosts.equiv file and function in almost the same way. The difference is the scope of access granted by entries in these two files. In the .rhosts file, the entries grant or deny access to a single user account; the entries in hosts.equiv control access to an entire system.
This functional difference can be shown in a simple example. Assume the following entry:
horseshoe anthony
In crab's hosts.equiv file, this entry means that the user anthony on horseshoe can access any account on crab without entering a password. In an .rhosts file in the home directory of user resnick, the exact same entry allows anthony to rlogin from horseshoe as resnick without entering a password, but it does not grant password-free access to any other accounts on crab.
Individuals use the .rhosts file to establish equivalence among the different accounts they own. The entry shown above would probably be made only if anthony and resnick are the same person. For example, I have accounts on several different systems. Sometimes my username is hunt, and sometimes it is craig. It would be nice if I had the same account name everywhere, but that is not always possible; the names craig and hunt are used by two other people on my local network. I want to be able to rlogin to my workstation from any host that I have an account on, but I don't want mistaken logins from the other craig and the other hunt. The .rhosts file gives me a way to control this problem.
For example, assume my username on crab is craig, but my username on filbert is hunt. Another user on filbert is craig. To allow myself password-free access to my crab account from filbert, and to make sure that the other user doesn't have password-free access, I put the following .rhosts file in my home directory:
filbert hunt
filbert -craig
Normally the hosts.equiv file is searched first, followed by the user's .rhosts file, if it exists. The first explicit match determines whether or not password-free access is allowed. Therefore, the .rhosts file cannot override the hosts.equiv file. The exception to this is root user access. When a root user attempts to access a system via the r commands, the hosts.equiv file is not checked; only .rhosts in the root user's home directory is consulted. This allows root access to be more tightly controlled. If the hosts.equiv file were used for root access, entries that grant trusted access to hosts would give root users on those hosts root privileges. You can add trusted hosts to hosts.equiv without granting remote root users root access to your system.
You should remember that the user can provide access with the .rhosts file even when the hosts.equiv file doesn't exist. The only way to prevent users from doing this is to periodically check for and remove the .rhosts files. As long as you have the r commands on your system, it is possible for a user to accidentally compromise the security of your system.
12.2.6. Secure Shell
The weak security of the r commands poses a security threat. You cannot use these commands to provide secure remote access, even if you use all the techniques given in the previous section. At best, only trusted local systems on a secured local network can be given access via the r commands. The reason for this is that the r commands grant trust based on a belief that the IP address uniquely identifies the correct computer. Normally it does. But an intruder can corrupt DNS to provide the wrong IP address or corrupt routing to deliver to the wrong network, thus undermining the authentication scheme used by the r commands.
An alternative to the remote shell is the secure shell. Secure shell replaces the standard r commands with secure commands that include encryption and authentication. Secure shell uses a strong authentication scheme to ensure that the trusted host really is the host it claims to be. Secure shell provides a number of public-key encryption schemes to ensure that every packet in the stream of packets is from the source it claims to be from. Secure shell is secure and easy to use.
There are currently two versions of secure shell in widespread use: SSH Secure Shell, which is a commercial product, and OpenSSH, which is an open source product. OpenSSH is included with various versions of Unix and Linux, and both the open source and the commercial secure shell products are available for download from the Internet if your system does not include secure shell. The examples used in this section are based on OpenSSH, but the basic functions of both versions of secure shell are essentially the same.
The basic components of secure shell are:
- sshd
-
The secure shell daemon handles incoming SSH connections. sshd should be started at boot time from one of the boot scripts; don't start it from inetd.conf. sshd generates an encryption key every time it starts. This can cause it to be slow to start, which makes it unsuitable for inetd.conf. A system serving SSH connections must run sshd.
- ssh
-
The secure shell user command. The ssh command replaces rsh and rlogin. It is used to securely pass a command to a remote system or to securely log into a remote system. This command creates the outgoing connections that are handled by the remote secure shell daemon. A client system that wants to use an SSH connection must have the ssh command.
- scp
-
Secure copy (scp) is the secure shell version of rcp.
- ssh-keygen
-
Generates the public and private encryption keys used to secure the transmission for the secure shell.
- sftp
-
A version of FTP that operates over a secure shell connection.
When an ssh client connects to an sshd server, they exchange public keys. The systems compare the keys they receive to the known keys they have stored in the /etc/ssh_known_hosts file and in the .ssh/known_hosts file in the user's home directory.[134]
[134]The system administrator can initialize the ssh_known_hosts file by running make-ssh-known-hosts, which gets the key from every host within a selected domain.
If the key is not found or has changed, the user is asked to verify that the new key should be accepted:
> ssh horseshoe
Host key not found from the list of known hosts.
Are you sure you want to continue connecting (yes/no)? yes
Host 'horseshoe' added to the list of known hosts.
craig's password: Watts.Watt.
Last login: Thu Sep 25 15:01:32 1997 from rodent
Linux 2.0.0.
/usr/X11/bin/xauth:  creating new authority file /home/craig/.Xauthority
If the key is found in one of the files or is accepted by the user, the client uses it to encrypt a randomly generated session key. The session key is then sent to the server, and both systems use the key to encrypt the remainder of the SSH session.
The client is authenticated if it is listed in the hosts.equiv file, the shost.equiv file, the user's .rhosts file, or the .shosts file. This type of authentication is similar to the type used by the r commands, and the format of the shost.equiv and the .shosts files is the same as their r command equivalents. Notice that in the sample above, the user is prompted for a password. If the client is not listed in one of the files, password authentication is used. As you can see, the password appears in plain text. However, there is no need to worry about password thieves because SSH encrypts the password before it is sent across the link.
Users can employ a public-key challenge/response protocol for authentication. First generate your public and private encryption keys:
> ssh-keygen
Initializing random number generator...
Generating p:  ......................................++ (distance 616)
Generating q:  ....................++ (distance 244)
Computing the keys...
Testing the keys...
Key generation complete.
Enter file in which to save the key (/home/craig/.ssh/identity):
Enter passphrase: Pdky&tiaj.
Enter the same passphrase again: Pdky&tiaj.
Your identification has been saved in /home/craig/.ssh/identity.
Your public key is:
1024 35 158564823484025855320901702005057103023948197170850159592181522
craig@horseshoe
Your public key has been saved in /home/craig/.ssh/identity.pub
The ssh-keygen command creates your keys. Enter a password (or "passphrase") of at least 10 characters. Use the rules described earlier for picking a good password to choose a good passphrase that is easy to remember. If you forget the passphrase, no one will be able to recover it for you.
Once you have created your keys on the client system, copy the public key to your account on the server. The public key is stored in your home directory on the client in .ssh/identity.pub. Copy it to .ssh/authorized_keys in your home directory on the server. Now when you log in using ssh, you are prompted for the passphrase:
> ssh horseshoe
Enter passphrase for RSA key 'craig@horseshoe': Pdky&tiaj.
Last login: Thu Sep 25 17:11:51 2001
To improve system security, the r commands should be disabled after SSH is installed. Comment rshd, rlogind, rexcd, and rexd out of the inetd.conf file to disable inbound connections to the r commands. To ensure that SSH is used for outbound connections, replace rlogin and rsh with ssh. To do this, store copies of the original rlogin and rsh in a safe place, rerun configure with the special options shown here, and run make install:
# whereis rlogin
/usr/bin/rlogin
# whereis rsh
/usr/bin/rsh
# cp /usr/bin/rlogin /usr/lib/rlogin
# cp /usr/bin/rsh /usr/lib/rsh
# ./configure  -- with-rsh=/usr/bin  -- program-transform-name='s/ s/r/'
# make install
The example assumes that the path to the original rlogin and rsh commands is /usr/bin. Use whatever is correct for your system.
After replacing rlogin and rsh, you can still log into systems that don't support SSH. You will, however, be warned that it is not a secure connection:
> rlogin cow
Secure connection to cow refused; reverting to insecure method.
Using rsh.  WARNING: Connection will not be encrypted.
Last login: Wed Sep 24 22:15:28 from rodent
SSH is an excellent way to have secure communications between systems across the Internet. However, it does require that both systems have SSH installed. When you control both ends of the link, this is not a problem. But there are times when you must log in from a system that is not under your control. For those occasions, one-time passwords, such as those provided by OPIE, are still essential.
|  | |
| 12. Network Security |  | 12.3. Application Security |

Copyright © 2002 O'Reilly & Associates. All rights reserved.