
Chapter 16. The World Wide Web and Electronic Mail
Contents:
The previous chapter put you on a network. It may have been hard work, but the result was quite an accomplishment: your system is now part of a community. If you are connected to the Internet, the next step is to get access to all the riches this medium offers. People generally agree that the most useful applications on the Internet are the World Wide Web and electronic mail; they are the subjects of this chapter.
16.1. The World Wide Web
The World Wide Web (WWW or Web, for short) is a relative newcomer to the Internet information hierarchy. The WWW project's goal is to unite the many disparate services available on the Internet into a single, worldwide, multimedia, hypertext space. In this section we'll show you how to access the WWW with your Linux machine. We'll also describe how to configure your own WWW server to provide documents to the Web.
The World Wide Web project was started in 1989 by Tim Berners-Lee at the European Center for Particle Physics (CERN). The original goal of the project was to allow groups of researchers in the particle-physics community to share many kinds of information through a single, homogeneous interface.
Before the Web, each type of information available via the Internet was provided by its own unique client/server pair. For example, to retrieve files via FTP, one used the FTP client, which connected to the ftpd daemon on the server machine. Gopher (an old hierarchical document system that was considered quite flashy before the Web), Usenet news, finger information, and so forth all required their own individual clients. The differences between operating systems and machine architectures compounded the problem; in theory, these details should be hidden from the user who is trying to access the information.
The Web provides a single abstraction for the many kinds of information available from the Internet. One uses a single Web "client," a so-called browser--such as Netscape Navigator or Lynx--to access the Web. On the Web, information is provided as documents (also known as "pages"), where each document may have links to others. Documents may be located on any machine on the Internet that is configured to provide web access. Representing information in this way is commonly referred to as "hypertext," which is an important concept underlying the entire Web.
For example, the Linux Documentation Project provides various Linux-related documents via the Web. The LDP home page, which can be found at http://www.linuxdoc.org, contains links to a number of other Linux-related pages around the world. The LDP home page is shown in Figure 16-1.
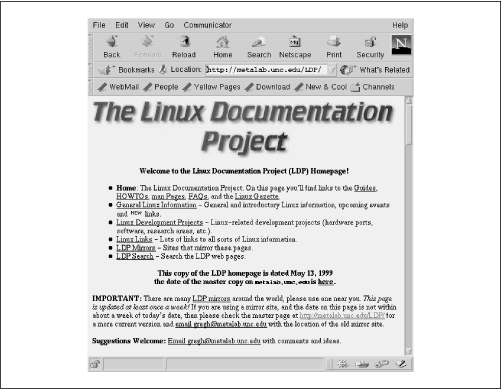
Figure 16-1. Linux Documentation Project (LDP) Home Page on the World Wide Web
The highlighted regions of text in the document are links. When the user selects a link (e.g., by clicking on the text with the mouse), the document pointed to by the link is retrieved. The documents can reside on virtually any machine on the Internet; the actual "locations" of web documents are hidden from the user.
Many of the documents available via the Web are in the form of multimedia hypertext pages, as seen in Figure 16-1. These pages may contain links to pictures, sounds, MPEG video files, PostScript documents, and much more. This multimedia information is provided by a protocol known as HyperText Transfer Protocol (HTTP). The Web is also capable of accessing documents provided via FTP, Gopher, Usenet news, and so on.
For example, when accessing a document via HTTP, you are likely to see a page such as that displayed in Figure 16-1--with embedded pictures, links to other pages, and so on. When accessing a document via FTP, you might see a directory listing of the FTP server, as seen in Figure 16-2. Clicking on a link in the FTP document either retrieves the selected file or displays the contents of another directory.

Figure 16-2. FTP directory as displayed in the Netscape Navigator Web browser
Given this kind of abstraction, we need a way to refer to documents available on the Web. Uniform Resource Locators, or URLs, are the answer. A URL is simply a pathname uniquely identifying a web document, including the machine it resides on, the filename of the document, and the protocol used to access it (FTP, HTTP, etc.). For example, when you visit LDP's home page:
it redirects you to the URL:http://www.linuxdoc.org
Let's break this down. The first part of the URL, http:, identifies the protocol used for the document, which in this case is HTTP. The second part of the URL, //metalab.unc.edu, identifies the machine where the document is provided. The final portion of the URL, LDP/index.html, is the logical pathname to the document on metalab.unc.edu. This is similar to a Unix pathname, in that it identifies the file index.html in the directory LDP. Therefore, to access the LDP home page, you'd fire up a browser, telling it to access http://metalab.unc.edu/LDP/index.html. What could be easier?http://metalab.unc.edu/LDP/index.html
Actually, the conventions of web servers do make it easier. If you specify a directory as the last element of the path, the server understands that you want the file index.html in that directory. So you can reach the LDP home page with a URL as short as:
To access a file via anonymous FTP, we can use a URL such as:http://metalab.unc.edu/LDP/
This URL retrieves the introductory Linux information on tsx-11.mit.edu. Using this URL with your browser is identical to using ftp to fetch the file by hand.ftp://tsx-11.mit.edu/pub/linux/docs/INFO-SHEET/
The best way to understand the Web is to explore it. In the following section we'll explain how to get started with a browser. Later in the chapter, we'll cover how to configure your own machine as a web server for providing documents to the rest of the Web.
Of course, in order to access the Web, you'll need a machine with direct Internet access (via either Ethernet or PPP). In the following sections, we assume that you have already configured TCP/IP on your system and that you can successfully use clients such as telnet and ftp.
16.1.1. Using Netscape Navigator
Netscape Navigator is one of the most popular browsers. Versions are available for the Macintosh, Microsoft Windows, and, of course, the X Window System on Unix machines. As you would expect, there is a Linux binary version available, which you can obtain from the Netscape FTP sites, such as ftp://ftp.netscape.com.
Netscape Navigator exists in two incarnations. First, there is the product developed and distributed by Netscape Communications Inc., which is available only in binary, but may now (unlike in earlier times) be freely redistributed. Second, there is Mozilla, which in a way is the "Open Source" version of Netscape Navigator. Netscape has made the source code available for everybody to hack on under a license similar to the GPL, but of course they do not assume responsibility for those versions. In this book, we will cover only the "official" version from Netscape, but you can find full information about the Open Source version at http://www.mozilla.org.
In addition, there are two versions of the software shipped by Netscape. First, there is Navigator, the standalone web browser. Second, there is Netscape Communicator, which really is a suite of programs, including Navigator, a mail and news client, and several other, less often used programs. When you want to use only the web browser, it suffices to get just Navigator. If you want to use the other tools as well, get the full Communicator suite. In the following description, we will assume that you use Communicator, because that's what is on most Linux distributions. If you have Navigator, things should be the same except that you won't have the mail and news client.
Here, we assume that you're using a networked Linux machine running X and that you have obtained a copy of the Netscape Navigator binary. As stated before, your machine must be configured to use TCP/IP, and you should be able to use clients such as telnet and ftp.
Starting Netscape Navigator is simple. Run the command:
where url is the complete web address, or URL, for the document you wish to view. If you don't specify a URL, Netscape should display the Netscape home page as shown in Figure 16-3 by default, but you can specify another page to be displayed on startup, even a blank page.eggplant$ netscape url
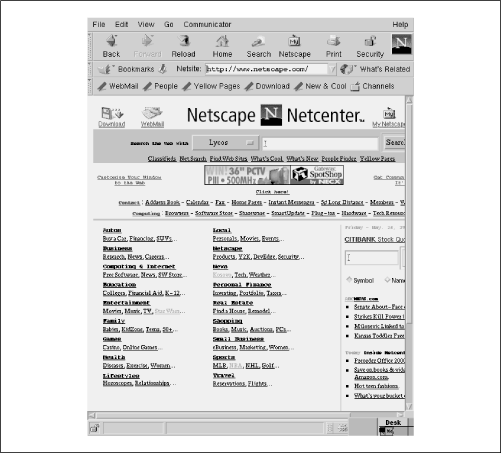
Figure 16-3. Netscape home page
The Netscape home page is a good place to start if you're interested in Web exploration. It contains links to information about the software itself, as well as demonstration documents showing off the power of the Web. (See the next section "Section 16.1.2, "Navigating the Web"," for more information on finding your way around the Web.)
While using Netscape Navigator, you can scroll the document using the scrollbars on the edge of the window. Alternatively, you can use the space bar and Delete key to move back and forth by pages or the arrow keys to scroll the document in smaller steps.
Links appear as highlighted text (usually in blue, on color systems, or underlined on monochrome). To follow a link, simply click on it with the mouse. Netscape remembers the links that you have followed; after you have selected a link, it appears in a darker color (or with dotted underlines) in the future.
Keep in mind that retrieving documents on the Web can be slow at times. This depends on the speed of the network connection from your site to the server, as well as the traffic on the network at the time. In some cases, web sites may be so loaded that they simply refuse connections; if this is the case, Netscape displays an appropriate error message. At the bottom edge of the Netscape window, a status report is displayed, and while a transfer is taking place, the Netscape Navigator logo in the upper-right corner of the window animates. Clicking on the logo takes you back to the Netscape home page.
As you traverse links within Netscape Navigator, each document is saved in the window history, which can be recalled using the Go menu. Pressing the Back button at the top edge of the Netscape window moves you back through the window history to previously visited documents. Similarly, the Forward button moves you forward through the history.
You can also bookmark frequently visited web sites (or URLs) to Netscape's "bookmarks file." Whenever you are viewing a document that you might want to return to later, choose Add Bookmark from the Communicator/Bookmarks menu. You can display your bookmarks by choosing the Bookmarks menu. Selecting any item in this menu retrieves the corresponding document from the Web.
As mentioned previously, you can access new URLs by running netscape with the URL as the argument. However, you can also select Open Page… from the File menu. Just type the name of the URL into the text-entry field, press the Enter key, and the corresponding document is retrieved.
Netscape Navigator is a powerful application with many options. There are many ways to customize Netscape's behavior; however, many of the customization details tend to change from release to release. Fortunately, Netscape has provided complete documentation for Navigator online, via the Web (where else?). This information is available on Netscape's home page at http://www.netscape.com. Recent versions of Navigator also include the documentation as a local copy.
Netscape is not the only browser that reads Web documents. The National Center for Supercomputing Applications (NCSA), which developed the first modern Web browser, Mosaic, has recently released a powerful new version called Vosaic.
Another browser for the X Window System that currently does not have all the bells and whistles but is fast and easy to use is kfm from the KDE project (see "Section 11.3, "The K Desktop Environment"" in Chapter 11, "Customizing Your X Environment" ). Yet another versatile browser is Lynx. It is a text-based browser, so you miss the pictures when you use it. But this makes it fast, and you may find it convenient. You can also use it without the X Window System. And finally, for those who never want to leave Emacs, there is Emacs/W3, a fully featured web browser you can use within Emacs or XEmacs.
16.1.2. Navigating the Web
The Web is growing at a tremendous rate. In fact, by the time you read this book, the Web may have completely changed in appearance from the descriptions given here. Hundreds of thousands of web servers have emerged since the Web's inception.
As the Web expands to encompass countless servers from all over the world, it becomes more difficult to find the information that's out there. Unless you happen to run across a URL or hyperlink to an interesting site, how can you locate information by subject?
Fortunately, a number of services have appeared on the Web to simplify this task. While none of these services provide a complete listing of web sites, the high degree of connectivity on the Web ensures that if whatever you're looking for is out there, you'll find it.
First, keep in mind that the Web is a dynamic place. We've made every attempt to certify that the information here is current, but by the time you read this book, several of these links may have moved, or may no longer exist.
A popular index of web sites is Yahoo!, available at:
but there are now many such "portals" offering a slice of interesting sites.http://www.yahoo.com
One of the largest search engines is:
which indexes millions of web sites. Also interesting is:http://www.altavista.com
where news articles are indexed and searchable.http://www.dejanews.com
16.1.3. Configuring Your Own WWW Server
Now that you've seen what the Web provides, you're ready to set up your own gas station on the information superhighway. Running your own web server is easy. It consists of two tasks: configuring the httpd daemon and writing documents to provide on the server.
httpd is the daemon that services HTTP requests on your machine. Any document accessed with an http URL is retrieved using httpd. Likewise, ftp URLs are accessed using ftpd, gopher URLs using gopherd, and so on. There is no single web daemon; each URL type uses a separate daemon to request information from the server.
There are several HTTP servers available. The one discussed here is the Apache httpd, which is easy to configure and very flexible. In this section, we'll discuss how to install and configure the basic aspects of this version of httpd. Later in the chapter, we talk about how to write your own documents in HTML (the markup language used by web pages) as well as more advanced aspects of server configuration, such as providing interactive forms.
The first step, of course, is to obtain a Linux httpd binary. Your Linux distribution may come with httpd installed, but make sure that this in fact is the Apache httpd and not one of the older ones. If you do not find Apache in your distribution, you can obtain the httpd sources from http://www.apache.org and build it yourself. The apache.org web site contains complete documentation for the software.
Apache--The Definitive Guide by Ben Laurie and Peter Laurie covers everything about Apache, including sophisticated configuration issues.
Where the various files of an Apache installation go depends on your distribution or the package you installed, but the following is a common setup. You should locate the various pieces in your system before continuing:
- /usr/sbin/httpd
Is the binary executable, which is the server itself. On Debian, this is /usr/sbin/apache instead.
- /etc/httpd
Contains the configuration files for httpd, most notably httpd.conf. We discuss how to modify these files later. On Debian systems, this is /etc/apache instead of /etc/httpd.
- /usr/local/httpd
Contains the HTML scripts to be served up to the site's clients. This directory and those below it, the web space, are accessible to anyone on the Web and therefore pose a severe security risk if used for anything other than public data.
- /var/log/httpd
Holds log files stored by the server.
Our task now is to modify the configuration files in the configuration subdirectory. You should notice at least the following four files in this directory: access.conf-dist, httpd.conf-dist, mime.types, and srm.conf-dist. Copy the files with names ending in -dist and modify them for your own system. For example, access.conf-dist is copied to access.conf and edited.
The latest version of Apache pretty much configures itself, but in case things go wrong, we'll tell you here how to do it manually so that you can fix things yourself.
At http://www.apache.org, you will find complete documentation on how to configure httpd. Here, we'll present sample configuration files that correspond to an actual running httpd.
16.1.3.1. httpd.conf
The file httpd.conf is the main server-configuration file. First, copy httpd.conf-dist to httpd.conf and edit it. In the following example, a sample httpd.conf is presented with comments explaining each field:
# This is the main server configuration file.
# See URL http://www.apache.org for instructions.

# Do NOT simply read the instructions in here without understanding
# what they do, if you are unsure consult the online docs. You have been
# warned.

# Originally by Rob McCool. Copyright (c) 1995-1999 The Apache Group.
# All rights reserved. See http://www.apache.org/LICENSE.txt for license.

# ServerType is either inetd, or standalone.

ServerType standalone

# If you are running from inetd, go to "ServerAdmin".

# Port: The port the standalone listens to. For ports < 1023, you will
# need httpd to be run as root initially.

Port 80

# HostnameLookups: Log the names of clients or just their IP numbers
#   e.g.   www.apache.org (on) or 204.62.129.132 (off)
# You should probably turn this off unless you are going to actually
# use the information in your logs, or with a CGI.  Leaving this on
# can slow down access to your site.
HostnameLookups on

# If you wish httpd to run as a different user or group, you must run
# httpd as root initially and it will switch.

# User/Group: The name (or #number) of the user/group to run httpd as.
#  On SCO (ODT 3) use User nouser and Group nogroup
#  On HPUX you may not be able to use shared memory as nobody, and the
#  suggested workaround is to create a user www and use that user.
User wwwrun
Group #-2

# The following directive disables keepalives and HTTP header flushes for
# Netscape 2.x and browsers which spoof it. There are known problems with
# these

BrowserMatch Mozilla/2 nokeepalive

# ServerAdmin: Your address, where problems with the server should be
# e-mailed.

ServerAdmin mdw@zucchini.veggie.org

# ServerRoot: The directory the server's config, error, and log files
# are kept in

ServerRoot /usr/local/httpd

# BindAddress: You can support virtual hosts with this option. This
# option is used to tell the server which IP address to listen to.
# It can either contain "*", an IP address, or a fully qualified
# Internet domain name. See also the VirtualHost directive.

#BindAddress *

# ErrorLog: The location of the error log file. If this does not start
# with /, ServerRoot is prepended to it.

ErrorLog /var/log/httpd.error_log

# TransferLog: The location of the transfer log file. If this does not
# start with /, ServerRoot is prepended to it.

TransferLog /var/log/httpd.access_log

# PidFile: The file the server should log its pid to
PidFile /var/run/httpd.pid

# ScoreBoardFile: File used to store internal server process information.
# Not all architectures require this.  But if yours does (you'll know
# because this file is created when you run Apache) then you *must*
# ensure that no two invocations of Apache share the same scoreboard file.
ScoreBoardFile /var/log/apache_status

# ServerName allows you to set a host name which is sent back to clients
# for your server if it's different than the one the program would get
# (i.e. use "www" instead of the host's real name).
#
# Note: You cannot just invent host names and hope they work. The name you
# define here must be a valid DNS name for your host. If you don't
# understand this, ask your network administrator.

#ServerName www.veggie.org

# CacheNegotiatedDocs: By default, Apache sends Pragma: no-cache with each
# document that was negotiated on the basis of content. This asks proxy
# servers not to cache the document. Uncommenting the following line
# disables this behavior, and proxies will be allowed to cache the
# documents.

#CacheNegotiatedDocs

# Timeout: The number of seconds before receives and sends time out

Timeout 300

# KeepAlive: Whether or not to allow persistent connections (more than
# one request per connection). Set to "Off" to deactivate.

KeepAlive On

# MaxKeepAliveRequests: The maximum number of requests to allow
# during a persistent connection. Set to 0 to allow an unlimited amount.
# We reccomend you leave this number high, for maximum performance.

MaxKeepAliveRequests 100

# KeepAliveTimeout: Number of seconds to wait for the next request

KeepAliveTimeout 15

# Server-pool size regulation.  Rather than making you guess how many
# server processes you need, Apache dynamically adapts to the load it
# sees --- that is, it tries to maintain enough server processes to
# handle the current load, plus a few spare servers to handle transient
# load spikes (e.g., multiple simultaneous requests from a single
# Netscape browser).

# It does this by periodically checking how many servers are waiting
# for a request.  If there are fewer than MinSpareServers, it creates
# a new spare.  If there are more than MaxSpareServers, some of the
# spares die off.  These values are probably OK for most sites ---

MinSpareServers 5
MaxSpareServers 10

# Number of servers to start --- should be a reasonable ballpark figure.

StartServers 5

# Limit on total number of servers running, i.e., limit on the number
# of clients who can simultaneously connect --- if this limit is ever
# reached, clients will be LOCKED OUT, so it should NOT BE SET TOO LOW.
# It is intended mainly as a brake to keep a runaway server from taking
# Unix with it as it spirals down...

MaxClients 150

# MaxRequestsPerChild: the number of requests each child process is
#  allowed to process before the child dies.
#  The child will exit so as to avoid problems after prolonged use when
#  Apache (and maybe the libraries it uses) leak.  On most systems, this
#  isn't really needed, but a few (such as Solaris) do have notable leaks
#  in the libraries.

MaxRequestsPerChild 30

# Proxy Server directives. Uncomment the following line to
# enable the proxy server:

#ProxyRequests On

# To enable the cache as well, edit and uncomment the following lines:

#CacheRoot /usr/local/etc/httpd/proxy
#CacheSize 5
#CacheGcInterval 4
#CacheMaxExpire 24
#CacheLastModifiedFactor 0.1
#CacheDefaultExpire 1
#NoCache a_domain.com another_domain.edu joes.garage_sale.com

# Listen: Allows you to bind Apache to specific IP addresses and/or
# ports, in addition to the default. See also the VirtualHost command

#Listen 3000
#Listen 12.34.56.78:80

#
# Read config files from /etc/httpsd
#
ResourceConfig  /etc/httpd/srm.conf
AccessConfig    /etc/httpd/access.conf
TypesConfig     /etc/httpd/mime.types
The ServerType directive is used to specify how the server will run--either as a standalone daemon (as seen here) or from inetd. For various reasons, it's usually best to run httpd in standalone mode. Otherwise, inetd must spawn a new instance of httpd for each incoming connection.
One tricky item here is the port number specification. You may wish to run httpd as a user other than root (that is, you may not have root access on the machine in question and wish to run httpd as yourself ). In this case, you must use a port numbered 1024 or above. For example, if we specify:
then we may run httpd as a regular user. In this case, HTTP URLs to this machine must be specified as:Port 2112
If no port number is given in the URL (as is the usual case), port 80 is assumed.http://www.veggie.org:2112/…
16.1.3.2. srm.conf
srm.conf is the Server Resource Map file. It configures a number of facilities provided by the server; for example, the directory where HTML documents are stored on your system, or what directory the various CGI binaries are located in. Let's walk through a sample srm.conf :
# The directory where HTML documents will be held.
DocumentRoot /usr/local/httpd/htdocs

# Personal directory for each user where HTML documents will be held.

UserDir public_html
Here, we specify the DocumentRoot directory, where documents to be provided via HTTP are stored. These documents are written in the HyperText Markup Language (HTML), which is discussed in the section "Section 16.1.4, "Writing HTML Documents"."
For example, if someone were to access the URL:
the actual file accessed would be /usr/local/httpd/htdocs/fruits.html.http://www.veggie.org/fruits.html
The UserDir directive specifies a directory each user may create in his home directory for storing public HTML files. For example, if we were to use the URL:
the actual file accessed would be ~mdw/public_html/linux-info.html.http://www.veggie.org/~mdw/linux-info.html
# If a URL is received with a directory but no filename, retrieve this
# file as the index (if it exists).
DirectoryIndex index.html

# Turn on 'fancy' directory indexes
FancyIndexing on
Here, we enable the indexing features of httpd. In this case, if a browser attempts to access a directory URL, the file index.html in that directory is returned, if it exists. Otherwise, httpd generates a "fancy" index with icons representing various file types. Figure 16-2 shows an example of such an index.
Icons are assigned using the AddIcon directive, as seen here:
# Set up various icons for use with fancy indexes, by filename
# E.g., we use DocumentRoot/icons/movie.xbm for files ending
#     in .mpg and .qt
AddIcon /icons/movie.xbm .mpg
AddIcon /icons/back.xbm ..
AddIcon /icons/menu.xbm ^^DIRECTORY^^
AddIcon /icons/blank.xbm ^^BLANKICON^^
DefaultIcon /icons/unknown.xbm
The icon filenames (such as /icons/movie.xbm) are relative to DocumentRoot by default. (There are other ways to specify pathnames to documents and icons--for example, by using aliases. This is discussed later.) There is also an AddIconByType directive, which lets you specify an icon for a document based on the document's MIME type and an AddIconByEncoding directive, which lets you specify an icon for a document based on the document's encoding (i.e., whether and how it is compressed). These encodings are described further later in the section "Section 16.1.4.4, "An aside: MIME types"."
You can also specify an icon to be used when none of the above match. This is done with the DefaultIcon directive.
The optional ReadmeName and HeaderName directives specify the names of files to be included in the index generated by httpd :
ReadmeName README
HeaderName HEADER
Here, if the file README.html exists in the current directory, it will be appended to the index. The file README will be appended if README.html does not exist. Likewise, HEADER.html or HEADER will be included at the top of the index generated by httpd. You can use these files to describe the contents of a particular directory when an index is requested by the browser:
# Local access filename
AccessFileName .htaccess

# Default MIME type for documents
DefaultType text/plain
The AccessFileName directive specifies the name of the local access file for each directory. (This is described later, along with the discussion about the access.conf file.) The DefaultType directive specifies the MIME type for documents not listed in mime.types. This is described further in the section "Section 16.1.4.4, "An aside: MIME types"":
The Alias directive specifies a pathname alias for any of the documents listed in srm.conf or accessed by a URL. Earlier, we used the AddIcon directive to set icon names using pathnames such as /icons/movie.xbm. Here, we specify that the pathname /icons/ should be translated to /usr/local/html/icons/. Therefore, the various icon files should be stored in the latter directory. You can use Alias to set aliases for other pathnames as well.# Set location of icons Alias /icons/ /usr/local/html/icons/ # Set location of CGI binaries ScriptAlias /cgi-bin/ /usr/local/httpd/cgi-bin/
The ScriptAlias directive is similar in nature, but it sets the actual location of CGI scripts on the system. Here, we wish to store scripts in the directory /usr/local/httpd/cgi-bin/. Any time a URL is used with a leading directory component of /cgi-bin/, it is translated into the actual directory name. More information on CGI and scripts is included in the section "Section 16.1.5.2, "Writing the CGI script"."
16.1.3.3. access.conf
The last configuration file that requires your immediate attention is access.conf, which is the global access configuration file for httpd. It specifies which files may be accessed and in what ways. You may also have a per-directory access configuration file if you require greater specificity. (Recall that we used the AccessFileName directive in srm.conf to set the local access file for each directory to .htaccess.)
Here is a sample access.conf file. It consists of a number of <Directory> items, each of which specifies the options and attributes for a particular directory:
Here, we specify that the CGI script directory should have the access options Indexes and FollowSymLinks. There are a number of access options available. These include:# Set options for the cgi-bin script directory. <Directory /usr/local/html/cgi-bin> Options Indexes FollowSymLinks </Directory>
- FollowSymLinks
Symbolic links in this directory should be followed to retrieve the documents they point to.
- ExecCGI
Allow the execution of CGI scripts from this directory.
- Indexes
Allow indexes to be generated from this directory.
- None
Disable all options for this directory.
- All
Enable all options for this directory.
There are other options as well; see the httpd documentation for details.
Next, we enable several options and other attributes for /usr/local/httpd/htdocs, the directory containing our HTML documents:
Here, we turn on the Indexes and FollowSymLinks options for this directory. The AllowOverride option allows the local access file in each directory (.htaccess, set in srm.conf ) to override any of the attributes given here. The .htaccess file has the same format as the global access.conf but applies only to the directory in which it is located. This way, we can specify attributes for particular directories by including a .htaccess file in those directories instead of listing the attributes in the global file.<Directory /usr/local/httpd/htdocs> Options Indexes FollowSymLinks # Allow the local access file, .htaccess, to override any attributes # listed here AllowOverride All # Access restrictions for documents in this directory <Limit GET> order allow,deny allow from all </Limit> </Directory>
The primary use for local access files is to allow individual users to set the access permissions for personal HTML directories (such as ~/public_html) without having to ask the system administrator to modify the global access file. There are security issues associated with this, however. For example, a user might enable access permissions in her own directory such that any browser can run expensive server-side CGI scripts. If you disable the AllowOverride feature, users cannot get around the access attributes specified in the global access.conf. This can be done by using:
which effectively disables local .htaccess files.AllowOverride None
The <Limit GET> field is used to specify access rules for browsers attempting to retrieve documents from this server. In this case, we specify order allow,deny, which means that allow rules should be evaluated before deny rules. We then instate the rule allow from all, which simply means any host may retrieve documents from the server. If you wish to deny access from a particular machine or domain, you could add the line:
The first entry denies access from all sites in the nuts.com domain. The second denies access from the site ftp://biffnet.biffs-house.us.deny from .nuts.com biffnet.biffs-house.us
16.1.3.4. Starting httpd
Now you're ready to run httpd, allowing your machine to service HTTP URLs. As mentioned previously, you can run httpd from inetd or as a standalone server. Here, we describe how to run httpd in standalone mode.
All that's required to start httpd is to run the command:
where configuration-file is the pathname of httpd.conf. For example:httpd -f configuration-file
starts up httpd, with configuration files found in /etc/httpd./usr/sbin/httpd -f /etc/httpd/httpd.conf
Watch the httpd error logs (the location of which is given in httpd.conf ) for any errors that might occur when trying to start up the server or when accessing documents. Remember you must run httpd as root if it is to use a port numbered 1023 or less. Once you have httpd working to your satisfaction, you can start it automatically at boot time by including the appropriate httpd command line in one of your system rc files, such as /etc/rc.d/rc.local.
Modern releases of Apache also provide a utility called apachectl that controls the starting, stopping, reloading, and so on of the httpd process.
Before you can request documents via HTTP from your browser, you'll need to write them. This is the subject of the next section.
16.1.4. Writing HTML Documents
Documents requested by HTTP may be in several forms. These forms include images, PostScript files, sounds, MPEG movies, and so forth. The mime.types configuration file describes the document types that httpd understands.
The most common type of document serviced by HTTP is an HTML file. HTML documents support text, links to other documents, inline images, and so forth. Most documents that you'll see on the Web are written in HTML. A more powerful alternative named XML has been getting a lot of press, but its strength lies in supporting specialized web applications, such as documents maintained in multiple languages and everybody's favorite buzzword--electronic commerce. HTML is sufficient for traditional, standalone pages.
HTML is surprisingly easy to learn. With the tutorial included here, you should be on your way to writing HTML documents and providing information to the Web in less than an hour.
Many tools allow you to convert other markup languages (such as LaTeX, Microsoft RTF, and so forth) to HTML, and vice versa. If you have particularly long documents in another formatting language that you wish to provide on the Web, it might be easier to convert them automatically to HTML or provide a PostScript or DVI image of the documents instead.
The canonical source for HTML information is the URL:
which is a beginner's guide to writing HTML documents. Here, we'll present the essentials of HTML to get you up to speed.http://www.ncsa.uiuc.edu/General/Internet/www/HTMLPrimer.html
16.1.4.1. HTML basics
If you're used to other formatting languages, such as TeX, HTML appears quite simple in comparison. Here is a minimal HTML document (which to be precise is not exactly correct HTML but something that all browsers understand):
<html>
<head>
<title>Ye Olde Generic HTML Document</title>
</head>
<body>
<h1>Writing HTML for Fun and Profit</h1>

Although writing HTML documents may not be a commmon source
of income, <em>authors</em> tend to bend the rules in this
respect.

<p> The advantage? It's really too easy for words.
</body>
</html>
Within HTML documents, elements are denoted by a <tag>…</tag> pair.[62]
[62]HTML is really a Document Type Definition in Standard Generalized Markup Language (SGML). SGML defines the <tag>…</tag> conventions.
As you can see, we begin the document with a header that contains the line:
which defines the title for this document. In the body that follows is an <h1> element, which is a top-level heading. Under Netscape Navigator for X, the title generally appears in the Document Title window and the heading within the document itself.<title>Ye Olde Generic HTML Document</title>
All HTML documents should have a title, but headings are, of course, optional. To HTML, a heading is just a portion of text that is set in a larger and/or bolder font. It has no bearing on the actual document structure.
HTML supports six levels of headings:
<h1>First-level heading</h1>
<h2>Second-level heading</h2>
…
<h6>Sixth-level heading</h6>
Following the heading is the body of the document. As you can see, we use the <em> tag to emphasize text:
...of income, <em>authors</em> tend to bend the rules in this...
Paragraphs are separated by a <p> tag. HTML ignores blank lines and indentation in the document. Therefore, to skip a line and begin a new paragraph, using <p> is necessary (unlike TeX, for example, which causes paragraph breaks at blank lines).
16.1.4.2. Viewing the document
Before we go much further with HTML, let's describe how to look at your first work of hypertext art. Most web browsers allow you to open a local HTML document and view it. For example, under Navigator, selecting Open Page from the File menu and then clicking Choose File... allows you to view an HTML file. Other browsers, such as Lynx, provide similar mechanisms. You should first save your HTML document in a file (such as sample.html ) and view it with your web browser.
When viewed in Netscape Navigator, our sample document looks like Figure 16-4. As you can see, Navigator does the actual "text formatting" for you; all that is required on your end is to write the document and point your web browser at it.
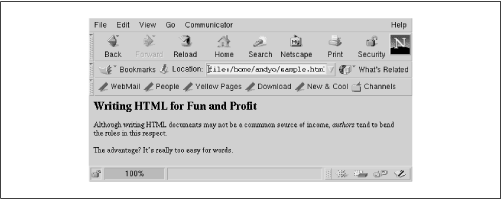
Figure 16-4. Sample HTML document displayed by Netscape
It's also quite easy to make your new HTML documents available via the Web. Assuming you have configured httpd as described in the previous section, you can place the HTML file in the httpd DocumentRoot directory (in our case, this is /usr/local/httpd/htdocs ).
Therefore, assuming the previous document is saved as /usr/local/httpd/htdocs/sample.html, and httpd is running on your system, anyone can access the document by opening the URL:
with a web browser. (Of course, substituting your own hostname for www.veggie.org.)http://www.veggie.org/sample.html
Note that you can create directories, symbolic links, and so forth within the DocumentRoot directory. Any HTTP URLs to your system will access filenames that are relative to DocumentRoot. So if we create the directory /usr/local/httpd/htdocs/my-docs and place sample.html there, the corresponding URL is:
http://www.veggie.org/my-docs/sample.html
16.1.4.3. Using links
In order to refer to other documents, or sections within the same document, links are used within the HTML source. For example:
Within Navigator, this sentence will look like Figure 16-5.<p> You can find more information about HTML <a href="http://www.w3.org/MarkUp/"> here </a>.

Figure 16-5. Link displayed by Netscape
The word "here" is highlighted, indicating that it is a link. Clicking on the link within Netscape retrieves the document pointed to by the URL:
The <a> element is known as an anchor ; it specifies a link that is associated with a particular region of text (in this case, the word "here").http://www.w3.org/MarkUp/
The <a> element we used is known as an absolute link. That is, the URL includes the complete machine and pathname specification. For documents on the same machine, you should use relative links, such as:
<p> You can also access the <a href="gardening.html">Vegetable Gardening
Home Page</a>.the link points to the URL:http://www.veggie.org/my-docs/sample.html
http://www.veggie.org/my-docs/gardening.html
If the filename used in a relative link begins with a slash (/ ), as in:
the URL is assumed to be relative to the DocumentRoot directory. In this case, the URL is equivalent to:Click <a href="/info/veggie.html">here</a> for more information.
http://www.veggie.org/info/veggie.html
Relative links can also point to the parent directory, as in:
<a href="../plants/plants.html">Here</a> is more about plants.
The use of relative links is important for documents that are related. They allow you to rearrange the directory hierarchy of HTML files without rendering all your links obsolete. However, when accessing unrelated documents on the same system, it might be best to use an absolute link. In this way, the location of your document does not depend on the location of others on the same system.
You can also use links to refer to sections within the same document. For example, the link:
refers to the location within the current document, tagged as so:See <a href="#Genetics">below</a> for information on genetically engineered vegetables.
Here, the anchor uses the name attribute, instead of href. In addition, the text within the anchor is the entire heading name. It's not required that you use headings as name anchors, but it usually makes sense to do so when you want to have cross references to other "sections" of the document. For instance, when a user selects the link pointing to this anchor, they will see the section heading:<a name="Genetics"> <h1>Genetically Engineered Vegetables: Our Specialty</h1> </a>
at the top of the Netscape Navigator document window.Genetically Engineered Vegetables: Our Specialty
Links can also refer to particular locations within other documents. For example:
refers to the section labeled with <a name="Genetics"> in the document tomatoes.html.<a href="tomatoes.html#Genetics">Here</a> is more information on our mutated tomatoes.
As you might guess, you are not limited to making links to other HTML documents. Links can point to image files, sounds, PostScript files, as well as other URL types such as FTP, Gopher, or WAIS services. In short, any valid URL can serve as a link. For example:
provides a link to the named FTP URL.Click <a href="ftp://ftp.veggie.org/pub/">here</a> to access our anonymous FTP archive.
16.1.4.4. An aside: MIME types
MIME stands for Multipurpose Internet Mail Extensions. As the named suggests, it was originally developed for electronic mail and is a standard for transporting documents that contain data other than plain printable ASCII text. You can find more information about MIME types at:
When you link to images or sounds, the range of valid image and sound types you may use depends on the abilities of the browser. For example, when accessing the URL:http://www.w3.org/TR/REC-html40/ types.html#h-6.7
the browser will be responsible for running a separate program to display the image. However, the server providing the image must tell the browser what type of data the incoming image is. This is handled by the mime.types file, in the httpd configuration directory. This file contains lines such as:http://www.veggie.org/pics/artichoke.gif
The first field in each line defines the MIME type name for the document in question. The remaining fields indicate filename extensions that the MIME type corresponds to. In this case, any filenames ending in .gif are treated as image/gif type documents.image/gif gif image/jpeg jpeg jpg jpe audio/basic au snd application/postscript ai eps ps text/html html text/plain txt
When the browser (say, Netscape Navigator) retrieves a document, it also gets information on the MIME type associated with it from the server. In this way, the browser knows how to deal with the document. For text/html documents, Navigator simply formats the HTML source text and displays it in the document window, for image/gif documents, it uses internal image viewing code to display the graphic. For image/png documents, Navigator runs a separate image viewer, such as xv. Similarly, application/postscript documents are viewed using Ghostview on most Unix systems.
How individual MIME types are dealt with is up to the browser. Navigator provides an option that allows you to specify a program to be run to process documents of a particular type.
The srm.conf file can also contain a DefaultType directive, which specifies which MIME type to use when all the other types do not apply. We use:
If the server is unable to determine the type of document, it assumes text/plain, which is used for unformatted text files. Netscape displays these text files in a constant-width font in the document window.DefaultType text/plain
16.1.4.5. Embedded images
One of the nicer features provided by HTML is the ability to include images directly in the document. This is accomplished with the <img> element:
This embeds the image pointed to by the relative URL pics/cat.gif in the document, as seen in Figure 16-6. Absolute URLs can be used with <img> as well.<img src="pics/cat.gif"> Tristessa, the Best Cat in the Universe.

Figure 16-6. Image displayed by Netscape
In theory, the <img> element can be used to embed "any" document into the current one. However, it is most commonly used for small images. The kind of images that can be inline depends on the particular browser. GIF and JPEG images seem to be universally accepted. However, note that not all browsers can display inline images--most notably text-based browsers such as Lynx.
You can also use <img> within an anchor, as in:
<a href="cat.html">
<img src="pics/cat.gif"></a>
Tristessa, the Best Cat in the Universe.
The display won't look any different, but a user who clicks on the picture will be taken to the page cat.html in the same subdirectory as the current page. To make it clear that another page is available, you should probably include both image and text in the anchor. This can be accomplished just by moving the closing </a> tag:
<a href="cat.html">
<img align="center" src="pics/cat.gif" alt="Photo of cat">
Tristessa, the Best Cat in the Universe.
</a>
As a slight aesthetic improvement (and to show that you have control over the placement of items) we centered the text next to the image by specifying align="center". We also conformed to modern accessibility guidelines by providing an alt tag that displays explanatory text for people who can't see the image, such as blind readers or anyone using a text-only browser. The final version of our little page is shown in Figure 16-7.
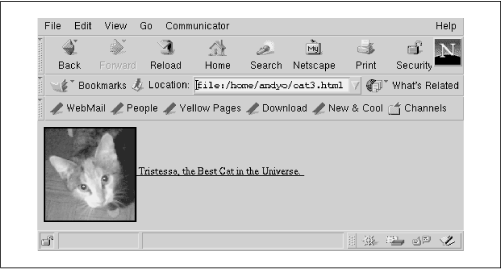
Figure 16-7. Image and link displayed by Netscape
16.1.4.6. More HTML features
Obviously, you need more than section headings, links, and inline images to write nicely formatted HTML documents. HTML provides many other text-layout features.
A numbered list can be obtained with the <ol> element, using <li> for each item in the list.
This list appears as shown in Figure 16-8 when formatted by Netscape Navigator.Zucchinis have the following nice features: <ol> <li> They're green. <li> They're crunchy. <li> They taste great in salads. </ol>
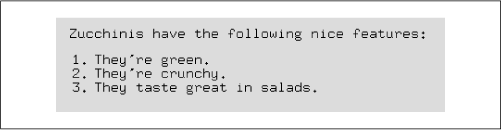
Figure 16-8. List displayed by Netscape
An unnumbered list can be obtained by using <ul> in place of <ol>. Unnumbered list items are marked with bullets instead of incremental numbers.
Lists can be nested as well. When unnumbered lists are nested, the bullet style usually changes at each level, as in Figure 16-9. The HTML source used to produce this list is:
Here is an example of a nested list.
<ul>
<li> The first item.
<li> The second item.
     <ul>
     <li> The first nested item.
     <li> Another item.
          <ul>
          <li> Yet another level of nesting.
          </ul>
     </ul>
</ul>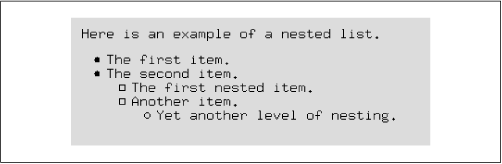
Figure 16-9. Nested lists displayed by Netscape
Various types of text emphasis are available. We've already seen <em>, which usually causes words to be placed in italics. Note that how these items are displayed depends entirely on the browser. The most commonly used emphasis tags are:
- <em>
Emphasized text, usually rendered as italics
- <code>
Program source code, usually rendered in a constant-width font
- <samp>
Sample output from a program, also in constant width
- <kbd>
User keyboard input
- <strong>
For strong emphasis, usually in boldface
Here is an example that uses several of these elements.
This is displayed within Navigator as seen in Figure 16-10.<p> <em>Amazing</em>, she thought. The <kbd>find</kbd> command can be used for almost <strong>anything!</strong>

Figure 16-10. Fonts displayed by Netscape
Note that <code>, <samp>, and <kbd> are all usually displayed as a constant-width typewriter font. However, it is important to distinguish between different types of logical emphasis in documents. In this way, we can change the typeface used to display <kbd> items (for example, to a slanted font), but allow <code> and <samp> to remain the same.
HTML also provides the <b>, <i>, and <tt> tags to produce boldface, italic, and constant-width text, respectively, should you wish to specify fonts directly.
The <pre> element allows you to include "preformatted" or "verbatim" text within an HTML document:
The source code for <code>hello.c</code> is as follows.
<pre>
#include <stdio.h>
void main() {
printf("Hello, world!");
}
</pre>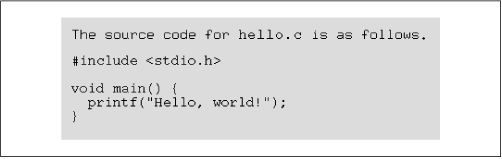
Figure 16-11. Preformatted text displayed by Netscape
Note the use of < to obtain < and > to obtain >. This is necessary because the < and > characters have a special meaning within HTML documents. Even within a <pre> element, substitution is necessary.
Other special characters are available as well, including:
- "
- &
To obtain an ampersand: &
- é
To obtain an acute-accented e : é
- ö
To obtain an o-umlaut: ö
The complete HTML specification, located at:
lists all the available codes.http://www.w3.org/TR/REC-html40/
You'll often seen a horizontal rule used in HTML documents to visually divide the page. This is obtained with the <hr> element, as so:
All right, I dare you to cross this line: <p><hr>
<p> All right, I dare you to cross this one: <p><hr>
Finally, the <address> element is often used at the end of HTML documents to specify the name and address of the author, or maintainer, of the page. For example:
<p><hr><p>
<address>Mr. P. Head, potatoe@veggie.org</address>
Many people link the name within the <address> item to a personal home page.
16.1.4.7. Finding out more
Within Netscape Navigator, you can view the HTML source for any document on the Web. While viewing the document in question, select the Document Source option from the View menu. This gives you an inside look at how the page was written. The Lynx web browser provides a similar option in the form of the backslash (\) command.
16.1.5. Building Interactive Forms
As mentioned in previous sections, Netscape Navigator and Apache httpd include support for forms, which allow the user to provide input (in the form of text-entry fields, buttons, menus, and so forth) to a script, executed on the server. For example, one form might include a text field for entering a username. Submitting the form causes the server to run a finger script, displaying the output as an HTML document.
The ability to use forms depends on the capabilities of both the browser and httpd server. Not all browsers can view forms, but nowadays most do. Also, not all implementations of httpd understand forms. We suggest using Apache httpd, discussed earlier in this chapter, which provides extensive forms support.
The canonical example of an interactive form is one where users can send electronic mail to the maintainer of the form page. In this section, through the use of this example, we'll demonstrate how to write forms and the server scripts that are executed by the forms. Of course, with a browser that includes a mail client of its own or that can be connected to a mail program, just putting mailto: mail_address into the HTML page would suffice. But a form could also be part of a larger application; for example, you might not only want to send feedback via mail, but also order goods in an online shopping application.
16.1.5.1. The HTML form document
The first step in building a form is to write an HTML document that corresponds to the form itself. These HTML pages contain a <form> element, which in turn contains several other elements denoting buttons, text-entry fields, and so forth.
Here, we present a small cross section of what forms can do. For an extensive example of forms use, see the URL:
which is a comprehensive database of information on over 30,000 movies, allowing you to search by title, genre, actors, directors, and so forth.http://us.imdb.com
Here is the HTML document for our simple mail form:
1  <title>Ye Olde Generic Mail Form</title>
2  <h1>Send mail to me</h1>
3  <p>You can use this form to send me mail.
4
5  <p><hr><p>
6  <form method="POST" action="/cgi-bin/mailer.pl">
7  <input name="from"> Your email address<p>
8  <input name="subject"> Subject<p>
9  <input type=hidden name="to" value="mdw@veggie.org">
10 <hr>
11 Enter message body below:<br>
12 <hr>
13 <textarea name="body" cols=60 rows=12></textarea><p>
14 <hr>
15 <input type=submit value="Send mail"><p>
16 </form>
When viewed within Netscape Navigator, this form looks like Figure 16-12.
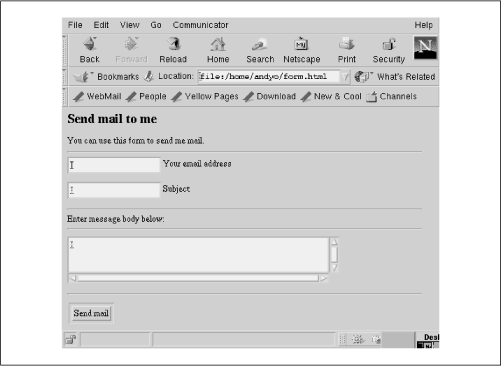
Figure 16-12. Form displayed by Netscape
As you can see, the form uses several additional features of HTML. Let's walk through the file and describe them all.
Line 6 uses the <form> element, which encloses the entire form itself. There are several options, or attributes, associated with the <form> element.
The method attribute specifies the means by which form information is sent to the server script. Valid methods are GET and POST. The GET method passes information as command-line arguments to the server script; the POST method passes information to the script's standard input. This option has bearing only on how you implement your server script; for various reasons, it's strongly suggested that you use the POST method.
The action attribute specifies the URL of the script that this form executes on the server. CGI scripts are usually stored in a directory named cgi-bin that must be specified in the ScriptAlias directive in the srm.conf file.
Here, we specify that the script:
should be executed when the form is submitted. The next section describes how to write this script./cgi-bin/mailer.pl
Lines 7-9 use the <input> element. This is the most common element found within a form; it specifies some kind of input item, such as a text field, button, or checkbox. The <input> element has several attributes.
The name attribute specifies a unique string that identifies this element to the server script. The type attribute specifies the type of input element. Its value can be text, radio, checkbox, password, submit, reset, or hidden. If no type is specified (as on lines 7 and 8), text is the default. The value attribute specifies the default value associated with this input item.
Several other attributes for input are also available; these set the maximum length of input for text entry fields, and so forth.
Lines 7 and 8 define input elements named from and subject, both of type text. These text-entry fields are used to enter the sender's email address and the subject of the message.
Line 9 defines a hidden element named to, which sets the email address that mail should be sent to. This is a "trick" that allows us to specify the recipient's email address within the HTML form itself. Otherwise, we'd have to specify the recipient address within the server script (mailer.pl ), which would require each user that wished to use the mail form to have a private copy of the script. This way, any user on the system can use the script, as long as he specifies his own address as the value of the to item. The reasons for this will become clear in the next section, where we discuss the mailer.pl script itself.
On line 13, we use the <textarea> element. This element denotes a multiline text-entry field, with scrollbars on the right and bottom edges. As with <input>, the name attribute names the element. The cols and rows attributes set the size of the textarea.
Note that unlike <input>, the <textarea> element has a corresponding </textarea> end tag on the same line. Any text that appears between <textarea> and </textarea> is the default contents of the entry field.
On line 15, we use another <input> element, of type submit. This defines a button which, when pressed, submits the form and runs the server script associated with it. The value attribute specifies the text of the button as displayed; in this case, it is "Send mail".
Finally, on line 16, we end the form with a </form> end tag.
Multiple forms can be used within a single HTML document; however, you cannot nest one <form> within another. A good book where you can learn about HTML and forms is HTML: The Definitive Guide by Chuck Musciano and Bill Kennedy.
16.1.5.2. Writing the CGI script
Scripts executed by forms use the CGI convention, which specifies how data is passed from the form to the script. At this point, it is not important to understand the details of the CGI specification; however, you should be aware that data is passed to scripts as a set of name/value pairs. For example, given our sample form, let's say the user entered the address:
in the from <input> field. The value bsmarks@norelco.com would then be associated with the name from when passed to the script.bsmarks@norelco.com
As mentioned previously, the mechanism by which these name/value pairs are passed to the server script depends upon the form method (GET or POST) used. In general, name/value pairs are encoded in the form:
and passed to the server script either on the command line (in the case of GET-method forms) or as standard input (in the case of POST-method forms). In addition, certain characters (such as =, &, and so on) must be escaped. Several environment variables pass certain parameters to the script.action?name=val&name=val&…
Server scripts can be written in practically any language, such as C, Perl, or even shell scripts. Because decoding the name/value pairs within a C program can be a bit harrowing, we instead show how to implement a script in Perl, in which text-processing facilities are more suited for this task.
The following example is the Perl script mailer.pl. Put this script in the directory you have set aside to hold CGI scripts when you configured the system:
#!/usr/bin/perl

use CGI qw(:standard);

print header(), start_html( "Mail form results" ),\
h1( "Mail form results" );

my $to = parse( "to" );
my $from = parse( "from" );
my $subject = parse( "subject" );
my $body = parse( "body" );

open (MAIL,"|/usr/lib/sendmail $to") ||
  die "<p>Error: Couldn't execute sendmail.\n";

print MAIL "To: $to\n";
print MAIL "From: $from\n";
print MAIL "subject: $subject\n\n";
print MAIL "$body\n";
close MAIL;

print p( "All right, mailed the following to <tt>$to</tt>:" );
print p( "<pre>\nTo: $to\nFrom: $from\nsubject:\
$subject\n\n$body\n</pre>" );
print end_html();
If you're new to Perl, refer to the introduction given in Chapter 13, "Programming Languages". However, you need not be a Perl wizard to follow this code.
This script first loads the module CGI.pm, which has been included in the Perl distribution since Perl 5.004; it will help you a great deal when it comes to writing CGI scripts. We first use its methods header(), ()start_html(), and h1() to write the header, including the crucial line:
which informs the server to watch for the MIME type of data coming from the script, and to start the HTML code. With CGI.pm you do not even need to worry about the HTML syntax!Content-type: text/html
After printing out those initial lines, we use the routine parse() from CGI.pm, which parses the parameters passed to the CGI script. While this doesn't sound like much, parsing those parameters is actually no small feat, because lots of things have to be taken into consideration. With parse, you simply pass the name of the parameter and get its value back.
The script then opens a pipe to /usr/lib/sendmail in the program that sends the mail message. (If you use a mail handler other than sendmail on your system, this filename should be modified.) We then pass the message to sendmail, prefixing it with an appropriate header containing the To:, From:, and Subject: fields derived from the data given on the form.
Note that there is a security risk here when you are using sendmail like this, because you do not know what is in the $to variable. In addition, the pipe technique is not very portable. In a production system, you would probably use the Perl module Mail::Mailer to send the mail, but since this has nothing to do with CGI scripting in particular, we leave this to your own explorations.
After closing the pipe to sendmail, we print the message as sent to standard output to allow the user to verify that the message was processed correctly. Again, we use the method p() from CGI.pm to output the HTML code. Finally, we use end_html() to correctly close the HTML tags.
Keep in mind that there are always security issues at work when dealing with HTML-based forms. Be certain that your scripts cannot be used to execute unauthorized processes on your system. If your server scripts are CPU-intensive, you might want to limit access to them to prevent heavy system load. In general, be sure that you know what you're doing when providing forms on your web server.
 |  |  |
| 15.4. NFS and NIS Configuration |  | 16.2. Electronic Mail |

Copyright © 2001 O'Reilly & Associates. All rights reserved.