|
» |
|
|
|
Updating your system using update-ux includes
the following tasks: After updating to HP-UX 11i v3, you might need to configure
OE Applications to make your system fully functional. See “Post-Update Tasks ” for instructions. Task 1: Create a Network Depot (Optional) | |
Create a network depot only if you intend to update other systems on the network using a depot.
This allows you to update all systems on the network without having
to move media from system to system. It also allows you to use the
preview (-p) option, which is new for HP-UX 11i v3.
You can use the preview (-p) option with either a
depot or media. If you are not creating a network depot, you can skip
this task. As root, follow this procedure to create a network depot from
the HP-UX 11i v3 two-DVD set onto a depot server: | | | |  | NOTE: Make sure you copy all products from both HP-UX 11i v3 DVDs
to your target depot. | | | | |
Verify
that you have at least 6 GB of free space to create the network depot
on another system in your network. If this space is not available,
use smh either to create a new volume group or
to extend an existing volume group. For help, refer to either SMH help or the HP-UX System Administrator’s
Guide. The HP-UX 11i v3 operating system
comes as a two DVD set. Insert the first DVD into the drive. Find the DVD-ROM device file name: ioscan -C disk
-f -n -k | more /dev/dsk/c1t2d0 is a typical
device name. Create the directory under root(/): mkdir /dvdrom Mount the first DVD onto the new directory as a file system, for example: mount /dev/dsk/c1t2d0 /dvdrom Create the directory that will
contain the network depot you want to create, for example: mkdir /var/11iv3 Copy all products on the mounted
DVD to the target depot. For example, to copy the contents of the first DVD to the target depot called update-depot type the following command: swcopy -s /dvdrom
\* @ /var/11iv3/update-depot Unmount the first DVD from its directory: umount /dvdrom Mount the second DVD onto the new directory as a file system, for example: mount /dev/dsk/c1t2d0 /dvdrom Copy all products on the mounted
DVD to the same target depot. For example, to copy the contents of
the second DVD to the target depot called update-depot type the following command: swcopy -s /dvdrom \* @ /var/11iv3/update-depot Unmount the second DVD from its directory: umount /dvdrom
The network depot is now ready to update your system to HP-UX
11i v3. Continue with “Task 2: Install the Latest Update-UX Bundle”. Task 2: Install the Latest Update-UX Bundle | |
Prior to updating your system, you must install a supported version of the update-ux command
from the Operating Environment DVDs. This procedure walks you through the installation of the latest
version of the Update-UX bundle, which includes
the update-ux command, from the Operating Environment
DVD media. From the DVD MediaFind the DVD-ROM device file name: ioscan -C disk
-f -n -k | more A device name associated with your DVD device should be displayed.
For example: /dev/dsk/c1t2d0 Create the directory under root(/). For example: mkdir /dvdrom Mount the DVD onto the new directory
as a file system. For example: mount /dev/dsk/c1t2d0
/dvdrom Using swinstall, install the
latest version of the Update-UX bundle on the
target system. | | | | | NOTE: Make sure you use the correct case to install the Update-UX bundle (in title case). This bundle contains
the update-ux command (lowercase). | | | | |
swinstall -s /dvdrom Update-UX From a DepotThe depot example uses the following syntax: depot_server:depot_path. For example: swinstall -s depot_server:/var/11iv3/update-depot
Update-UX
Task 3: Update Your System Using Update-UX | |
After you have installed the Update-UX bundle
on the target system and, optionally, created a network depot containing
all software to be installed, you can update your target system. You can update to HP-UX 11i v3 using one of the following
methods: | | | | | NOTE: Before you update your system to HP-UX 11i v3, review the known
problems in Appendix A. Make
sure to resolve any applicable issues before starting an update from
HP-UX 11i v2 to HP-UX 11i v3. | | | | |
Updating to HP-UX 11i v3 Using the Terminal User Interface
This section describes
how to update your system using the update-ux Terminal
User Interface (TUI). With the TUI, you use the Arrow, Tab, Space, and Return keys to navigate. There are seven steps in the TUI update-ux process: Table 6-2 TUI update-ux Steps 1.
Start-Up | Start the update-ux TUI. | | 2. Select
Source | Provide the location
of the software depot from which the software will be installed. | 3.
Select OE | Select
the OE that you wish to update to. | 4.
Select Software | Choose the software in the OE you selected to update. | | 5. Analysis
(Preview) | Analyze (preview)
the update selections to determine if the selected software can be
updated successfully. | | 6. Update | Perform the actual software update. | | 7. Verify
Update | Verify that the
software update was successful. |
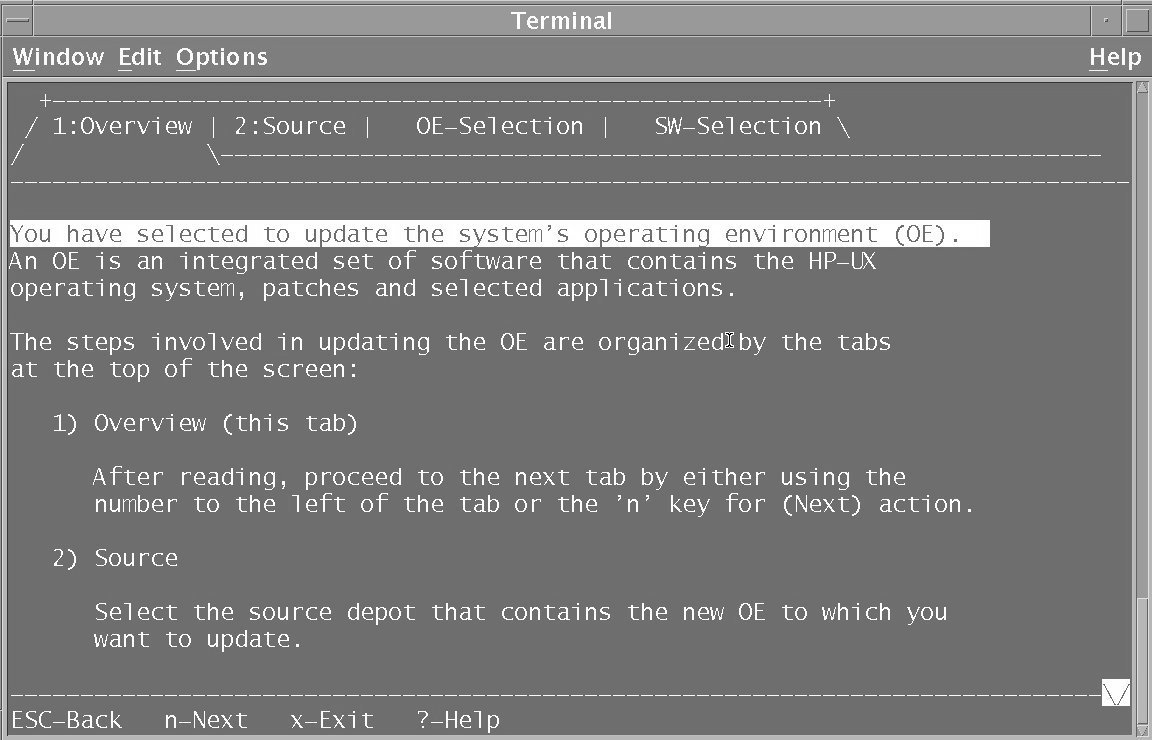
Step 1: Start-UpTo start the TUI for an update session, type: update-ux -i -s /dvdrom The TUI is automatically invoked and the Update-UX Overview
tab appears. If any screen other than the Overview tab appears, press 1 to display the Overview tab. This tab provides
an overview of the update process. Follow the numbered tabs to update
the OE. Use the navigation legend at the bottom of each screen to navigate
and select options on this terminal interface. After reviewing the information on the Update-UX Overview
tab, type n (next) to proceed to the Source Selection
tab.
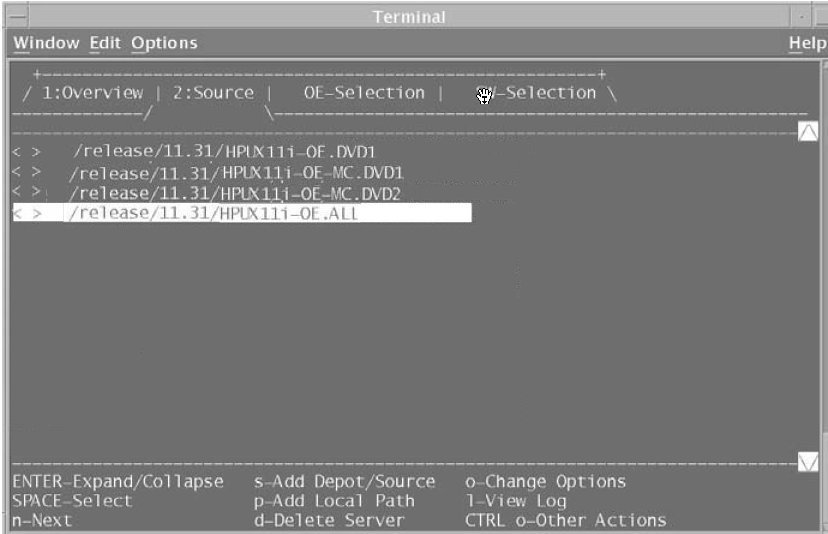
Step 2: Select Source The Source Selection tab appears. The Source Selection
tab displays a list of registered source depots on the local host
system. Specify the source depot that contains the new OE
that you want to use to update your target system. The system automatically
selects the local host and default depot path. You can
expand any entry that is preceded by the + sign. This allows you to
view the available depots on the server. If the depot containing the software you want to install
does not appear in the list, you can do one of the following: Add another host system to the list of registered
source depots, by entering s (Add Server/Depot) and then entering the name of the new
source host; or You can also remove a host system from the list of
registered source depots, by entering d (Delete Server).
Press Enter. The system retrieves
all the depots available for the host name specified and displays
a list of registered depots on the source host. Use the spacebar to select the depot containing the
software you want to install. Enter n (next) to confirm your selection
and proceed to the OE Selection tab. (The system displays the message
“Reading Data from Source”
before displaying the next tab.)
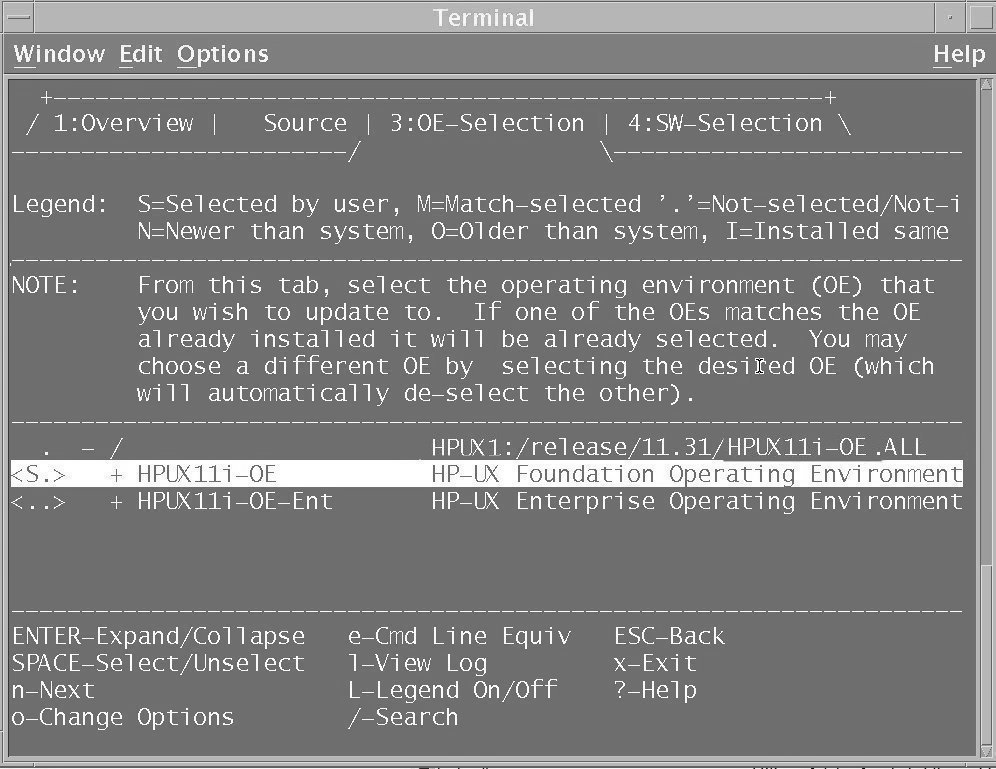
Step 3: Select OEThe OE Selection tab appears. An Operating Environment
(OE) is an integrated set of software that contains the HP-UX operating
system, and selected applications. The OE Selection tab displays the list of OEs to which you can
update. The OE that matches the one currently installed on your system
is automatically selected. You may choose a different OE by selecting
it (which will automatically deselect the other). Use this screen to select and review the contents
of the OE you want to update. There are three categories in the OE
that you can review: optional, required, and recommended. Highlight the category you would like to review and press Enter to expand and view its contents. On this
tab you can review the software contents included within the OE. | | | | | NOTE: You cannot select or deselect any software
on the 3: OE Selection tab. This is a view-only tab.
Use the 4: SW-Software Selection tab to select and
deselect software. | | | | |
You can expand the list of OE software to display the following
categories: Required: Software and administration
tools needed to create a minimally bootable and maintainable system.
Only drivers for basic hardware are included in this category. You
may need to install additional drivers to use all hardware components.
Software in this category is automatically selected as part of the
OE and cannot be deselected. Recommended: Software bundles
that HP recommends you install because it fulfills software dependencies,
if any exist. Software in this category is automatically selected
as part of the OE. You can, however, manually deselect the bundles
before you install or update your system. Optional: Any software bundles
in this category that match software currently installed on the target
system will automatically be selected by default. You can manually
select or deselect these bundles before you install or update your
system.
Press the Spacebar to select the OE you want to update;
then select n (next) to confirm your selection and
proceed to the Software Selection tab. The system displays
the message: Working...Loading *temporary* update
tools that do not affect the running system and will be removed when
the OE update is finished.
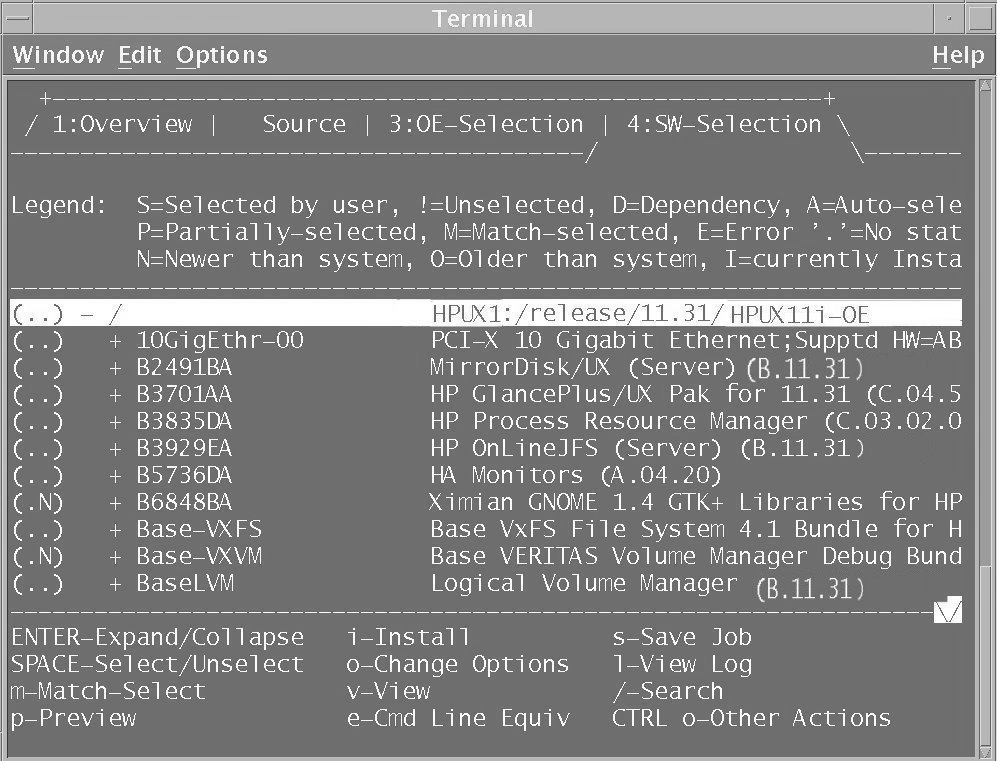
Step 4: Select SoftwareThe Software Selection tab appears. The Software Selection
tab displays the software contents of the OE you selected on the OE
Selection tab. On this tab you can adjust the software contents you
want to include within the OE. You can select or deselect optional software or deselect recommended
software you do not want to update. Deselecting recommended software
will deselect standalone software, network and storage drivers, and
recommended software that is common to all operating environments. Use the spacebar to select or deselect software from
the list. The flag M (Match) appears
when software has been matched to software currently installed on
your system. The flag P(Partial)
may appear if you select only a component of a software object or
if such components are automatically selected due to dependencies. The software products in each category have an associated flag
that is displayed in the left-hand column and are described below: S is selected by
the user. ! is unselected by
the user A is automatically
selected M is selected because
it matches software installed on your system E an error has occurred
when selecting this item . has no status;
is not selected or installed N is newer than the
software on the system O is older than the
software on the system I is currently installed
on the system.
After selecting the software you wish to install,
type p (preview) to preview the actions that will
occur for the update without modifying the system. The
output window appears and begins displaying messages beginning with: Analyzing software to be installed.
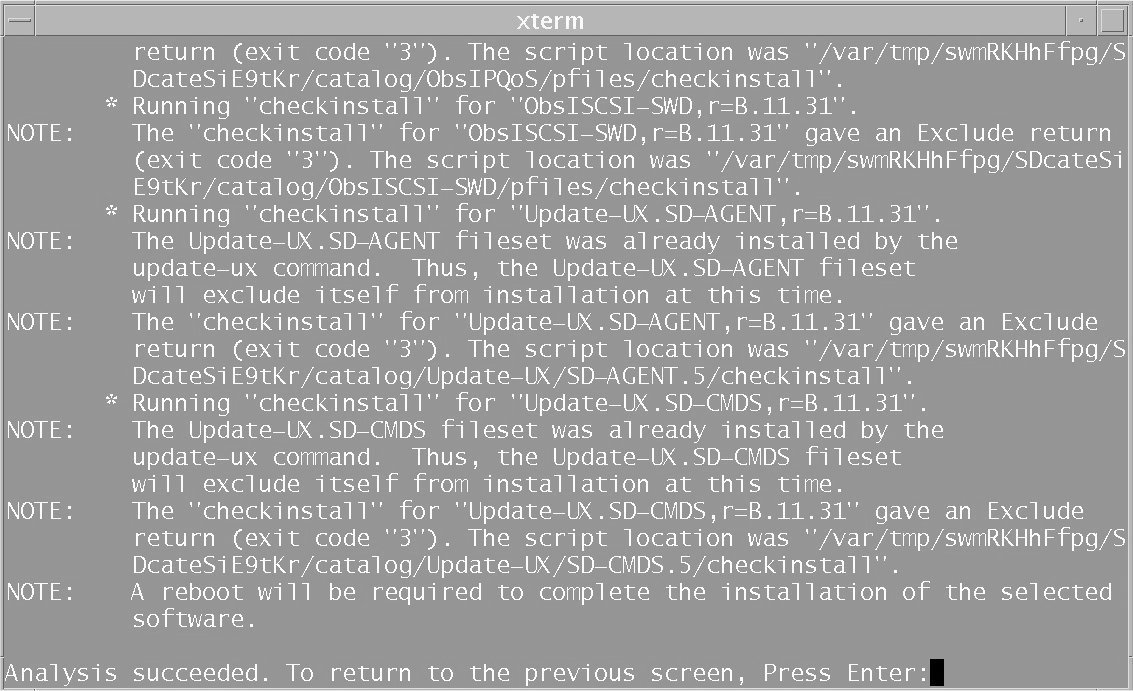
Step 5: Analysis (Preview)In this step, the update-ux TUI analyzes the software
you have selected. The Analysis window displays status information about the analysis
process. If the preview shows problems these will be displayed in
the Analysis window. When the analysis is complete press Enter to
return to the Software Selection tab and start the actual update process
(see “Step 6: Update”). If you started a preview session, the preview stops
after the analysis. Press Enter to return to the
Software Selection tab. After returning to the Software Selection tab, type l (log) to view the log file, which presents
a view of detailed install information. Review any errors, warnings, or notes. Warnings are
simply informational. If there are any errors, they will need to be
resolved before the update can continue.
Step 6: UpdateIn this step, the system proceeds with the actual update. At
the Software Selection tab type i (install) to start
the update process. After the update has started, the system will
typically execute a reboot. Step 7: Verify UpdateAfter your system has completed its reboot, you will be prompted
to change media when needed. Use the following steps to verify that
the update completed successfully: Verify that no errors were encountered before the
update began by viewing the contents of the log file: /var/adm/sw/update-ux.log. You should see output similar to the following: |
         Command entered: update-ux -s
         depot_server:/var/11iv3/update_depot SWM HPUX11i-OE
NOTE:    Output is logged to '/var/adm/sw/update-ux.log'
       * Obtaining some information from the source depot.
         cp /usr/lbin/swagent /var/adm/sw/tmp/update-ux
         compress /var/adm/sw/tmp/update-ux/swagent
         uncompress /var/adm/sw/tmp/update-ux/swagent.Z
         chmod +x /var/adm/sw/tmp/update-ux/swagent
       * Copying an SD agent from the source depot
         /usr/sbin/swagentd -k
         /usr/sbin/swagentd -r
         /usr/sbin/swcopy -s depot_server:/var/11iv3/update_depot
         -x logfile=/var/adm/sw/tmp/update-ux/swcopy.log
         -x autoselect_dependencies=false -x enforce_dependencies=false
         -x mount_all_filesystems=false -x register_new_depot=false
         -x uncompress_files=true -x reinstall=true SW-DIST.SD-AGENT @
         /var/adm/sw/tmp/update-ux/SWDIST.depot
         /usr/sbin/swagentd -k
         /usr/sbin/swagentd -r
         rm -f /var/adm/sw/tmp/update-ux/orig_swagent.log
         rm -f /var/adm/sw/tmp/update-ux/tmp_swagent.log
/usr/sbin/swagentd -k. |
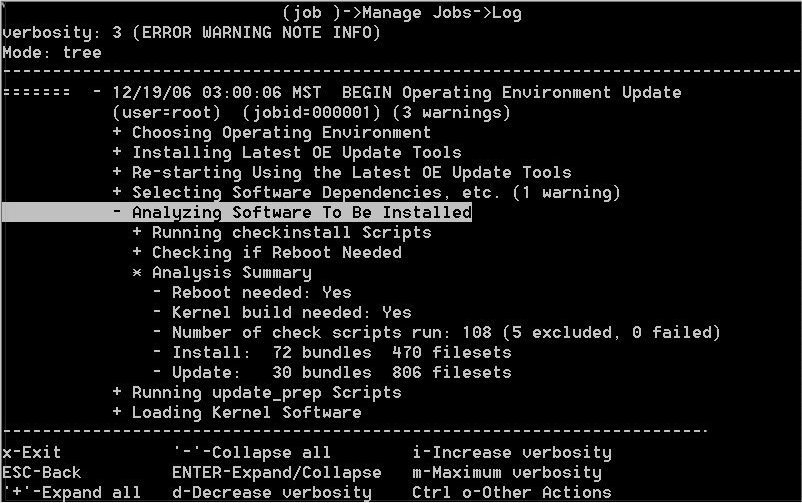
Verify that all appropriate software was updated successfully
by viewing the contents of the logfile: /var/opt/swm/swm.log. You may view the contents of the swm.log interactively by typing the following command: swm job -i The system displays a log screen that displays contents of the
log file /var/opt/swm/swm.log. This log screen provides multiple ways of viewing the information
recorded in the log file. You can filter out the messages by verbosity
levels, using the action keys at the bottom of the screen.
Table 6-3 “Log Files Generated During Update” lists the
log files that are generated during an update: Table 6-3 Log Files Generated During Update Log File | Description |
|---|
/var/opt/swm/swm.log | This log file contains the output
from the software selection, analysis and installation phases of the
software update. In addition, this log file includes output from all
control scripts that run during the update. The swm.log file is the primary log file that you should reference for the results
of the update process. | /var/adm/sw/update-ux.log | This log file contains the output
from the update-ux script. The update-ux script ensures that the right tools are installed before performing
the update. | /var/adm/sw/swagent.log | This log file contains the detailed
output from the software installation, including control scripts that
run during the update. Please note that the swm.log file is a superset of the information found in the swagent.log file. | /var/adm/sw/swagentd.log /var/adm/sw/swconfig.log /var/adm/sw/swinstall.log /var/adm/sw/swmodify.log /var/adm/sw/swreg.log /var/adm/sw/swremove.log /var/adm/sw/swverify.log | These are log files for individual commands
that run during the update. Success or failure and output from these
commands is recorded in the swm.log. Unless directed
by a message in another log file, there is no need to refer to these
log files. |
Updating to HP-UX 11i v3 Using the Command Line InterfaceUse the following syntax to run the update-ux command: update-ux -s source_location [-?][-i][-p][-v][-f selection_file][-x option=value][sw_spec...] Table 6-4 Update-UX Commands Update-UX Command | Description |
|---|
-ssource_location | Specifies the source containing the new software depot. Possible
locations are a local directory, a mounted DVD containing a depot,
or a remote system-and-depot combination. All paths used
in the source_location must be absolute
paths. If source_location is a remote system
and depot combination, specify the remote system first, followed by
the absolute path to the remote depot, separated by a colon with no
spaces; for example: swperf:/var/spool/sw | -? | Prints the usage statement. | -p | Previews an update task by running the
session through the analysis phase only. | -v | Turns on verbose output to stdout. | -f selection_file | Reads the list of software selections from selection_file instead of (or in addition to) the command
line. This option enables you to select and update optional software
or to deselect recommended software. | -x option=value | Specifies -x options to be applied during the update. For a typical update, no -x options are required. For information on -x options, refer to the swm (1M) manpage or the Software Distributor Administration Guide. | sw_spec | Software selections support
the same syntax as the swinstall command plus the
syntax described in the selection syntax section below. The following
syntax is supported for sw_spec: bundle[,version] product[.subproduct][.fileset][,version] !selection [bundle]/[%match] pattern-matching-expression where version can
be: [,r op revision][,a op arch][,v op vendor] [,c op category] [,q=qualifier][,l=location]
[,fr op revision][,fa op arch] where op can
be: =, ==, >=, <=, <, >, or != The = (equals) relational operator
lets you specify selections with the shell wildcard and pattern-matching-expressions: [ ], *, ? The syntax !selection causes that selection
to be deselected even if it was listed on the command line as part
of other selections. |
Adding and Removing Operating Environments From the Command
Line An Operating Environment (OE) represents a specific HP-UX release
that can be installed on a system. To update to HP-UX 11i v3 and include a specific HP-UX 11i v3
OE, you need to specify the OE name in the update-ux command. For example, to update to HP-UX 11i v3 and install the HP-UX
11i v3 Base OE, insert the HP-UX 11i v3 DVD in the local drive mounted
at /dvdrom. As root, enter: /usr/sbin/update-ux -s /dvdrom HPUX11i-BOE | | | | | NOTE: Make sure you install all new optional
software included in the OE collection that you want at the same time
that you do your update. | | | | |
Updating Optional Software From the Command Line To update to HP-UX 11i v3 and specify additional optional software
bundles on the command line, follow these steps: If you want to install additional
optional software included with the HP-UX 11i v3 Base OE collection,
enter: /usr/sbin/update-ux -s /dvdrom HPUX11i-BOE optional_software_bundle_name Complete any configuration for
HP software explained in the HP-UX 11i v3 Release Notes available on the Instant Information DVD and at http://docs.hp.com/en/oshpux11iv3.html
|