|
|

Use the Maintenance group of functions to make changes to the system hardware or software:
Figure 5-1 shows the options accessible from the Maintenance Menu screen.

Complete the following steps to access the Maintenance Menu screen:
Step 1 Access the Administrator Main Menu screen.
Step 2 Type C and press Enter.
The Maintenance Menu screen appears (see Figure 5-2). The cursor is located in the Enter Selection field.

The cursor is located in the Enter Selection field. Type the letter that precedes the function you want and press Enter. To return to the Administrator Main Menu, press the Prev Menu, Main Menu, or Exit key. The functions that can be accessed from this menu are discussed in the remainder of this chapter.
Use Card Maintenance to add cards to or delete cards from the database and change the status of a card, a port on a card, or a span on a card.
Complete the following steps to access the Card Maintenance screen:
Step 1 Access the Maintenance Menu screen (refer to the "Accessing the Maintenance Menu Screen" section).
Step 2 Type A and press Enter.
The Card Maintenance Menu screen appears (see Figure 5-3). The cursor is located in the ADD, DELETE, CHANGE STATUS (A,D,C,P) field.

Card Maintenance consists of up to 15 screens. Each screen lists 11 card entries, ordered according to their location within the system. A message towards the bottom of each screen states the number of time slots for which your system is licensed (actual number of purchased time slots) and how many time slots are currently in use (allocated).
 |
Note In the example in Figure 5-3, 1152 time slots were purchased for that switch, of which 272 have already been allocated. The time slot information on the Card Maintenance screen should match the time slot information displayed on the main menu and License Configuration screens. |
Use the Prev Screen and Next Screen keys to page through the listings. Use the Print Screen key to obtain a hard copy of any of these screens.
The Card Maintenance screen contains the following fields:
R L S—Display only. The Rack-Level-Slot/Group/Span hardware address (physical location) of the card.
CARD TYPE—Display only. Shows the kind of card in that location. You can change this field using the ADD, DELETE, CHANGE STATUS AND PORT DEFINITION (A,D,C,P) field.
V.RV—Display only. The version and revision level of the firmware installed on the card. Use this field to verify that firmware revisions for all network interface and service circuit cards are at the current level. The information in this field appears only if the status (S) of the card is other than Out of Service (O). For a listing of current firmware version/revision levels, refer to the current customer release notes.
|
Note If you are running a customer patch, you may see an inconsistency in the SPC.DWN and ICC.DWN file version revision numbers listed in this column. The inconsistency is due to the two character field length; customer patch version revision numbers are greater than two digits and the system converts them to binary coded digits for display purposes. Formal releases always contain two digits and do not experience this inconsistency. |
S—Display only. The current status of the card. You can change this field using the ADD, DELETE, CHANGE STATUS AND PORT DEFINITION (A,D,C,P) field. Valid values are:
|
Note VCO/4K and VCO/20 systems support only the DTG-2 Tone Generator card. VCO/80 systems support either the DTG-2 or DTG. |
ADD, DELETE, CHANGE STATUS AND PORT DEFINITIONS (A,D,C,P)—Data entry via main keypad. Specifies the function to perform.
|
Note You can add or delete Four Span T1/E1, MVDC T1, and ICC cards while the change state and port options are performed on a span. Operating on a span requires an interface identifier (i.e., 1 1 4-3, or 1 1 4-3-1 for ICC and SPC cards). |
|
Note You have the option of changing the status of all spans of an MVDC T1 or ICC card with a single command, or specifying a particular span. For example, to activate a card, type 1 1 4 and all spans in slot 4 are activated. |
You can add a card to the system database from the Add function of the Card Maintenance screen. The card does not have to be installed in the system before it can be added to the database.
Consider the following when adding a card to the database:
|
Note BRCs are only supported in VCO/80 and SDS-1000 systems. |
|
Note Each SPC-TONE, DTG-2 or DTG consumes 64 time slots. These time slots are "free," that is, provided at no charge by Cisco. The number of time slots available is adjusted upward to reflect the free DTG time slots, as displayed in the Card Maintenance, License Configuration, and main menu screens. Sixty-four time slots in the range of 0x4C0 to 0x4FF are reserved for each service engine configured as SPC-TONE. |
Complete the following steps to add a card to the database:
Step 1 Access the Card Maintenance screen (refer to the "Accessing the Card Maintenance Screen" section).
The Card Maintenance screen appears. The cursor is located in the command field.
Step 2 Type A and press the Next Field key. The cursor moves to the first R-L-S field.
Step 3 Type the physical location: rack/cabinet number, level number, and slot number, and press the Next Field key after each entry.
The cursor moves to the Card Type field and the "Hit 'Select' Key To Select Card Type..." message appears.
Step 4 Use the Select and Reverse Select keys to scroll through the values until the correct card type is displayed.
|
Note The Announcement and Primary Rate/DSS1 card types, although selectable, are not supported. |
Step 5 Deassign ports as required:
Step 6 Press Enter.
The "Card Is Added, But Out Of Service!" message appears as the database is automatically updated. The screen display is updated to show the addition of the card to the list. The Status field indicates the card is out of service, and all ports are shown as available. The cursor returns to the command field.
Step 7 Repeat Step 2 through Step 6 for all cards you want to add.
Step 8 Press the Exit key to return to the Maintenance Menu screen, or remain at this screen to change the status of the new cards.
To exit the Card Maintenance screen without making any changes, press the Exit, Prev Menu, or Main Menu key. No changes are made to the database unless Enter is pressed.
You can place cards and spans in Active, Out of service, Diagnostics, Maintenance, Remote Loopback, or Payload Loopback mode using the Card Maintenance screen.
Consider the following when making card and/or span status changes:
|
Note Any active IPRC that has not had prompts downloaded to it has a status of Maintenance. |
Complete the following steps to change the status of a card:
Step 1 Access the Card Maintenance screen (refer to the "Accessing the Card Maintenance Screen" section).
The cursor is located in the ADD, DELETE, CHANGE STATUS AND PORT DEFINITION (A,D,C,P) field.
Step 2 Type C and press the Next Field key.
The cursor moves to the first R-L-S field.
Step 3 Type the physical location: rack/cabinet number, level number, and slot number, and press the Next Field key after each entry.
The display is updated to show the card type, current status, available ports, and the screen that contains the selected card's listing, if not already displayed. The cursor moves to the State field and the "Type Status, Then Depress Enter!" message appears.
|
Note For Four Span T1/E1 and MVDC T1 cards, you must specify the span, otherwise the
message "Interface Required" appears. For ICC and SPC cards, you must specify the group
and interface. When changing the status of a multi-span card, you do not need to specify a particular span, although this option is still available. For example, to activate all spans of a multispan card, type 1 1 14 and all spans in slot 14 become active. |
Step 4 Type the appropriate character in the Status field and press Enter. Refer to "Card Maintenance Screen Field Definitions" section for field descriptions.
If no ports on the specified card are involved in active calls, the database is automatically updated and the screen display is updated to show the change of status when it occurs. The cursor returns to the command field and the "Card Status Is Changed" message appears.
If ports on the card specified are involved in active calls, the "xx ports active, Continue/Abort (C/A)" message appears.
Step 5 Perform the status change in one of the following two ways:
Step 6 Repeat Step 2 through Step 5 for all status changes you want to make.
Step 7 Press the Exit key to return to the Maintenance Menu screen.
To exit the Card Maintenance screen without making any changes, press the Exit, Prev Menu, or Main Menu key. No changes are made to the database unless you press Enter.
Use the Delete function on the Card Maintenance screen to delete a card from the system database. Consider the following when deleting a card from the system database:
Complete the following steps to delete a card from the database:
Step 1 Access the Card Maintenance screen (refer to the "Accessing the Card Maintenance Screen" section).
The cursor is located in the ADD, DELETE, CHANGE STATUS AND PORT DEFINITION (A,D,C,P) field.
Step 2 Type D and press the Next Field key.
The cursor moves to the first R-L-S field.
Step 3 Type the physical location: rack/cabinet number, level number, and slot number, and press the Next Field key after each entry.
|
Note You can delete an MVDC T1, ICC, or SPC by card or by span. To delete by card, type the rack, level, and slot numbers. To delete by span, type the rack, level, and slot/group/span or interface. |
The display is updated to show the card type, current status, available ports, and the screen that contains the selected card's listing, if not already displayed. The "To Delete Card, Depress Enter!" message appears.
Step 4 Press Enter.
The "Are You Sure? Then, Depress Enter!" message appears.
Step 5 Press Enter.
Step 6 The database is automatically updated and the screen display is updated to show the modifications. The cursor returns to the ADD, DELETE, CHANGE STATUS AND PORT DEFINITION (A,D,C,P) field, and the "Card is Deleted" message appears.
Step 7 Repeat Step 2 through Step 5 for all cards you want to delete.
Step 8 Press the Exit key to return to the Maintenance Menu screen.
To exit the Card Maintenance screen without making any changes, press the Exit, Prev Menu, or Main Menu key. No changes are made to the database unless you press Enter twice.
You can mark individual ports on an internal service circuit or network interface card as unavailable (0) from the Port Definition function on the Card Maintenance screen. Ports previously marked as unavailable can also be returned to use (1) with this function. This function is also known as activating or deactivating a port.
Consider the following when changing the status of a port:
Complete the following steps to change the status of a port:
Step 1 Access the Card Maintenance screen (refer to the "Accessing the Card Maintenance Screen" section).
The cursor is located in the ADD, DELETE, CHANGE STATUS AND PORT DEFINITION (A,D,C,P) field.
Step 2 Type P and press the Next Field key.
The cursor moves to the first R-L-S field.
Step 3 Type the physical location: rack/cabinet number, level number, and slot number, and press the Next Field key after each entry.
The display is updated to show the card type, current status, available ports, and the screen that contains the selected card's listing, if not already displayed. The cursor moves to the first Port field and the "Type Port Numbers, Then Depress Enter!" message appears.
|
Note For Four Span T1/E1 and MVDC T1 cards, you must specify the span or the message "Interface Required" appears. For ICC and SPC cards, you must specify the group and interface. |
Step 4 Use the Prev Field, Next Field keys, and the main keypad, to move the cursor to the desired port. Ports are organized sequentially, in clusters of eight.
a. To remove a port from service, move the cursor to the port and type 0.
b. To make a port available, move the cursor to the port and type 1.
Step 5 After you change the status of a port, press Enter.
Step 6 Complete one of the following options, which are dependent upon your configuration requirements:
Step 7 Complete one of the following options, which are dependent upon your configuration requirements:
Step 8 Repeat Step 2 through Step 7 for any cards on which you want to change port status.
Step 9 Press the Exit key to return to the Maintenance Menu screen.
To exit the Card Maintenance screen without making any changes, press the Exit, Prev Menu, or Main Menu key. No changes are made to the database you press Enter.
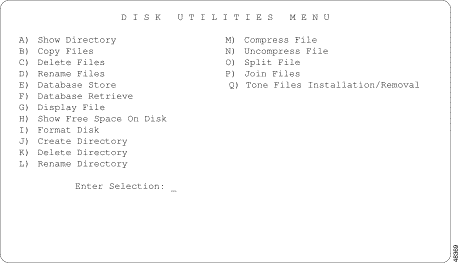
The Disk Utilities menu provides access to the DOS-based utilities that allow you to perform the following functions:
The system hard and floppy drives use the same DOS disk format as IBM-compatible PCs. The system floppy disk drives require 3.5-inch double-sided, high-density (DS, HD) diskettes. Floppy disks formatted or copied on a DOS PC are compatible with the system. There are some differences between PC-DOS and system DOS; refer to the "Filename Conventions" section.
To move system files, use the same basic filename conventions as standard PC-DOS, with the exception of the backslash (\) character. Files are identified by a drive specifier (A: for floppy drive and C: for hard drive), a filename of between one and eight alphanumeric characters, and a three-character filename extension following a period (.ext). In addition, you can specify a file as part of a directory path. The VCO/4K file system requires you to use a forward slash (/) character to separate directories and filenames (similar to UNIX) rather than standard PC-DOS backslash (\) character.
Two wildcard characters can also be used within filenames and extensions:
When you use a question mark (?) in a filename or extension, it indicates that any character can occupy that position. For example, the filename AB?DE.XYZ specifies all filenames with five characters, begin with AB, have any next character, are followed by DE, and end with the extension XYZ.
When you use an asterisk (*) in a filename or extension, it indicates that any character can occupy that position. It also indicates that any characters can occupy the remaining positions in the filename or extension. The asterisk wildcard is commonly used to specify all files with the same extension (*.XYZ) or all files with a common filename (ABCDE.*).
Two terms are used to describe the relationship of files during a Copy File operation:
|
Note These terms appear both in this text and in messages written to the screen and system log file. |
Complete the following steps to access the Disk Utilities Menu screen:
Step 1 Access the Administrator Main Menu screen.
Step 2 Access the Maintenance Menu screen (refer to the "Accessing the Maintenance Menu Screen" section).
Step 3 Type B and press Enter.
The Disk Utilities Menu screen appears (see Figure 5-4). The cursor is located in the Enter Selection field.
Use the Print Screen key to obtain a hard copy of this screen.
The Disk Utilities Menu screen options are described in the following sections:
Use the Show Directory option to view a list of all directories and files contained in a specified directory on either the system hard drive (C:) or floppy drive (A:). To view a directory on the floppy drive, insert the floppy disk into the drive before you press Enter. The system displays the following information:
Complete the following steps to view a directory listing:
Step 1 Access the Disk Utilities Menu screen (refer to the "Accessing the Disk Utilities Menu Screen" section).
Step 2 Type A and press Enter.
The Disk Directory screen appears (see Figure 5-5). The cursor is located in the data entry field.

Step 3 Perform one of the following actions, which is dependent upon your needs:
Step 4 Type the complete directory name you wish to display (including the drive designation), and press Enter.
The "Reading Directory" message appears while the system accesses the specified directory. The screen then clears and displays a directory listing similar to that shown in Figure 5-6. The number of files in the directory is shown on the message line.
Step 5 To view another directory, press the Exit key and return to Step 3.

To return to the Disk Utilities Menu screen before viewing another directory, press Enter.
Use the Copy Files option to copy files from one disk to another, and to copy files from one directory to another on the same disk.
If the file already exists on the destination disk, it is overwritten by the source file. A system status message shows the number of files copied. Use of wildcards in specifying filenames is supported as described in the "Filename Conventions" section.
Copy a single file by specifying the source and destination filenames. This process is especially useful when updating card download files, such as NBC or ICC downloads (NBC.DWN and ICC.DWN, respectively). The following example specifies to copy the ICC download file from the top-level directory on the floppy disk to the top-level directory on the hard disk. The destination filename in this example is the same as the source filename:
You can copy all Trace files on the system hard disk to a Trace directory on a floppy disk by specifying the following source and destination files:
Complete the following steps to copy one or more files:
Step 1 Access the Disk Utilities Menu screen (refer to the "Accessing the Disk Utilities Menu Screen" section).
Step 2 Type B and press Enter.
The Copy Files screen appears (see Figure 5-7). The cursor is located in the Copy From? field.

Step 3 Complete one of the following steps, which is dependent upon your configuration needs:
Step 4 Type the filename you wish to copy and press the Next Field key.
The cursor moves to the Copy To? field.
Step 5 Type the destination filename and press Enter.
The "Copying Files" message appears while the system copies the specified file. When copying is complete, the "X Files Copied" message appears, where X indicates the number of copied files. The system automatically returns to the Disk Utilities Menu screen after several seconds.
Use the Delete Files option to delete files from either the hard or floppy disk. A system status message shows the number of files deleted. Use of wildcards in specifying filenames is supported as described in the "Filename Conventions" section.
Delete a single file by specifying its filename. The following example specifies to delete the ICC download file from the hard disk:
Delete all system log files on the hard disk by specifying the following filename:
Complete the following steps to delete one or more files:
Step 1 Access the Disk Utilities Menu screen (refer to the "Accessing the Disk Utilities Menu Screen" section).
Step 2 Type C and press Enter.
The Delete Files screen appears. The cursor is located in the Delete What Files? field—the only field on the screen.
Step 3 Complete one of the following steps, which is dependent upon your configuration needs:
a. To delete a file from the hard drive (C:), proceed to Step 4.
b. To delete a file from a floppy disk (A:), insert the floppy disk into the drive and proceed to Step 4.
Step 4 Type the filename you need to delete and press Enter.
The screen is refreshed and displays a list of the files to be deleted. The "OK TO DELETE FILES <Y/N>?" message appears.
Step 5 Type Y and press Enter to delete the files indicated.
|
Note If you type N and press Enter, the display to returns to the Disk Utilities Menu screen and the operation is aborted. |
When deleting is complete, the "X Files Deleted" message appears, where X signifies the number of files that were deleted. The system automatically returns to the Disk Utilities Menu screen after several seconds.
Use the Rename Files option to change the name of a file. If the device is also changed as part of the rename operation, the source file is deleted.
|
Note Use of wildcards in specifying filenames is not supported for the Rename Files function. |
Complete the following steps to rename a file:
Step 1 Access the Disk Utilities Menu screen (refer to the "Accessing the Disk Utilities Menu Screen" section).
Step 2 Type D and press Enter.
The Rename Files screen appears. The Rename From? field and the Rename To? field are displayed on the screen. The cursor is located in the Rename From? field.
Step 3 Complete one of the following steps, which is dependent upon your configuration needs:
Step 4 Type the filename you want to rename, and press the Next Field key.
The cursor moves to the Rename To? field.
Step 5 Type the new filename and press Enter.
The "Renaming Files" message appears while the system renames the specified file. When the operation is complete, the "X Files Renamed" message appears, where X indicates the number of renamed files. The system automatically returns to the Disk Utilities Menu screen after several seconds.
Use the Database Store option to copy the system database from the hard disk to a floppy disk. This function allows you to make backup copies of the database to protect the system against accidental data loss.
When you access this function, the system automatically copies all files contained in the C:/DBASE directory to the A:/directory. Any files with the same filenames, as the database files that exist on the floppy disk, are overwritten.
Complete the following steps to back up the database from the hard disk (C:) to a floppy disk (A:):
Step 1 Access the Disk Utilities Menu screen (refer to the "Accessing the Disk Utilities Menu Screen" section).
Step 2 Type E and press Enter.
The Database Store screen appears. The cursor is located in the only field on the screen:
Step 3 Insert a formatted floppy disk into the A: drive.
Step 4 Type Y and press Enter.
The "Storing Data Base" message appears. As each database file is copied, its filename appears. When all database files are copied, the "Data Base Stored" message appears.
The system automatically returns to the Disk Utilities Menu screen after several seconds.
Use the Database Retrieve option to copy system database files from a floppy disk to the system hard disk. The database files in the C:/DBASE directory are overwritten during this process.
 |
Caution Make sure that the data to be copied from the floppy disk is the most current version available. Always verify that the replacement data on the hard disk will not destroy important changes and updates made to the database. |
|
Note To place new database tables into active system memory, you must reboot the system from the hard disk after retrieving the database from a floppy disk. This process disrupts in-progress calls and removes the system from operation for a period of several minutes. |
Complete the following steps to retrieve the database from a floppy disk (A:) and place copy them to the hard disk (C:):
Step 1 Access the Disk Utilities Menu screen (refer to the "Accessing the Disk Utilities Menu Screen" section).
Step 2 Type F and press Enter.
The Database Retrieve screen appears. The cursor is located in the only field on the screen:
Step 3 Insert the database backup floppy diskette into the drive.
Step 4 Type the Y and press Enter.
The "Retrieving Data Base" message appears. As each database file is copied, its filename appears. When all database files are copied, the "Data Base Retrieved" message appears. The system automatically returns to the Disk Utilities menu after several seconds.
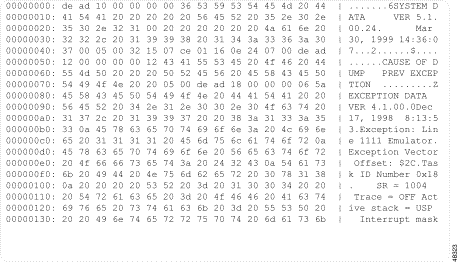
Use the Display File option to display the contents of a file as a raw hex and ASCII file. The exact filename must be specified.
|
Note The use of wildcard characters is not allowed with this option. |
The Display File screen is divided into three columns:
Address—The beginning address for the data displayed on that line. Addresses are expressed in hex.
Hex data—The hex values of the data contained in the file at the address indicated.
ASCII data—The ASCII values of the data contained in the file at the address indicated.
Twenty rows of data are displayed at a time. Use the Prev Screen and Next Screen keys to page through the data.
|
Note The Display File screen is generally used as a diagnostic tool under the direction of Cisco TAC. |
Complete the following steps to display the contents of a file:
Step 1 Access the Disk Utilities Menu screen (refer to the "Accessing the Disk Utilities Menu Screen" section).
Step 2 Type G and press Enter.
The Display File screen appears. The cursor is located in the Display What File? field—the only field that appears on the screen.
Step 3 Complete one of the following steps, which is dependent upon your configuration needs:
Step 4 Type the filename (including the device to be displayed) and press Enter.
The screen refreshes and displays the file data—similar to that shown in Figure 5-8.
Step 5 Use the Prev Screen and Next Screen keys to scroll through the file data.
Step 6 Press Enter to return to the Disk Utilities menu
Use the Show Free Space on Disk option to view the amount of free space on either the hard drive or a floppy disk. Free space is shown in the number of bytes available.
Complete the following steps to display the amount of free space:
Step 1 Access the Disk Utilities Menu screen (refer to the "Accessing the Disk Utilities Menu Screen" section).
Step 2 Type H and press Enter.
The Show Free Disk Space screen appears. The cursor is located in the Show Space On What Drive? field—the only field that appears on the screen.
Step 3 Complete one of the following steps, which is dependent upon your configuration needs:
Step 4 Type the device name (either C: or A:) and press Enter.
The "xxx Bytes Free on X:" message appears, where xxx signifies the number of bytes of free space available on the device X. The system automatically returns to the Disk Utilities Menu screen after several seconds.
Use Format Disk option to perform the following functions:
|
Caution Formatting a disk erases all data contained on it. Use of the Format Disk function is not recommended for the system hard disk; if formatting and initial software installation is required, use of the Software Installation Utilities is recommended. To protect information on floppy diskettes from accidental erasure, use the diskette's write protect tab. |
Complete the following steps to format a disk:
Step 1 Access the Disk Utilities Menu screen (refer to the "Accessing the Disk Utilities Menu Screen" section).
Step 2 Type I and press Enter.
The Format Disk screen appears (seeFigure 5-9).

The cursor is located in the Format What Drive? field.
Step 3 Type the device that corresponds to the disk you wish to format (C: or A:) and press the Next Field key.
The cursor moves to the Disk Volume Label field.
Step 4 Type the volume label for the disk being formatted (if a volume label is being used) and press the Next Field key.
The cursor moves to the Do Bad Sector Scan During Format <Y/N>? field.
Step 5 Type Y or N (Y is recommended) and press Enter.
The screen is refreshed and displays the disk to be formatted and the "OK TO FORMAT DISK <Y/N>?" message appears. The cursor is located in data entry field.
Step 6 Type Y and press Enter to format the indicated disk.
|
Note Typing any other character followed by Enter causes the display to return to the Disk Utilities Menu screen and abort the operation. |
The "Formatting Disk" message appears.
When formatting is complete, the "Device X: Formatted" message appears, where X indicates the formatted disk. The system automatically returns to the Disk Utilities Menu screen after several seconds.
Use the Create Directory option to create a directory on either the hard drive (C:) or a floppy disk (A:).
Complete the following steps to create a directory:
Step 1 Access the Disk Utilities Menu screen (refer to the "Accessing the Disk Utilities Menu Screen" section).
Step 2 Type J and press Enter.
The Create Directory screen appears. The cursor is located in the Create Which Directory? field—the only field on the screen.
Step 3 Complete one of the following steps, which is dependent upon your configuration needs:
Step 4 Press the Prev Menu key to see the directory listed.
The Disk Utilities Menu screen appears.
Step 5 Type A and press Enter.
The Disk Directory screen appears. The cursor is located in the What Directory? field.
Step 6 Depending on the drive in which you created the directory, type C:/ or A:/ and press Enter.
The new directory appears in the directory listing.
Step 7 To return to the Disk Utilities menu, press Enter or press the Prev Menu key twice.
Use the Delete Directory option to delete a directory from either the hard drive (C:) or a floppy disk (A:).
Complete the following steps to delete a directory:
Step 1 Access the Disk Utilities Menu screen (refer to the "Accessing the Disk Utilities Menu Screen" section).
Step 2 Type K and press Enter.
The Delete Directory screen appears. The cursor is located in the Delete Which Directory? field—the only field on the screen.
Step 3 Complete one of the following steps, which is dependent upon your configuration needs:
Step 4 Press the Prev Menu key to verify that the directory was deleted.
The Disk Utilities Menu screen appears.
Step 5 Type A and press Enter.
Step 6 The Disk Directory screen appears. The cursor is located in the What Directory? field.
Step 7 Depending on the drive in which you deleted the directory, type C:/ or A:/ and press Enter.
Step 8 Verify that the directory was deleted from the directory listing by reading the display.
Step 9 To return to the Disk Utilities menu, press Enter or press the Prev Menu key twice.
Use the Rename Directory option to rename a directory on the hard drive (C:).
Complete the following steps to rename a directory on the hard drive:
Step 1 Access the Disk Utilities Menu screen (refer to the "Accessing the Disk Utilities Menu Screen" section).
Step 2 Type L and press Enter.
The Rename Directory screen appears (see Figure 5-10). The cursor is located in the Rename From? field.

Step 3 Type C:/<original directory name>, where <original directory name> is the current name of the directory.
Step 4 Press the Next Field key.
The cursor moves to the Rename To? field.
Step 5 Type a new directory name: C:/<new directory name>, where <new directory name> is the directory's new name).
Step 6 Press Enter.
The directory has a new name.
Use the Compress File option to decrease the size of a file without losing information. You may want to compress a file to facilitate a file transfer, or to copy a file to another device. Consider the following when decreasing the size of a file:
Complete the following steps to decrease the size of a file:
Step 1 Access the Disk Utilities Menu screen (refer to the "Accessing the Disk Utilities Menu Screen" section).
Step 2 Type M and press Enter.
The Compress File screen appears. The cursor is located in the Compress What File? field—the only field displayed on the screen.
Step 3 Enter the drive and name of the file to be compressed on the blank line. For example, C:core1.
Step 4 Press Enter.
The size of the file has been decreased.
Use the Uncompress File option to expand a compressed file to its original size and content. Refer to the previous section, "Compress File" section for information on compressing files. Consider the following when uncompressing files:
Complete the following steps to uncompress a file:
Step 1 Access the Disk Utilities Menu screen (refer to the "Accessing the Disk Utilities Menu Screen" section).
Step 2 Type N and press Enter.
The cursor is located at the Uncompress What File? field—the only field displayed on the screen.
Step 3 Enter the drive and filename of the file to be uncompressed. For example, C:core1.
|
Note You can enter the filename with or without the .Z extension. If you enter the filename without an extension, the software assumes the .Z extension. |
Step 4 Press Enter.
The file is uncompressed.
Use the Split File option to split a large file into a series of smaller files. This may be required if you need to copy a large file on to a floppy disk.
All files accessible to the VCO switch can be split into a series of smaller files. The algorithm used requires an output filename and the number of bytes for each segmented file. The split function then produces the required number of file parts, each a segment of the original file. The sum of the files produced from the split comprises the total size of the original file.
Consider the following when splitting files:
Complete the following steps to split a large file into a series of smaller files:
Step 1 Access the Disk Utilities Menu screen (refer to the "Accessing the Disk Utilities Menu Screen" section).
Step 2 Type O and press Enter.
The Split File screeen appears (see Figure 5-11).

The cursor is located at the Split What File? field.
Step 3 Type the drive (C:/ or A:/) and filename of the file to be split.
Step 4 Press the Next Field key to move the cursor to the Split File Size field.
Step 5 Type the size (number of bytes) of each split file segment.
Step 6 Press Enter.
The file has been split into several smaller files.
An example of a split file is described as follows:
The resulting file segments are each 1,440,000 bytes. The total of the file segments in bytes equals the original file size. The last file segment may be less than the indicated size, depending on the size of the original file.
The output of the Split File operation results in a series of files with the designated output filename and an extension, as shown below.
The file extensions increase in alphabetic order as necessary to accommodate the full contents of the original file. For example, if the original core1 file to be split is 8.4 MB, the following split filenames and sizes would result:
The total of all split files, core.xaa through core.xaf, is 8,400,000 bytes (or 8.4 MB) which is the size of the original core file.
Use the Join Files option to reassemble split files back into the original file. Refer to the "Split File" section for information on splitting files. Joining files requires you to understand the concepts of source and destination files. Refer to the "Joining FilesSource and Destination Files" section.
The source files (the files associated with the Join From? field) are the files that will comprise the new file. The source files are the file segments that resulted from the split file operation.
You can specify the source file by filename with no extension. If the filename is designated without an extension, all files with that filename are joined. The files are joined as if the extension was designated with the multicharacter (*) wildcard. The order is based on the alpha character ordering of the file's extension.
The join operation supports alphabetic ordered wildcard symbols. You can specify the source file with the single-character wildcard—the question mark (?), or the multi-character wildcard—the asterisk (*). The join operation automatically appends the split files in alphabetic order to the destination file.
You may also initiate the join operation for each individual split file by indicating the specific filename with the full extension. Note however, that if this method is used, you must specify the files in the correct order by file extension (alphabetic order) to accurately reproduce the original file.
The destination file (the file associated with the Join To? field) is the file which is to be the composite of all the split files. After joining all file segments, the destination file is identical to the original file before the split process occurred.
|
Note If the destination filename already exists, the source files are appended to it. |
Complete the following steps to join split files:
Step 1 Access the Disk Utilities Menu screen (refer to the "Accessing the Disk Utilities Menu Screen" section).
Step 2 Type P and press Enter.
The Join Files screen appears (see Figure 5-12).

The cursor is located in the Join From? field.
Step 3 Enter the drive and filename of the source file. Consider the following when entering data into this field:
|
Note Enter the complete source file path name and filename, with extension, in the Join
From? field. Only one filename can be specified in the Join From? field. However, wildcard characters can be used to join several files. Refer to the next section, Source Files for information on the use of wildcard characters. |
Step 4 Press the Next Field key to move the cursor to the Join To? field.
Step 5 Enter the desired name of the destination file—the file which is to contain all source file(s).
Step 6 Press Enter.
The files are joined.
Use the Tone Files Installation/Removal option to install and remove tone plans associated with the multiple tone plan feature. The multiple tone plan feature enables you to install and administratively configure several tone plans in a single VCO/4K switch. You may also select and configure tone plans from several extended mode host application commands and from inpulse/outpulse rule configuration. Refer to the Cisco VCO/4K Extended Programming Reference for information on selecting and configuring tone plans with extended mode commands. Contact Cisco TAC for a list of available tone plans.
Complete the following steps to access the Tone Files Installation/Removal screen:
Step 1 Access the Disk Utilities Menu screen (refer to the "Accessing the Disk Utilities Menu Screen" section).
Step 2 Type Q and press Enter.
The Reading Next Format message is displayed briefly at the lower right of the Disk Utilities Menu screen and the Tone Files Installation/Removal screen appears (see Figure 5-13).

The Tone Files Installation/Removal screen fields are arranged in eight columns and twelve rows in the center of the screen and a single field at the bottom of the screen. The eight columns form four pairs; each pair consists of a Loc column and a Tone Plan column. Each Loc field is associated with the Tone Plan field directly to its right. The Tone Files Installation/Removal screen fields are described below.
Loc—Display only. Describes the location of the installed tone plan listed in the associated Tone Plan field. Locations are defined as follows:
Tone Plan—Display only. Contains the name of the installed tone plan listed in the associated Loc field.
Install or Remove Tone Files (I/R)—Data entry via main keyboard. Allows you to install or remove a tone plan. Valid options are as follows:
Complete the following steps to install multiple tone plans with the VCO/4K system software Disk Utilities administration screens:
Step 1 Insert a tone plan diskette into the VCO/4K system active side.
Step 2 Access the Tone Files Installation/Removal screen (refer to the "Accessing the Tone Files Installation/Removal Screen" section.
The Tone Files Installation/Removal screen is displayed (see Figure 5-13). The cursor is located in the Install or Remove (I/R) field.
Step 3 Type I and press Enter.
The "Enter Path of Tone Files To Install" message appears.
|
Note If you type an invalid character, the "Invalid Operation Specified" message appears and the screen is refreshed. Repeat Step 3. |
Step 4 Type A:/ and press Enter.
The tone plan files are copied from the diskette to the VCO/4K system C:/TONE directory. The cursor moves to the Install or Remove Tone Files (I/R) field and the following message appears at the bottom right of the Tone Files Installation/Removal screen:
Tone Files for CHINA3 Are Installed
|
Note If you type an invalid path name, the "Tone Files Not Found" message appears and the screen is refreshed. Repeat Step 3. |
The tone plan copied in Step 4 is installed in a subdirectory of the VCO/4K system C:/TONE directory and assigned a fixed number between 001 and 047.
Step 5 Repeat Step 3 and Step 4 to install the tone plans needed to meet your configuration requirements.
Step 6 If you have a nonredundant system or if all required tone plans have been installed to meet your configuration requirements, the multiple tone plan installation procedure is complete. If you have a redundant system, log in to the standby side and proceed to Step 7. Refer to the Cisco VCO/4K Administrator's Guide for instructions on changing the active side.
Step 7 Repeat Step 1 through Step 6 on the standby side.
The multiple tone plans are installed.
You may also install multiple tone plan via file transfer protocol (FTP). Complete the following steps to install multiple tone plan files via FTP:
Step 1 Access the Disk Utilities Menu screen (refer to the "Accessing the Disk Utilities Menu Screen" section).
Step 2 Type J and press Enter to access the Create Directory screen.
The Create Directory screen is displayed. The cursor is located at the beginning of the blank line.
Step 3 Type C:/TEMP and press Enter to create a temporary directory on the VCO/4K hard drive.
The TEMP directory is created on the active side of the VCO/4K system.
Step 4 Start an FTP client.
Step 5 Type mkdir temp and press Enter to create a temporary directory within the FTP client.
Step 6 Type cd temp and press Enter to access the newly created directory within the FTP client.
Step 7 Type bin and press Enter to set the FTP client to binary mode.
Step 8 Type mput *.* and press Enter to transfer the tone plan files to the VCO/4K C:/TEMP directory created in Step 3.
Step 9 Close the FPT client.
Step 10 From the Administrator Main Menu screen, type C and press Enter.
The Maintenance Menu screen is displayed.
Step 11 Type B and press Enter.
The Disk Utilities Menu screen is displayed. The cursor is located at the Enter Selection prompt.
Step 12 Type Q and press Enter.
The Reading Next Format message appears briefly at the lower right of the Disk Utilities Menu screen and the new Tone Files Installation/Removal screen is displayed (see Figure 5-13).
|
Note Default tone plans are preinstalled on VCO/4K systems. Figure 5-13 lists North America as the preinstalled default tone plan at location 000 (the C:/BOOT directory). Your default tone plan may be different. |
The cursor is located in the Install or Remove Tone Files (I/R) field.
Step 13 Type I and press Enter.
The "Enter Path of Tone Files To Install" message appears.
|
Note If you type an invalid character, the "Invalid Operation Specified" message appears and the screen is refreshed. Repeat Step 13. |
Step 14 Type C:/TEMP and press Enter.
The tone plan files are copied from the VCO/4K system C:/TEMP directory to the C:/TONE directory. The cursor moves to the Install or Remove Tone Files (I/R) field, and messages similar to the following appear at the bottom right of the Tone Files Installation/Removal screen:
Tone Files for CHINA3 Are Installed.
|
Note If you type an invalid path name, the "Tone Files Not Found" message appears and the screen is refreshed. Repeat Step 14. |
Step 15 Repeat Step 1 through Step 14 on the standby side.
The multiple tone plans are installed.
Complete the following steps to remove a tone plan associated with the multiple tone plans feature:
Step 1 Access the Disk Utilities Menu screen (refer to the "Accessing the Disk Utilities Menu Screen" section).
Step 2 Type Q and press Enter.
The Tone Files Installation/Removal screen is displayed. The cursor is located in the Install or Remove Tone Files (I/R) field.
Step 3 Type R and press Enter.
The "Enter LOC# of Tone Files to Remove" message appears.
|
Note If you type an invalid character, the "Invalid Operation Specified" message appears and the screen is refreshed. Repeat Step 3. |
Step 4 Type the Loc field number of tone plan you want to remove from the VCO/4K configuration.
Step 5 Press Enter.
The "Tone Files For xxx Is Removed" message appears, where xxx represents the tone plan Loc number.
|
Note If you type an invalid Loc number, the "Tone Files Not Found!" message appears. Repeat Step 3 through Step 5. |
Step 6 Repeat Step 3 through Step 5 for all other tone plans you want to remove from the VCO/4K configuration.
The removal of multiple tone plan associated tone plans is complete.
Use the Print/Display System Log File function to view or obtain a hard copy of the system event and error log. This log may contain status and error messages generated by the system. Specify, by date, the portion of the log you want to print or display.
In a redundant system, the system keeps log files for both the active and standby controller. You can specify either log for printing or viewing. Refer to "System Log Files" section the for an overview of the system log. System status and error messages are listed in Cisco VCO/4K System Messages.
Log files are stored according to month and date. Up to 31 log files can be stored on the system's hard disk. If you use the Ethernet communications option, log files can be stored on a remote disk drive with the Ethernet Network File System (NFS) facility. Specify the device on which the log files are stored via the File System Configuration screen; refer to "System Configuration," for more information. The Ethernet communications option is discussed in the Cisco VCO/4K Ethernet Guide.
|
Caution The system may delete log files in an attempt to free up hard disk space. Refer to the "Available Disk Space Monitored on Switch Hard Drive" section for detailed information. |
Complete the following steps to access the Select System Log File screen:
Step 1 Access the Maintenance Menu screen (refer to the "Accessing the Maintenance Menu Screen" section).
Type C and press Enter.
The Select System Log File screen appears (see Figure 5-14). The cursor is located in the OPERATION field.

The System Log File screen consists of one screen. Use the Print Screen key to obtain a hard copy of this screen.
Complete the following steps to print a system log:
Step 1 Access the Select System Log File screen (refer to the "Accessing the Select System Log File Screen." section).
Step 2 Use the Select key to scroll through the values until the Print selection is displayed.
Step 3 Press the Next Field key.
Step 4 Use the Select key to scroll through the values until the month for which you want to print the log file is displayed.
Step 5 Press the Next Field key.
Step 6 Type the date for which you want to print the log file.
Step 7 Complete one of the following steps, which is dependent upon your system's configuration:
Step 8 Press Enter.
The "Printing Log File For..." message appears.
|
Note To abort printing, press the Stop Print key. |
Step 9 Press the Exit key to return to the Maintenance Menu screen.
Complete the following steps to display a system log file:
Step 1 Access the Select System Log File screen (refer to the "Accessing the Select System Log File Screen." section).
Step 2 Use the Select key to scroll through the values until the Display selection is displayed.
Step 3 Press the Next Field key.
Step 4 Use the Select key to scroll through the values until the month for which you want to display the log file is displayed.
Step 5 Press the Next Field key.
Step 6 Type the date for which you want to display the log file.
Step 7 Complete one of the following steps, which is dependent upon your system's configuration:
Step 8 Press Enter.
The log file appears.
Step 9 Use the Prev Screen and Next Screen keys to page through the listings. If you press the Prev Screen key at the first screen, the screen displays the message listings at the end of the log file.
Step 10 Press Prev Menu twice to return to the Maintenance Menu screen.
Use the Print/Display System Trace File function to view or obtain a hard copy of the system trace file. This file contains all messages that were sent across the host communication interfaces for which tracing was enabled. In systems equipped with the TeleRouter software overlay, messages generated by that software are also printed if enabled for the internal interface. Tracing is enabled from the Host Configuration screens; refer to "System Configuration," for more information. You can specify the portion of the file to print or display by date.
Trace files are time-stamped and stored sequentially according to month and date. Up to 31 trace files can be stored on the system's hard disk. When the Ethernet communications option is used, trace files can be stored on a remote disk drive by using the Ethernet Network File System (NFS) facility. Specify the device on which the trace files are stored via the File System Configuration screen; refer to "System Configuration," for more information. The Ethernet communications option is discussed in the Cisco VCO/4K Ethernet Guide.
|
Note The system opens a trace file when tracing is enabled and closes the file when tracing is disabled. If tracing is left in enable mode over a period of days, all of the data in the file is date stamped using the date from the day when the file was first opened. |
|
Caution The system may delete trace files in an attempt to free up hard disk space. Refer to the "Available Disk Space Monitored on Switch Hard Drive" section for detailed information. |
Complete the following steps to access the Select System Trace File screen:
Step 1 Access the Maintenance Menu screen (refer to the "Accessing the Maintenance Menu Screen" section).
Type D and press Enter.
The Select System Trace File screen appears (see Figure 5-15). The cursor is located in the OPERATION field.

The Select System Trace File screen consists of one screen. Use the Print Screen key to obtain a hard copy of this screen.
Complete the following steps to print a system trace file:
Step 1 Access the Select System Trace File screen (refer to the "Accessing the Select System Trace File Screen" section).
Step 2 Use the Select key to scroll through the values until the Print selection is displayed.
Step 3 Press the Next Field key.
Step 4 Use the Select key to scroll through the values until the month for which you want to print the trace file is shown.
Step 5 Press the Next Field key.
Step 6 Type the date for which you want to print the trace file.
Step 7 Press Enter.
The "Printing Trace File For..." message appears.
|
Note To abort printing, press the Stop Print key. |
Step 8 Press the Exit key or press the Prev Menu key twice to return to the Maintenance Menu screen.
Complete the following steps to display a system trace file:
Step 1 Access the Select System Trace File screen (refer to the "Accessing the Select System Trace File Screen" section).
Step 2 Use the Select key to scroll through the values until the Display selection is shown.
Step 3 Press the Next Field key.
Step 4 Use the Select key to scroll through the values until the month for which you want to display the trace file is shown.
Step 5 Press the Next Field key.
Step 6 Type the date for which you want to display the trace file.
Step 7 Press Enter.
The trace file appears.
Step 8 Use the Prev Screen and Next Screen keys to page through the listings. Press the Prev Screen key at the first screen displays to display the message listings at the end of the trace file.
Step 9 Press the Prev Menu key once or the Exit key twice to return to the Maintenance Menu screen.
The Switch ACT System to SBY option applies to redundant system configurations only. It allows you to switch control from the current active side to the standby side. In order for this function to have any effect on system operation the following conditions must be met:
You can switch control with this function or the Change Active Controllers ($C0 01) command; refer to Cisco VCO/4K Standard Programming Reference and Cisco VCO/4K Extended Programming Reference for more information. When this function is used, switchover does not occur until the standby side controller is booted and has successfully completed file synchronization with the active side controller.
Complete the following steps to switch an active system to standby from the master console:
Step 1 Access the Maintenance Menu screen (refer to the "Accessing the Maintenance Menu Screen" section).
Step 2 Type E and press Enter.
The "ENTER to Confirm Switchover" message appears.
Step 3 Press Enter.
The "System Switch Initiated" message appears.
No other on-screen indication of switchover is provided. Log file messages to the system printers show the progress of the switchover. Figure 5-16 and Figure 5-17 show sample log files for a switchover from the A side to the B side.


Use the Master Timing Link Selection option to select the system T1 or PRI timing source. Timing can be derived from system internal clocking or from an incoming T1 or PRI bit stream. If, when incoming timing is used, the incoming reference is lost, the system automatically tries to resynchronize using the internal clock. Synchronization is discussed further in "T1/PRI Synchronization to Master Timing Link."
You can change T1 synchronization from the Master Timing Link Selection screen or by using the T1 Synchronization Control ($C0 02) command; refer to the Cisco VCO/4K Standard Programming Reference and the Cisco VCO/4K Extended Programming Reference for more information. Both methods allow you to do the following:
If you select incoming synchronization from the Master Timing Link Selection screen, you must enter the primary and secondary link values. The link values correspond to the hardware address of the digital trunk card to be used as the timing reference. (If you use the host command, specify a port address residing on that card.) The system verifies that the card specified is on-line, a digital trunk card, and that the primary and secondary values are not the same card. If these conditions are met, the database is updated on both the active and standby sides before the system attempts to synchronize to the new values. Refer to "T1/PRI Synchronization to Master Timing Link," for a flowchart detailing the synchronization process.
Complete the following steps to access the Master Timing Link Selection screen:
Step 1 Access the Maintenance Menu screen (refer to the "Accessing the Maintenance Menu Screen" section).
Step 2 Type F and press Enter.
The Master Timing Link Selection screen appears (see Figure 5-18). The cursor is located in the Change Timing Source To field.

Master Timing Link Selection consists of one screen. Use the Print Screen key to obtain a hard copy of this screen.
The Master Timing Link Selection screen contains the following fields:
Current Timing Source—Display only. Shows the source of the reference signal currently used for T1 synchronization. Valid values are:
Change Timing Source To—Data entry via Select key. Specifies the source to use as the reference signal for synchronization. Valid values and the additional data required, if necessary, are:
Primary R,L,S—Data entry via main keypad. This field is displayed only if Incoming timing is specified. Specifies the Rack-Level-Slot/Group/Span hardware address (physical location) of the card from which clocking should be derived. The hardware address must correspond to an on-line digital trunk card. For Four Span T1/E1, MVDC T1, and ICC T1/E1 cards, you must specify the span as well as the slot or the "Interface Required" message appears.
Secondary R,L,S—Data entry via main keypad. This field is displayed only if Incoming timing is specified. Specifies the Rack-Level-Slot/Group/Span hardware address (physical location) of the card from which clocking is derived if the primary signal is lost. The hardware address must correspond to an on-line digital trunk card other than that specified as the primary link value.
|
Note Cisco Systems recommends that you do not select two spans from the same programmable trunk card as Primary and Secondary links. |
Complete the following steps to change the master timing link:
|
Note To exit the Master Timing Link Selection screen without making any changes, press the Exit, Prev Menu, or Main Menu key before you press Enter the first time (Step 3 and Step 4). To abort the operation after pressing Enter the first time, press any key; the screen reverts to the original values and remains displayed. No changes are made to the database unless you press Enter twice. |
Step 1 Access the Master Timing Link Selection screen (refer to the "Accessing the Master Timing Link Selection Screen" section).
Step 2 Use the Select and Reverse Select keys to scroll through the values until the correct timing source is shown.
Step 3 Complete one of the following options, which depends upon your selection in Step 2.
Step 4 Type the physical location of the digital trunk card, or press the Next Field key to leave the primary value unchanged:
a. Type the Rack/Cabinet number and press the Next Field key.
b. Type the Level number and press the Next Field key.
c. Type the Slot/Group/Span number and press the Next Field key.
Step 5 Type the physical location of the digital trunk card if a secondary value is to be specified, or press Enter if there is no secondary value:
a. Type the Rack/Cabinet number and press the Next Field key.
a. Type the Level number and press the Next Field key.
a. Type the Slot/Group/Span number and press the Next Field key.
Step 6 Press Enter.
The "Press ENTER to Change Master Timing Link" message appears.
Step 7 Press Enter.
The system verifies the link values, if any. When verification is complete, the database is automatically updated and the timing change is made.
Step 8 Press the Exit key to return to the Maintenance Menu screen.
Use the Card Alarm Display option to view a listing of the current alarm conditions for all network interface and internal service circuit cards, or a specific card. Alarm conditions shown on this display result in system alarms; the appropriate alarm messages are output to the system printer and the log file.
Alarm conditions are automatically set and cleared at system reboot. These alarm conditions generate messages to the host in the form of Alarm Condition ($F0) reports. You can disable the generation of this report at system initialization from the System Feature Configuration screen. More information about alarm messages is contained in Cisco VCO/4K System Messages.
Complete the following steps to access the Card Alarm Display screen:
Step 1 Access the Maintenance Menu screen (refer to the "Accessing the Maintenance Menu Screen" section).
Step 2 Type G and press Enter.
The Card Alarm Display screen appears (see Figure 5-19). The cursor is located in the CARD TO DISPLAY field. Up to 30 current alarm conditions are listed in the RLS field.

The Card Alarm Display screen can consist of one or more screens. Each screen lists 30 messages, ordered according to hardware address. The number of screens depends on the number of alarm conditions currently in force. Use the Prev Screen and Next Screen to page through the listings. Use the Print Screen key to obtain a hard copy of any of these screens. This screen does not get updated automatically. To update the display to show the most recent alarms, press the Redraw key.
The Card Alarm Display screen consists of the following fields:
CARD TO DISPLAY—Data entry via main keyboard. Type in the Rack-Level-Slot/Group/ Span of the card you want to display.
R L S—Display only. Shows the Rack-Level-Slot/Group/Span hardware address (physical location) of the card for which an alarm exists.
ALARM STATE—Display only. Shows the alarm condition that exists for the card at the corresponding hardware address. MA indicates a major alarm, MI indicates a minor alarm. Valid values and their meanings are:
Complete the following steps to locate and display alarm messages for a specific card:
Step 1 Access the Card Alarm Display screen (refer to the "Accessing the Card Alarm Display Screen" section).
Step 2 Type the physical location in the CARD TO DISPLAY field.
Step 3 Type the Rack/Cabinet number and press the Next Field key.
Step 4 Type the Level number and press the Next Field key.
Step 5 Type the Slot number and press the Next Field key.
Step 6 Press the Exit key to return to the Maintenance Menu screen.
System alarms fall into seven categories: Fatal, Critical, Major, Minor, Aux 1, Aux 2, and Non-Alarmed Events. The specific alarm is identified by ALM messages. These same messages are output to the system printer and log file. A count of occurrences for each alarm is maintained on this screen. This counter is reset at system initialization.
Complete the following steps to access the System Alarms Display screen:
Step 1 Access the Maintenance Menu screen (refer to the "Accessing the Maintenance Menu Screen" section).
Step 2 Type H and press Enter.
The System Alarms Display screen appears (see Figure 5-20). The cursor is located in the Alarm Severity field. All current alarm conditions, if present, are listed.

The System Alarm Display can consist of multiple screens. Each screen lists up to 14 messages. Use the Print Screen key to obtain a hard copy of this screen. This screen does not get updated automatically. Use the Redraw key to update the display to show the most recent alarms.
The System Alarms Display screen contains the following fields:
Alarm Severity—Data entry via Select key. Specifies the type of system alarms to display. Valid values and their meaning are
Audible Cutoff (Y,N)—Optional. Data entry via main keypad. Specifies whether to disable the AAC alarm contact to stop any external CO alarms tied to the switch.
Alarm Descriptions—Display only. Shows the alarm conditions present for the system. Possible values and their meaning are listed in Cisco VCO/4K System Messages.
Occurrences—Display only. Shows the number of times this error has occurred.
Complete the following steps to display current system alarm conditions:
Step 1 Access the System Alarms Display screen (refer to the "Accessing the System Alarms Display Screen" section).
Step 2 Use the Select and Reverse Select keys to scroll through the values until the correct alarm severity is shown.
Step 3 Press Enter.
The display is updated to show all alarms and occurrences for the severity level chosen.
Step 4 Press Exit to return to the Maintenance Menu screen.
To exit the System Alarms Display screen, press the Exit, Prev Menu, or Main Menu screen.
Complete the following steps to disable the external alarm contacts on the AAC:
Step 1 Access the System Alarms Display screen (refer to the "Accessing the System Alarms Display Screen" section).
Step 2 Press the Next Field key.
The cursor moves to the Audible Cutoff (Y/N) field.
Step 3 Type Y and press Enter.
The "Press ENTER to Clear Alarms" message appears.
Step 4 Type Y and press Enter.
The "Alarms Cleared by System Administrator" message appears. The alarm contact on the AAC is opened, turning the external alarm off.
|
Note Alarm LEDs on the AAC are disabled when the Audible Cutoff option is chosen. Refer to the Cisco VCO/4K Technical Descriptions for more information. |
Step 5 Press the Exit key to return to the Maintenance Menu screen.
To exit the System Alarms Display screen, press the Exit, Prev Menu, or Main Menu key.
Use the Shutdown System option to reset the system controller from the master console. When you select this option, the system closes all open system files, terminates host communication, and resets the system controller.
In a nonredundant system, selecting this option tears down all calls being carried by the system. If the system is redundant, control is passed to the standby system controller and all stable calls are maintained. Calls that have not reached a stable state are torn down.
Complete the following steps to shut down the system and reset the system controller:
Step 1 Access the Maintenance Menu screen (refer to the "Accessing the Maintenance Menu Screen" section).
Step 2 Type I and press Enter.
The Shutdown System screen with the "ENTER To Confirm Shutdown" message appears.
Step 3 Press Enter.
The following messages appear:
All host links are disabled and the system controller is rebooted. The Maintenance Menu screen and the "PRM024: File System Closed Successfully" message are displayed until system initialization begins.
Use the Voice Prompt Maintenance option to display the Prompt Library Maintenance screen which allows you to access multiple prompt libraries. The fields within the upper portion of the screen allow you to define a logical name for a library, assign a default directory to a library, and display the total prompt usage for a library.
The main area of the screen displays up to ten prompt entries in a library. The prompt ID, filename, version, description, encoding method (A-law, Mu-law), and duration (in seconds), are displayed for each prompt.
The lower portion of the screen allows you to add, delete, update, and test prompts, edit prompt attributes, and update the IPRC supporting a library. Procedures for each of these options are described in this section.
The prompt library configuration information (library name and directory) are maintained automatically on both sides of a redundant controller. You must add the prompt files separately to both sides of a redundant system; the disk utilities do not provide a means for copying files from one controller to another.
Refer to the Cisco VCO/4K IPRC User's Supplement for procedures pertaining to this screen.
Complete the following steps to access the Prompt Library Maintenance screen:
Step 1 Access the Maintenance Menu screen (refer to the "Accessing the Maintenance Menu Screen" section).
Step 2 Type J and press Enter.
The Prompt Library Maintenance screen appears (see Figure 5-21).

The Prompt Library Maintenance screen contains the following fields:
LIBRARY—Data entry via administration keypad. Type a valid entry, from 1 to 16, to specify the library number to display.
NAME—Data entry via main keypad. Assign a logical name to the prompt library. This field accepts up to ten alphanumeric characters for the library name.
TOTAL USAGE (mins.)—Display only. Shows the total minute usage of all prompts in the library.
DIRECTORY—Data entry via main keypad. Assign a default device and directory for the prompt library. This field accepts up to 31 characters for the directory specification. The directory specification must include a device identifier (C: or F:) and a directory path (/boot/voice0).
ID—Display only. Shows the prompt ID assigned to this prompt file. Valid prompt IDs are 1 to 255.
FILENAME—Display only. Shows the filename for this prompt file entry.
VERSION—Display only. Shows the version of this prompt entry. The version is extracted from the prompt file.
DESCRIPTION—Display only. Shows the prompt file description for this prompt entry. The description is extracted from the prompt file.
LAW—Display only. Shows the encoding method (A-law or Mu-law) for the prompt file entry. The law is extracted from the prompt file. This field is an information only field; it does not examine the prompt data to determine the encoding method.
DURATION—Display only. Displays the duration, in seconds, for the prompt entry. The duration is calculated according to the length of the prompt file data.
COMMAND—Data entry via Select key. Specify a prompt maintenance action. When you press the Select key, the following options cycle through this field:
The Core Dump option results in the automatic storage of detailed information following a system failure, or at your request (see Figure 5-22).
The information in the core file contains data sets with information regarding the reason(s) the file is being created and why the system failed. The core file contains the following information:
The system automatically creates a core file when there is an exception, a watchdog timeout, or at your request.
Note the following considerations with automatically created core files:
Complete the following steps to initiate a core dump:
Step 1 Access the Maintenance Menu screen ("Accessing the Maintenance Menu Screen" section).
Step 2 Type K and press Enter.
The Core Dump options does not present you with a new screen. The Maintenance Menu screen remains displayed, and the "SHUTDOWN following Core Dump (Y/N)?" message appears at the bottom right of the screen (see Figure 5-22).

Step 3 Complete one of the following options, which is dependent upon your needs:
|
Note If you press Enter and do not indicate a SHUTDOWN option, the system remains in operation after a core dump. |
The core file is generated after you press Enter in response to the "SHUTDOWN following Core Dump (Y/N)?" message.
The system automatically writes the core file to the C:/ directory. When a system is initialized, it checks to make certain there is enough disk space for the largest core file. If there is not enough space, a message is issued indicating a problem. Refer to Cisco VCO/4K System Messages for a description of messages related to the core dump feature.
When a core file is generated, the file is named core1. Note that core1 is the current core file. If an older core file already exists in the directory, the existing (older) file's name is increased by one and is saved with the new filename. For example, if a core1 file exists, the file is renamed to core2 and the new core file is named core1. If there is a core1 and a core2 file on the system, the core1 file is renamed core2, and the core2 file is renamed core3. The new core file is named core1. The system maintains up to four core files.
You may be asked to send a core dump file to Cisco for analysis. Use one of the following methods that to copy the file from the VCO/4K. A Cisco TAC representative can assist you with copying and sending the file to Cisco.
1. Use FTP, the Remote File Transfer feature, on your VCO/SDS system and transfer the file to a workstation. Refer to the "FTP Password Configuration" section for information on FTP.
2. Split the core dump (core1) file and copy the resulting file segments on to floppy disks, and mail them to Cisco Systems. Refer to the "Split File" section for more information on splitting files.
3. If you have the Ethernet option and NFS, mount the F: drive (the network drive) and move the file to the F: drive. After the file is on the network drive, use one of the following methods to send the file to Cisco:
Use the Live Upgrade Control option to update software on a redundant system without loss of calls, and with a minimum reduction in capacity. The process consists of converting the system controller to a new release, then switching over the port and service cards that need to be upgraded.
Refer to the Cisco VCO/4K Software Installation Guide for detailed information regarding the Live Upgrade procedure.
![]()
![]()
![]()
![]()
![]()
![]()
![]()
![]()
Posted: Sat Sep 28 15:11:18 PDT 2002
All contents are Copyright © 1992--2002 Cisco Systems, Inc. All rights reserved.
Important Notices and Privacy Statement.