|
|

Use the System Configuration menu option to specify the system's interaction with peripheral equipment, storage devices, and host computers.
Use the System Configuration Menu screen, to perform the following tasks:
Figure 4-1 shows the options accessible from the System Configuration menu.

Complete the following steps to access the System Configuration Menu screen.
Step 1 Access the Administrator Main Menu screen.
Step 2 Type B and press Enter.
The System Configuration Menu screen appears (see Figure 4-2). The cursor is located in the Enter Selection field.
Step 3 Type the letter that precedes the option you want and press Enter.

The remainder of this chapter describes each function within the System Configuration menu option.
Use Peripheral Configuration to define operating parameters for system peripheral equipment. System peripherals include local master console, remote master console connected to the system by a modem, and system printers.
You can perform system administration tasks through one of three interface types:
Master consoles are connected to your system with EIA/TIA-232 cables. These cables attach to the Serial Port 1/Console port on the front panel of the CPU-TM card.
Use the Peripheral Configuration screen to define the keyboard type, baud rate, stop bits, bits per character, and parity protocols for communication between the local console and the system.
You can perform remote system administration via a remote maintenance modem. The modem connects to your system with EIA/TIA-232 cables. These cables attach to the Serial Port 2/TTY01 port on the front panel of the CPU-TM card. The communication parameters for remote consoles are the same as for local consoles. You must match the setup parameters for remote consoles to the communication parameters you define from the Peripheral Configuration screen.
 |
Note The system acknowledges a remote login attempt when it detects a CONNECT message (in ASCII) followed by a carriage return (CR) or line feed (LF) over the TTY01/Modem port. These connect signals are automatically generated by the 9600 etc/e modem recommended and supplied by Cisco Systems. |
You can perform system administration functions over a Telnet connection with the Telnet TTY option. An RJ-45 connector from a network source connects to a transceiver unit. This unit, in turn, attaches to the Ethernet port located on the front panel of the CPU-TM card. Refer to the Cisco VCO/4K Ethernet Guide for detailed information regarding Telnet operation requirements.
The default keyboard type for the local console and remote TTY01/modem settings is a VT220/320 terminal. Additional keyboard configurations are also supported for local/ remote master consoles. The keyboard type setting determines how the system interprets the application keypad and function keys for data input from the terminal. Refer to "Administration Keyboard Types," for an explanation of how the application and function keys are mapped for each keyboard type.
|
Note VT220/320 terminals use a series of command menus (outside of system administration) that prompt you for console setup parameters. These setup parameters must match the protocols defined for the console from the Peripheral Configuration screen for successful communication. Instructions for configuring VT220/320 terminals are contained in the Cisco VCO/4K Hardware Installation Guide. For other types of consoles, refer to the OEM instructions supplied with the master console for navigating through setup menus. Default peripheral settings in the system database are described in "Peripheral Configuration Screen Field Definitions" section. |
VCO/4K system software provides XON/XOFF support for both local and remote consoles; this option is configured only at the console level and cannot be modified through system administration.
Only parallel printers are supported by systems. Select the end-of-line terminator(s) (CR, LF, or both) to match the setting required for specific parallel printers. Refer to the Cisco VCO/4K Technical Descriptions for descriptions of CPU serial/parallel port locations and usage.
In redundant systems the peripheral configuration information is not transferred over the update channel; you must configure it for both CPUs.
Complete the following steps to access the Peripheral Configuration screen:
Step 1 Access the System Configuration Menu screen (refer to the "Accessing the System Configuration Menu Screen" section).
Step 2 Type A and press Enter.
The Peripheral Configuration screen is displayed (see Figure 4-3). The cursor is located in the Local TTY field.

The Peripheral Configuration menu consists of one screen. Use the Print Screen key to obtain a hard copy of this screen.
You can define the peripheral settings from the Peripheral Configuration screen prior to saving the configurations in the system database (by pressing Enter only after all changes have been made).
 |
Caution Use caution when defining the communication parameters for each master console, especially when selecting the keyboard type. If the configuration stored in the database does not match the actual equipment and/or protocols used, the master console will be unable to communicate with the system when a user attempts to log in. If this condition occurs, you must reselect the keyboard type from the Login screen. |
Complete the following steps to reselect the keyboard type, if necessary:
Step 1 Press the Ctrl and K keys simultaneously.
The following message appears in the bottom right corner of the login screen:
Keybrd: VT220 (V), Sun (S), Xview (X), Univ (U)
Step 2 Select the new keyboard type by pressing the appropriate letter.
The reselection is complete.
The Peripheral Configuration screen contains the following fields:
Local TTY—Display only. The only valid value is Console. It specifies that the master console is local VDT with VT100 display emulation.
You must configure the console Keyboard Type, Baud Rate, Stop Bits, Bits/Char, and Parity fields using the Next Field and Select keys.
|
Note For four-span cards, you must specify a span as well as a slot. |
XON/XOFF (local)—Data entry via Select key. Valid values are Enable (default) or Disable. When enabled, the XON/XOFF flow control protocol for asynchronous serial transmission is active for the local TTY.
Remote TTY—Display only. The only valid value is TTY01/Modem. It specifies that the master console is on a remote system.
XON/XOFF (remote)—Data entry via Select key. Valid values are Enable (default) or Disable. When enabled, the XON/XOFF flow control protocol for asynchronous serial transmission is active for the remote TTY.
Telnet TTY—Display only. The only valid value is Telnet. It specifies that you are accessing the system through an Ethernet Telnet connection (optional Ethernet software must be installed). You only need to configure the keyboard type when you select this field.
|
Note Once the Telnet connection is established, the local master console is disabled. (That is, a login screen is not displayed at the local TTY console.) A Telnet session can be established from a host computer; the host must be equipped with the appropriate terminal emulation software. For more information on Telnet connections, refer to the Cisco VCO/4K Ethernet Guide. |
Keyboard Type—Data entry via Select key. Specifies how the system interprets the application keypad and function keys on the local master console for data input. Valid values are:
Baud Rate—Applies to Console and TTY01/Modem options. The baud rate specifies the speed (in bits per second) at which data is transmitted over the link. Valid values are 300, 1200, 2400, 4800, 9600, and 19200 bps. The default value for Console is 9600. The default value for TTY01/Modem is 2400.
Bits/Char—Applies to Console and TTY01/Modem options. Specifies the number of bits used to represent a character, excluding parity and stop bits. Valid values are 7 and 8. The default value is 8.
Stop Bits—Applies to Console and TTY01/Modem options. Specifies the number of stop bits used. Valid values are 1 and 2. The default value is 1.
Parity—Applies to Console and TTY01/Modem options. Specifies whether error checking using a parity bit is to be performed. Valid values are NONE, EVEN, and ODD. The default setting is NONE.
Printer—Specifies the type of system printer supported. Currently, only parallel printers are supported for system operation.
End of Line Terminator—Specifies the terminating character(s) used to indicate the end of a printer line. The value in this field must match the terminator specified in the printer setup (refer to the documentation supplied with the printer). Valid values for this field are CR (carriage return), LF (line feed), and CR+LF (carriage return and line feed).
Complete the following steps when you finish configuring the peripherals:
Step 1 Verify your configuration selections.
Step 2 Press Enter.
The "Enter to Confirm New Configuration(s)" message appears.
Step 3 Press Enter
The configuration is saved to the system. No changes are made to the database unless you press Enter. When the system finishes updating the database with the new information, the "PRM039: Peripheral Configuration Updated" message appears.
To exit the Peripheral Configuration screen without making any changes, press the Exit, Prev Menu, or Main Menu key.
|
Note For VT220/320 terminals, press the F3 key to access the Modify VT220 Setup and configure the protocol parameters to match the screen. For other terminal types, refer to the documentation supplied with the terminal to modify the operating parameters. Once all changes are made, return to the Peripheral Configuration screen and press any key. |
Use File System Configuration to specify the devices/directories for storing and retrieving the system log and system trace files. System log files list all error and status messages generated by the diagnostic, fault recovery, and maintenance generic tasks. System trace files list the messages passed between the system and the host, and/or internal messages sent between the NBC and service circuit/network interface cards.
The storage device and directory for boot/download files and system database files is fixed.
The Network File System (NFS) directory specifications must be unique for each system CPU handled by a host. In a redundant system, the following pathnames could be used:
From the File System Configuration screen, you can specify the diskette drive (device A:) to store and retrieve system log and trace files. However, the system does not create the necessary directory while configuring the file system. If there is not a directory on the diskette, a PRM 018 message is generated when the system attempts to write the log/trace file to the diskette. To correct this problem, create a directory for the log or trace files on the diskette.
In redundant systems, the file system configuration information is not transferred over the update channel. Therefore, you must configure it for both CPUs.
Complete the following steps to access the File System Configuration screen:
Step 1 Access the System Configuration Menu screen (refer to the "Accessing the System Configuration Menu Screen" section).
Step 2 Type B and press Enter.
The File System Configuration screen is displayed (see Figure 4-4). The cursor is located in the Default Device field corresponding to the system log files.

File System Configuration consists of one screen. Use the Print Screen key to obtain a hard copy of this screen.
The File System Configuration screen contains two types of user-definable fields. These fields are accessible only in the System Log Files and System Trace Files areas of information.
Default Device—Data entry via Select key. Indicates the default device for storing and retrieving files. Valid values and their meanings are:
Default Directory—Data entry via main keypad. Indicates the standard directory for storing and retrieving each system file. You can include uppercase or lowercase alphanumeric characters and special characters in directory names. Insert a slash character (/) between directory names to specify a series of subdirectories.
Complete the following steps to define file system configurations:
|
Note You cannot define (modify) the file system configurations for boot/download and database files. |
Step 1 Display the File System Configuration screen (refer to the "Accessing the File System Configuration Screen" section).
The cursor is located in the Default Device field corresponding to the Log Files.
Step 2 Use the Prev Field and Next Field keys to position the cursor in the Default Device or Default Directory field corresponding to the file type you want to change.
Step 3 Repeat Step 2 for each file system setting you want to change.
Step 4 Press Enter.
The system verifies the configuration information. If the information is valid, the "Enter To Confirm New Configuration(s)" message appears.
Step 5 Press Enter.
The "Changing XXXXX File System" message appears, where XXXXX is the name of each file system modified. This message appears for each file system change. Once all file system changes are made, the "File System(s) Successfully Configured" message appears.
|
Note If you do not create a diskette directory for the log/trace file, a PRM 018 message is generated when the system attempts to write the files to the diskette. |
To exit the File System Configuration screen without making any changes, press Exit, Prev Menu, or Main Menu. No changes are made to the database unless you press Enter.
Use Host Configuration to configure host interfaces and software overlays and to indicate the status of alarm conditions for host interfaces. You can configure up to eight external (host computer) and one internal (software overlay) interfaces for the system.
The following constraints are placed on the host configuration:
For additional information on the ADLC protocol and the Ethernet communication option, refer to the Cisco VCO/4K Host Communication Guide and the Cisco VCO/4K Ethernet Guide. TeleRouter is documented in the Cisco VCO/4K TeleRouter Reference Guide.
In redundant systems the host configuration information is not transferred over the update channel. Therefore, it must be configured for both CPUs.
If you select an inactive host, an alarm is set and is displayed on the System Alarm Display screen until the host is activated.
The host communication parameters to be defined differ, in accordance with the specified interface. These parameters are listed in Table 4-1. For example, if the Interface field of the Host Configuration screen specifies the Internal interface, you must define the host name, overlay name and trace parameters only.
| Interface | Parameter |
|---|---|
Internal | Host Name (fixed Overlay) |
Overlay Name (TeleRouter or blank space) | |
Trace | |
SIO Port 3 SIO Port 4 | Host Name |
Poll Timeout | |
Baud Rate | |
Retry Counter | |
Parity | |
Trace | |
Block Factor | |
Modem | |
Protocol (fixed at ADLC) | |
Format | |
Reset Time | |
Alarm State | |
Ethernet | Host Name |
Connect Password (for local port) | |
Loc. Port (logical port number of local port) | |
Remote Internet Address | |
Remote (logical port number of remote port) | |
Trace | |
Protocol (fixed TCP) | |
Alarm State | |
Reset Time |
The call teardown upon host link failure feature is implemented on a per-host-link basis. The Host Configuration screen processing includes a field that defines the action to be taken upon host link failure—the Failure Action field. This field allows you to select one of the following actions:
Complete the following steps to access the Host Configuration screen:
Step 1 Access the System Configuration Menu screen (refer to the "Accessing the System Configuration Menu Screen" section).
Step 2 Type C and press Enter.
The Host Configuration screen is displayed (see Figure 4-5). The cursor is located in the first Interface field.

|
Note The Host Configuration screen contents adjust dynamically, depending on the value you specified in the Interface field. Figure 4-5 shows the possible combinations of fields that can be displayed for the Internal, SIO/ADLC, and Ethernet interfaces. All possible fields for this screen are identified in Table 4.1, and described in the "Host Configuration Screen Field Definitions" section. |
You can configure up to three types of host interfaces from the Host Configuration screen. The displayed host interface fields are determined by the value specified in the Interface field, and are divided into two groups: General and Interface Specific. The fields are defined as follows.
Interface—Data entry via Select key. Specifies the type of interface being configured. Also determines what data entry fields are displayed on the screen. Valid selections are:
Host Name—Data entry via main keypad. Required entry. Identifies the interface. The host name can be up to 10 alphanumeric characters, uppercase and lowercase.
|
Note If you select an inactive host, an alarm is set and displayed on the System Alarm Display screen until the host is activated. |
Trace—Data entry via main keypad. Specifies whether the trace utility is enabled for this interface. The system trace function is described in the "System Trace Configuration" section. Valid values and their meanings are:
Failure Action—Data entry via Select key. Specifies the action to take when a host link fails. Valid selections are:
Alarm State—Display only. Indicates the current alarm state for a host interface. Valid values and their meanings are:
Connect Password—Data entry via main keyboard. The ASCII string the host must issue in reply to the system when establishing a socket; used only when the Enable Host Password Check feature is set to Y. Up to 16 ASCII characters are allowed. Valid values depend on the application. This field may be blank if password checking is not performed.
Loc. Port—Data entry via main keyboard. The local port number from which this socket accepts data. Valid values are a valid Ethernet port number greater than 1023. The value must be supplied by the Ethernet administrator.
Host Name—Data entry via main keyboard. The host link used in system error and logfile messages. Up to 10 alphanumeric characters are allowed. Each link should have a unique name.
Rem. Inet Addr—Data entry via main keyboard or via Select key. (Remote Internet Address) The internet address of the host running the socket application. Use the INADDR_ANY wildcard character to enable communication with any host. If a specific host is required, a valid internet address is required in hexadecimal notation; convert the UNIX dot format to hexadecimal then precede the address with 0x. To disable all pinging for Ethernet host detection failure, set the Remote Internet Address to INADDR_ANY. The remote internet address should be supplied by the Ethernet administrator, otherwise, use a wildcard.
Rem. Port—Data entry via main keyboard. (Remote Port) Specifies the Ethernet port address from which the system controller accepts data. Valid values are 0 or a valid Ethernet Port number greater than 1023. The value must be supplied by the Ethernet administrator.
Trace—Data entry via main keyboard. The system trace facility is enabled for this socket (refer to the Cisco VCO/4K System Administrator's Guide). Valid values are 0 and 1. A value of 0 indicates that trace is not enabled. A value of 1 indicates that trace is enabled; messages will be sent to the printer and log file. A value of 0 is recommended for normal operation; 1 for troubleshooting.
Failure Action—Data entry via Select key. Specifies the action to take when a host link fails. Refer to the "Host Configuration Call Teardown Upon Host Link Failure Feature" section for a complete description of this field. Valid values and their meanings are:
Protocol—Display only. Defines the data transfer protocol used on this host link. The value for Ethernet is fixed at TCP.
Alarm State—Display only. Indicates the current alarm state for a host interface. Valid values are Off and On. Off means that no alarm condition exists for this host interface link. On means that an alarm condition exists for this host interface link. The presence of an alarm state for an interface indicates that link is currently out of service due to an error condition on either the system or host end. Refer to logfile messages to determine the cause of the link failure.
Ping Freq—Data entry via main keyboard. When the host is configured with Ethernet, you may enter data for the detection of an Ethernet link failure. Ping Freq specifies the time, in seconds, between probes. Valid values are from 0 to 60. To disable the host detection failure feature, set the Ping Freq and Ping Fail Limit fields to zero; probe once every minute. See also Rem.Inet.Addr. The default value is 0, indicating that probing should occur once every minute.
Reset Time—Data entry via main keyboard. Specifies the amount of time, in seconds, that the system waits after a link failure/reset before reestablishing the link. Valid values are from 0 to 999; the system requires a value of at least 1 minute (60 seconds). The default value is 60 (1 minute).
Ping Fail Limit—Data entry via main keyboard. Defines the number of consecutive failed probes to determine that an Ethernet connection is lost—see also Ping Freq. Valid values are from 0 to 10. The default value is 1 if the Ping Frequency is non-zero. (The default of 1 can be overridden with any value other than 0.) The default is 0 if the Ping Frequency is 0. (The default of 0 cannot be overridden.) This is once-a-minute probing. Any missing probe is declared a lost connection; the switch closes the connection by freeing up all sockets tied to the local ports and generates alarm messages. See also Rem.Inet.Addr.
Protocol—Display only. Defines the data transfer protocol used on this host link. Value for SIO-Port 3 and SIO-Port 4 is fixed at ADLC.
Reset Time—Data entry via main keypad. Specifies the amount of time, in seconds, the system waits after a link failure/reset before reestablishing the link. Valid values are from 0 to 999. A value of 60 seconds is recommended.
Poll Timeout—Data entry via Select key. Specifies the amount of time the system waits to be polled by the host before the system assumes an error condition exists on the link. Valid values are from 0 to 300 in increments of 1. Each count specifies a 1-second interval. A value of 15 seconds is recommended.
|
Note A value of 0 means there is an infinite wait; a value of 0 is not recommended for this timer because the system uses this timeout to determine when a link failure has occurred. |
Retry Counter—Data entry via main keypad. Specifies the number of times the system retransmits a message before it assumes that an error condition exists on the link. Valid values are from 0 to 255. A value of 5 is recommended.
Block Factor—Data entry via main keypad. Specifies the number of messages allowed in a multiblocked transmission. The system allows transmit blocks to be constructed with a message count up to this value. Valid values are from 1 to 32 in increments of 1. A value of 5 is recommended.
Format—Data entry via Select key. Specifies the number of stop bits used with the 8-bit data character. Valid selections are:
Baud Rate—Data entry via Select key. Specifies the speed (in bits per second), at which data is transmitted over the link. Valid selections are 300, 1200, 2400, 4800, 9600, and 19200.
Parity—Data entry via Select key. Specifies whether error checking using a parity bit is to be performed. Valid selections are:
Modem—Data entry via Select key. Specifies if a modem is used between this port and the host computer. Valid values are No and Yes. If Yes, full modem control signaling is used.
Configure each link between the system and a host computer from the Host Configuration screen. These links include the internal link between system call processing and the TeleRouter software overlay. Configure each link by specifying the interface (either internal or a physical port on the CPU-TM card) and assigning a set of parameters to that interface. You must define host links/overlays for both CPUs in a redundant system.
The Host Configuration screen consists of three data entry screens. The first screen contains data fields for configuring the internal link and up to two host links; the other two screens contain data fields for configuring up to three host links. Use the Tab key to move from one Interface field to the next. Use the Next Field and Prev Field keys to move from field to field within an interface specification. After you have finished specifying all link parameters, press Enter. The links are then reset and the configuration information is implemented.
|
Note If you select an inactive host, an alarm is set and is displayed on the System Alarm Display screen until the host is activated. |
Complete the following steps to define link configurations:
Step 1 Access the Host Configuration screen (refer to the "Accessing the Host Configuration Screen" section).
The cursor is located in the Interface Internal field.
Step 2 Type the correct value to enable or disable tracing for the Internal interface.
Step 3 To define an external interface, use the Select key to display the correct interface value.
The values displayed are determined by the value specified in the Interface field.
Step 4 Use the Prev Field and Next Field keys to move to the data entry field to be specified. Fill in the field using the Select or Reverse Select key, or the main keypad. Repeat this process for all fields required for the link configuration to be defined.
Step 5 Press Enter.
Step 6 The "Press Enter to update configuration" message appears.
Step 7 Press Enter.
The "Host configuration updated" message appears. The configuration data is written to the database, and the link is taken out of service and reestablished. This process takes several seconds.
Step 8 Press the Exit key to return to the System Configuration menu.
Use Password Configuration to create or change system passwords and set access levels for up to 16 users. You must identify each system user with a unique username, an alphanumeric password, and an access level. The ability to update this configuration information is limited by a user's access level.
The system supports four levels of system administration access: Levels 0, 1, 2, and 3. Only Level 0 (highest access) users can add and delete system users. Users with lower access levels can only change their own password. Only users can change their password.
Access levels determine the user's ability to modify screen information and update the system database. Access levels are linked to each administration screen via the Screen Access Configuration screen. For more information on limiting screen modifications, refer to the "Screen Access Configuration" section.
The Password Configuration screen has two main areas: a display area that lists the current users and their associated access levels, and a data entry area in which you can add, delete, or change user password configuration information.
Complete the following steps to access the Password Configuration screen:
Step 1 Access the System Configuration Menu screen (refer to the "Accessing the System Configuration Menu Screen" section).
Step 2 Type D and press Enter.
The Password Configuration screen is displayed (see Figure 4-6). The cursor is located in the Add/Del/Change field.

Password Configuration consists of one screen. Use the Print Screen key to obtain a hard copy of this screen.
The Password Configuration screen contains the following fields:
Username—Display only. Shows the functional name assigned to each system user.
Access Level—Display only. Shows the current access level of each system user. Valid values are 0, 1, 2 and 3.
Add/Delete/Change (A,D,C only)—Data entry via main keypad. Specifies the function you want to perform. Valid values are:
Username—Data entry via main keypad. Specifies the name assigned to the system user. From 3 to 15 uppercase and/or lowercase alphanumeric characters are allowed in this field. You must enter the username for all command functions.
Current Password—Data entry via main keypad. Specifies the password currently associated with the username entered. From 4 to 12 uppercase and/or lowercase alphanumeric characters are allowed in this field. This field is accessible only when you select C at the Add/Delete/Change (A,D,C only) field. All data entered in this field is hidden by asterisk (*) characters for security.
New Password—Data entry via main keypad. Specifies the new password assigned to the user (after you choose the A or C command). From 4 to 12 uppercase and/or lowercase alphanumeric characters are allowed in this field. All data entered in this field is hidden by asterisk (*) characters for security.
Verify Password—Data entry via main keypad. Verifies the exact spelling and case of the new password (after you select the A or C command). The data in this field must exactly match the contents of the New Password field. All data entered in this field is hidden by asterisk (*) characters for security.
Access Level—Data entry via main keypad. Specifies the access level assigned to each user. Database update is limited based on access level (refer to the "Screen Access Configuration" section for information on the Screen Access Configuration screen). Valid values are:
You can add a new user to the system database with the Add function of the Password Configuration screen. Only a Level 0 user can add other system users to the database. To complete this command, a Level 0 user must enter the Add (A) command, user name, password, and access level information. The default access level (if no level is specified) for new users is Level 3; however, any access level (0, 1, 2 and 3) can be assigned.
Complete the following steps to add a user to the database:
Step 1 Display the Password Configuration screen (refer to the "Accessing the Password Configuration Screen" section).
The cursor is located in the Add/Del/Change: (A/D/C Only) field.
Step 2 Type A and press the Next Field key.
The cursor moves to the Username field.
Step 3 Type the user's functional username and press the Next Field key.
The cursor moves to the New Password field.
Step 4 Type the new password and press the Next Field key.
The cursor moves to the Verify Password field.
Step 5 Type the password again to verify the entry and press the Next Field key.
The entry must exactly match the value entered in the New Password field. If the password is correctly reproduced, the cursor moves to the Access Level field. If the password is not verified, the "This Does Not Match The New Password" message appears.
Step 6 Type the access level and press Enter.
The database is automatically updated and the screen shows the addition of the user to the list. The cursor returns to the Add/Del/Change: (A/D/C Only) field.
Step 7 Repeat Step 2 through Step 6 to add all additional users to the system.
Step 8 Press the Exit key to return to the System Configuration menu.
To exit the Password Configuration screen without making any changes, press the Exit, Prev Menu, or Main Menu key. No changes are made to the database until you press Enter.
To delete a user from the system database, use the Delete function. To complete this command, enter the Delete (D) command and username. Only a Level 0 user can delete other system users from the database. Users cannot delete themselves while they are currently logged in to the system.
Complete the following steps to delete a user from the database:
Step 1 Display the Password Configuration screen (refer to the "Accessing the Password Configuration Screen" section).
The cursor is located in the Add/Del/Change: (A/D/C Only) field.
Step 2 Type D and press the Next Field key.
The cursor moves to the Username field.
Step 3 Type the user's functional username and press Enter.
The "Enter to Delete User xxxxx" message appears, where xxxxx = the username of the system user to delete.
Step 4 Press Enter.
The database is automatically updated and the screen is updated to reflect the deletion. The cursor returns to the Add/Del/Change: (A/D/C Only) field.
Step 5 Repeat Step 2 through Step 4 for all users you want to delete.
Press the Exit key to return to the System Configuration menu.
To exit the Password Configuration screen without making any changes, press the Exit, Prev Menu, or Main Menu key. No changes are made to the database until you press Enter.
All system users can change their own password in the system database. To complete this command, the user must enter the Change (C) command, username, current and new passwords, and access level information.
Complete the following steps to change a user's password:
Step 1 Display the Password Configuration screen (refer to the "Accessing the Password Configuration Screen" section).
The cursor is located in the Add/Del/Change: (A/D/C Only) field.
Step 2 Type C and press the Next Field key.
The cursor moves to the Username field.
Step 3 Type the user's functional username and press the Next Field key.
The cursor moves to the Current Password field.
Step 4 Type the user's current password, exactly as it exists in the database, and press the Next Field key.
The cursor moves to the New Password field.
Step 5 Type the new password (or the current password if you are only changing the access level) and press the Next Field key.
The cursor moves to the Verify Password field.
Step 6 Type the new/current password again to verify the entry and press the Next Field key. The entry must exactly match the value entered in the New Password field.
If you type the password correctly, the cursor moves to the Access Level field. If the password is not verified, the "This Does Not Match The New Password" message appears.
Step 7 To modify an access level, type the new access level and press Enter; otherwise, do not type and press Enter.
The database is automatically updated and the cursor returns to the Add/Del/Change: (A/D/C Only) field.
Step 8 Repeat Step 2 through Step 7 for all remaining passwords to be modified.
Step 9 Press the Exit key to return to the System Configuration menu.
To exit the Password Configuration screen without making any changes, press Exit, Prev Menu, or Main Menu. No changes are made to the database unless Enter is pressed.
Use the Clock/Calendar Configuration screen to change the system date and time settings. The time can also be reset by the host with the Configure VCA/Set System Clock ($C0 00) command.
The clock should be set by the host on a regular basis to ensure that host time and system time are synchronized. This is especially important if you need to determine the cause of system errors by comparing the log files kept by the system to any log files kept by the host.
Complete the following steps to access the Clock/Calendar Configuration screen:
Step 1 Access the System Configuration Menu screen (refer to the "Accessing the System Configuration Menu Screen" section)
Step 2 Type E and press Enter.
The Clock/Calendar Configuration screen appears (see Figure 4-7). The cursor is located in the Month field.

Clock/Calendar Configuration consists of one screen. Use the Print Screen key to obtain a hard copy of this screen. The Day of Week field is display only.
When you are changing the settings on the system clock/calendar, and a field is to be left unchanged, no entry is required in that field.
Complete the following steps to change the system clock/calendar setting:
Step 1 Display the Clock/Calendar Configuration screen (refer to the "Accessing the Clock/Calendar Configuration Screen" section).
The current system date/time information is displayed. The cursor is located in the Month field.
Step 2 Use the Select and Reverse Select keys to scroll through the selections until the correct month is shown.
Step 3 Type the date—the data for this field may be one or two digits.
Step 4 Type the year—the data for this field must be four digits; only values of 1991 or later are accepted.
Step 5 Type the hour in 24-hour format [00 (midnight) through 23 (11 PM)]—the data for this field may be one or two digits.
Step 6 Type the minutes (00 through 59)—the data for this field may be one or two digits.
Step 7 Type the seconds (00 through 59)—he data for this field may be one or two digits.
Step 8 Press the Exit key to return to the System Configuration menu.
To exit the Clock/Calendar Configuration screen without making any changes, press the Exit, Prev Menu, or Main Menu key. No changes are made to the database unless you press Enter.
Use System Feature Configuration to view all currently enabled system feature flags from the System Feature screen. From this screen, you can modify system operating characteristics to meet specific application requirements.
Complete the following steps to access the System Feature Configuration screen:
Step 1 Access the System Configuration Menu screen (refer to the "Accessing the System Configuration Menu Screen" section).
Step 2 Type F and press Enter.
The System Features screen appears (see Figure 4-8). The cursor is located in the first Allowed (Y,N) field.
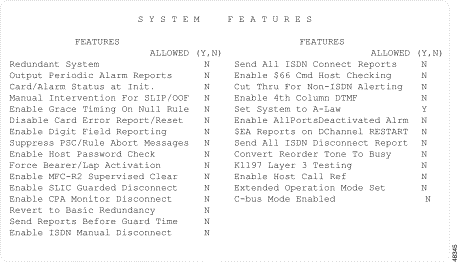
The System Features screen consists of one screen. Use the Print Screen key to obtain a hard copy.
|
Note When you change a system feature setting, you may need to reboot the system for the change to take effect. Refer to Table 4-2 for a list of system feature flags and the activation method for each flag. |
| System Feature Flag | Takes Effect Immediately | Switch Needs Rebooting |
|---|---|---|
Redundant System |
| X |
Output Periodic Alarm Reports |
| X |
Card/Alarm Status at Init. |
| X |
Manual Intervention For SLIP/OOF | X |
|
Enable Grace Timing On Null Rule | X |
|
Disable Card Error Report/Reset | X |
|
Enable Digit Field Reporting | X |
|
Suppress PSC/Rule Abort Messages | X |
|
Enable Host Password Check | X |
|
Force Bearer/Lap Activation | X |
|
Enable MFC-R2 Supervised Clear | X |
|
Enable SLIC Guarded Disconnect | X |
|
Enable CPA Monitor Disconnect | X |
|
Revert to Basic Redundancy | X |
|
Send Reports Before Guard Time | X |
|
Enable ISDN Manual Disconnect | X |
|
Send All ISDN Connect Reports | X |
|
Enable $66 Cmd Host Checking | X |
|
Cut Thru For Non-ISDN Alerting | X |
|
Enable 4th Column DTMF | X |
|
Set System to A-Law | X1 |
|
Enable AllPortsDeactivated Alrm | X |
|
$EA Reports on DChannel RESTART | X |
|
Send All ISDN Disconnect Report | X |
|
Convert Reorder Tone To Busy | X |
|
K1197 Layer 3 Testing | X |
|
Enable Host Call Ref | X |
|
Extended Operational Mode Set | Display Only | |
C-bus Mode Enabled | Display Only | |
| 1ICC and SPC cards need to be removed from service and reactivated before the setting takes effect. |
The System Features screen consists of the following fields:
FEATURES—Display only. Shows the system features. Feature definitions are listed in the "System Feature Descriptions" section.
ALLOWED (Y,N)—Data entry via main keypad. Indicates whether the corresponding feature is enabled or disabled. Valid values are Y and N.
This section describes current system features. If the feature flags on the System Features screen differ from Figure 4-8, contact Cisco Systems TAC.
|
Note The Suppress PSC/Rule Abort Messages feature flag applies only when the optional TeleRouter software overlay is installed on the system. The Enable Host Password Check feature flag applies only when the optional Ethernet software is installed on the system. |
Informs the initialization software whether the system control configuration is redundant or nonredundant. Redundant systems contain a second system controller and an additional NBC. However, even with the proper hardware, a system will not function as a redundant system unless this feature is enabled. If you change this feature setting, you must reboot the system for the change to take effect.
When enabled, major/minor alarm reports are output to the system printer 5 minutes after system initialization is complete, and every 30 minutes thereafter. If you anticipate heavy call traffic, disable this feature to reduce processing overhead on the system. If you change this feature setting, you must reboot the system for the change to take effect.
When enabled, this feature blocks the printing of card restored and alarm messages for every card during the initial ten minutes following a system boot. The card restored and alarm messages in large systems slow the system boot and lead to performance problems; in those systems, you should enable this feature. If you change this feature setting, you must reboot the system for the change to take effect.
The system automatically takes a programmable trunk card out of service when the Slip or out-of-frame (OOF) limit is reached. The limit for OOFs is 17; the error threshold of slips is 256. Both error threshold counters are reset at midnight. If you set this feature to Y, the system takes the card out of service and does not attempt to reset it. You must manually set the card back to active from the Card Maintenance screen. If you set this feature to N, the card returns to active automatically when the condition clears.
The null outpulse rule (rule 0) performs an outward seizure (SEIZE token), a wait for final answer (FINAL SUP A token), and starts a 30-second grace timer. If you set this feature to Y, the outgoing port is considered answered if either true answer is detected or the grace timer expires. If you set this feature to N, only detection of true answer supervision is accepted as the final answer. Refer to the Cisco VCO/4K Standard Programming Reference and the Cisco VCO/4K Extended Programming Reference for more information on the null outpulse rule.
Set this feature to Y to disable printing the card error report and prevent resetting the card error threshold counters. Normally, a card error report is printed at its occurrence and the threshold counters are reset at midnight.
Enable this feature to cause the Optional Field Designator byte to appear in MF Digit ($D0), DTMF Digit ($D1), and Spoken Digit ($D4) reports. The Optional Field Designator byte indicates the field that the system stores the digits reported. When you set this feature to Y, the Optional Field Designator byte appears in the byte offset position normally reserved for the digit string, and the digit string is shifted to the next byte offset. Refer to the Cisco VCO/4K Standard Programming Reference and the Cisco VCO/4K Extended Programming Reference for more information on digit reporting.
For use only with the optional TeleRouter software overlay. When enabled, this feature prevents Permanent Signal Condition and inpulse rule abort messages from being written to the system log while operating TeleRouter in an unhosted environment. Certain types of line equipment use the tones issued during Permanent Signal processing to determine disconnects. This feature suppresses the PSC messages generated by this normal occurrence with these line types. Also, certain situations may generate Inpulse Rule abort messages due to incoming call abandons prior to call routing. This feature prevents system log files from becoming filled with inpulse rule abort messages.
Set to N to disable Ethernet password checking. This allows a link to be established without requiring that the correct password be received on that link. This feature is useful when a small, closed network is used for host-to-system communication. Ethernet passwords are defined with the Host Configuration screen; refer to the "Host Configuration" section for more information.
During Diagnostic procedures, use this feature to force ISDN B-channels to Active without the D-channel being active. Set this feature to Y to enable the function or N to disable the function. The default is N.
|
Note Use this feature under the direction of Cisco Systems TAC. |
A system-wide feature that supports automatic call release on outgoing ports in response to backward MFCR2 supervision tones. If you set this feature to Y, an outgoing port is released when the system detects a specified backward tone during R2 signaling. (Note that backward tones are country specific.) The system performs disconnect processing appropriate for the port type involved and generates an Outgoing Port Change of State ($DA) report indicating a supervision error and specifying the backward tone detected. Refer to your country supplement for information on the backward supervision tones.
|
Note This system feature enables/disables automatic call release on a system-wide basis. If the feature is enabled (feature flag set to Y), any outgoing port receiving the backward error tones is automatically released. If the feature is disabled (feature flag set to N), the outgoing port remains in setup state unless out-of-band supervision or a host command changes the port state. |
Enables or disables the Guarded Disconnect option, which is available for special SLIC cards. If you set the feature flag to Y, the special SLIC card can send an out-of-band Calling Party Disconnect signal to the two-wire devices connected to the card. If you set the feature to N, the Guarded Disconnect option is disabled. The default value is N, which is also the value for normal operation.
Enables the UTC devices that cannot pass out-of-band end-of-call signals to detect in-band tones when the calling party abandons the call. When the system receives this tone, it treats it as a positive disconnect. Set the flag to Y to enable the feature. However, in order for it to function, make sure the following conditions also exist:
The default value for the flag is N, which is also the value for normal operation.
Enhanced redundancy enables both system controllers to consistently track conference calls and ports in SETUP. Set the Revert to Basic Redundancy feature to Y to disable tracking. Set the feature to N to enable tracking.
Specifies whether to send the Incoming Port Change of State Report ($DB) before or after guard timing completes. If you set the feature flag to Y, the $DB is sent to the host before guard timing is complete. If you set the feature flag to N, the $DB report is sent to the host after guard timing is complete.
Allows the host to control disconnects. If you enable this feature (set the flag to Y), the system reports the DISCONNECT message to the host via the ISDN Port Change of State ($EA) report. The RELEASE message will not be sent until an ISDN Port Control ($49) command is received by the system from the host.
If you disable this feature (set the flag to N), the system processes the DISCONNECT automatically. All DISCONNECT IEs are reported to the host via the $EA report, and a RELEASE message is returned to the network.
Specifies whether to send the ISDN Port Change of State ($EA) report each time an ISDN Connect message event is received from an ISDN D-channel. If you set the feature flag to Y, the $EA report is sent to the host for every ISDN Connect message received. If you set the feature flag to N, the ISDN supervision template configuration or an ISDN Port Control ($49) command controls how $EA reports for Connect messages are sent.
Enables or disables the host checking of the Voice Path Control ($66) command. If you set this feature flag to Y, the system accepts $66 commands only from the host link assigned to the call. (The controlling host assigns the link based on the Incoming Call Distribution field configuration.) If you set this flag to N, the system accepts $66 host commands from any host link, regardless of the host link assigned as controlling host.
Note that this feature flag is valid only when the Host Control Checking option is enabled. (Refer to the "System Host Configuration" section for information on Host Control Checking.) If Host Control Checking is disabled, the $66 Command Host Checking flag is ignored (i.e., $66 commands are accepted from any host link even though the flag is set to Y).
Enables or disables the sending of ringback tones to the incoming ports, or the ability to let incoming ports listen to outgoing ports when alerting messages are received in ISDN to non-ISDN connections.
If you set this feature flag to Y, the incoming ports listen to the outgoing ports when alerting messages are received in ISDN to non-ISDN connections.
If you set this feature flag to N, a ringback tone is sent to incoming ports in ISDN to non-ISDN connections.
If you enable this feature, $D1 segments attached to $DD or $ED reports follow the enhanced format.
Determines the backplane law for the system. This flag is used to configure the MVDC, ICC, and SPC cards. Refer to the Cisco VCO/4K Technical Descriptions to determine the method for setting backplane law for other card types. To prevent an incorrect system configuration, ensure that all service circuit cards and port interface cards are configured for the same law.
Valid values are Y and N. If you set the flag to Y, the system backplane law is set to A-law (European standard). If you set the flag to N, the system is set to Mu-law (North American standard). The default is N.
|
Note If you change the value of this feature flag, the ICC and SPC do not detect the change until you take the card out of service and then bring the card back into service. |
|
Note When in the System Features screen, you are setting the backplane law. When in the Programmable Trunk Configuration screen, you are setting the network law. In the ICC Programmable Trunk Configuration screen, the SYS value set in the LAW field will cause the network law configuration for that port to match the system backplane law. This is especially useful for configuring signaling channels which should not undergo any law conversions. |
If you set this feature flag to Y, this option raises a PRI/N card alarm when all the ports on the card are deactivated. An Alarm Condition ($F0) report is sent to the host specifying which card caused the alarm. A minor system alarm is raised and the event is logged if the system alarm condition does not already exist.
The new alarm is raised only when all the ports are deactivated from the Card Maintenance screen, the $90 command from the host, or through a far end port-state transition to out of service.
When at least one of the deactivated ports becomes available for use, the card alarm is cleared and the event is logged. An $F0 is generated to the host, specifying the card in which the alarm condition is cleared. The minor system alarm is cleared and the event is logged if there are no other occurrences of the same alarm.
For the alarm to clear, a port which has been deactivated must be made available from the Card Maintenance screen, the $90 command from the host, or through a far end port-state transition to out of service.
When all the ports of a PRI/N card are deactivated, a card alarm is raised and this event is logged.
For use with ISDN. This feature allows you to enable/disable the generation of ISDN Port Change of State ($EA) reports for the D-channel, and all associated B-channels, when the system receives a D-channel RESTART message by setting the feature flag to either Y to enable, or N to disable.
If you enable this feature, an $EA report is generated for the D-channel, and all associated B-channels, when the system receives a D-channel RESTART message.
If you disable this feature, $EA reports are not generated for D-channel RESTART messages.
For use with Japanese ISDN. This feature allows you to enable/disable the sending of ISDN Port Change of State ($EA) reports each time a DISCONNECT message is received from an ISDN D-channel by setting this feature flag to either Y to enable, or N to disable.
When set to N (disabled), disconnect report handling is consistent with system software releases prior to V4.2 FSR00. When set to Y (enabled), the system functions properly with Japanese ISDN.
For use with Japanese networks. Allows you to select an alternate busy tone for Japanese networks which use a normal busy tone instead of the reorder tone during PSC (Permanent Signaling Condition) processing on a port.
Valid values are N and Y. When set to N, the normal reorder tone is presented during PSC. When set to Y, the normal busy tone is presented.
Not for customer use. This flag is used during tests performed with the K1197 Conformance tester. Valid values are Y and N. Set to Y (enabled) and the Datalink Release report is ignored. Enabling this feature also causes Sync Source switching to stop. Set to N to disable conformance testing.
For use with ISDN configurations. Allows you to enable/disable the 2 B-channel transfer feature by setting the feature flag to either Y to enable, or N to disable.
If you enable this feature, the system passes the call reference up to the host, which enables the host application to support 2 B-channel transfer. The call reference value is sent to the host in byte offsets 20 and 21 of the ISDN Port Change of State ($EA) report with standard mode API. The call reference value is sent to the host in byte offsets 25 and 26 of the $EA report with extended mode API.
For ISDN message types, with the exception of RELEASE COMPLETE, the VCO/4K sends the call reference value to the host. If the VCO/4K receives a RELEASE COMPLETE message, the call reference value is not sent to the host, but instead sends a replacement call reference value, xFFFE.
For incoming ISDN calls, the network switch is responsible for generating the call reference value. For outgoing ISDN calls, the VCO/4K is responsible for generating the call reference value.
If you disable this feature, the 2 B-channel transfer feature is disabled.
This flag is read-only. If enabled (set to Y), extended operational mode is activated. Activate extended mode during the installation process by selecting the Set Extended Operational Mode option from the Installation Utilities screen. To configure your VCO system for 4,000+ ports, both the Extended Operation Mode Set and C-bus Mode Enabled flags must be set to Y.
This flag is read-only. If set to Y, C-bus is enabled, and the switch can take advantage of the 4,000+ ports. If set to N, C-bus is disabled, and your system is limited to 2,000+ ports. To configure your VCO system for 4,000+ ports, both the C-bus Mode Enabled and Extended Operation Mode Set flags must be set to Y.
Complete the following steps to enable or disable a system feature flag:
Step 1 Display the System Features screen (refer to the "Accessing the System Feature Configuration Screen" section).
The cursor is located in the first Allowed (Y/N) field.
Step 2 Use the Prev Field and Next Field keys to position the cursor in the Allowed (Y/N) field corresponding to the feature you want to enable or disable.
Step 3 Type Y or N, depending on the setting you want for that feature.
Step 4 Repeat Step 2 and Step 3 for each feature setting you want to change.
Step 5 Press Enter.
The database is automatically updated.
Step 6 Press the Exit key to return to the System Configuration menu.
To exit the System Features screen without making any changes, press the Exit, Prev Menu, or Main Menu key. No changes are made to the database unless you press Enter.
Use Screen Access Configuration to control database access and function key assignments for all system administration screens and menus. This function applies the same access levels (0, 1, 2, and 3) assigned to each system user from the Password Configuration screen. Refer to the "Password Configuration" section for more information on assigning access levels to system users.
All system users, including Level 3, can view all administration screens and functions. On the other end of the range, Level 0 users can both view and modify all system database tables.
The ability of Level 1 and Level 2 users to modify database tables depends entirely on the values entered in the Screen Access Configuration screen. These settings work in a pyramid fashion. Level 2 users can modify database tables for all screens marked with Level 2 or Level 3 access. Similarly, Level 1 users can modify the tables for all screens marked with Level 1, Level 2 or Level 3 access. Level 0 users reside at the top of the pyramid; they can change database information for screens marked with any access level.
You can also use Screen Access Configuration to map up to 15 programmable function keys to system administration menus and screens. VT220/320 keys marked F6 through F20 can be used for single keystroke access, including the keys labeled Help and Do. Refer to "Administration Keyboard Types," for function key mapping for keyboard types other than VT220/320.
Complete the following steps to access the Screen Access Configuration screen:
Step 1 Access the System Configuration Menu screen (refer to the "Accessing the System Configuration Menu Screen" section).
Step 2 Type G and press Enter.
The Screen Access Configuration screen appears (see Figure 4-9). The cursor is located in the Access Level field.

The Screen Access Configuration option consists of six screens. Use the Print Screen key to obtain a hard copy of each screen.
The Screen Access Configuration screens consist of the following fields:
Format Name—Display only. Shows the title of the screen format, listed alphabetically.
Access Level—Data entry via main keypad. Specifies the access level assigned to the screen format. Valid values are 0 to 3.
Function Key—Data entry via Select key. Specifies the function key assigned to the screen to provide single keystroke access. VT220/320 keys marked F6 to F20 can be used; the F15 selection corresponds to the Help key on VT220/32 keyboards, while F16 indicates the Do key. Use function keys only for screens residing immediately under a menu; you cannot assign function keys to screens residing under submenus (such as the Line/Trunk/PRI card configuration screens).
|
Note Function key mapping varies for keyboard types other than VT220/320. Refer to "Administration Keyboard Types," for more information. |
Screen Access Configuration contains six pages of screen titles, listed in alphabetical order. Only Level 0 users can perform screen access changes. Access levels can be modified for most screens. All menu screens and the System Login and Password Configuration screens are permanently assigned Level 3 access; the access level for these screens cannot be changed. Similarly, the access level for the System Feature Configuration screen is fixed at Level 0.
You can assign function keys to all menus and all screens immediately residing under a menu. You cannot assign function keys to screens residing under submenus (requiring data entry on the submenu before they can be accessed). When a function key is assigned to a screen, it is removed from the available listing.
Complete the following steps to assign access levels and programmable function keys:
Step 1 Access the Screen Access Configuration screen (refer to the "Accessing the Screen Access Configuration Screen" section).
The cursor is located in the first Access Level field.
Step 2 Use the Next Field and Prev Field keys to position the cursor in the Access Level or Function Key field that corresponds to the screen assignment you want to change. The fields that cannot be modified (access levels permanently set or screens residing under submenus) are bypassed.
Step 3 Repeat Step 2 for each screen assignment you want to change.
Step 4 Press Enter.
The "Screen Access Table Updated" message appears and the database is automatically updated.
To exit the Screen Access Configuration screen without making any changes, press the Exit, Prev Menu, or Main Menu key. No changes are made to the database until you press Enter.
Use Software/Firmware Configuration to display the following items for the system controller (Side A or B) to which the system administration terminal is currently connected:
Complete the following steps to access the Software/Firmware Configuration screen:
Step 1 Access the System Configuration Menu screen (refer to the "Accessing the System Configuration Menu Screen" section).
Step 2 Type H and press Enter.
The Software/Firmware Configuration screen appears (see Figure 4-10). The cursor is located in the DETAILED DIRECTORY OF DEVICE field.

Software/Firmware Configuration consists of one screen. Use the Print Screen key to obtain a hard copy of this screen.
The Software/Firmware Configuration screen consists of the following fields:
VRTX OS—Display only. Shows the version and revision (x.xx) of the operating system firmware PROM installed on the CPU board to which the administration terminal is connected.
IFX—Display only. Shows the version and revision (x.xx) of the file system component of the operating system firmware PROM installed on the CPU board to which the administration terminal is attached.
TNX—Display only. Shows the version and revision (x.xx) of the network component of the operating system firmware PROM installed on the CPU board to which the master console is attached.
DETAILED DIRECTORY OF DEVICE—Data entry via Select key. Specifies the device for which to display the configuration information. Valid values are:
<SYSTEM> GENERIC EXECUTABLE FILES—Display only. Shows the filename, version and revision (x.x), field service release (FSR), and checksum for all V5.x files resident on the device selected. The fields are arranged according to the descriptions that follow.
VER.REV FSR PUN—Specifies the version revision level, field service release (FSR) level, and PUN of the generic release.
File Name—Specifies the name of the executable file for which information is displayed. Executable files are indicated by the .exe file extension.
Ver.Rev Pun—The version revision level and PUN of the executable file is not displayed for each executable file. The system software .exe files, with the exception of optional software products, share the same software version number displayed in the VER. REV FSR PUN field on the left side of the screen.
|
Note If you are running a customer patch, you may see an inconsistency in the SPC.DWN and ICC.DWN file version revision numbers listed in this column. The inconsistency is due to the two character field length; customer patch version revision numbers are greater than two digits and the system converts them to binary coded digits for display purposes. Formal releases always contain two digits and do not experience this inconsistency. |
Check Sum—Specifies the checksum calculated for the file on the hard disk.
<SYSTEM> DATA DOWNLOAD FILES—Display only. Indicates the filename, version and revision (x.xx), PUN, and checksum for all data download files resident on the device selected. The fields are arranged according to the descriptions that follow.
File Name—Specifies the name of the download file for which information is displayed. Download files are indicated by the .dwn extension. Examples of some of the valid values and their meanings are:
Complete the following steps to display the system software/firmware configuration for a particular device:
Step 1 Access the Software/Firmware Configuration screen (refer to the "Accessing the Software/Firmware Configuration Screen" section).
The cursor is located in the Detailed Directory of Device field.
Step 2 Use the Select key to specify the value of the device for which you want to view the configuration.
Step 3 Press Enter.
The configuration information for the device selected is displayed.
Step 4 Repeat Step 2 and Step 3 for all devices for which the configuration is to be displayed.
Press the Exit key to return to the System Configuration menu.
Use License Configuration to update your Timeslot Allocation License or display the system's current usage of time slots. This section describes Timeslot Allocation Licensing and the License Configuration screen.
With a few exceptions, each port on the system uses a time slot. VCO/4K systems are shipped with 1024 preallocated time slots, which support up to 1,024 individual ports. Once your system configuration reaches 1024 ports, you cannot add more cards to the system until you upgrade your timeslot license. Timeslot licenses are sold in 536-slot increments, up to a maximum of 4088 time slots for VCO/4K systems and 1936 for VCO/20 systems. (See your sales representative for further information on upgrading your Timeslot Allocation License.)
|
Note DRC24 and DRC48 ports do not consume time slots. |
Timeslot Allocation Licensing is nontransferable; you cannot take the license from one system and use it on another.
Complete the following steps to access the License Configuration screen:
Step 1 Access the System Configuration Menu screen (refer to the "Accessing the System Configuration Menu Screen" section).
Step 2 Type I and press Enter.
The License Configuration screen appears (see Figure 4-11). The cursor is located in the Enter License # field.

The sample shown in Figure 4-11 is from a redundant system. The screen on a nonredundant system does not include the column of information listed under B-Side.
The License Configuration screen contains the following fields:
Number of Time-Slots Allocated—Display only. Shows the number of time slots that are currently assigned within the system.
Number of Time-Slots Available—Display only. Shows the maximum number of time slots available within your system, including the "free" DTG time slots.
Number of Time-Slots Licensed—Display only. Shows the number of time slots purchased for your system.
The values for these fields increase and decrease as you add and delete cards from the system database. If you continue to add cards until the Number of Time-Slots Allocated field exceeds the Number of Time-Slots Licensed field, the system will operate normally, but the last card (and any subsequent cards) will not be added to the database. (Refer to Cisco VCO/4K System Messages for information on warning and error messages.)
In addition, the number of time slots available may be more or less than the number of time slots licensed for the following reasons:
|
Note Timeslot information is also displayed on the Card Maintenance and main menu screens. |
Serial Number—Display only. Shows the serial number of the system's CPU card. This number is encoded in the card at the factory and cannot be altered. A unique license number is associated with this serial number.
License Number—Display only. Displays the license number associated with the serial number of your CPU. If your system does not have a Timeslot Allocation License, this field is blank.
Enter License #—Data entry via main keyboard. Use this field to enter a new license number when you update your Timeslot Allocation License or when you replace the CPU card.
You must update the Timeslot Allocation License each time you replace the system's CPU card or purchase a license for additional time slots.
When you update the Timeslot Allocation License on redundant systems, keep the following points in mind:
Complete the following steps to update the Timeslot Allocation License:
Step 1 If your system is redundant, make sure that you are operating from the active side.
Step 2 Access the License Configuration screen (refer to the "Accessing the License Configuration Screen" section).
The cursor is located in the Enter License # field.
Step 3 If you are using VCO/4K system software Version 5.1(3) or lower, proceed to Step 3a. If using VCO/4K system software Version 5.1(4) or higher, proceed to Step 3b.
a. Contact Cisco TAC, if using system software Version 5.1(3) or lower, and advise them of the number shown in the Serial Number field. If you have a redundant system, advise them of the number for side A. Proceed to Step 4.
b. Enter the Universal License Code, summa4, in both the A-Side and the B-Side Enter License # fields. Do not enter a license number in this field; it is not necessary to obtain a license number from Cisco Systems to obtain time slots. The system is configured for the maximum number of time slots available. 2K systems receive 1936 time slots, and 4K systems receive 4088 time slots. Proceed to Step 6.
Step 4 When TAC allocates a new license number to you, enter the number in the Enter License # field and press Enter. If you entered the serial number correctly, the License Configuration is updated. If you did not enter the license number correctly, the "Invalid License Number" error message appears. Reenter the number and press Enter.
Step 5 If you have a redundant system, advise TAC of the serial number listed under side B. Repeat Step 4 for side B from the active controller.
Step 6 Press the Prev Menu or Exit key to exit the License Configuration screen.
You can exit the License Configuration screen by pressing the Enter key without entering any numbers.
Use System Host Configuration to define general system-wide host configuration parameters, including host setup timer functionality, response to all host link failure conditions, host control of call load, host control verification, distribution of new incoming calls, reporting no host alarms at initialization, and reporting system initialization to all hosts.
Complete the following steps to access the System Host Configuration screen:
Step 1 Access the System Configuration Menu screen (refer to the "Accessing the System Configuration Menu Screen" section).
Step 2 Type J and press Enter.
The System Host Configuration screen appears (see Figure 4-12). The cursor is located in the Host Setup Timer field.

Host load sharing is controlled by the Incoming Call Distribution field. Set this parameter field to CYCLIC to enable load sharing. A list of all active host links is maintained by the system. When load sharing is enabled, this list is referred to for each new call attempt to obtain the next active host link, which is then assigned to the call. As other host links become active, they are added to the list. As host links fail, they are removed from the list, so that the load is always shared among all active links. Refer to the "Redundancy Modifications" section for related enhancements on redundant systems.
If a command is received for a call in which no controlling host has been assigned, the host issuing the command will be assigned. In addition, commands received from a host that is not controlling the call are rejected if you have enabled Host Control Checking.
Host Setup Timer, if enabled, is performed for the assigned host link. If the assigned host process does not respond to the initial call report within the defined setup timer interval, the call is torn down. A line/trunk port marked as Always Off-hook class of service is set back to idle state. Line/trunk ports with other classes of service are processed through permanent signaling conditioning (PSC).
Use the NO HOST token in an inpulse rule to modify the processing performed upon expiry of the host setup timer. In the event of a host timeout, the NO HOST token forces rule processing to execute the inpulse rule specified in the data field of the NO HOST token. This behavior can cause delays in tearing down a call which is not responded to by a host. Note that a self-referential NO HOST rule token can cause the inpulse rule to loop indefinitely.
The distribution of call reports does not apply to the informational routing reports generated by the TeleRouter software overlay (internal host). The routing reports are sent to either the controlling host associated with a given port involved in a call routing action, or are broadcast to all hosts.
The enhancements to the call processing behavior are summarized as follows:
The host setup timer processing provides the reorder sequence when no host link is available to control the call (provided the NO HOST token is not used to modify this behavior; refer to Host Load Sharing for a description). Use the Host Setup Timer field in the System Host Configuration screen to enable or disable host setup timing, as well as to configure the duration of the timer.
Use the All Host Link Failure Action field to generate a fatal alarm (system shutdown and reboot) or perform a conditional switchover (no reboot; redundant systems only) when all host links fail.
In the case of fatal alarm processing associated with the failure of all host links, no check for active host links on the standby controller are made before switching over and shutting down.
A system switchover occurs only if the standby controller is online (file synchronization complete) and has active host links. The active controller that switches to standby will not reboot following the conditional switchover. Redundant systems will not switch over when all hosts fail and the standby is not online (that is, ready to process calls) when conditional switchover is enabled. Furthermore, should a host link become active on the standby controller following the loss of all host links on the active controller, no switchover is initiated. However, the active host on the standby controller can initiate a switchover via a host command, thereby taking over call processing responsibilities.
To support the conditional switchover functionality, each side of a redundant switch must be aware of the number of active external host links on the other side.
Following file synchronization after a system boot, the number of active external host links associated with each side of a redundant system is transmitted by that side to the other side. Furthermore, any time the number of active host links changes on either side, that fact is transmitted to the other side. This allows both sides of a redundant switch to be aware of the number of active host links on each side.
The System Host Configuration screen contains the following fields:
Host Setup Timer—Data entry via Select key and the main keypad. Enables or disables host setup timer functionality, and configures the duration of the setup timer. The setup timer refers to the length of time that a host has to respond to a new call report. The valid range for the setup timer is from 1 to 60 seconds. The default value is 6. When host setup timing is disabled, the timer duration is not displayed. Valid selections are:
All Host Link Failure Action—Data entry via Select key. Specifies the action that will be taken if all host links fail during system operation. Valid selections are:
Host Control Of Call Load—Data entry via Select key. Enables or disables host control of call load feature. This feature is in effect when the host links are marked as ready to process calls. No call reports are issued to a host link until it is marked as available to process calls. Valid selections are:
Host Control Checking—Data entry via Select key. Enables or disables host control verification. Valid selections are:
Incoming Call Distribution—Data entry via Select key. Specifies how new incoming calls are distributed to available host links. Valid selections are:
No Host Alarm Reports At Init—Data entry via Select key. Enables or disables the suppression of alarm reports during the first five minutes following system initialization. During system initialization, several alarm conditions are set and cleared as part of normal processing. An Alarm Condition ($F0) report is normally issued to all active host links whenever an alarm condition is set or cleared. Enabling this feature suppresses these reports until the system is beyond the initialization period.
Report System Init To All Hosts—Data entry via Select key. Enables or disables the sending of Active/Standby Mode ($DC) reports to indicate that the system has completed initialization and is ready to process calls.
Conf Calls in Host Failure Proc—Data entry via Select key. Determines whether to include the voice path to/from a conference in the alarm message if a host link fails. (Refer to the All Host Link Failure Action field definition earlier in this section for detailed information regarding the actions that will be taken if all host links fail during system operation.) Valid selections are:
Use Ethernet/NFS/SNMP Configuration to configure the Ethernet/NFS/SNMP optional software.
Complete the following steps to access the Ethernet/NFS/SNMP Configuration screen:
Step 1 Access the System Configuration Menu screen (refer to the "Accessing the System Configuration Menu Screen" section).
Step 2 Type K and press Enter.
Step 3 The Ethernet/NFS/SNMP Configuration screen appears (see Figure 4-13). The cursor is located in the Current System Internet Address field.

Ethernet/NFS/SNMP Configuration consists of one screen. Use the Prev Field and Next Field keys to move through the fields. Use the Print Screen key to obtain a hard copy of this screen.
When Ethernet is initially installed, the system reads the information in the Current System Internet Address field and supplies a default value for class A, B, or C subnets in the System Subnet Mask field. If you want to change the class after the initial installation, type an IP address class type value into the System Subnet Mask field. The values corresponding to the class type are:
If you assign a new class of IP address at some point after the initial installation, you must also type in the appropriate system subnet mask. The system will not automatically reconfigure subnet mask based on your new IP address. You must reboot the system after changing the subnet mask in order for the new value to take effect.
The Ethernet/NFS/SNMP Configuration screen contains the following fields.
Current System Internet Address—Display only. Shows the Internet address for the switch.
New System Internet Address On Reboot—Data entry via main keypad. Specifies the VCO system Internet address to change to on reboot.
|
Note If you have already disabled NFS Access, you can skip over the NFS-related fields and continue on to configure the Gateway Routing Table parameters. |
Enable NFS File Access—Data entry via main keypad. Specifies whether NFS file access is enabled. Valid values are N for not enabled, or Y for enabled.
NFS Server Internet Address—Data entry via main keypad. Indicates the Internet address assigned to the device (usually the host computer) on which the log and trace files are to be stored. This value must be supplied by the Ethernet administrator.
NFS Server Name—Data entry via main keypad. Indicates the name assigned to the device (usually the host computer) on which the log and trace files are to be stored. This value must be supplied by the Ethernet administrator.
NFS Mount Directory Point—Data entry via main keypad. Indicates the name of the mount directory device into which the log and trace files are to be stored. This value must be supplied by the Ethernet administrator.
Target System Name—Data entry via main keypad. Indicates the name assigned to the system by the Ethernet administrator.
Target System User ID—Data entry via main keypad. Indicates the UNIX user ID assigned to the system by the Ethernet administrator.
Target System Group ID—Data entry via main keypad. Indicates the UNIX group ID assigned to the system by the Ethernet administrator.
Target System Umask—Data entry via main keypad. Indicates the user mask assigned to the system by the Ethernet administrator. Cisco Systems, Inc. recommends a value of 0x0 unless used on the LAN.
System Subnet Mask—Data entry via main keypad. Indicates the value of the IP address class type (class A, B, or C subnets). Valid values include nonnull characters.
Gateway Routing Configuration—Data entry via main keypad. Provides access to the Gateway Routing Configuration screen. Type any character and press Enter.
SNMP Management Station IP Address—Data entry via main keypad. Allows the user to enter an IP address of the SNMP station; the IP address can be changed as needed and there is no need for rebooting the system. The new IP address is saved to memory and to NVRAM. Type the IP address, then press Enter.
Use the Gateway Routing screen to gain access to a Cisco switch over a gateway.
Complete the following steps to access the Gateway Routing screen:
Step 1 Access the Ethernet/NFS/SNMP Configuration screen (refer to the "Accessing the Ethernet/NFS/SNMP Configuration Screen" section).
Step 2 Enter any character and press Enter.
The Gateway Routing Configuration screen appears (see Figure 4-14).

Gateway Routing Configuration consists of one screen. Use the Prev Field and Next Field keys to move through the fields. Use the Print Screen key to obtain a hard copy of this screen.
The Gateway Routing Configuration screen has various fields. The data entry fields correspond to the following supported gateways:
Current System Internet Address—Display only. Shows the current Internet address for the gateway.
Destination Subnet Address—Data entry via main keypad. Indicates the Internet address of the destination host or the destination network. A valid Internet address in standard notation (12.13.14.15) must be supplied by the Ethernet administrator.
Gateway IP Address—Data entry via main keypad. Indicates the address assigned to the gateway through which the destination host can be accessed. A valid Internet address in standard notation (12.13.14.15) must be supplied by the Ethernet administrator.
Use file transfer protocol (FTP) to create and remove directories, rename and delete files, and move files between a remote host and the VCO/4K switch. For example, use FTP to transfer VCO/4K core dump files from the VCO/4K to a remote host. The file can then be compressed or split (refer to the "FTP quote Command" section) and sent to Cisco for analysis.
To grant FTP access permission to the VCO, you must add privileged users to the database via the FTP Password Configuration screen.
Complete the following steps to access the FTP Password Configuration screen:
Step 1 Access the System Configuration screen (refer to the "Accessing the System Configuration Menu Screen" section).
Step 2 Type L and press Enter.
The FTP Password Configuration screen appears (see Figure 4-15).

To add a user, you must identify each user with a unique username, an alphanumeric password, and an access level. The access level must be set at 0, 1, 2, or 3 but has no affect on FTP usage.
The FTP Password Configuration screen contains a display-only area that lists the current users and their associated access levels, and a data entry area in which you can add, delete, or change user password configuration information.
The FTP Password Configuration screen contains the following fields:
Username—Display only. Shows the functional name assigned to each system user.
Access Level—Display only. Shows the current access level of each system user. Valid values are 0, 1, 2 and 3. (This field has no affect on FTP usage.)
Add/Delete/ Change (A/D/C only)—Data entry via main keypad. Specifies the function you want to perform. Valid values are:
Username—Data entry via main keypad. Specifies the name assigned to the system user. A username can consist of 3 to 15 uppercase and/or lowercase alphanumeric characters. You must enter the username for all command functions.
Current Password—Data entry via main keypad. Use when changing a user password, to specify the password currently associated with the username entered. Note that this field is accessible only when you type C in the Add/Delete/ Change (A/D/C only) field. All data entered in this field is hidden by asterisk (*) characters for security.
New Password—Data entry via main keypad. Use when entering a new user or when changing a user's password, to specify the new password assigned to the user. Note that this field is accessible after you type either A or C in the Add/Delete/ Change (A/D/C only) field. A password can consist of 4 to 12 uppercase and/or lowercase alphanumeric characters. All data entered in this field is hidden by asterisk (*) characters for security.
Verify Password—Data entry via main keypad. Verifies the exact spelling/case of the new password (after you type A or C in the Add/Delete/ Change (A/D/C only) field). The data in this field must exactly match the contents of the New Password field. All data entered in this field is hidden by asterisk (*) characters for security.
Access Level—Data entry via main keypad. Specifies the access level assigned to each user. Valid values are 0, 1, 2 and 3. Although this field must be set for each user, it has no affect on FTP usage.
The remote file transfer process is based on standard FTP, which involves two connections:
|
Note FTP is a TCP/IP or Internet tool and requires implementation on the remote site. |
The following limitations apply:
|
Note Due to the 2-minute limitation, do not use wildcards to transfer files as this would open data transfer connections in rapid succession. |
Complete the following steps to access the VCO/4K through FTP:
Step 1 Configure the VCO system for access. Add the users who will be allowed access to the VCO/4K through FTP. Use the FTP Password Configuration screen to add users.
Step 2 Invoke FTP from the FTP workstation. Type ftp hostname, where hostname is the IP address of the VCO. If the connection is successful, you are prompted for a username at the FTP prompt.
Step 3 Log in to the VCO/4K. If you enter a valid username, the system prompts for the password. If you enter an invalid username or password, the system returns the "Login failed" message.
|
Note Only one user can access the system through FTP at a time. If a user is already logged in to the system, any subsequent login does not proceed until the current FTP user exits. Then the login procedure continues. |
After you connect and log in to the VCO/4K system, you can create or remove directories, rename or delete files, or move files between the remote host and the VCO/4K.
|
Note There is no correlation between the VCO/4K login (refer to the "Password Configuration" section) and the FTP login. |
Examples of valid FTP commands are described in the following sections:
|
Note Although FTP supports other commands, only the commands listed in this document are supported. If you encounter difficulties with unsupported commands, log out of the application and log in. |
You can transfer files between a remote host and the VCO/4K. Use the procedures described in the following sections to transfer files:
Complete the following steps to set the mode for FTP:
Step 1 Log in to the system (refer to the "Accessing the VCO/4K via FTP" section).
Step 2 Type type at the FTP prompt to verify the current mode for the transfer of files.
|
Note Binary files must be transferred in binary mode only. |
The system responds by displaying the current mode.
Step 3 Type ascii to set the ASCII mode for file transfer, if needed. This is the default mode.
Step 4 Type bin to set the binary mode for file transfer.
Complete the following steps to transfer files from the VCO/4K to a remote host:
Step 1 Log in to the system (refer to the "Accessing the VCO/4K via FTP" section).
Step 2 Set the file transfer mode to binary (refer to the "Setting the Mode for FTP" section).
Step 3 Type cd <pathname> to navigate to the directory on the remote host where to transfer the files.
|
Note The pathname is the directory on the remote host. For example: cd C:/temp/dir. |
Step 4 Type get <filename> to transfer the file from the current directory on the VCO/4K to the directory on the remote host indicated in Step 1.
|
Note The filename is the name of the file to transfer. For example: get C:/corel. If you want to change the name of the filename as you transfer it to the remote host, use the following command: get <filename> <newfilename>. The newfilename is the designated filename on the remote host after the transfer. The original filename remains unchanged on the VCO/4K. |
Complete the following steps to transfer files from the remote host to the VCO/4K:
Step 1 Log in to the system (refer to the "Accessing the VCO/4K via FTP" section).
Step 2 Set the file transfer mode to binary (refer to the "Setting the Mode for FTP" section).
Step 3 Type cd <pathname> to navigate to the directory on the remote host where the file to be transferred resides.
|
Note The pathname is the directory on the remote host. For example: cd C:/temp/dir. |
Step 4 Type put <filename> to transfer the file from the remote host to the current directory on the VCO/4K.
|
Note The filename is the name of the file to be transferred. |
You can invoke the compress, uncompress, split, and join functions through FTP. You can also invoke these functions on the VCO/4K from the Disk Utilities screen. Refer to the "Disk Utilities" section for information on these Disk Utilities functions.
Use the quote command at the FTP prompt to execute the functions described in the following sections:
|
Note The quote command is case sensitive; it must be typed in lowercase. The compress, uncompress, split, and join commands are not case sensitive; they may be typed in uppercase or lowercase. |
Type quote compress <filename> to compress a file, where filename is the name of the file to be compressed. For example, quote compress C:core1.
|
Note The name of the file to be compressed cannot contain a file extension. |
Type quote uncompress <filename> to uncompress a file, where filename is the name of the file to be uncompressed. For example, quote uncompress C:core1.
Type quote split <filename> <file_size> to split a file, where filename is the name of the file to be split, and file_size is the desired size (in bytes) of the file segments. For example: quote split C:core1 1440000
|
Note The recommended split size for floppy disks is 1,440,000 bytes. |
Type quote join <destination_filename> <source_filename> to join a file, where destination_filename is the name of the file that is to contain all the file segments to be joined, and source_filename is the file segment(s) to be joined or appended to the destination_filename.
The destination file (i.e., destination_filename) is the file defined to be the composite of all the split files. After all file segments are joined, the destination file is identical to the original file before the split process occurred.
|
Note If the destination filename already exists, the source files are appended to it. |
The source files (source_filename) are the files that will comprise the new (destination) file. The source files are the file segments that resulted from the split file function.
You can specify the source file by filename with no extension. If the filename is designated without an extension, all files with that filename are joined. For example, quote join c:joinfile core1
In the example above, the files are joined as if the extension was designated with the multicharacter (*) wildcard. The order is based on the alpha character ordering of the file's extension.
The join operation supports alphabetic ordered wildcard symbols. You can specify the source file with one of the following single character wildcards:
The join operation automatically appends the split files in alphabetic order to the destination file. For example, use of the ? wildcard in the file extension, quote join c:joinfile core1.x?? This command joins all files named core1 with an extension beginning with x, followed by any two characters, to a file named joinfile. It joins multiple files because of the use of the ? wildcard.
For example, use of the * wildcard in the file extension: quote join c:joinfile core1.* This command joins all files named core1, with any extension, to a file named joinfile. It joins all files because of the use of the * wildcard.
You may also initiate the join operation for each individual split file by indicating the specific filename with the full extension. For example, quote join c:joinfile core1.xaa. If you use this method, you must specify the files in the correct order by file extension (alphabetic order) in order to reproduce the original file. If there are additional file segments to be added to the destination file, you must use the syntax above to append each one. For example, the next command would be quote join c:joinfile core1.xab.
If you issued this command after the quote join c:joinfile core1.xaa command, the file named core1.xab would be appended to the file named joinfile, after the contents of the file core1.xaa.
|
Note If you append one file at a time, you must append the files in the order which you want them added to the destination file. |
You can type the following additional FTP commands at an FTP prompt to manipulate files and directories:
ls—Lists the files in the current directory.
dir—Lists the file and directory names in the current VCO/4K directory, along with additional information such as size, date of creation, and date of recent modification.
pwd—Displays the current directory pathname.
cd <pathname>—Changes the current directory to the directory indicated by pathname. The pathname is a directory. Use only absolute pathnames starting with /. All absolute pathnames are relative to the C: drive.
mkdir <dirname>—Creates a new directory under the current directory. The dirname is the directory name. If you are unable to create a directory (typically as a result of restricted privileges), an error message is displayed.
rmdir <dirname>—Removes the directory indicated. The dirname is the directory name. The directory must be empty. The directory must be located in the current directory. If the directory does not exist, an error message is displayed.
delete <filename>—Deletes the filename indicated from the current directory. If the filename does not exist, an error message is displayed. If the filename does not reside in the current directory, include a pathname in the command.
rename <filename new_filename>—Renames the filename to the new_filename.
rename <dirname new_dirname>—Renames the dirname to the new_dirname.
bye—Exits the FTP application.
close—Closes the FTP session but does not exit the FTP application.
Use the Multiple Tone Plan Configuration screen to configure the tone plans associated with the multiple tone plan feature. Several tone plans can be configured in a single VCO/4K, with no more than six of the tone plans containing MFCR2 tones. Refer to the Cisco VCO/4K System Software Version 5.2(n) Release Notes for a list of currently available tone plans.
The DTG/DTG2 cards are not supported for users of the multiple tone plan feature. Complete the following steps before using the VCO/4K system administration multiple tone plan feature configuration menu options:
Step 1 Ensure that the default multiple tone plan SPC-TONE card type is in service (SPC-TONE provides the same functionality as DTG/DTG2).
Step 2 Ensure that the SPC-OUTP outpulsing resource is in service and added to a resource group.
Step 3 Take the DTG/DTG2 cards out of service (OOS).
You are now ready to configure the multiple tone plan feature.
Complete the following steps to access the Multiple Tone Plan Configuration screen:
Step 1 Access the Administrator Main Menu screen.
Step 2 Type B and press Enter.
The System Configuration Menu screen is displayed. The cursor is located at the Enter Selection prompt.
Step 3 Type M and press Enter.
The Multiple Tone Plan Configuration screen appears (see Figure 4-16).

The Multiple Tone Plan Configuration screen consists of one screen. The data that this screen contains is used to identify specific tone plans with which to further configure the VCO/4K system via the following administration screens and extended mode commands:
Refer to the Cisco VCO/4K Extended Programming Reference for more information on extended mode commands.
The Multiple Tone Plan Configuration screen contains the following fields.
Default Tone Plan—Data entry via Select key. Identifies the name of the default tone plan installed.
|
Note Any installed tone plan can be the default tone plan. |
Tone Plan ID—Display only. Describes the tone plan ID number associated with the Name directly to its right.
Name—Date entry via Select key. Identifies the name of the tone plan associated with the Tone Plan ID directly to its left.
n Tones Installed—Display only. Identifies the number of tone plans, other than the default, installed on the VCO/4K system. Access the Tone Files Installation/Removal screen to determine the names of the tone plans installed.
Complete the following steps to assign multiple tone plan names to ID numbers in the system database:
Step 1 Access the Multiple Tone Plan Configuration screen (refer to the "Accessing the Multiple Tone Plan Configuration Screen" section).
The cursor is located at the Default Tone Plan entry field.
Step 2 Use the Select key to select the appropriate default tone plan for your configuration requirements.
|
Note If the correct default tone plan is listed, proceed to Step 3. |
Step 3 Use the Next Field key to position the cursor in the Name entry field associated with the first Tone Plan ID.
Step 4 Use the Select key to select an appropriate tone plan for your configuration requirements.
Step 5 Press the Next Field key to position the cursor in the next available Name entry field.
Step 6 Use the Select key to select an appropriate tone plan for your configuration requirements.
Step 7 Repeat Step 5 and Step 6 for the remaining Name fields, as needed.
Step 8 Press Enter.
The following message appears at the bottom of the screen:
Press 'Y' to Confirm Change
Step 9 Press Y.
The following message appears at the bottom of the screen:
Tone Configuration Changed!
|
Note Your configuration may not require that all available tone plan selections be made; select only those needed. Refer to the Cisco VCO/4K System Software Version 5.2(n) Release Notes as you configure the multiple tone plans in the VCO/4K system to ensure that the limit of six MFCR2 tone plans in one system is not exceeded. |
The selections are saved to the VCO/4K system configuration table; the data is now backed up and can be restored after a system reboot.
You have assigned multiple tone plan names to ID numbers. Refer to the "SPC-TONE Plan Configuration" section to assign specific tone plans to individual SPC spans of the VCO/4K.
![]()
![]()
![]()
![]()
![]()
![]()
![]()
![]()
Posted: Sat Sep 28 15:14:42 PDT 2002
All contents are Copyright © 1992--2002 Cisco Systems, Inc. All rights reserved.
Important Notices and Privacy Statement.