|
|

Table Of Contents
Cisco Router and Security Device Manager Quick Start Guide
Translated Versions of This Document
Task 1: Install Interface Cards, and Cable the Router
Task 2: Configure Your PC, and Connect It to the Router
Is Your Router Configured as a DHCP Server?
These Routers Are Not Configured as DHCP Servers
Task 4: Complete Cisco SDM Express
Task 5: Reconnect to the Router Using the New IP Address
Task 6: Install SDM from the CD
You're Done! Where to Go from Here
For More Information About SDM and About Your Router
Obtaining the Latest Version of SDM
I Use the Cisco IOS Startup Sequence
I Want to Enable SDM on a Router I Configured Using the Cisco IOS Startup Sequence
Cisco Router and Security Device Manager Quick Start Guide
Cisco Router and Security Device Manager (SDM) is an easy-to-use device management tool that allows you to configure Cisco IOS security features and network connections through an intuitive web-based graphical user interface. This quick start guide shows you how to connect your PC to your router and begin using SDM.
SDM runs under Firefox 1.0.3, Internet Explorer version 5.5 or later, and under Netscape 7.1 on a PC that is running Microsoft Windows XP, Windows 2000, Windows 2003, Windows ME, or Windows NT 4.0 (with Service Pack 4). SDM supports Java plug-in version 1.4.2_05 and later.
If you do not want to use SDM to configure the router, see the "I Use the Cisco IOS Startup Sequence" section.
Translated Versions of This Document
Translated versions of this document are available in the following languages: German, Dutch, French, Spanish, and Italian.
•
Die Deutsche Version dieses Dokuments finden Sie unter http://www.cisco.com/go/sdm. Klicken Sie im linken Rahmen auf Technical Documentation.
•
Klik opTechnical Documentation in het linkerdeelvenster.
•
Cliquez sur Technical Documentation dans le volet gauche.
•
•
Task 1: Install Interface Cards, and Cable the Router
Before SDM can be used to configure the router, you must install all the necessary hardware accessories that are applicable to your router, such as WAN interface cards (WICs), network modules (NMs), or advanced interface module (AIM) cards that you will use to connect to the network. Refer to the quick start guide for your router for instructions on installing these interface cards, cabling the router, and verifying that all the connections are working properly.
Task 2: Configure Your PC, and Connect It to the Router
You have to set up the PC to communicate with SDM. SDM is shipped with a default configuration file that assigns an IP address to a LAN interface on the router, and you must configure the PC to be on the same subnet as the router LAN interface.
First determine whether your router is configured as a Dynamic Host Configuration Protocol (DHCP) server or not.
Is Your Router Configured as a DHCP Server?
If you have one of the routers listed in Table 1, the router is configured as a DHCP server. Configure the PC to obtain an IP address and a Domain Name System (DNS) server IP address automatically, as shown in Figure 1. Connect the Ethernet port on the PC with the router port shown in Table 1.
If you do not find your router model in Table 1, look for the router model you are setting up in Table 2 in the section " These Routers Are Not Configured as DHCP Servers."
Figure 1 Configuring the PC to Obtain an IP Address Automatically
When you have configured your PC and connected it to the router, go to Task 3: Log on to the Router.
These Routers Are Not Configured as DHCP Servers
If you did not find your router in Table 1, your router is not configured as a DHCP server, and you must assign a static IP address to the PC. Click Use the following IP address, and assign an IP address between 10.10.10.2 and 10.10.10.6 to the Ethernet port of the PC, and use the subnet mask 255.255.255.248, as shown in Figure 2. You can leave the Default gateway and DNS server fields blank. Find your router model in Table 2 and connect the Ethernet port on the PC to the router port shown in the table.
Figure 2 Configuring Your PC with a Static IP Address Between 10.10.10.2 and 10.10.10.6
Table 2 lists the routers that are not configured as DHCP servers.
When you have configured your PC and connected it to the router, go to Task 3: Log on to the Router.
Task 3: Log on to the Router
If you received the SDM CD with your router, use the CD to connect to the router by following the next procedure. If you did not receive the SDM CD, use the procedure in the "I Did Not Receive the SDM CD" section.
I Received the SDM CD
If you received the SDM CD, complete the following procedure.
Step 1
Step 2
Step 3
Figure 3 SDM CD Screen
Step 4
Figure 4 First-Time Router Setup Window
Step 5
Step 6
I Did Not Receive the SDM CD
If you did not receive the SDM CD, use this procedure to connect to the router.
Step 1
http://10.10.10.1
Step 2
Step 3
Tip
•
•
•
•
Task 4: Complete Cisco SDM Express
Cisco SDM Express is an SDM program that lets you quickly configure the router LAN and Internet connections.
Step 1
Figure 5 SDM Express Launch Page
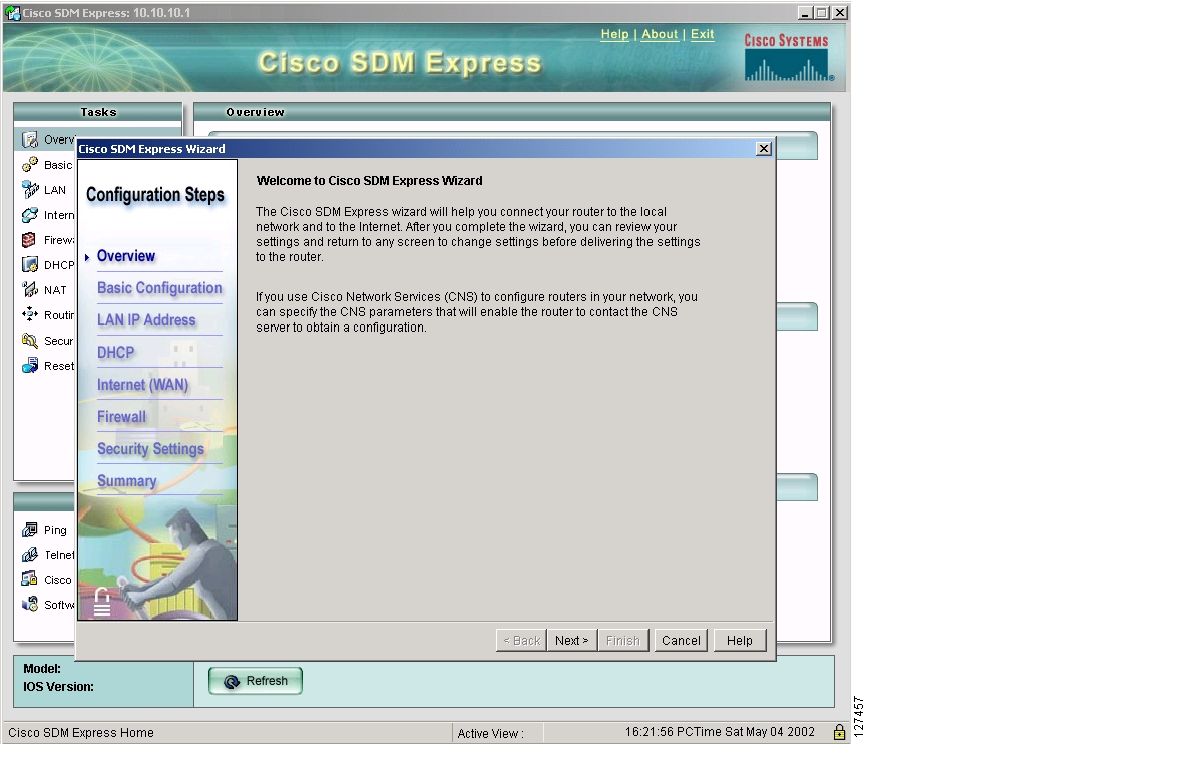
Step 2
Figure 6 SDM Express Overview and Wizard Pages
Tip
Step 3
Step 4
Task 5: Reconnect to the Router Using the New IP Address
If you changed the IP address of the router LAN interface as recommended in the SDM Express wizard, you lost your connection to the router. Follow these steps to reconnect to your router:
Step 1
If you did not configure a DHCP server on the router, your network uses static IP addresses, and you must assign a new IP address to the PC Ethernet interface. Place it on the same subnet as the router's Ethernet port, which you configured in Task 4. Figure 7 shows an example PC configuration when the router LAN IP address is 20.20.20.1 (as indicated by the Default gateway field) and the subnet mask is 255.255.255.0. The PC is configured with an IP address of 20.20.20.2, an address on the same subnet as the router.
Figure 7 If you did not configure the router as a DHCP server, configure the PC with a static IP address (Example)
Step 2
http://new-IP-addressFor example, if you gave the LAN interface the IP address 20.20.20.1, you would enter the following command in the browser.
http://20.20.20.1Step 3
Figure 8 SDM Home Page
If you followed the procedure in the "I Received the SDM CD" procedure, the SDM Express Overview window appears, as shown in Figure 9.
Figure 9 SDM Express Overview Window
Step 4
Step 5
If you did not receive the SDM CD, SDM is already installed on your router. You can proceed to the "Using SDM" section to learn about SDM.
Task 6: Install SDM from the CD
If you have the SDM CD, you can install SDM on the PC and on the router. If SDM launched when you reconnected to the router in Task 5: Reconnect to the Router Using the New IP Address, SDM is already installed on the router and you do not need to complete this procedure.
The installation wizard on the CD guides you through installing SDM and its components on your PC and your router. Installing SDM on your PC allows you to use SDM to configure and manage other routers on your network.
Step 1
Figure 10 Click Install SDM
Step 2
Figure 11 Select Where You Want to Install SDM
You can also install SDM and its other applications on your router, or you can install them on both the PC and the router.
Step 3
Using SDM
If SDM is installed on the router, start it by opening a browser and entering the new IP address that you gave the LAN interface, just as you did in Task 5: Reconnect to the Router Using the New IP Address.
http://new-IP-addressIf SDM is installed on the PC, start it by selecting it from the program menu (Start > Programs >
Cisco Systems > SDM 2.1. Then, provide the IP address of the router in the SDM Launcher window ( Figure 12).Figure 12 SDM Launcher
Tip
Cisco SDM provides a series of easy-to-use wizards that quickly take you step by step through configuring your router, without requiring knowledge of the Cisco IOS software CLI. You can use SDM wizards to:
•
•
•
•
•
•
•
After you have used wizards to create basic configurations, SDM enables you to edit the configurations you created. You can edit firewalls to create a firewall policy for your network. You can also configure and manage the Intrusion Prevention System (IPS) on the router to protect your network from attacks, and perform additional tasks, such as creating user accounts and creating router management policies.
To start a wizard, simply click the Configure button at the top of the SDM home page shown in Figure 8, and then click the appropriate button in the left frame of the SDM Configuration window, Figure 13.
Figure 13 An SDM Configuration Window
Click the Help button in any SDM window for more information on the task you are performing.
SDM automatically saves changes to the router's running configuration, and you can direct it to save the running configuration to the startup configuration.
You're Done! Where to Go from Here
Now that you have used SDM to give your router an initial configuration, you can continue to use SDM to configure additional features or modify existing feature configurations.You can use the SDM URL to start SDM and then add to or modify your router configuration at any time.
If you have other supported routers on which you would like to install SDM, see the "Obtaining the Latest Version of SDM" section.
For More Information About SDM and About Your Router
For additional information about SDM features, refer to the SDM online help. Additional information about SDM is also available on the SDM website at http://www.cisco.com/go/sdm. This website provides access to detailed information about SDM, including an SDM FAQ, data sheet, customer presentation, Flash demo, and links to technical documentation and product updates. If you are configuring a Cisco 83x router, you should obtain the document Switching From Cisco Router Web Setup to Cisco Router and Security Device Manager on Cisco 83x Series Routers.
Refer to the quick start guide for your router for other procedures, such as connecting a PC to the router console port so that you can use the CLI when you need to, and using the router LEDs to verify installation. The quick start guide may also contain important warranty information.
Obtaining the Latest Version of SDM
SDM is regularly enhanced to provide new features. If you are already running SDM on the router, you can update SDM automatically by clicking on the Tools menu and selecting Update SDM. SDM will determine if there is a more recent version available and enable you to download it and install it on the router.
If you have a supported router that does not have SDM installed, you can download the latest version of SDM free of charge and instructions for installing it on your router from the following location:
http://www.cisco.com/pcgi-bin/tablebuild.pl/sdm
You should consult the SDM release notes to determine if it is supported for the router on which you want to install it.
Updating SDM from the CD
You can use the SDM CD to update the SDM software on other routers. Follow the procedure in the "Task 6: Install SDM from the CD" section, selecting Cisco Router in the Install Options screen in Figure 11. Provide the router's IP address, a username with privilege level 15 and the password. When asked if you want to overwrite the SDM software, click Yes. The Installation wizard will update SDM software on your router.
I Use the Cisco IOS Startup Sequence
This section explains how to use the Cisco IOS startup sequence to configure your router instead of using SDM.
Note
Because SDM uses a default configuration file, your router will not execute the standard Cisco IOS startup sequence. You can use this section to run the Cisco IOS setup utility and take advantage of a TFTP or BOOTP configuration download, or use other features available through the standard Cisco IOS startup sequence. It also tells you what to do if you want to use SDM in the future.
The configuration file shipped with your router does the following:
•
•
•
•
If you want to erase the existing configuration and take advantage of the Cisco IOS startup sequence, perform the following steps. SDM will remain on the router.
Step 1
Step 2
Step 3
Step 4
yourname> enableyourname#Step 5
yourname# erase startup-configStep 6
Step 7
yourname# reloadStep 8
After you press Enter, the router will begin executing the standard startup sequence. If you want to use SDM to perform subsequent configurations for the router, you must manually configure the router to support web-based applications, and the Telnet and Secure Shell (SSH) protocols. You must also create a user account with a privilege level of 15. See the "I Want to Enable SDM on a Router I Configured Using the Cisco IOS Startup Sequence" section for this information.
I Want to Enable SDM on a Router I Configured Using the Cisco IOS Startup Sequence
This section provides information on enabling SDM on a router that has been configured using the Cisco IOS startup sequence or the CLI. If you erased the factory startup configuration in order to use the Cisco IOS startup sequence, you can still use SDM. In order to do so, you must configure the router to support web-based applications, configure it with a user account defined with privilege level 15, and then configure it to support the Telnet and SSH protocols. These changes can be made using a telnet session or using a console connection.
Configuring the Router to Support Web-Based Applications, a User with Priv 15, and Telnet/SSH
Step 1
Router(config)# ip http serverRouter(config)# ip http secure-serverRouter(config)# ip http authentication localIf the router uses an IPSec Cisco IOS image, the HTTPS server is enabled. Otherwise only the HTTP server is enabled.
Step 2
Router(config)# username <username> privilege 15 password 0 <password>Replace <username> and <password> with the username and password that you want to configure.
Step 3
Router(config)# line vty 0 4Router(config-line)# privilege level 15Router(config-line)# login localRouter(config-line)# transport input telnetRouter(config-line)# transport input telnet sshRouter(config-line)# exitStep 4
Router(config)# logging buffered 51200 warningTo begin using SDM on a router that has received a manual configuration, read the next section.
Starting SDM on a Manually Configured Router
SDM is a web-based application that must be run from a PC that is connected to the router over a LAN. See Table 1 or Table 2 to determine which router port to connect the PC to. If the router is configured as a DHCP server, the PC must be configured to receive an IP address automatically. If the router is not configured as a DHCP server, you must configure the PC with a static IP address on the same subnet as the router interface to which you are connecting the PC. For example, if the router interface has the IP address 172.16.30.1, and the subnet mask is 255.255.255.248, you must configure the PC IP address in the range 172.16.30.2 through 172.16.30.6.
Step 1
https://LAN-IP-addressStep 2
The SDM Overview window appears, as shown in Figure 8. To continue configuring your router, see the "Using SDM" section.
Cisco.com
You can access the most current Cisco documentation on the World Wide Web at this URL:
http://www.cisco.com/univercd/home/home.htm
You can access the Cisco website at this URL:
See the quick start guide for the router you have just configured for information on obtaining other documentation, providing documentation feedback, and obtaining technical assistance.
Printed in the USA on recycled paper containing 10% postconsumer waste.
Copyright © 2005 Cisco Systems, Inc. All rights reserved.
![]()
![]()
![]()
![]()
![]()
![]()
![]()
![]()
Posted: Tue Jan 31 07:10:42 PST 2006
All contents are Copyright © 1992--2006 Cisco Systems, Inc. All rights reserved.
Important Notices and Privacy Statement.