|
|

Table Of Contents
Add App-Name Application Entry
Add Fragment application entry
Add or Edit http Application Entry
Firewall Policy
The Firewall Policy feature lets you view and modify firewall configurations— access rules, and/or CBAC inspection rules—in the context of the interfaces whose traffic they filter. Using a graphical representation of the router and its interfaces, you can select different interfaces on the router and see whether an access rule or an inspection rule has been applied to that interface. You can also view the details of the rules displayed in the Edit Firewall Policy/ACL window.
Edit Firewall Policy/ACL
Use the Edit Firewall Policy/ACL window to view the access and inspection rules in a context that displays the interfaces the rules are associated with. Also use it to modify the access and inspection rules that are displayed.
Configure a Firewall Before Using the Firewall Policy Feature
Before using the Edit Firewall Policy/ACL window, you should perform the following tasks:
1.
Configure LAN and WAN interfaces. You must configure the LAN and WAN interfaces before you can create a firewall. You can use the LAN and WAN wizards to configure connections for your router.
2.
3.
Use the Firewall Policy View Feature
After you have created the firewall, you can use the Firewall Policy View window to get a graphical view of the firewall in the context of the router interfaces, and to modify it if you need to.
The four major sections in this topic are:
•
•
•
For a use case example, see Firewall Policy Use Case Scenario.
Note
Select a Traffic Flow
Use the From and To lists of interfaces to select a particular traffic flow: traffic that enters the router on a specified From interface and that exits the router on a specified To interface. SDM displays all interfaces that have IP addresses in alphabetical order in both the From and To interface lists. By default, SDM selects the first interface in the From list, and the second interface in the To list.
There must be a least two configured interfaces on the router. If there is only one, SDM will display a message telling you to configure an additional interface. The following graphic shows the Traffic Selection panel.
From-Select the interface from which the traffic flow you are interested in originates. The firewall will protect the network connected to the From interface. The From list contains only interfaces with configured IP addresses.
To—Select the interface out of which the traffic will leave the router. . The To list contains only interfaces with configured IP addresses.

Details button. Click to view details about the interface. Details such as IP address, encapsulation type, associated IPSec policy, and authentication type are provided.
Example—To view the traffic flow from the network connected to the Ethernet 0 interface exiting the router on the Serial 0 interface exists, select From: Ethernet 0, and select To: Serial 0, and click Go.
Go button—Click Go to update the diagram with information about the interfaces you have selected. The diagram is not updated until you click Go. The Go button is disabled if you have not selecte a From interface or a To interface, or if the From and To interfaces are the same.
View Option—Selecting Swap From and To interface allows you to swap the interfaces that you originally selected without having to reselect them from the From list and the To list. You can use the swap option if you want to create a firewall protecting both the network connected to the From interface and the network connected to the To interface. You can select View all Access control lists in traffic flow when one access rule has been applied to the From interface and another access rule has been applied to the To interface for a traffic direction you have chosen. The entries of both access rules are displayed in another window.
Examine the Traffic Diagram and Select a Traffic Direction
The traffic diagram contains a diagram of the router, with a From interface and a To interface. When you select the From and To interfaces and click Go, this area is dynamically updated to show the selected interfaces and the types of rules applied, as well as the direction in which they have been applied.
The following illustration shows the traffic selection panel and the traffic diagram area displaying the access rules and inspection rules in the selected traffic flow.
Originating Traffic—Click this to highlight the part of the diagram that represents the traffic flow that enters the router at the From interface and exits the router at the To interface. When this area is highlighted, you can see the details of the rules applied in the direction of traffic flow.
Returning Traffic—Click this to highlight the part of the diagram that represents returning traffic. When this area is highlighted, you can see the details of the rules applied to traffic that enters the router on the To interface and exits the router on the From interface.
Icons—Rules are represented by icons in the traffic flow:
Make Changes to Access Rules and Inspection Rules as Necessary
The policy panel shows the details of the rules applied to the selected traffic flow. The Policy panel is updated when the From and To interfaces are selected and when the Traffic Diagram is toggled between Originating Traffic focus and Returning Traffic focus.
ThePolicy panel is blank if an access rule that contains no entries has been associated with an interface. For example, if a rule name was associated with an interface using the CLI, but entries for the rule were not created, this panel would be blank. If the Policy Panel is blank, you can use the Add button to create entries for the rule.
Service Area header fields
Firewall Feature Availability—If the Cisco IOS image that the router is using supports the Firewall feature, this field contains the value Available.
Access Rule—The name or number of the access rule whose entries are being displayed.
Inspection Rule—The name of the inspection rule whose entries are being displayed.
Interface List—If the selected traffic flow (Originating or Returning) contains an access rule on both the From interface and the To interface, you can use this list to toggle between the two rules.
Service Area buttons

Service area buttons are disabled if the rule is read-only. A rule is read-only when it contains syntax that SDM does not support.
Add—Click to add an access rule entry. Specify whether you want to add the entry before or after the entry currently selected. Then, create the entry in the Add an Entry window. Remember that the order of entries is important. SDM displays the Extended entry dialog when you add an entry from the Edit Firewall Policy/ACL window. If you want to add a standard rule entry, you can do so in the Rules window.
Edit—Click to edit a selected access rule entry. Although you can only add extended rule entries in the Edit Firewall Policy/ACL window, you are not prevented from editing a standard rule entry that has already been applied to a selected interface.
Cut—Click to remove a selected access rule entry. The entry is placed on the clipboard and can be pasted to another position in the list, or it can be pasted to another access rule. If you want to reorder an entry, you can cut the entry from one location, select an entry before or after the location that you want for the cut entry, and click Paste. The Paste context menu allows you to place the entry before or after the entry you selected.
Copy—Select a rule entry and click to put the rule entry on the clipboard.
Paste—Click to paste an entry on the clipboard to the selected rule. You will be prompted to specify whether you want to paste the entry before or after the currently selected entry. If SDM determines that an identical entry already exists in the access rule, it displays the Add an Extended Rule Entry window so that you can modify the entry. SDM does not allow duplicate entries in the same access rule.
If there is an existing standard rule that filters the returning traffic flow to which you are applying the firewall, SDM informs you that it will convert the standard access rule to an extended rule.
Examples—To apply a firewall that protects the network connected to the Ethernet 0 interface from traffic entering the Ethernet 1 interface, select From: Ethernet 0, and To: Ethernet 1. Then click Apply Firewall.
If you want to apply a firewall that protects the network connected to the Ethernet 1 interface from traffic entering the Ethernet 0 interface, you can do so in the Rules window.
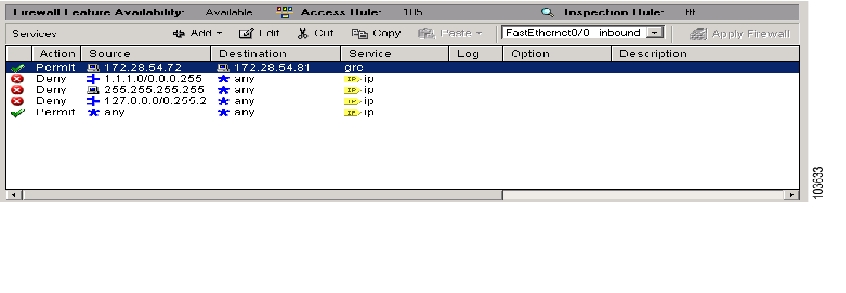
Service Area Entry Fields
The following table describes the icons and other data in the Service Area entries.
Whether the traffic will be permitted or denied

Permit source traffic

Deny source traffic
DestinationNetwork or host address, or any host or network.

The address of a network

The address of a host

Any network or host
Type of service filtered.

Examples: TCP, EIGRP, UDP, GRE. See IP Services.

Examples: Telnet, http, FTP. See TCP Services.

Examples: SNMP, bootpc, RIP. See UDP Services.

Internet Group Management Protocol ( IGMP).

Examples: echo-reply, host-unreachable. See ICMP Message Types.
Whether or not denied traffic is logged.

Log denied traffic. To configure logging for firewalls see Firewall Log.
Options configured using the CLI
No icons.
Any description provided.
No icons
Applications Area
This area appears if the Cisco IOS image running on the router supports CBAC Inspection rules. The Applications area displays the inspection rule entries that are filtering the traffic flow. This area is updated whenever a new traffic flow is selected. This area displays the inspection rule that will affect the selected direction of traffic.
The Applications area is shown in the following graphic.
The Applications area will display one of the following for Originating traffic:
•
•
Inspection rules applied to Returning traffic are not displayed.You can display an inspection rule applied to Returning traffic by clicking Swap From and To interfaces in the View Options menu. You can view inspection rules that are not displayed in the Edit Firewall Policy/ACL window in the Inspection Rules window.
Add—If there is no inspection rule, you can add the SDM default inspection rule, or you can create and add a custom inspection rule. If you add the SDM default inspection rule to a traffic flow with no inspection rule, it will be associated with the inbound traffic to the From interface. You can add an entry for a specific application whether or not an inspection rule already exists.
Edit—Click to edit a selected entry.
Delete—Click to delete a selected entry.
Global Settings—Click to display a dialog box that enables you to set global timeouts and thresholds.
Summary—Click to display the application or protocol name and description for each entry.
Detail—Click to display the application or protocol name, description, alert status, audit trail status, and timeout settings for each entry.
Application Area entry fields
The following table describes the Application area entry fields.
Apply Changes Button
Click to deliver changes you have made in this window to the router. If you leave the Edit Edit Firewall Policy/ACL window without clicking Apply Changes, SDM displays a message indicating that you must either apply changes or discard them.
Discard Changes Button
Click to discard changes you have made in this window. This button does not let you remove changes that you have delivered to the router using the Apply Changes button.
Swap From and To Interfaces to Bring Other Rules into View
SDM only displays inspection rules for Originating traffic in the Application area. If you want to view an inspection rule that is applied to Returning traffic in the diagram, select Swap From and To interfaces in the View Options menu.
Add App-Name Application Entry
Use this window to add an application entry that you want the Cisco IOS firewall to inspect.
Alert Action
One of the following:
•
•
•
Audit Action
One of the following:
•
•
•
Timeout
Specify how long the router should wait before blocking return traffic for this protocol or application. The field is prefilled with the default value for the protocol or application.
Add rpc Application Entry
Add a Remote Procedure Call (RPC) program number in this window, and specify Alert, Audit, Timeout, and Wait time settings.
Alert Action
One of the following:
•
•
•
Audit Action
One of the following:
•
•
•
Timeout
Specify how long the router should wait before blocking return traffic for this protocol or application. The field is prefilled with the default value.
Program Number
Enter a single program number in this field.
Wait Time
You can optionally specify how many minutes to allow subsequent RPC connections from the same source to be made to the same destination address and port. The default wait time is zero minutes.
Add Fragment application entry
In this window, you can add a fragment entry to an inspection rule that you are configuring in the Edit Firewall Policy/ACL window, and you can specify Alert, Audit, and Timeout settings. A fragment entry sets the maximum number of unreassembled packets that the router should accept before dropping them.
Alert Action
One of the following:
•
•
•
Audit Action
One of the following:
•
•
•
Timeout
Specify how long the router should wait before blocking return traffic for this protocol or application. The field is prefilled with the default value.
Range (optional)
Enter the maximum number of unreassembled packets the router should accept before dropping them. Enter a value between 50 and 10000.
Add or Edit http Application Entry
Use this window to add an http application to the inspection rule.
Alert Action
One of the following:
•
•
•
Audit Action
One of the following:
•
•
•
Timeout
Specify how long the router should wait before blocking return traffic for this protocol or application. The field is prefilled with the default value.
Hosts/network for Java applet download
The source hosts or networks whose applet traffic is to be inspected. Multiple hosts and networks can be specified.
Click Add to display the Java Applet Blocking window in which you can specify a host or network.
Click Delete to remove an entry from the list.
Java Applet Blocking
Use this window to specify whether Java applets from a specified network or host should be permitted or denied.
Action
One of the following:
•
•
Host/Network
Specify the network or the host.
Type
One of the following:
•
•
•
IP Address/Wildcard Mask
Enter a network address and then the wildcard mask to specify how much of the network address must match exactly.
For example, if you entered a network address of 10.25.29.0 and a wildcard mask of 0.0.0.255, any Java applet with a source address containing 10.25.29 would be filtered. If the wildcard mask were 0.0.255.255, any Java applet with a source address containing 10.25 would be filtered.
Host Name/IP
This field appears if you selected A Host Name or IP Address as Type. If you enter a host name, ensure that there is a DNS server on the network that can resolve the host name to an IP address.
SDM Warning: Inspection Rule
This window is displayed when SDM finds two inspection rules have been configured for a direction in a traffic flow. For example, you might have one inspection rule applied to the inbound traffic to the From interface, and another applied to the outbound traffic on the To interface. Two inspection rules may not harm the functioning of the router, but they may be unnecessary. SDM allows you to keep the inspection rules the way they are, to remove the inspection rule on the From interface, or to remove the rule on the To interface.
•
•
•
Before you make a selection and click OK, you may want to click Cancel, and examine the two inspection rules to determine if you need to need to add entries to the inspection rule you want to retain. You can add entries by using the Add button in the Application area toolbar in the Edit Firewall Policy/ACL window.
SDM Warning: Firewall
This window appears when you click Apply Firewall in the Edit Firewall Policy/ACL window. It lists the interfaces to which it will apply a rule, and describes the rule that it will apply.
Example:
SDM will apply firewall configuration to the following interfaces:Inside (Trusted) Interface: FastEthernet 0/0* Apply inbound default SDM Inspection rule* Apply inbound ACL. Anti-spoofing, broadcast, local loopback, etc.).Outside (Untrusted) Interface: Serial 1/0* Apply inbound access list to deny returning traffic.Click OK to accept these changes, or click Cancel to stop the application of the firewall.
![]()
![]()
![]()
![]()
![]()
![]()
![]()
![]()
Posted: Fri Oct 7 13:31:02 PDT 2005
All contents are Copyright © 1992--2005 Cisco Systems, Inc. All rights reserved.
Important Notices and Privacy Statement.