|
|

The Internet Protocol (IP) is a packet-based protocol used to exchange data over computer networks. IP handles addressing, fragmentation, reassembly, and protocol demultiplexing. It is the foundation on which all other IP protocols, collectively referred to as the IP Protocol suite, are built. IP is a network-layer protocol that contains addressing and control information that allows data packets to be routed.
The Transmission Control Protocol (TCP) is built upon the IP layer. TCP is a connection-oriented protocol that specifies the format of data and acknowledgments used in the transfer of data. TCP also specifies the procedures that the computers use to ensure that the data arrives correctly. TCP allows multiple applications on a system to communicate concurrently because it handles all demultiplexing of the incoming traffic among the application programs.
This chapter describes how to configure the IP protocol. For a complete description of the commands in this chapter, refer to the "IP Commands" chapter of the Router Products Command Reference publication. For information on configuring the various IP routing protocols, refer to the "Configuring IP Routing Protocols" chapter of this manual. For historical background and a technical overview of IP, see the Internetworking Technology Overview publication.
Cisco's implementation of IP provides most of the major services contained in the various protocol specifications. Cisco routers also provide the TCP and User Datagram Protocol (UDP) services called Echo and Discard, which are described in RFCs 862 and 863, respectively.
Cisco supports both TCP and UDP at the transport layer, for maximum flexibility in services. Cisco also supports all standards for IP broadcasts.
A number of tasks are associated with configuring IP. A basic and required task for configuring IP is to assign IP addresses to network interfaces. Doing so enables the interfaces and allows communication with hosts on those interfaces using IP. Associated with this task are decisions about subnetting and masking the IP addresses.
To configure IP, complete the tasks in the following sections:
Remember that not all of the tasks in these sections are required. The tasks you need to perform will depend on your network and your needs.
At the end of this chapter, the examples in the "IP Configuration Examples" illustrate how you might configure your network using IP.
IP addresses identify locations to which IP datagrams can be sent. See the Internetworking Technology Overview publication for detailed information on IP addresses.
Some IP addresses are reserved for special uses and cannot be used for host, subnet, or network addresses. Table 16-1 lists ranges of IP addresses and showswhich addresses are reserved and which are available for use.
| Class | Address or Range | Status |
|---|---|---|
| A | 0.0.0.0 1.0.0.0 through 126.0.0.0 127.0.0.0 | Reserved Available Reserved |
| B | 128.0.0.0 128.1.0.0 through 191.254.0.0 191.255.0.0 | Reserved Available Reserved |
| C | 192.0.0.0 192.0.1.0 through 223.255.254 223.255.255.0 | Reserved Available Reserved |
| D | 224.0.0.0 through 239.255.255.255 | Multicast group addresses |
| E | 240.0.0.0 through 255.255.255.254 255.255.255.255 | Reserved Broadcast |
The official description of IP addresses is found in RFC 1166, "Internet Numbers."
To receive an assigned network number, contact your Internet service provider.
To assign an IP address and a network mask to a network interface on the router, perform the following task in interface configuration mode:
| Task | Command |
|---|---|
| Set an IP address for an interface. | ip address ip-address mask |
A mask identifies the bits that denote the network number in an IP address. When you use the mask to subnet a network, the mask is then referred to as a subnet mask. Subnets are described in the Internetworking Technology Overview publication.
The tasks required to enable additional, optional, IP addressing features are contained in the following sections:
The software supports multiple IP addresses per interface. You can specify an unlimited number of secondary addresses. Secondary IP addresses can be used in a variety of situations. The following are the most common applications:
To assign multiple IP addresses to network interfaces, perform the following task in interface configuration mode:
| Task | Command |
|---|---|
| Assign multiple IP addresses to network interfaces. | ip address ip-address mask secondary |
See the "IP Configuration Examples" section at the end of the chapter for an example of creating a network from separated subnets.
Subnetting with a subnet address of zero is illegal and strongly discouraged (as stated in RFC 791) because of the confusion that can arise between a network and a subnet that have the same addresses. For example, if network 131.108.0.0 is subnetted as 255.255.255.0, subnet zero would be written as 131.108.0.0--which is identical to the network address.
You can use the all zeros and all ones subnet (131.108.255.0), even though it is discouraged. Configuring interfaces for the all ones subnet is explicitly allowed. However, if you need the entire subnet space for your IP address, perform the following task in global configuration mode to enable subnet zero:
| Task | Command |
|---|---|
| Enable the use of subnet zero for interface addresses and routing updates. | ip subnet-zero |
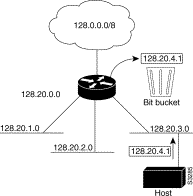
At times the router might receive packets destined for a subnet of a network that has no network default route. Figure 16-1 shows the router in network 128.20.0.0 connected to subnets 128.20.1.0, 128.20.2.0, and 128.20.3.0. Suppose the host sends a packet to 128.3.4.1. By default, if the router receives a packet destined for a subnet it does not recognize, and there is no network default route, the router discards the packet.
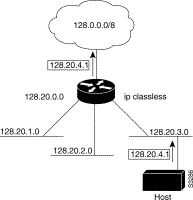
In Figure 16-2, classless routing is enabled in the router. Therefore, when the host sends a packet to 128.3.4.1, instead of discarding the packet, the router forwards the packet to the best supernet route.
To have the router forward packets destined for unrecognized subnets to the best supernet route possible, perform the following task in global configuration mode:
| Task | Command |
|---|---|
| Enable classless routing behavior. | ip classless |
You might want to enable IP processing on a serial or tunnel interface without assigning an explicit IP address to the interface. Whenever the unnumbered interface generates a packet (for example, for a routing update), it uses the address of the interface you specified as the source address of the IP packet. It also uses the specified interface address in determining which routing processes are sending updates over the unnumbered interface. Restrictions are as follows:
If you are configuring Intermediate System-to-Intermediate System (IS-IS) across a serial line, you should configure the serial interfaces as unnumbered. This allows you to conform with RFC 1195, which states that IP addresses are not required on each interface.
To enable IP processing on an unnumbered serial interface, perform the following task in interface configuration mode:
| Task | Command |
|---|---|
| Enable IP processing on a serial or tunnel interface without assigning an explicit IP address to the interface. | ip unnumbered interface-name |
The interface you specify must be the name of another interface in the router that has an IP address, not another unnumbered interface.
The interface you specify also must be enabled (listed as "up" in the show interfaces command display).
An example of how to configure serial interfaces can be found in the "IP Configuration Examples" section at the end of the chapter.
Our IP implementation allows you to control interface-specific handling of IP addresses by facilitating address resolution, name services, and other functions. The following sections describe how to configure IP addressing options:
A device in the IP can have both a local address, which uniquely identifies the device on its local segment or LAN, and a network address, which identifies the network the device belongs to. The local address is more properly known as a data link address because it is contained in the data link layer (Layer 2 of the OSI model) part of the packet header and is read by data link devices (bridges and all device interfaces, for example). The more technically inclined will refer to local addresses as MAC addresses, because the Media Access Control (MAC) sublayer within the data link layer processes addresses for the layer.
To communicate with a device on Ethernet, for example, the router first must determine the 48-bit MAC or local data link address of that device. The process of determining the local data link address from an IP address is called address resolution. The process of determining the IP address from a local data link address is called reverse address resolution. The router uses three forms of address resolution: Address Resolution Protocol (ARP), proxy ARP, and Probe (which is similar to ARP). The router also uses the Reverse Address Resolution Protocol (RARP). The ARP, proxy ARP, and RARP protocols are defined in RFCs 826, 1027, and 903, respectively. Probe is a protocol developed by the Hewlett-Packard Company for use on IEEE-802.3 networks.
The Address Resolution Protocol (ARP) is used to associate IP addresses with media or MAC addresses. Taking an IP address as input, ARP determines the associated media address. Once a media or MAC address is determined, the IP address/media address association is stored in an ARP cache for rapid retrieval. Then the IP datagram is encapsulated in a link-layer frame and sent over the network. Encapsulation of IP datagrams and ARP requests and replies on IEEE 802 networks other than Ethernet is specified by the Subnetwork Access Protocol (SNAP).
The Reverse Address Resolution Protocol (RARP) works the same way as ARP, except that the RARP Request packet requests an IP address instead of a local data link address. Use of RARP requires a RARP server on the same network segment as the router interface. RARP often is used by diskless nodes that do not know their IP addresses when they boot. Our routers attempt to use RARP if they do not know the IP address of an interface at startup. Also, the routers are able to act as RARP servers by responding to RARP requests that they are able to answer. See the "Loading System Images, Microcode Images, and Configuration Files" chapter to learn how to configure a router as a RARP server.
Perform the following tasks to set address resolution on the router:
The procedures for performing these tasks are described in the following sections.
ARP and other address resolution protocols provide a dynamic mapping between IP addresses and media addresses. Because most hosts support dynamic address resolution, you generally do not need to specify static ARP cache entries. If you do need to define them, you can do so globally. Doing this task installs a permanent entry in the ARP cache. The router uses this entry to translate 32-bit IP addresses into 48-bit hardware addresses.
Optionally, you can specify that the router respond to ARP requests as if it were the owner of the specified IP address, and you also have the option of specifying an ARP entry timeout period when you define ARP entries.
The following two tables list the tasks to provide dynamic mapping between IP addresses and media address.
Perform either of the following tasks in global configuration mode:
Perform the following task in interface configuration mode:
| Task | Command |
|---|---|
| Set the length of time an ARP cache entry will stay in the cache. | arp timeout seconds |
To display the type of ARP being used on a particular interface and also display the ARP timeout value, use the show interfaces EXEC command. Use the show arp EXEC command to examine the contents of the ARP cache. Use the show ip arp EXEC command to show IP entries. To remove all nonstatic entries from the ARP cache, use the privileged EXEC command clear arp-cache.
By default, standard Ethernet-style ARP encapsulation (represented by the arpa keyword) is enabled on the IP interface. You can change this encapsulation method to SNAP or HP Probe, as required by your network, to control the interface-specific handling of IP address resolution into
48-bit Ethernet hardware addresses.
When you set HP Probe encapsulation, the router uses the Probe protocol whenever it attempts to resolve an IEEE-802.3 or Ethernet local data link address. The subset of Probe that performs address resolution is called Virtual Address Request and Reply. Using Probe, the router can communicate transparently with Hewlett-Packard IEEE-802.3 hosts that use this type of data encapsulation. You must explicitly configure all interfaces for Probe that will use Probe.
To specify the ARP encapsulation type, perform the following task in interface configuration mode:
| Task | Command |
|---|---|
| Specify one of three ARP encapsulation methods for a specified interface. | arp {arpa | probe | snap} |
The router uses proxy ARP, as defined in RFC 1027, to help hosts with no knowledge of routing determine the media addresses of hosts on other networks or subnets. For example, if the router receives an ARP request for a host that is not on the same network as the ARP request sender, and if the router has the best route to that host, then the router sends an ARP reply packet giving its own local data link address. The host that sent the ARP request then sends its packets to the router, which forwards them to the intended host. Proxy ARP is enabled by default.
To disable proxy ARP, perform the following task in interface configuration mode, as necessary, for your network:
| Task | Command |
|---|---|
| Disable proxy ARP on the interface. | no ip proxy-arp |
Local-area mobility provides the ability to relocate IP hosts within a limited area without reassigning host IP addresses and without changes to the host software. Local-area mobility is supported on Ethernet, Token Ring, and FDDI interfaces only.
To create a mobility area with only one router, perform the following tasks:
| Task | Command |
|---|---|
| Step 1 Enabled bridging on the router. | bridge group protocol {dec | ieee}1 |
| Step 2 Enter interface configuration mode. | See Table 2-1. |
| Step 3 Enable local-area mobility. | ip mobile arp [timers keepalive hold-time] [access-group access-list-number] |
| Step 4 Configure bridging on the interface. | bridge-group group1 |
To create larger mobility areas, you must first redistribute the mobile routes into your IGP. The IGP must support host routes. You can use Enhanced IGRP, OSPF, or ISIS; you can also use RIP in some cases, but this is not recommended. To redistribute the mobile routes into your existing IGP configuration, perform the following tasks:
| Task | Command |
|---|---|
| Step 1 Enter router configuration mode. | router {eigrp autonomous-system | isis [tag] | ospf process-id} |
| Step 2 Set default metric values. | default-metric number or default-metric bandwidth delay reliability loading mtu |
| Step 3 Redistribute the mobile routes. | redistribute mobile |
If your IGP supports summarization, you should also restrict the mobile area so that it falls completely inside the area. This lets hosts roam within the mobile area without affecting routing outside the area.
The mobile area must consist of a contiguous set of subnets.
Hosts that roam within a mobile area should rely on a configured default router for their routing.
Each unique IP address can have a host name associated with it. The router maintains a cache of host name-to-address mappings for use by the EXEC connect, telnet, ping and related Telnet support operations. This cache speeds the process of converting names to addresses.
IP defines a naming scheme that allows a device to be identified by its location in the IP. This is a hierarchical naming scheme that provides for domains. Domain names are pieced together with periods (.) as the delimiting characters. For example, Cisco Systems is a commercial organization that the IP identifies by a com domain name, so its domain name is cisco.com. A specific device in this domain, the File Transfer Protocol (FTP) system for example, is identified as ftp.cisco.com.
To keep track of domain names, IP has defined the concept of a name server whose job it is to hold a cache, or database, of names mapped to IP addresses. To map domain names to IP addresses, you must first identify the host names, then specify a name server, and enable the Domain Name System (DNS), the Internet's global naming scheme that uniquely identifies network devices. You do these by performing the tasks in the following sections:
The following sections describe these tasks.
The router maintains a table of host names and their corresponding addresses, also called a host name-to-address mapping. Higher-layer protocols such as Telnet use host names to identify network devices (hosts). The router and other network devices must be able to associate host names with IP addresses to communicate with other IP devices. Host names and IP addresses can be associated with one another through static or dynamic means.
Manually assigning host names to addresses is useful when dynamic mapping is not available.
To assign host names to addresses, perform the following task in global configuration mode:
| Task | Command |
|---|---|
| Statically associate host names with IP addresses. | ip host name [tcp-port-number] address1 [address2...address8] |
You can specify a default domain name that the router software will use to complete domain name requests. You can specify either a single domain name or a list of domain names. Any IP host name that does not contain a domain name will have the domain name you specify appended to it before being added to the host table.
To specify a domain name or names, perform either of the following tasks in global configuration mode:
| Task | Command |
|---|---|
| Define a default domain name that the router will use to complete unqualified host names.
or Define a list of default domain names to complete unqualified host names. | ip domain-name name
|
See the "IP Configuration Examples" section at the end of this chapter for an example of establishing IP domains.
To specify one or more hosts (up to six) that can function as a name server to supply name information for the DNS, perform the following task in global configuration mode:
| Task | Command |
|---|---|
| Specify one or more hosts that supply name information. | ip name-server server-address1 [[server-address2]...server-address6] |
If your network devices require connectivity with devices in networks for which you do not control name assignment, you can assign device names that uniquely identify your devices within the entire internetwork. The Internet's global naming scheme, the DNS, accomplishes this task. This service is enabled by default.
To disable the DNS, perform the following task in global configuration mode:
| Task | Command |
|---|---|
| Disable DNS-based host name-to-address translation. | no ip domain-lookup |
See the "IP Configuration Examples" section at the end of this chapter for an example of enabling the DNS.
If your router has both IP and International Organization for Standardization Connectionless Network Service (ISO CLNS) enabled and you want to use ISO CLNS NSAP (Network Service Access Point) addresses, you can use the DNS to query these addresses, as documented in RFC 1348. This feature is enabled by default.
To disable DNS queries for ISO CLNS addresses, perform the following task in global configuration mode:
| Task | Command |
|---|---|
| Disable DNS queries for ISO CLNS addresses. | no ip domain-lookup nsap |
HP Probe Proxy support allows a router to respond to HP Probe Proxy name requests. These requests are typically used at sites that have Hewlett-Packard (HP) equipment and are already using HP Probe. Tasks associated with HP Probe Proxy are shown in the following two tables.
To configure HP Probe Proxy, perform the following task in interface configuration mode:
| Task | Command |
|---|---|
| Allow the router to respond to HP Probe Proxy name requests. | ip probe proxy |
Perform the following task in global configuration mode:
| Task | Command |
|---|---|
| Enter the host name of an HP host (for which the router is acting as a proxy) into the host table. | ip hp-host hostname ip-address |
See the "IP Configuration Examples" section at the end of this chapter for an example of configuring HP hosts on a network segment.
Every router ships with IP routing automatically enabled. If you choose to set up the router to bridge rather than route IP datagrams, you must disable IP routing. To disable IP routing, perform the following task in global configuration mode:
| Task | Command |
|---|---|
| Disable IP routing. | no ip routing |
When IP routing is disabled, the router will act as an IP end host for IP packets destined for or sourced by it, whether or not bridging is enabled for those IP packets not destined for the router. To reenable IP routing, use the ip routing command.
The router software provides three methods by which the router can learn about routes to other networks when IP routing is disabled and the router is acting as an IP host:
When IP routing is disabled, the default gateway feature and the router discovery client are enabled, and proxy ARP is disabled. When IP routing is enabled, the default gateway feature is disabled and you can configure proxy ARP and the router discovery servers.
The most common method of learning about other routes is by using proxy ARP. Proxy ARP, defined in RFC 1027, enables an Ethernet host with no knowledge of routing to communicate with hosts on other networks or subnets. Such a host assumes that all hosts are on the same local Ethernet and that it can use ARP to determine their hardware addresses.
Under proxy ARP, if a router receives an ARP Request for a host that is not on the same network as the ARP Request sender, the router evaluates whether it has the best route to that host. If the router does have the best route, it sends an ARP Reply packet giving its own Ethernet hardware address. The host that sent the ARP Request then sends its packets to the router, which forwards them to the intended host. The software treats all networks as if they are local and performs ARP requests for every IP address. This feature is enabled by default.
Proxy ARP works as long as other routers support it. Many other routers, especially host-based routing software, do not support it.
Another method for locating routes is to define a default router (or gateway). The software sends all nonlocal packets to this router, which either routes them appropriately or sends an IP Control Message Protocol (ICMP) redirect message back to the router, telling it of a better route. The ICMP redirect message indicates which local router the host should use. The software caches the redirect messages and routes each packet thereafter as efficiently as possible. The limitations of this method are that there is no means of detecting when the default router has crashed or is unavailable and no method of picking another router if one of these events should occur.
To set up a default gateway for a host, perform the following task in global configuration mode:
| Task | Command |
|---|---|
| Set up a default gateway (router). | ip default-gateway ip-address |
To display the address of the default gateway, use the show ip redirects EXEC command.
The router software provides a third method, called router discovery, by which the router can dynamically learn about routes to other networks using the Gateway Discovery Protocol (GDP) or the ICMP Router Discovery Protocol (IRDP) for detecting routers. The software is also capable of wire-tapping Routing Information Protocol (RIP) and Interior Gateway Routing Protocol (IGRP) routing updates and inferring the location of routers from those updates. The server/client implementation of router discovery does not actually examine or store the full routing tables sent by routers, it merely keeps track of which systems are sending such data.
This mechanism supports the following protocols:
You can configure these protocols in any combination. When possible, we recommend that you use GDP or IRDP because they allow each router to specify both a priority and the time after which a router should be assumed down if no further packets are received. Routers discovered using IGRP are assigned an arbitrary priority of 60. Routers discovered through RIP are assigned a priority of 50. For IGRP and RIP, the software attempts to measure the time between updates and will assume that the router is down if no updates are received for 2.5 times that interval.
Each router discovered becomes a candidate for the default router. The list of candidates is scanned and a new highest-priority router is selected when any of the following events occur:
To configure the router discovery feature using the GDP routing protocol, perform the following task in interface configuration mode:
| Task | Command |
|---|---|
| Use the GDP protocol to configure router discovery. | ip gdp gdp |
To configure the router discovery feature using the IRDP routing protocol, perform the following task in interface configuration mode:
| Task | Command |
|---|---|
| Use the IRDP protocol to configure router discovery. | ip gdp irdp |
To configure the router discovery feature using the RIP routing protocol, perform the following task in interface configuration mode:
| Task | Command |
|---|---|
| Use the RIP protocol to configure router discovery. | ip gdp rip |
To configure the router discovery feature using the IGRP routing protocol, perform the following task in interface configuration mode:
| Task | Command |
|---|---|
| Use the IGRP protocol to configure router discovery. | ip gdp igrp |
At this point in the configuration process, you can choose to configure one or more of the many routing protocols that are available based on your individual network needs. Routing protocols provide topology information of an internetwork. Refer to the "Configuring IP Routing Protocols" chapter for the tasks involved in configuring IP routing protocols. If you want to continue to perform basic IP configuration tasks, continue reading the following sections.
A broadcast is a data packet destined for all hosts on a particular physical network. Network hosts recognize broadcasts by special addresses. Broadcasts are heavily used by some protocols, including several important Internet protocols. Control of broadcast messages is an essential part of the IP network administrator's job.
Our routers support two kinds of broadcasting: directed broadcasting and flooding. A directed broadcast is a packet sent to a specific network or series of networks, while a flooded broadcast packet is sent to every network. A directed broadcast address includes the network or subnet fields.
Several early IP implementations do not use the current broadcast address standard. Instead, they use the old standard, which calls for all zeros instead of all ones to indicate broadcast addresses. Many of these implementations do not recognize an all-ones broadcast address and fail to respond to the broadcast correctly. Others forward all-ones broadcasts, which causes a serious network overload known as a broadcast storm. Implementations that exhibit these problems include systems based on versions of BSD UNIX prior to Version 4.3.
Routers provide some protection from broadcast storms by limiting their extent to the local cable. Bridges (including intelligent bridges), because they are Layer 2 devices, forward broadcasts to all network segments, thus propagating all broadcast storms.
The best solution to the broadcast storm problem is to use a single broadcast address scheme on a network. Most modern IP implementations allow the network manager to set the address to be used as the broadcast address. Many implementations, including the one on our router, can accept and interpret all possible forms of broadcast addresses.
For detailed discussions of broadcast issues in general, see RFC 919, "Broadcasting Internet Datagrams," and RFC 922, "Broadcasting IP Datagrams in the Presence of Subnets." The router support for Internet broadcasts generally complies with RFC 919 and RFC 922; however, it does not support multisubnet broadcasts as defined in RFC 922.
The current broadcast address standard provides specific addressing schemes for forwarding broadcasts. Perform the tasks in the following sections to enable these schemes:
See the "IP Configuration Examples" section at the end of this chapter for broadcasting configuration examples.
To enable forwarding of directed broadcasts on an interface where the broadcast becomes a physical broadcast, perform one of the tasks that follow. By default, this feature is enabled only for those protocols configured using the ip forward-protocol global configuration command. You can specify an access list to control which broadcasts are forwarded. When an access list is specified, only those IP packets permitted by the access list are eligible to be translated from directed broadcasts to physical broadcasts.
Perform either of the following tasks in interface configuration mode as required for your network:
Network hosts occasionally use UDP broadcasts to determine address, configuration, and name information. If such a host is on a network segment that does not include a server, UDP broadcasts are normally not forwarded. You can remedy this situation by configuring the interface of your router to forward certain classes of broadcasts to a helper address. You can have more than one helper address per interface.
You can specify a UDP destination port to control which UDP services are forwarded. You can specify multiple UDP protocols. You can also specify the Network Disk (ND) protocol, which is used by older diskless Sun workstations, and you can specify the network security protocol SDNS. By default, both UDP and ND forwarding are enabled if a helper address has been defined for an interface. The description for the ip forward-protocol command in the Router Products Command Reference publication lists the services that are forwarded by default if you do not specify any UDP ports.
When you configure the forwarding of UDP broadcasts, you are configuring the router to act as a BOOTP forwarding agent. BOOTP packets carry Dynamic Host Configuration Protocol (DHCP) information. (DHCP is defined in RFC 1531.) This means that the router is now compatible with DHCP clients.
To enable forwarding and to specify the destination address, perform the following task in interface configuration mode:
| Task | Command |
|---|---|
| Enable forwarding and specify the destination address for forwarding UDP broadcast packets, including BOOTP. | ip helper-address address |
To specify which protocols will be forwarded, perform the following task in global configuration mode:
| Task | Command |
|---|---|
| Specify which protocols will be forwarded over which ports. | ip forward-protocol {udp [port] | nd | sdns} |
See the "IP Configuration Examples" section at the end of this chapter for an example of how to configure helper addresses.
The router supports IP broadcasts on both local- and wide-area networks. There are several ways to indicate an IP broadcast address. Currently, the most popular way, and the default, is an address consisting of all ones (255.255.255.255), although the routers can be configured to generate any form of IP broadcast address. Our routers also can receive and understand any form of IP broadcast.
To set the router's IP broadcast address, perform the following task in interface configuration mode:
| Task | Command |
|---|---|
| Establish a different broadcast address (other than 255.255.255.255). | ip broadcast-address [ip-address] |
If the router does not have nonvolatile memory, and you need to specify the broadcast address to use before the router has been configured, you have to change the IP broadcast address by setting jumpers in the processor configuration register. Setting bit 10 causes the router to use all zeros. Bit 10 interacts with bit 14, which controls the network and subnet portions of the broadcast address. Setting bit 14 causes the router to include the network and subnet portions of its address in the broadcast address. Table 16-2 shows the combined effect of setting bits 10 and 14.
| Bit 14 | Bit 10 | Address (<net><host>) |
|---|---|---|
| Out | Out | <ones><ones> |
| Out | In | <zeros><zeros> |
| In | In | <net><zeros> |
| In | Out | <net><ones> |
Some router platforms allow the configuration register to be set through the software; see the "Loading System Images, Microcode Images, and Configuration Files" chapter for details. For other router platforms, the configuration register can only be changed through hardware; see the appropriate hardware installation and maintenance manual for your system.
You can allow IP broadcasts to be flooded throughout your internetwork in a controlled fashion using the database created by the bridging spanning-tree protocol. Turning on this feature also prevents loops. In order to support this capability, the routing software must include the transparent bridging and bridging must be configured on each interface that is to participate in the flooding. If bridging is not configured on an interface, it still will be able to receive broadcasts, but the interface will never forward broadcasts it receives and the router will never use that interface to send broadcasts received on a different interface.
Packets that are forwarded to a single network address using the IP helper address mechanism can be flooded. Only one copy of the packet is sent on each network segment.
In order to be considered for flooding, packets must meet the following criteria. (Note that these are the same conditions used to consider packets forwarding via IP helper addresses.)
A flooded UDP datagram is given the destination address you specified with the ip broadcast-address command on the output interface. The destination address can be set to any desired address. Thus, the destination address may change as the datagram propagates through the network. The source address is never changed. The TTL value is decremented.
After a decision has been made to send the datagram out on an interface (and the destination address possibly changed), the datagram is handed to the normal IP output routines and is therefore subject to access lists if they are present on the output interface.
To use the bridging spanning-tree database to flood UDP datagrams, perform the following task in global configuration mode:
| Task | Command |
|---|---|
| Use the bridging spanning-tree database to flood UDP datagrams. | ip forward-protocol spanning-tree |
If no actual bridging is desired, you can configure a type-code bridging filter that will deny all packet types from being bridged. Refer to the "Configuring Transparent Bridging" chapter for more information about using access lists to filter bridged traffic. The spanning-tree database is still available to the IP forwarding code to use for the flooding.
You can speed up flooding of UDP datagrams using the spanning-tree algorithm. Used in conjunction with the ip forward-protocol spanning-tree command, this feature boosts the performance of spanning tree-based UDP flooding by a factor of about four to five times. The feature, called turboflooding, is supported over Ethernet interfaces configured for ARPA encapsulated, Fiber Distributed Data Interface (FDDI), and HDLC-encapsulated serial interfaces, but is not supported on Token Ring interfaces. As long as the Token Rings and the non-HDLC serial interfaces are not part of the bridge group being used for UDP flooding, turboflooding will behave normally.
To enable turboflooding, perform the following task in global configuration mode:
| Task | Command |
|---|---|
| Use the bridging spanning-tree database to speed up flooding of UDP datagrams. | ip forward-protocol turbo-flood |
The IP suite offers a number of services that control and manage IP connections. Many of these services are provided by the Internet Control Message Protocol (ICMP). ICMP messages are sent by routers to hosts or other routers when a problem is discovered with the Internet header. For detailed information on ICMP, see RFC 792.
To configure IP services, complete the tasks in the following sections:
See the "IP Configuration Examples" section at the end of this chapter for examples of ICMP services.
If the router receives a nonbroadcast packet destined for itself that uses an unknown protocol, it sends an ICMP Protocol Unreachable message back to the source. Similarly, if the router receives a packet that it is unable to deliver to the ultimate destination because it knows of no route to the destination address, it sends an ICMP Host Unreachable message to the source. This feature is enabled by default.
You can disable this service by performing the following task in interface configuration mode:
| Task | Command |
|---|---|
| Disable the sending of ICMP Protocol Unreachable and Host Unreachable messages. | no ip unreachables |
Routes sometimes can become less than optimal. For example, it is possible for the router to be forced to resend a packet through the same interface on which it was received. If this happens, the router sends an ICMP Redirect message to the packet's originator telling it that it is on a subnet directly connected to the router, and that it must forward the packet to another system on the same subnet. It does so because the originating host presumably could have sent that packet to the next hop without involving the router at all. The Redirect message instructs the sender to remove the router from the route and substitute a specified device representing a more direct path. This feature is enabled by default.
You can disable the sending of ICMP Redirect messages by performing the following task in interface configuration mode:
| Task | Command |
|---|---|
| Disable the sending of ICMP Redirect messages to learn routes. | no ip redirects |
Our routers support the IP Path MTU Discovery mechanism, as defined in RFC 1191. IP Path MTU Discovery allows a host to dynamically discover and cope with differences in the maximum allowable maximum transmission unit (MTU) size of the various links along the path. Sometimes a router is unable to forward a datagram because it requires fragmentation (the packet is larger than the MTU you set for the interface with the ip mtu command), but the "Don't fragment" (DF) bit is set. The router sends a message to the sending host, alerting it to the problem. The host will have to fragment packets for the destination so that they fit the smallest packet size of all the links along the path. This technique is shown in Figure 16-3.
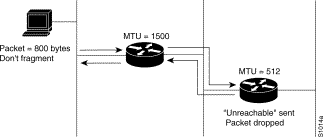
IP Path MTU Discovery is useful when a link in a network goes down, forcing use of another, different MTU-sized link (and different routers). As shown in Figure 16-3, suppose one is trying to send IP packets over a network where the MTU in the first router is set to 1500 bytes, but then reaches a router where the MTU is set to 512 bytes. If the datagram's "Don't fragment" bit is set, the datagram would be dropped because the 512-byte router is unable to forward it. All packets larger than 512 bytes will be dropped in this case. The second router returns an ICMP Destination Unreachable message to the source of the datagram with its Code field indicating "Fragmentation needed and DF set." To support IP Path MTU Discovery, it would also include the MTU of the next-hop network link in the low-order bits of an unused header field.
IP Path MTU Discovery is also useful when a connection is first being established and the sender has no information at all about the intervening links. It is always advisable to use the largest MTU that the links will bear; the larger the MTU, the fewer packets the host needs to send.
The Cisco 7000, AGS+, and Cisco 4000 routers support fast switching of IP packets between Ethernet and FDDI interfaces. When packets are being sent from FDDI to Ethernet interfaces and you are not using IP Path MTU Discovery, FDDI packets with data lengths larger than 1500 bytes will be fragmented into multiple Ethernet packets. This will slow performance. If the majority of your router traffic travels off the FDDI ring, you might want to either lower the MTU size on your host FDDI interfaces to 1500 bytes or run IP Path MTU Discovery on your hosts.
Because the CTR card does not support the switching of frames larger than 4472 bytes, some interoperability problems may occur if CTR cards are intermixed with other Token Ring cards on the same network. You can minimize this by setting lower (and the same) IP maximum packet sizes for all devices on the network with the ip mtu interface command.
All interfaces have a default MTU packet size. You can adjust the IP MTU size so that if an IP packet exceeds the MTU set for a router's interface, the router will fragment it.
Changing the MTU value (with the mtu interface configuration command) can affect the IP MTU value. If the current IP MTU value is the same as the MTU value, and you change the MTU value, the IP MTU value will be modified automatically to match the new MTU. However, the reverse is not true; changing the IP MTU value has no effect on the value for the mtu interface configuration command.
Also, all devices on a physical medium must have the same protocol MTU in order to operate.
To set the MTU packet size for a specified interface, perform the following task in interface configuration mode:
| Task | Command |
|---|---|
| Set the IP MTU packet size for an interface. | ip mtu bytes |
Occasionally, network devices need to know the subnet mask for a particular subnetwork in the internetwork. To achieve this information, such devices can send ICMP Mask Request messages. These messages are responded to by ICMP Mask Reply messages from devices that have the requested information. The router can respond to ICMP Mask Request messages if this function is enabled.
To enable the sending of ICMP Mask Reply messages, perform the following task in interface configuration mode:
| Task | Command |
|---|---|
| Enable the sending of ICMP Mask Reply messages. | ip mask-reply |
The router examines IP header options on every packet. It supports the IP header options Strict Source Route, Loose Source Route, Record Route, and Time Stamp, which are defined in RFC 791. If the router finds a packet with one of these options enabled, it performs the appropriate action. If it finds a packet with an invalid option, it sends an ICMP Parameter Problem message to the source of the packet and discards the packet.
IP provides a provision allowing the source IP host to specify a route through the IP network. This provision is known as source routing. Source routing is specified as an option in the IP header. If source routing is specified, the router forwards the packet according to the specified source route. This feature is employed when you want to force a packet to take a certain route through the network. The default is to perform source routing.
You can disable IP source-route header options by performing the following task in global configuration mode:
| Task | Command |
|---|---|
| Cause the router to discard any IP datagram containing a source-route option. | no ip source-route |
You can configure simplex Ethernet interfaces. This feature is useful for setting up dynamic IP routing over a simplex circuit; that is, a circuit that receives only or transmits only. When a route is learned on a receive-only interface, the interface designated as the source of the route is converted to the interface you specify. When packets are routed out this specified interface, they are sent to the IP address of the source of the routing update. To reach this IP address on a transmit-only Ethernet link, a static ARP entry mapping this IP address to the hardware address of the other end of the link is required.
To assign a transmit interface to a receive-only interface, perform the following task in interface configuration mode:
| Task | Command |
|---|---|
| Assign a transmit interface to a receive-only interface. | transmit-interface interface-name |
See the "IP Configuration Examples" section at the end of this chapter for an example of configuring a simplex Ethernet interface.
Packet filtering helps control packet movement through the network. Such control can help limit network traffic and restrict network use by certain users or devices. To permit or deny packets from crossing specified router interfaces, we provide access lists.
You can use access lists in several ways:
This section summarizes how to create access lists and how to apply them.
See the "IP Configuration Examples" section at the end of this chapter for examples of configuring access lists.
An access list is a sequential collection of permit and deny conditions that apply to IP addresses. The router tests addresses against the conditions in an access list one by one. The first match determines whether the router accepts or rejects the address. Because the router stops testing conditions after the first match, the order of the conditions is critical. If no conditions match, the router rejects the address.
The two steps involved in using access lists are as follows:
Step 1 Create an access list by specifying an access list number and access conditions.
Step 2 Apply the access list to interfaces or terminal lines.
These steps are described in the next sections.
The software supports two styles of access lists for IP:
To create either a standard or an extended access list, perform one of the following tasks in global configuration mode:
After an access list is created initially, any subsequent additions (possibly entered from the terminal) are placed at the end of the list. In other words, you cannot selectively add or remove access list command lines from a specific access list.
Refer to the "IP Configuration Examples" section at the end of this chapter for examples of implicit masks.
After an access list is created, you can apply it to one or more interfaces. Access lists can be applied on either outbound or inbound interfaces. The following two tables show how this task is accomplished for both terminal lines and network interfaces.
Perform the following task in line configuration mode:
| Task | Command |
|---|---|
| Restrict incoming and outgoing connections between a particular virtual terminal line (into a device) and the addresses in an access list. | access-class access-list-number {in | out} |
Perform the following task in interface configuration mode:
| Task | Command |
|---|---|
| Control access to an interface. | ip access-group access-list-number {in | out} |
For inbound access lists, after receiving a packet, the router checks the source address of the packet against the access list. If the access list permits the address, the router continues to process the packet. If the access list rejects the address, the router discards the packet and returns an ICMP Host Unreachable message.
For outbound access lists, after receiving and routing a packet to a controlled interface, the router checks the source address of the packet against the access list. If the access list permits the address, the router transmits the packet. If the access list rejects the address, the router discards the packet and returns an ICMP Host Unreachable message.
When you apply an access list (standard or extended) that has not yet been defined to an interface, the router will act as if the access list has not been applied to the interface and will accept all packets. Remember this behavior if you use undefined access lists as a means of security in your network.
The Hot Standby protocol provides high network availability because it routes IP traffic from hosts on Ethernet, FDDI, or Token Ring networks without relying on the availability of any single router.
This feature is useful for hosts that do not support a router discovery protocol such as IRDP and do not have the functionality to switch to a new router when their selected router reloads or loses power. Because existing TCP sessions can survive the failover, this protocol also provides a more transparent means of recovery for hosts that dynamically select a next hop for routing IP traffic.
When the Hot Standby protocol is configured on a network segment, it provides a virtual MAC address and an IP address that is shared between routers in a group of routers that are running the Hot Standby protocol. One of these routers is selected by the protocol to be the active router. The active router receives and routes packets destined for the groups MAC address. For n routers running the Hot Standby protocol, there are n+1 IP and MAC addresses assigned.
The Hot Standby Router Protocol detects when the designated active router fails, at which point a selected standby router assumes control of the Hot Standby group's MAC and IP addresses. A new standby router is also selected at that time.
Routers that are running the Hot Standby Router Protocol send and receive multicast UDP-based hello packets to detect router failure and to designate active and standby routers.
You can configure multiple Hot Standby groups on an interface, thereby making fuller use of the redundant routers. To do so, specify a group number for each Hot Standby command you configure for the interface.
To enable the Hot Standby protocol on an interface, perform the following task in interface configuration mode:
| Task | Command |
|---|---|
| Enable the Hot Standby protocol. | standby ip [ip-address] |
To configure other Hot Standby group attributes that affect how the local router participates in the Hot Standby Router Protocol, perform one or more of the following tasks in interface configuration mode:
Our IP Security Option (IPSO) support addresses both the basic and extended security options as described in RFC 1108. Our implementation is only minimally compliant with RFC 1108, because our router only accepts and generates a four-byte IPSO. IPSO is generally used to comply with the U.S. Government's DoD security policy.
Our basic IPSO support provides the following features:
To configure basic IPSO, complete the tasks in the following sections:
To enable IPSO and set security classifications on an interface, perform either of the following tasks in interface configuration mode:
Use the no ip security command to reset an interface to its default state.
To specify how IP security options are processed, perform any of the following optional tasks in interface configuration mode:
In order to fully comply with IPSO, the default values for the minor keywords have become complex. Default value usages include the following:
Table 16-3 provides a list of all default values.
| Interface Type | Level | Authority | Implicit Labeling | Add IPSO |
|---|---|---|---|---|
| None | None | None | On | Off |
| Dedicated | Unclassified | Genser | On | Off |
| Dedicated | Any | Any | Off | On |
| Multilevel | Any | Any | Off | On |
The default value for any interface is "dedicated, unclassified Genser." Note that this implies implicit labeling. This might seem unusual, but it makes the system entirely transparent to packets without options. This is the setting generated when you specify the no ip security interface configuration command.
Our extended IPSO support is compliant with the Department of Defense Intelligence Information System Network Security for Information Exchange (DNSIX) specification documents. Extended IPSO functionality can unconditionally accept or reject Internet traffic that contains extended security options by comparing those options to configured allowable values. This support allows DNSIX networks to use additional security information to achieve a higher level of security than that achievable with basic IPSO.
We also support a subset of the security features defined in the DNSIX Version 2.1 specification. Specifically, we support DNSIX definitions of the following:
There are two kinds of extended IPSO fields defined by the DNSIX 2.1 specification and supported by our implementation of extended IPSO--Network Level Extended Security Option (NLESO) and Auxiliary Extended Security Option (AESO) fields.
NLESO processing requires that security options be checked against configured allowable information, source, and compartment bit values and requires that the router be capable of inserting extended security options in the IP header.
AESO is similar to NLESO, except that its contents are not checked and are assumed to be valid if its source is listed in the AESO table.
To configure extended IPSO, complete the tasks in the following sections:
DNSIX Version 2.1 causes slow-switching code.
To configure global default setting for extended IPSO, including AESOs, perform the following task in global configuration mode:
| Task | Command |
|---|---|
| Configure system-wide default settings. | ip security eso-info source compartment-size default-bit |
To specify the minimum and maximum sensitivity levels for an interface, perform the following tasks in interface configuration mode:
To specify the extended IPSO sources that are to be treated as AESO sources, perform the following task in interface configuration mode:
| Task | Command |
|---|---|
| Specify AESO sources. | ip security aeso source compartment-bits |
The audit trail facility is a UDP-based protocol that generate an audit trail of IPSO security violations. This facility allows the system to report security failures on incoming and outgoing packets. The Audit Trail Facility sends DNSIX audit trail messages when a datagram is rejected because of IPSO security violations. This feature allows you to configure organization-specific security information.
The DNSIX audit trail facility consists of two protocols:
To configure the DNSIX auditing facility, complete the tasks in the following sections:
To enable the DNSIX audit trail facility, perform the following task in global configuration mode:
| Task | Command |
|---|---|
| Start the audit writing module. | dnsix-nat source ip-address |
To define and change primary and secondary addresses of the host to receive audit messages, perform the following task in global configuration mode:
To specify transmission paramters, perform the following tasks in global configuration mode:
Our IP accounting support provides basic IP accounting functions. By enabling IP accounting, users can see the number of bytes and packets switched through the router on a source and destination IP address basis. Only transit IP traffic is measured and only on an outbound basis; traffic generated by the router or terminating in the router is not included in the accounting statistics. To maintain accurate accounting totals, the router software maintains two accounting databases: an active and a checkpointed database.
Our IP accounting support also provides information identifying IP traffic that fails IP access lists. Identifying IP source addresses that violate IP access lists alerts you to possible attempts to breach security. The data also indicates that you should verify IP access list configurations. To make this feature available to users, you must first enable IP accounting of access list violations. Users can then display the number of bytes and packets from a single source that attempted to breach security against the access list for the source destination pair. By default, IP accounting displays the number of packets that have passed access lists and were routed.
To enable IP accounting, perform one of the following tasks for each interface in interface configuration mode:
| Task | Command |
|---|---|
| Enable basic IP accounting. | ip accounting |
| Enable IP accounting with the ability to identify IP traffic that fails IP access lists. | ip accounting access-violations |
To configure other IP accounting functions, perform one or more of the following tasks in global configuration mode:
To display IP access violations for a specific IP accounting database, perform the following task in EXEC mode:
| Task | Command |
|---|---|
| Display IP access-violation information. | show ip accounting [checkpoint] access-violations |
To display IP access violations, you must give the access-violations keyword on the command. If you do not specify the keyword, the command defaults to displaying the number of packets that have passed access lists and were routed. The access violations output displays the number of the access list failed by the last packet for the source and destination pair. The number of packets reveals how aggressive the attack is upon a specific destination.
Use the EXEC command show ip accounting to display the active accounting database. To display the checkpointed database, use the show ip accounting checkpoint EXEC command. The clear ip accounting EXEC command clears the active database and creates the checkpointed database.
To tune IP performance, complete the tasks in the following sections:
You can compress the headers of your TCP/IP packets in order to reduce their size, thereby increasing performance. Header compression is particularly useful on networks with a large percentage of small packets, such as those supporting many Telnet connections. This feature only compresses the TCP header, so it has no effect on UDP packets or other protocol headers. The TCP header compression technique, described fully in RFC 1144, is supported on serial lines using HDLC or PPP encapsulation. You must enable compression on both ends of a serial connection.
You can optionally specify outgoing packets to be compressed only if TCP incoming packets on the same interface are compressed. If you do not specify this option, the router will compress all traffic. The default is no compression.
You also can specify the total number of header compression connections that can exist on an interface. You should configure one connection for each TCP connection through the specified interface.
To enable compression, perform either of the following optional tasks in interface configuration mode:
You can set the amount of time the router will wait to attempt to establish a TCP connection. In previous versions of router software, the system would wait a fixed 30 seconds when attempting to do so. This amount of time is not sufficient in networks that have dial-up asynchronous connections, such as a network consisting of dial-on-demand links that are implemented over modems because it will affect your ability to Telnet over the link (from the router) if the link must be brought up.
Because the connection attempt time is a host parameter, it does not pertain to traffic going through the router, just to traffic originated at the router.
To set the TCP connection attempt time, perform the following task in global configuration mode:
| Task | Command |
|---|---|
| Set the amount of time the router will wait to attempt to establish a TCP connection. | ip tcp synwait-time seconds |
Fast switching involves the use of a high-speed switching cache for IP routing. With fast switching, destination IP addresses are stored in the high-speed cache so that some time-consuming table lookups need not be done. Our routers generally offer better packet transfer performance when fast switching is enabled. However, if you have bursts of traffic, or if slow-speed serial links (64K and below) are being fed from higher-speed media such as T1 or Ethernet, then disabling fast switching can reduce the packet drop rate to some extent. Fast switching allows outgoing packets to be load balanced on a per-destination basis.
To enable or disable fast switching, perform the following tasks in interface configuration mode:
| Task | Command |
|---|---|
| Enable fast-switching (use of a high-speed route cache for IP routing). | ip route-cache |
| Disable fast switching and enable load balancing on a per-packet basis. | no ip route-cache |
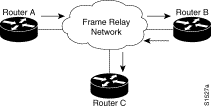
You can enable IP fast switching when the input and output interfaces are the same interface. This normally is not recommended, though it is useful when you have partially meshed media such as Frame Relay. You could use this feature on other interfaces, although it is not recommended because it would interfere with redirection.
Figure 16-4 illustrates a scenario where this is desirable. Router A has a DLCI to Router B, and Router B has a data link connection identifier (DLCI) to Router C. There is no DLCI between Routers A and C; traffic between them must go in and out of Router B through the same interface.
Perform the following task in interface configuration mode to allow IP fast switching on the same interface:
| Task | Command |
|---|---|
| Enable the fast switching of packets out of the same interface on which they arrived. | ip route-cache same-interface |
The silicon switching engine (SSE) is on the Silicon Switch Processor (SSP) board in the Cisco 7000. SSE switching contributes to very fast packet processing by allowing the SSE to perform switching independently of the system processor.
To enable SSE fast switching, perform the following task in interface configuration mode:
| Task | Command |
|---|---|
| Enable the SSE fast switching. | ip route-cache sse |
Autonomous switching contributes to faster packet processing by allowing the high-speed router bus to switch packets independently without interrupting the system processor. This feature works only in Cisco 7000 or AGS+ systems with high-speed network controller cards, and with a switch processor or ciscoBus controller card running microcode Version 1.4 or later.
By default, IP autonomous switching is not enabled.
Perform any of the following tasks in interface configuration mode as needed for your network:
The high-speed route cache used by IP fast switching and autonomous switching is invalidated when the IP routing table changes. By default, the invalidation of the cache is delayed slightly to avoid excessive CPU load while the routing table is changing.
To control route cache invalidation, perform the following tasks in global configuration mode as needed for your network:
| Task | Command |
|---|---|
| Allow immediate invalidation of the cache. | no ip cache-invalidate-delay |
| Delay invalidation of the cache. | ip cache-invalidate-delay [minimum maximum quiet threshold] |
You can configure IP over X.25, SMDS, Frame Relay, and DDR networks.To do this, configure the address mappings, as described in the appropriate wide-area networking chapters.
To monitor and maintain your network, perform the tasks in the following sections:
You can remove all contents of a particular cache, table, or database. Clearing a cache, table, or database can become necessary when the contents of the particular structure have become or are suspected to be invalid.
The following table lists the tasks associated with clearing caches, tables, and databases. All are performed in EXEC mode.
You can display specific router statistics such as the contents of IP routing tables, caches, and databases. Information provided can be used to determine resource utilization and solve network problems. You also can display information about node reachability and discover the routing path that your router's packets are taking through the network.
These tasks are summarized in the table that follows. See the "IP Commands" chapter in the Router Products Command Reference for details about the commands listed in these tasks. Perform the following tasks in privileged EXEC mode:
The following sections provide IP configuration examples:
In the following example, the second serial interface (serial 1) is given Ethernet 0's address. The serial interface is unnumbered.
interface ethernet 0
ip address 145.22.4.67 255.255.255.0
interface serial 1
ip unnumbered ethernet 0
In the following example, subnets 1 and 2 of network 131.108.0.0 are separated by a backbone, as shown in Figure 16-5. The two networks are brought into the same logical network through the use of secondary addresses.
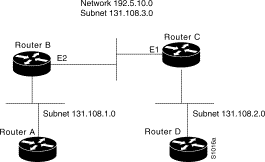
The following examples show the configurations for Routers B and C.
interface ethernet 2
ip address 192.5.10.1 255.255.255.0
ip address 131.108.3.1 255.255.255.0 secondary
interface ethernet 1
ip address 192.5.10.2 255.255.255.0
ip address 131.108.3.2 255.255.255.0 secondary
A cache of host name-to-address mappings is used by connect, telnet, ping, trace, write net, and configure net EXEC commands to speed the process of converting names to addresses. The commands used in this example specify the form of dynamic name lookup to be used. Static name lookup also can be configured.
The following example configures the host name-to-address mapping process for the router. IP DNS-based translation is specified, the addresses of the name servers are specified, and the default domain name is given.
! IP Domain Name System (DNS)-based host name-to-address translation is enabled
ip domain-lookup
! Specifies host 131.108.1.111 as the primary name server and host 131.108.1.2
! as the secondary server
ip name-server 131.108.1.111 131.108.1.2
! Defines cisco.com as the default domain name the router uses to complete
! unqualified host names
ip domain-name cisco.com
The example that follows establishes a domain list with several alternate domain names.
ip domain-list csi.com
ip domain-list telecomprog.edu
ip domain-list merit.edu
The following example has a network segment with Hewlett-Packard devices on it. The commands listed customize the router's first Ethernet port to respond to Probe name requests for bl4zip and to use Probe as well as ARP.
ip hp-host bl4zip 131.24.6.27
interface ethernet 0
arp probe
ip probe proxy
In the following example, one router is on network 191.24.1.0 and the other is on network 110.44.0.0, and you want to permit IP broadcasts from hosts on either network segment to reach both servers. Figure 16-6 illustrates how to configure the router that connects network 110 to network 191.24.1.
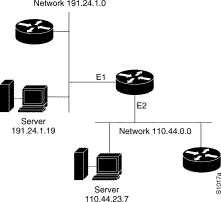
The following example shows the configuration:
ip forward-protocol udp
!
interface ethernet 1
ip helper-address 110.44.23.7
interface ethernet 2
ip helper-address 191.24.1.19
Our routers support two types of broadcasting: directed broadcasting and flooding. A directed broadcast is a packet sent to a specific network or series of networks, while a flooded broadcast packet is sent to every network. The following examples describe configurations for both types of broadcasting.
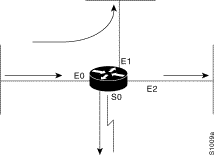
Figure 16-7 shows a flooded broadcast packet being sent to every network. The packet that is incoming from interface E0 is flooded to interfaces E1, E2 and S0.
A directed broadcast address includes the network or subnet fields. For example, if the network address is 128.1.0.0, the address 128.1.255.255 indicates all hosts on network 128.1.0.0. This would be a directed broadcast. If network 128.1.0.0 has a subnet mask of 255.255.255.0 (the third octet is the subnet field), the address 128.1.5.255 specifies all hosts on subnet 5 of network 128.1.0.0--another directed broadcast.
In the following example, flooding of IP broadcasts is enabled on all interfaces (two Ethernet and two serial). No bridging is permitted. The access list denies all protocols. No specific UDP protocols are listed by a separate ip forward-protocol udp interface configuration command, so the default protocols (TFTP, DNS, Time, NetBIOS, and BootP) will be flooded.
ip forward-protocol spanning-tree
bridge 1 protocol dec
access-list 201 deny 0x0000 0xFFFF
interface ethernet 0
bridge-group 1
bridge-group 1 input-type-list 201
interface ethernet 1
bridge-group 1
bridge-group 1 input-type-list 201
interface serial 0
bridge-group 1
bridge-group 1 input-type-list 201
interface serial 1
bridge-group 1
bridge-group 1 input-type-list 201
The example that follows changes some of the ICMP defaults for the first Ethernet interface 0. Disabling the sending of redirects could mean that you do not think your routers on this segment will ever have to send a redirect. Disabling the Unreachables messages will have a secondary effect--it also will disable IP Path MTU Discovery, because path discovery works by having routers send Unreachables messages. If you have a network segment with a small number of devices and an absolutely reliable traffic pattern--which could easily happen on a segment with a small number of little-used user devices--you would be disabling options that your router would be unlikely to use anyway.
interface ethernet 0
no ip unreachables
no ip redirects
The following is an example of configuring a simplex Ethernet interface. Figure 16-8 illustrates how to configure IP on two routers sharing transmit-only and receive-only Ethernet connections.

interface ethernet 0
ip address 128.9.1.1
!
interface ethernet 1
ip address 128.9.1.2
transmit-interface ethernet 0
!
!use show interfaces command to find router2-MAC-address-E0
arp router2-MAC-address-E0 128.9.1.4 arpa
interface ethernet 0
ip address 128.9.1.3
transmit-interface ethernet 1
!
interface ethernet 1
ip address 128.9.1.4
!
!use show interfaces command to find router1-MAC-address-E1
arp router1-MAC-address-E1 128.9.1.1 arpa
In the following example, network 36.0.0.0 is a Class A network whose second octet specifies a subnet; that is, its subnet mask is 255.255.0.0. The third and fourth octets of a network 36.0.0.0 address specify a particular host. Using access list 2, the router would accept one address on subnet 48 and reject all others on that subnet. The last line of the list shows that the router would accept addresses on all other network 36.0.0.0 subnets.
access-list 2 permit 36.48.0.3
access-list 2 deny 36.48.0.0  0.0.255.255
access-list 2 permit 36.0.0.0  0.255.255.255
interface ethernet 0
ip access-group 2 in
IP access lists contain implicit masks. For instance, if you omit the mask from an associated IP host address access list specification, 0.0.0.0 is assumed to be the mask. Consider the following example configuration:
access-list 1 permit 0.0.0.0
access-list 1 permit 131.108.0.0
access-list 1 deny 0.0.0.0 255.255.255.255
For this example, the following masks are implied in the first two lines:
access-list 1 permit 0.0.0.0 0.0.0.0
access-list 1 permit 131.108.0.0 0.0.0.0
The last line in the configuration (using the deny keyword) can be left off, because IP access lists implicitly deny all other access. This is equivalent to finishing the access list with the following command statement:
access-list 1 deny 0.0.0.0 255.255.255.255
The following access list only allows access for those hosts on the three specified networks. It assumes that subnetting is not used; the masks apply to the host portions of the network addresses. Any hosts with a source address that does not match the access list statements will be rejected.
access-list 1 permit 192.5.34.0  0.0.0.255
access-list 1 permit 128.88.0.0  0.0.255.255
access-list 1 permit 36.0.0.0  0.255.255.255
! (Note: all other access implicitly denied)
To specify a large number of individual addresses more easily, you can omit the address mask that is all zeros from the access-list global configuration command. Thus, the following two configuration commands are identical in effect:
access-list 2 permit 36.48.0.3
access-list 2 permit 36.48.0.3  0.0.0.0
In the following example, the first line permits any incoming TCP connections with destination ports greater than 1023. The second line permits incoming TCP connections to the SMTP port of host 128.88.1.2. The last line permits incoming ICMP messages for error feedback.
access-list 102 permit tcp 0.0.0.0 255.255.255.255 128.88.0.0 0.0.255.255 gt 1023
access-list 102 permit tcp 0.0.0.0 255.255.255.255 128.88.1.2 0.0.0.0 eq 25
access-list 102 permit icmp 0.0.0.0 255.255.255.255 128.88.0.0 255.255.255.255
interface ethernet 0
ip access-group 102 in
For another example of using an extended access list, suppose you have a network connected to the Internet, and you want any host on an Ethernet to be able to form TCP connections to any host on the Internet. However, you do not want IP hosts to be able to form TCP connections to hosts on the Ethernet except to the mail (SMTP) port of a dedicated mail host.
SMTP uses TCP port 25 on one end of the connection and a random port number on the other end. The same two port numbers are used throughout the life of the connection. Mail packets coming in from the Internet will have a destination port of 25. Outbound packets will have the port numbers reversed. The fact that the secure system behind the router always will be accepting mail connections on port 25 is what makes it possible to separately control incoming and outgoing services.The access list can be configured on either the outbound or inbound interface.
In the following example, the Ethernet network is a Class B network with the address 128.88.0.0, and the mail host's address is 128.88.1.2. The keyword established is used only for the TCP protocol to indicate an established connection. A match occurs if the TCP datagram has the ACK or RST bits set, which indicate that the packet belongs to an existing connection.
access-list 102 permit tcp 0.0.0.0 255.255.255.255 128.88.0.0 0.0.255.255 established
access-list 102 permit tcp 0.0.0.0 255.255.255.255 128.88.1.2 0.0.0.0 eq 25
interface ethernet 0
ip access-group 102 in
In the following example, three Ethernet interfaces are presented. These interfaces are running at security levels of Confidential Genser, Secret Genser, and Confidential to Secret Genser, as shown in
Figure 16-9.
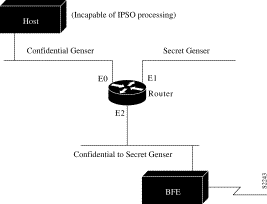
The following commands set up interfaces for the configuration in Figure 16-9:
interface ethernet 0
ip security dedicated confidential genser
interface ethernet 1
ip security dedicated secret genser
interface ethernet 2
ip security multilevel confidential genser to secret genser
It is possible for the setup to be much more complex.
In the following example, there are devices on Ethernet 0 that cannot generate a security option, and so must accept packets without a security option. These hosts do not understand security options; therefore, never place one on such interfaces. Furthermore, there are hosts on the other two networks that are using the extended security option to communicate information, so you must allow these to pass through the system. Finally, there also is a host (a Blacker Front End; see the "Configuring X.25 and LABP" chapter for more information about Blacker emergency mode) on Ethernet 2 that requires the security option to be the first option present, and this condition also must be specified. The new configuration follows.
interface ethernet 0
ip security dedicated confidential genser
ip security implicit-labelling
ip security strip
interface ethernet 1
ip security dedicated secret genser
ip security extended-allowed
!
interface ethernet 2
ip security multilevel confidential genser to secret genser
ip security extended-allowed
ip security first
You can specify the router address to use as the source address for ping packets. In the following example, it is 131.108.105.62:
Sandbox# ping
Protocol [ip]:
Target IP address: 131.108.1.111
Repeat count [5]:
Datagram size [100]:
Timeout in seconds [2]:
Extended commands [n]: yes
Source address: 131.108.105.62
Type of service [0]:
Set DF bit in IP header? [no]:
Data pattern [0xABCD]:
Loose, Strict, Record, Timestamp, Verbose[none]:
Sweep range of sizes [n]:
Type escape sequence to abort.
Sending 5, 100-byte ICMP Echos to 131.108.1.111, timeout is 2 seconds:
!!!!!
Success rate is 100 percent, round-trip min/avg/max = 4/4/4 ms
|
|