|
|

Product Number
WS-F5541
This installation and configuration note contains procedures for installing and configuring the Catalyst 5000 series Route Switch Feature Card (RSFC). The RSFC provides multiprotocol routing for Catalyst LAN switches. The RSFC is a fully functional Cisco IOS router feature card available on the Catalyst 5000 series Supervisor Engine II G (WS-X5540) and Supervisor Engine III G (WS-X5550).
This document contains the following sections:
Table 1 lists the RSFC specifications.
| Description | Specification |
|---|---|
Processor | 1 Mips R4700 RISC processor running at clock speed of 200 MHz. |
Interfaces | 1 serial console port (on supervisor engine front panel). |
| Memory | |
DRAM1 | 64-MB or 128-MB main and shared memory. |
NVRAM | 128-KB nonvolatile EPROM for the system configuration file. |
Flash SIMM | 16-MB onboard Flash SIMMs for the Cisco IOS images. |
Boot ROM | 256-KB EPROM for the ROM monitor program. |
| Regulatory Compliance | |
Safety | UL1950, CSA22.2-950, EN60950 |
EMC | FCC-Part15-Class A, EN55022-Class B, CISPR22-Class B, VCCI-Class 2, CE Marking |
Network homologation | Net 1, Net 2, Net 3 |
| 1DRAM = dynamic random-access memory |
These sections provide a functional overview of the Catalyst 5000 series RSFC:
The RSFC is a router feature card for the Catalyst 5000 series Supervisor Engine II G and Supervisor Engine III G modules. The RSFC runs Cisco IOS router software and directly interfaces to the Catalyst switch backplane to provide interVLAN routing.
The RSFC contains no physical interfaces. InterVLAN routing is accomplished using virtual interfaces that correspond one-to-one with the VLANs configured on the switch. For example, if you configure VLAN 100 on the switch, you can configure an RSFC interface in that VLAN by creating interface vlan100. All interface configuration on the RSFC is performed on these VLAN interfaces.
VLAN interfaces on the RSFC are assigned the base MAC address from a MAC address serial EEPROM on the RSFC that contains 64 MAC addresses. All user-configurable routing interfaces use the base MAC address by default. If desired, you can override the default MAC address assignment for an interface. For more information, see the "Assigning a Nondefault MAC Address to an Interface" section. Normally, there is no need to override the default MAC address.
The RSFC system memory configuration is as follows:
The RSFC uses these system software images:
The lowest four bits of the 16-bit configuration register (bits 3, 2, 1, and 0) form the boot field. The value of the boot field determines if the RSFC loads a system image and where the RSFC searches for the image:
For information on changing the configuration register boot field value, see the "Setting the Configuration Register Boot Field" section. For more information on the RSFC boot process, see the "RSFC Boot Process" section.
The BOOTLDR environment variable specifies one or more RSFC boot helper images. When the BOOTLDR variable is defined, the RSFC boots the specified boot helper image, which in turn boots a system image from Flash or over the network. If an entry in the BOOTLDR environment variable list specifies an invalid device or file, the RSFC skips that entry.
For information on changing the BOOTLDR environment variable, see the "Setting the BOOTLDR Variable" section. For more information on the RSFC boot process, see the "RSFC Boot Process" section.
The BOOT environment variable specifies one or more RSFC system images on various devices (such as bootflash: and tftp:). If the configuration register boot field value is set to any value between 0x2 and 0xF inclusive, the RSFC checks the contents of the BOOT variable at startup to determine the location and filename of the image to boot.
If an entry in the BOOT environment variable list does not specify a device, the RSFC assumes the device is tftp:. If an entry in the BOOT environment variable list specifies an invalid device, the RSFC skips that entry.
For information on changing the BOOT environment variable, see the "Setting the BOOT Variable" section. For more information on the RSFC boot process, see the "RSFC Boot Process" section.
When you boot a Catalyst 5000 series switch with an RSFC installed, the following process occurs on the RSFC:
1. The ROM monitor image loads and checks the value of the configuration register boot field.
2. The ROM monitor checks the contents of the BOOTLDR variable.
3. The ROM monitor checks the contents of the BOOT variable.
4. The boot helper image checks the contents of the BOOT variable.
5. The ROM monitor attempts to load the first image in bootflash:.
6. The boot helper attempts to load the first image in bootflash:.
Up to two Catalyst 5000 series supervisor engines with RSFCs can be installed in the Catalyst 5505, 5509, and 5500 chassis. Redundant RSFCs do not exchange configuration or system image information. Configuration changes on one RSFC do not affect the configuration of the second RSFC. You must manually configure both RSFCs independently.
Both RSFCs in a redundant configuration are active (even though one of the supervisor engines is in standby mode) and can perform routing functions. You can use the Hot Standby Router Protocol (HSRP) on VLAN interfaces to provide router interface backup.
In the event that the active supervisor engine fails, the system switches over to the standby supervisor engine. In this case, the redundant RSFC takes over all routing functions of the first RSFC (provided HSRP is configured properly on both RSFCs).
The RSFC requires these software and hardware versions:
Safety warnings appear throughout this note in procedures that, if performed incorrectly, may harm you. A warning symbol precedes each warning statement.
 | Warning This warning symbol means danger. You are in a situation that could cause bodily injury. Before you work on any equipment, be aware of the hazards involved with electrical circuitry and be familiar with standard practices for preventing accidents. To see translations of the warnings that appear in this publication, refer to the appendix "Translated Safety Warnings" in the Catalyst 5000 Series Supervisor Engine Installation Guide. |
These sections describe how to ensure your safety when installing the RSFC:
Use the following guidelines to ensure your safety and protect the equipment. This list does not include all potentially hazardous situations during installation, so be alert.
| Warning Only trained and qualified personnel should install, replace, or service this equipment. |
| Warning Before working on equipment that is connected to power lines, remove jewelry (including rings, necklaces, and watches). Metal objects will heat up when connected to power and ground and can cause serious burns or weld the metal object to the terminals. |
When working with electrical equipment, exercise these basic safety guidelines:
| Warning
Do not work on the system or connect or disconnect cables during periods of lightning activity. |
ESD damage occurs when electronic modules or components are improperly handled and can result in complete or intermittent failures. To prevent ESD damage, follow these guidelines:
 | Caution Periodically check the resistance value of the antistatic strap. The measurement should be between 1 and 10 megohms (Mohms). |
These tools are required to install the RSFC:
These sections describe how to remove and replace the supervisor engine:
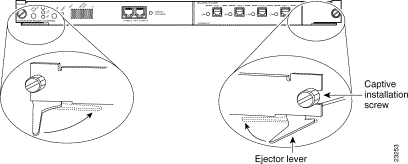
The ejector levers on the supervisor engine align and seat the supervisor engine connectors in the backplane. See Figure 1. If you fail to use the ejector levers to insert the supervisor engine, you can disrupt the order in which the pins make contact with the backplane. When removing a supervisor engine, use the ejector levers to ensure that the supervisor engine connector pins disconnect from the backplane properly. Any supervisor engine that is only partially connected to the backplane can disrupt the system.

Before removing the supervisor engine module, back up the switch configuration file as a precaution. Use the write network command to back up your configuration to a Trivial File Transfer Protocol (TFTP) server.
To remove the supervisor engine from the switch, follow these steps:
| Caution To prevent ESD damage, handle switching modules by the carrier edges only. |
 | Warning During this procedure, wear grounding wrist straps to avoid ESD damage to the card. Do not directly touch the backplane with your hand or any metal tool, or you could shock yourself. |
Step 1 If you do not plan to immediately reinstall the supervisor engine you are removing, disconnect any network interface cables attached to the uplink ports.
Step 2 Use a screwdriver to loosen the captive installation screws at the left and right sides of the supervisor engine.
Step 3 Grasp the left and right ejector levers. Simultaneously pull the left lever to the left and the right lever to the right to release the supervisor engine from the backplane connector.
Step 4 Grasp the supervisor engine with one hand and place your other hand under the carrier to support and guide the supervisor engine out of the slot. Avoid touching any of the components on the supervisor engine.
Step 5 Carefully pull the supervisor engine straight out of the slot, keeping your other hand under the carrier to guide it. Keep the supervisor engine horizontal to the backplane.
Step 6 Place the removed supervisor engine on an antistatic mat or antistatic foam or bag.
Step 7 If the slot is to remain empty, install a module filler plate to keep dust out of the chassis and to maintain proper airflow through the module compartment.
| Warning Blank faceplates and cover panels serve three important functions: they prevent exposure to hazardous voltages and currents inside the chassis; they contain electromagnetic interference (EMI) that might disrupt other equipment; and they direct the flow of cooling air through the chassis. Do not operate the system unless all cards, faceplates, front covers, and rear covers are in place. |
When installing the supervisor engine, note that it must go in a specific slot:
To install the supervisor engine, follow these steps:
| Caution To prevent ESD damage, handle switching modules by the carrier edges only. |
| Warning During this procedure, wear grounding wrist straps to avoid ESD damage to the card. Do not directly touch the backplane with your hand or any metal tool, or you could shock yourself. |
Step 1 Take the necessary precautions to prevent ESD damage, as described in the "Preventing ESD Damage" section.
Step 2 To install the supervisor engine, hold the front panel with one hand, and place your other hand under the carrier to support the supervisor engine. Do not touch the printed circuit boards or connector pins.
Step 3 Align the edges of the supervisor engine carrier with the slot guides on the sides of the switch chassis.
Step 4 Pivot the two module ejector levers out away from the faceplate. The ejector levers are shown pivoted out in Figure 2.
Step 5 Keeping one hand under the carrier to guide the supervisor engine, carefully slide it into the slot on the Catalyst 5000 series switch until the ejector levers click into place on the chassis. Be sure to keep the module horizontal to the backplane and avoid touching any of the components on the module.
Step 6 Using the thumb and forefinger of each hand, simultaneously pivot in both ejector levers, as shown in Figure 2, to fully seat the switching module in the backplane connector.
| Caution Always use the ejector levers when installing or removing switching modules. A module that is partially seated in the backplane will cause the system to halt and subsequently crash. |
Step 7 Use a screwdriver to tighten the captive installation screws at the left and right sides of the module.
This section describes how to install the RSFC in your Supervisor Engine II G or III G.
| Caution Use a wrist strap or other grounding device to prevent ESD damage. Refer to the Catalyst 5000 Series Installation Guide for ESD details including the locations of the ESD connectors on the Catalyst 5000 series switches. |
To install the RSFC in the supervisor engine, follow this procedure:
Step 1 If not already removed, remove the supervisor engine from the Catalyst 5000 series switch (see the "Removing and Replacing the Supervisor Engine" section for instructions).
Step 2 Place the supervisor engine on an antistatic mat or bag.
Step 3 Remove the RSFC from its antistatic bag and install it on the supervisor engine (see Figure 3). Be careful when seating the RSFC connectors to the supervisor engine.
Step 4 Ensure that the RSFC is securely seated in the supervisor engine.
Step 5 Use a Phillips-head screwdriver to install the eight screws that secure the RSFC to the supervisor engine standoffs (see Figure 3 for screw and standoff locations).
Step 6 Install the supervisor engine into the Catalyst 5000 series switch (see the "Installing the Supervisor Engine" section for instructions).

These sections describe how to configure interVLAN routing on the RSFC:
In order to successfully configure the RSFC for interVLAN routing, you must configure VTP and create and configure VLANs on the switch.
To configure VTP and VLANs on the switch, perform this task in privileged mode:
| Task | Command |
|---|---|
Step 1. Specify the VTP mode. | set vtp mode {client | server | transparent} |
Step 2. Configure a VTP domain (if you configured the switch as a VTP client or server). | set vtp domain name |
Step 3. Create VLANs on the switch. | set vlan vlan_num |
Step 4. Assign ports to the VLAN. | set vlan vlan_num mod_num/port_num |
This example shows how to configure VTP, create two VLANs, and assign switch ports to those VLANs:
Console> (enable) set vtp mode server

VTP domain modified
Console> (enable) set vtp domain Corp_Net

VTP domain Corp_Net modified
Console> (enable) set vlan 100

Vlan 100 configuration successful
Console> (enable) set vlan 200

Vlan 200 configuration successful
Console> (enable) set vlan 100 3/1-12

VLAN 100 modified.
VLAN 1 modified.
VLAN  Mod/Ports
---- -----------------------
100   1/1-2
      3/1-12

Console> (enable) set vlan 200 3/13-24

VLAN 200 modified.
VLAN 1 modified.
VLAN  Mod/Ports
---- -----------------------
200   1/1-2
      3/13-24

Console> (enable)
These sections describe basic configuration tasks you need to understand before you configure interVLAN routing on the RSFC:
To access configuration mode on the RSFC, perform this task:
| Task | Command |
|---|---|
Step 1. At the EXEC prompt, enter enable mode. | Router>enable |
Step 2. At the privileged EXEC prompt, enter global configuration mode. | Router#configure terminal |
Step 3. Enter the commands to configure interVLAN routing. | (Refer to the appropriate configuration tasks later in this publication.) |
Step 4. Exit configuration mode. | Router(config)#Ctrl-Z |
To view and save the configuration after you make changes, perform this task in privileged EXEC mode:
| Task | Command |
|---|---|
Step 1. View the current operating configuration at the privileged EXEC prompt. | show running-config |
Step 2. View the configuration in NVRAM. | show startup-config |
Step 3. Save the current configuration to NVRAM. | copy running-config startup-config |
In some cases, an RSFC interface might be administratively shut down. You can check the status of an interface using the show interface command.
To bring up an RSFC interface that is administratively shut down, perform this task:
| Task | Command |
|---|---|
Step 1. Specify the interface to bring up. | Router(config)#interface vlan interface_number |
Step 2. Bring the interface up. | Router(config-if)#no shutdown |
Step 3. Exit configuration mode. | Router(config-if)#Ctrl-Z |
These sections describe how to configure interVLAN routing on the Catalyst 5000 series RSFC:
Configuring interVLAN routing on the RSFC consists of two main procedures:
1. You must create and configure VLANs on the switch and assign VLAN membership to switch ports. For more information, see the "Configuring VTP and VLANs on the Switch" section.
2. You must create and configure VLAN interfaces for interVLAN routing on the RSFC. You must configure a VLAN interface for each VLAN for which you want to route traffic.
VLAN interfaces on the RSFC are virtual interfaces. However, you configure them in the same way you configure a physical router interface.
You can use the session mod_num command (where mod_num is the slot number associated with the RSFC) to access the RSFC from the switch CLI, eliminating the need to connect a terminal directly to the RSFC console port. To exit from the router CLI back to the switch CLI, enter exit at the RSFC command prompt.
This example shows how to access the RSFC from the switch CLI, and how to exit the router CLI and return to the switch CLI. In this example, because the RSFC is installed on the supervisor engine in slot 1, the RSFC is assigned module number 15. An RSFC installed on the supervisor engine in slot 2 is assigned module number 16.
Console> (enable) session 15

Trying Router-15...
Connected to Router-15.
Escape character is '^]'.

User Access Verification

Password:
Router>exit

Console> (enable)
To configure interVLAN routing for IP on the RSFC, perform this task:
| Task | Command |
|---|---|
Step 1. (Optional) Enable IP routing on the router1. | Router(config)#ip routing |
Step 2. (Optional) Specify an IP routing protocol2. | Router(config)#router ip_routing_protocol |
Step 3. Specify a VLAN interface on the RSFC. | Router(config)#interface vlan-id |
Step 4. Assign an IP address to the VLAN interface. | Router(config-if)#ip address n.n.n.n mask |
Step 5. Bring up the interface, if necessary. | Router(config-if)#no shutdown |
Step 6. Exit configuration mode. | Router(config-if)#Ctrl-Z |
This example shows how to enable IP routing on the RSFC, create a VLAN interface, and assign the interface an IP address:
Router#configure terminal

Enter configuration commands, one per line.  End with CNTL/Z.
Router(config)#ip routing

Router(config)#router rip

Router(config-router)#network 10.0.0.0

Router(config-router)#interface vlan 100

Router(config-if)#ip address 10.1.1.1 255.0.0.0

Router(config-if)#no shutdown

Router(config-if)#^Z

Router#
To configure interVLAN routing for Internetwork Packet Exchange (IPX) on the RSFC, perform this task:
| Task | Command |
|---|---|
Step 1. (Optional) Enable IPX routing on the router1. | Router(config)#ipx routing |
Step 2. (Optional) Specify an IPX routing protocol2. | Router(config)#ipx router ipx_routing_protocol |
Step 3. Specify a VLAN interface on the RSFC. | Router(config)#interface vlan-id |
Step 4. Assign a network number to the VLAN interface3. | Router(config-if)#ipx network [network | unnumbered] encapsulation encapsulation-type |
Step 5. Bring up the interface, if necessary. | Router(config-if)#no shutdown |
Step 6. Exit configuration mode. | Router(config-if)#Ctrl-Z |
This example shows how to enable IPX routing on the RSFC, create a VLAN interface, and assign the interface an IPX network address:
Router#configure terminal

Enter configuration commands, one per line.  End with CNTL/Z.
Router(config)#ipx routing

Router(config)#ipx router rip

Router(config-ipx-router)#network all

Router(config-ipx-router)#interface vlan100

Router(config-if)#ipx network 100 encapsulation snap

Router(config-if)#no shutdown

Router(config-if)#^Z

Router#
To configure interVLAN routing for AppleTalk on the RSFC, perform this task:
| Task | Command |
|---|---|
Step 1. (Optional) Enable AppleTalk routing on the router1. | Router(config)#appletalk routing |
Step 2. Specify a VLAN interface on the RSFC. | Router(config)#interface vlan-id |
Step 3. Assign a cable range to the VLAN interface. | Router(config-if)#appletalk cable-range cable-range |
Step 4. Assign a zone name to the VLAN interface. | Router(config-if)#appletalk zone zone-name |
Step 5. Bring up the interface, if necessary. | Router(config-if)#no shutdown |
Step 6. Exit configuration mode. | Router(config-if)#Ctrl-Z |
| 1This step is necessary if you have multiple routers in the network. |
This example shows how to enable AppleTalk routing on the RSFC, create a VLAN interface, and assign the interface an AppleTalk cable-range and zone name:
Router#configure terminal

Enter configuration commands, one per line.  End with CNTL/Z.
Router(config)#appletalk routing

Router(config)#interface vlan100

Router(config-if)#appletalk cable-range 100-100

Router(config-if)#appletalk zone Engineering

Router(config-if)#no shutdown

Router(config-if)#^Z

Router#
You can configure one or more HSRP groups on RSFC VLAN interfaces to provide transparent routing backup for the network. Each VLAN interface in an HSRP group shares a virtual IP address and MAC address. You can configure end stations and other devices to use the HSRP address as the default gateway so that the failure of one router interface does not interrupt service to those devices.
The interface with the highest HSRP priority is the active interface for that HSRP group.
To configure HSRP on an RSFC VLAN interface, perform this task in interface configuration mode:
| Task | Command |
|---|---|
Step 1. Enable HSRP and specify the HSRP IP address. If you do not specify a group-number, group 0 is used. | standby [group-number] ip [ip-address] |
Step 2. Specify the priority for the HSRP interface. Increase the priority of at least one interface in the HSRP group (the default is 100). The interface with the highest priority becomes active for that HSRP group. | standby [group-number] priority priority |
Step 3. (Optional) Configure the interface to preempt the current active HSRP interface and become active if the interface priority is higher than the priority of the current active interface. | standby [group-number] preempt [delay delay] |
Step 4. (Optional) Set the HSRP Hello timer and holdtime timer for the interface. The default values are 3 (Hello) and 10 (holdtime). All interfaces in the HSRP group should use the same timer values. | standby [group-number] timers hellotime holdtime |
Step 5. (Optional) Specify a clear-text HSRP authentication string for the interface. All interfaces in the HSRP group should use the same authentication string. | standby [group-number] authentication string |
This example shows how to configure an interface as part of HSRP group 100:
Router#configure terminal

Enter configuration commands, one per line.  End with CNTL/Z.
Router(config)#interface vlan100

Router(config-if)#standby 100 ip 172.20.100.10

Router(config-if)#standby 100 priority 110

Router(config-if)#standby 100 preempt

Router(config-if)#standby 100 timers 5 15

Router(config-if)#standby 100 authentication Secret

Router(config-if)#^Z

Router#
These sections describe common maintenance and administrative tasks you need to perform on the RSFC:
To set the name of the RSFC module and port from the switch CLI, perform this task in privileged mode:
| Task | Command |
|---|---|
Step 1. Set the RSFC module name. | set module name mod_num name_string |
Step 2. Set the RSFC port name. | set port name mod_num/port_num name_string |
Step 3. Verify the configuration. | show module [mod_num] show port [mod_num[/port_num]] |
This example shows how to set the port name of the RSFC in slot 1 and verify the configuration:
Console> (enable) set module name 15 RSFC module

Module name set.
Console> (enable) set port name 15/1 RSFC Port

Port 15/1 name set.
Console> (enable) show module 15

Mod Slot Ports Module-Type               Model               Status
--- ---- ----- ------------------------- ------------------- --------
15  1    1     Route Switch Feature Card WS-F5541            ok

Mod Module-Name         Serial-Num
--- ------------------- --------------------
15  RSFC module         00000001234

Mod MAC-Address(es)                        Hw     Fw         Sw
--- -------------------------------------- ------ ---------- -----------------
16  00-e0-aa-bb-cc-dd to 00-e0-aa-bb-cd-1c 0.1    12.0(3a)W5 12.0(3a)W5(8)
Console> (enable) show port 15/1

Port  Name               Status     Vlan       Level  Duplex Speed Type
----- ------------------ ---------- ---------- ------ ------ ----- ------------
15/1  RSFC Port          connected  1          normal   half   400 Route Switch

Port   Trap      IfIndex
-----  --------  -------
15/1   disabled  653


Use 'session' command to see router counters.

Last-Time-Cleared
--------------------------
Wed Mar 31 1999, 15:50:26
Console> (enable)
To download an RSFC system image, perform this task in privileged EXEC mode:
| Task | Command |
|---|---|
Download an RSFC system image. | copy source-url destination-url |
This example shows how to download an RSFC system image from a tftp: device (TFTP server) to the bootflash: device:
Router#copy tftp: bootflash:

Address or name of remote host []? 172.20.52.3

Source filename []? c5rsfc-js-mz.120-3.W5.8.bin

Destination filename [c5rsfc-js-mz.120-3.W5.8.bin]?
Accessing tftp://172.20.52.3/c5rsfc-js-mz.120-3.W5.8.bin...
Loading c5rsfc-js-mz.120-3.W5.8.bin .from 172.20.52.3 (via FastEthernet2/0.1): !
!!!!!!!!!!!!!!!!!!!!!!!!!!!!!!!!!!!!!!!!!!!!!!!!!!!!!!!!!!!!!!!!!!!!!!!!!!!!!!!!
!!!!!!!!!!!!!!!!!!!!!!!!!!!!!!!!!!!!!!!!!!!!!!!!!!!!!!!!!!!!!!!!!!!!!!!!!!!!!!!!
!!!!!!!!!!!!!!!!!!!!!!!!!!!!!!!!!!!!!!!!!!!!!!!!!!!!!!!!!!!!!!!!!!!!!!!!!!!!!!!!
!!!!!!!!!!!!!!!!!!!!!!!!!!!!!!!!!!!!!!!!!!!!!!!!!!!!!!!!!!!!!!!!!!!!!!!!!!!!!!!!
!!!!!!!!!!!!!!!!!!!!!!!!!!!!!!!!!!!!!!!!!!!!!!!!!!!!!!!!!!!!!!!!!!!!!!!!!!!!!!!!
!!!!!!!!!!!!!!!!!!!!!!!!!!!!!!!!!!!!!!!!!!!!!!!!!!!!!!!!!!!!!!!!!!!!!!!!!!!!!!!!
!!!!!!!!!!!!!!!!!!!!!!!!!!!!!!!!!!!!!!!!!!!!!!!!!!!!!!!!!!!!!!!!!!!!!!!!!!!!!!!!
!!!!!!!!!!!!!!!!!!!!!!!!!!!!!!!!!!!!!!!!!!!!!!!!!!!!!!!!!!!!!!!!!!!!!!!!!!!!!!!!
!!!!!!!!!!!!!!!!!!!!!!!!!!!!!!!!!!!!!!!!!!!!!!!!!!!!!!!!!!!!!!!!!!!!!!!!!!!!!!!!
!!!!!!!!!!!!!!!!!!!!!!!!!!!!!!!!
[OK - 3862105/7724032 bytes]

3862105 bytes copied in 259.224 secs (14911 bytes/sec)
Router#
In the event that you cannot session to the RSFC or the boot Flash is corrupted, you can download a new system image from the switch CLI directly to the RSFC RAM using TFTP.
To download a new system image to the RSFC using TFTP, perform this task in privileged mode:
| Task | Command |
|---|---|
Download a system image to the RSFC using TFTP from the switch CLI. | download host_ip_addr filename mod_num |
To reset the RSFC from the switch CLI, perform this task in privileged mode:
| Task | Command |
|---|---|
Reset the RSFC. | reset mod_num |
The configuration register boot field determines whether or not the RSFC loads a system image, and if so, where it should search for the system image. For more information on the function of the configuration register boot field, see the "Configuration Register Boot Field" section.
To set the configuration register boot field value on the RSFC, perform this task in global configuration mode:
| Task | Command |
|---|---|
Step 1. Obtain the current configuration register setting. | show bootvar |
Step 2. Enter configuration mode. | configure terminal |
Step 3. Modify the existing configuration register value. Change the least significant hexadecimal digit to a value between 0x0 and 0xF to reflect how you want the RSFC to load a system image. | config-register value |
Step 4. Exit configuration mode. | Ctrl-Z |
Step 5. Save the running configuration to NVRAM. | copy running-config startup-config |
Step 6. Reboot the RSFC to make your changes take effect. | reload |
This example shows how to change the configuration register boot field value to 0x2 (to cause the RSFC to boot the system image specified by the BOOT variable), given the current configuration register value of 0x101:
Router#show bootvar

BOOT variable =
CONFIG_FILE variable does not exist
BOOTLDR variable does not exist
Configuration register is 0x101

Router#configure terminal

Enter configuration commands, one per line.  End with CNTL/Z.
Router(config)#config-register 0x102

Router(config)#^Z

Router#copy running-config startup-config

Destination filename [startup-config]?
Building configuration...

Router#reload
The RSFC uses the BOOTLDR variable to locate a boot helper image to boot. For more information on the function of the BOOTLDR variable, see the "BOOTLDR Environment Variable" section.
To set the BOOTLDR environment variable on the RSFC, perform this task in global configuration mode:
| Task | Command |
|---|---|
Step 1. (Optional) Check the current contents of the BOOTLDR variable, if desired. | show bootvar |
Step 2. Enter configuration mode. | configure terminal |
Step 3. Specify the file_url: of the boot helper image. The file_url: contains the Flash device name and the filename of the system image file. | boot bootldr file_url: |
Step 4. Exit configuration mode. | Ctrl-Z |
Step 5. Save the running configuration to NVRAM. | copy running-config startup-config |
Step 1. (Optional) Verify the change to the BOOTLDR variable, if desired. | show bootvar |
Step 2. Reboot the RSFC to make your changes take effect. | reload |
This example shows how to add an image file in bootflash: to the BOOT variable:
Router#show bootvar

BOOT variable =
CONFIG_FILE variable does not exist
BOOTLDR variable does not exist
Configuration register is 0x102

Router#configure terminal

Enter configuration commands, one per line.  End with CNTL/Z.
Router(config)#boot bootldr bootflash:c5rsfc-boot-mz.120-3c.W5.8.bin

Router(config)#^Z

Router#copy running-config startup-config

Destination filename [startup-config]?
Building configuration...

Router#reload
The RSFC uses the BOOT variable to locate a system image to boot. For more information on the function of the BOOT variable, see the "BOOT Environment Variable" section.
To set the BOOT environment variable on the RSFC, perform this task in global configuration mode:
| Task | Command |
|---|---|
Step 1. (Optional) Check the current contents of the BOOT variable, if desired. | show bootvar |
Step 2. Enter configuration mode. | configure terminal |
Step 3. Specify the file_url: of the system image. The file_url: contains the Flash device name and the filename of the system image file. | boot system flash file_url: |
Step 4. Exit configuration mode. | Ctrl-Z |
Step 5. Save the running configuration to NVRAM. | copy running-config startup-config |
Step 1. (Optional) Verify the change to the BOOT variable, if desired. | show bootvar |
Step 2. Reboot the RSFC to make your changes take effect. | reload |
This example shows how to add an image file in bootflash: to the BOOT variable:
Router#show bootvar

BOOT variable =
CONFIG_FILE variable does not exist
BOOTLDR variable does not exist
Configuration register is 0x102

Router#configure terminal

Enter configuration commands, one per line.  End with CNTL/Z.
Router(config)#boot system flash bootflash:c5rsfc-js-mz.120-3c.W5.8.bin

Router(config)#^Z

Router#copy running-config startup-config

Destination filename [startup-config]?
Building configuration...

Router#reload
To assign a nondefault MAC address to an RSFC VLAN interface, perform this task in interface configuration mode:
| Task | Command |
|---|---|
Step 1. Assign a non-default MAC address to the VLAN interface. | mac-address H.H.H |
Step 2. Verify the configuration. | show interface vlan vlan-id |
This example shows how to assign a nondefault MAC address to an RSFC VLAN interface and verify the configuration:
Router#configure terminal

Enter configuration commands, one per line.  End with CNTL/Z.
Router(config)#interface vlan 200

Router(config-if)#mac-address 1234.5678.9ABC

Router(config-if)#^Z

Router#show interface vlan 200

Vlan200 is up, line protocol is up
  Hardware is Cat5k Virtual Ethernet, address is 1234.5678.9abc (bia 0010.0d3e.)

<...output truncated...>

Router#
These sections contain RSFC configuration examples:
This example consists of these sections:
Figure 4 shows the network configuration for this example. The network is configured as follows:

These configuration tasks must be performed to configure the network in this example:
1. Configure the Catalyst 5509 as a VTP server and assign a VTP domain name.
2. Configure the Catalyst 5505 as a VTP client in the same VTP domain.
3. Create the VLANs on the Catalyst 5509.
4. Configure the Gigabit EtherChannel ISL trunk link between the switches.
5. Assign the end station switch ports to the appropriate VLANs.
6. On the RSFC, create and assign IP addresses to the VLAN interfaces, one for each VLAN configured on the switch.
After you successfully configure the network, all end stations should be able to communicate with one another. Whenever a station in one VLAN transmits to a station in another VLAN, the traffic travels to the Catalyst 5509 and is passed to the RSFC on the appropriate VLAN interface. The RSFC checks the routing table, determines the correct outgoing VLAN interface, and sends the traffic out that interface to the Catalyst 5509. The Catalyst 5509 forwards the traffic out the appropriate switch port to the destination.
For example, if Host A transmits to the server, the Catalyst 5509 receives the traffic on port 6/1 and passes it to the RSFC on the VLAN 150 interface. The RSFC performs a routing table lookup and forwards the traffic out the VLAN 50 interface. The Catalyst 5509 forwards the traffic to the server out port 2/1.
Similarly, if Host B transmits to the server, the Catalyst 5505 receives the traffic on port 3/1 and passes it over the Gigabit EtherChannel ISL trunk link to the Catalyst 5509. The Catalyst 5509 passes the traffic to the RSFC over the VLAN 250 interface. The RSFC routes the traffic out the VLAN 50 interface and the Catalyst 5509 forwards the traffic to the server.
This example shows how to configure the Catalyst 5509:
Cat5509> (enable) set VTP domain Corporate mode server

VTP domain Corporate modified
Cat5509> (enable) set vlan 50
Vlan 50 configuration successful
Cat5509> (enable) set vlan 150

Vlan 150 configuration successful
Cat5509> (enable) set vlan 250

Vlan 250 configuration successful
Cat5509> (enable) set port channel 1/1-2 desirable

Port(s) 1/1-2 channel mode set to desirable.
Cat5509> (enable) set trunk 1/1 desirable isl

Port(s) 1/1 trunk mode set to desirable.
Port(s) 1/1 trunk type set to isl.
Cat5509> (enable) set port duplex 2/1 full

Port 2/1 set to full-duplex.
Cat5509> (enable) set vlan 50 2/1

VLAN 50 modified.
VLAN 1 modified.
VLAN  Mod/Ports
---- -----------------------
50    2/1

Cat5509> (enable) set port duplex 6/1 full

Port 6/1 set to full-duplex.
Cat5509> (enable) set vlan 150 6/1

VLAN 150 modified.
VLAN 1 modified.
VLAN  Mod/Ports
---- -----------------------
150   6/1

Cat5509> (enable)
This example shows how to configure the Catalyst 5505:
Cat5505> (enable) set VTP domain Corporate mode client

VTP domain Corporate modified
Cat5509> (enable) set port duplex 3/1 full

Port 3/1 set to full-duplex.
Cat5505> (enable) set vlan 250 3/1

VLAN 250 modified.
VLAN 1 modified.
VLAN  Mod/Ports
---- -----------------------
250   3/1

Cat5505> (enable)
This example shows how to configure the RSFC:
Console> (enable) session 15

Trying Router-15...
Connected to Router-15.
Escape character is '^]'.

RSFC>enable
RSFC#configure terminal

Enter configuration commands, one per line.  End with CNTL/Z.
RSFC(config)#interface vlan50

RSFC(config-if)#ip address 172.16.50.1 255.255.255.0

RSFC(config-if)#no shutdown

RSFC(config-if)#interface vlan150

RSFC(config-if)#ip address 172.16.150.1 255.255.255.0

RSFC(config-if)#no shutdown

RSFC(config-if)#interface vlan250

RSFC(config-if)#ip address 172.16.250.1 255.255.255.0

RSFC(config-if)#no shutdown

RSFC(config-if)#^Z

RSFC#
This example consists of these sections:
Figure 5 shows the network configuration for this example. The network is configured as follows:

The VLAN 100 and VLAN 200 interfaces on RSFC A are configured as the active HSRP interfaces for each VLAN (by setting the HSRP priority for the interfaces to 110). The VLAN 100 and VLAN 200 interfaces on RSFC B are configured as the standby HSRP router interfaces (by leaving the HSRP priority for the interfaces at the default value of 100).
Hosts in VLAN 100 are configured to use the VLAN 100 HSRP IP address (172.20.100.10) as their default gateway. Hosts in VLAN 200 are configured to use the VLAN 200 HSRP IP address (172.20.200.10) as their default gateway.
In this configuration, RSFC A actively routes traffic for the HSRP IP address and RSFC B provides transparent backup interfaces. In the event of a failure of the active supervisor engine or RSFC A, the standby interfaces on RSFC B become active and continue routing traffic from hosts using the HSRP IP address as their default gateway.
This example shows how to configure HSRP for RSFC A:
Router#configure terminal

Enter configuration commands, one per line.  End with CNTL/Z.
Router(config)#ip routing

Router(config)#router rip

Router(config-router)#network 172.20.0.0

Router(config-router)#interface vlan100

Router(config-if)#ip address 172.20.100.1 255.255.255.0

Router(config-if)#no shutdown

Router(config-if)#standby 100 ip 172.20.100.10

Router(config-if)#standby 100 priority 110

Router(config-if)#standby 100 preempt

Router(config-if)#standby 100 timers 5 15

Router(config-if)#standby 100 authentication Secret

Router(config-if)#interface vlan200

Router(config-if)#ip address 172.20.200.1 255.255.255.0

Router(config-if)#no shutdown

Router(config-if)#standby 200 ip 172.20.200.10

Router(config-if)#standby 200 priority 110

Router(config-if)#standby 200 preempt

Router(config-if)#standby 200 timers 5 15

Router(config-if)#standby 200 authentication Covert

Router(config-if)#^Z

Router#
This example shows how to configure HSRP for RSFC B:
Router#configure terminal

Enter configuration commands, one per line.  End with CNTL/Z.
Router(config)#ip routing

Router(config)#router rip

Router(config-router)#network 172.20.0.0

Router(config-router)#interface vlan100

Router(config-if)#ip address 172.20.100.2 255.255.255.0

Router(config-if)#no shutdown

Router(config-if)#standby 100 ip 172.20.100.10

Router(config-if)#standby 100 preempt

Router(config-if)#standby 100 timers 5 15

Router(config-if)#standby 100 authentication Secret

Router(config-if)#interface vlan200

Router(config-if)#ip address 172.20.200.2 255.255.255.0

Router(config-if)#no shutdown

Router(config-if)#standby 200 ip 172.20.200.10

Router(config-if)#standby 200 preempt

Router(config-if)#standby 200 timers 5 15

Router(config-if)#standby 200 authentication Covert

Router(config-if)#^Z

Router#
This equipment has been tested and found to comply with the limits for a Class A digital device, pursuant to part 15 of the FCC rules. These limits are designed to provide reasonable protection against harmful interference when the equipment is operated in a commercial environment. This equipment generates, uses, and can radiate radio-frequency energy and, if not installed and used in accordance with the instruction manual, may cause harmful interference to radio communications. Operation of this equipment in a residential area is likely to cause harmful interference, in which case users will be required to correct the interference at their own expense.
You can determine whether your equipment is causing interference by turning it off. If the interference stops, it was probably caused by the Cisco equipment or one of its peripheral devices. If the equipment causes interference to radio or television reception, try to correct the interference by using one or more of the following measures:
Modifications to this product not authorized by Cisco Systems could void the FCC approval and negate your authority to operate this product.
The following documents are available for the Catalyst 5000 series switches:
Other useful publications are as follows:
Cisco documentation and additional literature are available in a CD-ROM package, which ships with your product. The Documentation CD-ROM, a member of the Cisco Connection Family, is updated monthly. Therefore, it might be more current than printed documentation. To order additional copies of the Documentation CD-ROM, contact your local sales representative or call customer service. The CD-ROM package is available as a single package or as an annual subscription. You can also access Cisco documentation on the World Wide Web at http://www.cisco.com, http://www-china.cisco.com, or http://www-europe.cisco.com.
If you are reading Cisco product documentation on the World Wide Web, you can submit comments electronically. Click Feedback in the toolbar and select Documentation. After you complete the form, click Submit to send it to Cisco. We appreciate your comments.
Cisco Connection Online (CCO) is Cisco Systems' primary, real-time support channel. Maintenance customers and partners can self-register on CCO to obtain additional information and services.
Available 24 hours a day, 7 days a week, CCO provides a wealth of standard and value-added services to Cisco's customers and business partners. CCO services include product information, product documentation, software updates, release notes, technical tips, the Bug Navigator, configuration notes, brochures, descriptions of service offerings, and download access to public and authorized files.
CCO serves a wide variety of users through two interfaces that are updated and enhanced simultaneously: a character-based version and a multimedia version that resides on the World Wide Web (WWW). The character-based CCO supports Zmodem, Kermit, Xmodem, FTP, and Internet e-mail, and it is excellent for quick access to information over lower bandwidths. The WWW version of CCO provides richly formatted documents with photographs, figures, graphics, and video, as well as hyperlinks to related information.
You can access CCO in the following ways:
For a copy of CCO's Frequently Asked Questions (FAQ), contact cco-help@cisco.com. For additional information, contact cco-team@cisco.com.

![]()
![]()
![]()
![]()
![]()
![]()
![]()
![]()
Posted: Sat Sep 21 01:03:38 PDT 2002
All contents are Copyright © 1992--2002 Cisco Systems, Inc. All rights reserved.
Important Notices and Privacy Statement.