|
|

This chapter explains how to plan your site for installation of the Cisco 6400 carrier-class broadband aggregator. The Cisco 6400 can be installed in any area that meets the specifications and requirements outlined in this chapter.
To ensure normal system operation and avoid potential post-installation problems, you should choose an appropriate location for your Cisco 6400 and prepare the site properly for installing equipment prior to system delivery.
Complete the checklist in Table 2-1 several weeks before taking delivery of your Cisco 6400.
| Checkoff Column | Task Description |
|---|---|
| Choose a location for your Cisco 6400 that meets the requirements described in the "Site Selection Guidelines" section. |
| Ensure that your site meets the power requirements described in the "Site Power Requirements" section. |
| Determine the type of mounting to be used when installing the Cisco 6400, as described in the "Cisco 6400 Mounting Options" section. |
| Ensure that the equipment rack in which you plan to install the Cisco 6400 meets the requirements described in the "Rack Selection Guidelines" section. |
| Select an appropriate location for your equipment rack, as described in the "Rack Placement Guidelines" section. |
| Install the Cisco 6400 in the equipment rack, as described in the "Cisco 6400 Installation Guidelines" section. |
| Ensure that the Cisco 6400 chassis is fully enclosed prior to operation, as described in the "Integrity of Chassis Enclosure" section. |
| Plan your network and Cisco 6400 interface connections, as described in the "Cabling Requirements" section. |
| Ensure that the Cisco 6400 chassis is properly grounded, as described in the "System Grounding Requirements" section. |
| Observe proper safety and operating precautions during Cisco 6400 installation and operation, as described in the "Safety Guidelines" section. |
The Cisco 6400 is designed to run in the following conditions:
You should consider all of these factors in selecting a suitable location for your Cisco 6400.
Table 2-2 details the environmental requirements that your site should meet to ensure a proper operating environment for your Cisco 6400.
| Characteristic | Minimum | Maximum |
|---|---|---|
Temperature, ambient operating range at sea level (760 mm Hg)—in compliance with GR-63. Short-term operating temperature is limited to 55ºC. | 25ºF (-4ºC) | 104ºF (40ºC) |
Temperature, ambient nonoperating and storage | -40ºF (-40ºC) | 167ºF (75ºC) |
Relative humidity (RH), ambient (noncondensing) operating | 5% | 95% |
Altitude, operating and nonoperating | -200 ft (-61 m) | 10,000 ft (3048 m) |
Vibration, operating | N/A | 5 to 200 Hz, 0.5 g (1 oct./min) |
Vibration, nonoperating | N/A | 5 to 200 Hz, 0.5 g (1 oct./min) |
Knowing the physical characteristics of your Cisco 6400 can help you to choose an appropriate location for the system. Table 2-3 lists the dimensional and weight characteristics of the Cisco 6400, both as a standalone system and as packaged in a shipping crate ready for customer delivery. (See Figure 2-1)
| Characteristic | Cisco 6400 Standalone Chassis | Cisco 6400 Packaged for Shipment |
|---|---|---|
Height | 21.75 in. (55.2 cm) | 33 in. (83.8 cm) |
Width | 17.5 (44.5 cm) | 24 in. (61 cm) |
Depth | 12 in. (30.5 cm) | 33 in. (83.8 cm) |
Weight of fully configured chassis | 130 lb (59.02 kg) | 160 lb (72.6 kg) |


You should ensure that the floor under the telco rack in which you plan to install the Cisco 6400 (together with any other equipment) is capable of supporting the combined weight of the rack and all other installed equipment.
Using Table 2-4, you can calculate the approximate total weight of your Cisco 6400, as ordered for delivery. Add the weight of each individual component in Table 2-4, as appropriate, to the weight of the empty chassis (which includes the cable cover).
For additional information about floor loading requirements, consult the document GR-63-CORE, Network Equipment-Building System (NEBS) Requirements: Physical Protection.
| System Element | Weight |
|---|---|
Empty chassis, with cable cover (plastic bezel) | 37.80 lb (17.16 kg) |
Power Entry Module | |
Blower module | 10.95 lb (4.97 kg) |
Node switch processor (NSP) card | 8.00 lb (3.63 kg) |
Node route processor (NRP) card | 5.00 lb (2.27 kg) |
Line card carrier | 2.00 lb (0.91 kg) |
Node line card (NLC): | |
Line card carrier with two NLCs installed | 5.70 lb (2.59 kg) |
Approximate total weight of fully populated chassis | 130.00 lb (59.02 kg) |
Either a centralized DC source or an AC source can power the Cisco 6400. For DC sources, the Cisco 6400 can be configured with a DC PEM. For AC sources, the Cisco 6400 can be configured with either an AC PEM, or a DC PEM used in conjunction with the Cisco 6400 AC power shelf.
Each Cisco 6400 requires a dedicated branch circuit. If you equip your Cisco 6400 with dual power feeds, you should provide an independent power source for each cord. Doing so avoids compromising the power redundancy feature of the system.
 |
Warning Connect the unit only to a DC power source that complies with the Safety Extra-Low Voltage (SELV) requirements in IEC 60950 based safety standards. |
The following notice applies to every Cisco 6400:
This device complies with FCC Rules, Part 15. Operation is subject to the following conditions:
Table 2-5 lists the power consumption and heat dissipation characteristics of Cisco 6400 components. This information is useful in assessing the need for additional air conditioning capacity in your site.
| System Configuration | Power Consumption | Heat Dissipation |
|---|---|---|
Base system with AC power | 400W | 1367 Btu/hr |
Redundant base system with AC power | 550W | 1879 Btu/hr |
Base system with DC power | 335W | 1145 Btu/hr |
Redundant base system with DC power | 445W | 1528 Btu/hr |
Optional components: | | |
Maximum system power consumption and heat dissipation | 1200W | 4098 Btu/hr |
Table 2-6 outlines the electrical specifications of the DC PEM for the Cisco 6400.
| Characteristic | Description |
|---|---|
Input connections | Supports up to two separate -48 VDC input feeds by means of 2-position terminal blocks built into the Cisco 6400 backplane |
DC input voltage | -48 VDC/-60 VDC |
DC input current rating | Maximum power budget: 20A @ -48 VDC |
Power consumption | 1200W maximum |
Heat dissipation | 4098 Btu/hr maximum |
Table 2-7 outlines the electrical specifications of the AC PEM for the Cisco 6400.
| Characteristic | Description |
|---|---|
AC inlet power connector | IEC 320 C20 |
AC input voltage | 100 - 240 VAC, 50/60 Hz, single phase |
AC input current | 15 - 7A |
Power consumption | 1400W maximum |
Heat dissipation | 4760 Btu/hr maximum |
Table 2-8 outlines the electrical specifications of the optional AC power shelf that you can use for powering your Cisco 6400 in lieu of the DC input power distribution system in the Central Office (CO) environment. The AC power shelf provides the required -48 VDC source voltage for the DC PEM.
| Characteristic | Description |
|---|---|
AC inlet power connector | IEC 320 C20 |
AC input voltage | 200 - 240 VAC, 50/60 Hz, single phase |
AC input current | 6A |
Power consumption | 1400W maximum |
Heat dissipation | 4760 Btu/hr maximum |
When signal wires are run for any significant distance, two types of interference can be induced on the wires:
Strong EMI, especially when caused by lightning or nearby radio transmitters, can destroy the signal drivers and receivers in the Cisco 6400 and even create an electrical hazard by conducting power surges through power lines into installed equipment.
 |
Note To prevent or remedy interference problems, you may need to consult RFI/EMI experts. |
If signal wires exceed recommended cabling distances, or if signal wires pass between buildings, you should give special consideration to the effect that a lightning strike in your vicinity might have on electrical equipment.
The electromagnetic pulse (EMP) generated by lightning or other high-energy phenomena can couple enough energy into unshielded conductors to damage or destroy electronic equipment. If you have previously experienced such problems, you should consult with RFI/EMI experts to ensure that you have adequate electrical surge suppression and shielding of signal cables in your Cisco 6400 operating environment.
Most data centers cannot avoid the infrequent, but potentially catastrophic, problems described above without using pulse meters and other special equipment. Identifying and resolving such potential problems can consume substantial time and money. Nevertheless, you should ensure that you have a properly grounded and shielded electrical environment, paying special attention to the need for electrical surge suppression.
The Cisco 6400 can be mounted in the following ways:
|
Note Alternate mounting arrangements cannot be used when the Cisco 6400 chassis is used with its optional AC power shelf. When used with the AC power shelf, the Cisco 6400 chassis and the AC power shelf must be flush-mounted in a 19-inch rack, with the AC power shelf directly below the Cisco 6400. The Cisco 6400 can never be mounted on the floor. |
For a detailed description of the mounting options for the Cisco 6400, refer to the Cisco 6400 Hardware Installation and Maintenance Guide.
Cisco recommends that you obtain an equipment rack that has the following characteristics:
|
Note Ensure rack stability when you are installing your Cisco 6400. The rack/Cisco 6400 combination should comply with UL Standard 1950, Par. 4.1.1 and IEC 950, 4.1.1. You should install heavy equipment at or near the bottom of the rack to lower the center of gravity and enhance rack stability. |
If you already have an equipment rack that meets these basic requirements, you should review its present location at your site, giving full consideration to the Cisco 6400 installation guidelines and requirements provided in this document.
You should allow at least 3 to 4 feet of clearance in front of the rack for normal system maintenance and for removing and inserting the following Cisco 6400 components:
These guidelines are based on the assumption that you will be mounting your Cisco 6400 in a standard telco rack.
The Cisco 6400 is equipped with an internal blower module that draws ambient air into the unit from the bottom front and sides of the chassis and exhausts it out the top rear and sides of the chassis. (See Figure 2-3.) This ambient airflow pattern through the Cisco 6400 must be maintained at all times to ensure normal system operation and to prevent overtemperature conditions within the chassis.
To minimize the potential for thermal problems, you should place the chassis in the rack so that the air intake at the bottom front of the enclosure (see Figure 2-3) is not near the exhaust vents of other equipment. Similarly, you should ensure that the Cisco 6400 exhaust vent at the top rear of the enclosure (see Figure 2-3) is not near the air intake of other adjacent equipment.

Side panels can be installed in a rack that is housing a Cisco 6400 without posing potential overheating problems for the system, but the air intake on the bottom front of the chassis and the exhaust vents at the top rear of the chassis should not otherwise be blocked or restricted.
If the ambient air being drawn into the chassis is blocked, restricted, or too warm, an overtemperature condition can occur within the system. Under extreme conditions, an internal environmental monitoring facility will shut down the system to protect its internal circuitry.
Overtemperature conditions within the Cisco 6400 can occur under any of the following circumstances:
A temperature or humidity level that approaches the limits specified in Table 2-1 should be regarded as a potential problem. To help ensure normal system operation following Cisco 6400 installation, you should anticipate and correct any potential environmental anomalies before the system is delivered.
You should observe the following guidelines when installing the Cisco 6400 in a telco rack:
In addition to the guidelines outlined above, review the precautions for avoiding overtemperature conditions in the "System Ventilation Precautions" section.
For additional information about the proper placement of electronic equipment in your site, consult the document GR-63-CORE, Network Equipment-Building System (NEBS) Requirements: Physical Protection.
When you choose a rack location for installing your Cisco 6400, take into account the following cable routing requirements:
Figure 2-4 shows a Cisco 6400 with interface cables of various types routed through openings in the cable cover (smoked plastic bezel) attached to the front of the chassis. This cover not only dresses the front of the Cisco 6400, but also helps you neatly arrange the interface cables and keep them securely connected to chassis components.

The interface cable layout in your Cisco 6400 might differ from that shown in Figure 2-4, depending on the circuit boards installed in the chassis and the termination points of associated interface cables.
Although obscured from view in Figure 2-4 by the cable cover, cable management brackets attached to the top front and bottom front of the Cisco 6400 chassis help you to neatly arrange all of the interface cables attached to individual circuit boards. Figure 1-1 shows the location and physical configuration of these cable management brackets.
Cisco recommends using the top cable management bracket for managing the appropriate interface cables for the console (CON), auxiliary (AUX), 10BaseT (Ethernet), and 100BaseT (Fast Ethernet) ports on NSP cards and NRP cards. Cisco also recommends that you leave a service loop in the interface cables at the top corners of the chassis (see Figure 2-4) so that the cables will not interfere with the insertion or removal of the blower module.
Cisco recommends using the bottom cable management bracket for managing the interface cables associated with the fiber-optic ports on node line cards (NLCs).
For additional information about cable routing requirements within your site, consult the document GR-63-CORE, Network Equipment-Building System (NEBS) Requirements: Physical Protection.
For instructions on how to remove the top cable management bracket to service the blower module, refer to the Cisco 6400 Hardware Installation and Maintenance Guide.
The Cisco 6400 is designed to operate with all circuit boards, slot filler panels, covers, and components in place and securely attached. When thus secured, an enclosure is formed that accomplishes the following:
Air flow disturbances within the chassis can cause thermal overloading of electronic components and induce system failures.
 |
Caution Do not operate the Cisco 6400 without securing all line cards, bulkheads, slot filler panels, covers, and components to the chassis. You should operate the system so as to limit access to hazardous voltages and currents, prevent EMI radiation outside the chassis, and maintain the flow of cooling air through the chassis. |
This section outlines the cabling requirements for your Cisco 6400.
Before installing the Cisco 6400, you should have all interface cables and any additional required interface equipment on hand.
If you intend to build your own interface cables, you can refer to the cable pinouts detailed in "Cabling Specifications."
The extent of your network and the distances between network interface connections depend in part on the following factors:
The distance and rate limits referenced in the following sections are the IEEE-recommended maximum speeds and distances for signaling purposes. You should use this information as a guideline in planning your network connections prior to Cisco 6400 installation.
Table 2-9 shows the maximum transmission distances between stations for Ethernet and Fast Ethernet connections.
| Transceiver Speed | Cable Type | Transmission Mode | Maximum Distance between Stations |
|---|---|---|---|
10 Mbps | Category 3 | Full and half duplex | 328 feet (100 meters) |
100 Mbps | Category 5 | Full and half duplex | 328 feet (100 meters) |
The specifications for single-mode, fiber-optic transmissions are outlined in Table 2-10 and
Table 2-11.
| Characteristic | Permissible Value |
|---|---|
Transmitter output power | -14 to -8 dBm |
Receiver sensitivity | -32.5 to -8 dBm |
Wavelength | 1261 to 1360 nm |
Maximum span | 9 miles (14.5 km) |
| Characteristic | Permissible Value |
|---|---|
Transmitter output power | -15 to -8 dBm |
Receiver sensitivity | -28 to -8 dBm |
Wavelength | 1261 to 1360 nm |
Maximum span | 9 miles (14.5 km) |
Statistical models can determine the power budget more accurately than the worst-case method. Determining the link loss with statistical methods requires accurate knowledge of variations in the data link components.
Statistical power budget analysis is beyond the scope of this publication. For further information about estimating the power budget, you can refer to the following:
|
Note The International Telecommunications Union Telecommunications Standardization Sector (ITU-T) carries out the functions of the former Consultative Committee for International Telegraph and Telephone (CCITT). |
Refer to the following publications for more information on determining attenuation and power budget:
In a worst-case estimate of power margin (PM) for single-mode transmissions, the following assumptions are made:
The worst-case analysis provides a margin of error, although not all parts of an actual system will operate at worst-case levels.
The power budget (PB) is the maximum possible amount of power transmitted. The following shows the power budget calculations:
PB = PT - PR
PB = - 14 dBm - 32.5 dBm
PB = 18.5 dB
The power margin is equal to the power budget, minus the link loss:
PM = PB - LL
When the power margin is calculated, the result should be greater than zero to ensure that the link will work. A result of less than zero indicates that there is not enough power to operate the receiver.
Table 2-12 lists the factors that contribute to link loss and the estimate of the link-loss value attributable to each factor.
| Link Loss Factor | Estimate of Link Loss Value |
|---|---|
Connector | 0.5 dB |
Splice | 0.5 dB |
Fiber attenuation | 0.5 dB/km |
Table 2-13 lists the link attenuation and dispersion limit for a typical fiber-optic link.
| Characteristic | Single-Mode Fiber |
|---|---|
Attenuation | 0.5 dB |
Dispersion limit | No limit |
The power budget (PB) for single-mode, fiber optic transmission is equal to the maximum possible amount of power transmitted.
Below is an example of single-mode, power budget calculations with sufficient power for transmission, based on the following variables:
Given these variables, you can estimate the power margin as follows:
PM = PB - LL
PM = 18.5 dB - 12 km (0.5 dB/km) - 8 (0.5 dB) - 3 (0.5 dB)
PM = 18.5 dB - 6 dB - 4 dB - 1.5 dB
PM = 7.0 dB
The 7.0 dB value indicates that this link would have sufficient power for transmission.
Serial signals travel a limited distance at any given baud rate—the slower the baud rate, the greater the distance of the connection.
Table 2-14 shows the relationship between the baud rate and the distance of EIA/TIA-232 signals.
| Baud Rate (bps) | Distance (feet) | Distance (meters) |
|---|---|---|
2400 | 200 | 60 |
4800 | 100 | 30 |
9600 | 50 | 15 |
19,200 | 25 | 7.6 |
38,400 | 12 | 3.7 |
56,000 | 8.6 | 2.6 |
The bottom rear edge of the Cisco 6400 enclosure (see Figure 2-5) contains six threaded holes that are used as follows:
You should complete this grounding connection before applying power to the Cisco 6400.
|
Note The Cisco 6400 is compatible with customer sites that use either isolated or common bonding networks. |

This section alerts you to important safety and operating precautions that you should keep in mind during the installation and operation of your Cisco 6400.
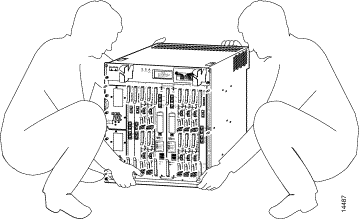
A Cisco 6400 chassis that is populated with two PEMs and a full complement of circuit boards weighs approximately 130 pounds (59.02 kg). You should exercise extreme care in lifting and moving the Cisco 6400.
|
Warning To prevent personal injury or damage to the chassis, never attempt to lift or tilt the chassis using the handles on modules (such as power supplies, fans, or cards); these types of handles are not designed to support the weight of the unit. Lift the unit only by using handles that are an integral part of the chassis, or by grasping the chassis underneath the lower edge. |
|
Warning Two people are required to lift the chassis. To prevent injury, keep your back straight and lift with your legs, not your back. |
Cisco recommends that two individuals lift the Cisco 6400 when it is to be moved within your site or to be installed in an equipment rack. Figure 2-6 illustrates the proper lifting techniques for handling the Cisco 6400.
In grasping the Cisco 6400 from the front, you should first remove the bottom cable management bracket (if present), remove the air filter assembly (if present), and insert your hand into the air intake opening.
In grasping the rear of the Cisco 6400, you should place your other hand beneath the exhaust vent at the top rear of the enclosure to support the weight of the chassis.
Keep the following precautions in mind when you plan equipment locations, perform system maintenance, or remove/install Cisco 6400 components:

When installing the Cisco 6400 in an equipment rack, you should observe the following precautions to avoid internal overtemperature conditions:
![]()
![]()
![]()
![]()
![]()
![]()
![]()
![]()
Posted: Fri Jul 5 11:03:15 PDT 2002
All contents are Copyright © 1992--2002 Cisco Systems, Inc. All rights reserved.
Important Notices and Privacy Statement.