|
|

This appendix shows the cards that can be inserted into appropriate slots in the front of the Cisco 6400 carrier-class broadband aggregator chassis and summarizes the pinouts for the associated ports and interface cables. It also shows other important connection facilities that are built into the backplane of the Cisco 6400.
Figure B-1 shows the Cisco 6400 node switch processor (NSP).

The NSP console (CON) port is a serial EIA/TIA-232 interface. Table B-1 lists the signals for this connector.
| Pin | Signal | Direction | Description |
|---|---|---|---|
1 | (RTS) | — | Hard wired to pin 8 |
2 | DTR | Output | Data Terminal Ready (for modem control) |
3 | TxD | Output | Transmit Data |
4 | GND | — | Signal Ground |
5 | GND | — | Signal Ground |
6 | RxD | Input | Receive Data |
7 | DSR | Input | Data Set Ready (for modem control) |
8 | (CTS) | — | Hard wired to pin 1 |
 |
Note The NSP console port does not support hardware flow control. To ensure proper operation, configure any terminal equipment connected to the console port for no hardware flow control or no flow control. |
The NSP auxiliary (AUX) port supports hardware flow control and modem control. Table B-2 lists the signals for this connector.
| Pin | Signal | Direction | Description |
|---|---|---|---|
1 | RTS | Output | Request to send (hardware flow control) |
2 | DTR | Output | Data Terminal Ready (modem control) |
3 | TxD | Output | Transmit Data |
4 | GND | — | Signal Ground |
5 | GND | — | Signal Ground |
6 | RxD | Input | Receive Data |
7 | DSR | Input | Data Set Ready (modem control) |
8 | CTS | Input | Clear to Send (hardware flow control) |
The NSP network management Ethernet (ETH) port provides for out-of-band network management for the NSP. Table B-3 lists the signals for this connector.
| Pin | Signal | Direction | Description |
|---|---|---|---|
1 | TxD+ | Output | Transmit Data + |
2 | TxD- | Output | Transmit Data - |
3 | RxD+ | Input | Receive Data + |
4 | NC | — | No connection |
5 | NC | — | No connection |
6 | RxD- | Input | Receive Data - |
7 | NC | — | No connection |
8 | NC | — | No connection |
Figure B-2 shows the Cisco 6400 node route processor (NRP).

The NRP console (CON) port is a serial EIA/TIA-232 interface. Table B-4 lists the signals for this connector.
| Pin | Signal | Direction | Description |
|---|---|---|---|
1 | NC | — | No connection |
2 | DTR | Output | Data Terminal Ready (for modem control) |
3 | TxD | Output | Transmit Data |
4 | GND | — | Signal ground |
5 | GND | — | Signal ground |
6 | RxD | Input | Receive Data |
7 | DSR | Input | Data Set Ready |
8 | NC | — | No connection |
|
Note The NRP console port does not support hardware flow control. To ensure proper operation, configure any terminal equipment connected to the console port for no hardware flow control or no flow control. |
The NRP auxiliary (AUX) port supports hardware flow control and modem control. Table B-5 lists the signals for this connector.
| Pin | Signal | Direction | Description |
|---|---|---|---|
1 | RTS | Output | Request To Send (for hardware flow control) |
2 | DTR | Output | Data Terminal Ready (for modem control) |
3 | TxD | Output | Transmit Data |
4 | GND | — | Signal ground |
5 | GND | — | Signal ground |
6 | RxD | Input | Receive Data |
7 | DSR | Input | Data Set Ready (for modem control) |
8 | CTS | Input | Clear To Send (for hardware flow control) |
The NRP network management Ethernet (ETH) port provides for out-of-band network management for the NRP. Table B-6 lists the signals for this connector.
| Pin | Signal | Direction | Description |
|---|---|---|---|
1 | TxD+ | Output | Transmit Data + |
2 | TxD- | Output | Transmit Data - |
3 | RxD+ | Input | Receive Data + |
4 | NC | — | No connection |
5 | NC | — | No connection |
6 | RxD- | Input | Receive Data - |
7 | NC | — | No connection |
8 | NC | — | No connection |
The Fast Ethernet (FE) port can be used to connect the NRP to a 100BaseT LAN. Table B-7 lists the signals for this connector.
| Pin | Signal | Direction | Description |
|---|---|---|---|
1 | TxD+ | Output | Transmit Data + |
2 | TxD- | Output | Transmit Data - |
3 | RxD+ | Input | Receive Data + |
4 | NC | — | No connection |
5 | NC | — | No connection |
6 | RxD- | Input | Receive Data - |
7 | NC | — | No connection |
8 | NC | — | No connection |
|
Note The 100BaseT (FE) port on the NRP does not meet the requirements of Bellcore GR 1089 Core, Section 4.5.9 (intrabuilding lightning surge) with unshielded twisted pair cabling attached. Therefore, if the Cisco 6400 is used in an environment where lightning-induced transients are likely to couple to the signal lines, the use of shielded interconnection cables for the 100BaseT port is required. |
Figure B-3 shows the Cisco 6400 OC-3 node line card (NLC).

Figure B-4 shows the fiber-optic interface cable for the OC-3/STM-1 NLC used with the Cisco 6400.
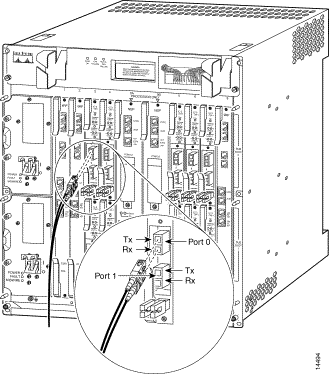
Figure B-5 shows suggested cable management for the OC-3/STM-1 fiber-optic cable.
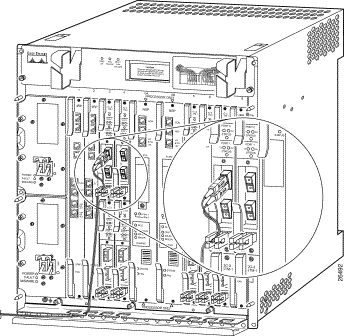
Figure B-6 shows the Cisco 6400 DS3 NLC (in a horizontal orientation).

Figure B-7 shows the coaxial interface cable for the DS3 NLC used with the Cisco 6400.
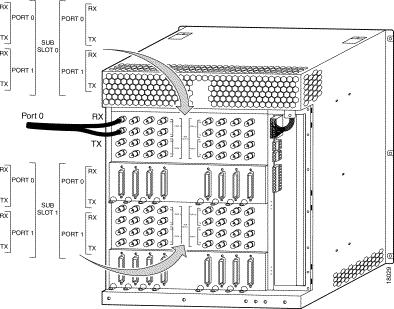
Figure B-8 shows the Cisco 6400 OC-12 NLC (in a horizontal orientation).

Figure B-9 shows the fiber-optic interface cable for the OC-12/STM-4 NLC used with the Cisco 6400.
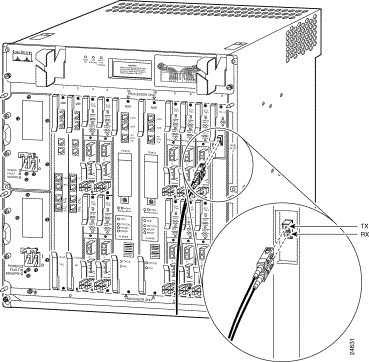
Figure B-10 shows suggested cable management for the OC-12/STM-4 fiber-optic cable.
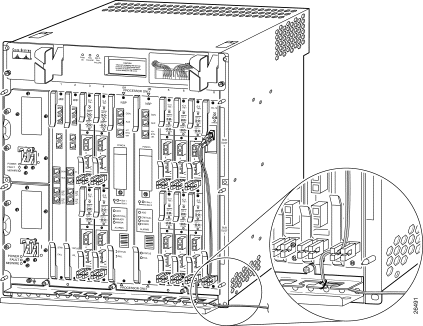
Figure B-11 shows the Building Integrated Timing Supply (BITS) terminal blocks on the Cisco 6400 chassis. The bottom BITS terminal block (labeled A) is associated with the NSP-S3B in slot 0A of the Cisco 6400 chassis (see Figure 1-1); the top BITS terminal block (labeled B) is associated with the NSP-S3B in slot 0B of the chassis.

|
Note In North America, the positive connection is known as tip, and the negative connection is known as ring. |
Figure B-12 shows the external alarm monitoring terminal block on the Cisco 6400. This facility accommodates the attachment of a customer-supplied external alarm monitoring facility to alert site personnel to the existence of an alarm condition in the Cisco 6400.

|
Note Figure B-12 shows the wiring configuration for normally open (NO) alarm relays. If you wire the Cisco 6400 in series with other equipment for the alarm indicators, use the normally closed (NC) terminal. If you wire the Cisco 6400 in parallel with other equipment, use the NO terminal. |
Figure B-13 shows the location of two identical system power terminal blocks on the rear of the Cisco 6400 chassis. These terminal blocks are associated with the power entry module (PEM) bays in the front of the chassis (see Figure 1-1). The upper terminal block services the top PEM bay; the lower terminal block services the bottom PEM bay.

|
Note Do not exceed the maximum torque of 10 inch-pounds on the DC connector. |
Figure B-14 shows the DC power conections with the rear cover installed.

Figure B-15 shows the location of the AC power cable connection on the AC PEM.
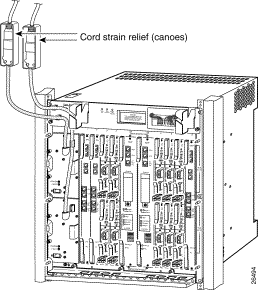
Figure B-16 shows the system grounding connection for the Cisco 6400.

![]()
![]()
![]()
![]()
![]()
![]()
![]()
![]()
Posted: Fri Jul 5 11:03:52 PDT 2002
All contents are Copyright © 1992--2002 Cisco Systems, Inc. All rights reserved.
Important Notices and Privacy Statement.