|
|

This chapter describes the procedures for installing the Cisco 6400 carrier-class broadband aggregator in a rack, connecting the interface and power cables, and powering up the Cisco 6400.
This chapter includes the following sections:
The sequence of procedures covers typical installations; you might need to modify these procedures if you have different site conditions. Recommended tools, equipment, and supplies are listed for each stage.
 |
Note The illustrations in this guide depict the original Cisco 6400 chassis. Your chassis may appear or look slightly different, but the installation procedure is the same. |
The following guidelines will help to ensure your safety and protect the equipment. This list does not cover all potentially hazardous situations.
 |
Warning Read the installation instructions before you connect the system to its power source. To see translations of this warning, refer to the Regulatory Compliance and Safety Information document that accompanied this device. |
|
Warning Do not work on the system or connect or disconnect cables during periods of lightning activity. To see translations of this warning, refer to the Regulatory Compliance and Safety Information document that accompanied this device. |
|
Warning To prevent personal injury or damage to the chassis, never attempt to lift or tilt the chassis using the handles on modules (such as power supplies, fans or cards); these types of handles are not designed to support the weight of the unit. Lift the unit only by using handles that are an integral part of the chassis, or by grasping the chassis underneath its lower edge. To see translations of this warning, refer to the Regulatory Compliance and Safety Information document that accompanied this device. |
|
Warning Two people are required to lift the chassis. To prevent injury, keep your back straight and lift with your legs, not your back. To see translations of this warning, refer to the Regulatory Compliance and Safety Information document that accompanied this device. |
The Cisco 6400 chassis can be mounted in any of the following ways:
|
Note If your Cisco 6400 chassis has an AC power shelf, alternative mounting arrangements cannot be used. The Cisco 6400 chassis and the AC power shelf must be flush-mounted in a 19-inch rack, with the AC power shelf directly below the Cisco 6400. The Cisco 6400 chassis can never be mounted directly on the floor. |
When installing the chassis in the rack, you should follow these guidelines:
|
Warning To prevent bodily injury when mounting or servicing this unit in a rack, you must take special precautions to ensure that the system remains stable. The following guidelines are provided to ensure your safety: |
To see translations of this warning, refer to the Regulatory Compliance and Safety Information document that accompanied this device.
The following tools and equipment are recommended as the minimum necessary for Cisco 6400 installation:
You might need additional tools and equipment to install associated equipment and cables. You might also require test equipment to check electronic and optical signal levels, power levels, and communications links.
The Cisco 6400 chassis can be flush-mounted in a 19-inch equipment rack using the rack mounting kit provided with your system. The chassis can be mounted with either the front or the rear chassis panel facing outward toward the aisle.
|
Note At least three people are required to mount the chassis: two persons to hold the unit, and one person to attach the screws. You should follow safe lifting practices when handling the Cisco 6400 chassis. See the "Safely Lifting the Chassis" section on. |
To install the rack-mount and cable-management brackets on a Cisco 6400 for a flush rack-mount configuration:
Step 2 Attach the mounting brackets so that the flanges that protrude to the sides are at the front of the chassis. Use three M5 screws per bracket (Figure 3-1).

Step 3 Two people are required to perform this step. A person should stand on either side of the chassis placing one hand in the air intake at the bottom front of the chassis. With the other hand grasp the top of the chassis under the air exhaust and carefully lift the chassis. Slowly lift the chassis in unison. To prevent injury, avoid sudden twists or moves.
Step 4 To position the chassis in the rack, insert the rear of the chassis between the rack posts. Align the mounting holes on the front flanges of the chassis with the mounting holes in the equipment rack.
Step 5 A third person should insert the mounting screws through the elongated holes in the bracket and into the threaded holes in the mounting post.
Step 6 Attach the cable management bracket to the bottom of the chassis (Figure 3-2).
|
Note The cable management bracket consists of two pieces (the cable guide and channel), but comes assembled. If you want to use just the cable guide, you can remove the channel by loosening the captive screws before attaching it to the chassis. |

The Cisco 6400 chassis can be center-mounted in a 19-inch equipment rack using the adapter kit provided with your system. The chassis can be mounted with either the front or the rear chassis panel facing outward toward the aisle.
|
Note At least three people are required to mount the chassis: two persons to hold the unit, and one person to attach the screws. You should follow safe lifting practices when handling the Cisco 6400 chassis. See the "Safely Lifting the Chassis" section on. |
To install the rack-mount and cable-management brackets on a Cisco 6400 for a center-mount configuration:
Step 2 Attach the optional mounting brackets to the chassis so that the flanges that protrude are at the middle of the chassis (Figure 3-3).

Step 3 Two people are required to perform this step. A person should stand on either side of the chassis placing one hand in the air intake at the bottom front of the chassis. With the other hand, grasp the top of the chassis under the air exhaust and carefully lift the chassis. Slowly lift the chassis in unison. To prevent injury, avoid sudden twists or moves.
Step 4 To position the chassis in the rack, insert the rear of the chassis between the rack posts. Align the mounting holes on the front flanges of the chassis with the mounting holes in the equipment rack.
Step 5 A third person should insert the mounting screws through the elongated holes in the bracket and into the threaded holes in the mounting post (Figure 3-4).
Step 6 Attach the cable management bracket to the bottom of the chassis (Figure 3-5).
|
Note The cable management bracket consists of two pieces (the cable guide and channel), but comes assembled. If you want to use just the cable guide, you can remove the channel by loosening the captive screws before attaching it to the chassis. |


The Cisco 6400 chassis can be center-mounted in a 23-inch equipment rack using the optional mounting brackets.
|
Note At least three people are required to mount the chassis: two persons to hold the unit, and one person to attach the screws. You should follow safe lifting practices when handling the Cisco 6400 chassis. See the "Safely Lifting the Chassis" section on. |
To install the rack-mount and cable-management brackets on a Cisco 6400 for a center-mount configuration:
Step 2 Attach the optional mounting brackets to the middle of the chassis (Figure 3-6).
Step 3 Attach the optional 23-inch bracket adapters to the chassis so that the flanges that protrude are at the middle of the chassis (Figure 3-7).

Step 4 Two people are required to perform this step. A person should stand on either side of the chassis placing one hand in the air intake at the bottom front of the chassis. With the other hand, grasp the top of the chassis under the air exhaust and carefully lift the chassis. Slowly lift the chassis in unison. To prevent injury, avoid sudden twists or moves.
Step 5 To position the chassis in the rack, insert the rear of the chassis between the rack posts. Align the mounting holes on the front flanges of the chassis with the mounting holes in the equipment rack.
Step 6 A third person should insert the mounting screws through the elongated holes in the bracket and into the threaded holes in the mounting post (Figure 3-8).
Step 7 Attach the cable management bracket to the bottom of the chassis (Figure 3-9).
|
Note The cable management bracket consists of two pieces (the cable guide and channel), but comes assembled. If you want to use just the cable guide, you can remove the channel by loosening the captive screws before attaching it to the chassis. |


You can mount the Cisco 6400 chassis in alternative locations, such as on an equipment shelf or in a cabinet. You might need special brackets or holders to secure the equipment.
|
Note You might need to provide additional cooling and ventilation if you mount the Cisco 6400 chassis in a cabinet. |
|
Note If your Cisco 6400 chassis has an AC power shelf, you cannot use alternative mounting arrangements. The Cisco 6400 chassis and the AC power shelf must be flush-mounted in a 19-inch rack, with the AC power shelf directly below the Cisco 6400. The Cisco 6400 chassis can never be mounted directly on the floor. |
After the chassis has been mounted, you should inspect the system. At the front of the chassis, check the ejector levers and ensure that the cards are securely installed. Tighten any captive installation screws that are loose on the cards. Ensure that your path to the rack is unobstructed.
This section provides procedures for connecting the Cisco 6400 chassis to earth ground. This procedure is required for all DC-powered installations, and any AC-powered installation where compliance with Bellcore grounding requirements is necessary. Make sure you have the recommended tools and supplies available (Table 3-1).
|
Warning When installing the unit, the ground connection must always be made first and disconnected last. To see translations of this warning, refer to the Regulatory Compliance and Safety Information document that accompanied this device. |
|
Warning Never defeat the ground conductor or operate the equipment in the absence of a suitably installed ground conductor. Contact the appropriate electrical inspection authority or an electrician if you are uncertain that suitable grounding is available. To see translations of this warning, refer to the Regulatory Compliance and Safety Information document that accompanied this device. |
Table 3-1 lists tools, equipment, and supplies you will need when you connect the system ground to the chassis.
| Quantity | Description | Comments |
|---|---|---|
1 | Number 2 Phillips screwdriver |
|
1 | Wire stripping tool |
|
1 | Crimping tool | Must fit diameter of grounding lugs. |
2 | 2-hole grounding lugs Must fit no. 6 stranded, no. 6 weld, or 37/24 flex cables. Each lug has two holes, centered 0.625 in. (15.87 mm) apart and accepts M5 screws. | Recommended types: |
Varies | Grounding wire | 6 AWG, 0.204 in. (5.18 mm) recommended. |
2 | M5 PEM screws with captive, locking washers | Included in accessory kit shipped with Cisco 6400 chassis. |
Varies | Screws to attach ground wire to grounding point at site | Part requirements depend on location. |
This section describes the procedure for connecting system ground to the Cisco 6400 chassis. Figure 3-10 illustrates a typical ground connection for the system.

To attach the grounding lug and cable to the grounding receptacle on the Cisco 6400:
Step 2 Use a wire stripping tool to remove approximately 3/4 inch (2 cm) of the covering from the end of the grounding wire.
Step 3 Insert the stripped end of the grounding wire in the open end of the grounding lug.
Step 4 Use a crimping tool to secure the grounding wire in the open end of the grounding lug.
Step 5 Locate the two grounding threaded holes at the bottom rear of the Cisco 6400.
Step 6 Place the grounding lug against the threaded holes.
Step 7 Insert the two M5 screws from the accessory kit through the holes in the lug and the threaded holes in the chassis. Use the cross-slotted screwdriver to tighten the screws and secure the grounding lug firmly to the chassis.
Step 8 Prepare the other end of the grounding wire for connection to an appropriate grounding point in your site.
In this procedure, you connect the Cisco 6400 to a -48 VDC power source. Before beginning the procedure, connect the chassis to earth ground as described in the previous section.
|
Warning Connect the unit only to a DC power source that complies with the Safety Extra-Low Voltage (SELV) requirements in IEC 60950 based safety standards. To see translations of this warning, refer to the Regulatory Compliance and Safety Information document that accompanied this device. |
|
Warning Before working on equipment that is connected to power lines, remove jewelry (including rings, necklaces, and watches). Metal objects will heat up when connected to power and ground and the heat can cause serious burns or weld the metal object to the terminals. To see translations of this warning, refer to the Regulatory Compliance and Safety Information document that accompanied this device. |
|
Warning This unit might have more than one power supply connection. All connections need to be removed to de-energize the unit. To see translations of this warning, refer to the Regulatory Compliance and Safety Information document that accompanied this device. |
|
Warning Use copper conductors only. To see translations of this warning, refer to the Regulatory Compliance and Safety Information document that accompanied this device. |
|
Warning A readily accessible two-poled disconnect device must be incorporated in the fixed wiring. To see translations of this warning, refer to the Regulatory Compliance and Safety Information document that accompanied this device. |
|
Warning This product requires short-circuit (overcurrent) protection, to be provided as part of the building installation. Install only in accordance with national and local wiring regulations. To see translations of this warning, refer to the Regulatory Compliance and Safety Information document that accompanied this device. |
|
Warning Care must be given to connecting units to the supply circuit so that wiring is not overloaded. To see translations of this warning, refer to the Regulatory Compliance and Safety Information document that accompanied this device. |
Table 3-2 lists the tools and supplies that you will need to connect the Cisco 6400 chassis to system power sources.
| Quantity | Description | Comments |
|---|---|---|
1 | Flat-blade screwdriver |
|
1 | Wire stripping tool |
|
2 or 4 | 10 AWG (minimum) wire cables | Cables must reach from the Two cables are needed for a single power source. Four cables are needed for two independent power sources. The cable to be connected to the Cisco 6400 chassis needs to have insulation stripped back not more than 0.394 in. (10 mm). |
To attach the DC power source on the Cisco 6400:
|
Warning Before performing any of the following procedures, ensure that power is removed from the DC circuit. To ensure that all power is OFF, locate the circuit breaker on the panel board that services the DC circuit, switch the circuit breaker to the OFF position, and tape the switch handle of the circuit breaker in the OFF position. To see translations of this warning, refer to the Regulatory Compliance and Safety Information document that accompanied this device. |
Step 2 Remove rear cover.
Step 3 Strip no more than 0.394 in. (10 mm) of insulation off the end of the power cables (Figure 3-11).

Step 4 Use a flat-blade screwdriver to connect the DC power lead from the first external power source to the DC terminal block labeled (-) 48V A. Figure 3-12 illustrates typical DC power lead connections for the system.

|
Note Apply a torque of approximately 7 inch-pounds on the DC terminal connector. Do not exceed the maximum torque of 10 inch-pounds. |
Step 5 Connect the return wire (RTN) to the terminal labeled (+) 48V RTN A.
Step 6 Connect the DC power lead from the second external power source, if you are using one, to the DC terminal block labeled (-) 48V B.
Step 7 Connect the second return wire (RTN) to the terminal labeled (+) 48V RTN B.
Step 8 Secure the power cabling to the Cisco 6400 chassis by feeding a tie wrap through the slot on the side of the chassis and binding the cables (Figure 3-12).

Step 9 Replace the rear cover, making sure that the power cables exit through the holes on the side of the cover (Figure 3-13).
|
Warning Secure all power cabling when installing this unit to avoid disturbing field-wiring connections. To see translations of this warning, refer to the Regulatory Compliance and Safety Information document that accompanied this device. |
Step 10 Check to see if the power entry module (PEM) units have been installed. If they have not, insert the primary PEM and the secondary PEM (if used) in the lower slot.
|
Warning After wiring the DC power supply, remove the tape from the circuit breaker switch handle and reinstate power by moving the handle of the circuit breaker to the ON position. To see translations of this warning, refer to the Regulatory Compliance and Safety Information document that accompanied this device. |
Step 11 Turn On power to the DC circuit.
Step 12 At the front of the chassis, flip the circuit breakers on the DC PEM units (or the power enable switch on the AC PEM units) to the ON ( | ) position (Figure 3-14).
If the power is properly connected, the PEM power LED is green, indicating that power is available to the chassis.

The Cisco 6400 can be powered directly from the facility VAC input by using the AC PEM, or (if your chassis has an AC-Input Power Shelf) by using the AC power shelf in conjunction with the DC PEM. This section describes the AC PEM installation.
|
Warning The device is designed to work with TN power systems. To see translations of this warning, refer to the Regulatory Compliance and Safety Information document that accompanied this device. |
The AC PEM is provided with an IEC 320 250V, 20A power cord with a male type connector (16A rating for Europe) for the attachment of power cords used throughout the world.
 |
Caution The 20A connector on the AC PEM is incompatible with the 15A power strips that are used in most equipment racks. Wiring codes prevent the AC-input power cable from being used with the power strips in equipment racks. |
|
Note The AC power cord that connects to the PEM power cord and then to the building VAC is not shipped with the Cisco 6400. You must order this power cord separately. |
There are five styles of AC-input power supply power cords available (differing in plug type); make sure you have the correct style for your site. (See Figure 3-15 and Table 3-4.) All AC-input power supply cords measure 14 feet (4.3 m).
Cisco recommends that you:
Table 3-3 lists the nominal and acceptable value ranges for source AC power.
| Specifications | Nominal Value | Acceptable Range |
|---|---|---|
AC input voltage | 100 to 240 VAC, single phase | 90 to 255 VAC |
AC input line frequency | 50/60 Hz | 47 to 63 Hz |
AC input current | 15 A @100 VAC 7 A @240 VAC | — |
Figure 3-15 shows power plugs and receptacles used in North America.

| Label | Description | Plug (Facility End of Cord) | Receptacle (Router End of Cord) | Product Number |
|---|---|---|---|---|
North American | 250 VAC, 60 Hz AC power cord | NEMA L6-20, 20A | IEC 320-C19 | CAB-AC-6CK-TWLK |
Japanese | 100 VAC, 50/60 Hz AC power cord | NEMA L6-20, 20A | IEC 320-C19 | CAB-DS-ACJ-TWLK |
North American | 120 VAC, 60 Hz AC power cord | NEMA 5-20P, 20A | IEC 320-C19 | CAB-DS-120VAC |
Australian | 240 VAC, 50 Hz AC power cord | AS 312, 10A | IEC 320-C19 | CAB-DS-ACA |
Argentinean | 220 VAC, 50 Hz AC power cord | AS 312, 10A | IEC 320-C19 | CAB-DS-ACR |
European | 230 VAC, 50 Hz AC power cord | CEE 7/7, 16A | IEC 320-C19 | CAB-DS-ACE |
Italian | 220 VAC, 50 Hz AC power cord | CEI 23-16/VII, 10A | IEC 320-C19 | CAB-DS-ACI |
United Kingdom | 240 VAC, 50 Hz AC power cord | BS 1363, 13A | IEC 320-C19 | CAB-DS-ACU |

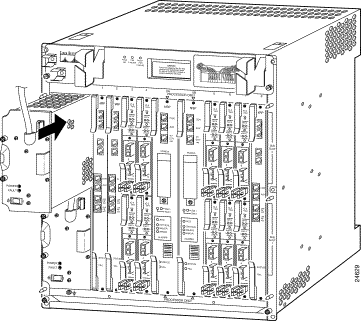
This section describes procedures for removing and installing an AC power entry module (PEM) plug-in unit in the Cisco 6400 chassis (Figure 3-17).
There are two PEM power bays in the system for redundancy. The PEM power bays are located at the front left side of the chassis. The top bay is wired to power circuit A; the bottom bay is wired to power circuit B. (The circuits are identified at the power terminals on the backplane.)
|
Warning Before working on equipment that is connected to power lines, remove jewelry (including rings, necklaces, and watches). Metal objects will heat up when connected to power and ground and can cause serious burns or weld the metal object to the terminals. To see translations of this warning, refer to the Regulatory Compliance and Safety Information document that accompanied this device. |
If you remove a redundant AC PEM, the chassis continues to operate normally. If you plan to remove the only operating PEM from a chassis, you should first power down the Cisco 6400. Refer to the procedure in the "Powering Down the System" section.
To remove a PEM from the Cisco 6400 chassis:
Step 2 Unplug the cable.
Step 3 Unscrew the retaining screws on the AC PEM faceplate.
Step 4 Grasp the AC PEM by the handle on the faceplate and pull it out of the chassis.
|
Caution Always install a filler panel over an empty PEM power bay to protect the connectors from contamination and to ensure proper air flow. |
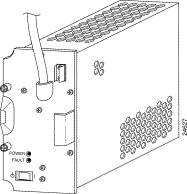
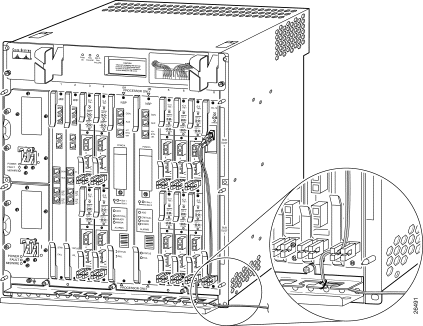
Figure 3-18 shows an AC PEM unit being installed in the Cisco 6400 chassis. You can insert a PEM unit into the Cisco 6400 without powering down the system.
To install an AC PEM in the Cisco 6400 chassis:
Step 2 Align the PEM and insert it into the power bay.
Step 3 Firmly push the PEM all the way into the power bay to ensure that the power connectors mate.
Step 4 Tighten the captive screws on the faceplate of the PEM to secure the PEM to the chassis.
Step 5 Plug in the AC power cable.
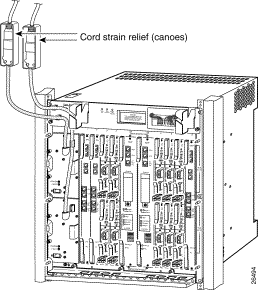
Step 6 Secure the AC power cable connection with the cord strain relief (canoe) (Figure 3-19).
Step 7 If the chassis is connected to power, turn the Power Enable switch on the AC PEM to On. The green POWER LED on the faceplate turns on to indicate that the AC PEM is providing power to the chassis. The yellow FAULT LED will go out.
After installing your AC PEM, start up the system by powering on the following components:
To power on the system:
Step 2 Power ON ( | ) the power switches located on each Cisco 6400 PEM front panel (Figure 3-20). A green power LED on each PEM should light.

If your system includes an NSP with Stratum 3 BITS timing (NSP-S3B), you can use a T1/E1 timing source to provide network synchronization. The rear of the chassis provides two terminal blocks for redundant BITS connections. For wire-wrap connections (Figure 3-21), use the appropriate tool for the size of the header to make the wire-wrap connection on the L-connector header. If you prefer not to use the L-connector headers, remove them by loosening the three screws on the terminal block and sliding the header out. Then, connect the wires directly to the terminal blocks (Figure 3-22).
The bottom terminal block (labeled A) services the NSP-S3B in slot 0A of the chassis. The top terminal block (labeled B) services the NSP-S3B in slot 0B. The terminals for each BITS connection are labeled negative (-), ground (GND), and positive (+). To connect the BITS to the Cisco 6400:
Step 2 Strip approximately 0.3 in (8 mm) of insulation from the end of each wire in the T1/E1 cable.
Step 3 Connect each wire of the T1/E1 cable to the L-connector header or directly to the BITS terminal block:
a. Connect the positive signal wire to the positive (+) terminal.
b. Connect the negative signal wire to the negative (-) terminal.
c. Connect the cable shield or ground wire to the ground (GND) terminal.
Step 4 If the system contains a second NSP-S3B, repeat Steps 2 and 3 for the second terminal block.
Step 5 Secure the BITS cabling to the Cisco 6400 chassis by feeding a tie wrap through the slot on the side of the chassis and binding the cables.
Step 6 Replace the rear cover, making sure that the T1/E1 cables exit through the holes on the side of the cover (Figure 3-12).


The Cisco 6400 provides relay contacts for customer-supplied audible or visual alarm indicators. Relay contacts are provided for three levels of severity:
The alarm terminal block is located at the rear of the Cisco 6400 chassis (Figure 3-23). Each alarm level has three terminals: normally closed (NC), common (COM), and normally open (NO).

To connect an alarm indicator to the Cisco 6400:
Step 2 Strip approximately 0.3 in (8 mm) of insulation from the end of each alarm indicator wire.
Step 3 Use a flat-blade screwdriver to connect the alarm indicator wires to the alarm terminal block:
a. Connect one wire to the common (COM) terminal.
b. Connect the other wire to the NC or NO terminal.
|
Note If you wire the Cisco 6400 in series with other equipment for the alarm indicators, use the normally closed (NC) terminal. If you wire the Cisco 6400 in parallel with other equipment, use the NO terminal. |
Step 4 Repeat Steps 2 and 3 for any remaining alarm indicators.
Step 5 Secure the alarm wiring to the Cisco 6400 chassis by feeding a tie wrap through the slot on the side of the chassis and binding the cables.
Step 6 Replace the rear cover, making sure that the alarm wires exit through the holes on the side of the cover (Figure 3-12).
Each Cisco 6400 NSP and NRP-1 module includes an asynchronous serial (EIA/TIA-232) console port. The RJ-45 connector corresponding to this console port is labeled CON. Using the console cable kit (included with the Cisco 6400), you can connect this port to most types of terminal equipment. The console cable kit contains:
|
Note A rollover cable reverses pins from end to end, connecting pin 1 (at one end) to pin 8 (at the other), pin 2 to pin 7, pin 3 to pin 6, and so on. Therefore, you can identify a rollover cable by comparing the two modular ends of the cable. Hold the cable ends in your hand, side-by-side, with the tabs at the back. The wire connected to the pin on the outside (left) of the left plug (pin 1) should be the same color as the wire connected to the pin on the outside (right) of the right plug (pin 8). |
|
Note There is no console port on the NRP-2SV module. If you have NRP-2SV modules installed in your Cisco 6400 chassis, the functionality of the console port is managed by the NSP module. |
To connect a terminal to the console port on a Cisco 6400 NSP or NRP-1:
Step 2 Connect one end of the RJ-45 rollover cable to the RJ-45 port labeled CON on the Cisco 6400 NSP or NRP-1 module.
Step 3 Connect the other end of the RJ-45 rollover cable to the RJ-45-to-DB-25 adapter labeled "Terminal." If your terminal comes equipped with a DB-9 serial connector, use the RJ-45-to-DB-9 adapter labeled "Terminal" instead of the DB-25 adapter.
Step 4 Plug the DB-25 or DB-9 (female) side of the adapter into your terminal equipment to complete the connection.
The Cisco 6400 has connections to both the external signal system (the data network) and the internal Ethernet management network. Both types of connections are discussed in the following paragraphs.
The internal Ethernet management network connections are made through the NSP module on the front panel of the Cisco 6400 system.
|
Note The following installation procedures do not cover cable preparation. You will need to obtain all cables prior to installation. Label each cable end with its destination. |
Use these guidelines to connect external cabling to the Cisco 6400 system:
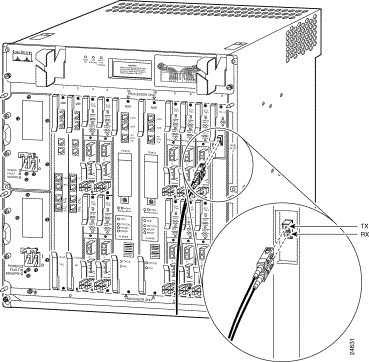
The OC-3/STM-1 NLC has two ports for single-mode intermediate reach fiber connections. Each port provides an interface to the ATM switching fabric for transmitting and receiving data at rates up to 155 Mbps bidirectionally.
|
Warning Class 1 laser product. To see translations of this warning, refer to the Regulatory Compliance and Safety Information document that accompanied this device. |
|
Warning Invisible laser radiation present. To see translations of this warning, refer to the Regulatory Compliance and Safety Information document that accompanied this device. |
|
Warning Because invisible radiation may be emitted from the aperture of the port when no fiber cable is connected, avoid exposure to radiation and do not stare into open apertures. To see translations of this warning, refer to the Regulatory Compliance and Safety Information document that accompanied this device. |
| |
Varning! | Osynlig laserstrålning när denna del är öppen och förregleringen är urkopplad. Rikta inte blicken in mot strålen. |
| |
Varoitus | Alleviates ja suojalukitus ohitettaessa olet alttiina näkymättömälle lasersäteilylle. Äjä katso säteeseen. |
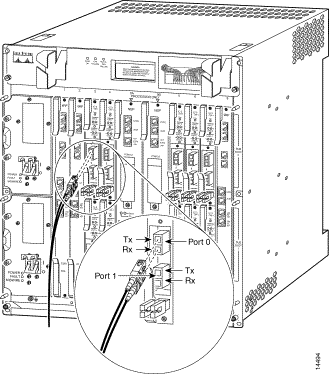
Figure 3-24 illustrates a typical connection of the OC-3 fiber-optic cable to the OC-3/STM-1 NLC ports.
To make this connection:
Step 2 Remove the protective cap from the OC-3/STM-1 fiber optic cable.
Step 3 Attach the OC-3 fiber optic cable to the NLC OC-3 port receptacles (Figure 3-24).
Step 4 Use Figure 3-25 as a guideline for suggested cable management for the OC-3/STM-1 fiber optic cable.
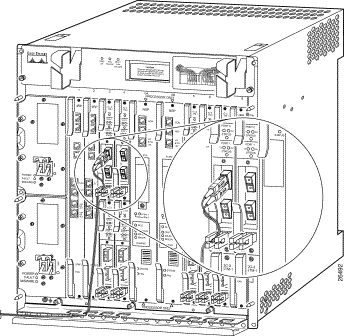
The DS3 NLC has two ports that connect to the ATM switching fabric using 75-ohm single or bundled coaxial cables with bayonet-style twist-lock (BNC) connectors attached to the back of the chassis for each DS3 port (Figure 3-26).
|
Warning The DS3 ports are not intended to be connected to cables that run outside the building where it is installed. For any connections outside the building, the DS3 ports must be connected to a network termination unit (NTU). NTU devices should comply with appropriate national safety standards such as UL 1950, CSA 950, EN 60950, IEC 950, and AS 3260. To see translations of this warning, refer to the Regulatory Compliance and Safety Information document that accompanied this device. |
The OC-12/STM-4 NLC has one port for single-mode intermediate reach fiber connections. The port provides an interface to the ATM switching fabric for transmitting and receiving data at rates up to
622 Mbps bidirectionally.
|
Warning Class 1 laser product. To see translations of this warning, refer to the Regulatory Compliance and Safety Information document that accompanied this device. |
|
Warning Invisible laser radiation present. To see translations of this warning, refer to the Regulatory Compliance and Safety Information document that accompanied this device. |
|
Warning Because invisible radiation may be emitted from the aperture of the port when no fiber cable is connected, avoid exposure to radiation and do not stare into open apertures. To see translations of this warning, refer to the Regulatory Compliance and Safety Information document that accompanied this device. |
| |
Varning! | Osynlig laserstrålning när denna del är öppen och förregleringen är urkopplad. Rikta inte blicken in mot strålen. |
| |
Varoitus | Alleviates ja suojalukitus ohitettaessa olet alttiina näkymättömälle lasersäteilylle. Äjä katso säteeseen. |
Figure 3-27 illustrates a typical connection of the OC-12 fiber-optic cable to the OC-12/STM-4 NLC ports.
To make this connection:
Step 2 Remove the protective cap from the OC-12/STM-4 fiber-optic cable.
Step 3 Attach the OC-12 fiber-optic cable to the NLC OC-12 port receptacles (Figure 3-27).
Step 4 Use Figure 3-28 as a guideline for suggested cable management for the OC-12/STM-4 fiber-optic cable.
Each Cisco 6400 NSP or NRP provides Ethernet ports for connection to a network management
Ethernet LAN. In order to make this connection, you need the following additional equipment (not included):
To connect the NSP or NRP-1 on your Cisco 6400 to a 10BASE-T Ethernet LAN:
Step 2 Connect the other end of the Ethernet cable to any unoccupied port on the Ethernet hub.
Step 3 Check the LNK (Link) LED on the NSP (or NRP) faceplate, next to the ETH (Ethernet) port. This LED is on (steady green) if the NSP (or NRP) is correctly connected to the 10BASE-T Ethernet LAN.
The Cisco 6400 NRP-1 provides a Fast Ethernet port. In order to make this connection, you need the following additional equipment (not included):
The RJ-45 port on the NRP is configurable for 10/100-Mbps full-duplex or half-duplex operation (half-duplex is the default) and supports IEEE 802.3, Ethernet, and IEEE 802.3u interfaces compliant with 10/100BASE-T specifications.
To connect the NRP on your Cisco 6400 to a Fast Ethernet LAN:
Step 2 Connect the other end of the cable to any unoccupied port on the Fast Ethernet hub or switch.
Step 3 Check the LNK (Link) LED on the NRP faceplate, next to the FE port. This LED lights (steady green) if the NRP is correctly connected to the Fast Ethernet LAN.
The Gigabit Ethernet Interface Connector (GBIC) port on the NRP-2SV has one fiber-optic interface port for connection of uplink and downlink interfaces. The port uses a GBIC that supports gigabit Ethernet rates on a variety of gigabit Ethernet interface types (SX and LX/LH). For a list of qualified GBICs and cable lengths, see Table 1-9.
|
Warning Class 1 laser product. To see translations of this warning, refer to the Regulatory Compliance and Safety Information document that accompanied this device. |
|
Warning Invisible laser radiation present. To see translations of this warning, refer to the Regulatory Compliance and Safety Information document that accompanied this device. |
|
Warning Because invisible radiation may be emitted from the aperture of the port when no fiber cable is connected, avoid exposure to radiation and do not stare into open apertures. To see translations of this warning, refer to the Regulatory Compliance and Safety Information document that accompanied this device. |
| |
Varning! | Osynlig laserstrålning när denna del är öppen och förregleringen är urkopplad. Rikta inte blicken in mot strålen. |
| |
Varoitus | Alleviates ja suojalukitus ohitettaessa olet alttiina näkymättömälle lasersäteilylle. Äjä katso säteeseen. |
Figure 3-29 illustrates a typical connection of the fiber-optic cable to the GBIC port.
To make this connection:
Step 2 Remove the protective cap from the GBIC fiber-optic cable.
Step 3 Attach the fiber-optic cable to the NRP-2SV port receptacle. Note the arrows on the port: The arrow pointing out from the chassis is TX; the arrow pointing in to chassis is RX (Figure 3-29).
Step 4 Connect the other end of the cable to any unoccupied fiber-optic port on the hub or switch.
Step 5 Check the LNK (Link) LED on the NRP-2SV faceplate, next to the GBIC port. This LED lights (steady green) if the NRP-2SV is correctly connected to the LAN.
For more information about the Gigabit Interface Converter, refer to the document Gigabit Interface Converter Installation Instructions for the Cisco 6400 NRP-2SV Module (Cisco document number 78-12263-xx).
When all of the interfaces are connected, check all the connections and then complete these steps:
Step 2 Check the external power connections; the PEMs should still be off. When two supplies are present, make sure that the cord for the second PEM is connected to an external power connection different from the one to which the first PEM is connected.
Step 3 Turn the PEM switch(es) on. The PEM green power indicator LEDs should light.
Step 4 Check that the Fan OK LED on the blower module is on.
Step 5 While the system initializes, the status LED on the NSP is blinking (yellow) until the boot is complete.
During the boot process, the NLC Fail LED remains lit (yellow), and all other LEDs (Status, TX, and RX LEDs) remain off until the boot is completed.
When the system boot is complete (it takes several seconds), the NSP begins to initialize the cards. During this initialization, the LEDs on each card flash on and off in different patterns. The status LED on each card stays on when initialization is completed, and the console screen displays a script and system banner similar to the following (this is only a sample; your screen will not match exactly):
            Restricted Rights Legend

Use, duplication, or disclosure by the Government is
subject to restrictions as set forth in subparagraph
(c) of the Commercial Computer Software - Restricted
Rights clause at FAR sec. 52.227-19 and subparagraph
(c) (1) (ii) of the Rights in Technical Data and Computer
Software clause at DFARS sec. 252.227-7013.

           cisco Systems, Inc.
           170 West Tasman Drive
           San Jose, California 95134-1706


Cisco Internetwork Operating System Software

IOS (tm) C6400 Software (C6400S-WP-M), Version 12.0(5)DB
Copyright (c) 1986-1999 by cisco Systems, Inc.
Compiled Tue 18-May-99 15:00 by jdoe
Image text-base: 0x60010908, data-base: 0x6069A000


FPGA VERSION: 97/11/25 22:11:51 1383107375 /rhino/fpga/fc_abr_fc3/xil/abr_fpga_r.bit
98/02/24 17:11:36 1332837880 /rhino/fpga/fc_stat_fpga/xilinx/stat_fpga_r.bit
97/11/13 10:03:51 1059421866 /rhino/fpga/fc_traffic_fc3/xil/upc_fpga.bit
97/08/06 13:09:19  288278431 /rhino/fpga/fc_netclk/xilinx/pll_cntl_r.bit

Initializing FC-PFQ hardware ... done.
cisco C6400S (R4600) processor with 131072K bytes of memory.
R4700 CPU at 100Mhz, Implementation 33, Rev 1.0
Last reset from s/w peripheral
2 Ethernet/IEEE 802.3 interface(s)
11 ATM network interface(s)
507K bytes of non-volatile configuration memory.

107520K bytes of ATA PCMCIA card at slot 0 (Sector size 512 bytes).
8192K bytes of Flash internal SIMM (Sector size 256K).


Press RETURN to get started!

Switch>
The Cisco 6400 should be operating correctly and transferring data.
|
Note If the rommon> prompt appears, your system requires
a manual boot to recover.
|
Your installation is now complete. Refer to the Cisco 6400 Software Setup Guide for additional software configuration information.
![]()
![]()
![]()
![]()
![]()
![]()
![]()
![]()
Posted: Fri Jul 5 10:58:30 PDT 2002
All contents are Copyright © 1992--2002 Cisco Systems, Inc. All rights reserved.
Important Notices and Privacy Statement.
