|
|

This section describes the attributes that control communication between components in SESM deployments. In many cases, attributes with matching values must be set on both sides of the communication for the communication to be successful.
This section includes the following topics:
The section applies to all SESM deployments, regardless of the SESM mode.
Figure 12-1 shows the attributes whose values must match for successful communication between an SESM web application and SSG. Table 12-1 describes how to set these attributes on both sides of the communication.
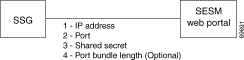
| Configuring Communication Between an SESM Web Application and SSG | ||
|---|---|---|
On the SSG side | Set these values using Cisco IOS commands on the SSG host. If the SSG is already configured, use show run to view the settings. | |
| 1. |
ssg default-network networkIPAddress mask
| |
| 2. |
ssg radius-helper auth-port port
| |
| 3. |
ssg radius-helper key secret
| |
| 4. |
ssg port-map length bits
Note Additional commands are required on SSG to enable and configure the host key feature. For more information, see the "Configuring the Port-Bundle Host Key Feature on SSG" section. | |
On the SESM web application side | 1. | IP Address—Make sure to install SESM web applications and their containers (the J2EE web servers) on the SSG default network. |
Set the following values in the SSG MBean in the application MBean configuration file (nwsp.xml, for example): | ||
| 2. | Port—Use the following attributes to set the RADIUS protocol ports for communication between the SSGs and SESM. These settings must match the settings on the SSG hosts.
| |
| 3. | Shared Secret—Use the following attributes to set the RADIUS protocol shared secrets for communication between the SSGs and SESM. These settings must match the settings on the SSG hosts.
| |
| 4. | Host Key Port Bundle Length—Use the following attributes to set the port-bundle length to match the settings on the SSG hosts.
| |
The RADIUS protocol is the communication mechanism used between an SESM web application and SSG. The following attributes are required by the RADIUS protocol:
The following attribute is used by the SSG port-bundle host key feature:
 |
Note We strongly recommend using the same port bundle length on all SSGs in the same network. The default value of 4 is recommended, which results in 16 ports per bundle and 4032 bundles per host key source IP address. |
This section describes attributes in a RADIUS mode deployment whose values must match each other for successful communication to occur.
Figure 12-2 shows the attributes whose configured values must match. Table 12-2 describes how to set these attributes on each side of the communication.
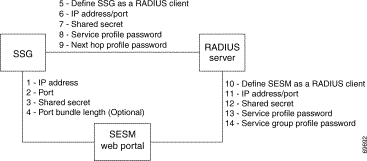
| Configuring Communication Between an SESM Application and SSG | ||
On the SESM and SSG Sides | 1 to 4 | See Table 12-1, "Setting Attributes for SESM to SSG Communication in All Modes" |
| Configuring Communication Between a RADIUS Server and SSG | ||
On the RADIUS Side | Set these values using the RADIUS product's native configuration procedures: | |
| 5. | Define SSG as a RADIUS Client—Define SSG as a NAS client. | |
| 6. | ||
| 7. | Shared secret—The shared secret value is specified when you define the SSG as a NAS client. | |
| 8. | ||
| 9. | ||
On the SSG Side | Set these values using Cisco IOS commands on the SSG host: | |
| 5. | Set up SSG as a RADIUS client—Use the following commands: #aaa new-model Note If the SSG is not supporting PPP connections, you do not need to use the aaa authentication ppp command. | |
| 6. | IP address/port—Use the following command: radius-server host RadiusHostIpAddr auth-port port
| |
| 7. | Shared secret—Use the following command: radius-server key RadiusSharedSecret
| |
| 8. | Service Password—Use the following command: ssg service-password servicePassword
| |
| 9. | (Optional) Next Hop Password—Use the following command: ssg next-hop download nextHopTableName password
| |
| Configuring Communication Between a RADIUS Server and an SESM Application | ||
On the RADIUS Side | Set these values using the RADIUS product's native configuration procedures: | |
| 10. | ||
| 11. | ||
| 12. | Shared secret—You set the shared secret value when you define the SESM application as a NAS client. Note If you are configuring primary and secondary RADIUS servers, the shared secret value established for the SESM NAS client must be the same on both RADIUS servers. | |
| 13. | ||
| 14. | ||
On the SESM web application side | Set the following value in the SESM MBean in the SESM web application configuration file (nwsp.xml, for example): | |
| 10. |
Note You can override the value for mode on the command line when you start the SESM application. For more information, see the "Starting the SESM Portals" section. | |
Set the following values in the AAA MBean in the SESM application configuration file (nwsp.xml, for example): | ||
| 11. | IP Address/Port—The attribute names for identifying IP addresses and authentication ports on primary and secondary RADIUS servers are:
| |
| 12. | ||
| 13. | Service Password—The attribute name is servicePassword. Use this attribute to provide SESM with the generic password used in the service profiles. | |
| 14. | Group Password—The attribute name is groupPassword. Use this attribute to provide SESM with the generic password used in the service group profiles. | |
The RADIUS protocol is the communication mechanism used between all of the components in this deployment. The following attributes are required by the RADIUS protocol:
This section describes attributes in a LDAP mode deployment whose values must match each other for successful communication to occur.
Figure 12-3 shows the attributes whose configured values must match on each side of the communication to successfully deploy SESM in LDAP mode. Table 12-3 describes how to set these attributes on each side of the communication.
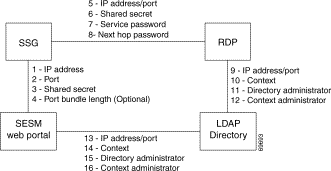
|
Note The service group password is not used in this deployment. Service group requests are obtained by the SESM web portal from the LDAP directory, and a password is not required. |
| Configuring Communication Between an SESM Web Application and SSG | ||
On the SESM and SSG Sides | 1 to 4 | See Table 12-1, "Setting Attributes for SESM to SSG Communication in All Modes" |
| Configuring Communication Between RDP and SSG | ||
On the RDP side | Set the following values in the RDP MBean on the RDP host machine. | |
| 5. | IP address/port—The attribute names are:
| |
| 6. | ||
| 7. | Service password—The attribute name is servicePassword. Replace | |
| 8. | (Optional) Next hop password—The attribute name is nextHopPassword. Replace | |
On the SSG side | Set the following values using Cisco IOS commands on the SSG: | |
| 5. | IP address/port—Use the following command: radius-server host RDPhostIpAddr auth-port port
| |
| 6. | Shared secret—Use the following command: radius-server key RDPSharedSecret
| |
| 7. | Service password—Use the following command to set the key that SSG uses in service requests: ssg service-password servicePassword
| |
| 8. | (Optional) Next hop password—Use the following command to set the key that SSG uses in next hop table requests: ssg next-hop download nextHopTableName password
| |
| Configuring Communication Between RDP and an LDAP Directory | ||
SPE configuration on the RDP side | Set these values in the dess-auth configuration file on the RDP host machine (dess-auth/config/dessauth.xml). | |
| 9. |
ldap://127.0.0.1:389/
You provide the initial value for this attribute during installation. The installation program prompts you for a directory address and directory port, and then it combines your responses, prefaces it with the ldap protocol label, and inserts the resulting string in the URL field in the config.xml file. | |
| 10. |
ou=sesm,o=cisco
You provide the initial value for this attribute during installation. The installation program prompts you for the directory container. | |
| 11. | Directory administrator—The attribute names are:
cn=admin,ou=sesm,o=cisco
uid=Directory Manager, ou=sesm, o=cisco
You provide the initial values for these attributes during installation. The installation program prompts you for directory server admin information. | |
| 12. |
cn=user,ou=sesm,o=cisco
You provide the initial values for this attribute during installation. The installation program prompts you for directory container admin information. | |
On the LDAP Directory Side | 9 to 12 | Use native administration tools for the LDAP directory product to configure the directory for SESM deployment. See the "Configuring an LDAP Directory for SESM Deployments," for guidelines and requirements. |
| Configuring Communication Between an SESM Application and an LDAP Directory | ||
SPE configuration on the SESM application side | 13 to 16 | If the RDP and SESM applications are installed on the same machine, the same config.xml file applies to both applications. In that case, the values you configured for fields 9 to 12 above are also used for communication between the SESM application and the directory. If the RDP and SESM web applications are installed on different machines, you must maintain two versions of the dess-auth configuration file. In that case, follow the instructions in fields 9 to 12 above to configure the config.xml file on the SESM web application's host machine. |
On the LDAP directory side | 13 to 16 | You only need to configure the LDAP directory one time. |
RDP and SESM web applications use the LDAP protocol to communicate with the LDAP directory. Some of the LDAP attributes required for communication are:
RDP and SESM web applications use the RADIUS protocol to communicate with SSG. Some of the attributes are:
This section describes the attributes that must be configured to use a proxy RADIUS server in an LDAP mode configuration.
Figure 12-4 shows the attributes whose configured values must match on each side of the communication between RDP in proxy mode and the RADUIS Server. Table 12-4 describes how to set these attributes on each side of the communication.
All other communication in this deployment are the same as described in the previous section.
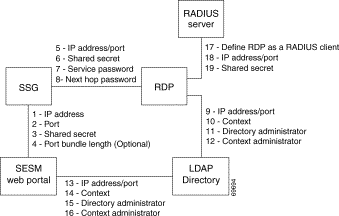
| Configuring Communication Between Components in LDAP Mode | ||
See Table 12-3. | 1 to 16 | See Table 12-3, "Setting Communication Attributes in an LDAP Mode Deployment" |
| Configuring Communication Between RDP and a RADIUS Server | ||
On the RADIUS side | Set these values using the RADIUS product's native configuration procedures: | |
| 17. | Set up a RADIUS Client—Define RDP as a NAS client. | |
| 18. | IP Address/Port—You can set the port on the RADIUS server host machine that the RADIUS server uses to listen for authentication requests. The port is usually port 1812, which is the industry's default authentication and authorization port for a RADIUS server. | |
| 19. | Shared secret—You set the shared secret value when you define the RDP application as a NAS client. Note If you are configuring primary and secondary RADIUS servers, the shared secret value must be the same on both RADIUS servers. | |
![]()
![]()
![]()
![]()
![]()
![]()
![]()
![]()
Posted: Fri Oct 18 10:00:33 PDT 2002
All contents are Copyright © 1992--2002 Cisco Systems, Inc. All rights reserved.
Important Notices and Privacy Statement.