|
|

This chapter provides some help with troubleshooting problems in a Cisco Subscriber Edge Services Manager (SESM) deployment. It includes the following topics:
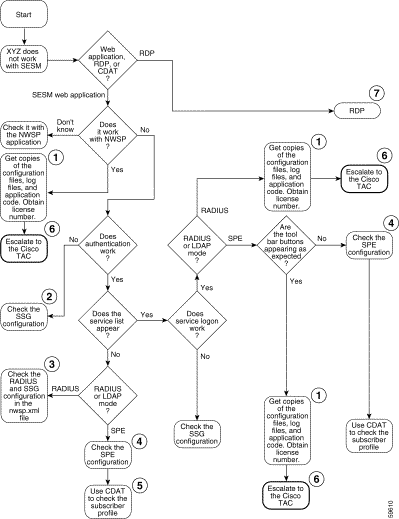
Figure 10-1 shows a procedure for analyzing problems in an SESM web application. The numbered callouts are keyed to the table that follows the figure.

| 1 | See Configuration File Summary and Logging and Debugging Mechanisms. |
| 2 | See Configuring the SSG. |
| 3 | See the SSG and AAA objects in Table 6-4. |
| 4 | See Configuring SPE. |
| 5 | Make sure the subscriber is subscribed to services and has the proper privileges to access those services. See the URL for CDAT documentation: http://www.cisco.com/univercd/cc/td/doc/solution/sesm/sesm_311/toolgd/index.htm |
| 6 | |
| 7 |
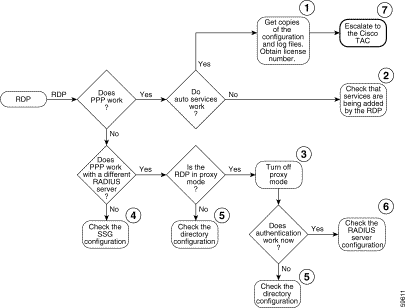
Figure 10-2 shows a procedure for analyzing problems in RDP. The numbered callouts are keyed to the table that follows the figure.

| 1 | See Configuration File Summary and Logging and Debugging Mechanisms. |
| 2 | See the RDPPacketFactory object in Table 6-6. |
| 3 | See RDP Modes. |
| 4 | See Configuring the SSG. |
| 5 | See Configuring SPE. |
| 6 | See the AAA object in Table 6-4. |
| 7 |
This section describes some facilities that might be useful in troubleshooting SESM installation and configuration problems. It includes the following topics:
The log files for the SESM web applications, RDP, and CDAT, are located in log directories. All of the configuration files use the application.log Java system property to set the location of the log directory. Java system properties are set by the application startup scripts.
See Table 7-1, "Java System Properties in Startup Scripts" for information about how the application startup scripts set application.log, the default values of application.log, and how to change the default.
You can use the SESM application's log files to troubleshoot problems. Two of the log files have debugging mechanisms that you can configure along with the logging features.
An SESM web application and its Jetty container write to the following log files:
Configure the container logs in the container MBean configuration file for the application:
jetty
config
nwsp.jetty.xml
wap.jetty.xml
Configure the application log in the application MBean configuration file:
nwsp
config
nwsp.xml
nwsp.debug
You can switch debugging on or off at the command line to override the default value in the XML file or use the -D option on the command line when you start the portal application.
The RDP application writes to the RDP application log file, which records logging and debugging messages. The logging feature logs RDP application activity. The debugging mechanism might be useful in debugging packet handling. The default name for this log file is date.application.log.
RDP uses the same logging facility that the SESM web applications use. Both use a Logger MBean to configure the logging and debugging features. For RDP, you configure the Logger MBean in the RDP configuration file:
rdp
config
rdp.xml
See the "Logger" object in Table 6-4 for information about configuring the Logger MBean.
CDAT is a web application running in a J2EE container, similar to the SESM web applications. The CDAT application and its Jetty container write to the same types of log files as the SESM web applications, as described previously in the "Logging and Debugging in SESM Web Applications" section.
Configure the container logs in the CDAT-specific container MBean configuration file:
jetty
config
cdat.jetty.xml
Configure the application log in the CDAT MBean configuration file:
cdat
config
cdat.xml
When you execute a startup script that includes the java command, you can specify any Java option on the command line. To specify Java options, use -jvm as an option on the command line. For example, you can add the following option to the command line when you execute the SESM application startup script:
-jvm -Djava.compiler=NONE
 |
Note This JMX HTML adaptor is not production quality. For example, configuration changes made using this console are not persistent. You should remove it from your configuration files before transitioning the SESM application to public use. See the "ManagementConsole" object in Table 6-4 for information about configuring and removing this adaptor. |
You can access the SESM management console on a web browser at the following URL:
http:// SESMserver:managementPortNumber/
Where:
applicationPortNumber + 100
Before you gain access to the management console, you must enter a valid user name and password. Enter the values that match the values in the ManagementConsole MBean in the application's configuration file. See the "ManagementConsole" object in Table 6-4 for more information.
If you purchased SESM, your license number is available on the License Certificate shipped with the product. If you have not purchased SESM, you can install an evaluation copy of the software without a license number. An evaluation installation provides full software functionality. Although the evaluation options do not have an expiration period, you must obtain a license before deploying SESM in a production environment.
The installation program records the license number and the software version you installed in the licensenum.txt file under the installation directory.
This section contains some hints that might help you identify and fix problems in SESM. The problems are divided into the following topics:
If the installer does not find an appropriate JRE, it installs the bundled JRE Version 1.2.2.
This section contains the following topics:
http://java.sun.com/products/j2se
The installer does the following when searching for a valid JDK or JRE:
1. It searches for a JDK Version 1.2.2 that is already installed.
2. Failing that, it searches for a JRE Version 1.2.2 or later that is already installed.
3. Failing that, it installs and uses the bundled JRE Version 1.2.2.
In some cases, even though a JRE is installed, the installer may not find it or finds a different JRE
On Windows NT, the installer looks in the NT Registry for the location of a JDK or JRE. It uses Java Version 1.2.2 in preference to Version 1.3.
On Solaris, the installer looks in the following well-known locations before installing the bundled JRE:
usr/jre /usr/jre1.2.2 /usr/java1.2 /usr/java /usr/java1.2.2 /usr/jdk /usr/jdk1.2 /usr/jdk1.2.2 | /opt/jre /opt/jre1.2.2 /opt/java /opt/java1.2 /opt/java1.2.2 /opt/jdk /opt/jdk1.2 /opt/jdk1.2.2 | /usr/jre1.3 /usr/jre1.3.0 /usr/java1.3 /usr/java /usr/java1.3.0 /usr/jdk /usr/jdk1.3 /usr/jdk1.3.0 | /opt/jre1.3 /opt/jre1.3.0 /opt/java /opt/java1.3 /opt/java1.3.0 /opt/jdk /opt/jdk1.3 /opt/jdk1.3.0 |
On Linux, the installer looks in the following well-known locations before installing the bundled JRE:
sun.java.1.2.2.jvm: /usr/jre /usr/jre1.2.2 /usr/java1.2 /usr/java /usr/java1.2.2 /usr/jdk /usr/jdk1.2 /usr/jdk1.2.2 /opt/jre /opt/jre1.2.2 /opt/java /opt/java1.2 /opt/java1.2.2 /opt/jdk /opt/jdk1.2 /opt/jdk1.2.2 | sun.java.1.3.x.jvm: /usr/jre1.3 /usr/jre1.3.1 /usr/java1.3 /usr/java /usr/java1.3.1 /usr/jdk /usr/jdk1.3 /usr/jdk1.3.1 /opt/jre1.3 /opt/jre1.3.1 /opt/java /opt/java1.3 /opt/java1.3.1 /opt/jdk /opt/jdk1.3 /opt/jdk1.3.1 | blackdownjdk122: /usr/jdk1.2.2 /usr/local/jdk1.2.2 /opt/jdk1.2.2
blackdownjdk13.jvm: /usr/j2sdk1.3 /usr/local/j2sdk1.3 /opt/j2sdk1.3
ibmjdk13.jvm: /opt/IBMJava2-13/ /usr/IBMJava2-13/ /usr/local/IBMJava2-13/ /opt/jdk13 /usr/jdk13 /usr/local/jdk13 |
installImageName -is:javahome location
Where:
If you do not see changes that you make to a JSP, follow these procedures:
Step 1 Install a JDK (Version 1.2.2 or later).
Step 2 Edit the application start script so that it uses the JDK, rather than the JRE (for example, edit jetty/bin/start.sh).
Step 3 Ensure that JDK_HOME points to the directory into which you installed the JDK.
Step 4 Stop the SESM application.
Step 5 Change directories to the application's WEB-INF directory. For example, enter:
cd installDir/nwsp/docroot/WEB-INF
Step 6 In the WEB-INF directory, back up the web.xml file by renaming it. For example, enter:
cp web.xml web.xml.bak
Step 7 In the WEB-INF directory, copy the web.recompile.xml file over web.xml. For example, enter:
cp web.recompile.xml web.xml
Step 8 Restart the SESM application.
The installed web.xml file points to precompiled versions of the JSPs. It does not reference the JSPs in /nwsp/docroot. Thus, changing the JSPs in docroot has no effect if you use the installed web.xml file.
The web.recompile.xml file references the JSPs in /nwsp/docroot, rather than using the precompiled JSPs.
This section describes some potential problems that you might encounter during installation.
To install SESM on a Solaris server with no X server, use the Silent or Console installation modes.
The SESM installation program writes to parts of the file system or Windows registry that are only accessible to a privileged user (that is, root on Solaris, or a member of the Administrators group on Windows NT). An SESM installation must be performed by a privileged user who has access to these resources. Otherwise, the outcome of the installation is unpredictable.
If you receive Java error messages indicating missing files in system level directories (for example, /var, on Solaris), you do not have correct permissions to perform the installation. See the preceding "Incorrect Permissions" section.
On a Solaris system, if you remove the contents of the SESM installation directory using the rm command instead of uninstalling SESM using the uninstall utility, then subsequent installations of SESM into the same directory might be adversely affected.
Uninstall SESM using uninstall.bin. If uninstalling is not possible, before reinstalling SESM, delete the vpd.properties file from the home directory of the person who is performing the installation.
 |
Note If you deploy multiple SESM installations, and you delete the vpd.properties file to recover from removing one of the installations, then you cannot use uninstall.bin to uninstall any of the other installations. |
The SESM installation program places the J2EE web server and SESM configuration files in the correct directories as defined in the startup scripts. If the configuration files are moved for any reason, then you must edit the web.xml file to reflect the new locations.
If the SSG port number or shared secret specified in the SESM application's MBean configuration file does not match actual SSG configuration (as performed on the SSG host), the SSG cannot see the SESM requests or is unable to decrypt the requests because the shared secret does not match. When the shared secret does not match, the SSG returns an Access Reject message.
For more information on SSG configuration, see "Configuring the SSG."
If incorrect IP addresses or port numbers are specified in the SESM application's MBean configuration file for the primary and secondary RADIUS servers, the RADIUS servers cannot see the SESM requests.
If the IP addresses and port numbers are correct, the RADIUS server returns an Access Reject when either of the following errors is present:
For more information on RADIUS configuration, see "Configuring RADIUS."
Out of memory exceptions might indicate that there is not enough Java virtual memory reserved to handle the number of users currently logged on.
Messages stating that the web server is unavailable might indicate that there is not enough Java virtual memory reserved to handle the number of users currently logged on. Follow the instructions in the "Out of Memory Exceptions" section to increase Java virtual memory.
The RADIUS server must be configured to recognize the following two clients:
If either of these configuration items is incorrect, then the RADIUS server sends Access Reject messages in response to all requests. See the "Configuring RADIUS Clients" section for information on configuring these RADIUS clients.
The SSG must have a default network location defined, from which the SESM web application is accessible. Otherwise, client requests never reach the SESM application, and the client browser eventually times out.
The SSG must have the radius-helper parameters configured with the correct port numbers and shared secret so that the SSG can see SESM messages and decrypt them. Because the SSG carries out authentication against the RADIUS server, it must also have the correct values defined for the radius-server parameters.
![]()
![]()
![]()
![]()
![]()
![]()
![]()
![]()
Posted: Mon Aug 26 08:47:51 PDT 2002
All contents are Copyright © 1992--2002 Cisco Systems, Inc. All rights reserved.
Important Notices and Privacy Statement.