|
|

The CDAT expert interface allows the service-provider administrator to create and maintain the objects and attributes for services, service groups, users, user groups, roles, rules, and Node Route Processor (NRP) information. Before using the CDAT expert interface, read the following:
The CDAT expert interface consists of a set of windows that allow the objects representing services, subscribers, and policy roles and rules to be created and maintained. The following sections describe how to use the CDAT expert interface to define service, subscriber, and policy information:
In addition to creating services, subscribers, and other objects with CDAT, the SSG software must be correctly configured for the services that you create. For information on configuring services on the SSG, see the Cisco 6400 Feature Guide.
As a simple example of the tasks that an administrator performs when using the CDAT interface, consider what tasks might be involved in creating a user with a set of privileges to access certain resources.
Because the steps outlined below start from the very beginning and assume that no user groups, roles, or rules exist, the tasks may seem a bit complicated. After becoming familiar with RBAC and CDAT, these tasks become fairly intuitive. More importantly, this set of tasks is only performed once—when the directory objects are created for the first time.
The following example outlines the steps that you perform to create a user who is a subscriber to a set of "Gold" services. The steps for this task are as follows:
1. With the Services window, create one or more services (the Gold services that Gold subscribers can access).
2. With the User Groups window, create a user group (GoldSubscriberGroup) for the users who will be granted access to the Gold services.
3. With the Users window, create the user (Joan) and make the user a member of the user group GoldSubscriberGroup.
4. With the Roles window, create a role (GoldSubscriberRole). The role defines the privileges the members of the GoldSubscriberGroup have.
a. Define the role's privileges to include the rights to subscribe to and unsubscribe from Gold services.
b. Make the user group GoldSubscriberGroup a subject (occupant) of the role GoldSubscriberRole.
5. With the Rules window, create a rule (GoldSubscriberRule). The rule will grant, to a specified role (GoldSubscriberRole), the privileges for a set of resources. For a Gold subscriber, the set of resources includes the Gold services.
a. Specify the set of resources (the Gold services) that are defined for the rule.
b. Associate the role GoldSubscriberRole with the rule GoldSubscriberRule.
When you complete the preceding steps, the privileges to subscribe to or unsubscribe from the set of Gold services are granted to the user group GoldSubscriberGroup because it is a subject of the GoldSubscriberRole. The user Joan has the privileges defined by the GoldSubscriberRole because she is a member of the GoldSubscriberGroup. The GoldSubscriberRule is applied to the specified services (the Gold services) and it associates GoldSubscriberRole with these services.
The greatest benefit to using CDAT is that it allows for bulk administration of users. Because the preceding example started from the beginning and created all needed objects for granting a subscriber the privileges to access a set of services, the steps might seem a bit complicated.
However, once these objects (a user group, a role for the group, and a rule granting privileges to resources) are in place, creating a thousand or ten thousand additional subscribers who are members of the GoldSubscriberGroup is simple and involves two steps for each subscriber:
1. Create the user—the new subscriber.
2. Specify that the user is a member of the GoldSubscriberGroup.
In addition to granting access to resources, you can perform other service-provider administration tasks at the group level. For example, because you have already defined the underlying structure of user groups, roles, and rules, adding or removing resources (services) that group members can access, and modifying the set of privileges for group members can be accomplished at the user group level.
With RBAC and CDAT, no user-by-user access control modifications need to be made. Bulk administration of users, services, and privileges makes subscriber provisioning simple and fast.
This section provides some information about getting started with the CDAT expert interface:
For information on installing, configuring, and starting CDAT, see the Cisco Subscriber Edge Services Manager and Subscriber Policy Engine Installation and Configuration Guide.
Before logging in to CDAT, make sure that cookies are enabled in your browser. CDAT requires a browser that allows cookies.
To log in to CDAT for the first time, you need a user name and password. The administrator who logs in first needs administrative privileges to begin the work of setting up the objects and attributes for services, subscribers, policy roles and rules, and so forth.
The easiest way to create an administrator user account for CDAT is to use some DESS sample data that the SESM installation program copies onto the CDAT server machine when it installs the CDAT and DESS software. The DESS sample data creates users (including an administrator user), users groups, services, roles, and rules. The DESS sample data is located in the install_dir/dess-auth/schema/samples directory, and is contained in two files: DESSadmin.ldf and DESSusecasedata.ldf.
You must manually install the DESS sample data with a facility such as ldapmodify. For information on installing the DESS sample data, see the following file:
After the DESS sample data is successfully installed, you can use the DemoUser5 user name (password cisco) to log in to CDAT for the first time. The DemoUser5 account is an administrative account with Cisco_Dess_Supervisor and Cisco_Azn_Super privileges, which are appropriate for a superuser-type administrator. The Demo5User can access all objects in the Organization Unit and can perform all CDAT tasks: access, create, delete, and modify all objects and attributes. The Demo5User can create user accounts, roles, and rules for all users, including administrators, account managers, and publishers.
 |
Note If your CDAT uses DemoUser5 and the other sample DESS objects, changing CDAT administrator passwords is a needed security precaution for production deployments of SESM and CDAT. |
Your first task after logging in for the first time as DemoUser5 should be to change the passwords associated with all CDAT administrator user accounts, including DemoUser3 and DemoUser5. CDAT administrator user accounts are members of user groups that occupy roles with administrative privileges (for example, Cisco_Dess_Supervisor, Cisco_Dess_Manage, and Cisco_Azn_Super). With CDAT, passwords must have at least one character.
The CDAT expert interface (Figure 2-1) allows you to create or update information for services, service groups, users, user groups, roles, rules, and NRPs.
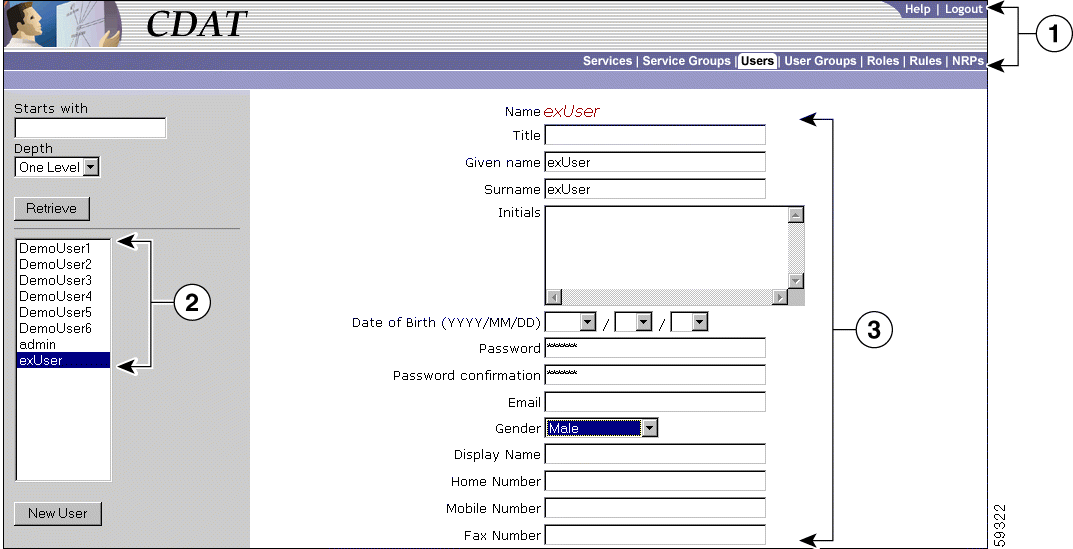
| 1 | Navigation Bar |
| 2 | Navigation List |
| 3 | Object Details |
In the CDAT expert interface, each object-management window contains these areas:
The bottom of the Object Details area contains a set of buttons. Figure 2-2 shows the buttons that appear at the bottom of the Users window.

The buttons shown in Figure 2-2 perform the following actions:
Some other considerations that you should be aware of when using the CDAT expert interface are:
All objects created with CDAT share the same name space. You cannot create a CDAT object (service, service group, user, user group, role, rule, or NRP) using the same name as an object of any of these types that already exists. If you try to create an object using a name already in use, CDAT displays a message that the object already exists and asks you to choose a new name.
When a user logs into CDAT, the objects that CDAT displays and the objects and attributes that the user can create, delete, and modify are directly related to the user groups that the CDAT user is a member of and to the following:
As an example, assume a user does not have Cisco_Azn_Super privilege for managing roles and rules. If this user logs in, CDAT does not display any roles or rules in the Roles and Rules windows. To see and manage roles and rules using CDAT, this user must a member of a user group that has Cisco_Azn_Super privilege and must have access to the resources of the container Organization Unit under which the roles and rules reside.
Some of the attributes that are in effect for a user or service profile are affected by inheritance.
When you define a service, service group, user, or user group, you can specify some attribute values at both the group level and the individual member level. When certain attribute values are specified at the user group or service group level, they are inherited by individual users and services that are group members. Table 2-1 lists the CDAT inheritable attributes.
When a value for an inheritable attribute is specified for an individual user or service, that value takes precedence over a value that is specified at the group level or container level.
For example, you can specify Idle Timeout and Session Timeout values for a service and for a service group.
To simplify the use of inheritable user and user group attributes, you should define user attributes at the individual user level only when an attribute is specific to the user. You should define all other attributes at the group level. Individual group members then inherit the group value.
Configuration attributes affect the behavior of the CDAT web application (for example, the port number where the web server listens for HTTP requests for CDAT). The configuration attributes also allow you to configure CDAT logging, debugging, and the management console.
Configuration attributes that affect the behavior of CDAT are defined in the cdat.jetty.xml file located in the install_dir/jetty/config directory, and the cdat.xml file located in the install_dir/cdat/config directory. Configuration attributes in the cdat.xml file include:
The CDAT management console is password protected. The management console's password is defined by the AuthInfo attribute in the cdat.xml file. In a production deployment, changing this password is a common-sense security precaution.
For detailed information on the CDAT configuration files and attributes, see the Cisco Subscriber Edge Services Manager and Subscriber Policy Engine Installation and Configuration Guide.
Many of the attributes that you define when creating a new service with CDAT are used by the Service Selection Gateway (SSG). The SSG connects the subscriber to the service or provides status information. The SSG is the enforcement point for authentication and service-specific policies such as session timeout, idle timeout, next-hop table, and other Internet Protocol (IP) attributes. The SSG also sends messages to the Cisco SESM web application regarding authentication failures or changes in the state of the SSG as a result of enforcement decisions (such as session timeout).
The following sections provide information on some of the SSG functionality that you can configure when creating a new service with CDAT.
When creating a new service with CDAT, you specify one of these service classes:
The SSG uses IOS access control lists (ACLs) to prevent users, services, and passthrough traffic from accessing specific IP addresses and ports. The ACLs can be configured for services and users by means of Cisco AV pairs.
When users are accessing multiple services, the SSG must determine the services for which the packets are destined. To do this, the SSG uses an algorithm to create a service access order list. This list is stored in the user's host object and contains services that are currently open and the order in which they are searched.
The algorithm that creates this list orders the open services based on the size of the network. Network size is determined by the subnet mask of the Service Route attribute (specified with Service routes box in Services window). A subnet that contains more hosts implies a larger network. If networks are the same size, the services will be listed in the order in which they were last accessed.
The Next hop gateway attribute in a service profile specifies the next hop key for a service. Each SSG uses its own next-hop table that associates this key with an actual IP address. Note that this attribute overrides the IP routing table for packets destined to a service. With CDAT, you use the NRPs window to create a next hop gateway table. For information on creating a next-hop table with CDAT, see "Creating and Updating NRP Information" section.
For information on downloading a next hop gateway table with the ssg next-hop command, see the Cisco 6400 Command Reference.
When the SSG receives a DNS request, it performs domain name matching using the Domain Name attribute from the service profiles of the currently logged-in services. For each service, you specify the Domain Name attribute in the Domain names box in the Services window.
The SSG can be configured to work with a single DNS server, or two servers in a fault-tolerant configuration. Based on an internal algorithm, DNS requests will be switched to the secondary server if the primary server begins to perform poorly or fails.
The Session Timeout and Idle Timeout attributes can be used in either a user or service profile. In a user profile, the attribute applies to the user's session. In a service profile, the attribute individually applies to each service connection.
In a dial-up networking or bridged (non-PPP) network environment, a user might disconnect from the NAS and release the IP address without using the SESM web application to log out from the SSG. If this happens, the SSG will continue to allow traffic to pass from that IP address, and this might be a problem if the IP address is obtained by another user.
The SSG provides two mechanisms to prevent this problem:
For each service, you specify an access mode in the Access mode box in the Services window. SSG services can be configured for concurrent or sequential access. Concurrent access allows users to log on to this service while simultaneously connected to other services. Sequential access requires that the user log out of all other services before accessing a service configured for sequential access.
Concurrent access is recommended for most services. Sequential access is ideal for services for which security is important, such as corporate intranet access, or for which there is a possibility of overlapping address space.
To create a service or update the attributes of an existing service, use the Services window (Figure 2-3).
When you first create a service, you click New Service and specify the following:
For a new or existing service, you can specify the following attributes:
Primary DNS servers (Required)
Secondary DNS servers (Optional)
For a proxy service, you specify the following attributes that provide information for the RADIUS server that the Service Selection Gateway (SSG) uses to authenticate access to this proxy service:
RADIUS server IP address (Required for a proxy service)
RADIUS server authentication port (Required for a proxy service)
RADIUS server accounting port (Required for a proxy service)
RADIUS shared secret (Required for a proxy service)
For a Layer 2 Tunnel Protocol (L2TP) tunnel service and virtual private dial network (VPDN), you specify the following attributes. For information on configuring L2TP and configuring the L2TP network server (LNS), see the Cisco 6400 Feature Guide.
Tunnel identifier (Required for a tunnel service)
Tunnel IP address (Required for a tunnel service)
Tunnel password (Required for a tunnel service)
Tunnel password confirmation (Required for a tunnel service)
Tunnel type (Required for a tunnel service)
CDAT displays the service groups that are currently defined. You indicate whether this service is a member of a service group by checking or unchecking the checkbox for the service group.
Local Cisco AV Pairs
|
Note Cisco AV pairs can be specified at the service and the service group level. Service and service group AV pairs are cumulative. The set that applies to a service are all AV pairs specified for the service and all AV pairs specified for any service groups of which the service is a member. Therefore, a common-sense strategy is to specify AV pairs at the individual service level and not at the service-group level. |
protocol:attribute=value
:) and equal sign (=) characters. In some cases, spaces are allowed between items within value. For example, spaces separate some of the parts of an access control list: ip:inacl#101=deny tcp 192.168.1.0 0.0.0.255 any eq 21
| Attribute Format | Description |
|---|---|
acl=x | ASCII number representing a connection access list. Used only when service=shell. For example: shell:acl=115. |
addr=x | A network address. Used with service=slip, service=ppp, and protocol=ip. Contains the IP address that the remote host should use when connecting via SLIP or PPP/IP. For example, addr=10.2.3.4. |
addr-pool=x | Specifies the name of a local address pool from which to get the address of the remote host (Cisco SESM web client). Used with service=ppp and protocol=ip. Note that addr-pool works in conjunction with local pooling. It specifies the name of a local pool, which must be preconfigured on the network access server. Use the ip local pool command to declare local pools. For example: |
inacl#<n> | ASCII access list identifier for an input access list to be installed and applied to an interface for the duration of the current connection. Use with service=ppp and protocol=ip and with service=ppp and protocol=ipx. Per-user access lists do not work with ISDN. |
inacl=x | ASCII identifier for an interface input access list. Use with service=ppp and protocol=ip. Per-user access lists do not work with ISDN. |
interface-config=x | Specifies user-specific interface configuration information with Virtual Profiles. The information that follows the equal sign (=) can be any Cisco IOS interface configuration command. |
ip-addresses=x | List of possible IP addresses, separated by spaces, that can be used for the end-point of a tunnel. Use with service=ppp and protocol=vpdn. |
min-links=<n> | Sets the minimum number of links for MLP. |
outacl#<n> | ASCII access list identifier for an interface output access list to be installed and applied to an interface during the current condition. Use with service=ppp and protocol=ip, and with service=ppp and protocol=ipx. Per-user access lists do not work with ISDN. |
outacl=x | ASCII identifier for an interface output access list. Use with service=ppp and protocol=ip, and with service=ppp and protocol=ipx. Contains an IP output access list for SLIP or PPP/IP (for example, outacl=4). The access list itself must already be configured on the router. Per-user access lists do not work with ISDN. |
pool-def#<n> | Defines IP address pools on the NAS. Use with service=ppp and protocol=ip. |
pool-timeout=x | In conjunction with pool-def, defines IP address pools on the NAS. During IPCP address negotiation, if an IP pool name is specified for a user (see the addr-pool attribute), a check is made that the named pool is defined on the NAS. If it is, the pool is consulted for an IP address. Use with service=ppp. |
protocol=x | A protocol that is a subset of a service. Currently supported protocols are atalk, bap, bridging, ccp, cdp, deccp, ip, ipx, lat, lcp, multilink, nbf, osicp, pad, rlogin, telnet, tn3270, vines, vpdn, xns, xremote, and unknown. |
proxyacl#<n> | Allows users to configure the downloadable user profiles (dynamic ACLs) by using the authentication proxy feature so that users can have the configured authorization to permit traffic going through the configured interfaces. |
route=x | Specifies a route to be applied to an interface. Use with service=slip, service=ppp, and protocol=ip. During network authorization, you can use this attribute to specify a per-user static route as follows: This indicates a temporary static route to be applied. The dst_address, mask, and gateway must be in dotted-decimal notation, with the same meanings as in the ip route configuration command on a NAS. If gateway is omitted, the peer's address is the gateway. The route is deleted when the connection terminates. |
route#<n> | Like route, this attribute specifies a route to be applied to an interface, but these routes are numbered, allowing you to use multiple routes. Use with service=ppp and protocol=ip, and with service=ppp and protocol=ipx. |
service=x | The service. Specify a service attribute to request authorization or accounting of that service. Values are slip, ppp, arap, shell, tty-daemon, connection, and system. This attribute is required. |
|
Note When a non-PPP user, such as in a bridged networking environment, disconnects from a service without logging off, the connection remains open and the user will be able to reaccess the service without going through the logon procedure. This is because no direct connection (PPP) exists between the subscriber and the SSG. To prevent non-PPP users from being logged on to services indefinitely, be sure to configure the Session-Timeout and/or Idle-Timeout attributes. |
CDAT displays the policy rules that are currently defined. You can indicate whether this service is a resource associated with a rule by checking or unchecking the checkbox for the rule. For information on rules, see the "Creating and Updating Rules" section.
To create a service group or update the attributes of an existing service group, use the Service Groups window (Figure 2-4). When creating a service group, you can make a service a member of the group by choosing the group in the Service Group Is member section of the Services window.
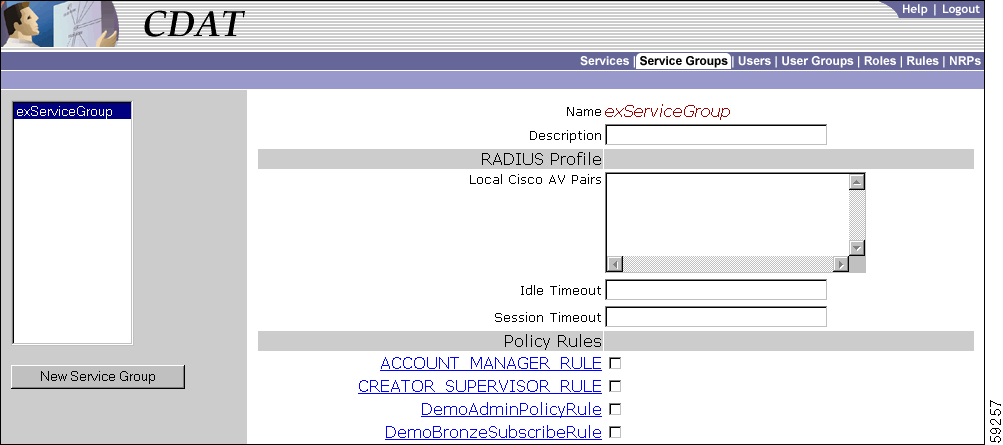
When you first create a service group, you click New Service Group and specify the following:
Name (Required)
For a new or existing service group, you can specify the following attributes:
Description (Optional)
Local Cisco AV Pairs (Optional)
|
Note Cisco AV pairs can be specified at the service and the service group level. Service and service group AV pairs are cumulative. The set that applies to a service are all AV pairs specified for the service and all AV pairs specified for any service groups of which the service is a member. Therefore, a common-sense strategy is to specify AV pairs at the individual service level and not at the service-group level. |
|
Note When a non-PPP user, such as in a bridged networking environment, disconnects from a service without logging off, the connection remains open and the user will be able to reaccess the service without going through the logon procedure. This is because no direct connection (PPP) exists between the subscriber and the SSG. To prevent non-PPP users from being logged on to services indefinitely, be sure to configure the Session-Timeout and/or Idle-Timeout attributes. |
CDAT displays the policy rules that are currently defined. You can indicate whether this service group is a resource associated with a rule by checking or unchecking the checkbox for the rule. For information on rules, see the "Creating and Updating Rules" section.
In CDAT, a user can be any one of the following:
For each category of user, the CDAT administrator creates an account for the user with the Users window. In addition, the CDAT administrator must create one or more user groups for each category of user because roles and privileges are specified for user groups, not individual users.
For the CDAT administrator, creating a user who has access to resources (services or objects and attributes in the LDAP directory) involves these steps:
1. Create a user group with the User Groups window.
2. Create a role with the Roles window and make the user group a subject (occupant) of the role. The role defines the privileges that user group members have.
3. Create a rule with the Rules window and associate the role with the rule. The rule will grant the privileges associated with specified roles to a set of resources defined in the rule. For a subscriber, the set of resources includes one or more services.
4. Create the user with the Users window and make the user a member of one or more user groups.
Creating user groups, roles, and rules is usually done once when the initial set of objects is being defined. Once these objects are defined, creating a user who actually has access to resources typically requires only Step 4.
To create a subscriber or administrator account or to update information in an existing subscriber or administrator account, use the Users window (Figure 2-5).
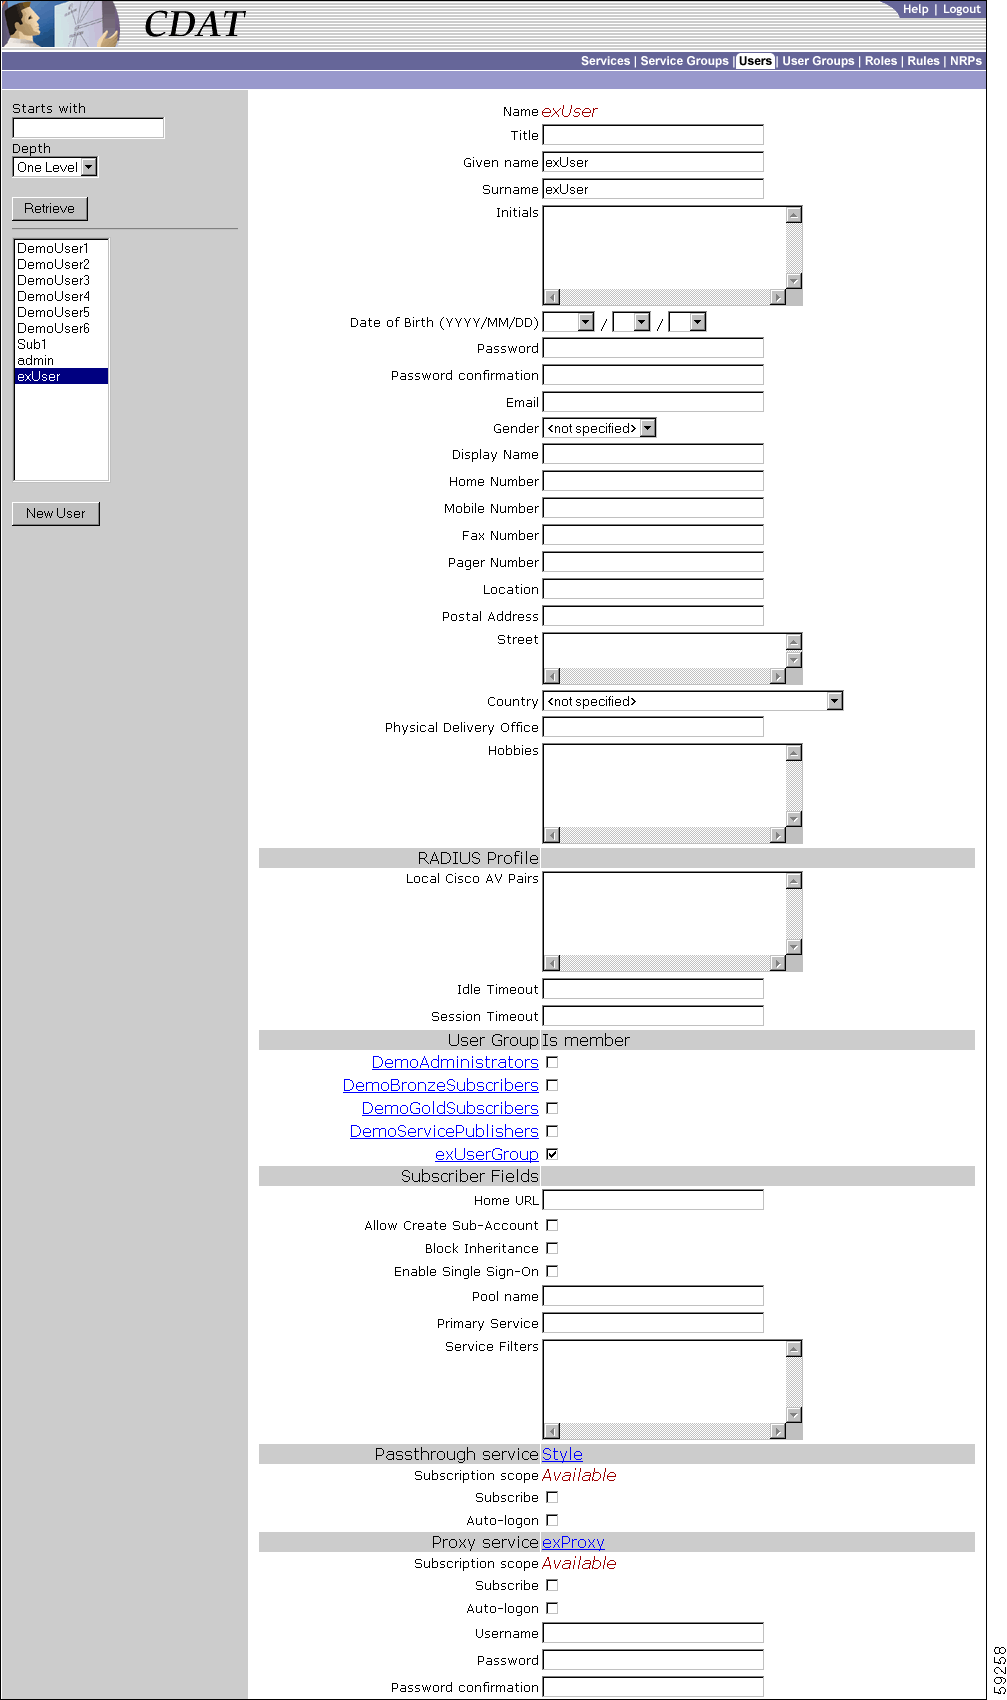
When you first create a user, you click New User and specify the following:
Name (Required)
For a new or existing user, you can specify the following attributes:
|
|
|
|
|
|
|
|
|
|
|
|
|
|
| |
|
|
|
|
|
Note A password must contain at least one character (letter or number). |
Local Cisco AV Pairs (Optional and for Subscribers Only)
|
Note Cisco AV pairs can be specified at the user and the user group level. User and user group AV pairs are cumulative. The set that applies to a user are all AV pairs specified for the user and all AV pairs specified for any user groups of which the user is a member. |
An upstream access control list is defined with the inacl AV pair and specifies an access control list to be applied to upstream traffic coming from the user. A downstream access control list is defined with the outacl AV pair and specifies an access control list to be applied to downstream traffic going to the user. Either type of access control list can be an IOS standard access control list or an extended access control list. The syntax for these AV pairs is as follows:
ip:inacl[#number]={standard-access-control-list | extended-access-control-list} Syntax Description
number | Access list identifier. |
standard-access-control-list | Standard access control list. |
extended-access-control-list | Extended access control list. |
Examples
ip:inacl#101=deny tcp 192.168.1.0 0.0.0.255 any eq 21


ip:outacl#101=deny tcp 192.168.1.0 0.0.0.255 any eq 21
Idle Timeout (Optional and for Subscribers Only)
|
Note When a non-PPP user, such as in a bridged networking environment, disconnects from a service without logging off, the connection remains open and the user will be able to reaccess the service without going through the logon procedure. This is because no direct connection (PPP) exists between the subscriber and the SSG. To prevent non-PPP users from being logged on to services indefinitely, be sure to configure the Session-Timeout and/or Idle-Timeout attributes. |
Session Timeout (Optional and for Subscribers Only)
CDAT displays the user groups that are currently defined. You can indicate whether the user is a member of a user group by checking or unchecking the checkbox for the group. For information on user groups, see the "User Groups Window" section.
Home URL (For Subscribers Only)
Allow Create Sub-Account (For Subscribers Only)
Block Inheritance (For Subscribers Only)
Enable Single Sign-On (Optional and for PPP Subscribers Only)
Pool Name (Not Currently Used)
Primary Service (Not Currently Used)
Service Filters (Optional and for Subscribers Only)
|
Note When a subaccount inherits service filters, the service names do not appear in the Service Filters box of the subaccount but are applied by the DESS/AUTH software at run time. |
For each service to which the user can subscribe, CDAT displays one of the following subscription scopes:
If CDAT does not display a service in the Users window, the user does not have the privileges needed to subscribe to the service. For each service to which the user has access, you can specify the following information:
Subscribe (For Subscribers Only)
|
Note If the subscriber has been given subscription privileges by the administrator, the subscriber can then use the SESM account-management pages to subscribe to or unsubscribe from the service if desired. |
Auto-logon (For Subscribers Only)
|
Note In the SESM web application configuration file, the auto-logon functionality is called the autoconnect feature. The autoConnect attribute in an SESM web application configuration file (for example, nwsp.xml) controls the auto-logon functionality. For information on the autoConnect attribute, see the Cisco Subscriber Edge Services Manager and Subscriber Policy Engine Installation and Configuration Guide. |
A user group is a set of users. With CDAT, individual users—subscribers, publishers, account managers, and administrators—must be associated with one or more user groups in order to get access to resources. After creating a user group, you can make a user a member of the group by choosing the group in the User Group Is member section of the Users window.
Privileges are granted to a user group through a role. The resources to which the user group has access are defined in a rule. With RBAC, both privileges and access to resources are managed at the group level. For example, a user group made up of subscribers can be given access at the group level to a new service.
For inheritable user and user group attributes, you should define user attributes at the individual user level only when an attribute is specific to the user. You should define all other attributes at the group level. Individual group members then inherit the group value. For more information on inheritable attributes, see the "Attribute Values and Inheritance" section.
To create a new user group or update the attributes of an existing user group, use the User Groups window (Figure 2-6).
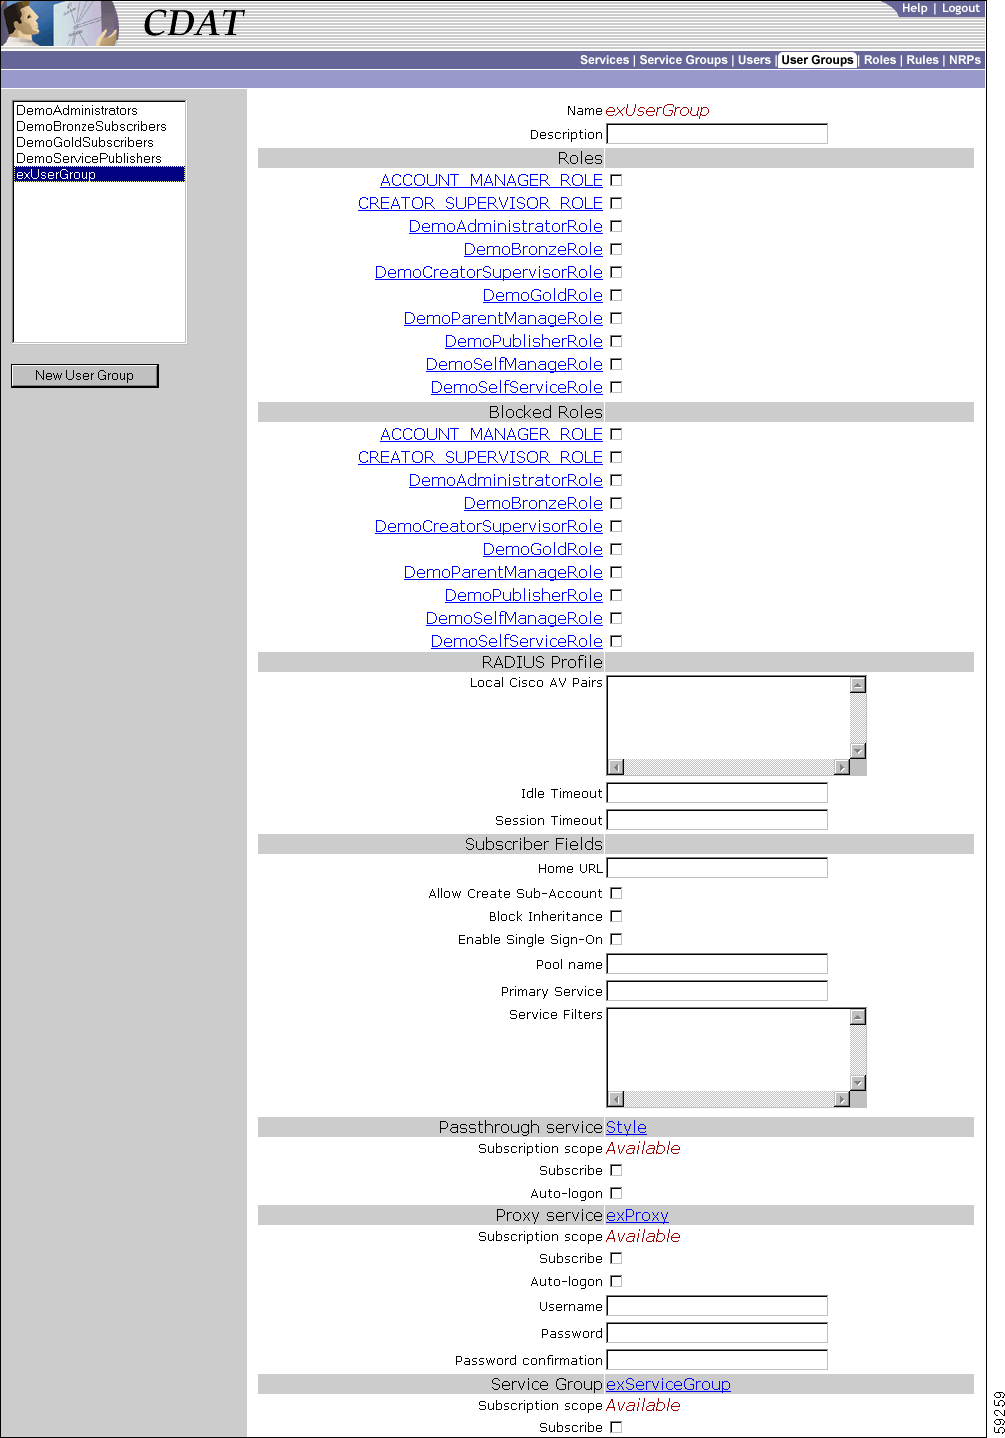
When you first create a service group, you click New Service Group and specify the following:
Name (Required)
For a new or existing user group, you can specify the following attributes:
Description (Optional)
CDAT displays the roles that are currently defined. You can indicate whether the user group is an occupant of a role by checking or unchecking the checkbox for the role. For information on roles, see the "Roles Window" section.
CDAT displays the roles that are currently defined. You currently do not use the Blocked Roles attribute at the user-group level.
Local Cisco AV Pairs (Optional and for Subscriber Groups Only)
|
Note Cisco AV pairs can be specified at the user and the user group level. User and user group AV pairs are cumulative. The set that applies to a user are all AV pairs specified for the user and all AV pairs specified for any user groups of which the user is a member. |
Idle Timeout (Optional and for Subscriber Groups Only)
|
Note When a non-PPP user, such as in a bridged networking environment, disconnects from a service without logging off, the connection remains open and the user will be able to reaccess the service without going through the logon procedure. This is because no direct connection (PPP) exists between the subscriber and the SSG. To prevent non-PPP users from being logged on to services indefinitely, be sure to configure the Session-Timeout and/or Idle-Timeout attributes. |
Session Timeout (Optional and for Subscriber Groups Only)
Allow Create Sub-Account (For Subscriber Groups Only)
Block Inheritance (Not Currently Used)
Enable Single Sign-On (For PPP Subscribers Only)
Pool Name (Not Currently Used)
Primary Service (Not Currently Used)
Service Filters (Optional and for Subscriber Groups Only)
|
Note When a subaccount inherits service filters, the service names do not appear in the CDAT Services window but are applied by the DESS/AUTH software at run time. |
For each service to which the user group can subscribe, CDAT displays a subscription scope:
If CDAT does not display a service in the User Groups window, the user group does not have the privileges needed to subscribe to the service.
For each available service, you can specify the following information:
Subscribe (For Subscriber Groups Only)
|
Note If the user group of subscribers has been given subscription privileges by the service-provider administrator, the subscriber can then use the SESM account-management pages to subscribe to or unsubscribe from the service if desired. |
Auto-logon (For Subscriber Groups Only)
|
Note In the SESM web application configuration file, the auto-logon functionality is called the autoconnect feature. The autoConnect attribute in an SESM web application configuration file (for example, nwsp.xml) controls the auto-logon functionality. For information on the autoConnect attribute, see the Cisco Subscriber Edge Services Manager and Subscriber Policy Engine Installation and Configuration Guide. |
In the RBAC model, a role is a collection of associated privileges. With CDAT, a user group may be assigned to multiple roles. In the context of Cisco SESM and CDAT, user groups fall into the following general categories:
With RBAC and CDAT, the underlying directory and DESS/AUTH software determines the roles for a given user in these ways:
If the RBAC objects were installed when the DESS software was installed, a set of predefined roles will be displayed in the list of roles. For information on the predefined roles, see "Predefined Roles and Rules."
This section provides two examples of subscriber roles and the privileges that you might grant to a subscriber.
For a subscriber who requires self-care privileges (managing account attributes such as passwords and addresses) and subaccount-creation privileges, you can use the privilege Cisco_Dess_Manage and as role occupant specify the dynamic subject Self. The dynamic subject Self defines the role occupant when the accessed resource name is the same as the subject name in the submitted privilege token. The dynamic subject Self allows a subscriber to be a role occupant only for objects and attributes that are related to the specific user account.
Roles for subscribers can require that you create two or more roles that are associated with specific privileges. As an example, consider an SESM deployment that allows only the parent user account (not the subaccount users) to create subaccounts. This model could be implemented with two distinct roles: one role for the parent user and one role for the subaccount user.
As an example of this model, assume that the parent user group is GoldSubscriberParent and is associated with a GoldSubscriberParentRole having these privileges:
The subaccount user group is GoldSubscriberSubaccount and is associated with a GoldSubscriberSubaccountRole having all of the preceding privileges except for Cisco_Dess_CreateSubAccount and Cisco_Dess_DeleteSubaccount. Not granting these two privileges to the subaccount role makes it impossible for the subaccount user to create or delete a subaccount.
To create a new role or update the attributes of an existing role, use the Roles window (Figure 2-7).

When you first create a role, you click New Role and specify the following:
Name (Required)
For a new or existing role, you can specify the following:
Description (Optional)
| Privilege | Description | Who Is Granted? |
|---|---|---|
Allows access to, creation, deletion, modification of a role or rule. Also allows assigning roles to subjects, policy rules to resources, and allows checking access on resources. | Administrators | |
Allows creation of user groups. Implied privileges: None. | Administrators | |
Cisco_Dess_CreateAccount | Allows creation of users. Implied privileges: Cisco_Dess_CreateSubAccount. | Account Managers |
Cisco_Dess_CreateService | Allows creation of services. Implied privileges: None. | Publishers |
Cisco_Dess_CreateServiceGroup | Allows creation of service groups. Implied privileges: None | Publishers |
Cisco_Dess_CreateSubAccount | Allows creation of subaccounts. Implied privileges: None | Subscribers |
Cisco_Dess_Delete | Allows deletion of user groups. Implied privileges: None. | Administrators |
Cisco_Dess_DeleteAccount | Allows deletion of user accounts. Implied privileges: Cisco_Dess_DeleteSubAccount | Account Managers |
Cisco_Dess_DeleteService | Allows deletion of services. Implied privileges: None | Publishers |
Cisco_Dess_DeleteSubAccount | Allows deletion of subaccounts. Implied privileges: None | Subscribers |
Cisco_Dess_Manage | Allows managing of DESS objects, including changing the set of attributes associated with these objects. Implied privileges: Cisco_Dess_Create, Cisco_Dess_CreateAccount, Cisco_Dess_CreateService, Cisco_Dess_CreateServiceGroup, Cisco_Dess_CreateSubAccount, Cisco_Dess_Delete, Cisco_Dess_DeleteAccount, Cisco_Dess_DeleteService, Cisco_Dess_DeleteSubaccount, Cisco_Dess_ManagePassword, Cisco_Dess_Modify, Cisco_Dess_Read, Cisco_Dess_Subscribe, Cisco_Dess_Unsubscribe | Administrators |
Cisco_Dess_Manage_Password | Allows reading and changing of passwords on user objects. This privilege grants modify rights to the set of attributes associated with the passwords. Implied privileges: None | Subscribers (for self-care) |
Cisco_Dess_Modify | Allows changes to attributes for DESS objects. Implied privileges: None | Subscribers (for self-care) |
Cisco_Dess_Read | Allows reading of DESS objects and their attributes. Implied privileges: None. | Subscribers (for self-care) |
Cisco_Dess_Subscribe | Allows subscription to a service. In order to subscribe to a service, the user must also have Cisco_Dess_Manage privilege on the user account. Implied privileges: None. | Subscribers |
Cisco_Dess_Supervisor | Allows management of DESS objects, including changing the set of attributes associated with these objects. Cisco_Dess_Supervisor and Cisco_Dess_Manage are identical. Implied privileges: Cisco_Dess_Create, Cisco_Dess_CreateAccount, Cisco_Dess_CreateService, Cisco_Dess_CreateServiceGroup, Cisco_Dess_CreateSubAccount, Cisco_Dess_Delete, Cisco_Dess_DeleteAccount, Cisco_Dess_DeleteService, Cisco_Dess_DeleteSubaccount, Cisco_Dess_Manage, Cisco_Dess_ManagePassword, Cisco_Dess_Modify, Cisco_Dess_Read, Cisco_Dess_Subscribe, Cisco_Dess_Unsubscribe | Administrators |
Cisco_Dess_Unsubscribe | Allows unsubscription to a service. | Subscribers |
A rule defines the set of conditions under which a role is associated with one or more resources. User groups can be made occupants of one or more roles. In this way, an administrator can define the resources that can be accessed by members of a user group.
If the RBAC objects were installed when the DESS software was installed, CDAT displays a set of predefined rules in the list of rules. For information on the predefined rules, see "Predefined Roles and Rules."
To create a new rule or update the attributes of an existing rule, use the Rules window (Figure 2-8).

When you first create a rule, you click New Rule and specify the following:
Name (Required)
For a new or existing rule, you can specify the following:
Description (Optional)
CISCO_AZN indicates authorization policies and is the only keyword used. Variable Operator Value
ResourceClass==top
ResourceClass is the only variable used. == operator is the only operator used. top is the only value used. CDAT allows creation of NRP-related information in an NRP object. Currently, NRP-related information is for a next-hop table.
Because multiple NRP-SSGs might access services from different networks, each service profile can specify a next-hop key, which is a string identifier, rather than an actual IP address. For each service, use the Services window's Next hop gateway box to specify the next-hop key for the service.
For each NRP-SSG to determine the IP address associated with the next-hop key, each NRP-SSG downloads its own next-hop table that associates keys with IP addresses. In the NRPs window, you use the Next Hop Table box to define the entries in the next-hop table for each NRP-SSG. The name of the next-hop table is the name that you give when you click New NRP.
To create and download a next-hop table that an NRP-SSG can use to access services from different networks, do the following:
Step 2 For each NRP-SSG, use CDAT to create a next-hop table.
a. In the NRPs window, click New NRP to create a next-hop table for the NRP, and specify the name for the next-hop table in the Name box. With CDAT, the next-hop table takes its name from the name of the NRP.
b. In the Next Hop Table box, define the entries in the next-hop table for the NRP-SSG. For example:
service3=192.168.103.3
service2=192.168.103.2
service1=192.168.103.1
Worldwide_Gaming=192.168.4.2
Step 3 On the RADIUS/DESS Proxy (RDP) server, specify the next-hop table password that will be used to access the next-hop table. The next-hop table password is specified in the \rdp\config\rdp.xml file:
<!-- Following attribute and type handle next hop profiles -->

<Call name="setAttribute">

<Arg>PASSWORD:nexthopcisco</Arg>

<Arg>NextHopRequest</Arg>

</Call>
By default, the password is nexthopcisco.
Step 4 On each NRP-SSG, use the following command to download the appropriate next-hop table:
In the preceding command, next-hop_table_name is the name you specified when creating the next-hop table (Step 2a). The next-hop_table_password is the password that is defined in the rdp.xml file (Step 3). For information on the ssg next-hop command, see the Cisco 6400 Command Reference.
To create or update information for an NRP, use the NRPs window (Figure 2-9) Currently, the only information you can create is a next-hop table.
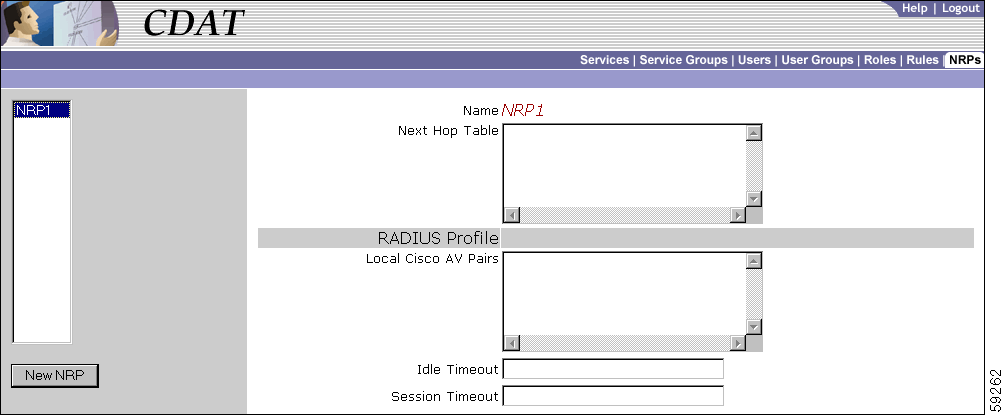
The NRPs window allows you to create a next-hop table. When you first create a next-hop table, you click New NRP and specify the following:
Name (Required)
For a new or existing next-hop table, you can specify the following:
Next Hop Table (Required)
service3=192.168.103.3
service2=192.168.103.2
service1=192.168.103.1
Worldwide_Gaming=192.168.4.2
Local Cisco AV Pairs (Not Currently Used)
Idle Timeout (Not Currently Used)
Session Timeout (Not Currently Used)
![]()
![]()
![]()
![]()
![]()
![]()
![]()
![]()
Posted: Tue Jul 2 12:00:03 PDT 2002
All contents are Copyright © 1992--2002 Cisco Systems, Inc. All rights reserved.
Important Notices and Privacy Statement.