|
|

Table Of Contents
Cisco Limited Lifetime Hardware Warranty Terms
Introduction to the Client Adapters
Determining the Latest Version of the Driver and Client Utilities
Installing the Client Utilities
Configuring the Client Adapter
Cisco Limited Lifetime Hardware Warranty Terms
There are special terms applicable to your hardware warranty as well as services you may use during the warranty period. Your formal Warranty Statement, including the warranty applicable to Cisco software, appears in the CD which accompanies your Cisco Product. Follow these steps to access and download the Cisco Information Packet and your warranty document from the CD or from Cisco.com.
1.
Launch your browser and go to the following URL:
http://www.cisco.com/univercd/cc/td/doc/es_inpck/cetrans.htm
The Warranties and License Agreement page appears.
2.
a.
b.
c.
d.
Note
3.
a.
78-6310-02C0b.
c.
From this page you can review the document online or click the PDF icon to download and print the document in Adobe Portable Document Format (PDF).
You may also contact our Service and Support website for assistance at:
http://www.cisco.com/public/Support_root.shtml.Duration of Hardware Warranty
As long as the original End User continues to own or use the Product, provided that: fan and power supply warranty is limited to five (5) years. In the event of discontinuance of product manufacture, Cisco warranty support is limited to five (5) years from the announcement of discontinuance.
Replacement, Repair or Refund Procedure for Hardware
Cisco or its service center will use commercially reasonable efforts to ship a replacement part within ten (10) working days after receipt of the RMA request. Actual delivery times may vary depending on Customer location.
Cisco reserves the right to refund the purchase price as its exclusive warranty remedy.
To Receive a Return Materials Authorization (RMA) Number
Please contact the party from whom you purchased the product. If you purchased the product directly from Cisco, contact your Cisco Sales and Service Representative.
Complete the information below and keep for ready reference.
Product purchased from:
Their telephone number:
Product Model and Serial number:
Maintenance Contract number:
Preface
This guide will help you install and minimally configure your Cisco Aironet Wireless LAN Client Adapter on a computer running Windows 95, 98, NT, 2000, Me, XP, CE, Linux, Mac OS 9.x, or Mac OS X. Because the installation and configuration process varies with each operating system, this guide sometimes refers you to the installation and configuration guide specific to the operating system your computer is running. The installation and configuration guides can be found on Cisco.com. The following table lists the guides for each operating system and their URLs.
http://cisco.com/univercd/cc/td/doc/product/wireless/airo_350/350cards/windows/index.htm
http://cisco.com/univercd/cc/td/doc/product/wireless/airo_350/350cards/win_ce/index.htm
Note
Introduction to the Client Adapters
The Cisco Aironet Wireless LAN Client Adapters are radio modules that provide transparent wireless data communications between fixed, portable, or mobile devices and other wireless devices or a wired network infrastructure. The client adapters are fully compatible when used in devices supporting Plug-and-Play (PnP) technology.
The primary function of the client adapters is to transfer data packets transparently through the wireless infrastructure through an access point to a wired LAN. The adapters operate similarly to a standard network product except that the cable is replaced with a radio connection and an access point is required to make the connection to the wire. No special wireless networking functions are required, and all existing applications that operate over a network can operate using these adapters.
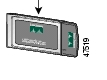
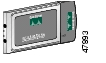
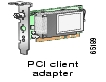
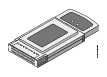
Types of Client Adapters
There are five types of client adapters:
Software Components
The client adapters have three major software components: radio firmware, a driver, and one or more client utilities.
Radio Firmware
The radio firmware controls the client adapter's radio and is installed on the client adapter at the factory. However, a more recent version of the firmware may be available from Cisco.com. See the installation and configuration guide specific to your computer's operating system to determine the version of your adapter's firmware and to upgrade it if necessary.
Driver
The driver provides an interface between a computer's operating system and the client adapter, thereby enabling the operating system and the applications it runs to communicate with the adapter. The driver is provided on the CD that shipped with the adapter and on Cisco.com and must be installed before the adapter can be used.
Client Utilities
The client utilities are optional applications that interact with the radio firmware to adjust client adapter settings and display information about the adapter. The utilities are provided on the CD that shipped with the client adapter and on Cisco.com. If you use the client utilities, Cisco recommends that you install them before you install the client adapter.
Note
Unpacking the Client Adapter
Each client adapter is shipped with the following items:
•
•
•
If any item is missing or damaged, contact your Cisco representative or reseller for support. Any remote antenna and its associated wiring are shipped separately.
Additional Requirements
In addition to the items shipped with the client adapter, you will also need the following in order to install and use the adapter:
•
Note
•
•
•
–
client name)–
–
–
–
–
–
Installing the Client Adapter
You must perform the following procedures in order to make your client adapter operational:
1.
2.
3.
4.
Note
Determining the Latest Version of the Driver and Client Utilities
The driver and client utilities are provided on the CD that shipped with the client adapter; however, a more recent version of each may be available from Cisco.com. Cisco recommends installing the most current versions.
Follow the steps below to determine the version of the driver and client utilities on your CD and Cisco.com.
1.
Note
2.
a.
http://www.cisco.com/public/sw-center/sw-wireless.shtml
b.
c.
Note
3.
4.
Installing the Driver
The driver you install for your client adapter depends on which operating system your computer is running. To install the driver, follow the instructions in Chapter 3 of the installation and configuration guide specific to your computer's operating system.
Installing the Client Utilities
This section provides instructions for installing the Aironet Client Utility (ACU) on computers running Windows 95, 98, NT, 2000, Me, and XP.
Note
Note
Note
1.
2.
a.
b.
c.
3.
a.
http://www.cisco.com/public/sw-center/sw-wireless.shtml
b.
c.
d.
e.
f.
g.
h.
i.
4.
5.
6.
•
•
7.
A status screen displays the progress of the installation. Then, one of two Setup Complete screens appears, depending on whether Windows needs to be restarted to complete the installation.
8.
•
•
Note
9.
Verifying Installation
To verify that you have installed the driver and client utilities and minimally configured your client adapter, check the adapter's LED display. If the installation was successful, the client adapter's green LED blinks.
Configuring the Client Adapter
If you want to enable security features or set advanced configuration parameters for your client adapter, refer to the installation and configuration guide specific to your computer's operating system. If you are using the PC-Cardbus card in a country other than the United States, you must adjust the card's transmit power to conform with the levels established by regulations for that country. See the next section for instructions.
In Case of Difficulty
If you followed the instructions in previous sections of this guide, you should have had no trouble getting your client adapter installed and running. However, if you did experience difficulty, help is available from Cisco. Before contacting Cisco, look for a solution to your problem in the following places:
•
•
Documentation Feedback
You can submit feedback to this document by detaching and completing the questionnaire on the cover and mailing it to Cisco.
If you are reading Cisco product documentation on Cisco.com,
you can submit technical comments electronically. Click Leave Feedback at the bottom of the Cisco Documentation home page. After you complete the form, print it out and fax it to Cisco at 408 527-0730.You can e-mail your comments to bug-doc@cisco.com.
To submit your comments by mail, complete the reader response card (attached to the cover of this guide) and mail it to us.
We appreciate your comments.
Safety Information
The FCC with its action in ET Docket 96-8 has adopted a safety standard for human exposure to radio frequency (RF) electromagnetic energy emitted by FCC certified equipment. When used with approved Cisco Aironet antennas, Cisco Aironet products meet the uncontrolled environmental limits found in OET-65 and ANSI C95.1, 1991. Proper operation of this radio device according to the instructions found in this manual and the Installation and Configuration Guide specific to your computer's operating system will result in user exposure that is substantially below the FCC recommended limits.
•
•
•
•
–
–
–
•
–
Warning
Warning
Warning
Compliance Information
Compliance information for Cisco wireless LAN client adapters is provided in the installation and configuration guide specific to your computer's operating system.
Glossary
![]()
![]()
![]()
![]()
![]()
![]()
![]()
![]()
Posted: Wed May 4 06:19:03 PDT 2005
All contents are Copyright © 1992--2005 Cisco Systems, Inc. All rights reserved.
Important Notices and Privacy Statement.