|
|

July 28, 2000
 |
Note The most current Cisco documentation for released products is available on Cisco Connection Online (CCO) at http://www.cisco.com. The online documents may contain updates and modifications made after the hardcopy documents were printed. |
These release notes describe the following topics:
These release notes describe the new features included in software version 2.2.0 for the Cisco Content Engines and Cisco Cache Engines. To simplify terminology, both the Cache Engine and the Content Engine are referred to as the "CE." Software version 2.2.0 is an extension of software version 2.1.0. See the Cisco Cache Engine User Guide, Version 2.1.0 for the following information:
|
Note Cisco recommends that you install the most recent software version available for your model of the CE. |
To determine the version of the software currently running on the Cisco CE, log on to the CE and enter the show version EXEC command.
CE software can be downloaded from the Cisco Systems Software Center at the following URL:
http://www.cisco.com/cgi-bin/tablebuild.pl/cache-engine
Presently, two types of CE software files are available on CCO to download, files with the .pax suffix and files with the .bin suffix. The .pax file contains the full-image software with the graphical user interface (GUI) and is the file routinely installed. The .bin file software is for recovery situations that require booting from the network, or restoring Flash memory. Refer to the section "Recovering the Cache Engine System Software" in the Cisco Cache Engine User Guide, Version 2.1.0 for instructions on loading your system image with the .bin file.
Step 2 Log on to the CE, and at the command prompt enter:
install filename.pax
where filename is the name of the .pax file.
Step 3 Follow the command line interface instructions as prompted.
Enter y at the "Copy new image to flash memory?[yes]:" prompt.
Step 4 After the CE has rebooted, use the show version command to display the current
software version.
Software version 2.2.0 is compatible with all models of the Cisco Series 500 Cache Engines and the Cisco Content Engine 590. To simplify terminology, both the Cache Engine and the Content Engine are referred to as the "CE" in this document.
Software version 2.2.0 will be shipped as a software option for the Cisco Content Engine 590, and supports the use of the Cisco Storage Array.
Improved WCCPv2 support for the Cisco Content Engines has been added to the Cisco Catalyst 6000 family switch.
The gui-server global configuration command was added to the command-line interface (CLI).
To specify or disable the CE management graphical user interface (GUI) server port, use the gui-server global configuration command.
gui-server {enable | port port}
enable | Enables the graphical user interface. |
port | Configures the graphical user interface server port. |
port | Port number. The default is 8001 (1-65535). |
The following example enables the CE management GUI on port 8002.
CE(config)# gui-server enable

CE(config)# gui-server port 8002
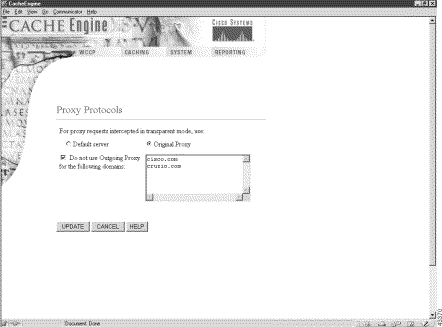
In transparent mode operation, the CE can intercept Hypertext Transfer Protocol (HTTP) and Secure Hypertext Transfer Protocol (HTTPS) traffic intended for another proxy server. The CE with software release 2.2.0 can forward the requests to the intended proxy, forward them to an alternative outgoing proxy, or service the client request directly with the origin server. Domain names, host names, and IP addresses can be excluded from proxy forwarding. The proxy-protocols global configuration command and the show proxy-protocols command were added to the CLI.
Use the proxy-protocols global configuration command to specify domain names, host names, or IP addresses to be excluded from proxy forwarding.
proxy-protocols {outgoing-proxy exclude {domains-only | enable | list word} | transparent {default-server | original-proxy}}
outgoing-proxy exclude | Sets global outgoing proxy exclude criteria. |
domains-only | Excludes only the domain names defined by the list option. |
enable | Enables global outgoing proxy exceptions. |
list | Sets the global outgoing proxy exclude list. |
word | Domain names, host names, or IP addresses to be excluded from proxy forwarding. |
transparent | Sets transparent mode behavior for proxy requests. |
default-server | Uses the CE to go to the origin server or the outgoing proxy, |
original-proxy | Uses the intended proxy server from the original request. |
When you enter the proxy-protocols transparent default-server global configuration command, the CE forwards intercepted HTTP and HTTPS proxy-style requests to the outgoing HTTP or HTTPS proxy server, if one is configured. If no outgoing proxy server is configured for the protocol, the request is serviced by the CE and the origin server.
The proxy-protocols transparent original-proxy global configuration option specifies that requests sent by a web client to another proxy server, but intercepted by the CE in transparent mode, be directed back to the intended proxy server.
The proxy-protocols outgoing-proxy exclude global configuration options allow the administator to specify domain names, host names, or IP addresses to be globally excluded from proxy forwarding. Domains are entered as an ASCII string, separated by spaces. The wildcard character * (asterisk) can be used for IP addresses (for instance, 174.12.*.*). Only one exclusion can be entered per command line. Enter successive command lines to specify multiple exclusions.
The following example configures the CE to forward intercepted HTTPS proxy-style requests to an outgoing proxy server. The domain names cisco.com, cruzio.com, and the IP addresses 174.12.*.* are excluded from proxy forwarding. The show proxy-protocols command verifies the configuration.
CE(config)# https proxy outgoing host 174.10.10.10 266

CE(config)# proxy-protocols transparent default-server

CE(config)# proxy-protocols outgoing-proxy exclude enable

CE(config)# proxy-protocols outgoing-proxy exclude list cisco.com

CE(config)# proxy-protocols outgoing-proxy exclude list 174.12.*.*
CE(config)# proxy-protocols outgoing-proxy exclude list cruzio.com
CE# show proxy-protocols all

Transparent mode forwarding policies: default server
  Global outgoing proxy exclude list is enabled
  Global outgoing proxy exclude list:
    cisco.com
    cruzio.com
    174.12.24.24
  Excluding only the domain names on the list is disabled.

The following example configures the CE to forward intercepted HTTP proxy-style requests to the
intended proxy server.

CE(config)# proxy-protocols transparent original-proxy
http proxy outgoing
https proxy outgoing
show proxy-protocols
Use the show proxy-protocols command to display current global outgoing proxy exclude status and criteria.
show {all | outgoing-proxy | transparent}
all | All proxy protocols-related parameters. |
outgoing-proxy | Global outgoing proxy exceptions. |
transparent | Transparent mode protocol policies. |
console# show proxy-protocols all

  Transparent mode forwarding policies: original proxy
  Global outgoing proxy exclude list is disabled
  Global outgoing proxy exclude list:
    cisco.com
    cruzio.com
    174.12.24.24
  Excluding only the domain names on the list is disabled
proxy-protocols
A Proxy Protocols page was added to the Caching menu, as shown in Figure 1. See the Proxy Protocols online help for further information.
The mfs EXEC command and the show mfs statistics commands were added to the CLI. No changes were made to the Management GUI.
To alter default settings of the memory file system (mfs), use the mfs EXEC command.
mfs {clear [force] | mount [size [objects]] | sync | unmount}
clear | Deletes all objects from the mfs volume. |
force | Forcefully deletes all objects from the memory file system. |
mount | Mounts the memory file system. |
size | Maximum size of the memory file system in megabytes (1-1000). |
objects | Maximum number of objects in the memory file system (1-1000000). |
sync | Saves memory file system objects to the cache file system (cfs). |
unmount | Unmounts the memory file system. |
The memory file system cannot be configured with the GUI.
The example defines the memory file system to use 1 megabyte of memory and to contain no more than 22222 objects.
CE# mfs mount 1 22222
cfs
show mfs statistics
Use the show mfs command to display the statistics and status information of the memory file system.
shows mfs statistics
statistics | Displays memory file system statistics. |
console# show mfs statistics
Filesystem Statistics for volume MFS   Status: mounted
    Data Bytes Max                 0 KB
    Data Bytes Used                0 KB
    Inode Hits                     0
    Inode Misses                   0
    MFS Read error                 0
    MFS Write error                0
    MFS Object Truncations         0
    Volume Clears                  0
    Volume Syncs                   1
    Mount time      Wed Jul 19 08:56:48 2000
mfs
show cfs statistics
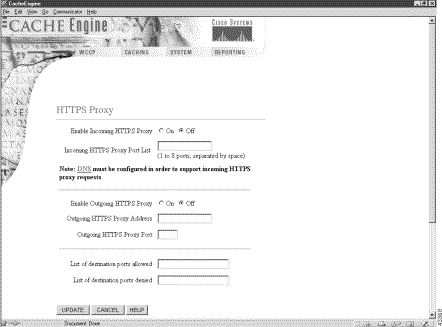
Software version 2.2.0 supports secure HTTP (HTTPS) with secure socket layers (SSL). The CE can be configured as an HTTPS proxy server or can transparently intercept and service HTTPS requests sent to another HTTPS proxy server. The HTTPS feature also implements the multiport feature, allowing HTTPS to share ports with native HTTP or other protocols. The https and debug https global configuration commands, as well as the show https command were added to the CLI. An HTTPS Proxy page was added to the Caching menu, as shown in Figure 2. See the HTTPS online help for further information.
Use the https global configuration command to configure the CE for HTTPS proxy services.
https {destination-port {allow {port | all} | deny {port | all}} | proxy {incoming port |
destination-port | Destination port restrictions proxy. |
allow | Allows HTTPS traffic to ports. |
port | Port numbers on which to listen for HTTPS requests (1-65535). |
all | Listens to all ports from 1 to 65535. |
deny | Denies HTTPS traffic to ports. |
proxy | Sets configuration parameters for proxy mode. |
incoming | Sets configuration for incoming proxy-mode requests. |
port | Port numbers on which to listen for HTTPS requests (1-65535). |
outgoing | Sets configuration to direct outgoing requests to another proxy server. |
host | Uses outgoing HTTPS proxy. |
hostname | Hostname of outgoing proxy. |
address | IP address of outgoing proxy. |
port | Port of outgoing proxy (1-65535). |
| HTTPS Proxy Features | Related CLI Commands (Abbreviated Syntax) |
|---|---|
Supports proxy on multiple ports (1-8) | https proxy incoming port_1-65535 . . . (up to 8 ports) |
Shares proxy ports with transparent services | Configure a WCCP service and an HTTPS incoming proxy on the same port. |
Shares proxy ports with other proxy protocol services | https proxy incoming port_1-65535 . . . (up to 8 ports) |
Restricts proxy protocols on specific ports | https destination-port {allow | deny} port_1-65535 ... (up to 8 ports) |
Configures outgoing HTTPS proxy server | proxy-protocols outgoing-proxy exclude . . . |
Original versus default outgoing HTTPS proxy | proxy-protocols transparent {default-server | original-proxy} |
Uses global exclude list(s) for HTTPS proxy | proxy-protocols outgoing-proxy exclude . . . |
Handles in transparent mode an HTTPS request bound for another proxy host | proxy-protocols transparent {default-server | original-proxy} |
The order in which the CLI commands are entered is not important.
The CE with software version 2.2.0 supports HTTPS in the following two scenarios:
In both cases the CE creates a connection to the origin server (directly or through another proxy server) and allows the Web client and origin server to set up an SSL tunnel through the CE.
HTTPS traffic is encrypted, and cannot be interpreted by the CE or any other device between the Web client and the origin server. HTTPS objects are not cached.
Because HTTPS does not provide headers used for most rule matching, the CE can only apply rules that are based on server name, domain name, or server IP address and port. See the "Rules Template" section for other further information.
The CE as an HTTPS proxy server supports up to eight ports. It can share the ports with transparent-mode services and with HTTP. In proxy mode, the CE accepts and services the HTTPS requests on the ports specified with the https proxy incoming command. All HTTPS requests on other proxy-mode ports are rejected in accordance with the error-handling settings on the CE. In transparent mode, all HTTPS proxy-style requests intended for another HTTPS proxy server are accepted. The CE acts on these transparently received requests in accordance with the proxy-protocols transparent command.
When the CE is configured to use an HTTPS outgoing proxy with the https proxy outgoing host command, all incoming HTTPS requests are directed to this outgoing proxy. The proxy-protocols outgoing-proxy exclude command creates a global proxy exclude list effective for all proxy server protocols including HTTPS. The CE applies the following logic when an outgoing proxy server is configured:
When a CE intercepts a proxy request intended for another proxy server and there is no outgoing proxy configured for HTTPS, and the proxy-protocols transparent default-server command is invoked, the CE addresses the request to the destination server directly and not to the client's intended proxy server.
Statistics Reporting
Only connection statistics are reported. Because requests and responses are sent through the secure tunnel, the CE is not able to identify the number of requests sent, or the number of bytes per request. Thus, the request and transaction per second (TPS) statistics are not available for HTTPS.
Transaction Logging
The CE logs HTTPS transactions in the transaction log in accordance with Squid syntax. One log entry is made for each HTTPS connection, though many transactions are performed per connection. The CE is not aware of objects conveyed through the SSL tunnel, only the HTTPS server name,
Syslog and URL Tracking
When URL tracking is enabled, the CE logs HTTPS transaction information to the syslog file. The syslog entries have the prefix <https>. For HTTPS there are no "misses" or "hits." Because the CE ignores objects transferred through an SSL tunnel, there is only one URL tracking entry per HTTPS connection (similar to the transaction log).
In this example, the CE is configured as an HTTPS proxy server, and accepts HTTPS requests on ports 81, 8080, and 8081.
CE(config)# https proxy incoming 81 8080 8081
In this example, the CE is configured to forward HTTPS requests to an outgoing proxy server (10.1.1.1) on port 8880.
CE(config)# https proxy outgoing host 10.1.1.1 8880
In this example, HTTPS destination port connection requests are denied for ports 20, 21, 23, and 119.
CE(config)# https destination-port deny 20 21 23 119
In this example, a domain name is excluded from being forwarded to outgoing proxy server.
CE(config)# proxy-protocols transparent default-server

CE(config)# proxy-protocols outgoing-proxy exclude enable

CE(config)# proxy-protocols outgoing-proxy exclude list cruzio.com
proxy-protocols
http proxy
show proxy-protocols
show http proxy
Use the show https command to display HTTPS proxy status and port policies.
show https {all | destination-port | proxy}
all | All HTTPS related configuration parameters. |
destination-port | Destination port restrictions. |
proxy | Proxy mode configuration. |
console# how https all

Incoming HTTPS proxy:
Not servicing incoming proxy mode connections.
Outgoing HTTPS proxy:
Directing request to proxy server at 1.1.1.1 port 76.
Destination port policies:
  Allow    all
  Allow    111   222   333
  Allow     33    44
  Deny     all
  Deny      20
  Deny      20    21    23   119
show statistics https
Use the show statistics https command to display HTTPS connection statistics.
show statistics httpsconsole# show statistics https
HTTPS Statistics
Total % of Total
---------------------------------------------------
Total connections: 0 -
Connection errors: 0 0.0
Total bytes: 0 -
Bytes received from client: 0 0.0
Bytes sent to client: 0 0.0
show https
An HTTPS Proxy page has been added to the Caching menu, as shown in Figure 2. See the HTTPS online help for further information.
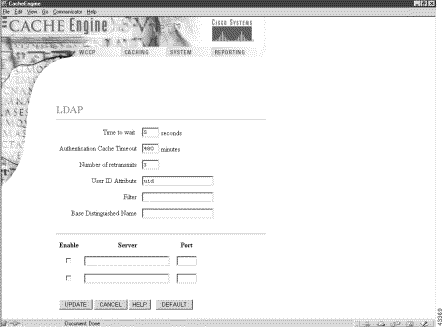
Enterprise system administrators can now use the CE to restrict Internet usage of users with the Lightweight Directory Access Protocol (LDAP). LDAP provides most of the services of the X.500 protocol, with less complexity and overhead. The ldap global configuration command was added to the CLI. Use the no form of the command to disable LDAP functions.
To configure the CE to perform user authentication with an LDAP server, use the ldap global configuration command.
ldap {authcache {auth-timeout minutes | max-entries entries} | client auth-header {401 | 407} | server {allow-mode | base baseword | filter filterword | host {hostname | hostipaddress} port portnumber | retransmit retries | timeout seconds | user-id-attribute useidword}}
authcache | Configures LDAP authentication cache parameters. |
auth-timeout | Sets the timeout value of records in the authentication cache. |
minutes | Specifies length in minutes between the user's last internet access and the removal of their entry from the authorization cache, forcing reauthentication with the LDAP server (30-1440). Default is 480 minutes; minimum is 30 minutes; maximum is 1440 minutes (24 hours). |
max-entries | Sets the maximum number of entries in the authentication cache. |
entries | Specifies the maximum number of entries in the authentication cache (500-32000). Default values are as follows:
Minimum is 50 percent of default value, Maximum is 200 percent of default value. |
client | Configures LDAP client parameters. |
auth-header | Specifies which HTTP header to use for authentication (user ID and password) when the style of the HTTP request indicates that no proxy server is present. Headers can be either HTTP 401 (server authentication) or HTTP 407 (proxy authentication). The default is HTTP 401. |
401 | Uses HTTP 401 to query users for credentials. |
407 | Uses HTTP 407 to query users for credentials. |
server | Configures LDAP server parameters. |
allow-mode | Allows HTTP traffic if the LDAP server does not respond. |
base | Sets the base distinguished name of the starting point for the search in the LDAP database. |
baseword | Specifies th base value. There is no default. |
filter | Sets the LDAP filter for the authentication group. |
filterword | Specifies text for the LDAP filter. There is no default. |
host | Sets host parameters. |
hostname | Specifies host name of the LDAP server. Two servers can be named. |
hostipaddress | Specifies the IP address of the LDAP server. |
port | Sets the TCP port for the LDAP authentication server. |
portnumber | Specifies LDAP server port number (1-65535). The default is 389. |
retransmit | Sets the number of retries to the active server. |
retries | Specifies the number of retries. The default is 3 retries (1-10). |
timeout | Sets the time to wait for an LDAP server to reply. |
seconds | Specifies the waiting time in seconds (1-100). The default is 5 seconds; minimum is 1 second; maximum is 100 seconds. |
user-id-attribute | Sets the User ID attribute on the LDAP server. |
useidword | Specifies the value for the User ID attribute (default is "uid"). |
An LDAP-enabled CE authenticates users with an LDAP server. With an HTTP query, the CE obtains a set of credentials from the user (user ID and password) and compares them against those in an LDAP server.
Software version 2.2.0 implements LDAP version 3 and supports all LDAP features except for Secure Authentication and Security Layer (SASL).
When the CE authenticates a user through the LDAP server, a record of that authentication is stored locally in the CE RAM (authentication cache). As long as the authentication entry is kept, subsequent attempts to access restricted Internet content by that user do not require LDAP server lookups.
The ldap authcache max-entries command sets the maximum number of authentication cache entries retained. The default values are as follows:
The ldap authcache auth-timeout command specifies how long an inactive entry can remain in the authentication cache before it is purged. Once a record has been purged, any subsequent access attempt to restricted Internet content requires an LDAP server lookup for reauthentication.
Proxy Mode LDAP Authentication
The events listed below occur when the CE is configured for LDAP authentication and one of the following two scenarios is true:
1. The CE examines the HTTP headers of the client request to find user information (contained in the Proxy-Authorization header).
2. If no user information is provided, the CE returns a 407 (Proxy Authorization Required) message to the client.
3. The client resends the request, including the user information.
4. The CE searches its authentication cache (based on user ID and password) to see if the client has been previously authenticated.
5. If a match is found, the request is serviced normally.
6. If no match is found, the CE sends a request to the LDAP server to find an entry for this client.
7. If the server finds a match, the CE allows the request to be serviced normally and stores the client's user ID and password in the authentication cache.
8. If no match is found, the CE again returns a 407 (Proxy Authorization Required) message to the client.
Transparent Mode LDAP Authentication
The events listed below occur when the CE is configured for LDAP authentication and both of the following are true:
1. The CE searches its authentication cache to see if the user's IP address has been previously authenticated.
2. If a match is found, the CE allows the request to be serviced normally.
3. If no match is found in the first step, the CE examines the HTTP headers to find user information (contained in the Authorization header).
4. If no user information is provided, the CE returns a 401 (Unauthorized) message to the client.
5. The client resends the request, including the user information.
6. The CE sends a request to the LDAP server to find an entry for this user.
7. If the server finds a match, the CE allows the request to be serviced normally and stores the client's IP address in the authentication cache.
8. If no match is found, the CE again returns a 401 (Unauthorized) message to the client.
In transparent mode, the CE uses the client's IP address as a key for the authentication database.
If you are using LDAP user authentication in transparent mode, it is recommended that the AuthTimeout interval configured with the ldap authcache auth-timeout command be short. IP addresses can be reallocated, or different users can access the Internet through an already authenticated device (PC, workstation, and the like). Shorter AuthTimeout values help reduce the possibility that individuals can gain access using previously authenticated devices. When the CE operates in proxy mode, it can authenticate with the user ID and password.
Allow Mode
Two LDAP servers can be specified with the ldap server host command to provide redundancy and improved throughput. CE load-balancing schemes distribute the requests to the servers.
If the CE cannot connect to either server, no authentication can take place. When the ldap server allow-mode command is invoked, the client is permitted access to the origin server if the LDAP server does not respond within the timeout interval specified with the ldap server timeout command. If allow mode is off (no ldap server allow-mode), users who have not been previously authenticated are denied access.
Security Options
The CE uses simple (nonencrypted) authentication to communicate with the LDAP server. Future expansion may allow for more security options based on SSL, SASL, or certificate-based authentication.
Domain Exclude
To exclude domains from LDAP authentication, define a no-auth rule. LDAP or Remote Authentication User Dial-in Service (RADIUS) authentication takes place only if the site requested does not match the specified pattern. See the "Rules Template" section for more details.
LDAP and RADIUS Considerations
LDAP authentication can be used with Websense URL filtering, but not with RADIUS authentication. Both LDAP and RADIUS rely on different servers, which may require different user IDs and passwords, making RADIUS and LDAP authentication schemes mutually exclusive. Should both RADIUS and LDAP be configured on the CE at the same time, LDAP authentication is executed, not RADIUS authentication.
Hierarchical Caching
In some cases, users are located at branch offices. A CE (CE1) can reside with them in the branch office. Another CE (CE2) can reside upstream, with an LDAP server available to both CEs for user authentication.
|
Note The http append ldap-proxy-auth-header global configuration command must be configured on the downstream CEs to ensure that proxy-authorization information, required by upstream CEs, is not not stripped from the HTTP request by the downstream CEs. |
If branch office user 1 accesses the Internet, and content is cached at CE1, then this content cannot be served to any other branch office user unless that user is authenticated. CE1 must authenticate the local users.
Assuming that both CE1 and CE2 are connected to the LDAP server and authenticate the users, when branch office user 2 firsts requests Internet content, CE1 responds to the request with an authentication failure response (either HTTP 407 if in proxy mode, or HTTP 401 if in transparent mode). User 2 enters the user ID and password, and the original request is repeated with the credentials included. CE1 contacts the LDAP server to authenticate user 2.
Assuming authentication success, and a cache miss, the request along with the credentials is forwarded to CE2. CE2 also contacts the LDAP server to authenticate user 2. Assuming success, CE2 either serves the request out of its cache or forwards the request to the origin server.
User 2 authentication information is now stored in the authentication cache in both CE1 and CE2. Neither CE1 nor CE2 needs to contact the LDAP server for user 2's subsequent requests (unless user 2's entry expires and is removed from the authentication cache).
This scenario assumes that CE1 and CE2 use the same method for authenticating users. Specifically, both CEs must expect the user credentials (user ID and password) to be encoded in the same way.
Hierarchical Caching in Transparent Mode
When the CE operates in transparent mode, the user's IP address is used as a key to the authentication cache. When user 2 sends a request transparently to CE1, after authentication, CE1 will insert its own IP address as the source for the request. Therefore CE2 cannot use the source IP address as a key for the authentication cache.
When CE1 inserts its own IP address as the source, it must also insert an X-Forwarded-For header in the request (http append x-forwarded-for-header command). CE2 must first look for an X-Forwarded-For header. If one exists, that IP address must be used to search the authentication cache. Assuming the user is authenticated at CE2, then CE2 must not change the X-Forwarded-For header, just in case there is a transparent CE3 upstream.
In this scenario, if CE1 does not create an X-Forwarded-For header (for example, if it is not a Cisco CE and does not support this header), then authentication on CE2 will not work.
Hierarchical Caching, CE in Transparent Mode with an Upstream Proxy
In a topology with two CEs, assume that CE1 is operating in transparent mode and CE2 is operating in proxy mode, with the browsers of all users pointing to CE2 as a proxy.
Because the browsers are set up to send requests to a proxy, an HTTP 407 message is sent from CE1 back to each user to prompt for credentials. By using the 407 message, the problem of authenticating based on source IP address is avoided. The user name and password can be used instead.
This mode provides better security than using the HTTP 401 message. The CE examines the style of the address to determine if there is an upstream proxy. If so, the CE uses an HTTP 407 message to prompt the user for credentials even when operating in transparent mode.
Authentication Cache Size Adjustments
If the authentication cache is not large enough to accommodate all authenticated users at the same time, the CE purges older entries that have not yet timed out.
The CE increments statistics that record these events. The show statistics ldap authcache command displays these statistics. When the authentication cache reaches 100% of capacity, a syslog message is generated. If the capacity stays at 100%, no new syslog messages are generated.
Another message is generated only if the capacity drops below 85%, and then returns to 100%. These syslog entries tell the administrator that the authentication cache size limit may need to be increased, assuming that enough system memory is available.
Transaction Logging
Once a user has been authenticated through LDAP, all transaction logs generated by the CE for that user contain user information. If the CE is acting in proxy mode, the user ID is included in the transaction logs. If the CE is acting in transparent mode, the user IP address is included instead.
If the transaction-logs sanitize command is invoked, the user information is suppressed.
Specify an LDAP server with IP address 1.1.1.1 on port 88.
CacheEngine(config)# ldap server host 1.1.1.1 port 88
To delete an LDAP server use the no ldap server command.
CacheEngine(config)# no ldap server host 1.1.1.1
Specify that the CE should use header 407 when asking the end user for authentication credentials (user ID and password).
CacheEngine(config)# ldap client auth-header 407
show ldap
show statistics ldap
clear statistics ldap
debug ldap
Configure the http ldap-proxy-auth-header global configuration command when the CE and an upstream server or proxy is performing LDAP authentication.
http ldap-proxy-auth-header {hostname | ipaddress}
hostname | Hostname of upstream proxy or server that will perform LDAP authentication. |
ipaddress | IP address of upstream proxy or server that will perform LDAP authentication. |
To prevent disclosure of a user's proxy authentication credentials to another host, the CE removes the HTTP Proxy-Authorization header from the HTTP request when it forwards the request. With LDAP authentication it is important that upstream proxies share the authentication credentials carried in the header. To prevent the CE from stripping out the HTTP Proxy-Authorization header, enter the
http append ldap-proxy-auth-header global configuration command. The CE will forward the Proxy-Authorization header with credentials to the specified host name or IP address.
console(config)# http append ?

  ldap-proxy-auth-header  Forward 'Proxy Authorization' headers in outbound
                          requests
  via-header              Include 'Via' header in responses/replies
  x-forwarded-for-header  Notify client-ip-addr to web-server via
                          'X-Forwarded-For' header

console(config)# http append ldap-proxy-auth-header ?

Hostname or A.B.C.D  IP address or hostname of proxy/server to receive proxy-auth headers
console(config)# http append ldap-proxy-auth-header 172.10.1.1
ldap
show ldap
The show ldap command to display the contents of the LDAP authentication cache and the LDAP configuration values.
show ldap {authcache | server}
authcache | Displays the contents of the LDAP authentication cache. |
server | Displays LDAP server information. |
To display the contents of the authentication cache, use the show ldap authcache command.
console# show ldap authcache

AuthCache
=====================
hash   914 : uid: admin nBkt: 0x0 nLRU: 0x0 pLRU: 0x0
             lacc: 964025922 ipAddr: a44247ab keyTp: 1
To display the LDAP configuration options of the CE, use the show ldap server command.
console# show ldap server

LDAP Configuration:
------------------
LDAP Authentication is on
    Timeout             = 5 seconds
    AuthTimeout         = 480 minutes
    Retransmit          = 3
    UserID-Attribute    = uid
    Filter              =
    Base                = ""
    AllowMode           = ENABLED
    ----------------------
    Servers
    -------
    IP 1.1.1.1, Port = 88, State: ENABLED
clear statistics ldap
ldap
show statistics ldap
Use the show statistics ldap command to display authentication and LDAP server related statistics.
show statistics ldap {authcache | server {interface | protocol}}
authcache | Displays LDAP authentication cache statistics. |
server | Displays LDAP server statistics. |
interface | Displays LDAP interface statistics. |
protocol | Displays LDAP protocol response counts. |
To show LDAP statistics, use the show stat ldap server protocol command. The output is displayed for each LDAP server. Because of the large number of protocol responses (about 50), only nonzero statistics are displayed.
CacheEngine# show stat ldap server protocol

     LDAP Server
     ---------------------------------
     1.1.1.1
     LDAP Success:              2005
     LDAP Invalid Syntax:          3
     ---------------------------------
     100.4.5.6
     LDAP Success:               100
     LDAP Undefined Type:          9
     LDAP Unwilling To Perform:    8
To show statistics about access to the LDAP authentication cache, use the show stat ldap authcache command .
CacheEngine# show stat ldap authcache

     Adds                        1308  Deletes                      297
     Hits                       23491  Misses                      1598
     Current Entries Used        1011  No Avail Entry                 0
     Avg.Cache Search             1.3  Max Cache Search Miss          3
     Max Cache Search Hit           2  Dup Add Attempts               0
     Number of Compares         26998  Userid Passwd Too Long         0
The show statistics ldap server interface command shows the LDAP statistics that refer to the interface between the rest of the CE code and the LDAP module. The output is broken down by server.
CacheEngine# show stat ldap server interface

     LDAP Server
     ---------------------------------------
     1.1.1.1
                   Attempts     Successes       Fails
     Connect       0            0               0
     Bind          0            0               0
     Search        0            0               0

     Unknown Password Format:
     ------------------------------------------
     100.4.5.6
                   Attempts     Successes       Fails
     Connect       0            0               0
     Bind          0            0               0
     Search        0            0               0

     Unknown Password Format:
     ----------------------------------------
clear statistics ldap
ldap
show ldap
Use the clear ldap authcache command to purge the CE of all the the LDAP authentication cache entries.
clear ldap authcacheTo purge all the entries in the authentication cache, use the clear ldap authcache command.
console# clear ldap authcache

Entries removed from authcache: 1
show ldap
clear statistics ldap
Use the clear statistics ldap command to reset the LDAP statistic counters.
clear statistics ldap {authcache | server {protocol | interface | all}
authcache | Clears authentication cache statistics. |
server | Clears LDAP server statistics. |
protocol | Clears LDAP protocol statistics. |
interface | Clears LDAP interface statistics. |
all | Clears all LDAP statistics. |
To clear LDAP server statistics, use the clear statistics ldap server command.
CacheEngine# clear statistics ldap server ?

       protocol    Clear LDAP protocol statistics
       interface   Clear LDAP interface statistics
       all         Clear all LDAP statistics
To clear LDAP authentication cache statistics, use the clear statistics ldap authecache command
console# clear statistics ldap authcache

Reset AuthCache Statistics
clear ldap authcache
The debug ldap command was added to the CLI. The no form of the command disables any option.
debug ldap {authcache {all | daemon | entry} | server {all | ber | bind | connect | error | receive | request | trace}}
authcache | Sets LDAP authentication cache debug options. |
server | Sets LDAP server debug options. |
all | Sets all authcache debugging. |
daemon | Debugs the authcache daemon. |
entry | Debugs authentication cache entry processing. |
all | Sets all LDAP debugging. |
ber | LDAP bit error rate debugs. |
bind | LDAP bind debugs. |
connect | LDAP connect debugs. |
error | LDAP application program interface errors. |
receive | LDAP receive debugs. |
request | LDAP request debugs. |
trace | LDAP trace debugs. |
In general, it is recommended that debug commands be used only at the direction of Cisco technical support personnel.
An LDAP page was added to the Caching Menu, as shown in Figure 3. See the LDAP online help for further information.
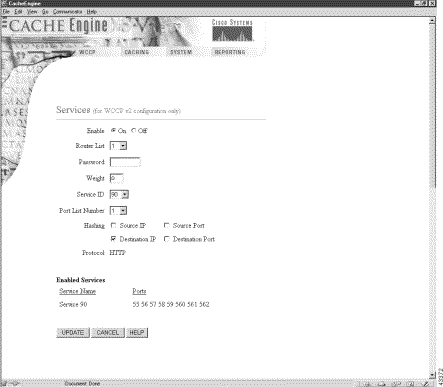
When operating with WCCP version 2, software version 2.2.0 allows the CE to receive and service HTTP and HTTPS requests transparently on multiple ports. The wccp port-list and the
wccp service-number global configuration commands were added to the CLI.
Use the wccp port-list global configuration command to associate ports with specific WCCP generic services.
wccp port-list listnum portnum
listnum | Port list number (1-8). |
portnum | Port number. Up to eight ports per list number are allowed (1-65535). |
Up to 8 port numbers can be included in a single port list. The port list is referenced by the
wccp service-number command that configures a specific WCCP generic service (90-97) to operate on those ports included in the port list.
In the following example, ports 10, 200, 3000, 110, 220, 330, 440 and 40000 are included in port list 3.
console(config)# wccp port-list 3 10 200 3000 110 220 330 440 40000
wccp service-number
Use the wccp service-number command to enable up to eight generic WCCP redirection services on the CE. The services must also be configured on the router running WCCP Version 2.
wccp service-number servnumber router-list-number routnumber port-list-number plistnumber
service-number | Specifies the generic WCCP Version 2 |
servnumber | WCCP Version 2 service number (90-97). |
router-list-number | Specifies the router list number. |
routnumber | Router list number (1-8). |
port-list-number | Specifies the port list number. |
plistnumber | Port list number (1-8). |
hash-destination-ip | (Optional.) Load-balancing hash—destination IP (default). |
hash-destination-port | (Optional.) Load-balancing hash—destination port. |
hash-source-ip | (Optional.) Load-balancing hash—source IP. |
hash-source-port | (Optional.) Load-balancing hash—source port. |
password | (Optional.) Specifies authentication password. |
passw | Password. |
weight | (Optional.) Sets weight percentage for load balancing (0-100). |
Proxy Mode
The CE supports up to eight incoming ports for HTTPS and eight incoming ports for HTTP. The incoming proxy ports can be the same ports that are used by the transparent-mode services. The incoming proxy ports can be changed without stopping any WCCP services running on the CE or on other CEs in the farm.
The CE parses requests received on a port to determine the protocol to be serviced. If the CE is not configured to support a received protocol, the proxy server returns an error. For example, if port 8080 is configured to run an HTTP and HTTPS proxy service, a File Transfer Protocol (FTP) request coming to this port is rejected.
Some TCP ports are reserved for system or network services (for example the CE FTP server and GUI) and cannot be used for proxying services in transparent mode or in proxy mode. If more than eight ports are required, the administrator can configure multiple custom WCCP services. Intercepted HTTP and HTTPS requests addressed to other proxy servers (received on transparent-mode ports) are serviced according to the proxy-protocols transparent command parameters.
Transparent Mode
The wccp service-number command can enable up to eight WCCP redirection services on a CE, provided that the services are also configured on the router. There are eight new generic WCCP services (90 to 97).
Each wccp service-number command specifies a router list, single port list (containing up to eight ports), hash parameters, password, and weight. With eight custom services using a maximum number of eight ports each, the maximum number of ports that can be specified for transparent redirection is 64.
The legacy custom web cache and reverse proxy services (service numbers 98 and 99) can be configured with only one port each. If only one legacy service is configured, the total maximum number of transparent redirection ports is 57. If both legacy services are configured, the maximum port total is 50.
All ports receiving HTTP that are configured as members of the same WCCP service share the following characteristics:
With CEs in a farm, the following restrictions apply:
The CE WCCP implementation currently allows global settings that apply to all WCCP services, such as healing parameters, slow start, and others. The multiple service model does not change that, and the settings in question remain global for the whole WCCP system.
Modifying Configurations
For proxy mode and transparent-mode commands, issuing a new command replaces the old one.
In proxy-mode, a no command that specifies the protocol and no ports disables the service for that protocol. To add or remove ports in proxy mode, issue a new command that specifies all the ports to be used. Ports can also be removed by a no command with a list of ports to remove. A no command that specifies only some of the configured ports removes these ports from the list, and the service continues to run on the remaining ports. For example, if HTTPS is received on 8080, 8081, and 82, the
no https proxy incoming 8081 command disables port 8081 but permits the HTTPS proxy service to continue on ports 8080 and 82.
In transparent-mode, to add or remove ports for a WCCP service, modify the port-list or create a new port list for the WCCP service.
In transparent mode, a no command that specifies the WCCP service number disables the service.
In the following example, WCCP generic service 90 is configured with router list 1, and port list 1. Port 8080 is the only element in port list 1.
CE(config)# wccp 90 router-list-num 1 port-list-number 1 hash-source-ip
hash-destination-port


CE(config)# wccp port-list 1 8080
In this example, the CE is configured to accept HTTP and HTTPS proxy requests on ports 81, 8080 and 8081:
CE(config)# http proxy incoming 81 8080 8081

CE(config)# https proxy incoming 81 8080 8081
The show wccp services was added to the CLI.
https proxy incoming
http proxy incoming
proxy-protocols
show https proxy
show http proxy
show services
A Services page has been added to the WCCP menu, as shown in Figure 4. See the Services online help for further information.
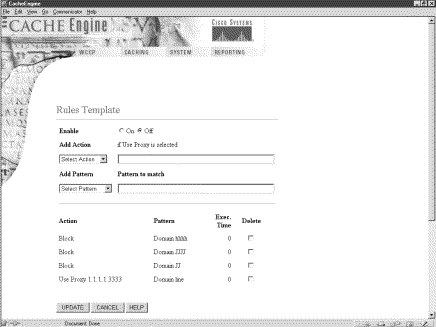
The Rules Template feature provides the administrator a flexible mechanism to configure caching and proxy behaviors. You specify a set of rules, each with a pattern and an action. For every incoming HTTP request, if a rule's pattern matches the request, the corresponding action of the rule is taken. The CLI syntax can be generalized as follows:
Define a rule: Rule action pattern-type patterns
Remove a rule: No rule action pattern-type patterns
A pattern can be URLs, domain names, IP addresses, port numbers, MIME types, or regular expressions. The rule global configuration command has been added to the CLI.
Use the rule global configuration command to set the rules by which the CE filters web traffic.
rule { block options | enable | no-auth options | no-cache options | no-proxy options | refresh options | selective-cache options | use-proxy options}
enable | Enables rules processing. |
block | Action—Blocks the request. |
no-auth | Action—Does not authenticate. |
no-cache | Action—Does not cache the object. |
no-proxy | Action—Does not use any upstream proxy. |
refresh | Action—Revalidates the object with the Web server. |
selective-cache | Action—Caches this object if permitted by HTTP. |
use-proxy | Action—Uses a specific upstream proxy. |
hostname | Host name of the specific proxy. |
ipaddress | IP address of the specific proxy. |
port | Port number of the specific proxy (1-65535). |
domain | Pattern type—Regular expression to match the domain name. |
dst-ip | Pattern type—Destination IP address of the request. |
d_ipaddress | Destination IP address of the request. |
d_subnet | Destination IP subnet mask. |
dst-port | Pattern type—Destination port number. |
port | Destination port number (1-65535). |
mime-type | Pattern type—MIME type to be matched with the Content-Type HTTP header. |
src-ip | Pattern type—Source IP address of the request. |
s_ipaddress | Source IP address of the request. |
s_subnet | Source IP subnet mask. |
url-regex | Pattern Type—Regular expression to match a substring of the URL. |
LINE | Pattern—Regular expression. |
A rule is a pattern and an action. If an HTTP request matches the pattern, the corresponding action is performed on the request.
A pattern defines the limits of an HTTP request; for instance, a pattern may specify that the source IP address fall in the subnet range 172.69.*.*.
An action is something the CE performs when processing an HTTP request, for instance, blocking the request, using an alternative proxy, and so forth.
Rules can be dynamically added, displayed, or deleted from the CE. The rules are preserved across reboots because they are written into persistent storage such as NVRAM. Only the system resources limit the number of rules the CE can support. Because rules consume resources, the the more rules there are defined, the more CE performance may be affected.
Actions
The Rules Template feature supports eight actions as follows:
|
Note The commands rule no-proxy and rule use-proxy take precedence over http proxy outgoing. |
Rules are ORed together. Multiple rules may all match a request; then all actions are taken, with precedence among conflicting actions. Each rule contains one pattern; patterns cannot be ANDed together. In future releases, ANDed patterns may be supported.
|
Note Because the MIME type exists only in the response, only the actions refresh , no-cache, and selective-cache apply to a rule of MIME type. |
It is possible to circumvent some rules. For example, to circumvent a rule with the domain pattern, just enter the Web server's IP address instead of the domain name in the browser. A rule may have unintended effects. For instance, a rule with the domain pattern specified as "ibm" that is intended to match "www.ibm.com" can also match domain names like www.ribman.com.
An src-ip rule may not apply as intended to requests that are received from another proxy because the original client IP address is in an X-fowarded-for header.
Patterns
The Rules Template feature supports six types of patterns, with the following names and functions.
|
Note In regular expression syntax, the dollar sign "$" metacharacter directs that a match is made only when the pattern is found at the end of a line. |
Multiple patterns can be input on the same line. If any of them matches the incoming HTTP request, the corresponding action is taken.
CacheEngine(config)# rule block domain \.foo.com ?

 LINE    <cr>

CacheEngine(config)# rule block domain \.foo.com bar.com

CacheEngine(config)#

CacheEngine(config)# rule no-cache url-regex \.*cgi-bin.* ?

 LINE     <cr>
CacheEngine(config)# rule no-cache url-regex \.*cgi-bin.*

CacheEngine(config)#

CacheEngine(config)# rule no-cache dst-ip 172.77.120.0 255.255.192.0
Most actions do not have any parameters, as in the preceding examples. One exception is use-proxy, as in the following example.
CacheEngine(config)# rule use-proxy ?

 Hostname or A.B.C.D. IP address of the specific proxy
CacheEngine(config)# rule use-proxy CE.foo.com ?

<1-65535>  Port number of the specific proxy
CacheEngine(config)# rule use-proxy CE.foo.com 8080 ?

  domain     Regular expression to match with the domain name
  dst-ip     Destination IP address of the request
  dst-port   Destination port number
  src-ip     Source IP address of the request
  url-regex  Regular expression to substring match with the URL
CacheEngine(config)# rule use-proxy CE.foo.com 8080 url-regex ?

 LINE  Regular expression to substring match with the URL
CacheEngine(config)# rule use-proxy CE.foo.com 8080 url-regex .*\.jpg$ ?

 LINE     <cr>
CacheEngine(config)# rule use-proxy CE.foo.com 8080 url-regex .*\.jpg$ .*\.gif$ .*\.pdf$

CacheEngine(config)#
Other branches of the rule command work similarly to the above examples.
To delete rules, use no in front of the rule creation command.
CacheEngine(config)#no rule block url-regex .*\.jpg$ .*\.gif$ .*\.pdf$

CacheEngine(config)#
bypass static
clear statistics rule
http proxy outgoing
proxy-protocols outgoing exclude
show rule
show statistics rule
url-filter
Use the show rule command to display rule definitions and to determine rule processing status.
show rule {action {action-type {all | pattern pattern-type}} | all}
action | Specifies which rules to show. |
all | Shows all the rules. |
Action type |
|
block | Specify block rule to show. |
no-auth | Shows Do not authenticate rules. |
no-cache | Shows no-cache rules. |
no-proxy | Shows no-proxy rules. |
refresh | Revalidates the object with the Web server. |
selective-cache | Caches this object. |
use-proxy | Uses a specific upstream proxy. |
Pattern type |
|
domain | Regular expression to match with the domain name. |
dst-ip | Destination IP address of the request. |
dst-port | Destination port number. |
mime-type | MIME type to be matched with the Content-Type. |
src-ip | Source IP address of the request. |
url-regex | Regular expression to substring match with the URL. |
console# show rule all

Rules Template Configuration
----------------------------
Rule Processing Enabled
rule block dst-port 33
rule block domain ethel.com
rule no-auth domain giggle.com
rule no-cache domain fred.com
To display all the rules, use the show rule command as follows:
CacheEngine# show rule ?

 all              show all the rules
 action           show all the rules with the same action
CacheEngine# show rule action ?

  block            Block the request
  no-auth          Do not authenticate
  no-cache         Do not cache the object
  no-proxy         Do not use any upstream proxy
  refresh          Revalidate the object with the web server
  selective-cache  Cache this object
  use-proxy        Use a specific upstream proxyCacheEngine
CacheEngine# show rule action use-proxy ?

 all                  show all the rules
 pattern              show all the rules with a specific type of pattern
CacheEngine# show rule action use-proxy pattern ?

  domain     Regular expression to match with the domain name
  dst-ip     Destination IP address of the request
  dst-port   Destination port number
  src-ip     Source IP address of the request
  url-regex  Regular expression to substring match with the URL
CacheEngine# show rule action use-proxy pattern url-regex

  Action : use-proxy 171.64.1.2 port 8080
  Pattern : url-regex \.jpg$ \.gif$ \.pdf$
...
rule
show statistics rule
clear statistics rule
The show statistics rule command was added to the CLI.
show statistics rule {action {action-type {all | pattern pattern-type}} | all}See the "show rule Command" section for an explanation of key words.
To display all rules, use the show statistics rule all command.
console# show statistics rule all

Rules Template Statistics
-------------------------
Rule hit count = 0   Rule: rule block dst-port 33
Rule hit count = 0   Rule: rule block domain sample1.com
Rule hit count = 0   Rule: rule no-auth domain sample2.com
Rule hit count = 0   Rule: rule no-cache domain .foo.com

CacheEngine# show statistics rule ?

 all              show all the rules
 action           show all the rules with the same action
CacheEngine# show statistics rule action ?

  block            Block the request
  no-auth          Do not authenticate
  no-cache         Do not cache the object
  no-proxy         Do not use any upstream proxy
  refresh          Revalidate the object with the web server
  selective-cache  Cache this object
  use-proxy        Use a specific upstream proxy
CacheEngine# show statistics rule action no-cache ?

 all                  show all the rules
 pattern              show all the rules with the same type of pattern
CacheEngine#show statistics rule action no-cache pattern ?

  domain     Regular expression to match with the domain name
  dst-ip     Destination IP address of the request
  dst-port   Destination port number
  mime-type  MIME type to be matched with the Content-Type
  src-ip     Source IP address of the request
  url-regex  Regular expression to substring match with the URL
CacheEngine# show statistics rule action no-cache pattern domain

  Action : no-cache
  Pattern : domain .foo.com
  Time executed : 35  12  77
...
rule
show rule
clear statistics rule
To reset the rule statistics counters, use the clear statistics rule EXEC command.
The show statistics rule command was added to the CLI.
clear statistics rule {action {action-type {all | pattern pattern-type}} | all}See the "show rule Command" section for an explanation of key words.
To clear all rule statistics, use the clear statistics rule all command.
console# clear statistics rule all
rule
show rule
show statistics rule
The debug rule EXEC command has been added to the CLI.
It is recommended that the debug rule command only be used at the direction of Cisco technical support personnel.
A Rules Template page has been added to the System menu, as shown in Figure 5. See the Rules Template online help for further information.
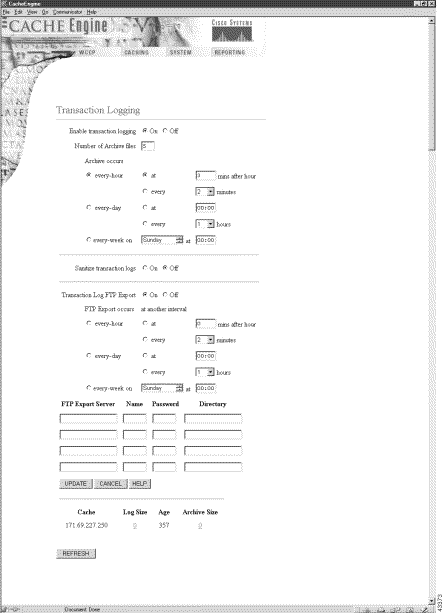
The new Transaction Log feature allows the administrator to schedule the archive and export of transaction log files in terms of specific days, hours, minutes, and seconds rather than in minutes and seconds only.
To schedule the archive and export of transaction log files to an FTP server, use the transaction-logs global configuration command. To disable transaction log features, use the no form of the command.
transaction-logs {archive options | enable | export options | file-marker | sanitize}
archive | Configures archive parameters. |
enable | Enables transaction log feature. |
export | Configures file export parameters. |
file-marker | Adds statements to translog indicating the file begin and end. |
sanitize | Masks end user identities in log file. |
options | See the expanded form of the command that follows. |
archive | Configures archive parameters. |
files | Saves archive log files to disk. |
maxnumfiles | Maximum number of archive files to save on disk (1-10). The default is 1. |
interval | Determines how frequently the archive file is to be saved. |
seconds | Time interval in seconds (120-86400). The default is 86,400 seconds (1 day). |
every-day | Archives using frequencies of 1 day or less. |
at time | Specifies the time of day at which to archive in hours and minutes (hh:mm). |
every hour | Interval in hours (1, 2, 3, 4, 6, 8, 12 or 24). |
every-hour | Archives using frequencies of 1 hour or less. |
at minute | Specifies the minute alignment for the hourly archive (0-59). |
every interval | Interval in minutes (2, 10, 15, 20, 30). |
every-week | Archives one or more times a week. |
on days | (Optional). Archives one or more days of the week (mon, tue, wed, thu, fri, sat, sun). |
at time | (Optional). Specifies the time of day at which to archive in hours and minutes (hh:mm). |
enable | Enables transaction log feature. |
export | Configures file export parameters. |
enable | Enables the exporting of log files at the specified interval. |
ftp-server | Sets FTP server to receive exported archived files. |
hostname | Host name of target FTP server. |
servipaddrs | IP address of target FTP server. |
login | User login to target FTP server. |
passw | User password to target FTP server. |
directory | Target directory for exported files on FTP server. |
interval | Transfers files to the FTP server after this interval. |
minutes | Export time interval in minutes (1-10,080). The default is 60 minutes. |
every-day | Exports using frequencies of 1 day or less. |
at time | Specifies the time at which to export each day in hours and minutes (hh.mm). |
every hour | Interval in hours (1, 2, 3, 4, 6, 8, 12, or 24). |
every-hour | Exports using frequencies of 1 hour or less. |
at minute | Specifies the minute alignment for the hourly archive (0-59). |
every interval | Interval in minutes (2, 10, 15, 20, or 30). |
every-week | Exports one or more times a week. |
on days | (Optional). Exports on one or more days of the week (mon, tue, wed, thu, fri, sat, sun). |
at time | (Optional). Specifies the time of day at which to export in hours and minutes (hh:mm). |
file-marker | Adds statements to translog indicating the file begin and end. |
sanitize | Writes user IP addresses in log file as 0.0.0.0. |
The transaction log archive and export functions are configured with the following commands:
The following limitations apply:
Configuring Intervals Between 1 Day and 1 Hour.
The interval can be set for once an day with a specific timestamp. It can also be set for frequencies of hours; these frequencies align with midnight. For example, every 4 hours means archiving will occur at 0000, 0400, 0800, 1200, 1600 and the like. It is not possible to archive at 0030, 430, 830, and so forth.
cepro(config)# transaction-logs archive interval every-day ?

  at        Specify the time at which to archive each day
  every     Specify the interval in hours. It will align with midnight

cepro(config)# transaction-logs archive interval every-day at ?

hh:mm  Time of day at which to archive (hh:mm)

cepro(config)# transaction-logs archive interval every-day every ?

<1-24>  Interval in hours: {1, 2, 3, 4, 6, 8, 12 or 24}
Scheduling Intervals of 1 Hour or Less
The interval can be set for once an hour with a minute alignment. It can also be set for frequencies of less than an hour; these frequencies will align with the top of the hour. That is, every 5 minutes means archiving will occur at 1700, 1705, and 1710.
cepro(config)# transaction-logs archive interval every-hour ?

  at     Specify the time at which to archive each day
  every     Specify interval in minutes. It will align with top of the hour

cepro(config)# transaction-logs archive interval every-hour at ?

<0-59>  Specify the minute alignment for the hourly archive
Scheduling Weekly Intervals
The interval can be set for once a week or multiple times within the week. For example, it is possible to archive "every Sunday at 0630" or "every Monday, Wednesday, and Friday at 1900". The administrator can select as many days as they wish, including all 7 days. Note that is it not possible to schedule the interval for different times on different days.
cepro(config)# transaction-logs archive interval every-week ?

  on  Day of the week
  <cr>

cepro(config)# transaction-logs archive interval every-week on ?

  DAY  Day of week to archive

cepro(config)# transaction-logs archive interval every-week on Monday ?

  DAY  Day of week to archive
  at   Specify the time of day at which to archive
  <cr>

cepro(config)# transaction-logs archive interval every-week on Monday Friday at ?
  hh:mm  Time of day at which to archive (hh:mm)
clear transaction-log
show transaction-logging
show statistics transaction-logs
transaction-log force
archive | Forces the archive of the working.log file. |
export | Forces the archived files to be exported to a server. |
The transaction-log force archive command causes the transaction log to be archived immediately to the CE hard disk. This command has the same effect as the clear transaction-log command.
The transaction-log force export command causes the transaction log to be exported immediately to an FTP server designated by the transaction-logs export ftp-server command.
The force commands do not change the configured schedule for archive or export of transaction log files. If a scheduled archive or export job is executing when a corresponding force command is entered, an error message is displayed. If a force command is executing when an archive or export job is scheduled to run, the scheduled job executes when the force command is complete.
console# transaction-log force archive

Starting transaction-log force archive command
Completed transaction-log force archive command
transaction-logs
clear statistics transaction-logs
clear transaction-log
show statistics transaction-logs
show transaction-logging
The Transaction Logging page in the Caching menu has been updated, as shown in Figure 6. See the Transaction Logging online help for further information.
The Storage Array hard disks are shipped without formatting or partitions. You must enter the disk manufacture EXEC command for each newly installed hard disk. Use the disk, cfs, and dosfs EXEC commands for subsequent maintenance of the disks.
Perform the following procedure when installing a new hard disk for the Cisco Storage Array:
Step 2 Power up the Storage Array, and then power up the CE.
Step 3 Make a note of the target numbers of any new disk drive that did not mount. The target number is the value of the "t" parameter in the disk volume name.
Determine the target numbers of the unmounted disks with one of the following methods:
CacheEngine# show cfs volumes

/c0t0d0s3: mounted

/c0t1d0s3: mounted

/c0t2d0s3: not mounted

/c0t3d0s3: not mounted

/c0t4d0s3: not mounted

/c0t5d0s3: not mounted
/c0t6d0s3: not mounted

/c0t7d0s3: not mounted
Thu Dec 31 16:06:50 1987: CFS volume /c0t2d0s3 mount failed S_cfslib_NOT_CFS_PARTITION

Thu Dec 31 16:06:50 1987: CFS volume /c0t3d0s3 mount failed S_cfslib_NOT_CFS_PARTITION

Thu Dec 31 16:06:50 1987: CFS volume /c0t4d0s3 mount failed S_cfslib_NOT_CFS_PARTITION

Thu Dec 31 16:06:50 1987: CFS volume /c0t5d0s3 mount failed S_cfslib_NOT_CFS_PARTITION

Thu Dec 31 16:06:50 1987: CFS volume /c0t6d0s3 mount failed S_cfslib_NOT_CFS_PARTITION

Thu Dec 31 16:06:50 1987: CFS volume /c0t7d0s3 mount failed S_cfslib_NOT_CFS_PARTITION
Step 4 Enter the disk manufacture command for each new hard disk to be installed.
In the following example, the disks with target numbers 2 and 3 are partitioned, formatted, and mounted with the disk manufacture EXEC command.
CacheEngine# disk manufacture /c0t2d0

total size of disk = 35843670

CISCO_UVFAT_1 vol /c0t2d0s1 part_off 0 part_siz 0

Skipping creation of DOS partition for SCSI device

CISCO_BFS_1 vol /c0t2d0s2 part_off 10 part_siz 1024

CISCO_CFS_1 vol /c0t2d0s3 part_off 1044 part_siz 35842616

CacheEngine# disk manufacture /c0t3d0

total size of disk = 35843670

CISCO_UVFAT_1 vol /c0t3d0s1 part_off 0 part_siz 0

Skipping creation of DOS partition for SCSI device

CISCO_BFS_1 vol /c0t3d0s2 part_off 10 part_siz 1024

CISCO_CFS_1 vol /c0t3d0s3 part_off 1044 part_siz 35842616
Step 5 Enter the show cfs volumes command to verify that the disks are mounted.
CacheEngine# show cfs volumes

/c0t0d0s3: mounted
/c0t1d0s3: mounted
/c0t2d0s3: mounted
/c0t3d0s3: mounted
Use the disk manufacture command to partition, format, and mount new disk drives in the Cisco Storage Array.
disk manufacture device_name
device_name | Specify the device name of the disk drive with the following syntax: /cn1tn2dn3
The device name is the same as the volume name, but the device name does not include a partition parameter (the "s" number). |
Target numbers are not statically mapped to a SCSI ID or a slot number. Upon bootup, the CE SCSI driver always scans the SCSI bus in the same direction and assigns logical target numbers to disks in simple numerical sequence according to their order on the SCSI bus. The first disk drive discovered on the SCSI bus is designated target 0; the second target 1; the third target 2; and so on. Targets 0 and 1 are the CE internal disk drives.
Cisco Storage Array Guidelines
Targets 2 through 13 are assigned to Storage Array disk drives. The leftmost hard disk inserted in a Storage Array bus is always target 2. Counting to the right, the next disk is target 3, the next disk is target 4, and so on. There can be empty slots between targets on the same bus, but this is not recommended. In a two-host, split-bus configuration, each bus is counted independently.
For example, in a split-bus, six-disk, fully populated Storage Array, bus 0 disk drive targets are 2, 3, 4, and bus 1 disk drive targets are 2, 3, 4. If the first disk on bus 1 is removed (slot 5 is empty) and the Cache Engine rebooted, bus 0 targets are still 2, 3, 4, but bus 1 targets are 2 and 3. The empty disk slot is skipped, and the target count begins with the first detected disk on bus 1.
Once a disk drive has been partitioned and formatted, it can be used in any Storage Array slot, but moving a disk drive from one slot to another makes the data it contains unusable to the CE. Power cycle the Cache Engine if the following actions occur while the Storage Array is in operation:
In the following example, cache1 and cache2 are CE 570 machines running software release 2.2.0. Refer to the Cisco Storage Array Installation and Configuration Guide for further information on configuring the Storage Array.
|
Note The larger the storage capacity of the disk drive, the longer the duration of the disk manufacture routine. |
In this example, six Storage Array disk drives are initialized in a single-host, joined-bus Storage Array configuration.
cache1# disk manufacture /c0t2d0

cache1# disk manufacture /c0t3d0

cache1# disk manufacture /c0t4d0

cache1# disk manufacture /c0t5d0

cache1# disk manufacture /c0t6d0

cache1# disk manufacture /c0t7d0
In the following example, cache1 is connected to the SCSI 0 connector of the Storage Array and cache2 is connected to the SCSI 1 connector.
The disks of a fully populated six-disk Storage Array are initialized in a two-host, split-bus configuration.
cache1# disk manufacture /c0t2d0

cache1# disk manufacture /c0t3d0

cache1# disk manufacture /c0t4d0


cache2# disk manufacture /c0t2d0

cache2# disk manufacture /c0t3d0

cache2# disk manufacture /c0t4d0
show disks
show disk-partitions
cfs
disk
dosfs
The following sections describe caveats still open at the printing of these release notes.
The following section describes caveats from previous releases that are resolved in Release 2.2.0.
console(config)# no wccp web-cache

console(config)# wccp web-cache router-list 1
Cisco Cache Engine User Guide, Version 2.1.0
Release Notes for Cisco Cache Engine 500 Series, Software Version 2.1.0
Release Notes for Cisco Cache Engine Software, Release 2.1.3
Cisco Storage Array Installation and Configuration Guide
Release Notes for the Cisco Storage Array
Regulatory Compliance and Safety Information for Cisco Cache Engine 500 Series
Cisco provides Cisco Connection Online (CCO) as a starting point for all technical assistance. Warranty or maintenance contract customers can use the Technical Assistance Center. All customers can submit technical feedback on Cisco documentation using the Web, e-mail, a self-addressed stamped response card included in many printed docs, or by sending mail to Cisco.
Cisco continues to revolutionize how business is done on the Internet. Cisco Connection Online is the foundation of a suite of interactive, networked services that provides immediate, open access to Cisco information and resources at anytime, from anywhere in the world. This highly integrated Internet application is a powerful, easy-to-use tool for doing business with Cisco.
CCO's broad range of features and services helps customers and partners to streamline business processes and improve productivity. Through CCO, you will find information about Cisco and our networking solutions, services, and programs. In addition, you can resolve technical issues with online support services, download and test software packages, and order Cisco learning materials and merchandise. Valuable online skill assessment, training, and certification programs are also available.
Customers and partners can self-register on CCO to obtain additional personalized information and services. Registered users may order products, check on the status of an order and view benefits specific to their relationships with Cisco.
You can access CCO in the following ways:
You can e-mail questions about using CCO to cco-team@cisco.com.
The Cisco Technical Assistance Center (TAC) is available to warranty or maintenance contract customers who need technical assistance with a Cisco product that is under warranty or covered by a maintenance contract.
To display the TAC web site that includes links to technical support information and software upgrades and for requesting TAC support, use www.cisco.com/techsupport.
To contact by e-mail, use one of the following:
| Language | E-mail Address |
|---|---|
English | tac@cisco.com |
Hanzi (Chinese) | chinese-tac@cisco.com |
Kanji (Japanese) | japan-tac@cisco.com |
Hangul (Korean) | korea-tac@cisco.com |
Spanish | tac@cisco.com |
Thai | thai-tac@cisco.com |
In North America, TAC can be reached at 800 553-2447 or 408 526-7209. For other telephone numbers and TAC e-mail addresses worldwide, consult the following web site: http://www.cisco.com/warp/public/687/Directory/DirTAC.shtml.
If you are reading Cisco product documentation on the World Wide Web, you can submit technical comments electronically. Click Feedback in the toolbar and select Documentation. After you complete the form, click Submit to send it to Cisco.
You can e-mail your comments to bug-doc@cisco.com.
To submit your comments by mail, for your convenience many documents contain a response card behind the front cover. Otherwise, you can mail your comments to the following address:
Cisco Systems, Inc.
Document Resource Connection
170 West Tasman Drive
San Jose, CA 95134-9883
We appreciate and value your comments.
You can access the most current Cisco documentation on the World Wide Web at http://www.cisco.com, http://www-china.cisco.com, or http://www-europe.cisco.com.
Cisco documentation and additional literature are available in a CD-ROM package, which ships with your product. The Documentation CD-ROM is updated monthly. Therefore, it is probably more current than printed documentation. The CD-ROM package is available as a single unit or as an annual subscription.
Registered CCO users can order the Documentation CD-ROM and other Cisco Product documentation through our online Subscription Services at http://www.cisco.com/cgi-bin/subcat/kaojump.cgi.
Nonregistered CCO users can order documentation through a local account representative by calling Cisco's corporate headquarters (California, USA) at 408 526-4000 or, in North America, call 800 553-NETS (6387)
This document is to be used in conjunction with the documents listed in the "Obtaining Documentation" section.
Access Registrar, AccessPath, Any to Any, Are You Ready, AtmDirector, Browse with Me, CCDA, CCDE, CCDP, CCIE, CCNA, CCNP, CCSI, CD-PAC, the Cisco logo, Cisco Certified Internetwork Expert logo, CiscoLink, the Cisco Management Connection logo, the Cisco NetWorks logo, the Cisco Powered Network logo, Cisco Systems Capital, the Cisco Systems Capital logo, Cisco Systems Networking Academy, the Cisco Systems Networking Academy logo, the Cisco Technologies logo, Fast Step, FireRunner, Follow Me Browsing, FormShare, GigaStack, IGX, Intelligence in the Optical Core, Internet Quotient, IP/VC, IQ Breakthrough, IQ Expertise, IQ FastTrack, IQ Readiness Scorecard, The IQ Logo, Kernel Proxy, MGX, Natural Network Viewer, NetSonar, Network Registrar, the Networkers logo, Packet, PIX, Point and Click Internetworking, Policy Builder, Precept, RateMUX, ReyMaster, ReyView, ScriptShare, Secure Script, Shop with Me, SlideCast, SMARTnet, SVX, The Cell, TrafficDirector, TransPath, VlanDirector, Voice LAN, Wavelength Router, Workgroup Director, and Workgroup Stack are trademarks; Changing the Way We Work, Live, Play, and Learn, Empowering the Internet Generation, The Internet Economy, and The New Internet Economy are service marks; and Aironet, ASIST, BPX, Catalyst, Cisco, Cisco IOS, the Cisco IOS logo, Cisco Systems, the Cisco Systems logo, the Cisco Systems Cisco Press logo, CollisionFree, Enterprise/Solver, EtherChannel, EtherSwitch, FastHub, FastLink, FastPAD, FastSwitch, GeoTel, IOS, IP/TV, IPX, LightStream, LightSwitch, MICA, NetRanger, Post-Routing, Pre-Routing, Registrar, StrataView Plus, Stratm, TeleRouter, and VCO are registered trademarks of Cisco Systems, Inc. or its affiliates in the U.S. and certain other countries. All other trademarks mentioned in this document are the property of their respective owners. The use of the word partner does not imply a partnership relationship between Cisco and any other company. (0005R)
Copyright © 2000, Cisco Systems, Inc.
All rights reserved.
![]()
![]()
![]()
![]()
![]()
![]()
![]()
![]()
Posted: Tue Jun 5 19:26:26 PDT 2001
All contents are Copyright © 1992--2001 Cisco Systems, Inc. All rights reserved.
Important Notices and Privacy Statement.