Note The most current Cisco documentation for released products is available on Cisco.com at
http://www.cisco.com. The online documents may contain updates and modifications made after the
hardcopy documents were printed.
Caution If you will have more than 40 gigabytes (GB) of content, do not upgrade the Content Distribution Manager to Cisco Application and Content Networking Software (ACNS), Release 4.0.3 at this time. A known defect exists that will prevent you from restoring the content from tape backup. See caveat CSCdv81077 in the "Caveats" section for more information.
This section describes the procedure for moving Content Engines and Content Routers from one Content Distribution Manager administrative domain to another.
To move a device between administrative Content Distribution Manager domains, you must perform the following actions:
1. Reset the device to factory settings.
2. Remove the device from the current administrative Content Distribution Manager domain.
3. Assign a new administrative Content Distribution Manager domain, using the Installation Wizard graphical user interface (GUI) or ACNS 4.0.3 software command-line interface (CLI).
4. Approve the device in the new administrative Content Distribution Manager domain.
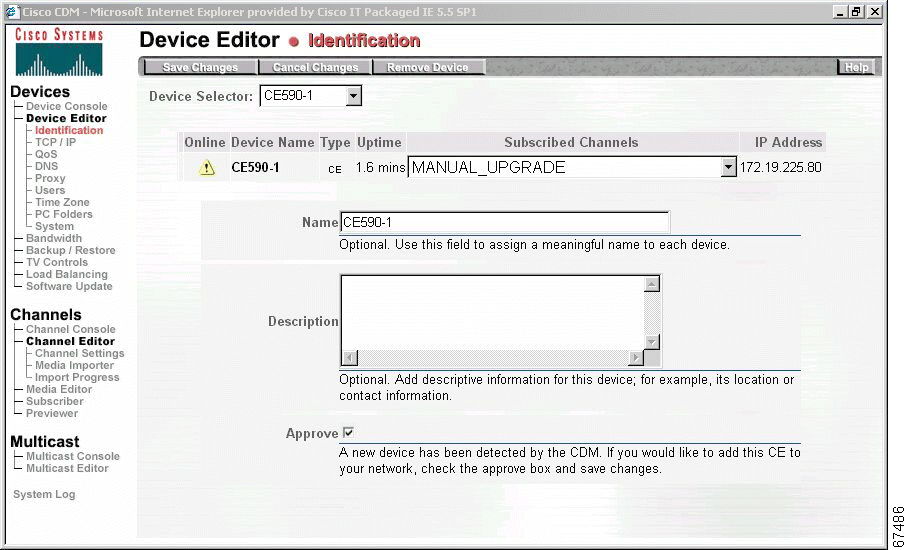
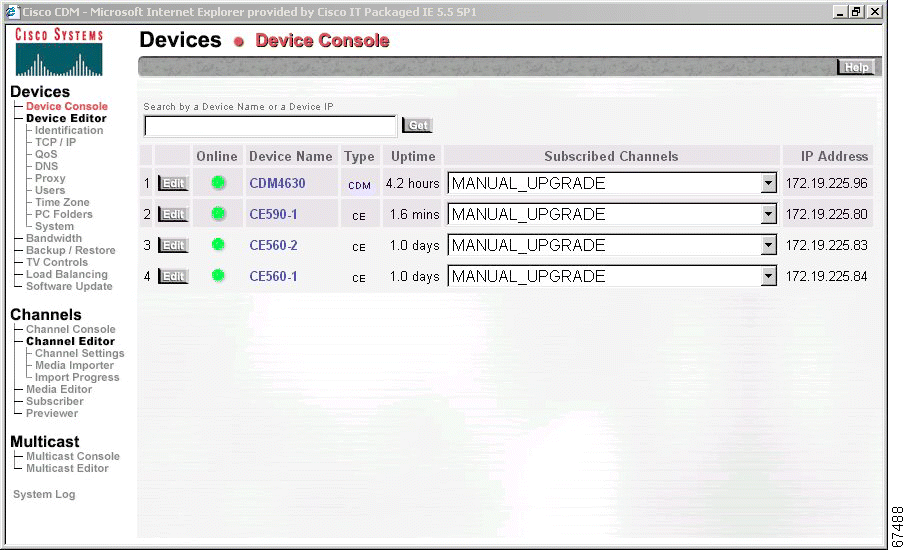
Step 4 On the Device Console screen, click the Edit button for the device that is being moved to a new domain. The Identification screen appears. (See Figure 3.)
There are two ways to assign a new administrative Content Distribution Manager domain:
Using the Installation Wizard
Using the ACNS CLI
Assigning a New Administrative Content Distribution Manager Domain Using the Installation Wizard
To assign a new administrative Content Distribution Manager domain using the Installation Wizard, follow these steps:
Step 1 Follow the instructions in the "Activating the Installation Wizard" section in Chapter 1 of the Cisco Enterprise CDN Software Configuration Guide, Version 3.0 to run the Installation Wizard from the CD-ROM or local hard disk drive.
Double-click the cndwiz.exe file to launch the Installation Wizard.
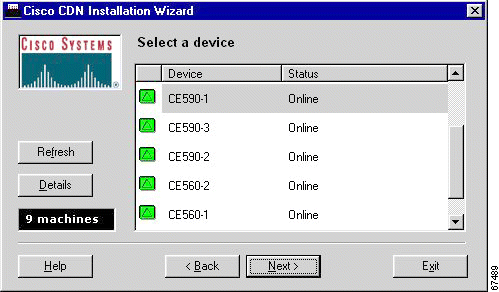
Step 2 Click Next to advance to the Select a Device dialog box, which lists all Enterprise Content Delivery Network (CDN) devices on the subnet by their device ID or by a user-friendly name previously assigned using the Installation Wizard. (See Figure 4.)
Note The Installation Wizard shows you only devices that are connected to the same local segment
as the Windows PC that is running the Installation Wizard program.
Step 3 When the device that you removed reboots, a yellow triangle appears in the Installation Wizard console with the following message:
Missing CDN settings
(This reboot occurred in the "Resetting the Device to Factory Settings" section.)
Choose the device and click Next to advance to the Name dialog box.
Step 4 Click Next to accept the Name dialog box settings and advance to the Content Distribution Manager dialog box (see Figure 5), or refer to Chapter 2, "Initializing Cisco Application and Content Networking Software and Setting Up the E-CDN Application," in the Cisco Application and Content Networking Software User's Guide, Release 4.0, for more information on providing a device name.
Step 7 Click Next to advance to the Obtain Network Settings Automatically (DHCP) dialog box.
Step 8 Click Next to accept the Obtain Network Settings Automatically (DHCP) dialog box settings and advance to the DNS-Domain Name System dialog box, or refer to Chapter 2, "Initializing Cisco Application and Content Networking Software and Setting Up the E-CDN Application," in the Cisco Application and Content Networking Software User's Guide, Release 4.0, for more information on configuring DHCP.
Step 9 Click Next to accept the DNS-Domain Name System dialog box settings and advance to the Proxy Server dialog box, or refer to Chapter 2, "Initializing Cisco Application and Content Networking Software and Setting Up the E-CDN Application," in the Cisco Application and Content Networking Software User's Guide, Release 4.0, for more information on specifying DNS servers.
Step 10 Click Next to accept the Proxy Server dialog box settings and advance to the Secure Proxy Server dialog box, or refer to Chapter 2, "Initializing Cisco Application and Content Networking Software and Setting Up the E-CDN Application," in the Cisco Application and Content Networking Software User's Guide, Release 4.0, for more information on configuring proxy servers.
Step 11 Click Next to advance to the Settings dialog box to review the configuration settings for your Content Engine or Content Router.
If the information is not accurate, click Back to step back through the Installation Wizard and change the configuration information.
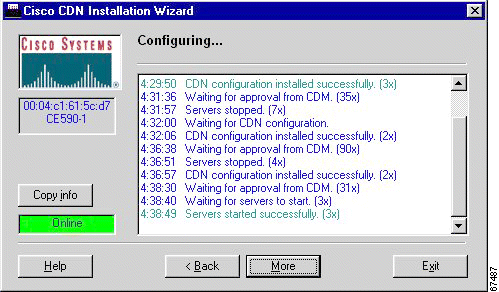
Note After you click Finish in the Installation Wizard, a status box appears with configuration information. Ultimately, you see the device status as "online"; however, if the device is a new Content Engine or Content Router, it must first be approved within the Content Distribution Manager GUI before the device status will change to online.
Before the device status shows as online, however, it may actually show as "failed." This usually happens when the device needs to be rebooted for the changes to take effect. While it is rebooting, the Installation Wizard loses communication with it, and the device status shows as failed. However, if you wait for the device to finish booting, the status in the Installation Wizard should change to online.
Step 12 From the Configuration Status screen, perform one of the following actions:
Click More to return to the Select a Device dialog box and configure another of your CDN devices, or click Exit to close the Installation Wizard.
You will see the following message in the status box:
Waiting for approval from CDM
The device will not come online until it has been approved within the Content Distribution Manager GUI.
Click Back and review your configuration settings.
You are now ready to approve the device using the Content Distribution Manager GUI.
Assigning a New Administrative Domain Using the ACNS 4.0.3 Software CLI
To assign a new administrative Content Distribution Manager domain using the ACNS 4.0.3 software CLI, follow these steps:
Step 1 When the device reboots, verify that there is no Content Distribution Manager assigned to this device by using the show running-config EXEC CLI command on the device. (This reboot occurred in the "Resetting the Device to Factory Settings" section.) There should be no Content Distribution Manager IP address listed.
Step 2 Use the ecdn cdm ip command in global configuration mode to associate the device with the IP address and (optionally) the port number of the new Content Distribution Manager. For example,
ContentEngine(config)# ecdn cdm ip 1.1.1.1 port 110
You are now ready to approve the device in the new administrative domain.
Step 3 On the Device Console screen, click the Edit button for the device that you moved to the new Content Distribution Manager domain. The Identification screen appears. (See Figure 8.)
Step 6 You can also view the Configuration Status screen (see Figure 10) for that device in the Installation Wizard to confirm that the device was moved successfully. The following message indicates a successful move:
Step 8 The Select a Device screen appears. Verify that the status of the device that you moved is online (a green triangle is next to the device name). (See Figure 11.)
The following section contains changes to Chapter 4, "Upgrading and Downgrading Your System Software," in the Cisco Application and Content Networking Software User's Guide, Release 4.0.
In all of the upgrade sections, add the following note:
Note If an ACNS 4.0 software system is connected to a Cisco console server while the ACNS 4.0 software
system is booting, a console session should be active, or else the device may enter recovery mode. If
this occurs, activate a console session and power cycle the device to boot up successfully.
In the "Upgrading from Cache 2.x Software to ACNS 4.0 Software" section, add the following note:
Note After mass upgrades from Cache 2.x software to ACNS 4.0 software, run the write memory
command on the Content Engines to avoid loss of configuration settings.
In the "Downgrading from ACNS 4.0 Software to Cache 2.x.x Software" section, add the following caution:
Caution Do not downgrade an ACNS 4.0 software system to Cache 2.x.x software if the system originally had only CDN Enterprise 2.1 software or E-CDN 3.0.2 software installed. Otherwise, the system may become nonoperational.
In the "Downgrading from ACNS 4.0 Software to Cache 3.1 Software" section, update the "Procedure" section with the following step:
Step 3 After the Cache 3.1 software reboots, download the realmedia.addon file to the /local1 directory on the Content Engine and install it using the following CLI commands:
disk partition disk00/02 400M sysfs #400M is user selectable
sysfs format disk00/02
sysfs mount disk00/02 local1
cd /local1
copy ftp disk (download realmedia.addon file)
install realmedia.addon
In the "Downgrading from ACNS 4.0 Software to CDN Enterprise 2.1 Software or E-CDN 3.0.2 Software" section, replace the existing note with the following notes:
Note You can downgrade from ACNS 4.0 software to CDN Enterprise software on all models except for
the Content Engine 7320 (which is not supported by CDN Enterprise software) and the Content
Distribution Manager 4650 with the Redundant Array of Inexpensive Disks (RAID) controller V3.
In some cases, not all content will be preserved. The downgrade process automatically detects
potential loss of content and warns the user. In this case, the user must agree to these terms before
proceeding.
Note The downgrade process from ACNS 4.0 software to CDN Enterprise software fails if the device is
connected to a console server but there is no Telnet session to the device. Do not perform the
downgrade with a console cable connected to the device if a Telnet session is not active.
In the "Downgrading from ACNS 4.0 Software to CDN Enterprise 2.1 Software or E-CDN 3.0.2 Software" section, replace the existing caution in the "Procedure" section with the following:
Caution You can downgrade from ACNS 4.0 software to CDN Enterprise software after having made changes to disk allocation using the disk configure command; however, not all content may be preserved.
Downgrading from ACNS 4.0 software to CDN Enterprise software on a model that never had CDN Enterprise software installed on it previously will not preserve content.
In addition, replace Step 7 in the "Procedure" section with the following step and add the remaining steps:
Step 7 If some of the devices still show ACNS 4.0.3 for the version information, go to the System Log page to display the system messages; otherwise, proceed to Step 10.
If the device is in danger of losing content, the downgrade process fails and an error is generated in the system log.
Step 8 If you would like to force the downgrade and lose content, choose one of the following methods:
Use Telnet to access the device and run the ecdn force-downgrade command.
Navigate to the following URL in a web browser, where device-ip-address is the IP address of the device:
http://device-ip-address/cgi-bin/force-downgrade
Step 9 Go to the Software Update page to execute the downgrade.
a. Choose the downgrade package version, and then choose all the device names of the devices you want downgraded. Click the Start Update button at the top of the page.
b. Wait approximately 30 minutes for the downgrade to be completed.
Step 10 After the downgrade is complete for all of your devices, then downgrade your Content Distribution Manager.
a. Go to the Software Update page. Choose the downgrade package version, and then choose your Content Distribution Manager. Click the Start Update button at the top of the page.
In the "Downgrading from ACNS 4.0 Software to CDN Enterprise 2.1 Software or E-CDN 3.0.2 Software" section, add the following procedure to downgrade from ACNS 4.0 software to CDN Enterprise software using the CLI.
To downgrade your device from ACNS 4.0.3 software to CDN Enterprise 2.1 software or E-CDN 3.0.2 software using the CLI, follow these steps:
Step 1 Use the copy ftp install command, with the applicable file:
For downgrade to CDN Enterprise 2.1 software, use the file ACNS-4.0.X-TO-ECDN21.upg.
For downgrade to CDN Enterprise 3.0.2 software, use the file ACNS-4.0.X-TO-ECDN-3.2.2.upg.
Note If the software cannot be downgraded without losing Enterprise CDN content, the CLI
command will fail and prompt the user to agree to a partial or entire loss of content.
Step 2 To force a downgrade, use the ecdn force-downgrade command and then run the copy ftp install command again.
When upgrading to ACNS 4.0.3 software from Cache Engine 3.x software, refer to the Cisco Application and Content Networking Software User's Guidefor a description of the new caching features introduced in this release.
Please note the following differences between Cache Engine 2.x software releases and ACNS 4.0.3 software:
In Cache 2.x software, the FTP transfer interval for cache transaction logs is configurable, but the interval in ACNS 4.0.3 software is fixed at 10 minutes.
The radius server-exclude command, which is supported in Cache 2.x software, is not supported in ACNS 4.0.3 software. However, the rule no-auth command in ACNS 4.0.3 software provides equivalent functionality. Refer to the Cisco Application and Content Networking Software User's Guide, Release 4.0 for more information.
The icp server http-port command is not supported in ACNS 4.0.3 software.
The boomerang Content Routing Agent (CRA) is currently not supported in ACNS 4.0.3 software but will be supported in a future ACNS software release.
The http server-ims command is not supported in ACNS 4.0.3 software but will be supported in a future ACNS software release.
In ACNS 4.0.3 software, the show user and show users commands display only users that are logged on to the Content Engine. These commands do not display users that are authenticated to receive content.
The trusted host command is not supported in ACNS 4.0.3 software. It is supported in Cache 2.x software because Cache 2.x software contains an FTP server. It is not supported in ACNS 4.0.3 software because ACNS 4.0.3 software contains an FTP client (not an FTP server).
In ACNS 4.0.3 software, the number of static bypass entries is limited to 32.
Enterprise Content Delivery Networks (E-CDNs) are made up of two or three types of devices:
Central distribution and management capabilities are provided by the Cisco Content Distribution Manager. The Content Distribution Manager may also provide content routing functionality.
Cisco Content Engines provide content delivery at the edge of the network. Content Engines use transparent caching technology to store content at the edge based on users' requests, and they use E-CDN technology to prepopulate rich media or large files in the Content Engines ahead of users' requests.
In larger deployments, content routing functionality may be provided by dedicated Cisco Content Routers. Content Routers are optional; if none are deployed, the Content Distribution Manager may provide this functionality.
There are many possibilities with regard to the types of devices required to build an E-CDN, the large number of topologies on which an E-CDN is expected to function, and the different types of content and request patterns for content.
With all these variables, sizing an E-CDN solution is a complex task. Use the following sections as a guide to determine whether the E-CDN will meet the customer's performance expectations, whether the the E-CDN deployment is realistic given the customer's network topology, and how many devices are required (for example, for content routing) to handle the customer's traffic load and request patterns.
The maximum number of Content Engines in an E-CDN deployment depends on various aspects of the network configuration, including:
Number of distinct content channels,
Whether Self-Organizing Distributed Architecture (SODA) is used,
Whether there are dedicated Content Routers
Number of Content Engines behind firewalls relative to the Content Distribution Manager and Content Routers.
A CDM-4650 with ACNS 4.0.3 software can support up to 200 Content Engines if a SODA-enabled hierarchy can be built. Deploying multiple CR-4430 Content Routers and minimizing the number of content channels make it possible to deploy more than 200 Content Engines.
A CDM-4630 can support small E-CDN deployments (fewer than 25 sites) and may be adequate for some medium-sized E-CDN deployments (fewer than 50 sites), depending on network topology.
No more than 100 content channels should be configured in ACNS 4.0.3 software.
A general rule is to allocate channels sparingly. Each channel has its own administration policies and storage allocation, so that every additional channel results in additional administrative network traffic during Content Engine-to-Content Distribution Manager communications. The keepalive messages associated with SODA are on a per-channel basis, so every additional channel results in additional WAN bandwidth consumption, particularly during the tree-building (topology discovery) phase of SODA.
No more than 10,000 objects total (in all channels) should be prepopulated into ACNS 4.0.3 software through the Content Distribution Manager. This is not a firm limit—although it is possible to exceed this number, it is not recommended.
A single channel should have no more than 6000 objects with ACNS 4.0.3 software. Although it is possible to exceed this number, it is not recommended.
No more than 3000 objects should be imported into the Content Distribution Manager at one time.
The time required to import multiple objects into a channel is a function of the number of objects already stored in that channel, as shown in Table 1:
Importing MPEG files into these channels takes approximately half a second longer than shown in Table 1 per object, because the Content Distribution Manager will generate a thumbnail for each MPEG clip.
The four basic network topologies in which an E-CDN can be deployed are characterized as follows:
Hub and spoke topology—A small number of nodes with high-speed links (a distribution WAN cloud) connects to a larger number of nodes with slower links (a regional WAN cloud). In this topology, an initial burst of network discovery traffic is followed by a stabilizing period in which the nodes will only attempt to build trees with their nearby neighbors and not with every node in the network.
Segmented topology—Some nodes (for example, a Content Engine inside another organization) are separated from other segments of the network by a firewall using NAT. In this case, it is more difficult for a Content Engine to discover the network topology existing between different Content Engines and the Content Distribution Manager, and this may result in more administrative network traffic than in hub and spoke design.
Fast topology—LAN-type connectivity exists between multiple Content Engines; for example, multiple Content Engines exist in a cluster at a single location for scalability or redundancy. In this case, the Content Engines will discover one another but only one cluster member should actually replicate content from the Content Distribution Manager or an upstream Content Engine and there will be constant administrative network traffic between the clustered Content Engines.
Slow topology—Very limited bandwidth exists between the various nodes (for example, 64-kbps ISDN or fractional T1 links).
Depending on the type of deployment, the two choices for enabling content distribution within a topology are SODA (automatic topology discovery) or star (manual override). The distributed content distribution enabled by SODA allows it to scale to larger numbers of edge nodes than in a star topology.
SODA Topology
The ideal network topology for SODA is a hierarchy (tree) of Content Engines, of which only some Content Engines parent off the Content Distribution Manager while other Content Engines naturally discover upstream Content Engines to parent off.
Table 2 describes the performance characteristics associated with SODA.
Ensure that the number of channels is kept to a minimum.
CDM-4630
Fast
50
Cumulative keepalive traffic is not segmented and will be visible on the network.
CDM-4650
Spoke and hub
200
This is the optimal topology for SODA.
CDM-4650
Segmented
200
This is the optimal topology for SODA.
CDM-4650
Slow
200
Ensure that the number of channels is kept to a minimum.
CDM-4650
Fast
200
Cumulative keepalive traffic is not segmented and will be visible on the network.
Note that it is possible to build a network supporting 1000 Content Engines with 1 CDM-4650, 1 Content Services Switch (CSS) 11000, and 5 CR-4430 units, with the network substantially segmented and SODA enabled, provided there are only 1 or 2 content channels.
Star Topology
In a star topology, SODA is disabled and all Content Engines use the Content Distribution Manager as a parent.
Table 3 describes the performance characteristics associated with a star topology.
A maximum of 500 entries are allowed in a single playlist. (A playlist itself may consist of both MPEG1 or MPEG2 video or audio clips and on-screen display overlay bitmap files.)
A maximum of 100 entries can be added to the playlist at a time.
The size of a video or audio clip is limited to 2 gigabytes (GB). To play a video longer than this, it must first be split into 2-GB chunks.
This section lists and describes caveats that were resolved in ACNS software, Release 4.0.3, and caveats that are still open in this release.
Caveats describe unexpected behavior in ACNS software, Release 4.0.3. Severity 1 caveats are the most serious; severity 2 caveats are less serious. Severity 3 caveats are moderate caveats, and only select severity 3 caveats are included.
The Box-Links page on a Content Engine has a link to the Content Engine user interface. That link incorrectly uses the IP address of the Content Engine instead of the IP address of the Content Distribution Manager.
CSCdt53452
Absolute local URLs are not supported with .asf files.
CSCdt70895
Proxy configuration settings cannot be disabled by going into the device editor GUI, checking the corresponding radio button, and clicking Save Changes.
CSCdt90611
Importing a large number of files (more than 100) in multiple folders using drag and drop and FTP clients can cause some of the files not to be imported.
CSCdu09617
Unnecessary console error messages appear on the console:
eth0: command unit failed to mark command 00000000 as complete at 12445
eth0: command unit failed to mark command 00000000 as complete at 12435
CSCdu30901
If a proxy server is set up for the CDN Enterprise Content Distribution Manager and the device is then rebooted for these changes to take effect, an attempt is made to obtain content from the Internet by importing media through HTTP. The Content Distribution Manager goes to the Internet to fetch the list of files when the user clicks Get List of Files not via the proxy server. However, the content is fetched through the proxy server.
CSCdv02302
The Content Engine stops accepting HTTP requests from clients under adverse network conditions (perhaps related to large amounts of CodeRed virus probing). This may also occur if clients are behind high-latency connections.
CSCdv17924
The Cache software crashes with a message to the console. This occurs when there is a cache hit but the requested server IP address does not match the IP address of the object source.
CSCdv18943
When you upgrade Content Engine 507, 560, and 590 devices running Cache 2.x software to Cache 3.1.1 or ACNS 4.0.1 software, under rare circumstances, the devices may hang or enter the kernel debugger (kdb) state at bootup. The Content Engine at this stage is unusable.
CSCdv20059
The Ethernet interface on a Content Engine becomes unresponsive after a period of use.
CSCdv40872
The Content Engine is unable to deal with the Nimda or CodeRed virus in an efficient manner.
CSCdw02892
The caching process may crash after you use the clear cache CLI command.
CSCdw05505
The HTTP cache may crash if end-to-end NT LAN Manager (NTLM) is triggered.
CSCdw05511
The Cache software stops servicing HTTP traffic in rare conditions, which may corrupt the cache file system (cfs) partitions.
CSCdw19288
The HTTP proxy stops accepting traffic on a Content Engine 7320, causing many cache-related CLI commands to fail.
CSCdw19495
A Content Engine under heavy utilization (that is, one experiencing a large number of concurrent connections) may run low on RAM and cause network problems.
CSCdw21183
The HTTP proxy stops accepting traffic when URL filtering is turned on.
CSCdw22702
On Windows 95 and Windows 98 clients using NTLM request authentication, the user is not able to authenticate against the primary domain controller (PDC) without being prompted for a username, password, and domain.
CSCdw23956
The caching process fails or takes a long time to service requests if any of the authentication modules (RADIUS/Lightweight Directory Access Protocol [LDAP]/NTLM) is enabled on the Content Engine and if any "destination-IP no-authentication" rules are configured.
Symptom: Changes made through the Content Distribution Manager GUI to the network settings of a Content Engine or Content Router (including IP address and DNS settings whether or not an HTTP proxy is configured for use) do not seem to have any effect.
Condition: This occurs on systems running the E-CDN application.
Workaround: The device must be rebooted for these changes to take effect.
CSCds75534
Symptom: When the Content Distribution Manager does not have any Content Engines enabled for TV-out, you should see the following message on the TV Controller page:
There are no TV Enabled Content Engines on your network
However, if you are using Netscape 4.7 on Windows 2000, the TV Controller page will be blank.
Condition: This occurs with Netscape 4.7 on Windows 2000.
Workaround: There is no known workaround.
CSCdt51451
Symptom: The Content Distribution Manager cannot configure a leap day. When you try to enter a leap day as the system date, the Content Distribution Manager displays a confirmation box with the wrong date.
Condition: This occurs on systems running the E-CDN application.
Workaround: There is no known workaround.
CSCdt52832
Symptom: After the backup and restore process, the icon for some files disappears. On both the Media Editor page and the Preview page, there is an icon next to the media file that may no longer appear. For MPEG files, it is usually the first frame of the video.
Condition: This problem only occurs with MPEG files.
Workaround: There is no known workaround.
CSCdt56198
Symptom: After you select the command to play a playlist of valid media files using the TV Controller GUI or using the API control, the playlist does not play. There is at least one future or past playlist time defined that can be viewed from the TV controller GUI under Time.
Condition: This problem occurs on systems running the E-CDN application with devices enabled for TV-out.
Workaround: The play command works when the TV time, the local time of the TV-out device (system time plus the time zone), falls within a defined start and stop time. There are two workarounds:
1. Remove all playlist times.
2. Define a new playlist time that reflects the current TV time.
CSCdt62678
Symptom: A software upgrade fails if a user clicks the Upgrade button too early.
Condition: After users have imported software upgrade files (meta, upg, and wmt) to the MANUAL_UPGRADE channel, they are then instructed to go to the Software Upgrade page, choose the Content Engines for upgrade, and then click the Upgrade button at the top of the page.
If the user clicks the Upgrade button before the upgrade files are replicated to the Content Engines, the upgrade will not occur. Users must make sure that all upgrade files have been successfully replicated to each selected Content Engine before they click the Upgrade button.
Workaround: The following steps should ensure that software upgrade is successful:
1. Create a MANUAL_UPGRADE channel and subscribe all appropriate Content Engines to it.
2. Import the upgrade files to the MANUAL_UPGRADE channel.
3. Go to the Import Progress page and wait for the import to be 100 percent complete.
4. Wait 20 minutes.
5. Click Channel Console and wait for the Replication Status of the MANUAL_UPGRADE channel to be 100 percent complete.
6. Go to the Software Upgrade page, choose the appropriate Content Engines, and then click the Upgrade button.
7. Wait for 20 minutes for the upgrade to be completed and then go to the Software Upgrade page to verify the software version number for each selected device.
In other words, before clicking the Upgrade button, make sure that the package files are replicated to the Content Engines. After importing the upgrade files, wait 20 minutes, check the MANUAL_UPGRADE channel, and wait for its replication status to be 100 percent completed.
CSCdt66494
Symptom: A lag occurs between the time that the Digital Fountain server stops serving a file and the time the channel replication status is updated on the Channel Console page of the user interface. The user may think that replication is finished for a channel because of what is shown on the replication status bar on the user interface, but because of the lag, the Digital Fountain server may still be serving files from that channel.
Condition: This occurs on systems running the E-CDN application on channels that have been enabled for multicast.
Workaround: To ensure that the Digital Fountain server has stopped serving files before importing new ones into the channel, the user should check whether the Digital Fountain server is still serving the files. Further information on how to check this can be obtained from the Digital Fountain documentation.
CSCdt69126
Symptom: A Content Distribution Manager is connected to two Content Engines, A and B. The Content Distribution Manager and Content Engine A are in one subnet, and Content Engine B is on another subnet. If the Content Distribution Manager and Content Engine A are rebooted, a file imported on a multicast channel gets replicated only to Content Engine A.
Condition: This occurs only on systems with multicast replication using a Digital Fountain server.
Workaround: Replicate the file again to successfully reach Content Engine B.
CSCdt77959
Symptom: If the user sets the timeout value through the Multicast Server Page on the Content Distribution Manager GUI and if the Digital Fountain server is overloaded, then the files that the Digital Fountain server has not started serving may never be served.
Condition: This occurs only if the user has overloaded the Digital Fountain server by importing more files at a rate higher than what can be sustained by the Digital Fountain server, and at the same time, by setting the timeout value to be very high. For more information, refer to the E-CDN documentation for the limit on the number of files that can be multicast and also the Digital Fountain server documentation regarding limitations on the number of files.
Workaround: The user should be careful about the number of files imported into the multicast channels and also the rate that has been set for the channel. For example, if the user has a Digital Fountain server with a rate limit of 12 Mbps, importing 13 files into a channel whose rate is 1 Mbps per file will overload the server.
Also, users should set the timeout such that if Content Engines do not receive the file through multicast, they can obtain it through unicast.
CSCdt84468
Symptom: A change in the multicast timeout on the Content Distribution Manager is ignored if the change is made after the Digital Fountain client on the Content Engine has already begun downloading the content.
Condition: This occurs on systems running the E-CDN application.
Workaround: Reimport the files after changing the timeout, and wait for 15 to 20 minutes to have the new timeout take effect.
CSCdt87214
Symptom: If the user has fewer than 22 layers on the Multicast Server page, then the Digital Fountain server will use a single multicast group address to distribute the content.
Condition: This is observed on Digital Fountain servers that are sold with the E-CDN application.
Workaround: Because of the limitation of the Digital Fountain server, the user must enter 22 or more layers on the Multicast Server page in order for multiple multicast addresses to be used by the Digital Fountain server for multicasting content.
CSCdt88091
Symptom: When a Content Engine that is enabled for TV-out is unsubscribed from a channel, the content from that channel still appears in the playlist. As a result, on the TV controller GUI, the content that belonged to the channel that the Content Engine is now unsubscribed from still appears, and the monikers are displayed, instead of the names.
Condition: This occurs on systems running the E-CDN application.
Workaround: If the mode is changed to Play, unsubscribed content is automatically removed from the playlist. Otherwise, choose the unsubscribed content in the playlist and click the Remove button.
CSCdu26321
Symptom: Inconsistent behavior occurs between the Internet Explorer 5.0 and Netscape Navigator 4.7.7 browsers. A Digital Fountain server that appears as online when you use Internet Explorer 5.0 appears as offline when you use Netscape Navigator 4.7.7.
Condition: This occurs on systems running the E-CDN application.
Workaround: Netscape Navigator 4.7.7 is not a supported browser. The user should use a supported browser version. For browser versions that are supported by the E-CDN application, refer to the E-CDN user documentation.
CSCdu36845
Symptom: The TV-out GUI allows a non-BMP file type to be used as the overlay image. For example, if an MPEG file larger than 64 KB is used as the overlay image, the system goes into a loop.
Condition: This occurs on systems running the E-CDN application.
Workaround: Do not use a non-BMP file type as an overlay image, and contact the Cisco Technical Assistance Center.
CSCdu48145
Symptom: FIN packets, which are harmless to the operation of Content Engine as well as to the network in general, are present on the customer network.
Condition: This may occur on systems running ACNS 4.0 software.
Workaround: To prevent these harmless packets from propagating to the customer network, configure the router attached to the Content Engine interface using theip-access-list feature or similar feature to drop packets coming from the Content Engine on source port 8999.
CSCdu58231
Symptom: Deleting a channel with a large number of items causes the Content Distribution Manager GUI to freeze.
Condition: This occurs on systems running the E-CDN application.
Workaround: Delete a small number (fewer than 100) content items from the channel at a time until all desired channel items have been removed. Once the channel is empty, then remove or delete the channel.
CSCdu58252
Symptom: Deleting a channel with a large number of items takes a very long time.
Condition: This occurs on systems running the E-CDN application.
Workaround: Delete a small number (fewer than 100) content items from the channel at a time until all desired channel items have been removed. Once the channel is empty, then remove or delete the channel.
CSCdu76346
Symptom: Changing the time zone does not reboot the system. Changing the clock from the Identification page causes two reboots. Showlog operates in different time zones than the system clock. The system page is not refreshed, forcing the user to close and reopen the GUI to see the changes.
Condition: This occurs on systems running the E-CDN application.
Workaround: There is no known workaround.
CSCdu79580
Symptom: Repeatedly clicking NEXT (10 to 15 times) from the GUI or API while the playlist is in PLAY mode hangs the video server. The video monitor flickers for awhile as it attempts to play the next file and then hangs.
Condition: This only occurs when NEXT is clicked several times a second on systems running the E-CDN application.
Workaround: The E-CDN application must stopped and restarted to clear the error condition. In this case, the system will automatically restart, but this could take up to 60 minutes. Otherwise, stopping and restarting the E-CDN application can be done by either disabling and then enabling the E-CDN application or by rebooting the system.
This problem can be avoided by clicking NEXT at a slower pace, pausing for a second or two between the clicks.
CSCdu83579
Symptom: If a user enables multicast on one channel and replicates the files successfully, and then creates another channel and enables multicast while the replication is occurring, the Content Distribution Manager reboots. The Digital Fountain server now serves all the files, including files from the first channel, when it should only be serving the files from the second channel.
Condition: This occurs on systems running the E-CDN application.
Workaround: There is no known workaround.
CSCdu87698
Symptom: Multicast replication through a Digital Fountain server may continue replicating for up to 30 minutes after the last Content Engine has received the entire file. This is normal behavior in the current product design.
Condition: The Content Engine replication status is only reported back every 10 minutes and the Content Distribution Manager only checks for the reported replication status from the Content Engines every 10.5 minutes. The Digital Fountain control process in the Content Distribution Manager only checks file replication status every 12 minutes.
None of these timers are tunable, nor are they synchronized. So if the timers are not correlated, you potentially see the multicast continue for up to 30 minutes after the last Content Engine has received the complete file.
Workaround: You can use routers supporting Internet Group Management Protocol (IGMP) version 2 in front of the Digital Fountain server and in front of the Content Engines. The Content Engines will only subscribe to the multicast channel and the routers will only route those multicast packets while the Content Engines are receiving content.
Once each Content Engine has the content, it is unsubscribed from the multicast channel and its router will stop routing the multicast traffic. When all Content Engines are unsubscribed, the router in front of the Digital Fountain server will also stop routing multicast traffic. Therefore, even though the Digital Fountain server is still sending multicast traffic, that traffic does not pass the router.
CSCdu89034
Symptom: If connection to the Content Distribution Manager is lost, then all the devices attached to the Content Distribution Manager send frequent TCP SYN messages to the Content Distribution Manager. If more devices are attached to this Content Distribution Manager, this may cause a SYN storm. This symptom also occurs with a Content Engine that has lost its network connection, and has many children attached to its hierarchy.
Condition: This occurs on systems running the E-CDN application.
Workaround: There is no known workaround.
CSCdv02664
Symptom: RADIUS authentication fails if a username or password length is greater than the maximum length of 20 characters for a RADIUS username and 16 characters for a password.
Condition: This occurs on systems running ACNS 4.0 software.
Workaround: There is no known workaround.
CSCdv15269
Symptom: Removing a channel from the Content Distribution Manager GUI while the Content Engine is off line leaves the contents on the Content Engine. The contents stay on the Content Engine even after it comes on line again.
Condition: This occurs on systems running the E-CDN application.
Workaround: Bring the Content Engine back on line, add the channel back into the Content Distribution Manager, and then delete the channel from the Content Distribution Manager. This should remove the channel and its contents from the Content Engine.
CSCdv20665
Symptom: The Content Distribution Manager GUI is very slow or unusable.
Condition: The Content Distribution Manager is very busy or has a very large number of content items, or there are communication problems on your network.
Workaround: Assess network status and resolve any network problems, reduce the number of content items on the Content Distribution Manager, or wait for the Content Distribution Manager to finish the current operation: importing content, deleting content, replicating content, and the like.
CSCdv20680
Symptom: When you perform Content Distribution Manager GUI operations, requests for content from clients are processed slowly.
Condition: A large number of content items on the Content Distribution Manager may be causing Content Distribution Manager GUI operations to be slower. While certain operations are occurring, such as requesting the Device Console page, requesting the Import Progress page, requesting the Subscriber page, requesting the Media Editor page, importing content, or deleting content, the processing done by the Content Distribution Manager may prevent the Content Distribution Manager from handling client requests in a timely manner.
Workaround: Use a Content Router (a Content Router 4430, for example) to service client HTTP requests to reduce the number of content items on the Content Distribution Manager, or perform administration tasks during off hours.
CSCdv20748
Symptom: The Content Distribution Manager restarts itself internally during very heavy operations.
Condition: If the Content Distribution Manager has a large number of content items and a heavy operation is in process, such as deleting or importing 200 files, the Content Distribution Manager may become so busy in its processing that the background health checks time out, and they will restart the internal Content Distribution Manager processes.
Workaround: The restarting is a normal safety measure. However, the operational load on the Content Distribution Manager is too heavy. Wait for this operation to finish, and make future operations smaller by importing fewer files at a time, for instance.
CSCdv20754
Symptom: After the Content Router 4430 IP address is changed, the Device Console shows it as green (online), but with the old IP address. Even though the System page shows the new IP address, Content Engines try to contact the Content Router using the old IP address.
Condition: The IP address of the Content Routers did not change in all references.
Workaround: Perform the following steps:
1. Use the Content Distribution Manager GUI to remove the Content Router from the Content Distribution Manager domain.
2. Enter the following URL in a web browser, choose the option to Reset to factory settings at next reboot [reset], and then click the Set button:
4. Use the Installation Wizard or ACNS CLI to add the Content Router back into the CDN using the desired IP address.
CSCdv20780
Symptom: While the Content Distribution Manager is attempting to import files, not all files are imported.
Condition: This could be due to conflicting filenames, an extremely busy Content Distribution Manager, or errors during the import process.
Workaround: Verify that none of the filenames conflict and that special characters from the following list are deleted from the filename during import:
Keep in mind that a space is converted to an underscore when creating filenames. If you import two files with conflicting names, only one will be imported.
Workaround: First eliminate any conflicting filenames. If you have no conflicting filenames, reduce the number of files that you import at one time. Do not start the next import until the previous one has completely finished.
CSCdv25922
Symptom: A new Content Engine waiting for approval does not appear at the top of the list of devices.
Condition: This occurs on systems running the E-CDN application.
Workaround: Search by the device name or device IP address field on the Device Console page to list the new device.
CSCdv25987
Symptom: The search facility on the Content Distribution Manager is unpredictable and is difficult to use. When a search for devices is done on the Content Distribution Manager using a substring, it can return duplicate results for the Content Engine and miss Content Engines that are meant to be listed.
Condition: This has occurred in large installed bases of Content Engines.
Workaround: There is no known workaround.
CSCdv26610
Symptom: The HTTP import method returns variable results. With a browsable HTTP directory running on a Microsoft Internet Information Server (IIS), applying a filter produces an error, even if the files actually exist. Browsing to the directory works with a standard browser, and it is sometimes possible to obtain a list of files with a "*" filter for the directory.
Condition: This occurs on systems running the E-CDN application.
Workaround: There is no known workaround.
CSCdv28262
Symptom: Even with automatic hierarchy disabled, there will still be router requests sent by every Content Engine every 30 seconds for every channel on each of those Content Engines.
Condition: This condition is most noticeable in a Content Delivery Network with multiple channels and a large number of Content Engines.
Workaround: Reduce the number of channels, disable the network hierarchy, or filter traffic between Content Engines that do not need to communicate.
CSCdv29357
Symptom: During the playback of some Motion Picture Experts Group (MPEG2) files using TV-out, the video decode freezes at some position in the file while the audio decode continues. Repeated playback shows that the video freeze occurs at the same position.
Condition: This symptom occurs on systems running any E-CDN application version. The hardware platforms on which this problem occurs are the CE-507AV-CDN and CE-560AV-CDN manufactured with the Vela Cineview 2083 MPEG decoder card.
Workaround: The problem occurs with MPEG2 files encoded at a variable bit rate (VBR). The hardware decoder interprets some sequences as an error and stops the decode. We recommend that MPEG2 files encoded for TV-out use constant bit rate (CBR) to avoid this problem. Files exhibiting this behavior should be reencoded.
CSCdv38067
Symptom: In a network where Content Engines are behind a firewall (in a private address space), the Content Distribution Manager is able to route a request behind the firewall, but a Content Router is not. When there is no firewall, no problem occurs.
Condition: This symptom occurs on systems running the E-CDN application.
Workaround: There is no known workaround.
CSCdv41359
Symptom: The Content Distribution Manager GUI response time to create a new channel increases as the number of channels increases.
Condition: This occurs on systems running the E-CDN application.
Workaround: There is no known workaround.
CSCdv41455
Symptom: The Content Distribution Manager reboots if the user exits the Backup/Restore Utility through the close box without starting the restore procedure.
Condition: This occurs on systems running the E-CDN application.
Workaround: Do not open the Backup/Restore Utility screen unless you intend to perform the backup or restore operations and only close the screen when it is appropriate to have the Content Distribution Manager reboot.
CSCdv43167
Symptom: Certain commands generate a spurious diagnostic error in configuration mode, including host name and IP default gateway, but there is no impact on the command itself:
touch: /sonoma/state/setup-flags/manual-netrcm-config: no such file or directory in
the session output
Condition: This occurs on systems running ACNS 4.0 software.
Workaround: There is no known workaround.
CSCdv44014
Symptom: When a playlist is defined but no audio/video card is present or it is no longer detected by the MPEG decode driver, the video server attempts playback. This causes an event record to be written and an exception.
These excess event records are then replicated to the Content Distribution Manager, causing performance problems when left unchecked.
Condition: This occurs on systems running the E-CDN application.
Workaround: There is no known workaround.
CSCdv46802
Symptom: After the HTTP port is changed and the Content Distribution Manager is rebooted, the HTTP server listens on the new port, but all Content Engines go off line. This symptom occurs with regard to changing the Alternate IP Port setting as well.
Condition: This occurs on systems running the E-CDN application.
Workaround: Since the Content Engines do not register the new port using an alternate IP port in the Content Distribution Manager GUI, the Content Engines must be reconfigured using the Installation Wizard.
CSCdv54977
Symptom: The cache process may restart on a Content Engine 7320.
Condition: If this problem occurs, it is infrequent and is related to use of the Internet Cache Protocol (ICP). The cache process fails and automatically restarts in approximately 1 to 2 minutes, so the service outage is temporary. This occurs only on a Content Engine 7320.
Workaround: There is no known workaround.
CSCdv60905
Symptom: If a user disables the E-CDN application, uses the CLI to change network settings, and then enables the E-CDN application within 40 seconds, the following symptoms may occur:
1. The changes are lost and are replaced with old network settings stored in the library of the E-CDN.
2. The E-CDN application hangs in an "IP missing" state.
Condition: This occurs on systems running the E-CDN application.
Workaround: In the first case, the network settings must be reconfigured while the E-CDN application is enabled. In the second case, the host name can be changed to trigger the E-CDN application to exit the "IP missing" state.
To avoid this problem, after disabling the E-CDN application and changing network settings, wait 2 minutes for the new network settings to be stored in the E-CDN library before enabling the E-CDN application again.
CSCdv60998
Symptom: Although a login prompt is visible, no login is possible when a user attempts to use Telnet to access a device during an upgrade.
Condition: This occurs on systems running ACNS 4.0 software.
Workaround: After the upgrade is completed, the specified username and password can be used to log in. Using Telnet during an upgrade may make the upgrade appear to have failed because the Content Engine name on the login prompt is "none"; however, the upgrade is in progress and the device should be ready after 10 minutes.
CSCdv61722
Symptom: The upgrade/downgrade manager may be blocked from servicing FTP requests if the E-CDN application is enabled.
Condition: This occurs on systems running the E-CDN application.
Workaround: Before installing the upgrade/downgrade manager, disable the E-CDN application first. If the upgrade/downgrade manager was installed with E-CDN enabled, disable the E-CDN application, save the configuration, and then reboot before attempting automated upgrades.
CSCdv66971
Symptom: In certain circumstances, downgrading from ACNS 4.0.3 software to E-CDN 3.x software can hang the system. This occurs only if the Content Engine, Content Router, or Content Distribution Manager console port is connected to a console server, a Cisco 2500 Series, for instance, and if there is no active session on the serial port of the console server to which the device is connected.
Condition: The problem occurs because the console server, with no active session on the port in question, sends serial line flow control to the Content Engine, Content Router, or Content Distribution Manager to have it stop sending characters. This effectively blocks the downgrade from continuing.
Workaround: Remove the console cable and connect the serial cable to a PC running communications software. Alternatively, initiate a session on the console server and observe the output from the Content Engine, Content Router, or Content Distribution Manager.
When a downgrade has already been initiated and the device has hung, configure the serial connection as above and reboot the device. In most cases the downgrade will run to completion.
CSCdv70012
Symptom: The cache process may fail if healing mode is enabled.
Condition: If healing mode is enabled on a Content Engine 7320, the cache process may crash. The cache process automatically restarts but may crash and restart again. This happens only on the Content Engine 7320 platform.
Workaround: There is no known workaround at this time. We strongly recommend not enabling healing mode on the Content Engine 7320.
CSCdv70071
Symptom: The verifier not responding error occurs in a Content Engine 7320.
Conditions: This problem happens only when heavy debug information is turned on, which should not be a normal situation when the cache is serving real traffic.
Workaround: The system needs to be rebooted to bring the cache to a correct state.
CSCdv71152
Symptom: Deleting several messages using Microsoft Hotmail or Microsoft Outlook Express Version 6 fails.
Condition: This problem occurs if you are using Microsoft Hotmail or Microsoft Outlook Express.
Workaround: Delete a single message at a time.
CSCdv72187
Symptom: If no name server has been configured, the cache process exits while serving a request that requires name resolution.
Condition: This problem occurs if no name servers have been configured.
Workaround: Configure a name server using the ip nameserver CLI command in global configuration mode.
CSCdv72270
Symptom: The Windows Media Technologies (WMT) service stops working if it is under extremely high load for a long period. In this case, WMT traffic will be refused by the Content Engine.
Condition: Under extremely high loads for long periods, WMT service will trigger some timing-related bugs that cause WMT service to stop accepting new requests.
Workaround: This is not a common situation because the product targeted load is far less than the load causing this problem. However, the workaround is to disable and enable WMT through the CLI or the GUI.
CSCdv72605
Symptom: The cache process may fail if healing mode is enabled.
Condition: If healing mode is enabled on a Content Engine 7320, the cache process may crash. The cache process automatically restarts but may crash and restart again. This happens only on the Content Engine 7320 platform.
Workaround: There is no known workaround at this time. We strongly recommend not enabling healing mode on the Content Engine 7320.
CSCdv73439
Symptom: Rebooting with a communications server connected to the console brings a Content Engine into rescue mode.
Condition: If the communications server is not configured correctly, it could send data to the console connection that causes the Content Engine to enter rescue mode.
Workaround: Following is a known good console line configuration that prevents this problem:
line 1 16
no exec
exec-timeout 0 0
transport preferred none
transport input telnet
transport output none
stopbits 1
CSCdv73808
Symptom: The static bypass list does not support more than 32 entries.
Condition: This occurs on systems running ACNS 4.0 software.
Workaround: There is no known workaround.
CSCdv75250
Symptom: If an HTTPS request is directed to the Content Engine on port 443 with the URL filtering feature enabled, it may cause the cache process to crash.
Condition: This occurs on systems running ACNS 4.0 software.
Workaround: Disable URL filtering.
CSCdv76775
Symptom: When you downgrade from ACNS 4.0 software to Cache 3.x software, Cache 3.x software detects a problem with the software file system (swfs) and decides to reformat it.
Condition: This is seen when downgrading to Cache 3.x software from ACNS 4.0 software, regardless of what component of the ACNS 4.0 software was running on the device earlier (E-CDN application, Cache software, and so forth). Swapping was not turned off successfully by the downgrade script, which causes the partitioning and building of the swfs to be corrupted.
Workaround: After Cache 3.x software reformats the swfs, RealMedia code needs to be installed. The commands to manually install RealMedia code (realmedia.addon) on Cache 3.x software are as follows:
disk partition disk00/02 1G sysfs // 1G is an example, it is user selectable.
sysfs format disk00/02
sysfs mount disk00/02 local1
cd /local1
copy ftp disk ftpserveripdir realmedia.addon realmedia.addon
install realmedia.addon
After the downgrade, the swfs is created by default, but the system file system (sysfs) needs to be created manually to be able to download RealMedia code and install it on the swfs.
CSCdv77157
Symptom: When you use the disk add CLI command to incorporate newly added disks with the E-CDN file system (ecdnfs) allocated on them, the E-CDN application does not make use of the additional storage partitions. E-CDN-fill happens continuously, sometimes causing the E-CDN application not to start.
Condition: This occurs on a Content Engine with ACNS 4.0 software.
Workaround: Use the disk config CLI command instead to incorporate additional disks or when the above condition has occurred. This workaround wipes out all existing E-CDN application content, but once this is done, the new storage capacity is used.
CSCdv80480
Symptom: The ACNS to Cache 2.x software downgrade fails, rebooting the system continuously.
Condition: This only occurs after upgrading a Content Engine 500 Series with Enterprise CDN 3.0.x software to ACNS 4.0 software and then downgrading it to Cache 2.x software.
Workaround: Do not downgrade ACNS software to Cache software if it was not upgraded from Cache software.
CSCdv80694
Symptom: The HTTP proxy service crashes.
Condition: This can occur if Internet Cache Protocol (ICP) on the server side is enabled and clients poll using ICP.
Workaround: Disable ICP server functionality. The HTTP proxy service will restart.
CSCdv81077
Symptom: The backup and restore functionality on a Content Distribution Manager 4650 with ACNS 4.0.3 software and with total channel size of more than 40 GB does not go through successfully.
Conditions: The Content Distribution Manager 4650, ACNS 4.0.3 software, and total channel used space are greater than 40 GB.
Workaround: Contact the Cisco Technical Assistance Center.
CSCdw00875
Symptom: If you use the Full button to perform a tape backup, after restoring, your system may become nonoperational. The Full backup option backs up all files in the /tmp directory that, if restored onto a running system, will cause the system to crash.
Condition: This occurs on systems running ACNS 4.0 software.
Workaround: During the backup procedure, only specify files in the location /sonoma/state*/* to be backed up. For example:
/sonoma/state/*
/sonoma/state1/*
/sonoma/state2/*
CSCdw04197
Symptom: Outgoing proxy monitoring, which uses a fixed timeout, will fail in some customer networks if the round-trip time is higher.
Condition: This occurs on systems running ACNS 4.0 software.
Workaround: There is no known workaround.
CSCdw05501
Symptom: The cache process crashes when end-to-end NTLM authentication is triggered and the connection between the Content Engine and the browser is lost before the connection between the Content Engine and the web server is closed.
Condition: This occurs on systems running ACNS 4.0 software.
Workaround: None. The cache process will stop and restart automatically.
CSCdw05503
Symptom: The Cache software proxy may crash when you use the clear cache CLI command.
Condition: This occurs on systems running ACNS 4.0 software.
Workaround: None. The Cache software will restart if it crashes.
CSCdw16537
Symptom: The icp server remote-client CLI command is now limited to eight entries.
Condition: This occurs on systems running ACNS 4.0 software.
Workaround: There is no known workaround.
CSCdw16542
Symptom: Because of a limitation on the total cache file system (cfs) storage space supported, the cfs mount CLI command is now limited to seven entries.
Condition: This occurs on systems running ACNS 4.0 software.
Workaround: There is no known workaround. However, cache performance is not affected by this limitation.
CSCdw19568
Symptom: Clicking the Update button in the Cache software GUI after modifications have been made saves changes only to the running configuration, but does not write changes to the startup configuration in NVRAM. Upon reboot, all GUI changes are lost.
Condition: This occurs on systems running ACNS 4.0 software.
Workaround: Use the write memory CLI command to save changes to the startup configuration in NVRAM.
CSCdw27994
Symptom: The cache process stops servicing requests that need a DNS lookup.
Condition: This may occur during periods of very high load on the Content Engine.
Workaround: Reboot the system.
CSCsp00854
Symptom: After you import content into a channel, wait until the import is done, and then immediately check the replication status bar on the Channel Console page, the replication status appears to be complete, even though replication may not be finished yet.
Condition: This occurs on systems running the E-CDN application.
Workaround: Because there is some delay before the replication status is updated, you should wait at least 15 to 20 minutes after an import is complete before checking the replication status.
CSCsp01083
Symptom: If you try to import media files in a Netscape browser by clicking the computer name in the Using PC Folders for Importing section of the Media Importer page, you see a Login Incorrect error message.
Condition: This occurs on systems running the E-CDN application.
Workaround: Use Microsoft Internet Explorer to open the import folder of your Content Distribution Manager, or use Windows Explorer to browse the network neighborhood for the Content Distribution Manager name.
CSCsp01389
Symptom: The default start and stop times for a TV-out device are set to the user system time and not that of the TV-out device. Therefore, the TV-out device could be in a different time zone with a different month, day, or year.
Condition: This occurs on systems running the E-CDN application.
The following section corrects errors to the section with the same name in Chapter 4, "Maintaining the System Software," in the Cisco Enterprise CDN Software User Guide, Version 3.0.
The Content Distribution Manager provides the capability for tape backup and restoration to protect against lost data and to provide service recovery.
We recommend that you do a backup before performing any software upgrades.
Note You must be running an X11 server on your PC client to use the backup and restore utilities. In this
procedure, we use Reflection X as an example of an X11 server.
To use the backup feature, follow these steps:
Step 1 Be sure that the Content Distribution Manager has been rebooted since the DLT7000 tape drive was installed and powered on. Otherwise, the Content Distribution Manager will not recognize the tape drive and the backup will fail.
Step 2 Load the DLT tape IV cartridge into the DLT7000 tape drive on your device.
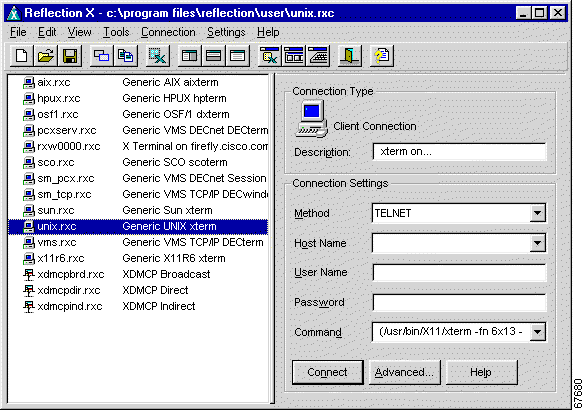
Step 3 In order to access the backup interface, you must first launch an X11 server application on your PC client. If you are using Reflection X, the X Client Manager screen appears. (See Figure 12.)
Step 5 On the same PC client as your X11 server application, launch your web browser and enter the following URL, where cdm-ip-address is the IP address of the Content Distribution Manager that contains the tape backup hardware:
http://cdm-ip-address
Enter the administrator username and password and then click OK. The Cisco Content Distribution Manager screen appears.
Step 6 Click Backup/Restore. The Backup/Restore screen appears. (See Figure 13.)
Step 7 On the Backup/Restore screen, click the Start Backup button, and then click OK to confirm. The Backup Restore Utility (BRU) main screen may take up to a minute to open.
Note If the Backup Restore Utility main screen does not appear, verify that you have an X11 server
running on your PC.
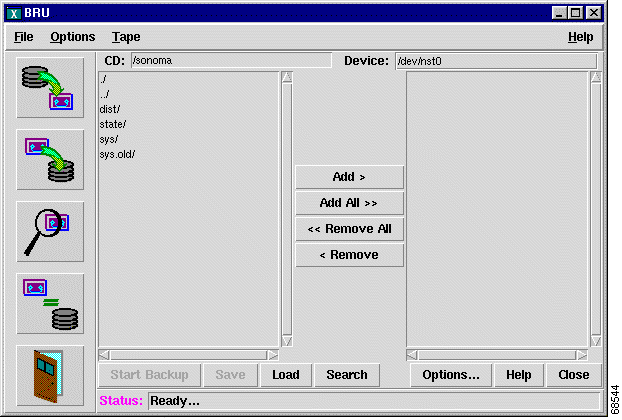
Step 8 The Backup Restore Utility main screen appears. Click the first icon in the left column, which represents backing up from disk to tape. The File Listing screen appears. (See Figure 14.)
Caution Do not click the Full button. Clicking the Full button automatically backs up temporary system files. If you then perform a restore operation, the temporary system files from the backup will overwrite any subsequent temporary system files. If this occurs, your system will fail.
Step 9 You must perform the backup in the /sonoma directory. Choose all folders listed in the left-hand column that contain the name "state" and add them to the backup list. (Click Add to include these folders in the right-hand column backup list.)
Note In order to back up all of your data, you must add to the backup list all folders in the /sonoma
directory that contain the name "state" (/sonoma/state, /sonoma/state1, and so forth).
Step 10 Click Start Backup. The Backup Progress screen appears.
Step 11 On the Backup Progress screen, enter an archive label for your backup and restore tape that is shorter than 52 characters and then click Create Backup. The Backup Estimate screen appears. (See Figure 15.)
Step 12 The Backup Restore Utility estimates the number of cartridges necessary to complete the operation. Click Continue to begin the backup. The Backup Progress screen appears. (See Figure 16.)
The Status line at the bottom of the Backup Restore Utility screen indicates the status of the backup.
Step 13 When the progress bar in the Backup Progress screen reaches 100 percent, the backup has been completed. Click the Done button and then remove the tape by pressing the unload button on the DLT7000 tape drive.
To use the restore feature, follow these steps:
Step 1 Launch your X11 server application on your PC client. If you are using Reflection X, the X Client Manager screen appears. (See Figure 12.)
Step 2 Click Generic UNIX xterm.
Step 3 Insert the tape cartridge containing the backup into the Content Distribution Manager.
Step 4 On the same PC client as your X11 server application, launch your web browser and enter the following URL, where cdm-ip-address is the IP address of the Content Distribution Manager that contains the tape backup hardware:
http://cdm-ip-address
Enter the administrator username and password and then click OK. The Cisco Content Distribution Manager screen appears.
Step 5 Click Backup/Restore. The Backup/Restore screen appears. (See Figure 13.)
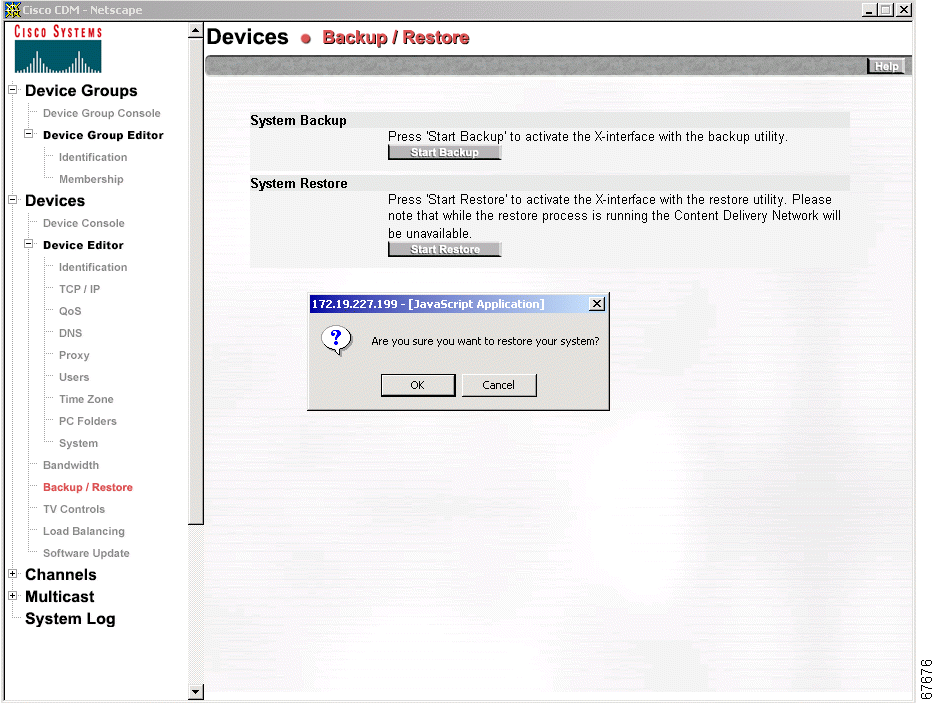
Step 6 On the Backup/Restore screen, click the Start Restore button, and then click OK to confirm. The Backup Restore Utility main screen may take up to a minute to open.
At this time, the Content Distribution Manager stops serving media to users.
Note If the Backup Restore Utility main screen does not appear, verify that you have an X11 server
running on your PC.
Step 7 The Backup Restore Utility main screen appears. On the Backup Restore Utility main screen, click the second icon in the left column, which represents restoring from tape to disk.
Note Once you have selected the restore procedure, exiting this process at any time will
automatically reboot the Content Distribution Manager.
A Device Info screen appears on top of the Backup Restore Utility main screen. (See Figure 14.)
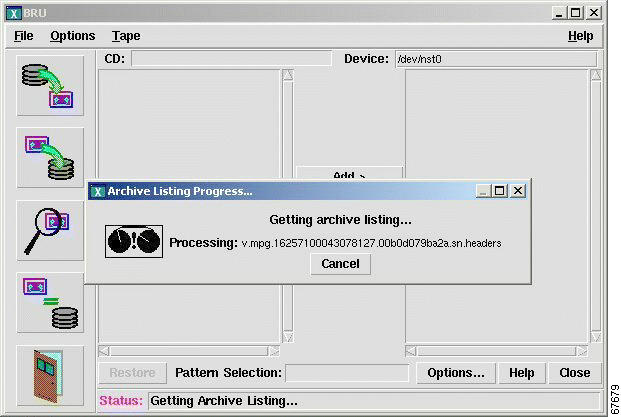
Step 8 On the Device Info screen, click OK. The Archive Listing Progress screen appears. (See Figure 17.)
Step 10 When the restore process ends, this error message may appear:
Warning BRU exited abnormally
Ignore this error message and click Cancel. The Backup Restore Utility main screen remains.
Step 11 On the Backup Restore Utility main screen, click the Done button.
Step 12 To exit the Backup Restore Utility, click the icon representing an open door.
The Content Distribution Manager then reconciles all the records of the old Content Distribution Manager MAC address with the MAC address of the new Content Distribution Manager.
Note The Content Distribution Manager then reboots automatically.
Step 13 When the Content Distribution Manager has finished rebooting, launch your web browser and enter the following URL, where cdm-ip-address is the IP address of the Content Distribution Manager that contains the tape backup hardware:
cdm-ip-address
Enter the administrator username and password and then click OK. The Cisco Content Distribution Manager screen appears.
In the Content Distribution Manager GUI, verify the following items:
All the Content Engines appear in the device console in red print and are offline.
The following error message appears as a popup window. The message corresponds to an error condition encountered by the Content Distribution Manager in attempting to carry out a requested action.
Error Message Rewinding Failed! Perhaps you have an incorrect setting for 'rewindcmd' in your /etc/brutab file.
Explanation Generally, this message is displayed if the external DLT tape drive is not recognized by the Content Distribution Manager. If the Content Distribution Manager is rebooted when the DLT tape drive is powered off, the Content Distribution Manager does not recognize the tape drive. In Content Distribution Managers with internal tape drives, this message appears only if the tape drive is defective, if the power or SCSI cable needs to be reseated, or if the SCSI bus is not properly configured.
Recommended Action Fix the problem, and then reboot the Content Distribution Manager.
To maintain your DLT tape drive in good condition, use the cleaning cartridge provided with the DLT tape drive. An LED on the front of the DLT tape drive illuminates to indicate when it is time to use the cleaning cartridge.
The following files log ACNS 4.0.3 software information:
System log
E-CDN application log
Content access log
Windows Media Technologies (WMT) access log
System Log
The system log contains important administration messages. Refer to the Cisco Enterprise CDN Software User Guide, Version 3.0 for additional information.
E-CDN Application Log
The E-CDN application log contains detailed information regarding the E-CDN application and can be viewed in two different ways:
To display the contents of the ecdn.log file on the screen, use the type or type-tail EXEC CLI commands in the CLI. Refer to the Cisco Cache Software Command Reference, Release 3.1 for additional information on the type EXEC CLI command. Refer to the Cisco Application and Content Networking Software User's Guide for additional information on the type-tail EXEC CLI command.
To access the log file from a browser, you must log in as administrator and enter the following URL, where device-ip-address is the address of the device:
The content access log is located on the Content Distribution Manager and contains information regarding content that has been accessed through all Content Engines by a client through HTTP (CE Play and CDM Play options), RealMedia (RealPlay option), or with the TV Out feature (in the case of Content Engines that support this feature).
The log file is created every day shortly after midnight and contains the following entries: content title, content moniker, client address, server name, server moniker, start time, end time, aborted, server type, and appliance IP.
Note This log file does not contain access to WMT played content. For a log of WMT played content, see
the WMT access log.
The content access log can be accessed from a client through any of the following methods, where cdm-ip-address is the IP address of the Content Distribution Manager:
To use FTP, specify the following:
admin@cdm-ip-address/export
To use HTTP, specify the following:
cdm-ip-address/export
To use a mapped drive, map a drive to the following:
\\cdm-ip-address\export
WMT Access Log
The WMT access log contains information about access to WMT content and is created at each individual device that streams Windows media. It is not included in the content access log.
This is a standard Windows Media type log file, conforming to the World Wide Web Consortium (W3C) standard for an enhanced log file. The contents of this log file are defined in each file header as follows:
To access the file, use Windows to map a drive to the Content Engine and change to the vod_out directory.
Note For Windows NT, you may need to use the Content Distribution Manager GUI to create a user called
"nobody" and log in as that user before mapping a drive from Windows to the Content Engine.
Use the clocktimezone offset global configuration command to specify a time zone, where timezone is the desired time zone entry from the following time zone table and 0 0 is the offset (ahead or behind) Coordinated Universal Time (UTC) in hours and minutes. UTC was formerly known as Greenwich mean Time.
ce(config)# clock timezone timezone0 0
Note The time zone entry is case-sensitive and must be specified in the exact notation listed in the
following time zone table.
Note When using a time zone entry from the following time zone table, the system is automatically
adjusted for daylight saving time.
Note A new mechanism for setting time zones using the global configuration command clock
summertime will be implemented in a future release.
When the Content Distribution Manager replicates files to the Content Engines, filenames that contain special characters may be altered. Some special characters are removed from the filename; others are replaced with different characters. The following special characters table summarizes how special characters in filenames are handled during replication.
If a filename does not contain an extension and all the characters in the filename are removed, the file is renamed "content." For example, a file named & would be renamed content, but a file named &.txt would be renamed .txt.
In the case of IP address-based authentications with multiple users on the same PC, once a user has been authenticated, the request to reauthenticate does not occur until the timeout entry in the Content Engine has been reached.
To ensure that all users in a multiuser, single-PC environment are authenticated, the minimum timeout value has been changed from 30 minutes to 1 minute.
In a multiuser, multi-PC environment, setting the timeout to less than 30 minutes is not recommended.
Note You should set the minimum timeout to 1 minute only for a multiuser, single-PC environment.
Otherwise, setting the timeout to 1 minute will needlessly cause reauthentication to occur for every
new request, thus affecting the response time of those requests.
If the E-CDN application is enabled in ACNS 4.0.3 software, with the E-CDN application HTTP server listening on default port 80 for HTTP requests and port 443 for HTTPS requests, interaction may occur between the proxy and the E-CDN application.
The interaction does not occur if the E-CDN application listens on ports other than the default port 80 for HTTP and 443 for HTTPS. Interactions between the proxy and the E-CDN application are:
Rules Template—If the Rules Template is enabled, many rules also apply to E-CDN application HTTP requests and communication. These rules are block, redirect, rewrite, and use-server. Other rules apply to HTTP-specific parameters and do not apply here.
HTTP authentication—HTTP authentication using Remote Authentication User Dial-In Service (RADIUS), Lightweight Directory Access Protocol (LDAP), or NTLM does not apply to the E-CDN application.
URL filtering—If this option is enabled, it also applies to E-CDN application HTTP requests and communication, both Websense and built-in goodlist and badlist filtering.
Proxy transaction log—If the proxy transaction log is enabled, all E-CDN application requests are also logged to the proxy transaction log. This includes both end user requests for E-CDN application content as well as communication between the Content Distribution Manager and the Content Engine. Therefore, if the transaction log is exported, the extra E-CDN application requests are also visible. For HTTPS requests, the log entry does not contain all of the normal information that a normal entry contains, but it does contain the client IP address and request time.
The following information updates the "Content Preloading" section of Chapter 3 in the Cisco Cache Software, Software Configuration Guide, Release 3.1:
In order for an administrator to preload authenticated content to the Content Engine, the username and password must be specified in the URL list file entry, for example:
In network topologies where there is a private DNS server and a global DNS server, if the primary DNS server sends a negative response to a host name, the Content Engine can now be configured to query the secondary DNS server as well. The Content Engine now can reach hosts outside the domain of the private DNS server in the case of a negative response, and vice versa.
To enable this feature, use the ip name-server serial-lookup command in global configuration mode. For example:
ContentEngine(config)# ip name-server serial-lookup
Note In order to use RealServer splitting, a valid RealServer license must be installed. Refer to the Cisco
Enterprise CDN Software User Guide, Version 3.0 for instructions on installing a RealServer license.
You can use E-CDN application Content Engine devices to split live RealServer broadcasts. The client uses the URL in the following format to contact the Content Distribution Manager that will automatically redirect the client to link to the split stream on the local Content Engine:
The first time that the Content Engine receives a request, an initial transaction occurs between the Content Engine and the RealServer to establish the data flow for the split stream. Subsequent client requests do not require the recurrence of this transaction.
This allows multiple clients to request the same content while not consuming more bandwidth on the back end than a single client would require.
By default, clients receive the split stream from the Content Engine by unicast. To multicast the split stream from the Content Engine to clients that are configured to receive multicast, the RealServer multicast feature can be enabled on the Content Engine.
Refer to the "Enabling CDN Back-Channel Multicasting on a LAN" section in the Release Notes for Cisco Enterprise CDN Software Version 3.0.2 for more information.
Once a user has been authenticated through LDAP, all transaction logs generated by the Content Engine for that user contain user information. A new CLI command has been added to include username logging for both NTLM and RADIUS in proxy mode.
To enable this feature, use the transaction-logs format extended-squid command in global configuration mode. For example:
ContentEngine(config)# transaction-logs format extended-squid
Hardware installation guides explain how to physically install your hardware and how to connect console and network cables. They contain illustrations and step-by-step instructions. The following hardware installation guides are available:
Cisco Content Engine 500 Series Hardware Installation Guide
Cisco Content Distribution Manager 4630 Hardware Installation Guide
Cisco Content Networking Hardware Installation Guide for the Seven-Rack Unit Chassis
A hardware installation guide is included in the documentation accessory kit that ships with your hardware product. Hardware documentation is also available on Cisco.com at the following URL:
The regulatory compliance and safety information document provides essential safety information about your Content Engine, Content Distribution Manager, or Content Router. This document contains multilingual translations of the safety warnings found in your hardware installation guide.
The multilingual Regulatory Compliance and Safety Information for the Cisco Content Networking Product Series document is included in the documentation accessory kit that ships with your hardware product.
Cisco Application and Content Networking Software User's Guide
Use this publication for basic ACNS software startup configuration, disk-space configuration and allocation guidelines, software upgrade and downgrade procedures, and ACNS software new feature descriptions and commands.
The Cisco Application and Content Networking Software User's Guide is included in the documentation accessory kit that shipped with your order.
Cache Application Software Documents
Cache software documents provide basic caching configurations and list the Cache software CLI commands that are also available in ACNS 4.0.3 software. The following Cache application software documents are available:
Note Some of the Cache software commands in these documents are no longer available in ACNS 4.0.3
software or have been changed. Therefore, when an apparent conflict exists between similar
commands, the information in the Cisco Application and Content Networking Software User's Guide
supersedes all command descriptions for Cache software in releases before the ACNS 4.0.3 software
release. (Refer to Chapter 5, "Cisco Application and Content Networking Software Cache
Application Features" and Appendix A, "Cache Application Commands in Cisco Application and
Content Networking Software, Release 4.0" of the Cisco Application and Content Networking
Software User's Guide, and refer to the Release Notes for Cisco Application and Content Networking
Software, Release 4.0.3 for the most current Cache application command information.)
Enterprise CDN Application Software Documents
Enterprise CDN documents provide basic and advanced configuration information that is applicable to the ACNS 4.0.3 software E-CDN application. The following documents are available:
Cisco Enterprise CDN Software Configuration Guide Version 3.0
Cisco Enterprise CDN Software User Guide Version 3.0
Release Notes for Cisco Enterprise CDN Software Version 3.0
Release Notes for Cisco Enterprise CDN Software Version 3.0.2
Enterprise CDN software documents are available on Cisco.com at the following URL:
Cisco documentation and additional literature are available in a Cisco Documentation CD-ROM package, which is shipped with your product. The Documentation CD-ROM is updated monthly and may be more current than printed documentation. The CD-ROM package is available as a single unit or through an annual subscription.
Nonregistered Cisco.com users can order documentation through a local account representative by calling Cisco corporate headquarters (California, USA) at 408 526-7208 or, elsewhere in North America, by calling 800 553-NETS (6387).
If you are reading Cisco product documentation on Cisco.com, you can submit technical comments electronically. Click Feedback at the top of the Cisco Documentation home page. After you complete the form, print it out and fax it to Cisco at 408 527-0730.
You can e-mail your comments to bug-doc@cisco.com.
To submit your comments by mail, use the response card behind the front cover of your document, or write to the following address:
Cisco Systems Attn: Document Resource Connection 170 West Tasman Drive San Jose, CA 95134-9883
Cisco provides Cisco.com as a starting point for all technical assistance. Customers and partners can obtain documentation, troubleshooting tips, and sample configurations from online tools by using the Cisco Technical Assistance Center (TAC) Web Site. Cisco.com registered users have complete access to the technical support resources on the Cisco TAC Web Site.
Cisco.com is the foundation of a suite of interactive, networked services that provides immediate, open access to Cisco information, networking solutions, services, programs, and resources at any time, from anywhere in the world.
Cisco.com is a highly integrated Internet application and a powerful, easy-to-use tool that provides a broad range of features and services to help you to
Streamline business processes and improve productivity
Resolve technical issues with online support
Download and test software packages
Order Cisco learning materials and merchandise
Register for online skill assessment, training, and certification programs
You can self-register on Cisco.com to obtain customized information and service. To access Cisco.com, go to the following URL:
The Cisco TAC is available to all customers who need technical assistance with a Cisco product, technology, or solution. Two types of support are available through the Cisco TAC: the Cisco TAC Web Site and the Cisco TAC Escalation Center.
Inquiries to Cisco TAC are categorized according to the urgency of the issue:
Priority level 4 (P4)—You need information or assistance concerning Cisco product capabilities, product installation, or basic product configuration.
Priority level 3 (P3)—Your network performance is degraded. Network functionality is noticeably impaired, but most business operations continue.
Priority level 2 (P2)—Your production network is severely degraded, affecting significant aspects of business operations. No workaround is available.
Priority level 1 (P1)—Your production network is down, and a critical impact to business operations will occur if service is not restored quickly. No workaround is available.
Which Cisco TAC resource you choose is based on the priority of the problem and the conditions of service contracts, when applicable.
The Cisco TAC Web Site allows you to resolve P3 and P4 issues yourself, saving both cost and time. The site provides around-the-clock access to online tools, knowledge bases, and software. To access the Cisco TAC Web Site, go to the following URL:
All customers, partners, and resellers who have a valid Cisco services contract have complete access to the technical support resources on the Cisco TAC Web Site. The Cisco TAC Web Site requires a Cisco.com login ID and password. If you have a valid service contract but do not have a login ID or password, go to the following URL to register:
If you cannot resolve your technical issues by using the Cisco TAC Web Site, and you are a Cisco.com registered user, you can open a case online by using the TAC Case Open tool at the following URL:
The Cisco TAC Escalation Center addresses issues that are classified as priority level 1 or priority level 2; these classifications are assigned when severe network degradation significantly impacts business operations. When you contact the TAC Escalation Center with a P1 or P2 problem, a Cisco TAC engineer will automatically open a case.
To obtain a directory of toll-free Cisco TAC telephone numbers for your country, go to the following URL:
Before calling, please check with your network operations center to determine the level of Cisco support services to which your company is entitled; for example, SMARTnet, SMARTnet Onsite, or Network Supported Accounts (NSA). In addition, please have available your service agreement number and your product serial number.
This document is to be used in conjunction with the documents listed in the "Related Documentation" section.
AccessPath, AtmDirector, Browse with Me, CCIP, CCSI, CD-PAC, CiscoLink, the Cisco Powered Network logo, Cisco Systems Networking Academy, the Cisco Systems Networking Academy logo, Cisco Unity, Fast Step, Follow Me Browsing, FormShare, FrameShare, IGX, Internet Quotient, IP/VC, iQ Breakthrough, iQ Expertise, iQ FastTrack, the iQ Logo, iQ Net Readiness Scorecard, MGX, the Networkers logo, ScriptBuilder, ScriptShare, SMARTnet, TransPath, Voice LAN, Wavelength Router, and WebViewer are trademarks of Cisco Systems, Inc.; Changing the Way We Work, Live, Play, and Learn, and Discover All That's Possible are service marks of Cisco Systems, Inc.; and Aironet, ASIST, BPX, Catalyst, CCDA, CCDP, CCIE, CCNA, CCNP, Cisco, the Cisco Certified Internetwork Expert logo, Cisco IOS, the Cisco IOS logo, Cisco Press, Cisco Systems, Cisco Systems Capital, the Cisco Systems logo, Empowering the Internet Generation, Enterprise/Solver, EtherChannel, EtherSwitch, FastHub, FastSwitch, GigaStack, IOS, IP/TV, LightStream, MICA, Network Registrar, Packet, PIX, Post-Routing, Pre-Routing, RateMUX, Registrar, SlideCast, StrataView Plus, Stratm, SwitchProbe, TeleRouter, and VCO are registered trademarks of Cisco Systems, Inc. and/or its affiliates in the U.S. and certain other countries.
All other trademarks mentioned in this document or Web site are the property of their respective owners. The use of the word partner does not imply a partnership relationship between Cisco and any other company. (0110R)