|
|

In transparent caching through WCCP, the user is unaware that the request made to an origin server is redirected to the Content Engine by a WCCP-enabled router. A request to a WCCP-enabled router allows for traffic interception on any port number for traffic that traverses the WCCP-enabled router or switch. WCCP contains many fail-safe mechanisms to ensure that the caching solution remains entirely transparent to the end user.
A Content Engine transparently caches as follows. (See Figure 4-1.)
1. A user requests a web page from a browser.
2. The WCCP-enabled router analyzes the request, and based on TCP destination port number, the router determines whether it should transparently redirect the request to a Content Engine. Access lists are used to control which requests can be redirected.
3. If the Content Engine does not have the requested content, it sets up a separate TCP connection to the end server to retrieve the content (3a). The content returns to, and is stored on, the
Content Engine (3b).
4. The Content Engine sends the content to the client. Upon subsequent requests for the same content, the Content Engine transparently fulfills the request from its local storage.
WCCP can also handle asymmetric packet flows and always maintains a consistent mapping of web servers to caches regardless of the number of switches or routers used in a WCCP service group (up to 32 routers or switches communicating with up to 32 caches in a cluster).
There are some significant advantages to deploying caches in transparent mode:
A transparent request is a request redirected to the Content Engine from a router. Transparent requests have a different destination IP address than that of the Content Engine. The style of the URL within a transparent request is usually server-style but can be proxy-style when the Content Engine intercepts a request destined for another proxy server. Server-style requests do not include the protocol and host name, but Real-Time Streaming Protocol (RTSP) requests are the same for server-style and for proxy-style. If a server-style URL is received, only HTTP and RTSP are supported (if RTSP user agent criteria are met). If a proxy-style URL is received, HTTP, HTTP over Secure Socket Layer (HTTPS), FTP, and RTSP are supported when the respective proxy services are configured.
The wccp service-number global configuration command can enable up to eight dynamic WCCP redirection services (90 to 97) on a Content Engine, provided that the services are also configured on the router. Each wccp service-number command specifies a router list, single port list (containing up to eight ports), application type, hash parameters, password, and weight.
The hash parameters specify how traffic should be load-balanced among the different service groups. Specifically, hashing maps items from one item set to another, such as mapping destination IP addresses to different Content Engines in a service group from the WCCP-enabled router for load-balancing purposes.
The legacy custom web cache and reverse proxy services (service numbers 98 and 99) can be configured with only one port each. If only one legacy service is configured, the total maximum number of transparent redirection ports is 57. If both legacy services are configured, the maximum port total is 50.
 |
Note The service group feature requires WCCP version 2. |
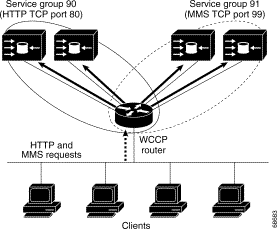
With 8 dynamic services using a maximum number of 8 ports each, the maximum number of ports that can be specified for transparent redirection is 64. In Figure 4-2 the two Content Engines on the left handle only HTTP traffic through port 80 and are defined as members of Service Group 0. The two Content Engines on the right handle only Microsoft Media Server (MMS) requests and are defined as members of Service Group 1.
All ports receiving HTTP that are configured as members of the same WCCP service share the following characteristics:
With Content Engines in a farm, the following restrictions apply:
The Content Engine WCCP implementation currently allows global settings that apply to all WCCP services, such as healing parameters, slow start, and others. The multiple service model does not change that, and the settings in question remain global for the whole WCCP system.
To use a WCCP-enabled router, an IP address must be configured on the interface connected to the Internet and the interface must be visible to the Content Engine on the network.
Use the following configuration tasks to help you configure the Content Engine in transparent mode using a WCCP-enabled router. To learn about transparent caching with a Layer 4 switch, see the "Transparent Caching with the Cisco CSS 11000 Series Switch" section.
To use WCCP, the Content Engine must be properly configured. Keep these important points in mind:
To enable an interface to redirect web traffic to the Content Engine using WCCP Version 1, perform the following tasks beginning in global configuration mode:
For more information on how to configure a WCCP-enabled router for transparent caching see "Web Cache Communication Protocol Version 1" and "Web Cache Communication Protocol Version 2."
One of the fundamental principles of transparent network caching is that the cache must remain transparent to the end user at all times. A transparent caching solution must not introduce any possible failure conditions or side-effects in a network.
The Cisco caching solution uses a WCCP-enabled router and various advanced techniques to ensure that the cache remains transparent, even if web browsers are nonoperational or web servers that are not HTTP compliant.
The following features ensure that customers do not encounter unexpected problems while deploying Cisco caching solutions:
|
Note When bypass is enabled, the client itself tries to reach the origin server. You must make sure to disable all bypass options at this point to eliminate unnecessary burden on the network. |
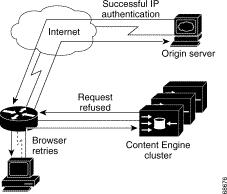
Because of IP authentication, some web sites do not allow the Content Engine to connect directly on behalf of the client. In order to preserve cache transparency and avoid disruption of service, the Content Engine can use authentication traffic bypass to automatically generate a dynamic access list for the selected client/server pairs. Authentication bypass triggers are also propagated upstream and downstream in the case of hierarchical caching.
To enable transparent error handling and dynamic authentication bypass, and to configure static bypass lists, use the bypass global configuration command. To disable the bypass feature, use the no form of the command.
For example, when a client/server pair performs authentication bypass, it is bypassed for a configurable amount of time, which is set by the global configuration bypass timer command (10 minutes by default).
This example forces all authenticated HTTP traffic to bypass the Content Engine for 24 hours:
The following two scenarios describe typical dynamic traffic bypass situations.
A user issues an HTTP request from a web browser. The request is transparently intercepted and redirected to the Content Engine. The Content Engine accepts the incoming TCP connection from the web browser, determines that the request is for an object not in storage (cache-miss), and issues a request for the object from the origin web server, but receives some kind of error (for instance, a protocol or authentication error) from the web server.
The Content Engine has already accepted the TCP connection from the web browser and the three-way TCP handshake has taken place. The Content Engine detects that the transaction with the web server is failed, but it does not know the cause (the origin web server is performing authentication based on user source IP address, incompatibility between the TCP stacks, and so forth).
Dynamic client bypass in this case means that the Content Engine returns an HTTP response code 200 (200 Temporarily Moved) to the browser with the exact same URL again. The Content Engine closes the TCP connection between the web browser and the Content Engine by issuing a "Connection: close" HTTP response header to the web browser. The browser then automatically retries the connection.
On the connection retry, the Content Engine does not accept the connection. It passes the request back to the WCCP-enabled router or switch unintercepted. The router then sends the flow toward the origin web server directly from the web browser, thereby bypassing the Content Engine. (See Figure 4-3.)
When the Content Engine receives non-HTTP requests over TCP port 80, the Content Engine issues a "retry" response, closes the connection, and does not accept subsequent connections in the same manner as in Scenario 1. A "retry" response is a normal HTTP response which states that the response needs a refresh or another try.
|
Note Non-HTTP includes nonconforming HTTP as well as different protocols such as Secure Shell (SSH), Simple Mail Transfer Protocol (SMTP), or Network News Transport Protocol (NNTP). An example of nonconforming HTTP is the failure of a web server to issue two carriage returns and line feeds at the end of the HTTP header section. |
These two scenarios implement the WCCP return-path functionality, which is a mechanism whereby a Content Engine can return traffic to the WCCP-enabled router or switch, telling the router or switch to forward the packets as if the Content Engine were not present.
It is typical for about 3 percent of all HTTP traffic flows to fail. These failed flows are automatically retried using authentication bypass or dynamic client bypass, demonstrating that the failure conditions were preexisting and not due to the deployment of transparent caching.
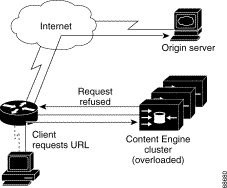
If a Content Engine becomes overwhelmed with traffic, it can use the overload bypass feature to reroute the overload traffic.
When the Content Engine is overloaded and the bypass load command is enabled, the Content Engine refuses additional requests and forwards them to the origin servers. If the load remains too high, more traffic is bypassed to the servers, and so on until the Content Engine can handle the load. The time interval between one bucket being bypassed and the next, is set by the out-interval option. The default is 4 seconds. (See Figure 4-4.)
When the first bucket bypass occurs, a set interval must elapse before the Content Engine begins to again service the bypassed buckets. The duration of this interval is set by the time-interval option. The default is 10 minutes.
When the Content Engine begins to service the bypassed traffic again, it begins with a single bypassed bucket. If the load is serviceable, it picks up another bypassed bucket, and so on. The time interval between picking up one bucket and the next is set by the in-interval option. The default is 60 seconds.
The bypass static command permits traffic from specified sources to bypass the Content Engine. The type of traffic sources are as follows:
Wildcards in either the source or the destination field are not supported.
To clear all static configuration lists, use the no form of the command.
|
Note You can also configure the router with access lists (ACLs) to increase static bypass performance. |
This example forces HTTP traffic from a specified client to a specified server to bypass the Content Engine:
This example forces all HTTP traffic destined to a specified server to bypass the Content Engine:
This example forces all HTTP traffic from a specified client to any web server to bypass the Content Engine:
This example forces all authenticated HTTP traffic to bypass the Content Engine for 24 hours:
A static list of source and destination addresses helps to isolate instances of problem-causing clients and servers.
To display static configuration list items, use the show bypass list command.
The total number of entries in the bypass list is reported by the show bypass summary command.
The multiport feature can be summarized as follows:
The proxy incoming option of the http, https, ftp, and rtsp global configuration commands now supports up to eight ports per protocol.
The multiport feature requires WCCP Version 2 and requires the configuration of the wccp port-list and the wccp service-number global configuration commands. The application cache option of the wccp service-number global configuration command redirects traffic to the Cache software conventional caching processes, whereas the application streaming option redirects traffic to the Content Engine media caching processes.
|
Note Domain Name System (DNS) must be configured in order to support all incoming proxy requests. |
To disable HTTP, HTTPS FTP, RTSP, and MMS incoming proxy services use the no protocol proxy incoming command. To add or remove ports in proxy mode, issue a new command that specifies all the ports to be used.
In transparent mode, to add or remove ports for a WCCP service, modify the port list or create a new port list for the WCCP service. A no wccp service-number command disables the specified service.
In the following example, ports 200, 3000, 110, 220, 330, 440, and 40000 are added to port list 3.
In this example, the Content Engine is configured to accept FTP, HTTP, and HTTPS proxy requests on ports 81, 8080, and 8081:
WCCP flow protection is a mechanism that ensures that no existing flows are broken when a new Content Engine is brought online.
When transparent traffic interception or redirection first commences, WCCP flow protection ensures that no existing HTTP flows are broken by allowing those preexisting HTTP flows already established to continue on.
WCCP flow protection also ensures that when a new Content Engine joins an existing Content Engine cluster, existing flows serviced by preexisting caches in the cluster will continue to receive those existing flows.
The mechanisms used by WCCP flow protection result in all of the benefits of maintaining per flow state information in a centralized location but without the overhead, scaling issues, and redundancy or resiliency issues (for example, asymmetrical traffic flows) associated with keeping per flow state information in the switching layer.
Use the wccp flow-redirect command to implement WCCP flow protection.This command works with WCCP Version 2 only. This flow protection feature is designed to keep the TCP flow intact as well as to not overwhelm Content Engines when they come up or are reassigned new traffic. This feature also has a slow start mechanism whereby the Content Engines try to take a load appropriate for their capacity.
This example shows how to enable WCCP flow protection in a Content Engine.
Accelerated WCCP is a generic term for a deployment in which WCCP on a router or switch can take advantage of switching hardware that either partially or fully implements the traffic interception and redirection functions of WCCP in hardware at Layer 2. Accelerated WCCP is currently supported only with the Cisco Catalyst 6000 and 6500 Family switches.
The Content Engine must have a Layer 2 connection with the switch. Because there is no requirement for a generic routing encapsulation (GRE) tunnel between the switch and the Content Engine, the switch can use a cut-through method of forwarding packets. For the Catalyst 6000 and 6500 Family switches, this feature is called WCCP Layer 2 Policy Feature Card (PFC) Redirection and has been available since Cisco IOS Release 12.1(1)E. This method is intended to achieve forwarding performance of up to 3 gigabits per second using a combination of the Supervisor Engine 1A and the Multilayer Switch Feature Card 2 (MSFC2).
Related Cache software commands are wccp custom-web-cache, wccp media-cache, wccp reverse-proxy, wccp service-number, and wccp web-cache.
The following example configures a Content Engine to receive Layer 2 redirected traffic from a Catalyst 6500 Series switch with a Multilayer Switch Feature Card and Supervisory Engine 1 (MSFC/SUP 1). (Multiple caching services are configured for informational purposes only.)
The Cisco CSS 11000 series switch can support transparent caching and conventional proxy caching. It also supports web acceleration through intelligent reverse proxy caching. The CSS switch provides several load-balancing methods depending how you want to distribute data over the caches (for example, entire URL, URL string, entire domain name, or domain string). The CSS switch also builds a list of known cacheable objects. The list may be modified, but much of the work is reduced by the Content Engine caching capabilities.
In a regular proxy cache configuration, the proxy server acts as a proxy for the client. In the reverse proxy configuration, the reverse proxy server acts as a proxy for the server. Also, a reverse proxy cache stores specific content, whereas proxy and transparent caches store frequently requested content. Reverse proxy caches serve two primary functions:
In a reverse proxy cache configuration, the proxy server is configured with an Internet-routable IP address. Clients are directed to the proxy server based on a DNS resolution of a domain name. To a client, the reverse proxy server appears like a web server.
Transparent caching deploys cache servers that are transparent to the browsers. You do not have to configure browsers to point to a cache server. Cache servers duplicate and store inbound Internet data previously requested by clients.
When you configure transparent caching on the CSS switch, the switch intercepts and redirects outbound client requests for Internet data to the cache servers on your network. The cache either returns the requested content if it has a local copy or sends a new request to the origin server for the information. If all cache servers are unavailable in a transparent cache configuration, the CSS switch allows all client requests to progress to the origin servers.
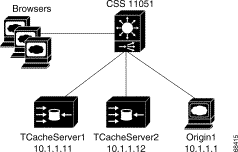
A CSS switch is introduced between the user and the cache. (See Figure 4-5.) You can configure the CSS switch to dynamically analyze the content and determine if it is cacheable or not. If it is cacheable, the CSS switch directs it to the cache service. If it is not cacheable, the CSS switch sends it directly to the
origin server.
The transparent cache servers will be stocked with static data (that is, HTML, Audio Video Interleaved [AVI], Joint Photographic Experts Group [JPEG], or Graphics Interchange Format [GIF]) files. Any files that are not cacheable (for example, ASP) will be passed directly to the server.
Requests for cacheable content are load-balanced over the two cache servers based on the URL. In a real-world scenario, they could also be balanced based on the domain name.
The http l4-switch enable command permits the Content Engine to transparently receive Layer 4 redirected traffic from Layer 4-enabled switches such as the Cisco CSS11000 series switches. See the "Transparent Caching Sample Configuration Output" section for specific configuration information.
Use the following task and CLI commands to help you configure serv1 as a transparent caching service using the CSS 11000 switch. Ensure that you have configured interfaces, services, owners, VLANs and content rules prior to configuring caching with the CSS 11000. Refer to the Content Services Switch Basic Configuration Guide for further information on how to configure these attributes.
For a complete description of each command, refer to the Content Services Switch Command Reference.
Step 2 Specify transparent caching service type for serv1.
Step 3 Create an extension qualifier list (EQL) in which you specify which content types the CSS 11000 is to cache.
Step 4 Describe the eql by entering a quoted text string with a maximum length of 64 characters.
Step 5 Specify the extension for content you want the CSS 11000 to cache. Enter a text string from 1 to 8 characters.
You may also provide here a description of the extension type. Enter a quoted text string with a maximum length of 64 characters.
Step 6 Specify the EQL in a content rule to match all content requests with the desired extension.
Step 7 Configure the load balancing method for the cache content rule. The default is roundrobin.
Step 8 Specify a failover type to define how the CSS 11000 handles content requests when a service fails (bypass, linear, next). The default is linear.
Step 9 Display the EQL configuration.
Step 10 Display the content rule to show the cache configuration.
The following is a very basic CSS 11000 switch configuration output for transparent caching using CLI commands. Use the show running-config CLI command to display the switch configuration parameters after provisioning the CSS 11000 switch.
|
Note There is no virtual IP address because the switch is transparent (not visible to the client). |
|
Note Anything that is cacheable should be load balanced using the URL and sent to the cache servers. |
![]()
![]()
![]()
![]()
![]()
![]()
![]()
![]()
Posted: Mon Oct 6 11:10:25 PDT 2003
All contents are Copyright © 1992--2003 Cisco Systems, Inc. All rights reserved.
Important Notices and Privacy Statement.