|
|

The following sections describe how to configure CTE network connections:
The configuration instructions throughout those sections assume the following setup:
The "The CTE and Your Network" section provides an overview to the typical network configurations for the CTE. Use Table 3-1 as a guide to determining the best location for a CTE, based on network topology and website characteristics.
Table 3-1 CTE Network Location Guidelines
The general process for configuring a CTE and connected devices is as follows:
1. Draw a diagram of the data flow for the CTE, including all IP addresses and VLAN numbers.
2. Physically connect the CTE to the network.
Depending on your network topology, you may need to use one or both of the CTE ports (NICs).
3. Verify that the CTE can ping the device connected to it (such as a server load balancer).
4. If you are configuring multiple CTEs, associate the various CTE network connections with a CTE server farm.
5. Configure the server load balancer so that the CTE can access the application servers.
6. Configure the server load balancer so that the CTE is accessible by clients requesting application content.
7. Verify that the data flow of the CTE is as planned.
8. If a client does not require in-line data transformation by the CTE, direct its traffic to the application servers if possible.
These sections describe how to configure the CTE and connected devices:
You can connect a CTE directly to an application server if your site has only one server and you want all traffic destined for the server to pass through the CTE. The CTE determines how to handle requests for application content based on the request header, which indicates the type of device making the request. The CTE intercepts requests from supported mobile devices and passes through other requests.
Connecting a CTE directly to an application server does not require any changes to the server configuration.
Connecting a CTE to a application server requires either one or two network cables as follows:
Figure 3-1 shows the most basic application server connection to a CTE.
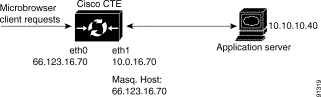
Figure 3-2 shows an application server connection to a CTE, where the CTE uses NAT.
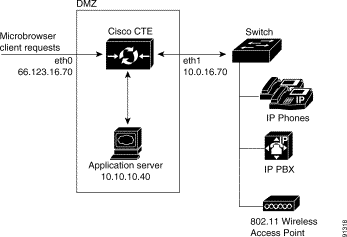
Figure 3-3 shows an application server connection to a CTE inside of a firewall. You would use a similar setup to locate a CTE behind a proxy server.
If your CTE is behind a firewall or proxy server, you will need to set up CTE proxy settings through the Administration Tool. For more information, see the "Specifying Outbound Proxy Settings" section. You will also need to specify a masquerade port for link rewriting, as described in the "Configuring Network Interface Settings" section.
 |
Note If there is a firewall or proxy server between the computer on which Design Studio is installed and the CTE, Design Studio users will need to specify the host and port for HTTP and HTTPS connections when logging in to Design Studio. |
Use the CTE Administration Tool to configure network settings. For example, specify the interfaces for the scenario in Figure 3-3 as follows:
Interface 0 IP Address: 66.123.16.70
Interface 0 Subnet Mask: 255.255.255.0
Interface 1 IP Address: 10.0.16.70
Interface 0 Subnet Mask: 255.255.255.0
Interface 0 Masq Host: 66.123.16.70
Default Gateway: 10.10.10.40
Gateway Interface: eth1
Default Host: http://www.mydomain.com
You can also use the CTE to bridge two networks in a DMZ by configuring one network on Interface 0 and the other network on Interface 1.
You can connect one or more CTEs to a server load balancer. Characteristics of this configuration include the following:
The CTE farm and the application server farm are directly accessible through load-balanced virtual IP (VIP) addresses. This configuration allows you to direct traffic that originates from a wireless device to the CTE farm VIP address.
Figure 3-4 shows a server load balancer setup in which CTE requests go through a server load balancer.
The server load balancer (SLB) configuration handles requests from microbrowser clients as follows:
1. The SLB uses header parsing to determine the type of device originating the request.
2. The SLB passes standard browser traffic (Internet Explorer and Mozilla user agents) directly to the application server farm. The SLB proxies all other user agents through the CTE.
3. After receiving a request, the CTE reissues the request to the value contained in the Host field of the request HTTP header. If the Host field is not present, the request will be reissued to the value of the Default Host setting in the CTE Administration Tool. The Default Host setting should be the domain address of the SLB (www.mydomain.com).
4. The SLB receives the request and directs it to the appropriate application server.
5. The application server retrieves the content and passes it through the SLB to the CTE.
The CTE transforms the content and sends it back through the SLB and on to the client device.
To establish the physical connection, do the following:
Use the CTE Administration Tool to configure network settings. For example, specify the interfaces for CTE 1, shown in Figure 3-4, as follows:
Interface 0 IP Address: 10.10.20.25
Interface 0 Subnet Mask: 255.255.255.0
Interface 0 Masq Host: 10.10.20.25
Default Gateway: 10.10.50.2
Gateway Interface: eth0
Masq Host: 10.10.20.25
Default Host: http://www.mydomain.com
Clients can use the CTE as a transparent HTTP proxy server. To set up the CTE as an HTTP proxy server, configure the client to point to the CTE. There is no setup required on the CTE itself.
The CTE cannot operate as a transparent secure proxy at this time.
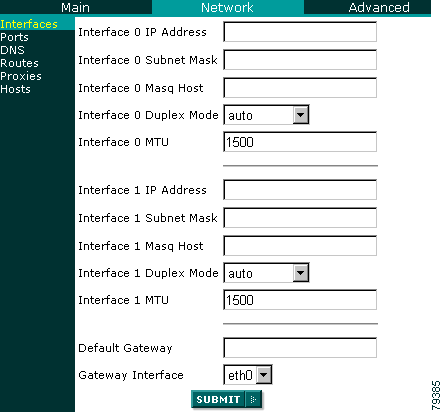
The first time that you start the CTE, the serial console prompts you for the IP address and subnet mask for NIC interface 0 and the IP address of the default gateway device. You can later use the Administration Tool to change those settings.
The network interface settings are as follows:
Duplex mode is either auto, full duplex, or half duplex. Use the default setting, auto, unless you need to change it.
The MTU defines the maximum size of each transmitted packet. The default is 1500. Use the default setting unless you need to change it.
For information on these settings, refer to the "Configuring the Masquerade Protocol, Host, and Port" section.
To change the network interfaces settings, go to the Network > Interfaces screen of the CTE Administration Tool.
When the CTE proxies a web page, it rewrites each link, prepending the appropriate address for the CTE. As a result, the links are directed through the CTE without having to rewrite the underlying web page. The following settings specify how links are to be written:
Use a masquerade protocol when you want the CTE to rewrite its links, such as when you have an SSL termination device located between the client and the CTE. Choose HTTP or HTTPS to force a rewrite to those protocols. Choose Auto to rewrite links to HTTPS if the client is connected through SSL and to rewrite to HTTP is the client is not connected through SSL.
The CTE uses the masquerade host to rewrite URLs sent to the requesting IP phone or wireless device. This feature makes all requests appear to originate from the same client and enables the CTE to send its response to a request back on the correct network connection.
If the masquerade host is not defined, the CTE sends responses out through the NIC where the gateway is identified. If the masquerade host is defined, the CTE writes all connections to the interface with the specified hostname or IP address.
The masquerade host can be a Network Address Translation (NAT) IP address/hostname or a registered domain address so that you can put the CTE on one IP address and resolve to it using NAT or name resolution.
Suppose that you have the following scenario:
If no masquerade host is specified and the CTE receives a request for www.fox.com, the CTE rewrites each link on the page. Thus, if you click a finance link, the CTE ensures that the request will go through the CTE by rewriting the link to http://192.168.1.100/http://finance.fox.com .
If the masquerade host is set to mobile.customer.com and the CTE receives a request for the finance page of www.fox.com, the CTE rewrites the link to http://mobile.customer.com/http://finance.fox.com .
The masquerade port is the port used when the CTE rewrites its links. Use this setting when you have a port-forwarding device located between the client and the CTE. Specify "0" to rewrite the link to the port to which the client is connected. Specify a port number to rewrite the link to that number.
For example, suppose that a CTE is on port 8080 behind a firewall that maps internal port 8080 to external port 80. In order for clients to correctly make requests, the CTE must rewrite links to port 80 although they are connected to the CTE on port 8080. In this case, you would use the masquerade port to specify how links are to be rewritten.
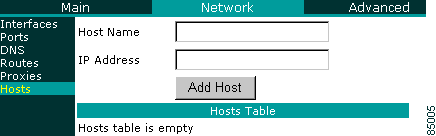
You can map CTE hostnames to IP addresses. The host aliases that you define override DNS settings.
Although the CTE does not include an NIS client and thus does not support commands such as ypbind and nslookup, name resolution libraries can resolve CTE hostnames by checking the /etc/hosts file.
To add, review, or remove host aliases, go to the Network > Hosts screen of the CTE Administration Tool.
|
Note After you add a host, you must click the Restart Server button that
appears after you click Submit. (You do not have to restart the server until
you have made all changes.) To clear all host aliases, click Clear Hosts Table. |
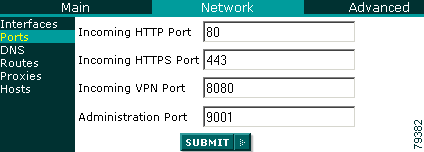
You can change the default settings of the following ports:
Typically, you will not need to change this value. However, you might need to change the value to match your firewall configurations. For example, if the CTE is hosted at an ISP, and the ISP admits only a certain range of ports, you might need to specify a different port.
|
Note The CTE listens on all interfaces. |
To configure network ports, go to the Network > Ports screen of the CTE Administration Tool.
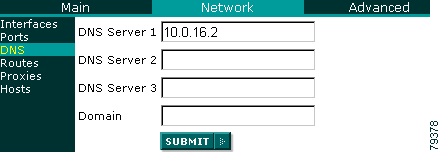
The first time that you start the CTE, the serial console prompts you for DNS settings. You can use the Administration Tool to change the following settings:
To configure DNS settings, go to the Network > DNS screen of the CTE Administration Tool.
The CTE and Design Studio each have proxy settings that you will want to set if your network does not allow your computer access to HTTP or HTTPS traffic.
You will need to set up proxy settings in the following circumstances:
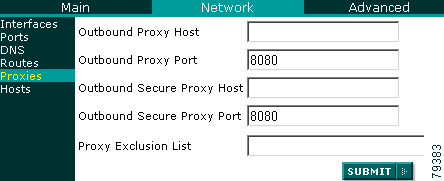
The proxy settings in the Administration Tool are as follows:
These settings specify a proxy server for HTTP (nonsecure requests). If your CTE is behind a firewall or proxy server, the CTE will use these settings for HTTP requests.
These settings specify a secure proxy server for HTTPS (secure requests). The proxy server must support the CONNECT command.
This setting is a space-separated list of subnets that will not use the defined proxy server (such as, 10.0.16.192, 10.0.16.193). You can use standard regular expression wildcard characters in this setting (such as 10.0.16.*).
To specify proxy settings, go to the Network > Proxies screen of the CTE Administration Tool.
When setting up communication with another host or network, you will sometimes need to create a static route from the CTE to the new destination. Set up static routes on the CTE port not being used by the default gateway. For an example static route setup, see the "Static Route Example" section.
To create a static route, perform these steps:
The Network > Routes screen appears.
Step 2 Enter the IP address of the destination LAN.
Step 3 Enter the subnet mask for the gateway device. The default is 255.255.255.0.
Step 4 Enter the IP address for the default gateway. If you do not specify a gateway, the CTE can access content only on the local network.
Step 5 Select the Interface for the static route. The default is eth0.
Step 6 Click Add Static Route.
To test a static route, perform these steps:
Step 2 Type 6 (Ping).
Step 3 Enter the host IP address for the device you want to ping and press Enter.
If you are successfully communicating with the other machine, messages will appear saying that the same number of packets were transmitted and received, and zero packets were lost.
If you are not communicating with the other machine, the status messages indicate that zero packets were received and all the packets were lost. Return to Step 1 and recreate the static route.
To remove a static route, perform these steps:
Step 2 Click Clear All Routes.
Suppose the IP address of the eth0 port on your CTE is 10.0.16.20 and there has been a request to access information at 129.6.0.20, to which you currently have no path. You can create a static route through the Ethernet port that is not set as your CTE default gateway, and out to the requested network address, as shown in Figure 3-5.
Figure 3-5 shows the following connections:
To set up this static route, you need to establish the path between the eth1 port and IP address 129.6.0.20.
To set up the example static route, perform these steps:
Step 2 Set the IP address of the destination LAN to 129.6.0.0.
Step 3 Set the subnet mask for the gateway device to the default value, 255.255.255.0.
Step 4 Set the IP address of the default gateway to 192.168.0.1.
Step 5 Choose eth1 as the gateway device interface.
Step 6 Click Add Static Route.
![]()
![]()
![]()
![]()
![]()
![]()
![]()
![]()
Posted: Mon Aug 18 15:35:17 PDT 2003
All contents are Copyright © 1992--2003 Cisco Systems, Inc. All rights reserved.
Important Notices and Privacy Statement.