|
|

These release notes contain important information and caveats for the Cisco Content Transformation Engine 1400 (CTE) and Design Studio Release 1.1. Information in this document supplements information in the Cisco Content Transformation Engine 1400 Configuration Note and the Design Studio User Guide.
These release notes contain the following topics:
Improper configuration of the Cisco CTE 1400 can result in a security risk. Before you deploy the Cisco CTE 1400, verify the configuration as follows:
By default, the CTE proxies only the web pages it has transformed in order to prevent access to protected servers that are on the same subnet as the CTE. If you choose to override that default, as described in the "Configuring the Cisco CTE 1400 to Proxy All Web Pages" section, do not put the CTE on the same subnet as protected servers.
 |
Note If you configure the CTE to proxy all web pages, the CTE provides access to computers on the same subnet as the web servers configured to work with the CTE. For example, suppose a CTE has an external IP address of 24.221.1.1 and an internal IP address of 192.168.1.31. On the same subnet, you have an intranet server, protected from outside access, with an IP address of 192.168.1.20. It is possible to access all ports on the protected intranet server through the CTE by using the URL http://24.221.1.1/http://192.168.1.20. |
The CTE communicates with Design Studio through port 9001 using clear-text transmissions. To assure secure operations, you must block access to CTE port 9001 from outside of your firewall.
When you complete work on the projects in a configuration file and are ready to put the file into production, you must publish the configuration file to the Cisco CTE 1400. Only one configuration file can reside on a CTE at a time: The configuration file that you publish replaces the configuration file previously in effect on the CTE.
We recommend that you follow these guidelines when working with Design Studio configuration files:
The Design Studio application requires the following:
The Cisco CTE 1400 and Design Studio support the formats most commonly used for websites and wireless devices.
Website content in the following formats is supported:
Wireless device microbrowsers do not support all content types. The Cisco CTE 1400 passes the following content to a wireless device as is:
Table 1 lists the destination devices supported by the Cisco CTE 1400.
|
|
1 cHTML = Compact HTML 2 WML = Wireless Markup Language |
Before you upgrade a CTE, record its network and DNS parameters. You will need to reconfigure the CTE after you upgrade it.
To upgrade to the latest release, perform these steps:
Step 2 Download the upgrade files, one for the CTE and one for Design Studio.
The download process copies the following files to your PC:
Step 3 Start the already installed version of Design Studio.
Step 4 From the Design Studio File menu, choose Upgrade CTE 1400.
Step 5 In the Open dialog box, navigate to CTEserver116 and click Open.
Design Studio uploads and installs the CTE upgrade file.
Step 6 Exit Design Studio.
Step 7 In the CTE console, reset the CTE network and DNS parameters.
Step 8 Exit Design Studio.
Step 9 To install the upgrade to Design Studio, double-click CTEDesignStudio116.exe.
Step 10 Restart Design Studio.
|
Note Design Studio automatically upgrades configuration files created in release 1.1.5 to the release 1.1.6 format. When you attempt to open a configuration file, Design Studio gives you the choice of overwriting the old file or saving it to a different name. |
The following sections describe new features in Cisco CTE 1400 and Design Studio release 1.1.6:
You can now monitor the performance of the CTE. You use the CTE console to enable and disable the logging of system performance information and to view the information collected during the logging. By reviewing the information provided, you can track unusual changes which can affect the stability and performance of the CTE.
The information provided includes the following:
Running the performance monitor degrades the performance of the CTE.
To monitor and view performance information, perform these steps:
Step 2 Answer yes to the prompt to start the monitoring and press Enter.
Step 3 When you are ready to view performance information, type 21 (View System Performance Information) and press Enter.
To stop the monitoring, perform these steps:
Step 2 Answer no to the prompt to stop the monitoring and press Enter.
The CTE logs informational, warning, and error messages related to the interactions between the CTE and Design Studio. You can view the Server Log from Design Studio and you can change the logging level in the CTE console so that all messages or only server version information is displayed in the log.
To change the logging level, perform these steps:
Step 2 Type v to toggle verbose mode on and off.
To view the Server Log from Design Studio, perform these steps:
Step 2 To refresh the display, click Refresh.
Step 3 To exit the window, click Done.
By default, the CTE proxies only the web pages it has transformed in order to prevent access to protected servers that are on the same subnet as the CTE. You can use the CTE console to override the default behavior so that the CTE proxies all web pages: Select option 12 (Enable Unrestricted Proxy Support) and enter yes to the prompt. For more information, see the "Important Security Information" section.
You can specify that CTE requests for web pages go through a proxy server or use a direct connection. For example, you can specify a proxy server for nonsecure requests and use a direct connection for secure requests.
To specify a proxy server for HTTP (nonsecure requests), perform these steps:
Step 2 Enter the HTTP proxy IP address and press Enter.
To specify a proxy server for HTTPS (secure requests), perform these steps:
Step 2 Enter the HTTPS proxy IP address and press Enter.
To disable a proxy server, perform these steps:
Step 2 Specify 0 as the IP address and press Enter.
Design Studio release 1.1.6 contains a preview of VoiceXML support. This preview enables you to create a transformation for one static web page that a caller can then access by phone through the BeVocal or Tellme VoiceXML service providers. When a caller dials the number you set up with a VoiceXML service provider, the service provider sends a request for the page through the CTE. The CTE transforms the page to VoiceXML and delivers the page to the service provider, which then reads the page to the caller.
To set up a VoiceXML transformation, perform these steps:
The service provider will ask you to specify a user name, password, IP address, and port number. The service provider will give you a phone number for your VoiceXML portal.
Step 2 Create a project in Design Studio and add the web page you want to transform to VoiceXML.
|
Note The page must be available on the internet. VoiceXML service providers cannot access intranet content. |
Step 3 Specify a page identifier for the page.
Step 4 Use Design Studio transformation rules to select the content you want callers to hear when they request the page from BeVocal or Tellme.
|
Note All Configure dialog boxes now include VoiceXML in the list of Device Types. Be sure to choose VoiceXML in the Device Type list when you configure the rules. |
The content you select must contain static content; dynamic content is currently not supported. You can include links, but a caller will not be able to select and follow links in this preview release of VoiceXML.
Step 5 Save the configuration file and publish it to the CTE.
Step 6 Dial the phone number for the VoiceXML portal to hear the transformed content.
Since web pages can contain more information than is reasonable to send to a device with a microbrowser, you can use Design Studio to manually paginate a web page, effectively creating multiple views of the page. For example, if a page contains four categories of links, you can divide the page into four smaller pages, each containing one category of links.
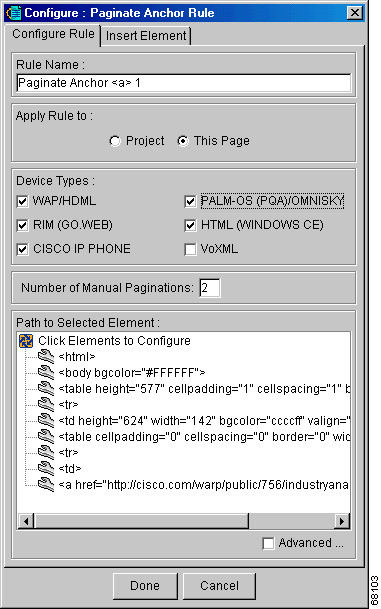
To paginate a page, you must first apply a Paginate Anchor rule to the link that points to the content you want to divide. You then apply multiple Pagination Identifier rules to the page that you want to divide. The Pagination Identifier rules map each link to a particular view of the page.
To create links to the page you want to paginate, follow these steps:
Step 2 Choose Paginate Anchor from the shortcut menu.
The Configure: Paginate Anchor Rule dialog box appears.
Step 3 Choose each device type to which you want to apply the rule.
Step 4 In the Number of Manual Paginations text box, enter the total number of links you want to create.
This number corresponds to the number of views you want to create for one web page.
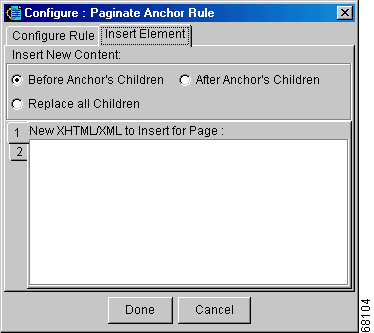
Step 5 Click the Insert Element tab.
The Insert Element tab appears.
Use the Insert Element tab to specify the text you want to appear before, after, or instead of the existing link. The text you insert should uniquely identify each view of the destination page.
Step 6 Select the location for the inserted text, as follows:
Step 7 In the text box for tab 1, enter the text you want to display for the link.
For example, if you want the word "Overview" followed by a br element, type: Overview<br/>.
Step 8 Click tab 2 and enter the text and any XHTML elements for the link.
Step 9 Repeat the preceding step for each tab.
Step 10 Click Done.
To define a view of a page, follow these steps:
The Browse tab displays the link text you just created.
Step 2 Click one of the links you created.
Step 3 Click Add Page to Project.
Step 4 Right-click anywhere in the XHTML source view.
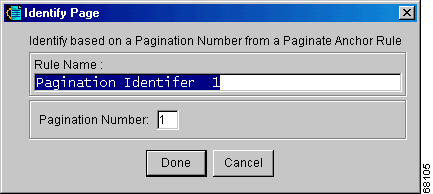
Step 5 Choose Pagination Identifier from the shortcut menu.
The Identify Page dialog box appears.
Step 6 In the Pagination Number text box, enter the number that corresponds to the tab number where you specified the link text to this view.
For example, to define the view for the "Overview" page you identified as "1" when configuring the Paginate Anchor rule, enter 1 in the Pagination Number text box.
Step 7 Click Done.
Step 8 Apply a Tag Contains rule to uniquely identify this view.
For example, apply a Tag Contains rule to a text element that appears just in this view.
Step 9 Apply a Select rule to the element that contains the text you want to appear in this view.
For example, if the text you want to appear in this view is contained in a table, apply the Select rule to the table.
Step 10 Repeat steps 2 through 9 for each view you want to create.
|
Note To return to the page that contains the links to each view, click the page link in the project tree. The page displays in the Browse tab where you can then click any link you have created. |
When you navigate to a page that contains frames, previous releases of Design Studio gave you the choice of transforming the individual frames or using the content of the noframes element. You now have a third option: redirect the page to one of the frames. This option enables you to eliminate an intermediate page, freeing a wireless device user from having to click through it.
To redirect a page to one of its frames, perform these steps:
Step 2 Create an identifier for the page.
Step 3 In the project tree, click a device type for which you want to create a No Frames rule.
Step 4 Right-click the XHTML source view.
Step 5 Choose Frames from the shortcut menu.
Step 6 Choose whether to apply the rule to all pages in this project or just this page.
Step 7 Select Redirect to frame.
Step 8 From the drop-down menu, choose the destination frame name.
Step 9 Choose each device type to which you want to apply the rule.
Step 10 Click Done.
Design Studio transforms the page, includes the message "This page will redirect to," and includes the frame name.
In previous releases of Design Studio, you had to use the Modify rule to replace an image with alternate text. Design Studio now has a new rule, named Image ALT, designed specifically to handle images.
To use alternate text instead of an image, perform these steps:
Step 2 Choose Image ALT from the shortcut menu.
Step 3 Choose whether to apply the rule to all pages in this project or just this page.
Step 4 Choose each device type to which you want to apply the rule.
Step 5 Click Done.
|
Note You can apply the Image ALT rule to multiple elements, such as to all images on a page. In the Configure: Image ALT Rule dialog box, click the img element in the Path to Selected Element area, and then change the depth and position settings. |
|
Note The following new feature is intended only for users familiar with XSL. |
You can now fine-tune the XPath expression formed by the other settings in the Configure Path dialog boxes. The Configure Text Path dialog box and the Configure Element Path dialog box contain a new area where you can configure an XPath expression.
To manually configure an XPath expression, perform these steps:
Step 2 Select Manually Configure Element.
Step 3 Click Reload to view the current XPath expression for the node.
Step 4 Edit the XPath configuration in the text box.
Design Studio alerts you if you enter invalid syntax for the XPath.
Step 5 Click Done.
This section contains the following topics:
This section describes the additional known limitations in Cisco CTE 1400 release 1.1.6.
The default browser on a Palm device cannot handle more than two consecutive redirect requests. When that occurs, the Palm device displays the message "You've been redirected too many times."
Workaround: Use the Blazer browser instead of the Elaine browser for Palm devices.
When a Palm device receives a URL that contains "[]" (square brackets), it displays an error message with error code iNet 141B. In a future release, the CTE will transform the URL so that the page renders on the Palm.
Workaround: Use Design Studio to create a transformation rule that removes the portion of the URL contained in square brackets.
Although you can specify Dynamic Host Configuration Protocol (DHCP) as the boot protocol (option 2 in the CTE console), the CTE works only with DHCP servers that are configured to return a host name.
Web sites that are coded in WML do not pass through the CTE if the URL to the site is relative. If the URL to the WML-coded site is absolute, the site content passes through the CTE.
The CTE does not retain a backup version of a configuration file. When you publish a configuration file, it overwrites the previous configuration file.
Workaround: Archive configuration files on your PC.
When CTE console option 9 (Set Secure Proxy) is disabled, SSL/HTTPS sessions are converted to HTTP and are, thus, unsecure. When secure proxy is set, the CTE should instead drop any server-side connections to HTTPS content.
Workaround: Enable the Set Secure Proxy option.
Input fields that are created with the textarea element do not work on WAP devices.
Workaround: Use the modify rule to change the textarea element to an input element. Be sure to delete any textarea attributes, such as rows and cols, that are not valid for input elements.
Design Studio allows you to publish a configuration file that does not contain any identifier rules. Without an identifier rule, a configuration file matches all pages. As a result, a wireless device user can retrieve any page through the CTE, even if console option 12 (Enable Unrestricted Proxy Support) is disabled.
Workaround: Include at least one identifier rule per page in a configuration file.
This section describes the additional known limitations in Design Studio release 1.1.6.
Two consecutive upgrades to the CTE cause Design Studio to hang.
Workaround: Restart Design Studio after you upgrade the CTE.
You cannot select in the browser view content that is generated by a style sheet.
Workaround: Select the content in the XHTML source view.
Design Studio supports only the XSL and XHTML namespaces. If you import an XSL style sheet that contains references to other namespaces, the console displays a message such as the following: "Unsupported stylesheet operation: no such prefix: rdf."
Workaround: Remove references to unsupported namespaces in XSL style sheets.
Design Studio does not support XSL style sheets that have an xsl:import element followed by an xsl:include element. If you attempt to add a page to an XML project that uses such a style sheet, the CTE console displays the error MalFormedURLException and Design Studio will need to be stopped and restarted.
Workaround: Combine the XSL style sheet referenced by the xsl:include element with the style sheet referenced by the xsl:import element. Design Studio supports the xsl:import element.
Design Studio cannot save a configuration file that contains an XML page with a CDATA section.
Workaround: You can use any of the following workarounds:
Design Studio does not correctly store the name of Paginate Identifier rules in a configuration file. When you open a configuration file, Paginate Identifier rules might not have a name.
Workaround: When you open a configuration file that contains Paginate Identifier rules, verify that the rules have names. If they do not, edit the rules and enter a name for them.
|
Note The *** in this section indicate that the caveat was reported and resolved after release 1.1.5. |
This section describes the caveats resolved in Cisco CTE 1400 release 1.1.6.
The CTE assumed that the network mask set for the second network interface card (eth1) is the same for the first network interface card (eth0).
Resolution: You can set the network mask for eth1 by using the CTE console option 3 (Set Networking Parameters) as described in the Cisco Content Transformation Engine 1400 Configuration Note.
WML devices that use the pre-3.1 version of the Openwave Mobile Browser (UP.Browser), sometimes displayed a Form Compilation Error when attempting to handle forms.
Resolution: The CTE correctly handles the forms on the earlier versions of the UP.Browser.
When browsing on a Palm VII, clicking a Submit button sometimes resulted in the display of the same page.
Resolution: The correct page is now loaded.
Decimal character references below 160 will be encoded differently in release 1.1.6. The encoding change will affect any rules that include these special characters.
Resolution: The encoding for decimal character references has changed. Design Studio converts the encoding when you open a release 1.1.5 configuration file in release 1.1.6.
The CTE could not access a website from behind a proxy firewall. To your website, the CTE appeared as a browser, like Internet Explorer or Netscape. If you set up your website to use a proxy server, the CTE was unable to access pages from your website.
Resolution: The CTE now supports proxy servers, as described in the "Directing Cisco CTE 1400 Requests through a Proxy Server" section.
If you configure a cache engine to cache pages from the CTE, you can log in to the CTE but cannot retrieve web pages from it. This problem has been observed only with the Cisco cache engine.
Resolution: Set your cache engine to bypass mode. Review the configuration note for your cache engine for instructions.
Unless option 4 (Set Masquerade Host) was set in the CTE console, you could not follow links on WAP-enabled phones that use WML.
Resolution: You no longer have to set a masquerade host to follow links on WAP-enabled phones that use WML.
The CTE sometimes did not correctly handle a form on WML and IP phones if the form had an input type of "hidden" and a value that contained the "%" character.
Resolution: The CTE correctly handles the forms.
Some servers return a content-type value of "text/plain" for XML documents. Because the CTE chose a parser based on the content-type value, the wrong parser was used for XML documents.
Resolution: The CTE now chooses a parser based on the filename extension, rather than the content-type value.
A CTE attempting to perform more than two transformations simultaneously will successfully handle only one of the transformations and will not respond to the other requests.
Resolution: The CTE correctly handles multiple simultaneous transformations.
|
Note The *** in this section indicate that the caveat was reported and resolved after release 1.1.5. |
This section describes the resolved caveats in release 1.1.6 of Design Studio.
When uploading a configuration file to the CTE, Design Studio appeared to hang.
Resolution: Design Studio displays a progress bar, so you can monitor the progress of the upload.
When you saved a configuration file, Design Studio did not check for a file of the same name in that directory and display the Save As dialog box.
Resolution: Design Studio displays the Save As dialog box when you attempt to save a configuration file with a duplicate file name.
If you attempted to browse to a page while Design Studio was publishing a configuration file to the CTE, Design Studio displayed a message that there was a problem with the upload although it was completed successfully.
Resolution: Design Studio no longer displays an error message when the upload completes successfully.
A page sometimes rendered differently in the Edit tab and the Browse tab. This problem occurred when you created a rule with the Match Element Name field not selected and the Position to Match option set to a range. Design Studio incorrectly calculated the range in the Edit tab.
Resolution: Pages now render correctly in the Edit tab.
Design Studio sometimes worked incorrectly when you attempted to save a configuration file. In some cases, a Java NullPointerException occurred; in other cases, Design Studio incorrectly interpreted a filename as invalid.
Resolution: Design Studio now correctly saves configuration files.
Design Studio allowed the p element to be hierarchical. Any rule associated with a p element may not have resulted in a correct transformation.
Resolution: Design Studio no longer allows the p element to be hierarchical. Design Studio corrects the transformation rules for the p element when you open a 1.1.5 configuration file in release 1.1.6.
Design Studio did not correctly display some UTF-8 characters, such as the bullet character.
Resolution: Design Studio correctly displays the special characters.
The Dial rule could not prepend a "9" or other number to access an external number.
Resolution: The Configure: Dial Rule dialog box now includes a text box for entering a phone number prefix.
Clicking the Close button in the Save As dialog box did not close the dialog box and displayed a Conflict message box.
Resolution: The Close button in the Save As dialog box works correctly.
The Find dialog box did not work correctly when the search string included a space or the following special characters: /, <, >, =.
Resolution: The Find dialog box handles spaces and special characters.
Design Studio might not display the content of a noframes element in the browser view.
Resolution: Design Studio always displays the content of a noframes element.
Design Studio incorrectly calculated the range values in the Configure Element dialog boxes.
Resolution: Design Studio correctly calculates the range values.
The Review and Commit option has changed from 8 to 31. The Restart/Shutdown option has changed from 9 to 32.
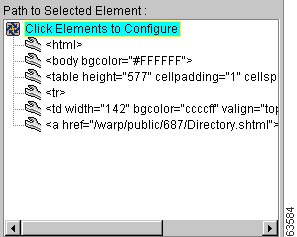
The Path to Selected Element area in the Identify Page dialog box and all Configure: Rule dialog boxes has changed. Previously the Path to Selected Element area contained a button for each path element. Now the path elements are presented in a list as shown in Figure 1.
This section describes the known limitations in Cisco CTE 1400 release 1.1.5.
The CTE supports HTTP Basic Authentication only.
Workaround: None. A future release of the CTE will support Digest Authentication. There is no planned support for Windows NT Challenge/Response Authentication (also referred to as NTLM).
The CTE does not support web pages that exceed 256 KB.
Workaround: None. In a future release, the CTE console will allow you to configure the supported page size.
The CTE assumes that the network mask set for the second network interface card (eth1) is the same for the first network interface card (eth0).
The CTE currently supports only strong (128-bit) Secure Sockets Layer (SSL) encryption for incoming connections.
Although you can specify Dynamic Host Configuration Protocol (DHCP) as the boot protocol (option 2 in the CTE console), the CTE currently works only with DHCP servers that are configured to return a host name.
Workaround: To use DHCP with the CTE, configure your DHCP server to return a host name. Alternatively, reserve an IP address for the CTE. In a future release, the CTE will fully support DHCP.
Decimal character references below 160 will be encoded differently in the next release. The encoding change will affect any rules that include these special characters.
The CTE cannot access a website from behind a proxy firewall. To your website, the CTE appears as a browser, like Internet Explorer or Netscape. If you set up your website to use a proxy server, the CTE is unable to access pages from your website.
Workaround: Do not force proxy use. Release 1.1.6 of the CTE removes this limitation.
The masquerade IP address (option 4 in the CTE console) defaults to an invalid value.
Workaround: Use option 4 in the CTE console to set the CTE masquerade IP address to the appropriate value. For information, refer to the Cisco Content Transformation Engine 1400 Configuration Note.
The CTE processes web pages only from servers that return a valid content type, either "text/html" or "text/xml." The CTE does not transform a web page with any other content type and passes it to wireless devices as is.
Workaround: Set up your server to return a supported content type.
The CTE may not correctly handle a form on WML and IP phones if the form has an input type of "hidden" and a value that contains the "%" character.
Workaround: None. Release 1.1.6 of the CTE fixes this problem.
You must choose the type of encoding used for web pages from the CTE console.
Workaround: The CTE uses Latin-1 encoding by default, which will work for most pages that are not encoded in Unicode Transformation Format-8 (UTF-8). We recommend that you use Latin-1 encoding for HTML-based pages and UTF-8 encoding for XML documents. You can also choose raw, ASCII, or macro encoding.
This section describes the known limitations in Design Studio release 1.1.5.
The scroll bars in the XHTML source view are incorrect. This problem occurs as the result of a known issue with JRE/JDK version 1.2.2 that will be resolved in a future release.
Workaround: Redisplay the XHTML source view by opening and closing a node in the tree.
When uploading a configuration file to the CTE, Design Studio appears to hang.
Workaround: Wait until Design Studio completes the upload. A future release of Design Studio will contain a progress bar and performance enhancements.
You cannot rename a page or project in Design Studio.
Workaround: Support for renaming pages and projects will be included in a future release.
The drop-down menus in the Log in to the Cisco CTE 1400 dialog box do not retain previously selected values. For example, if you change the value of the User Name field, the previously selected value no longer appears in the menu. This problem occurs as the result of a known issue with JRE/JDK version 1.2.2.
You cannot delete or edit multiple rules simultaneously by selecting them in the Transformation Rules or Identifier Rules lists and then clicking the Delete or Edit button. Design Studio performs the command only on the last rule selected.
Workaround: Delete or edit the rules individually.
After applying a rule or clicking a tab, the Edit or View Original tab is blank.
Workaround: Change to a different tab and the page will render.
When you click a link in either the Edit tab or View Original tab, Design Studio sometimes displays the link destination instead of selecting the link.
Workaround: Click the Browse tab, click the previously selected tab, and then select the link.
After the following sequence of steps, Design Studio is unable to load additional web pages:
c. Browse to www.yoursite.com.
e. Remove the page from the project.
f. Browse to www.yoursite.comn. (Notice the spelling at the end of the URL.)
Workaround: Save the project, exit Design Studio, and restart Design Studio. This problem will be fixed in a future release.
You cannot save a configuration file (.cte) with an extension that contains a "/" or "\".
Workaround: Remove the slash from the filename.
A page renders differently in the Edit tab and the Browse tab. This problem occurs when you create a rule with the Match Element Name field not selected and the Position to Match option set to a range. Design Studio incorrectly calculates the range in the Edit tab.
Workaround: View the page in the Browse tab, which renders the page in the same way that the CTE will transform it.
Design Studio allows the p element to be hierarchical. Any rule associated with a p element may not result in a correct transformation.
Workaround: None. Release 1.1.6 of the CTE correctly flattens the p element.
If you configure a cache engine to cache pages from the CTE, you can log in to the CTE but cannot retrieve web pages from it.
Workaround: Do not configure a cache engine to cache pages from the CTE. A future release of the CTE will support cache engines.
After browsing to a page in Design Studio, the URL listed in the Address field is incorrect. This problem occurs if the server where the web page originates is returning a content type other than "text/html" or "text/xml."
Workaround: Set up your server to return a supported content type.
The Dial rule cannot prepend a "9" or other number to access an external number.
Workaround: None. Release 1.1.6 of the CTE supports prepended numbers.
The following documents are available for the Cisco CTE 1400 and Design Studio:
The following sections explain how to obtain documentation from Cisco Systems.
You can access the most current Cisco documentation on the World Wide Web at the following URL:
Translated documentation is available at the following URL:
http://www.cisco.com/public/countries_languages.shtml
Cisco documentation and additional literature are available in a Cisco Documentation CD-ROM package, which is shipped with your product. The Documentation CD-ROM is updated monthly and may be more current than printed documentation. The CD-ROM package is available as a single unit or through an annual subscription.
Cisco documentation is available in the following ways:
http://www.cisco.com/cgi-bin/order/order_root.pl
http://www.cisco.com/go/subscription
If you are reading Cisco product documentation on Cisco.com, you can submit technical comments electronically. Click Leave Feedback at the bottom of the Cisco Documentation home page. After you complete the form, print it out and fax it to Cisco at 408 527-0730.
You can e-mail your comments to bug-doc@cisco.com.
To submit your comments by mail, use the response card behind the front cover of your document, or write to the following address:
Cisco Systems
Attn: Document Resource Connection
170 West Tasman Drive
San Jose, CA 95134-9883
Cisco provides Cisco.com as a starting point for all technical assistance. Customers and partners can obtain documentation, troubleshooting tips, and sample configurations from online tools by using the Cisco Technical Assistance Center (TAC) Web Site. Cisco.com registered users have complete access to the technical support resources on the Cisco TAC Web Site.
Cisco.com is the foundation of a suite of interactive, networked services that provides immediate, open access to Cisco information, networking solutions, services, programs, and resources at any time, from anywhere in the world.
Cisco.com is a highly integrated Internet application and a powerful, easy-to-use tool that provides a broad range of features and services to help you to:
You can self-register on Cisco.com to obtain customized information and service. To access Cisco.com, go to the following URL:
The Cisco TAC is available to all customers who need technical assistance with a Cisco product, technology, or solution. Two types of support are available through the Cisco TAC: the Cisco TAC Web Site and the Cisco TAC Escalation Center.
Inquiries to Cisco TAC are categorized according to the urgency of the issue:
Which Cisco TAC resource you choose is based on the priority of the problem and the conditions of service contracts, when applicable.
The Cisco TAC Web Site allows you to resolve P3 and P4 issues yourself, saving both cost and time. The site provides around-the-clock access to online tools, knowledge bases, and software. To access the Cisco TAC Web Site, go to the following URL:
All customers, partners, and resellers who have a valid Cisco services contract have complete access to the technical support resources on the Cisco TAC Web Site. The Cisco TAC Web Site requires a Cisco.com login ID and password. If you have a valid service contract but do not have a login ID or password, go to the following URL to register:
http://www.cisco.com/register/
If you cannot resolve your technical issues by using the Cisco TAC Web Site, and you are a Cisco.com registered user, you can open a case online by using the TAC Case Open tool at the following URL:
http://www.cisco.com/tac/caseopen
If you have Internet access, it is recommended that you open P3 and P4 cases through the Cisco TAC Web Site.
The Cisco TAC Escalation Center addresses issues that are classified as priority level 1 or priority level 2; these classifications are assigned when severe network degradation significantly impacts business operations. When you contact the TAC Escalation Center with a P1 or P2 problem, a Cisco TAC engineer will automatically open a case.
To obtain a directory of toll-free Cisco TAC telephone numbers for your country, go to the following URL:
http://www.cisco.com/warp/public/687/Directory/DirTAC.shtml
Before calling, please check with your network operations center to determine the level of Cisco support services to which your company is entitled; for example, SMARTnet, SMARTnet Onsite, or Network Supported Accounts (NSA). In addition, please have available your service agreement number and your product serial number.
AccessPath, AtmDirector, Browse with Me, CCIP, CCSI, CD-PAC, CiscoLink, the Cisco Powered Network logo, Cisco Systems Networking Academy, the Cisco Systems Networking Academy logo, Fast Step, Follow Me Browsing, FormShare, FrameShare, GigaStack, IGX, Internet Quotient, IP/VC, iQ Breakthrough, iQ Expertise, iQ FastTrack, the iQ Logo, iQ Net Readiness Scorecard, MGX, the Networkers logo, Packet, RateMUX, ScriptBuilder, ScriptShare, SlideCast, SMARTnet, TransPath, Unity, Voice LAN, Wavelength Router, and WebViewer are trademarks of Cisco Systems, Inc.; Changing the Way We Work, Live, Play, and Learn, Discover All That's Possible, and Empowering the Internet Generation, are service marks of Cisco Systems, Inc.; and Aironet, ASIST, BPX, Catalyst, CCDA, CCDP, CCIE, CCNA, CCNP, Cisco, the Cisco Certified Internetwork Expert logo, Cisco IOS, the Cisco IOS logo, Cisco Press, Cisco Systems, Cisco Systems Capital, the Cisco Systems logo, Enterprise/Solver, EtherChannel, EtherSwitch, FastHub, FastSwitch, IOS, IP/TV, LightStream, MICA, Network Registrar, PIX, Post-Routing, Pre-Routing, Registrar, StrataView Plus, Stratm, SwitchProbe, TeleRouter, and VCO are registered trademarks of Cisco Systems, Inc. and/or its affiliates in the U.S. and certain other countries.
All other trademarks mentioned in this document or Web site are the property of their respective owners. The use of the word partner does not imply a partnership relationship between Cisco and any other company. (0108R)
Copyright © 2001, Cisco Systems, Inc.
All rights reserved.
![]()
![]()
![]()
![]()
![]()
![]()
![]()
![]()
Posted: Mon Aug 18 17:05:18 PDT 2003
All contents are Copyright © 1992--2003 Cisco Systems, Inc. All rights reserved.
Important Notices and Privacy Statement.