|
|

This document provides a description of the Cisco MGX 8850 Wide Area Edge Switch card set that comprises the Voice Interworking Service Module (VISM).
A Cisco MGX 8850 Wide Area Edge Switch, when equipped with one or more VISM card sets, has the capability of transporting digitized voice signals as VoIP packets over an ATM network. VISM is designed so that future releases will also support voice over frame relay and voice over ATM.
A VISM equipped MGX 8850 can emulate many of the functions of a Tandem (Class 4) switch.
In this application VISM functions as voice gateway and performs call control in conjunction with a Calling Agent. The Calling Agent initiates and controls the call control functions and VISM performs the transmission of the voice payload through a bearer circuit.
Equipped with eight T1 or E1 ports, an array of Digital Signal Processors (DSPs), and a broadband interface to the packet network, VISM is ideally suited to processing high density digital voice circuits by providing echo cancellation, dejittering, and packetization on the fly.
A VISM card set is installed in a MGX 8850 Wide Area Edge Switch as a front card and a back card.
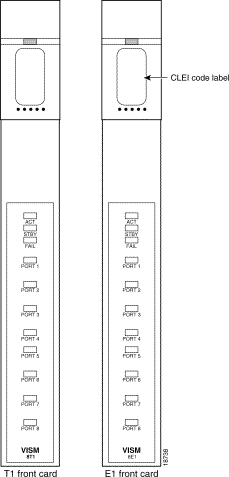
There are two kinds of front card: a VISM-8T1 card that supports digitized voice over up to 8 T1 lines and a VISM-8E1 card that supports digitized voice over up to 8 E1 lines.
This document consists of the following sections:
This section defines words, acronyms, and actions which may not be readily understood.
DSPM Digital Signal Processing Module
DTMF Dual Tone Multi Frequency
MIPS Million Instructions Per Second
PNNI Private Network-to-Network Interface
RTP Real-time Transport Protocol
SGCP Simple Gateway Control Protocol
UFM Universal Frame-Relay Module
VISM VoIce Interworking Service Module
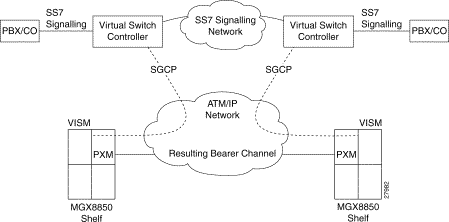
Figure 1 shows how two MGX 8850 shelves can transport voice through an ATM/IP network.
Each MGX 8850 shelf is configured with one or more VISM card sets which provides interfaces for the voice TDM signals on T1 or E1 lines. Each MGX 8850 shelf also connects to the ATM/IP network through its Processor Switch Module (PXM).
Voice connections are set up using Virtual Switch Controllers (VSCs) that receive CCS signals from a PBX. Call setup and routing is then achieved through a combination of C-ISUP SS7 and simple gateway control protocol (SGCP) commands that are sent over the IP network to the VISM cards in the MGX 8850 shelves and the other VSCs involved in routing the call.
Once a voice connection is established, the voice payload connection is between a T1 or E1 line at one shelf, through the VISM, through the PXM, through the ATM network, through the PXM and VISM at the remote shelf, and out to the T1 or E1 line.
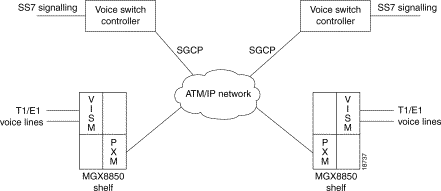
Call Setup and Teardown involves the originating and destination PBXs (or Central Offices), the originating and destination VSCs (also sometimes referred to as Call or Calling Agents) and the originating and destination VISM cards. Communication between the PBXs/COs and the VSCs is through the ISDN User Part (ISUP) of the SS7 signaling system. Communication between the VSCs and the VISM cards is through the Simple Gateway Control Protocol (SGCP) developed jointly by Cisco and Bellcore.
The communication links involved in call setup and teardown are shown in Figure 1-2.
A (highly simplified) sequence of steps in call setup is as follows:
1. When a user goes off-hook to make a call, the PBX or CO initiates the process by sending an SS7 Setup command to the VSC.
2. The VSC sends a SGCP Create Connection (CRCX) command to the originating VISM. The VISM obtains an endpoint and port address for the call and responds with a CRCX acknowledgment.
3. Using the SS7 network, the originating VSC sends an SS7 Initial Address message (IAM) to the destination VSC. This message contains all the pertinent information about the call.
4. The destination VSC uses SGCP commands to setup a connection between the two VISM cards using the IP address, endpoints and port numbers at each VISM.
5. The destination VSC sends an SS7 Setup message to the destination PBX/CO. The PBX responds with an SS7 Proceeding message which is relayed to the originating VSC.
6. The originating VSC issues a SGCP Modify Connection (MDCX) message to the originating VISM.
7. An end-to-end bearer channel is setup for the call to proceed.
When the call is finished, the finishing PBX sends an SS7 Disconnect message to its VSC and, using a combination of the SS7 and SGCP protocols, the connection, endpoints, etc. are released.
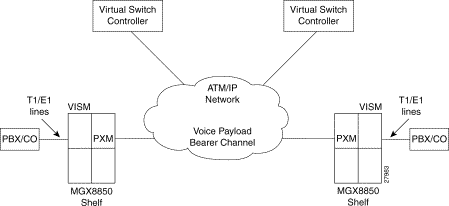
VISM cards use the bearer channel that is created by the call setup process to transmit the voice payload across the IP/ATM network as shown in Figure 1-3
After the VISM receives digital voice signals over the T1 or E1 line, the signal is passed to a DSP that performs echo cancellation, converts the stream to PCM and packs the voice samples into Real Time Protocol (RTP) packets. UDP and IP headers are added, and the packets are then transported in IP packets. The IP address is obtained from the VSC during the call setup process.
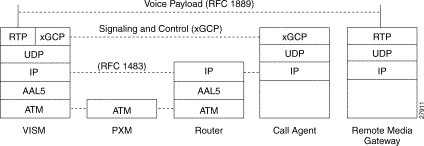
The protocol stacks involved in call control and voice payload are shown in Figure 1-4.
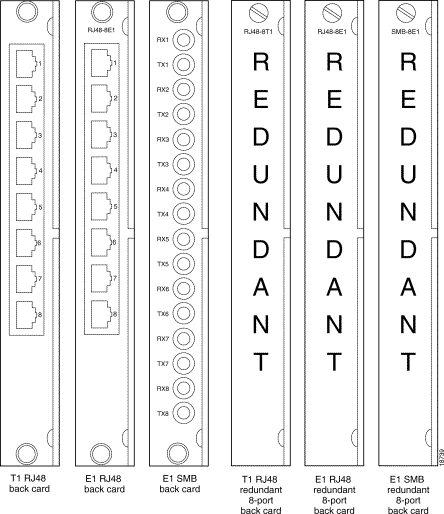
VISM front cards are shown in Figure 1-5, and VISM back cards are shown in Figure 1-6.
The VISM card set is managed and configured through a command repertoire which is executed through the command line interface (CLI) or through CiscoView.
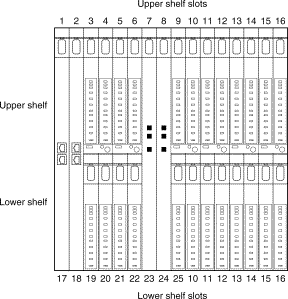
VISM cards are single height cards, and installation of a VISM card set in an MGX 8850 Wide Area Edge Switch consists of installing one front card and one back card in either an upper or lower shelf slot. Slots 1-6, 9-14, 17-22, and 25-30 are available for VISM cards (see Figure 1-7).
Step 2 Gently slide the card all the way into the slot and press the insertion/extractor lever until it snaps into the vertical position.
Note The card should slide in and out with only slight friction on the adjacent board's EMI gaskets. Do not use force. Investigate any binding.
Step 2 Position the rear card guides over the appropriate slot at the top and bottom of the card cage.
Step 3 Gently slide the card all the way into the slot and tighten the two captive screws on the back card's faceplate. Tighten the upper and lower screws to prevent misalignment of the card. Do not overtighten the screws. Tighten only enough to secure the card.
When the VISM front and back cards are installed the T1 or E1 cables can then be connected to the RJ-48 or SMB connectors on the back card.
Step 2 Gently pull the card out of the card cage.
Step 2 Use a flat screwdriver to undo the two retaining screws in the back card's faceplate.
Step 3 Pull both of the two extractor levers out to the horizontal position. This action will start the removal of the card. Gently pull the card out of the card cage.
When a VISM card is powered up (either by being installed in an already running MGX 8850 shelf or, if already installed, by starting the shelf) the card performs extensive testing and initialization functions. If the card has already been configured, the initialization includes downloading the configuration data from the disk on the PXM. The whole process can take a minute or two during which the LED indicator blink. When the LEDs become quiescent, the card is in the Active state and is ready to be configured (if necessary) and process data.
VISM configuration is performed by entering commands either from an alpha-numeric terminal connected to the PXM's serial port or through CiscoView. The section describing these commands can be found on page 22.
Step 2 Bring up T1/E1 lines.
For each T1/E1 line being used, use the addln command where the parameter, line number, corresponds to the port number on the back card.
For each T1/E1 line being used, use the cnfln command to specify the desired coding, length, clock source parameters.
Step 3 Specify Endpoints
Use the addendpt command to add an endpoint for each T1 or E1 DS0 port. An endpoint is a logical port corresponding to a particular DS0 and is required by the VSC for sending the SGCP Create Connection command to the VISM. The addendpt command assigns an endpoint number to the endpoint and links it to a specific line (DS1) and DS0 on that line.
Step 4 Use the addport command and then the addrscprtn command to add a port and resource partition on the network side of the VISM card.
The partition and port must be deleted (using the delrscprtn and delport commands) before a VISM card is removed from its slot.
Step 5 Add a PVC from the VISM to the PXM card in the MGX8850
Use the addchan or addcon command to create a master segment PVC between the VISM card and the router. Adding a PVC must be done with the CLI and cannot be performed under CiscoView.
The addchan and addcon commands have the format:
addchan <lcn><rmtvpi><rmtvci><rmtNSAP>
addcon <nodename><slotNo><portNo><vpi><vci>
These commands are described under the Command Line Interface section.
A slave segment PVC must also be specified on the MGX 8850 PXM card. When this slave segment is setup the VPI and VCI values specified for the master segment on the VISM card and the slave segment on the PXM card must be the same.
Step 6 Configure the DSPs
VISM front card contains 36 digital signal processors (DSPs) of which 24 are dedicated to voice compression only and 12 are general purpose (voice compression or echo cancellation). As a guide, one DSP has the capacity to handle 21 DS0 ports with echo cancellation but with no compression. Use the cnfecancnt command to specify how many DSPs are to be used for echo cancellation.
Configure the echo canceller DSPs parameters using the appropriate cnfecanxxx commands to specify idle pattern, noise match reenable, echo canceller reenable, tone disable, and maximum tail.
Configure the voice compression DSPs using the appropriate cnfcompxxx commands to specify voice detection and packet size.
Confirm all DSP parameters using the dspcarddsp command.
Step 2 Add the slave segment of the PVC between the VISM and the PXM.
Use the addcon or addchan commands to setup the slave segment. The VPI and VCI values must match those used when setting up the master segment in the VISM.
The router is the point at which the voice bearer channel interfaces with the ATM/IP network. It is the responsibility of the router to route the call through the network to the correct IP destination. The router should be configured so that it recognizes the cells over the ATM link as AAL5 format with encapsulated IP datagrams.
For example, if a Cisco 7500 router is used, the command sequence (after entering configuration mode) would be:
— interface ATM1/0/0.1 point-to-point
— ip address 198.45.16.101 255.255.255.252
— atm pvc ID <Vpi> <Vci> aal5mux ip
— wr (save the configuration) to disk)
The VSC needs to be configured so that it knows the bearer and D channel configurations and the identity of the VISM card. The configuration procedure depends very much on the make and model of VSC being used.
If the Cisco VSC 2700 is being used the command sequence is as follows (see the appropriate VSC 2700 manual for details of these commands):
Step 2 Configure TransPath
TransPath->Cards
Add Cage
Add Cards
TramsPath->TrafficPaths
Add Traffic Paths
Specify DPC, Protocol
TransPath->SignalPaths
Add Signal pathsSpecify OPC, Protocol and Traffic Paths. Usage must be set to Access
TransPath->Channels
TransPath->Properties 9override)
BorigStartIndex 1
BTermStartIndex 1
VNETid <VISM domain name) (must be the same as that specified on the VISM card.
The VISM-8T1 (but not the VISM-8E1) can be configured to provide 1:N redundancy through the use of a SRM-3T3 card.
Service module redundancy provides 1 for N redundancy for a group of VISM service modules where a group consists of N active service modules and one standby service module. The standby service module is installed with the redundant version of the back card.
1:N redundancy must be configured by the user. When the failure of an active VISM in a group is detected, the SRM is ordered to invoke 1:N redundancy for that group. The back card of the failed service module now directs data to and from the standby service module. The SRM-3T3 can support multiple group failures.
When the failed card is replaced, switch back to normal operation must be made by the user (it is not automatic). See the MGX 8850 Manual for more details about general 1:N redundancy.
Several kinds of alarms can be detected by the VISM-8T1/E1.
Definition of alarm states is given in T1.403 for DS1 and G.704 for E1. The alarms are propagated to the remote end over the ATM network in accordance with ATM specifications.
Table 1-1
VISM Alarms
The VISM-8T1 and VISM-8E1 card sets provide the capability for creating a range of loopback paths for diagnostic purposes. The available loopback configurations that can be configured are:
Path 1: Remote Line Loopback, (per Line).
Path 3: Payload Loopback through the CPU towards the network (per channel - for OAM cells)
Loopbacks are enabled through the addlnloop and dellnloop commands
This section describes the available VISM 1.0 troubleshooting tools together with some remedial actions that can be taken under various abnormal situations.
The first level of troubleshooting tools is the set of LED indicators located on the VISM card itself.
The VISM card has 3 card status LEDs and 8 line status LEDs, organized as shown in Figure 1-8
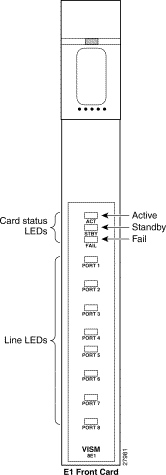
ACTIVE LED will be lit GREEN, when the card is in the ACTIVE state.
STANDBY LED will be lit Orange, when the card is in the STANDBY state or when the card's DSPs are getting downloaded as part of card booting up. STANDBY LED will be a blinking Orange when the card is in the boot state.
FAIL LED will be lit RED when the card is in the FAIL state.
The 8 line LEDs correspond to the eight T1 or E1 ports on the back card and are lit as follows:
GREEN - if the line has been added and there is no alarm on that line.
ORANGE - if the line has been added and there is a YELLOW alarm condition on the line.
RED - if the line has been added and there is a LOS condition (RED alarm condition) on the line.
The second level of troubleshooting aids is the range of "display" commands that are available through the Command Line Interface. Some of these commands are performed when logged into the PXM card and some when logged into the VISM card (see next section for details of the VISM display commands and the Cisco MGX 8850 Command Reference publication for details of the PXM display commands). The CLI prompt indicates the current card last logged onto by the user.
For example, executing the dspcd (display card) and version commands provides the following information:
The VISM dsplog command can provide useful information when an abnormal situation arises. The format of an entry in the VISM log is:
Slot number of the VISM card from which a message is logged
The process on the VISM card that logged that message.
Severity of the message - if it is a fatal error causing card reboot, severity is 1. For all other messages, severity is 6.
The message number, found in /include/vism_error.h
A single line description - the log message.
1. An E1 card is inserted in a slot where a T1 card WAS present (or vice versa), resulting in configuration mismatch.
2. When at least minimum number of DSPs failed to download - currently the threshold is fixed at 5.
3. When the backcard type does not match with the front card type - if the front card is of type T1 (E1) and the backcard type is E1 (T1).
The T1/E1 mismatch causes can be identified using the PXM dspcds command as follows:
The PXM cnfsmcnf command can also be used as follows:
The VISM dspcd command displays the following information:
When at least the minimum number of DSPs fail to download:- dsplog on the PXM shows:
If the number of DSPs (6 in the above case) is greater than 5, then, the card will fail to come up ACTIVE. If this condition happens repeatedly, the card has to be replaced.
The DSP condition is shown by the PXM dspcds command as shown below:
The PXM dsplog command can indicate that the backcard type does not match with the front card type:
In this mismatch condition, the PXM dspcds command displays the following information.
The VISM dspcd command displays the following information:
Use the PXM dspcds command to check whether the card is in the ACTIVE/STANDBY state. If the VISM card is not in the ACTIVE/STANDBY state, cc to that slot is not possible.
Reasons why the above conditions can occur include:
For downloading a slot specific image, there must be a VISM card in the slot to which firmware is being downloaded. The card must be in either the ACTIVE or BOOT state. Confirm this is the case and try again.
Make sure that VISM card is seated in the slot, and making the electrical contacts to the backplane.
Make sure the call has echo cancellation turned on. If the echo delay is longer than the provision tail length, the echo cancellation will not work. Provision the tail length (cnfecantail) to a bigger value.
The VISM card is not inserted completely in the slot. Firmware does not see the Card Insert Bit status as set. Make sure that the VISM card is seated in the slot correctly, with top and bottom half portions of the VISM card making electrical contact with the back plane.
The VISM card set is configured and managed through a command line interface. Commands are entered at the shelf's PXM card and are executed on the appropriate card. The Cisco MGX 8850 Wide Area Edge Switch and the Cisco MGX 8220 Edge Connector share a common command structure and details of the command language and commands can be found in the Cisco MGX 8850 Command Reference publication.
The following commands are used with the VISM cards only.
The cnfvismip command configures the VISM IP address on the VISM card. The VISM IP address is used to communicate with the VSC and as an identification for VoIP endpoints. Once configured the parameter values are stored on the PXM's hard disk and are retrieved for subsequent re-boots of the card.
cnfvismip <vismIpAddress><netMask>
:
Log: Yes State: Active Privilege: 1
The dspvismip command displays all the IP configuration information on the VISM card.
Log: No State: Any Privilege: Any user
A typical display for the VISM card is:
The cnfsuip command configures the VSC (SU) address on the VISM card. Once configured the parameter values are stored on the PXM's hard disk and are retrieved for subsequent re-boots of the card.
:
Log: Yes State: Active Privilege: 1
The dspsuip command displays the VSC (SU) IP configuration information on the VISM card.
Log: No State: Any Privilege: Any user
A typical display for the VISM card is:
The addendpt command is used to add the endpoints on the VISM card. The endpoint on VISM is a logical port that consists of one DS0. The parameters entered in this command are used to create the "endpoint ID" which is required by the VSC for sending the Create Connection SGCP command to the VISM card.
addendpt <endpoint_num> <ds1_num> <ds0_num>
An endpoint number in the range 1-240 for E1 and 1-192 for T1. |
|
The DS0 configured for this endpoint. DS0s are numbered 1 to 31 for E1 lines and 1 to 24 for T1 lines. |
:
Log: Yes State: Active Privilege: 1
The delendpt command is used to delete the specified endpoint on the VISM card.
:
Log: Yes State: Active Privilege: 1
The dspendpt command is used to display information about the specified endpoint on the VISM card.
:
Log: No State: Any Privilege: Any user
A typical display for the VISM card is:
The dspendpts command displays information about all the endpoints on the VISM card.
Log: No State: Any Privilege: Any user
The dspendptusage command displays information about the use of all the endpoints on the VISM card.
Log: No State: Any Privilege: Any user
A typical VISM display is shown below
The cnfdomain command is used to configure a domain name for a VISM card. The domain name is used when creating an endpoint ID for each endpoint on the card. The endpoint ID is used, in turn, to address SGCP commands to a specific endpoint. If this command is not executed, the default domain name of cisco.com is used.
:
Log: Yes State: Active Privilege: 1
The dspdomain command is used to display a domain name for the VISM card.
Log: No State: Any Privilege: Any user
A typical display for the VISM card is:
The addport command is used to add a VISM port on the packet network side. Before a VISM card is removed from the MGX 8850, the port should be deleted with the delport command.
Log: Yes State: Active Privilege: 1
The delport command is used to delete a VISM port on the packet network side. This command should be executed before a VISM card is removed from the MGX 8850. If a VISM card is removed with the port undeleted, any subsequent card inserted into the same slot may not operate correctly.
Log: Yes State: Active Privilege: 1
The addrscprtn command is used to add a VISM port partition and is used in conjunction with the addport command. This command should be executed before a VISM card is removed from the MGX 8850. Unlike other resource partition commands on the MGX 8850, this command has no parameters. If parameters are entered, they are ignored.
Log: Yes State: Active Privilege: 1
The delrscprtn command is used to delete a VISM port resource partition. This command should be executed before a VISM card is removed from the MGX 8850. If a VISM card is removed with the port undeleted, any subsequent card inserted into the same slot may not operate correctly. Unlike other resource partition commands on the MGX 8850, this command has no parameters. If parameters are entered, they are ignored.
Log: Yes State: Active Privilege: 1
The cnfecancnt command is used to configure the number of digital signal processors (DSPs) on the VISM card that can be used as echo cancellers. There are 12 multi-purpose DSPs on the VISM card that can be configured either for echo cancellation or for voice compression.
| Caution This command resets the card when executed, however a confirmation of the command is required before execution. |
Configure number of echo canceller DSPs
:
Log: Yes State: Active Privilege: 1
The cnfecanidle command is used to configure the idle pattern for digital signal processors (DSPs) on the VISM card that are used for echo cancellation. This command applies to all DSPs on the VISM used for echo cancellation.
Configure idle pattern for echo cancellation DSPs
cnfecanidle <idlePattern> <idleDirection>
:
Log: Yes State: Active Privilege: 1
The cnfecannr command is used to configure the non-linear re-enable for digital signal processors (DSPs) on the VISM card that are used for echo cancellation. This command applies to all DSPs on the VISM used for echo cancellation.
Configure non-linear processing (NLP) re-enable for echo cancellation DSPs
:
Log: Yes State: Active Privilege: 1
The cnfecannoise command is used to configure the noise matching for digital signal processors (DSPs) on the VISM card that are used for echo cancellation. This command applies to all DSPs on the VISM used for echo cancellation.
Configure noise matching for echo cancellation DSPs
A number in the range of 1-2. |
:
Log: Yes State: Active Privilege: 1
The cnfecantone command is used to configure the tone disable for digital signal processors (DSPs) on the VISM card that are used for echo cancellation. This command applies to all DSPs on the VISM used for echo cancellation.
Configure tone disable for echo cancellation DSPs
A number 1, 2, or 4. |
:
Log: Yes State: Active Privilege: 1
The cnfecannrn command is used to configure the re-enable canceller for digital signal processors (DSPs) on the VISM card that are used for echo cancellation. This command applies to all DSPs on the VISM used for echo cancellation.
Configure re-enable canceller for echo cancellation DSPs
A number in the range of1-2. |
:
Log: Yes State: Active Privilege: 1
The cnfecanrec command is used to configure the residual echo control for digital signal processors (DSPs) on the VISM card that are used for echo cancellation. This command applies to all DSPs on the VISM used for echo cancellation.
Configure residual echo control for echo cancellation DSPs
cnfecanrec <residualEchoControl>
:
Log: Yes State: Active Privilege: 1
The cnfecantail command is used to configure the maximum tail length (in milliseconds) for digital signal processors (DSPs) on the VISM card that are used for echo cancellation. This command applies to all DSPs on the VISM used for echo cancellation.
Configure maximum tail length for echo cancellation DSPs
The length of the maximum tail in milliseconds. Permissible values are 24, 32, 48, 64, 80, 96, 112, and 128. |
:
Log: Yes State: Active Privilege: 1
The cnfcompvad command is used to configure the voice detection for digital signal processors (DSPs) on the VISM card that are used for voice compression. This command applies to all DSPs on the VISM used for voice compression.
Configure voice detection on all voice compression DSPs
:
Log: Yes State: Active Privilege: 1
The cnfcompsize command is used to configure the packet size for digital signal processors (DSPs) on the VISM card that are used for voice compression. This command applies to all DSPs on the VISM used for voice compression.
Configure packet size on all voice compression DSPs
:
Log: Yes State: Active Privilege: 1
The dspcarddsp command is used to display all card level parameters for both echo cancellation and voice compression DSPs.
Display card parameters for DSPs
Log: No State: Any Privilege: Any user
A typical display for the VISM card is:
The dsplinedsp command is used to display all line level parameters for both echo cancellation and voice compression DSPs.
Display line parameters for DSPs
Log: No State: Any Privilege: Any user
The dspcarddsp command is used to display all card level parameters for both echo cancellation and voice compression DSPs.
Display card parameters for DSPs
Log: No State: Any Privilege: Any user
A typical display for the VISM card is:
The following command is the only command that has been modified to accommodate the VISM card.
The addchan command is used for adding a PVC between the VISM card and a router and now has the format:
addchan <lcn><rmtVpi><rmtVci><rmtNSAP>.
Where <lcn> specifies the logical channel for the PVC and must be in the range 16 - 255. The remaining parameters are optional and are not applicable to the VISM card.
These commands are common to other service modules and are documented in the Cisco MGX 8850 Command Reference publication.
dspcd - Display card -A typical display for a VISM card is:
clrmsgcnt - Clear Control Message counter
dspmsgcnt - Display Control Message Counter
A typical display for a VISM card is:
version - Displays version data for a card -
A typical display for the VISM card is:
chkflash - Check CRC flash image.
Help - Help (list of commands supported by card).
? - Help (list of commands supported by card).
dspalm - Display Alarms for a line
A typical display for the VISM card is:
dspalms - Display all Alarms on card
A typical display for the VISM card is:
clralm - Clear Alarm on the card
clralms - Clear all alarms in the card
dspalmcnf - Display Alarm threshold configuration
A typical display for the VISM card is:
cnfalm - configure the alarm parameters
dspalmcnt - Display Alarm counters/statistics
A typical display for the VISM card is:
clralmcnt - Clear Alarm counters/statistics
clralmcnts - Clear alarm counters for all lines
dspln - Display line configuration
A typical display for the VISM card is:
dsplns - Display all lines on card
A typical display for the VISM card is:
cnfchan - configures a channel
dspchan - displays configuration of a channel
dspchans - display the status of all channels
dspcon - display the status of a channel
dspcons - display the status of all channels
AX-VISM-8T1/8E1 7.25" x 16.25"
VISM Line Modules
AX-RJ48-8T1-LM 7.0" x 4.5"
AX-R-RJ48-8T1-LM 7.0" x 4.5"
AX-RJ48-8E1-LM 7.0" x 4.5"
AX-R-RJ48-8E1-LM 7.0" x 4.5"
AX-SMB-8E1-LM 7.0" x 4.5"
AX-R-SMB-8E1-LM 7.0" x 4.5"
48 V DC, (100 W estimated)
5 V DC, (25 W estimated)
3.3 V DC (43 W estimated)
2.5 V DC (12 W estimated)
T1/E1 Framers:
OOF Count
LCV Count
FER Count
CRC Error Count
RTP/RTCP: Number of packets received
Number of packets transmitted
Number of error packets received
ATM cells Number of cells transmitted to cellbus
Number of cells discarded due to intershelf alarm
Number of cells transmitted with CLP bit set
Number of AIS cells transmitted
Number of FERF cells transmitted
Number of end-end loop-back cells transmitted
Number of segment loop-back cells transmitted
Number of cells received from cellbus
Number of cells received with CLP bit set
Number of AIS cells received
Number of FERF cells received
Number of end-end loop-back cells received
Number of segment loop-back cells received
Number of OAM cells discarded due to CRC-10 error
Diagnostics: Header of last cell with unknown LCN
![]()
![]()
![]()
![]()
![]()
![]()
![]()
![]()
Posted: Wed Jan 7 14:22:04 PST 2004
All contents are Copyright © 1992--2003 Cisco Systems, Inc. All rights reserved.
Important Notices and Privacy Statement.