|
|

This chapter includes the information required for correct installation and operation of the Port Concentrator Shelf (PCS). (See Figure 1-1.)
The PCS is connected to the FRM-2 or FRP-2 by one or more X.21 links (referred to as "concentrated links"). In a full configuration, each concentrated link services one of four 11-port modules in the PCS, for a total of 44 ports per Frame Relay card.

The following terms are used to identify PCS components:
The PCS is compatible only with:
The PCS should be operated in a clean, dry environment that does not exceed the following specifications:
In addition, do not place the PCS near any surface that generates heat. The environment should be free from dust and extreme fluctuations in temperature and humidity. Place the PCS a minimum of six feet from any potential sources of electromagnetic interference (EMI).
An AC-powered PCS must be plugged into a grounded, three-prong commercial power source (either 115 VAC or 220 VAC as appropriate) that is located no more than 6 feet (1.8 meters) from the PCS chassis.
A DC-powered PCS must be connected to a -48 volt DC source that complies with the SELV Requirements of EN 60950 / IEC 950 / UL 1950 / CSA 950. The source must be capable of supplying up to 6A continuously. An easily accessible disconnect device should be installed as part of the supply wiring.
An AC-powered PCS should be connected to a branch circuit with overcurrent protection rated no more than 20A.
A DC-powered PCS should have a maximum 15A branch circuit overcurrent protector installed at the power source.
In North America, the overcurrent protection should conform to the National Electrical Code (ANSI/NFPA 70) and the Canadian Electrical Code (C22.1, Part 1) for protection against excess currents, short circuits and earth faults.
For safety, and for minimal radio frequency interference (RFI), all electrical connections should be made using shielded cables. To comply with FCC requirements, each cable must have a shield that covers all conductors and must connect to the metal shell of the mating connector.
When correctly installed with front cover attached, the PCS meets FCC requirements for a Class A digital device, pursuant to part 15 of the FCC Rules.
If a module is removed from the chassis, it should always be stored in a static-shielded bag.
The PCS is shipped in a custom container that should be saved in case the PCS must be returned to StrataCom for any reason. Returning a unit in other than the original container may result in damage and void the warranty.
Installing the PCS consists of the following tasks:
1. Setting jumpers and interface type (DTE or DCE) on each of the port interface cards.
2. Inserting PCS modules into the chassis.
3. Installing the PCS chassis in the equipment rack (if desired).
4. Attaching front cover to the rack.
5. Connecting the chassis to a power source and applying power.
6. Making port (to external device) and line (to the FRM-2 or FRP-2 Card) connections with the appropriate cables.
The following tools are required to install the PCS:
A Hex Key (Allen wrench) is supplied in the shipping container for attaching the front cover.
The PCS requires 8.75 inches of vertical rack space. A minimum of two inches above and below the unit should be left open for cooling.
See the section "Installing the Shelf in a Rack and Attaching the Front Cover" later in this chapter.
The concentrated link connection to the FRM-2 or FRP-2 must always have a DTE V.11 interface with clocking as set at the factory (see Figure 1-7).
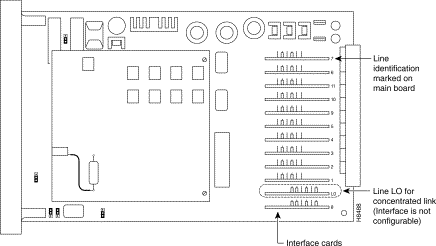
Line L0 (see Figure 1-2) on each module connects to the FRM-2 or FRP-2.
Port interfaces are defined by a separate hardware interface card inserted into the main board for each port (see Figure 1-2).
For each line, you must set or verify the following:
At the time of your order, V.11 (X.21), V.28, or V.35 interfaces are specified for Frame Relay ports. Any mix of interfaces and type can be used.
The PCS ships with all lines set to DTE interface. If you require a DCE interface on a Frame Relay port, you must take the following steps:
1. Find the interface card associated with the line you want to change to a DCE interface (see Figure 1-2 and the following section, "Identifying Lines").
2. Remove the interface card, rotate it 180 degrees and reinsert it with "DCE" on the top edge (see Figure 1-3).
For each module, each interface card is in a slot that is labeled L0 through L11:

Interface clocking and other functions for the V.28 interface are selected by the six jumpers in the center of the interface card. (See Figure 1-4 and Figure 1-5.)

A strap between pins two and three is shown as <2-3>.
A strap between pins one and two is shown as <1-2>.
This jumper connects or disconnects the Transmit Clock (CT114). Position <2-3> allows the device to operate in synchronous mode. Position <1-2> disconnects the signal, putting the interface into asynchronous mode. Since the PCS does not support asynchronous mode, this jumper should be left in position <2-3>.
For DCE mode, Transmit Clock is supplied by position <2-3>. For DTE mode, Transmit Clock is accepted by position <2-3>.
This jumper connects or disconnects the Receive Clock (CT115). Position <2-3> allows the device to operate in synchronous mode. Position <1-2> disconnects the signal, putting the interface into asynchronous mode. Since the PCS does not support asynchronous mode, this jumper should be left in position <2-3>.
For DCE mode, Receive Clock is supplied by position <2-3>. For DTE mode, Receive Clock is accepted by position <2-3>.
Jumpers TB3, TB4, and TB5 are not used. Each jumper should always be in position <1-2>.
This jumper enables or disables local Receive Clock based on the state of the Carrier Detect signal. Generally, a DCE device supplies a Receive Clock signal to a DTE device.
For DCE mode, the PCS port supplies a clock in all cases to the connected device. The position of this jumper has no effect.
For DTE mode, refer to Table 1-1.
| Position <1-2> | Position <2-3> | |
|---|---|---|
Carrier Detect ON | Receive Clock accepted from DCE | Receive Clock accepted from DCE |
Carrier Detect OFF | Internal Receive Clock generated | Receive Clock accepted from DCE |
See Figure 1-6 for the V.11 interface jumper positions.

Jumper TB1 should always be in position 2.
These jumpers are used in conjunction for four possible combinations for DTE interface mode clocking.
In DCE mode, the PCS port always provides Transmit and Receive Clock signals to the attached device, so the position of these jumpers has no effect. (See Table 1-2.)
TB2 Position 2 TB3 Position 2 |
|
Both Transmit and Receive Clocks are taken from the attached device. | |
TB2 Position 2 TB3 Position 1 |
|
When Carrier Detect (CT109) is present, the Receive Clock is taken from the attached device. When Carrier Detect is not present, the PCS port uses an internally generated Receive Clock. | |
TB2 Position 1 TB3 Position 2 |
|
Enables reception of external X.24 clock signals (CT114 A/B). | |
TB2 Position 1 TB3 Position 1 |
|
When Indication (IA/IB) are present, the Receive Clock is taken from the attached device. If not present, the PCS port uses an internally generated Receive Clock. |
As shown in Figure 1-2, L0 houses the interface card for the concentrated link port. This must always be a V.11 interface card in DTE mode, with the jumpers in the positions indicated in Figure 1-7.

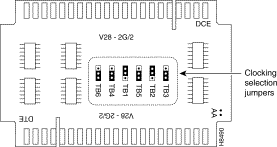
There are two types of V.35 interface cards, designated V.35-1G and V.35-2G.
The V.35-1G interface card has no jumpers. Clocking and other signals adhere to the V.35 specification. (See Table 1-4.)
The V.35-2G has one jumper used to select clocking operation. (See Figure 1-8.)

When this interface is DTE mode, jumper TB1 enables local Receive Clock generation. Generally, a DCE device such as a modem or CSU/DSU supplies a Receive Clock signal to a DTE device. When the interface is in DCE mode, this jumper has no effect because the interface will supply the clock in all cases to the attached DTE.
When in DTE mode, this interface can either accept the Receive Clock from the DCE at all times or only when a Carrier Detect signal (CT109) is present. When jumper TB1 is in the position <1-2>, the interface generates its own Receive Clock when Carrier Detect (CT109) is absent. When Carrier Detect is present from the DCE, the interface accepts the Receive Clock from the DCE.
When the jumper is in position <2-3>, the interface accepts the clock from the attached DCE at all times. (See Table 1-3.)
| Position <1-2> | Position <2-3> | |
|---|---|---|
Carrier Detect ON | Receive Clock accepted from DCE | Receive Clock accepted from DCE |
Carrier Detect OFF | Internal Receive Clock generated | Receive Clock accepted from DCE |
Take the following steps to install the rack and attach the front cover (see Figure 1-9):
Step 2 Slide the door bracket with door clasp under the screws on the right side, and the door assembly with the hinge bracket under the screws on the left side.
Step 3 Check the alignment of the door clasp and the plastic clutch on the inside of the door and make any necessary adjustments.
Step 4 Tighten the screws attaching the chassis to the rack.

The power supply can only be inserted into one slot. The four additional slots house modules for ports 1-44. (See Figure 1-10.)

When you insert modules into the chassis shelf, ensure that they snap into the backplane.
Only one slot can accommodate the power supply (see Figure 1-10). The power supply must be secured into place by the two screws that are attached to the front of the power supply module.
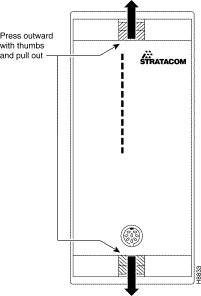
To remove a module from the chassis, press outward on the two catches with your thumbs and pull firmly outward (see Figure 1-11.)
When all modules are installed in the chassis, and the chassis has been properly rack-mounted, connect the female end of the power supply cord to the power connector on the rear panel of the PCS. Connect the plug of the power supply cord to the appropriate electrical outlet (115V or 230V).
Connect DC power to the PCS only after all modules are installed in the chassis and the chassis has been properly rack-mounted. Make sure the DC power source is off before connecting the DC power cable.
The cable from the DC-power source must have three insulated #14 AWG (1.5 mm2) conductors (stranded) and the cable must be terminated with closed-loop ring terminals at the PCS. The safety earthing conductor has insulation that is green with one or more yellow stripes.
Take the following steps to connect DC power:
Step 2 Check that the screws securing the conductors to the PCS terminal block are tight.
Step 3 Check that the power switch on the front panel of the PCS is in the OFF position.
Step 4 Close the disconnect device at the 48V power source.
Step 5 Close the power switch on the front panel of the PCS.
When successfully completed, the uppermost LED on each module should be green. If the LED is red, this indicates a power-up test failure and you must contact the Cisco Technical Assistance Center.
On the rear panel, the ports through which each module is connected to the FRM-2 or FRP-2 are labeled L1, L2, L3, and L4 (see Figure 1-12).

Connect these ports to the FRM-2 or FRP-2 ports with the cable (provided by Cisco) labeled Concentrated Link.
On the rear panel, ports through which external devices are connected to the PCS are labeled 1-44. These are the port numbers used in the IPX or IGX configuration commands.
Cables to connect PCS lines to external devices can be purchased from StrataCom. The pinouts for X.21bis (V.10/V.11), V.28, and V.35 interfaces are shown in Table 1-4, Table 1-5, and Table 1-6.
Cables for use with PCS ports are described in the appendix "PCS Cables."
| CCITT Circuit | Function | Pin | X.21 Function |
|---|---|---|---|
Shield | Cable Screening | 1 |
|
CT102A | Signal Ground | 7 |
|
CT102B | Common Return | 10 |
|
CT103A | Transmitted Data | 2 | T |
CT103B | Transmitted Data | 14 | T |
CT104A | Received Data | 3 | R |
CT104B | Received Data | 16 | R |
CT105A | Control | 4 |
|
CT105B | Control | 23 |
|
CT106 | Ready to Send | 5 |
|
CT107 | Data Set Ready | 6 |
|
CT108 | Data Terminal Ready | 20 |
|
CT109A | Carrier Detected | 8 | I |
CT109B | Carrier Detected | 9 | I |
CT114A | Transmit Element Timing | 15 | Clock |
CT114B | Transmit Element Timing | 13 | Clock |
CT115A | Receive Element Timing | 17 |
|
CT115B | Receive Element Timing | 12 |
|
CT140 | Remote Loopback (Loop 2) | 21 |
|
CT141 | Remote Loopback (Loop 3) | 18 |
|
CT142 | Test Indicator | 25 |
|
| CCITT Circuit | Function | Pin |
|---|---|---|
Shield | Cable Screening | 1 |
CT102A | Signal Ground | 7 |
CT103A | Transmitted Data | 2 |
CT104A | Received Data | 3 |
CT105A | Request to Send | 4 |
CT106 | Ready to Send | 5 |
CT107 | Data Set Ready | 6 |
CT108 | Data Terminal Ready | 20 |
CT109A | Carrier Detected | 8 |
CT111 | Data Signal Rate | 23 |
CT116 | Selector (DTE) | 9 |
CT114A | Transmit Element Timing | 15 |
CT115A | Receive Element Timing | 17 |
CT117 | Standby Indicator | 10 |
CT140 | Remote Loopback (Loop 2) | 21 |
CT141 | Remote Loopback (Loop 3) | 18 |
CT142 | Test Indicator | 25 |
CT125 |
| 22 |
| CCITT Circuit | Function | Pin |
|---|---|---|
Shield | Cable Screening | 1 |
CT102A | Signal Ground | 7 |
CT103A | Transmitted Data | 2 |
CT103B | Transmitted Data | 14 |
CT104A | Received Data | 3 |
CT104B | Received Data | 16 |
CT105A | Request to Send | 4 |
CT106 | Ready to Send | 5 |
CT107 | Data Set Ready | 6 |
CT108 | Data Terminal Ready | 20 |
CT109A | Carrier Detected | 8 |
CT114A | Transmit Element Timing | 15 |
CT114B | Transmit Element Timing | 13 |
CT115A | Receive Element Timing | 17 |
CT115B | Receive Element Timing | 12 |
![]()
![]()
![]()
![]()
![]()
![]()
![]()
![]()
Posted: Wed Jan 24 10:34:05 PST 2001
All contents are Copyright © 1992--2001 Cisco Systems, Inc. All rights reserved.
Important Notices and Privacy Statement.