|
|

February 23, 2001
This document provides updates to the following publications:
The Universal Router Module (URM) is a dual-processor card, featuring both a modified Cisco IGX 8400 series UXM-E processor and a modified Cisco 3660 modular-access router processor. Each processor uses a different operating system; refer to documentation for both Cisco IOS and
Switch Software (SWSW) while working with the URM.
For information about Administration Firmware Version XAA, see the Release Notes.
All related documentation is available online, on the document CD-ROM, or you can order printed documentation. See "Obtaining Documentation" for more information.
 |
Tip The most current version of this document is available online at the following link: http://www.cisco.com/univercd/cc/td/doc/product/wanbu/igx8400/9_3_20/ 9_3_22rn/index.html |
 |
Note While referring to related documentation, remember that the URM can differ from the hardware and software described in the documentation listed in Table 1 and Table 2. |
| Document Title | Description |
|---|---|
Cisco IGX 8400 Series Installation and Configuration | Provides installation and configuration for the Cisco IGX 8400 series switches. |
Provides reference information and technical details about the Cisco IGX 8400 series switches. | |
Update to the Cisco IGX 8400 Series Reference | Provides update information for Cisco SWSW Version 9.3.10 specific to the Cisco IGX 8400 series. Use this document with Cisco IGX 8400 Series Reference, Release 9.3. |
Cisco BPX 8600 Series Installation and Configuration | Provides a general description and technical details of the Cisco BPX 8600 series switches. |
Cisco WAN Switching Command Reference | Provides detailed information on the general command-line interface (CLI) commands used with Cisco SWSW Version 9.3.20. |
Cisco WAN Switching SuperUser Command Reference | Provides detailed information on the CLI commands used with Cisco SWSW Version 9.3.05 that require SuperUser access authorization. |
WAN Interface Cards Hardware Installation Guide | Provides hardware installation information for the VWIC-2MFT T1 and E1. |
Update to Cisco WAN Interface Cards Hardware Installation Guide | Provides an update to the WAN Interface Cards Hardware Installation Guide. |
| Document Title | Description |
Cisco IOS Configuration Fundamentals Configuration Guide, Cisco IOS Release 12.1 | Provides introductory Cisco IOS configuration information for users new to Cisco IOS configuration tasks. |
Cisco IOS Configuration Fundamentals Command Reference, Cisco IOS Release 12.1 | Provides introductory Cisco IOS command information for users new to Cisco IOS software. |
Cisco IOS Wide-Area Networking Configuration Guide, Cisco IOS Release 12.1 | Provides Cisco IOS configuration information specific to WAN environments. |
Cisco IOS Wide-Area Networking Command Reference, Cisco IOS Release 12.1 | Provides Cisco IOS command information specific to WAN environments. |
Release Notes for Cisco IGX 8400 Series URM for Cisco IOS Release 12.1 YA | Provides the Cisco IOS release notes for Cisco IOS Release 12.1(5)YA, specific to the Cisco IGX 8400 series switch. |
Cisco IOS Voice Featues on IGX 8400 Series Universal Router Module, Cisco IOS Release 12.1 | Provides information on the Cisco IOS voice features that are found on the URM. |
This update covers aspects of the operational parameters supported in Cisco SWSW Version 9.3.20 and describes new features supported on the Cisco IGX 8400 series WAN switches, including the Cisco IGX 8410, Cisco IGX 8420, and Cisco IGX 8430.
The update provides procedures and specifications for the Universal Router Module (URM), a voice applications card for the Cisco IGX 8400 series.
| Convention | Description |
|---|---|
boldface | Indicates commands and keywords. |
italics | Indicates arguments for which the user supplies a value. |
angle brackets (< >) | Indicates required command arguments (command descriptions); indicates nonprinting characters, such as passwords (examples). |
square brackets ([ ]) | Indicates optional command arguments (command descriptions); indicates default responses to system prompts (examples). |
vertical bars ( | ) | Separates alternative keywords. |
screen font
| Indicates terminal sessions and information displayed by the system. |
boldface screen font
| Indicates information entered by the user. |
|
Note Means reader take note. Notes contain helpful suggestions or references to materials not contained in this document. |
 |
TimeSaver Means the described action saves time. You can save time by performing the action described in the paragraph. |
|
Tip Means the following information will help you solve a problem. The tips information might not be troubleshooting or even an action, but could be useful information, similar to a Timesaver. |
 |
Caution Means reader be careful. In this situation, you might do something that could result in equipment damage or loss of data. |
| |||
Waarschuwing | Dit waarschuwingssymbool betekent gevaar. U verkeert in een situatie die lichamelijk letsel kan veroorzaken. Voordat u aan enige apparatuur gaat werken, dient u zich bewust te zijn van de bij elektrische schakelingen betrokken risico's en dient u op de hoogte te zijn van standaard maatregelen om ongelukken te voorkomen. | ||
Varoitus | Tämä varoitusmerkki merkitsee vaaraa. Olet tilanteessa, joka voi johtaa ruumiinvammaan. Ennen kuin työskentelet minkään laitteiston parissa, ota selvää sähkökytkentöihin liittyvistä vaaroista ja tavanomaisista onnettomuuksien ehkäisykeinoista. | ||
Attention | Ce symbole d'avertissement indique un danger. Vous vous trouvez dans une situation pouvant causer des blessures ou des dommages corporels. Avant de travailler sur un équipement, soyez conscient des dangers posés par les circuits électriques et familiarisez-vous avec les procédures couramment utilisées pour éviter les accidents. | ||
Warnung | Dieses Warnsymbol bedeutet Gefahr. Sie befinden sich in einer Situation, die zu einer Körperverletzung führen könnte. Bevor Sie mit der Arbeit an irgendeinem Gerät beginnen, seien Sie sich der mit elektrischen Stromkreisen verbundenen Gefahren und der Standardpraktiken zur Vermeidung von Unfällen bewußt. | ||
Avvertenza | Questo simbolo di avvertenza indica un pericolo. La situazione potrebbe causare infortuni alle persone. Prima di lavorare su qualsiasi apparecchiatura, occorre conoscere i pericoli relativi ai circuiti elettrici ed essere al corrente delle pratiche standard per la prevenzione di incidenti. | ||
Advarsel | Dette varselsymbolet betyr fare. Du befinner deg i en situasjon som kan føre til personskade. Før du utfører arbeid på utstyr, må du vare oppmerksom på de faremomentene som elektriske kretser innebærer, samt gjøre deg kjent med vanlig praksis når det gjelder å unngå ulykker. | ||
Aviso | Este símbolo de aviso indica perigo. Encontra-se numa situação que lhe poderá causar danos físicos. Antes de começar a trabalhar com qualquer equipamento, familiarize-se com os perigos relacionados com circuitos eléctricos, e com quaisquer práticas comuns que possam prevenir possíveis acidentes. | ||
¡Advertencia! | Este símbolo de aviso significa peligro. Existe riesgo para su integridad física. Antes de manipular cualquier equipo, considerar los riesgos que entraña la corriente eléctrica y familiarizarse con los procedimientos estándar de prevención de accidentes. | ||
Varning! | Denna varningssymbol signalerar fara. Du befinner dig i en situation som kan leda till personskada. Innan du utför arbete på någon utrustning måste du vara medveten om farorna med elkretsar och känna till vanligt förfarande för att förebygga skador. | ||
To see translations of all warnings contained in this document, see "Translated Safety Warnings".
Any device that uses electricity must be handled carefully; follow these guidelines to ensure general safety:
 |
Warning Ultimate disposal of this product should be handled according to all national laws and regulations. For translated warnings, see "Product Disposal Warning". |
|
Warning Before working on equipment that is connected to power lines, remove jewelry (including rings, necklaces, and watches). Metal objects will heat up when connected to power and ground and can cause serious burns or can weld the metal object to the terminals. For translated warnings, see "Jewelry Removal Warning". |
Follow these guidelines when you work on equipment powered by electricity.
|
Warning When installing the unit, the ground connection must always be made first and disconnected last. For translated warnings, see "Ground Connection Warning". |
|
Warning Read the installation instructions before you connect the system to its power source. For translated warnings, see "Installation Warning". |
|
Warning This product relies on the building's installation for short-circuit (overcurrent) protection. Ensure that a fuse or circuit breaker no larger than 120 VAC, 15A U.S. (240 VAC, 10A international) is used on the phase conductors (all current-carrying conductors). For translated warnings, see "Circuit Breaker (15A) Warning". |
Electrostatic discharge (ESD) can damage equipment and impair electrical circuitry. ESD damage occurs when electronic components are improperly handled and can result in complete or intermittent failures.
Always follow ESD-prevention procedures when you remove and replace components. Ensure that the chassis is electrically connected to earth ground. Wear an ESD-preventive wrist strap, ensuring that it makes good skin contact. Connect the grounding clip to an unpainted surface of the chassis frame to safely ground unwanted ESD voltages. To guard against ESD damage and shocks, the wrist strap and cord must operate properly. If no wrist strap is available, ground yourself by touching the metal part of the chassis.
|
Caution For safety, periodically check the resistance value of the antistatic strap, which should be between 1 and 10 megohm (Mohm). |
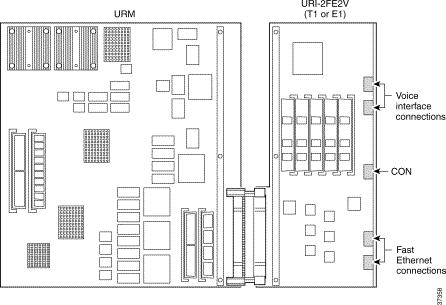
The Universal Router Module (URM) delivers high-density voice interfaces, Fast Ethernet connectivity and ATM switching through a combination of Cisco IOS Release 12.1(5)YA and Switch Software (SWSW) Version 9.3.20 functionality.
The URM consists of a logically-partitioned front card connected to a universal router interface (URI) back card. The front card contains an embedded UXM-E running an Administration firmware image, and an embedded router (based on the Cisco 3660 router) running a Cisco IOS image. The embedded UXM-E and the embedded router connect through a logical internal ATM interface, with capability equivalent to an OC3 ATM port.
|
Note SWSW treats this interface as an OC3 ATM port, and this interface is the only port on the embedded UXM-E that is visible to SWSW. |
Unlike the Cisco 3660 router, which has one slot for the motherboard and six slots for network modules, the embedded router has three virtual slots with built-in interfaces (see Table 4).
| Slot | Name | Description |
|---|---|---|
Slot 0 | ATM 0/0 | The internal ATM interface connected to the embedded UXM-E ATM port. |
Slot 1 | FE1/0 and FE1/1 | Fast Ethernet interfaces connected to the Fast Ethernet ports on the BC-URI-2FE2V back card. |
Slot 2 | T1 2/0 and T1 2/1; E1 2/0 and E1 2/1 | T1 or E1 interfaces connected to the T1 or E1 ports on the VWIC installed in the back card. |
Because the URM front card contains both an embedded UXM-E and an embedded Cisco router, the front card runs two separate software images with two different download procedures. For the embedded UXM-E, the Administration firmware image (Version XAA) is downloaded and saved to the embedded UXM-E Flash memory through SWSW command-line interface (CLI) commands, which are documented in Cisco IGX 8400 Series Installation and Configuration.
The embedded router runs Cisco IOS software. You can download and save the Cisco IOS image using standard Cisco IOS procedures as outlined in any documentation supporting
Cisco IOS Release 12.1(5)YA or later (see Cisco IOS Configuration Fundamentals Configuration Guide).
The embedded UXM-E hardware is based on the UXM-E card for the Cisco IGX series and features 16 MB asynchronous DRAM, 8 MB Flash memory, and 8 KB BRAM. The embedded router hardware is based on the Cisco 3660 modular-access router and features 8 MB boot Flash SIMM, 32 MB Cisco IOS Flash SIMM, and 128 KB NVRAM.
The back card (BC-URI-2FE2VT1 or BC-URI-2FE2VE1) contains an installed voice and WAN interface card (VWIC) with a generic dual-port T1 or E1 digital voice interface. See Figure 1 for a visual breakdown of the URM, and Table 5 for a hardware and software summary.
| Card | Component | Software | Management Software |
|---|---|---|---|
NPM | NPM installed in the Cisco IGX chassis | SWSW Version 9.3.20
| SWSW CLI |
URM | Embedded UXM-E | Administration Firmware Version XAA | SWSW CLI |
URM | Embedded Cisco router | Cisco IOS Release 12.1(5)YA or later | Cisco IOS CLI |
Back | BC-URI-2FE2VT1 or BC-URI-2FE2VE1 | — | — |
Back | VWIC-2MFT-T1 or VWIC-2MFT-E1 | — | — |
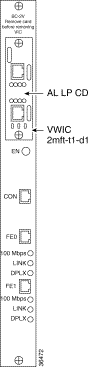
To locate different LEDs on the URM front card faceplate, see Figure 2. Refer to Table 6 for a description of the LED function.

| LED | Color | Meaning |
|---|---|---|
LP | Yellow | A loopback condition (either local or remote) exists on one or both T1/E1 interfaces. |
CD/AL | Red | A carrier is not detected or an alarm condition exists on one or both of the T1 or E1 interfaces. |
IOS SYS | Green | (Blinking) The Cisco IOS image is loading. (Steady) The Cisco IOS software is up. |
FAIL | Red | Self-test has detected a card failure. |
ACT | Green | (Steady) The card is active. (OFF) The card is down and the embedded router is held in reset. |
STBY | Yellow | The card is in standby and the embedded router is held in reset. |
|
Caution The URM supports only the BC-URI-2FE2VT1 and the BC-URI-2FE2VE1. Do not use other Cisco IGX back cards with the URM. |
The BC-URI-2FE2VT1 and BC-URI-2FE2VE1 back cards provide T1 and E1 digital voice interfaces for the URM. BC-URI-2FE2VT1 features include:
See Figure 3 to locate LEDs and interfaces on the URM back card. See Table 7 for a description of the physical ports on the back card, Table 8 for a description of the LEDs on the URI back card, and Table 9 for a description of the LEDs located on the installed VWIC.
|
Tip The VWIC-2MFT T1 or E1 must be installed in the appropriate BC-URI-2FE2V for the back card to function. |
Different URIs are made by inserting the appropriate VWIC into the basic BC-URI-2FE2V back card. Two VWICs can be used: the VWIC-2MFT-T1 for T1 connections and the VWIC-2MFT-E1 for E1 connections.
The VWIC-2MFT is a generic dual port T1 (VWIC-2MFT-T1) or E1 (VWIC-2MFT-E1) digital voice interface in a combined voice and WAN interface card (VWIC) for voice applications. VWIC-2MFT provides the following services for T1 or E1 networks:
At the physical layer, the VWIC provides two network interfaces through RJ-48C jacks with on-card TDM drop-and-insert capability, supported through router Cisco IOS reload operations. Because of the TDM backend, the VWIC is used as the front end for applications supporting channelized T1 and E1 services for voice.
|
Note For details on the VWIC T1 and E1 cards for voice connections, see the WAN Interface Cards Hardware Installation Guide. |
| Connector | Function |
|---|---|
Console port | A standard RJ-45 port that supports EIA/TIA-232 communication to a Cisco IOS CLI. |
10/100 Fast Ethernet ports (FE0 and FE1) | Standard RJ-45 UTP interfaces that support 10 Mbps, or 100 Mbps full or half duplex. |
T1/E1 interfaces | The T1/E1 interfaces are provided on the VWIC-2MFT daughter card which is inserted into the BC-URI-2FE2VT1 or BC-URI-2FE2VE1 back card. |
| LED | Color | Meaning |
|---|---|---|
EN | Green | The back card is powered on. After Cisco IOS software is up, this LED indicates whether the voice subsystem is up or not. It will not light up if the VWIC is not installed in the back card. |
100 Mbps | Green | The link speed is 100 Mbps. |
LINK | Green | The link is up. |
DPLX | Green | The link is in full-duplex mode. |
| LED | Color | Meaning |
|---|---|---|
LP | Yellow | A loopback is configured. |
CD | Green | A carrier is detected. |
AL | Yellow | An alarm condition exists. |
The Cisco IGX backplane is a cell bus composed of four parallel data buses that transmit up to four cells at a time. This bus bandwidth is organized into allocated units called universal bandwidth units (UBUs), each capable of transmitting 4000 cells per second or 2000 fast packets per second. The Cisco IGX has a total of 584 UBUs, giving the Cisco IGX the capacity to transmit about 2 million cells or 1 million fast packets per second.
Each URM receives a default bandwidth from the Cisco IGX at power on. You can configure this default bandwidth by using the SWSW CLI command, cnfbusbw. For more information on this and other SWSW commands, refer to the Cisco WAN Switching Command Reference .
|
Note Except for slots 1 and 2 (which are reserved for the NPM), all slots in the Cisco IGX can be used to support a URM. However, the total number of UBUs allocated to all cards supported in the Cisco IGX cannot exceed the total Cisco IGX backplane bandwidth. |
Connections terminating on the URM can be virtual path connections (VPC) or virtual channel connections (VCC).
The Cisco IOS router in the URM connects to Cisco IGX WAN through an internal ATM interface on the URM card. Because the URM supports voice connections using either standard VoIP or
Cisco proprietary VoATM configurations (using ATM PVCs on the internal ATM interface), the remote end of these connections is either an ATM PVC endpoint or a Frame Relay (FR) PVC endpoint.
For voice applications, both the embedded UXM-E and the embedded router must be configured with WAN connections that terminate at the internal ATM port. The embedded router must also be configured with voice ports and dial-peers. The routing of a voice call from a voice port to the WAN connection depends on the destination information for each voice call (each call's routing information is described in the dial-peer configuration commands).
When a call is placed, the URM receives the call through one of the T1 or E1 ports on the URI back card, and decides where to route the call with the help of the embedded router dial-peers. ATM cells transfer from the embedded router to the Cisco IGX, then to the configured ATM PVC destination. At the destination, ATM cells travel from the Cisco IGX network into the embedded router of the destination URM. With the help of dial-peers, this destination router routes the cells to the appropriate voice port, which plays the voice into a T1/E1 channel.
When setting up a communication in a voice network using the URM, you will perform the following tasks (see "Configuring the URM" for details):
1. Use the SWSW CLI to set up connections between any Cisco IGX Frame Relay (FR) port or external ATM port and the internal ATM interface within the URM.
2. Use the Cisco IOS CLI to configure the corresponding ATM PVCs on the internal ATM interface.
3. Use the Cisco IOS CLI to program dial-peers that connect the VoIP or VoATM voice ports of the URM to the internal ATM interface.
|
Note Cisco IOS Release 12.1(5)YA does not support FRF.5/FRF.8 services for connections that originate or terminate in the embedded router. |
FR connections that originate in the URM card cannot be configured to go over the internal ATM interface connecting the embedded router to the Cisco IGX WAN. Remote FR cards that support FRF.8 service interworking, such as the Cisco IGX UFM, should use FRF.8 service interwork at the FR/ATM network boundary to make end-to-end voice/data connections with the Cisco IGX URM.
The translational mode of the FRF.8 service interworking feature supports data and VoIP connections between the URM and remote FR endpoints. The transparent mode of FRF.8 service interworking allows the VoATM connections on URM to terminate in remote FR endpoints that have been configured for Voiceover Frame Relay (VoFR) operation.
End-to-end data and voice connections using VoIP are supported over both ATM trunks and fast packet trunks. See Table 14 for more information about voice and data connections supported on the URM.
URM functionality is not supported by Cisco WAN Manager (CWM), CiscoWorks 2000 (CW2K) or Cisco Voice Manager (CVM); therefore, configuration information must be entered through SWSW CLI and Cisco IOS CLI. See the following network management features:
|
Note Information regarding card, interface, and connections in the Cisco IOS domain (such as number and status of the interfaces, call and connections status, and statistics) can be accessed through the Cisco IOS CLI only. |
You need the following tools and parts to install the URM:
|
Tip To avoid bending any pins, install the back card first. |
|
Note The VWIC must be installed for the back card to function. Before installing the back card in the Cisco IGX chassis, verify that the correct VWIC is in place. |
Step 1 Attach an ESD-preventive wrist strap before handling the card. The Cisco IGX 8400 series chassis has attached wrist straps on the front and the back of the chassis.
|
Caution Always follow ESD-prevention procedures when you remove and replace components. Wear an ESD-preventive wrist strap or ground yourself by periodically touching the metal part of the chassis. |
Step 2 Visually inspect the BC-URI-2FE2V to verify that it is in good working order.
Step 3 Hold down the ejector levers and slide the back card into the chassis. Make sure that the ejector levers do not get caught behind the faceplate.
Step 4 Using the number 1 Phillips screwdriver, tighten the captive mounting screws on the top and bottom of the back card faceplate.
|
Tip The front card must be connected to the back card for the URM to power on. If you install the front card before installing the back card, make sure that both cards are seated properly. |
Step 1 Attach an ESD-preventive wrist strap before handling the card. The Cisco IGX 8400 series has attached wrist straps on the front and the back of the chassis.
|
Caution Always follow ESD-prevention procedures when you remove and replace components. Wear an ESD-preventive wrist strap or ground yourself by periodically touching the metal part of the chassis. |
Step 2 Using the 5/32-inch Allen wrench, open the Cisco IGX 8400 series switch door.
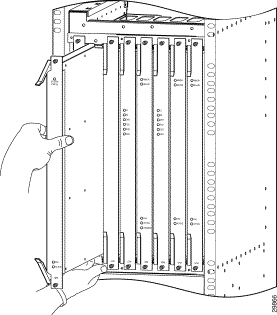
Step 3 Hold the card faceplate with one hand and support the card's weight with the other, then slide the card vertically into the selected slot. Hold down the ejector levers while seating the card (see Figure 4).
|
Caution Always use the ejector levers when disengaging or seating a card. Failure to do so can cause erroneous system error messages, and indicate module failure. |
|
Note The URM automatically powers on when the card is seated. The front card faceplate LEDs will blink, indicating URM POST (see Figure 2 for LED location and description). |
Step 4 Wait for the front card faceplate LEDs to finish cycling, then verify that the standby LED (STBY) is on.
Step 5 Using the number 1 Phillips screwdriver, tighten the panel fasteners at the top and bottom of the front card faceplate.
Step 6 Using the 5/32-inch Allen wrench, close the Cisco IGX 8400 series switch door.
During initial URM configuration, complete the following tasks:
1. Use SWSW commands to configure the internal ATM port.
2. Use SWSW commands to configure ATM connections onto the embedded UXM-E.
3. Use Cisco IOS commands to configure the internal ATM port for IP.
4. Use Cisco IOS commands to configure voice connections onto the embedded router.
For information on SWSW commands, refer to "WAN Switch Software for the URM", or to Cisco WAN Switching Command Reference .
For information on Cisco IOS commands, refer to "Cisco IOS Software for the URM", Cisco IOS Configuration Fundamentals Configuration Guide, Cisco IOS Release 12.1, or to any Cisco IOS documentation supporting Cisco IOS Release 12.1(5)YA (see "Obtaining Documentation" for more information).
|
TimeSaver To limit confusion between SWSW and Cisco IOS terminal sessions, complete the embedded UXM-E configuration using SWSW before configuring the embedded router using Cisco IOS software. |
Step 1 Verify that the back and front cards are properly seated by checking the front card faceplate's active (ACT) LED (see Figure 2). If the LED is on, the cards are properly seated and the URM is powered on.
Step 2 Use the SWSW dspcds command to verify that the URM is in standby.
Step 3 (optional) Use the SWSW cnfrtr command to verify the following default configuration information:
|
TimeSaver Use cnfrtr slot n 1 to configure both parameters at the same time. |
|
Note If you reconfigure the URM to load the Cisco IOS configuration from NVRAM, the router will enter the Cisco IOS setup utility. |
Step 4 Use the SWSW addport command to create the internal ATM port. The addport slot.1 command activates the embedded UXM-E and powers on the embedded router.
When the embedded router powers on, the Cisco IOS image loads from the embedded router's boot Flash SIMM to the Flash SIMM. The factory-default Cisco IOS configuration loads from NPM.
|
Note By default, the URM's internal ATM interface is a UNI port with a maximum bandwidth of 353,208 calls per second (cps) (equivalent to an OC-3 ATM port); the interface cannot be configured as a NNI port. |
|
Note If you have not connected a terminal to the CON port on the back card, you will not see the embedded router's initial start-up screens (see "Cisco IOS Software for the URM" for an example start-up screen). |
Step 5 (optional) Use the SWSW cnfport command to configure the internal ATM port to support ILMI.
|
Note The port does not support LMI management protocol and should be configured to support either ILMI or none. If ILMI is not configured on the internal ATM port, the embedded UXM-E does not discover the assigned IP addresses for the URM card. |
Step 6 Use the SWSW upport command to bring the internal ATM port to active state.
Step 7 Use the SWSW addcon command to configure ATM connections onto the embedded UXM-E. For more information on configuring ATM connections, see Cisco IGX 8400 Series Installation and Configuration.
|
TimeSaver If you want the Cisco IOS configuration to load from NVRAM in the future, use the SWSW cnfrtr slot r command at the SWSW CLI. |
Step 8 Connect a dedicated console to the URM through the serial port (CON) located on the back card (see Figure 3).
Step 9 (optional) Use the Cisco IOS show version command to view information presented in the embedded router's initial start-up screens.
Router# show version

Cisco Internetwork Operating System Software
IOS (tm) 3600 Software (URM-IS-M), Version 12.1(5)YA, EARLY DEPLOYMENT RELEASE SOFTWARE
(fc1)
TAC Support:http://www.cisco.com/cgi-bin/ibld/view.pl?i=support
Copyright (c) 1986-2001 by cisco Systems, Inc.
Compiled Wed 24-Jan-01 12:29 by yiyan
Image text-base:0x60008960, data-base:0x6113E000

ROM:System Bootstrap, Version 12.1(5r)YA, RELEASE SOFTWARE (fc1)
ROM:3600 Software (URM-IS-M), Version 12.1(5)YA, EARLY DEPLOYMENT RELEASE SOFTWARE (fc1)

Router uptime is 2 minutes
System returned to ROM by power-on
System image file is "flash:urm-is-mz.121-5.YA"

cisco URM (R527x) processor (revision 01) with 57344K/8192K bytes of memory.
Processor board ID
R527x CPU at 225Mhz, Implementation 40, Rev 10.0
Bridging software.
X.25 software, Version 3.0.0.
SuperLAT software (copyright 1990 by Meridian Technology Corp).
Primary Rate ISDN software, Version 1.1.
 --More--
IGX slot number 15
URM image loaded from flash (controlled by "cnfrtrparm" on IGX)
URM booting with BLANK configuration (controlled by "cnfrtr" on IGX)
Front card type:URM Main Board
Back card type:URI-2FE2V
2 FastEthernet/IEEE 802.3 interface(s)
1 ATM network interface(s)
2 Channelized T1/PRI port(s)
DRAM configuration is 64 bits wide with parity disabled.
123K bytes of non-volatile configuration memory.
32768K bytes of processor board System flash (Read/Write)
8192K bytes of processor board Boot flash (Read/Write)

Configuration register is 0x101

Router#
Step 10 (optional) To enter the Cisco IOS setup utility for basic configuration information, use the Cisco IOS setup command.
Step 11 Use the Cisco IOS command ip address in the interface configuration mode to configure an IP address onto the internal ATM interface.
|
TimeSaver Cisco IOS software does not automatically save configuration changes to the embedded router NVRAM. To avoid losing configuration changes, use the Cisco IOS copy run start command to save copies of your Cisco IOS running configuration to the embedded router NVRAM while you are working. |
Step 12 Use an IP-based protocol (such as Telnet, FTP, or TFTP) to connect the management network with the embedded router. When connected, the embedded router reports assigned IP addresses to the embedded UXM-E through an ILMI topology discovery.
|
Tip Use the IP address configured on the internal ATM interface as the endpoint for a management VC between the URM and the management network. |
|
Note For ILMI to discover and display the IP address, the internal ATM interface must have a configured IP address and ILMI must be configured on the internal ATM port. The ILMI protocol does not exchange any other IP addresses with the Cisco IGX. |
Step 13 To configure ports on the URM, use Cisco IOS CLI commands. For more information, see Cisco IOS Configuration Fundamentals Configuration Guide.
Step 14 Configure voice connections on the URM using Cisco IOS CLI and SWSW CLI commands. For more information, refer to SWSW or Cisco IOS documentation listed in "Related Documentation".
The following differences between the two operating systems can impact connection setup:
Cisco IGX allows a UNI specified range of 0 to 65535. However, the embedded router has a VCI range of 0 to 1023, so you cannot terminate connections with a VCI value greater than 1023 on the URM. The ATM PVCs configured onto the embedded router must correspond to the WAN connections configured onto the embedded UXM-E. If the two sides of a connection are inconsistent, try checking the traffic parameter values for each side to see if they are different, then redefine each value so that they are consistent.
|
Note The PVC with the address vpi.vci 0.1023 on the URM internal ATM port is reserved and is not available to the user. |
Step 15 Save configuration changes to the embedded router NVRAM using the Cisco IOS copy run start command.
Step 16 If you have not already done so, reconfigure the embedded router to load the Cisco IOS configuration from NVRAM in the future using the SWSW cnfrtr slot r command at the SWSW CLI.
|
Tip After you have configured the embedded router, set up an external TFTP server to back up your Cisco IOS configuration. Use the Cisco IOS copy nvram tftp://host address/destination file command to copy the Cisco IOS configuration to the TFTP server. |
If you have trouble, see "Obtaining Technical Assistance" on page 21 for information on how to get technical assistance.
You can use standard and superuser commands on the SWSW CLI to create voice connections on the URM (see Table 10).
|
Note The Cisco IOS image stored in boot Flash is managed by SWSW; see "Managing the Boot Flash Cisco IOS Image" for more information. |
Card management, port management, and connection management commands for the embedded UXM-E side of the URM are unchanged.
For details on command syntax and parameters, see Cisco WAN Switching Command Reference and Cisco WAN Switching SuperUser Command Reference . Note that the superuser commands are rarely used and many of them are only for debug purposes.
|
Note Because there is no physical line connecting the embedded UXM-E to the embedded
Cisco IOS router, SWSW line connections and commands are not supported on the URM.
|
The addport command activates the internal ATM port on the embedded UXM-E.
The dsprtrslot command displays a snapshot of the router operational information on a slot. Displayed information includes: router state, Cisco IOS alarm status, VIC type, and Cisco IOS software image.
|
TimeSaver To quickly display Cisco IOS software image information and VIC type for a specific slot, use the dsprtrslot slot command (see Example 2). |
igx1           TN    Cisco           IGX 8420  9.3.2G    Oct. 9 2000  09:47 PDT


Router Slot 15 Operational Info


  Card Type      :  URM

  Router State   :  Ios

  IOS Status Alrm:  Ok

  IOS SW Image   :  URM-IS-M 12.1(20000905:234634)

  VIC Type       :  VIC-2T1


Last Command: dsprtrslot 15


Next Command:
The dsprtrslots command displays and refreshes router information for all slots in a Cisco IGX 8400 series switch. Information displayed includes:
igx1           TN    Cisco           IGX 8420  9.3.2G    Oct. 9 2000  09:53 PDT

                           R O U T E R   S L O T S

   Card VIC          Router                 Card VIC          Router
   Type Type         Status                 Type Type         Status
 1 No router in NPM                       9 --   --           --
 2 No router in NPM                      10 --   --           --
 3 --   --           --                  11 --   --           --
 4 --   --           --                  12 --   --           --
 5 --   --           --                  13 URM  VIC-2E1      Ok
 6 --   --           --                  14 --   --           --
 7 --   --           --                  15 URM  VIC-2T1      Ok
 8 --   --           --                  16 --   --           --


Last Command: dsprtrslots


Next Command:
The dsprtr command displays a current snapshot of the router configuration for the selected slot. Information displayed includes Cisco IOS configuration source, and router serial port function.
|
TimeSaver Try using dsprtr slot to quickly display Cisco IOS configuration source information and router serial port function information on a specific slot. See Example 4. |
igx1           TN    Cisco           IGX 8420  9.3.2G    Oct. 9 2000  10:02 PDT

Configuration for Router Slot 15:                                    Snapshot
    IOS Configuration:       from router NVRAM
    Router Serial Port:      CON


Last Command: dsprtr 15


Next Command:
The cnfrtr command lets you configure the embedded router Cisco IOS configuration source on a logically active or standby slot. This command can also be used to specify the router serial port function.
Syntax: cnfrtr slot ios-cnfg [serial-pt-cnfg]
For example:
|
TimeSaver To combine your Cisco IOS configuration and your serial port function into one command, use cnfrtr slot {n | r} [1 | 2]. See Example 5. |
sw180          TN    Cisco           IGX 8420  9.3.2l    Oct. 9 2000  10:26 GMT

Configuration for Router Slot 12:                                   Snapshot
    IOS Configuration:      from router NVRAM
    Router Serial Port:     CON


Last Command:cnfrtr 12 r 1

Next Command:
Use cnfrtrparm to set the router service-level configuration on a logically active or standby slot. This command can also be used to configure ROM monitor action, to reset the router following Cisco IOS IPC failure, and to disable boot Flash write protection.
Syntax: cnfrtrparm slot parm-index parm-value (see Table 11 for more syntax information).
|
Tip To prevent router reset on Cisco IOS IPC failure, use cnfrtrparm slot 2 1. |
| Parm-index item | Parm-index number | Parm-value item | Parm-value number |
|---|---|---|---|
Rommon action | 1 | Load Cisco IOS software | 1 |
Reset router on Cisco IOS software IPC failure | 2 | N | 1 |
Boot Flash write enable | 3 | Y | 1 |
For example (see Example 6):
sw180          TN    Cisco           IGX 8420  9.3.2l    Oct. 9 2000  10:19 GMT

1   Rommon Action                   [  load IOS         ]
2   Reset Router on IOS IPC Failure [  No               ]
3   BootFlash Write Enable          [  Yes              ]


Last Command:cnfrtrparm 12 1 1


Next Command:
The rstrtr command (see Example 7) resets the card's embedded router without requiring the card to be physically reset or restarted; the command can only be used on logically active slots.
Syntax: rstrtr slot
sw180          TN    Cisco           IGX 8420  9.3.2l    Oct. 9 2000  10:27 GMT

Configuration for Router Slot 12:                                   Snapshot
    IOS Configuration:      from router NVRAM
    Router Serial Port:     CON


This Command:rstrtr 12


Reset router with above configuration ? (y|n)
The URM boot Flash image is managed through SWSW commands entered at the SWSW CLI. By default, boot Flash memory is configured as read-only. However, the boot Flash memory can be reconfigured to read-write for Cisco IOS image updates using the following procedure.
Step 1 At the SWSW CLI, use the SWSW command cnfrtrparm slot 3 y. The terminal connected to the embedded router displays the following message:
%IPC_URM-6-BFLASH:Boot flash programmed Read/Write from IGX console
Step 2 Update the boot Flash Cisco IOS image using a standard Cisco IOS image update procedure (see Cisco IOS Configuration Fundamentals Configuration Guide for more information).
Step 3 At the SWSW CLI, use the SWSW command cnfrtrparm slot 3 n to reconfigure the boot Flash memory to read-only.
You can use standard Cisco IOS commands at the Cisco IOS CLI to configure voice connections on the URM. See Table 12 for a summary of Cisco IOS commands used to configure the URM for the first time.
The URM stores two Cisco IOS images: the main system image "urm-is-mz" stored in system Flash, and the boot helper image "urm-wboot-mz" stored in boot Flash. The boot Flash image is a Cisco IOS image with limited functionality and is used to recover from the loss or damage of the main Cisco IOS system image.
For information on how to recover from the loss or damage of the Cisco IOS system image, see Cisco IOS Configuration Fundamentals Configuration Guide.
For more information on Cisco IOS configuration and commands, see Cisco IOS Configuration Fundamentals Configuration Guide.
For details on command syntax and parameters, see Cisco IOS Configuration Fundamentals Command Reference.
To see a sample Cisco IOS start-up screen for the URM, see Example 8.
| Command | Description |
|---|---|
show version | Shows the current Cisco IOS image version. |
setup | Starts the setup utility, a series of basic configuration questions that generate a simple Cisco IOS configuration file. |
show run | Shows the current Cisco IOS running configuration file. |
ip address address subnet mask | Configures an ip address on the selected interface. Must be entered from interface configuration mode. |
copy running-config startup-config | Copies the running configuration file (including any configuration changes that you have entered) to the embedded router's start-up configuration file (stored in NVRAM). |
copy nvram tftp://host address/destination file | Copies the embedded router's Cisco IOS configuration file to an external TFTP server. |
show bootflash | Displays the contents of the boot Flash memory. |
System Bootstrap, Version 12.1(5r)YA, RELEASE SOFTWARE (fc1)
Copyright (c) 2000 by cisco Systems, Inc.
IGX URM processor with 65536 Kbytes of main memory

Main memory is configured to 64 bit mode with parity disabled


program load complete, entry point: 0x80008000, size: 0xa22638

Self decompressing the image :
#############################################################################################################
#############################################################################################################
#############################################################################################################
#############################################################################################################
#############################################################################################################
#############################################################################################################
#############################################################################################################
#############################################################################################################
############################################################# [OK]


Smart Init is enabled

smart init is sizing iomem

  ID            MEMORY_REQ                 TYPE

0001D0          0X0025178C URM Front Card ATM Port

0001D2          0X000E9500 URM Backcard BC_2V2FE FE Ports

0001D4          0X000FF10C URM Backcard BC_2V2FE T1/E1 Ports

                0X0010A6F8 public buffer pools

                0X00211000 public particle pools

TOTAL:          0X00755490


If any of the above Memory Requirements are

"UNKNOWN", you may be using an unsupported

configuration or there is a software problem and

system operation may be compromised.

Rounded IOMEM up to: 8Mb.

Using 12 percent iomem. [8Mb/64Mb]


              Restricted Rights Legend

Use, duplication, or disclosure by the Government is
subject to restrictions as set forth in subparagraph
(c) of the Commercial Computer Software - Restricted
Rights clause at FAR sec. 52.227-19 and subparagraph
(c) (1) (ii) of the Rights in Technical Data and Computer
Software clause at DFARS sec. 252.227-7013.

           cisco Systems, Inc.
           170 West Tasman Drive
           San Jose, California 95134-1706


Cisco Internetwork Operating System Software
IOS (tm) 3600 Software (URM-IS-M), Version 12.1(5)YA, RELEASE SOFTWARE (fc1)
TAC Support: http://www.cisco.com/cgi-bin/ibld/view.pl?i=support
Copyright (c) 1986-2001 by cisco Systems, Inc.
Compiled Wed 24-Jan-01 12:29 by yiyan
Image text-base: 0x60008960, data-base: 0x6113E000

cisco URM (R527x) processor (revision 01) with 57344K/8192K bytes of memory.
Processor board ID
R527x CPU at 225Mhz, Implementation 40, Rev 10.0
Bridging software.
X.25 software, Version 3.0.0.
SuperLAT software (copyright 1990 by Meridian Technology Corp).
Primary Rate ISDN software, Version 1.1.
URM image loaded from flash (controlled by "cnfrtrparm" on IGX)
URM booting with BLANK configuration (controlled by "cnfrtr" on IGX)
Front card type: URM Main Board
Back card type: URI-2FE2V
2 FastEthernet/IEEE 802.3 interface(s)
1 ATM network interface(s)
2 Channelized T1/PRI port(s)
DRAM configuration is 64 bits wide with parity disabled.
123K bytes of non-volatile configuration memory.
32768K bytes of processor board System flash (Read/Write)
8192K bytes of processor board Boot flash (Device not programmable)
Establishing interprocessor communication...done
IGX slot number 15
Boot flash programmed Read/Write from IGX

SETUP: new interface FastEthernet1/0 placed in "shutdown" state
SETUP: new interface FastEthernet1/1 placed in "shutdown" state


Press RETURN to get started!


00:00:18: %LINK-3-UPDOWN: Interface FastEthernet1/0, changed state to up
00:00:18: %LINK-3-UPDOWN: Interface FastEthernet1/1, changed state to up
00:00:19: %LINEPROTO-5-UPDOWN: Line protocol on Interface FastEthernet1/0, changed state to down
00:00:19: %LINEPROTO-5-UPDOWN: Line protocol on Interface FastEthernet1/1, changed state to down
00:00:24: %LINK-3-UPDOWN: Interface ATM0/0, changed state to up
00:00:25: %LINEPROTO-5-UPDOWN: Line protocol on Interface ATM0/0, changed state to up
00:00:32: %LINEPROTO-5-UPDOWN: Line protocol on Interface FastEthernet1/0, changed state to up
00:00:50: %LINK-5-CHANGED: Interface FastEthernet1/0, changed state to administratively down
00:00:50: %LINK-5-CHANGED: Interface FastEthernet1/1, changed state to administratively down
00:00:51: %SYS-5-RESTART: System restarted --
Cisco Internetwork Operating System Software
IOS (tm) 3600 Software (URM-IS-M), Version 12.1(5)YA, RELEASE SOFTWARE (fc1)
TAC Support: http://www.cisco.com/cgi-bin/ibld/view.pl?i=support
Copyright (c) 1986-2001 by cisco Systems, Inc.
Compiled Wed 24-Jan-01 12:29 by yiyan
00:00:51: %LINEPROTO-5-UPDOWN: Line protocol on Interface FastEthernet1/0, changed state to down
00:00:51: %IP-5-WEBINST_KILL: Terminating DNS process
00:00:54: %DSPRM-5-UPDOWN: DSP 15 in slot 2, changed state to up
00:00:55: %DSPRM-5-UPDOWN: DSP 7 in slot 2, changed state to up
00:00:55: %DSPRM-5-UPDOWN: DSP 8 in slot 2, changed state to up
00:00:55: %DSPRM-5-UPDOWN: DSP 9 in slot 2, changed state to up
00:00:55: %DSPRM-5-UPDOWN: DSP 10 in slot 2, changed state to up
00:00:55: %DSPRM-5-UPDOWN: DSP 11 in slot 2, changed state to up
00:00:55: %DSPRM-5-UPDOWN: DSP 12 in slot 2, changed state to up
00:00:55: %DSPRM-5-UPDOWN: DSP 13 in slot 2, changed state to up
00:00:55: %DSPRM-5-UPDOWN: DSP 14 in slot 2, changed state to up
00:00:55: %DSPRM-5-UPDOWN: DSP 0 in slot 2, changed state to up
00:00:55: %CONTROLLER-5-UPDOWN: Controller T1 2/0, changed state to up
00:00:55: %CONTROLLER-5-UPDOWN: Controller T1 2/1, changed state to up
Router>
Router>
Router>en
Router#
Router# show version

Cisco Internetwork Operating System Software
IOS (tm) 3600 Software (URM-IS-M), Version 12.1(5)YA, RELEASE SOFTWARE (fc1)
TAC Support: http://www.cisco.com/cgi-bin/ibld/view.pl?i=support
Copyright (c) 1986-2001 by cisco Systems, Inc.
Compiled Wed 24-Jan-01 12:29 by yiyan
Image text-base: 0x60008960, data-base: 0x6113E000

ROM: System Bootstrap, Version 12.1(5r)YA, RELEASE SOFTWARE (fc1)
ROM: 3600 Software (URM-IS-M), Version 12.1(5)YA, RELEASE SOFTWARE (fc1)

Router uptime is 2 minutes
System returned to ROM by power-on
System image file is "flash:urm-is-mz.121-5.YA"

cisco URM (R527x) processor (revision 01) with 57344K/8192K bytes of memory.
Processor board ID
R527x CPU at 225Mhz, Implementation 40, Rev 10.0
Bridging software.
X.25 software, Version 3.0.0.
SuperLAT software (copyright 1990 by Meridian Technology Corp).
Primary Rate ISDN software, Version 1.1.

IGX slot number 15
URM image loaded from flash (controlled by "cnfrtrparm" on IGX)
URM booting with BLANK configuration (controlled by "cnfrtr" on IGX)
Front card type: URM Main Board
Back card type: URI-2FE2V
2 FastEthernet/IEEE 802.3 interface(s)
1 ATM network interface(s)
2 Channelized T1/PRI port(s)
DRAM configuration is 64 bits wide with parity disabled.
123K bytes of non-volatile configuration memory.
16384K bytes of processor board System flash (Read/Write)
16384K bytes of processor board Boot flash (Read/Write)

Configuration register is 0x101

Router#
Router#
Router# show running configuration

Building configuration...

Current configuration : 672 bytes
!
version 12.1
no service single-slot-reload-enable
service timestamps debug uptime
service timestamps log uptime
no service password-encryption
!
hostname Router
!
logging rate-limit console 10 except errors
!
voice-card 2
!
ip subnet-zero
!
!
no ip finger
!
call rsvp-sync
!
!

!
!
!
controller T1 2/0
!
controller T1 2/1
!
!
interface ATM0/0
 no ip address
 no atm ilmi-keepalive
!
interface FastEthernet1/0
 no ip address
 shutdown
 duplex auto
 speed auto
!
interface FastEthernet1/1
 no ip address
 shutdown
 duplex auto
 speed auto
!
ip classless
no ip http server
!
!
dial-peer cor custom
!
!
!
!
line con 0
 transport input none
line aux 0
line vty 0 4
!
end

Router#
Router#
You can use both SWSW self-test and background test diagnostic commands on the URM (see Table 13). Self-test works with the embedded UXM-E.
| Command | Description | Local Endpoint (on URM) | Remote Endpoint (on URM) |
|---|---|---|---|
cnftstparm card type | Enables or disables the URM self-test and ATM background test. | — | — |
addloclp slot.port | Adds local loopback on the specified ATM port. This command cannot be used on the URM internal ATM port. | Y | — |
addloclp slot.port.vpi.vci or addloclp slot.port.dlci | Adds local loopback on the specified connection at the local endpoint. | Y | Y |
addlocrmtlp slot.port.vpi.vci | Adds remote loopback on the specified connection at the local endpoint. | Y | Y |
addrmtlpslot.port.vpi.vci or addrmtlp slot.port.dlci | Adds remote loopback on the specified connection at the remote endpoint. | Y | Y |
tstdelay slot.port.dlci or tstdelay slot.port.vpi.vci | Verifies continuity and measures round-trip delay of the user data on a connection (with or without Foresight.) | Y | Y |
tstcon slot.port.dlci | Verifies connection continuity on a FR endpoint. | N | Y |
tstconseg slot.port.vpi.vci | Sends the OAM segment loopback cells to the CPE to verify the continuity between the port and the CPE. | Y | Y |
cnfoamlpbk slot | Configures parameters for OAM loopback. | Y | Y |
dellp slot.port | Removes port loopback. This command cannot be used on a URM internal ATM port. | Y | — |
dellp slot.port.vpi.vci or | Removes loopback on connection or port. | Y | Y |
If the main Cisco IOS system image stored in Flash is lost or damaged, you can use the Cisco IOS boot helper image to copy backup images or configuration files from an external TFTP server or another online source.
Step 1 At the SWSW CLI, use the SWSW command cnfrtrparm slot 1 2 to configure the embedded router to load the boot helper image instead of the system image at router startup.
Step 2 Use the SWSW command resetcd or rstrtr to reboot the embedded router. The embedded router reboots using the Cisco IOS boot helper image.
Step 3 At the Cisco IOS CLI, repeat Steps 1 through 12 of the procedure described in "Configuring the URM".
Step 4 Using the Cisco IOS command copy, copy the saved Cisco IOS configuration file from the external TFTP server to the embedded router NVRAM.
Step 5 At the SWSW CLI, use the SWSW command cnfrtrparm slot 1 1 to configure the embedded router to load the system image at router startup.
Step 6 Use the SWSW command resetcd or rstrtr to reboot the embedded router. The embedded routerl reboots using the new Cisco IOS system image.
When replacing the URM, you should complete these tasks in the following order to avoid damage to the card:
1. Remove the front card.
2. Remove the back card.
3. Replace the back card.
4. Replace the front card.
5. Configure the card as appropriate.
|
Note The Cisco IOS software holds the embedded router in reset when the URI back card is removed; the embedded router does not resume until the URI back card is reseated. |
You need the following tools and parts to remove the front and back cards:
|
Caution The VWIC component of the URI back card is not hot-swappable; removal of the VWIC can damage the URM. |
Step 1 Using the Cisco IOS command copy, save the Cisco IOS configuration to an external TFTP server.
Step 2 In a separate terminal session, connect with the embedded UXM-E.
Step 3 Using the SWSW command cnfrtr slot n 1, reconfigure the embedded router to load the Cisco IOS configuration file from the NPM.
Step 4 Attach an ESD-preventive wrist strap before handling the card. The Cisco IGX 8410 cabinet has attached wrist straps on the front and the back of the chassis.
|
Caution Always follow ESD-prevention procedures when you remove and replace components. Wear an ESD-preventive wrist strap or ground yourself by periodically touching the metal part of the chassis. |
Step 5 Using the 5/32-inch Allen wrench, open the Cisco IGX 8400 series switch door.
Step 6 Using the number 1 Phillips screwdriver, loosen the panel fasteners at the top and bottom of the front card faceplate.
Step 7 Hold down the ejector levers while unseating the front card. Hold the card faceplate with one hand and support the card's weight with the other, then slide the card vertically out of the slot.
|
Caution Always use the ejector levers when disengaging or seating a card. Failure to do so can cause erroneous system error messages, and indicate module failure. |
Step 8 Identify and mark any cable locations before removing cables from the back card, then unplug all cables.
Step 9 Using the number 1 Phillips screwdriver, loosen the captive mounting screws on the top and bottom of the back card faceplate.
Step 10 Hold down the ejector levels and slide the back card out of the cabinet.
|
Note The VWIC must be installed for the back card to function. |
You need the following tools and parts to replace the front and back cards:
Step 1 Attach an ESD-preventive wrist strap before handling the card. The Cisco IGX 8400 series cabinet has attached wrist straps on the front and the back of the chassis.
|
Caution Always follow ESD-prevention procedures when you remove and replace components. Wear an ESD-preventive wrist strap or ground yourself by periodically touching the metal part of the chassis. |
Step 2 Visually inspect the replacement BC-URI-2FE2V to verify it is in good working order.
|
Note The VWIC must be installed for the back card to function. Before installing the back card in the Cisco IGX chassis, verify that the correct VWIC is in place. |
Step 3 Hold down the ejector levers and slide the back card into the cabinet. Make sure the ejector levers do not get caught behind the faceplate.
|
Caution Always use the ejector levers when disengaging or seating a card. Failure to do so can cause erroneous system error messages, and indicate module failure. |
Step 4 Using the number 1 Phillips screwdriver, tighten the captive mounting screws on the top and bottom of the back card faceplate.
Step 5 Reconnect all cables according to the marks made before removing the card.
Step 6 Using the 5/32-inch Allen wrench, open the Cisco IGX 8400 series switch door.
Step 7 Hold the front card faceplate with one hand and support the card's weight with the other, then slide the card vertically into the selected slot. Hold down the ejector levers while seating the card.
|
Note The URM automatically powers on when the card is seated. The front card faceplate LEDs will blink, indicating URM POST (see Figure 2 for LED location and description). |
Step 8 Wait for the front card faceplate LEDs to finish cycling, then verify that the standby LED (STBY) is on.
Step 9 Using the number 1 Phillips screwdriver, tighten the panel fasteners at the top and bottom of the front card faceplate.
Step 10 Using the 5/32-inch Allen wrench, close the Cisco IGX 8400 series switch door.
Step 11 Repeat Steps 1 through 12 of the procedure described in "Configuring the URM".
Step 12 Using the Cisco IOS command copy, copy the saved Cisco IOS configuration file from the external TFTP server to the embedded router NVRAM.
|
Note The URM extracts information from the CAS signaling bits in the T1 or E1 frame. When a signaling bit changes state, the URM sends signaling packets to the card at the other end of the connection. CSS signaling, such as DPNSS and ISDN signaling, are supported through a clear (transparent) channel. |
|
Note For VISM connections, the URM only supports VoIP. |
| Hardware Platform | Connection Endpoint | Connection Type | Voice Connection | Data Connection |
|---|---|---|---|---|
Cisco BPX | BXM | CBR | Y | Y |
Cisco BPX | BXM | VBRrt | Y | Y |
Cisco BPX | BXM | VBRnt | Y | Y |
Cisco BPX | BXM | ABR | N | Y |
Cisco BPX | BXM | UBR | N | Y |
Cisco BPX | BXM | FST | N | Y |
Cisco IGX | UXM | CBR | Y | Y |
Cisco IGX | UXM | VBRrt | Y | Y |
Cisco IGX | UXM | VBRnt | Y | Y |
Cisco IGX | UXM | ABR | N | Y |
Cisco IGX | UXM | UBR | N | Y |
Cisco IGX | UXM | FST | N | Y |
Cisco IGX | UFM | FR | Y FRF.8 SIW | Y FRF.8 SIW |
Cisco IGX | UFM | FST | N | Y FRF.8 SIW |
Cisco IGX | URM | CBR | Y | Y |
Cisco IGX | URM | VBRrt | Y | Y |
Cisco IGX | URM | VBRnt | Y | Y |
Cisco IGX | URM | ABR | N | Y |
Cisco IGX | URM | UBR | N | Y |
Cisco IGX | URM | FST | N | Y |
Cisco IGX | CVM | — | N | N |
Cisco IGX | HDM | — | N | N |
Cisco IGX | LDM | — | N | N |
Cisco MGX | VISM | — | Y | N |
Cisco MGX | RPM | — | N | Y |
Cisco MGX | FRSM | FR | Y FRF.8 SIW | Y FRF.8 SIW |
Cisco MGX | FRSM | FST | N | Y FRF.8 SIW |
Cisco MGX | AUSM | CBR | Y | Y |
Cisco MGX | AUSM | VBRrt | Y | Y |
Cisco MGX | AUSM | VBRnt | Y | Y |
Cisco MGX | AUSM | ABR | N | Y |
Cisco MGX | AUSM | UBR | N | Y |
Cisco MGX | AUSM | FST | N | Y |
|
Note Use FRF.8 SIW transparent mode for VoATM connections, and use FRF.8 SIW translational mode for VoIP and data connections. |
|
Note No limitation exists for the number of URM modules in a Cisco IGX switch. However, the
aggregate bandwidth allocated to the cards in the node cannot exceed the total available
Cisco IGX backplane bandwidth.
|
| |||
Waarschuwing | Dit waarschuwingssymbool betekent gevaar. U verkeert in een situatie die lichamelijk letsel kan veroorzaken. Voordat u aan enige apparatuur gaat werken, dient u zich bewust te zijn van de bij elektrische schakelingen betrokken risico's en dient u op de hoogte te zijn van standaard maatregelen om ongelukken te voorkomen. | ||
Varoitus | Tämä varoitusmerkki merkitsee vaaraa. Olet tilanteessa, joka voi johtaa ruumiinvammaan. Ennen kuin työskentelet minkään laitteiston parissa, ota selvää sähkökytkentöihin liittyvistä vaaroista ja tavanomaisista onnettomuuksien ehkäisykeinoista. | ||
Attention | Ce symbole d'avertissement indique un danger. Vous vous trouvez dans une situation pouvant causer des blessures ou des dommages corporels. Avant de travailler sur un équipement, soyez conscient des dangers posés par les circuits électriques et familiarisez-vous avec les procédures couramment utilisées pour éviter les accidents. | ||
Warnung | Dieses Warnsymbol bedeutet Gefahr. Sie befinden sich in einer Situation, die zu einer Körperverletzung führen könnte. Bevor Sie mit der Arbeit an irgendeinem Gerät beginnen, seien Sie sich der mit elektrischen Stromkreisen verbundenen Gefahren und der Standardpraktiken zur Vermeidung von Unfällen bewußt. | ||
Avvertenza | Questo simbolo di avvertenza indica un pericolo. La situazione potrebbe causare infortuni alle persone. Prima di lavorare su qualsiasi apparecchiatura, occorre conoscere i pericoli relativi ai circuiti elettrici ed essere al corrente delle pratiche standard per la prevenzione di incidenti. | ||
Advarsel | Dette varselsymbolet betyr fare. Du befinner deg i en situasjon som kan føre til personskade. Før du utfører arbeid på utstyr, må du vare oppmerksom på de faremomentene som elektriske kretser innebærer, samt gjøre deg kjent med vanlig praksis når det gjelder å unngå ulykker. | ||
Aviso | Este símbolo de aviso indica perigo. Encontra-se numa situação que lhe poderá causar danos físicos. Antes de começar a trabalhar com qualquer equipamento, familiarize-se com os perigos relacionados com circuitos eléctricos, e com quaisquer práticas comuns que possam prevenir possíveis acidentes. | ||
¡Advertencia! | Este símbolo de aviso significa peligro. Existe riesgo para su integridad física. Antes de manipular cualquier equipo, considerar los riesgos que entraña la corriente eléctrica y familiarizarse con los procedimientos estándar de prevención de accidentes. | ||
Varning! | Denna varningssymbol signalerar fara. Du befinner dig i en situation som kan leda till personskada. Innan du utför arbete på någon utrustning måste du vara medveten om farorna med elkretsar och känna till vanligt förfarande för att förebygga skador. | ||
| |||
Waarschuwing | Voordat u aan een systeem werkt dat een aan/uit schakelaar heeft, dient u de stroomvoorziening UIT te schakelen en de stekker van het netsnoer uit het stopcontact te halen. | ||
Varoitus | Ennen kuin teet mitään sellaiselle järjestelmälle, jossa on kaksiasentokytkin, katkaise siitä virta ja kytke virtajohto irti. | ||
Attention | Avant de travailler sur un système équipé d'un commutateur marche-arrêt, mettre l'appareil à l'arrêt (OFF) et débrancher le cordon d'alimentation. | ||
Warnung | Bevor Sie an einem System mit Ein/Aus-Schalter arbeiten, schalten Sie das System AUS und ziehen das Netzkabel aus der Steckdose. | ||
Avvertenza | Prima di lavorare su un sistema dotato di un interruttore on/off, spegnere (OFF) il sistema e staccare il cavo dell'alimentazione. | ||
Advarsel | Slå AV strømmen og trekk ut strømledningen før det utføres arbeid på et system som er utstyrt med en av/på-bryter. | ||
Aviso | Antes de começar a trabalhar num sistema que tem um interruptor on/off, DESLIGUE a corrente eléctrica e retire o cabo de alimentação da tomada. | ||
¡Advertencia! | Antes de utilizar cualquier sistema equipado con interruptor de Encendido/Apagado (ON/OFF), cortar la alimentación y desenchufar el cable de alimentación. | ||
Varning! | Slå AV strömmen och dra ur nätsladden innan du utför arbete på ett system med strömbrytare. | ||
| |||
Waarschuwing | Alvorens aan apparatuur te werken die met elektrische leidingen is verbonden, sieraden (inclusief ringen, kettingen en horloges) verwijderen. Metalen voorwerpen worden warm wanneer ze met stroom en aarde zijn verbonden, en kunnen ernstige brandwonden veroorzaken of het metalen voorwerp aan de aansluitklemmen lassen. | ||
Varoitus | Ennen kuin työskentelet voimavirtajohtoihin kytkettyjen laitteiden parissa, ota pois kaikki korut (sormukset, kaulakorut ja kellot mukaan lukien). Metalliesineet kuumenevat, kun ne ovat yhteydessä sähkövirran ja maan kanssa, ja ne voivat aiheuttaa vakavia palovammoja tai hitsata metalliesineet kiinni liitäntänapoihin. | ||
Attention | Avant d'accéder à cet équipement connecté aux lignes électriques, ôter tout bijou (anneaux, colliers et montres compris). Lorsqu'ils sont branchés à l'alimentation et reliés à la terre, les objets métalliques chauffent, ce qui peut provoquer des blessures graves ou souder l'objet métallique aux bornes. | ||
Warnung | Vor der Arbeit an Geräten, die an das Netz angeschlossen sind, jeglichen Schmuck (einschließlich Ringe, Ketten und Uhren) abnehmen. Metallgegenstände erhitzen sich, wenn sie an das Netz und die Erde angeschlossen werden, und können schwere Verbrennungen verursachen oder an die Anschlußklemmen angeschweißt werden. | ||
Avvertenza | Prima di intervenire su apparecchiature collegate alle linee di alimentazione, togliersi qualsiasi monile (inclusi anelli, collane, braccialetti ed orologi). Gli oggetti metallici si riscaldano quando sono collegati tra punti di alimentazione e massa: possono causare ustioni gravi oppure il metallo può saldarsi ai terminali. | ||
Advarsel | Fjern alle smykker (inkludert ringer, halskjeder og klokker) før du skal arbeide på utstyr som er koblet til kraftledninger. Metallgjenstander som er koblet til kraftledninger og jord blir svært varme og kan forårsake alvorlige brannskader eller smelte fast til polene. | ||
Aviso | Antes de trabalhar em equipamento que esteja ligado a linhas de corrente, retire todas as jóias que estiver a usar (incluindo anéis, fios e relógios). Os objectos metálicos aquecerão em contacto com a corrente e em contacto com a ligação à terra, podendo causar queimaduras graves ou ficarem soldados aos terminais. | ||
¡Advertencia! | Antes de operar sobre equipos conectados a líneas de alimentación, quitarse las joyas (incluidos anillos, collares y relojes). Los objetos de metal se calientan cuando se conectan a la alimentación y a tierra, lo que puede ocasionar quemaduras graves o que los objetos metálicos queden soldados a los bornes. | ||
Varning! | Tag av alla smycken (inklusive ringar, halsband och armbandsur) innan du arbetar på utrustning som är kopplad till kraftledningar. Metallobjekt hettas upp när de kopplas ihop med ström och jord och kan förorsaka allvarliga brännskador; metallobjekt kan också sammansvetsas med kontakterna. | ||
| |||
Waarschuwing | Dit produkt dient volgens alle landelijke wetten en voorschriften te worden afgedankt. | ||
Varoitus | Tämän tuotteen lopullisesta hävittämisestä tulee huolehtia kaikkia valtakunnallisia lakeja ja säännöksiä noudattaen. | ||
Attention | La mise au rebut définitive de ce produit doit être effectuée conformément à toutes les lois et réglementations en vigueur. | ||
Warnung | Dieses Produkt muß den geltenden Gesetzen und Vorschriften entsprechend entsorgt werden. | ||
Avvertenza | L'eliminazione finale di questo prodotto deve essere eseguita osservando le normative italiane vigenti in materia. | ||
Advarsel | Endelig disponering av dette produktet må skje i henhold til nasjonale lover og forskrifter. | ||
Aviso | A descartagem final deste produto deverá ser efectuada de acordo com os regulamentos e a legislação nacional. | ||
¡Advertencia! | El desecho final de este producto debe realizarse según todas las leyes y regulaciones nacionales. | ||
Varning! | Slutlig kassering av denna produkt bör skötas i enlighet med landets alla lagar och föreskrifter. | ||
| |||
Waarschuwing | Bij de installatie van het toestel moet de aardverbinding altijd het eerste worden gemaakt en het laatste worden losgemaakt. | ||
Varoitus | Laitetta asennettaessa on maahan yhdistäminen aina tehtävä ensiksi ja maadoituksen irti kytkeminen viimeiseksi. | ||
Attention | Lors de l'installation de l'appareil, la mise à la terre doit toujours être connectée en premier et déconnectée en dernier. | ||
Warnung | Der Erdanschluß muß bei der Installation der Einheit immer zuerst hergestellt und zuletzt abgetrennt werden. | ||
Avvertenza | In fase di installazione dell'unità, eseguire sempre per primo il collegamento a massa e disconnetterlo per ultimo. | ||
Advarsel | Når enheten installeres, må jordledningen alltid tilkobles først og frakobles sist. | ||
Aviso | Ao instalar a unidade, a ligação à terra deverá ser sempre a primeira a ser ligada, e a última a ser desligada. | ||
¡Advertencia! | Al instalar el equipo, conectar la tierra la primera y desconectarla la última. | ||
Varning! | Vid installation av enheten måste jordledningen alltid anslutas först och kopplas bort sist. | ||
| |||
Waarschuwing | Raadpleeg de installatie-aanwijzingen voordat u het systeem met de voeding verbindt. | ||
Varoitus | Lue asennusohjeet ennen järjestelmän yhdistämistä virtalähteeseen. | ||
Attention | Avant de brancher le système sur la source d'alimentation, consulter les directives d'installation. | ||
Warnung | Lesen Sie die Installationsanweisungen, bevor Sie das System an die Stromquelle anschließen. | ||
Avvertenza | Consultare le istruzioni di installazione prima di collegare il sistema all'alimentatore. | ||
Advarsel | Les installasjonsinstruksjonene før systemet kobles til strømkilden. | ||
Aviso | Leia as instruções de instalação antes de ligar o sistema à sua fonte de energia. | ||
¡Advertencia! | Ver las instrucciones de instalación antes de conectar el sistema a la red de alimentación. | ||
Varning! | Läs installationsanvisningarna innan du kopplar systemet till dess strömförsörjningsenhet. | ||
| |||
Waarschuwing | Dit produkt is afhankelijk van de installatie van het gebouw voor kortsluit- (overstroom)beveiliging. Controleer of er een zekering of stroomverbreker van niet meer dan 120 Volt wisselstroom, 15 A voor de V.S. (240 Volt wisselstroom, 10 A internationaal) gebruikt wordt op de fasegeleiders (alle geleiders die stroom voeren). | ||
Varoitus | Tämä tuote on riippuvainen rakennukseen asennetusta oikosulkusuojauksesta (ylivirtasuojauksesta). Varmista, että vaihevirtajohtimissa (kaikissa virroitetuissa johtimissa) käytetään Yhdysvalloissa alle 120 voltin, 15 ampeerin ja monissa muissa maissa 240 voltin, 10 ampeerin sulaketta tai suojakytkintä. | ||
Attention | Pour ce qui est de la protection contre les courts-circuits (surtension), ce produit dépend de l'installation électrique du local. Vérifier qu'un fusible ou qu'un disjoncteur de 120 V alt., 15 A U.S. maximum (240 V alt., 10 A international) est utilisé sur les conducteurs de phase (conducteurs de charge). | ||
Warnung | Dieses Produkt ist darauf angewiesen, daß im Gebäude ein Kurzschluß- bzw. Überstromschutz installiert ist. Stellen Sie sicher, daß eine Sicherung oder ein Unterbrecher von nicht mehr als 240 V Wechselstrom, 10 A (bzw. in den USA 120 V Wechselstrom, 15 A) an den Phasenleitern (allen stromführenden Leitern) verwendet wird. | ||
Avvertenza | Questo prodotto dipende dall'installazione dell'edificio per quanto riguarda la protezione contro cortocircuiti (sovracorrente). Verificare che un fusibile o interruttore automatico, non superiore a 120 VCA, 15 A U.S. (240 VCA, 10 A internazionale) sia stato usato nei fili di fase (tutti i conduttori portatori di corrente). | ||
Advarsel | Dette produktet er avhengig av bygningens installasjoner av kortslutningsbeskyttelse (overstrøm). Kontroller at det brukes en sikring eller strømbryter som ikke er større enn 120 VAC, 15 A (USA) (240 VAC, 10 A internasjonalt) på faselederne (alle strømførende ledere). | ||
Aviso | Este produto depende das instalações existentes para protecção contra curto-circuito (sobrecarga). Assegure-se de que um fusível ou disjuntor não superior a 240 VAC, 10A é utilizado nos condutores de fase (todos os condutores de transporte de corrente). | ||
¡Advertencia! | Este equipo utiliza el sistema de protección contra cortocircuitos (o sobrecorrientes) deló propio edificio. Asegurarse de que se utiliza un fusible o interruptor automático de no más de 240 voltios en corriente alterna (VAC), 10 amperios del estándar internacional (120 VAC, 15 amperios del estándar USA) en los hilos de fase (todos aquéllos portadores de corriente). | ||
Varning! | Denna produkt är beroende av i byggnaden installerat kortslutningsskydd (överströmsskydd). Kontrollera att säkring eller överspänningsskydd används på fasledarna (samtliga strömförande ledare) för internationellt bruk max. 240 V växelström, 10 A (i USA max. 120 V växelström, 15 A). | ||
| |||
Waarschuwing | Er is gevaarlijke netwerkspanning aanwezig in WAN poorten ongeacht of de stroom naar de switch INGESCHAKELD of UITGESCHAKELD is. Om elektrische schokken te vermijden, dient u voorzichtig te werk te gaan wanneer u in de nabijheid van WAN poorten werkt. Wanneer u kabels losmaakt, dient u eerst het uiteinde dat zich het verst van de switch vandaan bevindt, te verwijderen. | ||
Varoitus | WAN-porteissa on vaarallisia verkkojännitteitä riippumatta siitä, onko reitittimen virta kytketty vai ei. Välttyäksesi sähköiskulta ole varovainen työskennellessäsi WAN-porttien lähettyvillä. Kun irrotat kaapeleita, irrota reitittimestä kauempana sijaitseva pää ensiksi. | ||
Attention | Les ports de réseau longue distance (WAN) gèrent des tensions de réseau dangereuses, que le routeur soit sous tension ou pas. Pour éviter tout risque d'électrocution, prenez toutes les précautions nécessaires avant de travailler à proximité des ports WAN. Pour déconnecter les câbles, commencez par débrancher l'extrémité la plus éloignée du routeur. | ||
Warnung | In WAN-Ports sind gefährliche Netzspannungen vorhanden, auch wenn der Strom zum Switch abgeschaltet wurde. Zur Vermeidung von Elektroschock Vorsicht bei der Arbeit in der Nähe von WAN-Ports. Beim Abtrennen von Kabeln zuerst das vom Switch entfernte Ende lösen. | ||
Avvertenza | Nelle porte WAN sono presenti tensioni di rete pericolose, sia che il switch sia acceso o meno (ON od OFF). Per evitare scosse elettriche, fare attenzione quando si lavora in prossimità di porte WAN. Quando si scollegano cavi, staccare per primo il connettore collegato al switch. | ||
Advarsel | Det er livsfarlig nettverksspenning i WAN-utganger, uavhengig av om strømmen til fordelingsenheten er slått av (OFF) eller på (ON). Vær forsiktig når du jobber nær WAN-utganger slik at du unngår elektrisk støt. Hvis du skal løsne kabler, må du først løsne den enden som er lengst borte fra fordelingsenheten. | ||
Aviso | Existem sempre tensões de rede perigosas nas portas WAN, independentemente da corrente para o dispositivo repartidor de mensagens estar ligada (ON) ou desligada (OFF). Para evitar choques eléctricos, tenha o devido cuidado ao trabalhar perto das portas WAN. Ao desconectar os cabos, separe primeiro a extremidade que se encontra ligada ao dispositivo repartidor de mensagens. | ||
¡Advertencia! | Hay tensiones de red peligrosas en los puertos de redes de área extendida (WAN), tanto con la alimentación al switch conectada como desconectada. Para evitar la sacudida eléctrica, proceda con precaución cuando trabaje en las proximidades de puertos WAN. Para desconectar los cables, desconecte primero el extremo que va al switch. | ||
Varning! | Farlig nätverksspänning föreligger i WAN-portarna oavsett om strömförsörjningen till distributören är bruten eller ej. För att undvika elektriska stötar ska du vara försiktig vid arbete i närheten av dessa portar. När du kopplar bort en kabel ska du först koppla bort den ände som inte är ansluten till distributören. | ||
| |||
Waarschuwing | Installatie en reparaties mogen uitsluitend door getraind en bevoegd personeel uitgevoerd worden. | ||
Varoitus | Ainoastaan koulutettu ja pätevä henkilökunta saa asentaa tai vaihtaa tämän laitteen. | ||
Avertissement | Tout installation ou remplacement de l'appareil doit être réalisé par du personnel qualifié et compétent. | ||
Achtung | Gerät nur von geschultem, qualifiziertem Personal installieren oder auswechseln lassen. | ||
Avvertenza | Solo personale addestrato e qualificato deve essere autorizzato ad installare o sostituire questo apparecchio. | ||
Advarsel | Kun kvalifisert personell med riktig opplæring bør montere eller bytte ut dette utstyret. | ||
Aviso | Este equipamento deverá ser instalado ou substituído apenas por pessoal devidamente treinado e qualificado. | ||
¡Atención! | Estos equipos deben ser instalados y reemplazados exclusivamente por personal técnico adecuadamente preparado y capacitado. | ||
Varning | Denna utrustning ska endast installeras och bytas ut av utbildad och kvalificerad personal. | ||
| |||
Waarschuwing | Deze apparatuur hoort geaard te worden Zorg dat de host-computer tijdens normaal gebruik met aarde is verbonden. | ||
Varoitus | Tämä laitteisto on tarkoitettu maadoitettavaksi. Varmista, että isäntälaite on yhdistetty maahan normaalikäytön aikana. | ||
Attention | Cet équipement doit être relié à la terre. S'assurer que l'appareil hôte est relié à la terre lors de l'utilisation normale. | ||
Warnung | Dieses Gerät muß geerdet werden. Stellen Sie sicher, daß das Host-Gerät während des normalen Betriebs an Erde gelegt ist. | ||
Avvertenza | Questa apparecchiatura deve essere collegata a massa. Accertarsi che il dispositivo host sia collegato alla massa di terra durante il normale utilizzo. | ||
Advarsel | Dette utstyret skal jordes. Forviss deg om vertsterminalen er jordet ved normalt bruk. | ||
Aviso | Este equipamento deverá estar ligado à terra. Certifique-se que o host se encontra ligado à terra durante a sua utilização normal. | ||
¡Advertencia! | Este equipo debe conectarse a tierra. Asegurarse de que el equipo principal esté conectado a tierra durante el uso normal. | ||
Varning! | Denna utrustning är avsedd att jordas. Se till att värdenheten är jordad vid normal användning. | ||
| |||
Waarschuwing | Incorrecte aansluiting van deze of aangesloten apparatuur op een stopcontact voor algemene doeleinden kan een gevaarlijke situatie tot gevolg hebben. | ||
Varoitus | Tämän laitteen tai siihen liitettyjen laitteiden virheellinen kytkentä yleispistorasiaan voi aiheuttaa vaaratilanteen. | ||
Attention | Un branchement incorrect de cet équipement ou de l'équipement branché à une prise d'usage général peut créer une situation dangereuse. | ||
Warnung | Inkorrektes Anschließen von diesem oder damit verbundenen Geräten an einer Allzwecksteckdose kann eine Gefahrensituation verursachen. | ||
Avvertenza | Un collegamento errato di questo apparecchio, o dell'apparecchiatura a esso collegato, a una presa di uso generale può causare una situazione pericolosa. | ||
Advarsel | Feil kobling av dette utstyret eller tilhørende utstyr til et vanlig uttak kan føre til farlige situasjoner. | ||
Aviso | Uma conexão incorrecta a uma ficha de alimentação eléctrica normal, deste ou de qualquer equipamento a este conectado, poderá resultar numa situação potencialmente perigosa. | ||
Advertencia | La conexión incorrecta de este equipo, o del equipo conectado, a una toma o receptáculo de tipo general podría resultar en una situación peligrosa. | ||
Varning! | Felaktig koppling av denna eller ansluten utrustning till ett universaluttag kan orsaka riskfylld situation. | ||
| |||
Waarschuwing | Dit toestel is bedoeld voor installatie op plaatsen met beperkte toegang. Een plaats met beperkte toegang is een plaats waar toegang slechts door servicepersoneel verkregen kan worden door middel van een speciaal instrument, een slot en sleutel, of een ander veiligheidsmiddel, en welke beheerd wordt door de overheidsinstantie die verantwoordelijk is voor de locatie. | ||
Varoitus | Tämä laite on tarkoitettu asennettavaksi paikkaan, johon pääsy on rajoitettua. Paikka, johon pääsy on rajoitettua, tarkoittaa paikkaa, johon vain huoltohenkilöstö pääsee jonkin erikoistyökalun, lukkoon sopivan avaimen tai jonkin muun turvalaitteen avulla ja joka on paikasta vastuussa olevien toimivaltaisten henkilöiden valvoma. | ||
Attention | Cet appareil est à installer dans des zones d'accès réservé. Ces dernières sont des zones auxquelles seul le personnel de service peut accéder en utilisant un outil spécial, un mécanisme de verrouillage et une clé, ou tout autre moyen de sécurité. L'accès aux zones de sécurité est sous le contrôle de l'autorité responsable de l'emplacement. | ||
Warnung | Diese Einheit ist zur Installation in Bereichen mit beschränktem Zutritt vorgesehen. Ein Bereich mit beschränktem Zutritt ist ein Bereich, zu dem nur Wartungspersonal mit einem Spezialwerkzeugs, Schloß und Schlüssel oder anderer Sicherheitsvorkehrungen Zugang hat, und der von dem für die Anlage zuständigen Gremium kontrolliert wird. | ||
Avvertenza | Questa unità deve essere installata in un'area ad accesso limitato. Un'area ad accesso limitato è un'area accessibile solo a personale di assistenza tramite un'attrezzo speciale, lucchetto, o altri dispositivi di sicurezza, ed è controllata dall'autorità responsabile della zona. | ||
Advarsel | Denne enheten er laget for installasjon i områder med begrenset adgang. Et område med begrenset adgang gir kun adgang til servicepersonale som bruker et spesielt verktøy, lås og nøkkel, eller en annen sikkerhetsanordning, og det kontrolleres av den autoriteten som er ansvarlig for området. | ||
Aviso | Esta unidade foi concebida para instalação em áreas de acesso restrito. Uma área de acesso restrito é uma área à qual apenas tem acesso o pessoal de serviço autorizado, que possua uma ferramenta, chave e fechadura especial, ou qualquer outra forma de segurança. Esta área é controlada pela autoridade responsável pelo local. | ||
¡Advertencia! | Esta unidad ha sido diseñada para instalarse en áreas de acceso restringido. Área de acceso restringido significa un área a la que solamente tiene acceso el personal de servicio mediante la utilización de una herramienta especial, cerradura con llave, o algún otro medio de seguridad, y que está bajo el control de la autoridad responsable del local. | ||
Varning! | Denna enhet är avsedd för installation i områden med begränsat tillträde. Ett område med begränsat tillträde får endast tillträdas av servicepersonal med ett speciellt verktyg, lås och nyckel, eller annan säkerhetsanordning, och kontrolleras av den auktoritet som ansvarar för området. | ||
| |||
Waarschuwing | Tijdens onweer dat gepaard gaat met bliksem, dient u niet aan het systeem te werken of kabels aan te sluiten of te ontkoppelen. | ||
Varoitus | Älä työskentele järjestelmän parissa äläkä yhdistä tai irrota kaapeleita ukkosilmalla. | ||
Attention | Ne pas travailler sur le système ni brancher ou débrancher les câbles pendant un orage. | ||
Warnung | Arbeiten Sie nicht am System und schließen Sie keine Kabel an bzw. trennen Sie keine ab, wenn es gewittert. | ||
Avvertenza | Non lavorare sul sistema o collegare oppure scollegare i cavi durante un temporale con fulmini. | ||
Advarsel | Utfør aldri arbeid på systemet, eller koble kabler til eller fra systemet når det tordner eller lyner. | ||
Aviso | Não trabalhe no sistema ou ligue e desligue cabos durante períodos de mau tempo (trovoada). | ||
¡Advertencia! | No operar el sistema ni conectar o desconectar cables durante el transcurso de descargas eléctricas en la atmósfera. | ||
Varning! | Vid åska skall du aldrig utföra arbete på systemet eller ansluta eller koppla loss kablar. | ||
| |||
Waarschuwing | De combinatie van de stekker en het elektrisch contactpunt moet te allen tijde toegankelijk zijn omdat deze het hoofdmechanisme vormt voor verbreking van de aansluiting. | ||
Varoitus | Pistoke/liitinkohta toimii pääkatkaisumekanismina. Pääsy siihen on pidettävä aina esteettömänä. | ||
Attention | La combinaison de prise de courant doit être accessible à tout moment parce qu'elle fait office de système principal de déconnexion. | ||
Warnung | Der Netzkabelanschluß am Gerät muß jederzeit zugänglich sein, weil er als primäre Ausschaltvorrichtung dient. | ||
Avvertenza | Il gruppo spina-presa deve essere sempre accessibile, poiché viene utilizzato come dispositivo di scollegamento principale. | ||
Advarsel | Kombinasjonen støpsel/uttak må alltid være tilgjengelig ettersom den fungerer som hovedfrakoplingsenhet. | ||
Aviso | A combinação ficha-tomada deverá ser sempre acessível, porque funciona como interruptor principal. | ||
¡Advertencia! | El conjunto de clavija y toma ha de encontrarse siempre accesible ya que hace las veces de dispositivo de desconexión principal. | ||
Varning! | Man måste alltid kunna komma åt stickproppen i uttaget, eftersom denna koppling utgör den huvudsakliga frånkopplingsanordningen. | ||
| |||
Waarschuwing | Voordat u een van de onderstaande procedures uitvoert, dient u te controleren of de stroom naar het gelijkstroom circuit uitgeschakeld is. Om u ervan te verzekeren dat alle stroom UIT is geschakeld, kiest u op het schakelbord de stroomverbreker die het gelijkstroom circuit bedient, draait de stroomverbreker naar de UIT positie en plakt de schakelaarhendel van de stroomverbreker met plakband in de UIT positie vast. | ||
Varoitus | Varmista, että tasavirtapiirissä ei ole virtaa ennen seuraavien toimenpiteiden suorittamista. Varmistaaksesi, että virta on KATKAISTU täysin, paikanna tasavirrasta huolehtivassa kojetaulussa sijaitseva suojakytkin, käännä suojakytkin KATKAISTU-asentoon ja teippaa suojakytkimen varsi niin, että se pysyy KATKAISTU-asennossa. | ||
Attention | Avant de pratiquer l'une quelconque des procédures ci-dessous, vérifier que le circuit en courant continu n'est plus sous tension. Pour en être sûr, localiser le disjoncteur situé sur le panneau de service du circuit en courant continu, placer le disjoncteur en position fermée (OFF) et, à l'aide d'un ruban adhésif, bloquer la poignée du disjoncteur en position OFF. | ||
Warnung | Vor Ausführung der folgenden Vorgänge ist sicherzustellen, daß die Gleichstromschaltung keinen Strom erhält. Um sicherzustellen, daß sämtlicher Strom abgestellt ist, machen Sie auf der Schalttafel den Unterbrecher für die Gleichstromschaltung ausfindig, stellen Sie den Unterbrecher auf AUS, und kleben Sie den Schaltergriff des Unterbrechers mit Klebeband in der AUS-Stellung fest. | ||
Avvertenza | Prima di svolgere una qualsiasi delle procedure seguenti, verificare che il circuito CC non sia alimentato. Per verificare che tutta l'alimentazione sia scollegata (OFF), individuare l'interruttore automatico sul quadro strumenti che alimenta il circuito CC, mettere l'interruttore in posizione OFF e fissarlo con nastro adesivo in tale posizione. | ||
Advarsel | Før noen av disse prosedyrene utføres, kontroller at strømmen er frakoblet likestrømkretsen. Sørg for at all strøm er slått AV. Dette gjøres ved å lokalisere strømbryteren på brytertavlen som betjener likestrømkretsen, slå strømbryteren AV og teipe bryterhåndtaket på strømbryteren i AV-stilling. | ||
Aviso | Antes de executar um dos seguintes procedimentos, certifique-se que desligou a fonte de alimentação de energia do circuito de corrente contínua. Para se assegurar que toda a corrente foi DESLIGADA, localize o disjuntor no painel que serve o circuito de corrente contínua e coloque-o na posição OFF (Desligado), segurando nessa posição a manivela do interruptor do disjuntor com fita isoladora. | ||
¡Advertencia! | Antes de proceder con los siguientes pasos, comprobar que la alimentación del circuito de corriente continua (CC) esté cortada (OFF). Para asegurarse de que toda la alimentación esté cortada (OFF), localizar el interruptor automático en el panel que alimenta al circuito de corriente continua, cambiar el interruptor automático a la posición de Apagado (OFF), y sujetar con cinta la palanca del interruptor automático en posición de Apagado (OFF). | ||
Varning! | Innan du utför någon av följande procedurer måste du kontrollera att strömförsörjningen till likströmskretsen är bruten. Kontrollera att all strömförsörjning är BRUTEN genom att slå AV det överspänningsskydd som skyddar likströmskretsen och tejpa fast överspänningsskyddets omkopplare i FRÅN-läget. | ||
| |||
Waarschuwing | Voordat u aan een frame of in de nabijheid van voedingen werkt, dient u bij wisselstroom toestellen de stekker van het netsnoer uit het stopcontact te halen; voor gelijkstroom toestellen dient u de stroom uit te schakelen bij de stroomverbreker. | ||
Varoitus | Kytke irti vaihtovirtalaitteiden virtajohto ja katkaise tasavirtalaitteiden virta suojakytkimellä, ennen kuin teet mitään asennuspohjalle tai työskentelet virtalähteiden läheisyydessä. | ||
Attention | Avant de travailler sur un châssis ou à proximité d'une alimentation électrique, débrancher le cordon d'alimentation des unités en courant alternatif ; couper l'alimentation des unités en courant continu au niveau du disjoncteur. | ||
Warnung | Bevor Sie an einem Chassis oder in der Nähe von Netzgeräten arbeiten, ziehen Sie bei Wechselstromeinheiten das Netzkabel ab bzw. schalten Sie bei Gleichstromeinheiten den Strom am Unterbrecher ab. | ||
Avvertenza | Prima di lavorare su un telaio o intorno ad alimentatori, scollegare il cavo di alimentazione sulle unità CA; scollegare l'alimentazione all'interruttore automatico sulle unità CC. | ||
Advarsel | Før det utføres arbeid på kabinettet eller det arbeides i nærheten av str¿mforsyningsenheter, skal str¿mledningen trekkes ut pÅ vekselstrømsenheter og strømmen kobles fra ved strømbryteren på likestrømsenheter. | ||
Aviso | Antes de trabalhar num chassis, ou antes de trabalhar perto de unidades de fornecimento de energia, desligue o cabo de alimentação nas unidades de corrente alternada; desligue a corrente no disjuntor nas unidades de corrente contínua. | ||
¡Advertencia! | Antes de manipular el chasis de un equipo o trabajar cerca de una fuente de alimentación, desenchufar el cable de alimentación en los equipos de corriente alterna (CA); cortar la alimentación desde el interruptor automático en los equipos de corriente continua (CC). | ||
Varning! | Innan du arbetar med ett chassi eller nära strömförsörjningsenheter skall du för växelströmsenheter dra ur nätsladden och för likströmsenheter bryta strömmen vid överspänningsskyddet. | ||
| |||
Waarschuwing | U dient de voeding niet aan te raken zolang het netsnoer aangesloten is. Bij systemen met een stroomschakelaar zijn er lijnspanningen aanwezig in de voeding, zelfs wanneer de stroomschakelaar uitgeschakeld is en het netsnoer aangesloten is. Bij systemen zonder een stroomschakelaar zijn er lijnspanningen aanwezig in de voeding wanneer het netsnoer aangesloten is. | ||
Varoitus | Älä kosketa virtalähdettä virtajohdon ollessa kytkettynä. Virrankatkaisimella varustetuissa järjestelmissä on virtalähteen sisällä jäljellä verkkojännite, vaikka virrankatkaisin on katkaistu-asennossa virtajohdon ollessa kytkettynä. Järjestelmissä, joissa ei ole virrankatkaisinta, on virtalähteen sisällä verkkojännite, kun virtajohto on kytkettynä. | ||
Attention | Ne pas toucher le bloc d'alimentation quand le cordon d'alimentation est branché. Avec les systèmes munis d'un commutateur marche-arrêt, des tensions de ligne sont présentes dans l'alimentation quand le cordon est branché, même si le commutateur est à l'arrêt. Avec les systèmes sans commutateur marche-arrêt, l'alimentation est sous tension quand le cordon d'alimentation est branché. | ||
Warnung | Berühren Sie das Netzgerät nicht, wenn das Netzkabel angeschlossen ist. Bei Systemen mit Netzschalter liegen Leitungsspannungen im Netzgerät vor, wenn das Netzkabel angeschlossen ist, auch wenn das System ausgeschaltet ist. Bei Systemen ohne Netzschalter liegen Leitungsspannungen im Netzgerät vor, wenn das Netzkabel angeschlossen ist. | ||
Avvertenza | Non toccare l'alimentatore se il cavo dell'alimentazione è collegato. Per i sistemi con un interruttore di alimentazione, tensioni di linea sono presenti all'interno dell'alimentatore anche quando l'interruttore di alimentazione è en posizione di disattivazione (off), se il cavo dell'alimentazione è collegato. Per i sistemi senza un interruttore, tensioni di linea sono presenti all'interno dell'alimentatore quando il cavo di alimentazione è collegato. | ||
Advarsel | Berør ikke strømforsyningsenheten når strømledningen er tilkoblet. I systemer som har en strømbryter, er det spenning i strømforsyningsenheten selv om strømbryteren er slått av og strømledningen er tilkoblet. Når det gjelder systemer uten en strømbryter, er det spenning i strømforsyningsenheten når strømledingen er tilkoblet. | ||
Aviso | Não toque na unidade abastecedora de energia quando o cabo de alimentação estiver ligado. Em sistemas com interruptor, a corrente eléctrica estará presente na unidade abastecedora, sempre que o cabo de alimentação de energia estiver ligado, mesmo quando o interruptor se encontrar desligado. Para sistemas sem interruptor, a tensão eléctrica dentro da unidade abastecedora só estará presente quando o cabo de alimentação estiver ligado. | ||
¡Advertencia! | No tocar la fuente de alimentación mientras el cable esté enchufado. En sistemas con interruptor de alimentación, hay voltajes de línea dentro de la fuente, incluso cuando el interruptor esté en Apagado (OFF) y el cable de alimentación enchufado. En sistemas sin interruptor de alimentación, hay voltajes de línea en la fuente cuando el cable está enchufado. | ||
Varning! | Vidrör inte strömförsörjningsenheten när nätsladden är ansluten. För system med strömbrytare finns det nätspänning i strömförsörjningsenheten även när strömmen har slagits av men nätsladden är ansluten. För system utan strömbrytare finns det nätspänning i strömförsörjningsenheten när nätsladden är ansluten. | ||
| |||
Waarschuwing | De E1-interfacekaart mag slechts geïnstalleerd worden in door ACA toegestane apparatuur van de klant of in Data Terminal Equipment (DTE) die vrijgesteld is van de vergunningsvereisten van ACA. De apparatuur van de klant moet in een kastje geplaatst worden met sluitplaten die dichtgeschroefd kunnen worden om te voorkomen dat de gebruiker toegang verkrijgt tot overspanning op de apparatuur van de klant. De apparatuur van de klant heeft een schakelsysteem waarop telecommunicatienetwerkspanning kan staan. | ||
Varoitus | E1-liitäntäkortin saa asentaa ainoastaan ACA:n hyväksymiin asiakaslaitteisiin tai Data Terminal Equipment -laitteisiin (DTE), jotka eivät kuulu ACA:n lupavaatimusten piiriin. Asiakaslaitteet on sijoitettava koteloon, jossa on kiinni ruuvattavat kannet, jotta käyttäjä ei altistu asiakaslaitteiden ylijännitteille. Asiakaslaitteissa on virtapiiri, jossa voi olla tietoliikenneverkkojännitteitä. | ||
Attention | La carte d'interface E1 ne peut être installée que dans un équipement de l'utilisateur autorisé par ACA ou dans un DTE (Data Terminal Equipment) pour lequel l'autorisation de ACA n'est pas exigée. L'équipement de l'utilisateur ne doit être placé que dans une enceinte munie de couvercles à vis qui empêchent l'utilisateur d'accéder aux surtensions présentes. L'équipement de l'utilisateur est muni de circuits qui peuvent avoir des tensions de réseau de télécommunications. | ||
Warnung | Die E1-Schnittstellenkarte darf nur in einer von der Australian Communications Authority (ACA) zugelassenen Teilnehmereinrichtung oder einer von den ACA-Zulassungsanforderungen ausgenommenen Datenendeinrichtung (DEE) installiert werden. Die Teilnehmereinrichtung muß in einem Gehäuse untergebracht sein, das mit Aufschraubdeckeln versehen ist, um den Zugang der Benutzer zu Überspannungen an der Teilnehmereinrichtung zu verhindern. In der Teilnehmereinrichtung befinden sich Schaltkreise, an denen möglicherweise Fernmeldenetzspannungen anliegen. | ||
Avvertenza | La scheda d'interfaccia E1 può essere installata solo in un'apparecchiatura con autorizzazione ACA o in un 'Data Terminal Equipment (DTE)' esente dai requisiti per l'autorizzazione ACA. La suddetta apparecchiatura deve essere contenuta in un armadio con coperchi bloccabili con viti, per impedire l'accesso alle sovratensioni in essa presenti; i suoi circuiti possono essere a tensioni di rete di telecomunicazioni. | ||
Advarsel | Grensesnittkortet E1 kan kun installeres i kundeutstyr som er godkjent av ACA, eller i dataterminalutstyr (DTE) som er unndratt ACAs krav til tillatelse. Kundeutstyret må kun være plassert i et kabinett som har lokk som er skrudd fast, for å hindre brukertilgang til overspenning på kundeutstyret. Kundeutstyret inneholder kretser som kan ha nettverksspenning for telekommunikasjon. | ||
Aviso | O cartão de ligação E1 apenas poderá ser instalado em equipamento dos clientes que possuam autorização da ACA (Australian Communications Authority) ou num DTE (Data Terminal Equipment), que esteja isento dos requisitos de autorização da ACA. O equipamento dos clientes deverá ser somente colocado numa caixa com tampas de aparafusar, para impossibilitar o acesso do utilizador às altas tensões deste mesmo equipamento. O equipamento do cliente possui circuitos que poderão ter tensões de rede de telecomunicações. | ||
Advertencia | La tarjeta de interfaz E1 sólo se puede instalar en un equipo de cliente permitido por ACA o en un equipo de terminal de datos (DTE) que no requiera el permiso de ACA. El equipo del cliente sólo debe estar instalado en un armario con cubiertas atornilladas, para evitar el acceso del usuario a los sobrevoltajes presentes en dicho equipo. El equipo del cliente tiene circuitos donde pueden estar presentes voltajes de la red de telecomunicaciones. | ||
Varning! | E1-gränssnittskortet får endast installeras i en av ACA tillåten kundutrustning eller en Data Terminal Equipment (DTE) som är undantagen ACA:s licenskrav. Kundutrustningen måste vara i ett skåp med igenskruvade lock som hindrar användaren från att komma åt överspänning på kundutrustningen. Det finns kretsar i kundutrustningen som kan ha nätverksspänning. | ||
| |||
Waarschuwing | Er moet een gemakkelijk toegankelijke, tweepolige stroomverbreker opgenomen zijn in de vaste bedrading. | ||
Varoitus | Kiinteään johdotukseen on liitettävä kaksinapainen kytkinlaite, johon on helppo päästä käsiksi. | ||
Attention | Un disjoncteur bipolaire facile d'accès doit être intégré dans le câblage fixe. | ||
Warnung | Die feste Verdrahtung muß eine leicht zugängliche, zweipolige Trennvorrichtung enthalten. | ||
Avvertenza | Nei cablaggi fissi va incorporato un sezionatore a due poli facilmente accessibile. | ||
Advarsel | En lett tilgjengelig, topolet frakoblingsenhet må være innebygd i det faste ledningsnettet. | ||
Aviso | Deverá incorporar-se um dispositivo de desconexão de dois pólos de acesso fácil, na instalação eléctrica fixa. | ||
Advertencia | El cableado fijo debe incorporar un dispositivo de desconexión de dos polos y de acceso fácil. | ||
Varning! | En lättillgänglig tvåpolig frånkopplingsenhet måste ingå i den fasta kopplingen. | ||
The product is compliant with the following international approval requirements:
| Test | Applied to | Level | Immunity Criteria | Specification | Year | Comments |
|---|---|---|---|---|---|---|
Radiated emissions | Enclosure | Class A and Class B | A | EN55022 | 1998 | Class A (other areas) |
Conducted emissions | AC line | Class A and Class B | A | EN55022 | 1998 | Class A (other areas) |
Conducted emissions | Signal line | Class A and Class B | A | EN55022 | 1998 | Class A (other areas) |
Harmonic current emissions | Equipment input current | <16 A per phase | — | EN61000-3-2 | 1995 | — |
Fluctuations and flicker | Low-voltage supply system | — | — | EN61000-3-3 | 1995 | For equipment with rated current <16 A |
Conducted immunity (CW) | Mains ports | 3V 1 kHz 80% AM 0.15 to 80 MHz | A | EN61000-4-6 | 1996 | Spot frequency tests at 0.2, 1.2, 7.1, 13.56, 21, 27.12, and 68 MHz |
Conducted immunity (CW) | DC ports | 3V 1 kHz 80% AM 0.15 to 80 MHz | A | EN61000-4-6 | 1996 | Spot frequency tests at 0.2, 1.2, 7.1, 13.56, 21, 27.12, and 68 MHz. Does not apply to equipment marketed with an external power converter. Does not apply to DC lines within signal cables. |
Conducted immunity (CW) | Signal lines (all) | 3V 1 kHz 80% AM 0.15 to 80 MHz | A | EN61000-4-6 | 1996 | Spot frequency tests at 0.2, 1.2, 7.1, 13.56, 21, 27.12, and 68 MHz. Applies to lines supporting comms on cables >3m. |
Electrical fast/burst transients | Mains ports | 1000V (peak) 5 kHz Rep. freq. | B | EN61000-4-4 | 1995 | — |
Electrical fast/burst transients | DC ports | 500V (peak) 5 kHz Rep. freq. | B | EN61000-4-4 | 1995 | Does not apply to equipment marketed with an external power converter. Does not apply to DC lines within signal cables. |
Electrical fast/burst transients | Signal lines (all) | 500V (peak) 5 kHz Rep. freq. | B | EN61000-4-4 | 1995 | Applies to lines supporting comms on cables >3m. |
Electrostatic discharge (ESD) | Enclosure | 4kV contact 8kV air | B | EN61000-4-2 | 1995 | Based upon IEC801-2 (1991). Applies to at least 200 discharges. |
Power frequency magnetic field | Enclosure | 3 A/m at 50 Hz | A | EN61000-4-8 | 1994 | Must contain devices susceptibility to H-fields: VDUs, microphones. VDU interference allowed above 1 A/m. |
Radiated electric field immunity | Enclosure | 3V 1 kHz 80% AM 80 to 1000 MHz | A | EN61000-4-3 | 1996 | Spot frequency tests at 80, 100, 120, 160, 230, 434, 460, 600, 863, 900 MHz. |
Surges line to earth | Signal lines excluding primary protection | 1500V 1.2/50 (8/20) | R | CCITT K series | — | Applies to lines which will leave buildings: ISDN, telephone lines. Apply this level if the port does not include primary protection. |
Surges line to earth | Signal lines including primary protection | 4000V 1.2/50 (8/20) | R | CCITT K series | — | Applies to lines which will leave buildings: ISDN, telephone lines. Apply this level if the port includes primary protection. |
Surges line to earth | DC Ports | 500V 1.2/50 (8/20) | B | EN61000-4-5 | 1995 | Does not apply to equipment marketed with an external power converter. Does not apply to DC lines within signal cables. |
Surges line to earth | Mains ports | 1000V 1.2/50 (8/20) | B | EN61000-4-5 | 1995 | — |
Voltage interruptions/ dips | Mains ports | 30% reduction for 500 ms | C | EN61000-4-11 | 1995 | — |
Voltage interruptions/ dips | Mains ports | 95% reduction for 5000 ms | C | EN61000-4-11 | 1995 | — |
Voltage interruptions/ dips | Mains ports | 95% reduction for 10 ms | B | EN61000-4-11 | 1995 | — |
The following sections provide sources for obtaining documentation from Cisco Systems.
You can access the most current Cisco documentation on the World Wide Web at the following sites:
Cisco documentation and additional literature are available in a CD-ROM package, which ships with your product. The Documentation CD-ROM is updated monthly and may be more current than printed documentation. The CD-ROM package is available as a single unit or as an annual subscription.
Cisco documentation is available in the following ways:
If you are reading Cisco product documentation on the World Wide Web, you can submit technical comments electronically. Click Feedback in the toolbar and select Documentation. After you complete the form, click Submit to send it to Cisco.
You can e-mail your comments to bug-doc@cisco.com.
To submit your comments by mail, use the response card behind the front cover of your document, or write to the following address:
Attn Document Resource Connection
Cisco Systems, Inc.
170 West Tasman Drive
San Jose, CA 95134-9883
We appreciate your comments.
Cisco provides Cisco.com as a starting point for all technical assistance. Customers and partners can obtain documentation, troubleshooting tips, and sample configurations from online tools. For Cisco.com registered users, additional troubleshooting tools are available from the TAC website.
Cisco.com is the foundation of a suite of interactive, networked services that provides immediate, open access to Cisco information and resources at anytime, from anywhere in the world. This highly integrated Internet application is a powerful, easy-to-use tool for doing business with Cisco.
Cisco.com provides a broad range of features and services to help customers and partners streamline business processes and improve productivity. Through Cisco.com, you can find information about Cisco and our networking solutions, services, and programs. In addition, you can resolve technical issues with online technical support, download and test software packages, and order Cisco learning materials and merchandise. Valuable online skill assessment, training, and certification programs are also available.
Customers and partners can self-register on Cisco.com to obtain additional personalized information and services. Registered users can order products, check on the status of an order, access technical support, and view benefits specific to their relationships with Cisco.
To access Cisco.com, go to the following website:
h ttp://www.cisco.com
The Cisco TAC website is available to all customers who need technical assistance with a Cisco product or technology that is under warranty or covered by a maintenance contract.
If you have a priority level 3 (P3) or priority level 4 (P4) problem, contact TAC by going to the TAC website:
P3 and P4 level problems are defined as follows:
In each of the above cases, use the Cisco TAC website to quickly find answers to your questions.
To register for Cisco.com, go to the following website:
http://www.cisco.com/register/
If you cannot resolve your technical issue by using the TAC online resources, Cisco.com registered users can open a case online by using the TAC Case Open tool at the following website:
http://www.cisco.com/tac/caseopen
If you have a priority level 1(P1) or priority level 2 (P2) problem, contact TAC by telephone and immediately open a case. To obtain a directory of toll-free numbers for your country, go to the following website:
http://www.cisco.com/warp/public/687/Directory/DirTAC.shtml
P1 and P2 level problems are defined as follows:
AccessPath, AtmDirector, Browse with Me, CCDA, CCDE, CCDP, CCIE, CCNA, CCNP, CCSI, CD-PAC, CiscoLink, the Cisco NetWorks logo, the Cisco Powered Network logo, Cisco Systems Networking Academy, the Cisco Systems Networking Academy logo, Discover All That's Possible, Fast Step, Follow Me Browsing, FormShare, FrameShare, GigaStack, IGX, Internet Quotient, IP/VC, iQ Breakthrough, iQ Expertise, iQ FastTrack, the iQ Logo, iQ Net Readiness Scorecard, MGX, the Networkers logo, Packet, PIX, RateMUX, ScriptBuilder, ScriptShare, SlideCast, SMARTnet, TransPath, Voice LAN, Wavelength Router, WebViewer are trademarks of Cisco Systems, Inc.; Changing the Way We Work, Live, Play, and Learn, Empowering the Internet Generation, are service marks of Cisco Systems, Inc.; and Aironet, ASIST, BPX, Catalyst, Cisco, the Cisco Certified Internetwork Expert logo, Cisco IOS, the Cisco IOS logo, Cisco Systems, Cisco Systems Capital, the Cisco Systems logo, Enterprise/Solver, EtherChannel, EtherSwitch, FastHub, FastSwitch, IOS, IP/TV, LightStream, MICA, Network Registrar, Post-Routing, Pre-Routing, Registrar, StrataView Plus, Stratm, SwitchProbe, TeleRouter, and VCO are registered trademarks of Cisco Systems, Inc. or its affiliates in the U.S. and certain other countries.
All other brands, names, or trademarks mentioned in this document or Web site are the property of their respective owners. The use of the word partner does not imply a partnership relationship between Cisco and any other company. (0101R)
Copyright © 2001, Cisco Systems, Inc.
All rights reserved.
![]()
![]()
![]()
![]()
![]()
![]()
![]()
![]()
Posted: Wed Oct 30 10:53:41 PST 2002
All contents are Copyright © 1992--2002 Cisco Systems, Inc. All rights reserved.
Important Notices and Privacy Statement.
