|
|

August 15, 2000
 |
Note You can find the most current Cisco IGX documentation on Cisco Connection Online (CCO). These electronic documents may contain updates and modifications made after the hardcopy documents were printed. |
This update for Cisco IGX 8400 series WAN switches supports Cisco Switch Software (SWSW) Release 9.3.10. This update is revised to describe new SWSW features supported on the Cisco IGX 8400 series platform. Use this update with the Cisco IGX 8400 Series Reference Guide.
Cisco BPX 8600 Series Installation and Configuration DOC-7810674= | Provides a general description and technical details of the |
Cisco IGX 8400 Series Reference DOC-7810706= | Provides a general description and technical details of the |
Update to the Cisco IGX 8400 Series Reference Guide DOC-78-11029= | Provides update information about new features in the 9.3.10 Switch Software release that apply to the IGX 8400 switch. Use this update document in conjunction with the Cisco IGX 8400 Series Reference, 9.3.05 Switch Software release documentation on the IGX 8400 switch. |
Cisco IGX 8400 Installation and Configuration DOC-7810722= | Provides installation instructions for the IGX multiband switch. |
Update to the Cisco WAN Switching Command Reference Guide DOC-7811457= | Provides update information about new features contained in the 9.3.10 Switch Software release that apply to both BPX and IGX switches documented in the WAN Switching Command Reference. Use this update document in conjunction with Cisco WAN Switching Command Reference, Release 9.3.05. |
Cisco WAN Switching Command Reference DOC-7810703= | Provides detailed information on the general command line interface commands. |
Cisco WAN Switching SuperUser Command Reference DOC-7810702= | Provides detailed information on the command line interface commands requiring SuperUser access authorization. |
Cisco MPLS Installation and Configuration DOC-7810672= | Provides information on a method for forwarding packets through a network. |
WAN CiscoView for the IGX 8400 Switches DOC-7810669= | Provides instructions for using WAN CiscoView for the IGX 8400. |
WAN CiscoView for the BPX 8600 Switches DOC-7810670= | Provides instructions for using WAN CiscoView for the BPX 8600. |
Cisco WAN Manager Installation Guide for Solaris, Release 10 DOC-7810308= | Provides procedures for installing Release 10 of the Cisco WAN Manager (CWM) network management system on Solaris systems. |
Cisco WAN Manager User's Guide, Release 10 DOC-7810658= | Provides procedures for using Release 10 of the Cisco WAN Manager (CWM) network management system. |
Cisco WAN Manager SNMP Proxy Agent Guide DOC-7810786= | Provides information about the Cisco WAN Manager Simple Network Management Protocol (SNMP) Service Agent components and capabilities. |
Cisco WAN Manager Database Interface Guide DOC-7810785= | Provides the information to gain direct access to the Cisco WAN Manager Informix OnLine database that is used to store information about the elements within your network. |
The Cisco IGX 8400 series WAN switches consist of the Cisco IGX 8410, 8420, and 8430. This update covers descriptions for both common and unique aspects of the operational parameters supported in Cisco SWSW Release 9.3.10.
|
Note Throughout this document, the Universal Switching Module (UXM) is referenced. Please note that all 9.3.10 features are supported on the UXM-E module as well. |
Virtual Switch Interfaces (VSIs) allow a node to be managed by multiple controllers, such as Multi-Protocol Label Switching (MPLS) and PNNI.
When a VSI is activated on a port, trunk, or virtual trunk so that it can be used by a master controller, the resources associated with the port, trunk or virtual trunk are made available to the controller. These control planes can be external or internal to the switch. The VSI provides a mechanism for networking applications to control the switch and use some of the switch resources. VSI traffic is collected in QBin numbers 10-15, which are assigned to VSI traffic.
Qbin statistics allow network engineers to properly engineer and overbook the network on a per Class of Service (CoS), or per qbin basis.
Multi-Protocol Label Switching (MPLS) enables routers at the edge of a network to apply simple labels to packets (frames), allowing devices in the network core to switch packets according to these labels with minimal lookup activity. Label switching in the network core can be performed by switches, such as ATM switches, or by existing routers.
MPLS integrates virtual circuit switching with IP routing to offer scalable IP networks over ATM (MPLS supports data, voice, and multimedia service over ATM networks). MPLS summarizes routing decisions so that switches can perform IP forwarding, and bring other benefits that apply even when label switching is used in router-only networks.
Using MPLS techniques, it is possible to set up explicit routes for data flows that are constrained by path, resource availability, and requested Quality of Service (QoS). MPLS also facilitates highly-scalable Virtual Private Networks.
MPLS assigns labels to IP flows, placing them in the IP frames. The frames can then be transported across packet or cell-based networks and switched on the labels, rather than being routed using IP address look-up.
A routing protocol such as Open Shortest Path First (OSPF), uses the Label Distribution Protocol (LDP) to set up MPLS virtual connections (VCs) on the switch.
Enhanced Local Management Interface (ELMI) provides a protocol to monitor the status of permanent virtual connections between two communication devices. Through ELMI, the Cisco WAN Manager (CWM) recognizes the existing connectivity between an IGX 8400 switch and a Cisco IOS router.
By enabling the ELMI protocol on the IGX 8400 interface, the router and the switch register their IP address and logical interface index (IfIndex) with each other. This helps the CWM detect connectivity between the router and the switch. ELMI acts as the transport mechanism for this exchange of information.
Each adjacent node exchanges its management IP address plus interface information via the ILMI protocol. Having ILMI topology discovery implemented on the IGX enables the CWM to also discover other ATM devices such as Cisco routers, that are attached to the IGX (UXM) so long as the devices support ILMI 4.0.
Virtual Switch Interface (VSI) is a common control interface between the IGX 8410, 8420, and 8430 switches and an external controller that supports the VSI protocol.
A VSI allows a node to be controlled by external controllers, such as Multi-Protocol Label Switching (MPLS).
You can enable up to three VSI partitions together or independently in addition to AutoRoute on each interface.
VSI on the IGX provides:
In the VSI control model, a controller sees the switch as a collection of slaves with their interfaces. The controller can establish connections between any two interfaces. The controller uses resources allocated to its partition.
The creation and enabling of a VSI partition causes a VSI interface to be made available to the controller. A default CoS template of 1 is assigned to an interface when it's activated. Using the switch software CLI or CiscoView allows you to configure a different template to an interface.
VSI controllers are allocated a partition of the switch resources and manage their partition through the VSI protocol. The controllers run the VSI master. The VSI master entity interacts with the VSI slave running on the UXMs through the VSI protocol. This sets up VSI connections using the resources in the partition assigned to the controller.
Controllers require a bandwidth of at least 150 cells per second (cps) to be reserved on the port for signalling. The addctrlr command is rejected if the minimum of 150 cps is not available on the port as free bandwidth (free bandwidth = port speed - PVC maximum bandwidth - VSI bandwidth). By using the cnfrsrc command to change bandwidth allocation to AutoRoute and VSI on the port, the required controller bandwidth becomes available on the port.
When using the addctrlr command to add a VSI controller to the switch, you must specify the controller ID. This is a number between 1 and 16 that uniquely identifies the controller. Two different controllers must always be specified with different controller IDs.
To add an MPLS controller (or a generic VSI controller that does not need AnnexG protocol):
Step 1 Up the line by using the upln command.
Step 2 Up ports by using the upport command.
Step 3 Configure the partition resources by using the cnfrsrc command.
Step 4 Add an MPLS controller by using the addctrlr command.
|
Note Adding a controller on a UXM interface must also be accompanied by configuring a VSI partition on the interface of that controller if VSI connections are expected to be configured on that interface. For example MPLS controllers XTAG interfaces support includes the setting up of a tag-control-VC between the hosting interface and the XTAG interface. This VC is a VSI connection and the controller will not be able to configure this connection if the hosting interface does not have a VSI partition. |
To view VSI controllers, use:
The designation for a MPLS Controller serving as an interface shelf is Label Switch Controller (LSC).
To delete an MPLS controller:
Step 1 Delete an MPLS controller from an IGX node by using the delctrlr command.
Step 2 Down the port by using the dnport command.
Step 3 Down the line by using the dnln command.
When configuring resource partitions on a VSI interface, you typically use the following commands:
The next step to complete when adding a VSI-based controller, such as an Label Switching Controller (LSC) is to configure resource partitions on UXM interfaces to allow the controller to manage the UXM interfaces. To do this, you must create resource partitions on these interfaces. Use the cnfrsrc command to add, delete, and modify a partition on a specified interface.
See Table 1 for a listing of cnfrsrc parameters, ranges and values, and descriptions. These descriptions are oriented to actions and behavior of the UXM firmware; in most cases, objects (messages) are sent to switch software. Most of these parameters appear on the cnfrsrc screen.
| Parameter (Object) Name | Range/Values | Default | Description |
|---|---|---|---|
VSI partition | 1...3 | 1 | Identifies the partition |
Partition state | D = Disable Partition E = Enable Partition | D | For partition state = E, Objects are mandatory |
Min LCNs | 0...8K | 0 | Minimum LCNs (connections) guaranteed for this partition. |
Max LCNs | 0...8K | 0 | Maximum LCNs permitted on this partition |
Start VPI | 0... 255 (UNI) 0...4095 (NNI) | 0 | Partition start UNI and NNI |
End VPI | 0... 255 (UNI) 0...4095 (NNI) | 0 | Partition end UNI and NNI |
Min Bw | 0... Line Rate | 0 | Minimum partition bandwidth |
Max Bw | 0... Line Rate | 0 | Maximum partition bandwidth |
|
Note If the default value isn't specified, the default remains the previously configured value. |
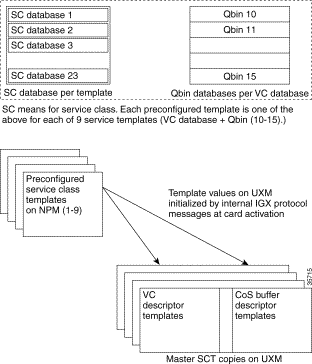
The ATM CoS templates (or Service Class Template, SCT) provide a way to map a set of extended parameters. These templates are generally platform specific, based on the set of standard ATM parameters, which have passed to the VSI slave in a UXM port interface during initial setup of the interface.
A set of service templates is stored in each IGX switch. The set is downloaded to the service modules (UXMs) as needed during initial configuration of the VSI interface when a trunk or line is enabled on the UXM.
Each service template type has an associated Qbin mapping table. The Qbins manage bandwidth by temporarily storing cells and then serving them out based on bandwidth availability and the CoS priority.
When ATM cells arrive from the edge Label Switch Router (LSR) at the UXM port with one of four CoS labels, they receive CoS handling based on that label. A table look-up is performed, and the cells are processed, based on their connection classification. Based on VPI/VCI as the COS lookup or classifier index, a cell receives the ATM differentiated service associated with its template type and service type plus associated Qbin characteristics and other associated ATM parameters.
A default service template is automatically assigned to a logical interface (VI) when you up the interface by using the commands upln and uptrk. The corresponding Qbin template is then copied into the card's (UXM) data structure of that interface.
Examples of assigning a default service template by using the commands upln and uptrk include:
This default template has the identifier of 1. To change the service template from service template 1 to another service template, use the cnfvsiif command.
To assign a selected service template to an interface (VI,) use the cnfvsiif command and specify the template number. It has the syntax:
cnfvsiif slot.port.vtrk tmplt_id
For example:
cnfvsiif 3.1 2

cnfvsiif 3.1.1 2
|
Note ATMF is not supported in this release. Use Template1 as the service template. |
Use the dspvsiif command to display the type of service template assigned to an interface (VI). It has the following syntax:
dspvsiif slot.port.vtrk
dspvsiif 3.1

dspvsiif 3.1.1
To change some of the template's Qbin parameters, use the cnfqbin command. The Qbin is now "user configured" as opposed to "template configured".
To view this information, use the command dspqbin.
|
Note SCTs can also be reassigned on a live interface. The UXM card will trigger a resynchronization process with the controllers. For a Cisco MPLS VSI controller, this will lead to resyncing of all connections on the card owned by that controller and may be service affecting. |
dspsct
Use the dspsct command to display the service class template number assigned to an interface. The command has three levels of operation:
dspsct
With no arguments lists all the service templates resident in the node as in the following example:
sanjose        TN    Cisco           IGX 8430  9.3.10 July 29 2000 23:47 PST

                         Service Class Templates

Template   Name

   1       MPLS1
   2       ATMF1
   3       ATMF2
   4       ATMF_tagcos_1
   5       ATMF_tagcos_2
   6       ATMF_TAGABR_1
   7       ATMF_TAGABR_2
   8       atmf_TAGCoS_TAGABR_1
   9       atmf_TAGCoS_TAGABR_2


Last Command: dspsct


Next Command:
|
Note ATMF is not supported in this release. Use Template1 as the service template. |
dspsct tmplt_id
Lists all the Service Classes in the template as in the following example:
sanjose        TN    Cisco           IGX 8430  9.3.10 July 29 2000 23:47 PST

         Service Class Map for MPLS1 Template

Service Class    Qbin    Service Class    Qbin    Service Class   Qbin

    Default       13
    Signaling     10
    Tag0          10
    Tag1          11
    Tag2          12
    Tag3          13
    Tag4          10
    Tag5          11
    Tag6          12
    Tag7          13
    TagAbr        14

Last Command: dspsct 1


Next Command:
dspsct tmplt_id Service_class
Service Classes lists all the parameters of that Service Class as in the following example:
sanjose        TN    Cisco           IGX 8430  9.3.10 July 29 2000 23:47 PST

    Service Template:MPLS1 (1)                 Service Type:  TagAbr (210)

Service Category               TagAbr (210)
Qbin                           14
UPC Enable                     NONE
Minimum Cell Rate              0                 (% of PCR)
Sustained Cell Rate            0                 (% of PCR)
Initial Cell Rate              100               (% of PCR)
Maximum Burst Size             1024              (cells)
Scaling Class                  Scaled 2nd
CAC Treatment                  LCN
VC Max Threshold               61440             (cells)
VC Dscd Selection              EPD
VC CLP High                    100               (% of Vc MAX Threshold)
VC EPD                         40                (% of Vc MAX Threshold)
VC EFCI                        20                (% of Vc MAX Threshold)
VSVD                           NONE
Decrease Time Factor           500               (milli seconds)
Rate Decrease Factor           16                (Inverse Decrease Factor)
Rate Increase Factor           16                (Inverse Decrease Factor)
data cells b/w Fwd RM Cells    32                (Cells)
Time b/w Fwd RM Cells          0
Cut-Off Decrease Factor        16
Transient Buffer Exposure      16777215
Fixed Round Trip Time          0

Last Command:dspsct 1 TagAbr

Next Command:
dspqbint tmplt_id qbin_number
Displays the Qbin templates as in the following example:
sanjose        TN    Cisco           IGX 8430  9.3.10 July 29 2000 23:59 PST

    Service Template: 1         Qbin:  14

Discard Threshold:          300000    (micro secs)
CLP Low/EPD Threshold:      95        (% of Discard Threshold)
CLP High Threshold:         100       (% of Discard Threshold)
EFCI Threshold:             6         (% of Discard Threshold)
EPD:                        Enabled
Vc Shaping:                 Enabled


Last Command: dspqbint 1 14


Next Command:
cnfqbin slot.port qbin_number
Configures the Qbin. If you answer no when prompted, the command allows you to configure Qbin parameters. If you answer yes when prompted the command will use the card Qbin values from the Qbin templates. The following example displays the command:
sanjose        TN    Cisco           IGX 8430  9.3.10 July 30 2000 00:14 PST

Qbin Database 7.1 on UXM qbin 14        (Configured by User)
                                        (EPD Enabled on this qbin)

Qbin State:              Enabled
Discard Threshold:       1000 cells
EPD Threshold:           95%
High CLP Threshold:      100%
EFCI Threshold:          6%


Last Command: cnfqbin 7.1 14 e N 1000 95 100 6

Next Command:
dspqbin slot.port qbin_number
Displays Qbin parameters currently configured for the virtual interface as shown in the following example:
sanjose        TN    Cisco           IGX 8430  9.3.10 July 30 2000 00:19 PST

Qbin Database 7.1 on UXM qbin 14        (Configured by MPLS1 Template)
                                        (EPD Enabled on this qbin)

Qbin State:              Enabled
Discard Threshold:       1040 cells
EPD Threshold:           95%
High CLP Threshold:      100%
EFCI Threshold:          6%


Last Command: dspqbin 7.1 14

Next Command:
|
Note The commands, dspsct, dspqbint, dspqbin, and cnfqbin are for VSI Qbins (Qbins 10-15) only and cannot be applied on AutoRoute Qbins. |
Each template table row includes an entry that defines the Qbin to be used for that CoS (see Figure 7).
This mapping defines a relationship between the template and the interface Qbin's configuration.
A Qbin template defines a default configuration for the set of Qbins for the logical interface. When a template is assigned to an interface, the corresponding default Qbin configuration becomes the interface's Qbin configuration.
After a service template has been assigned, you can adjust some of this configuration's parameters on a per-interface basis. Changes you make to the Qbin configuration of an interface affect only that interface's Qbin configuration. Your changes do not affect the Qbin template assigned to that interface.
To change the template's configuration of the interface, provide new values by using the cnfqbin command. The Qbin is now "user configured" instead of "template configured". This information is displayed on the dspqbin screen, which indicates whether the values in the Qbin are from the template assigned to the interface, or whether the values have been changed to user-defined values.
To see the Qbin's default service type and number, execute the dspsct command.
Use the following commands to configure Qbins:
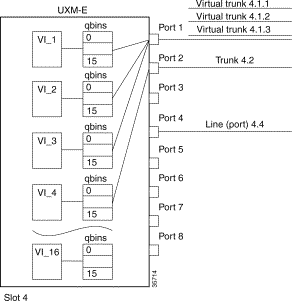
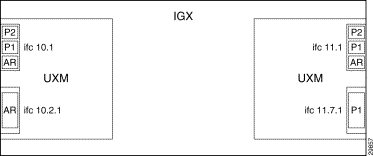
The UXM has 16 virtual interfaces that provide Qbin buffering capability. One virtual interface is assigned to each logical trunk (physical or virtual) or line when the trunk on the line is enabled. (See Figure 1.)
Each virtual interface has 16 Qbins assigned to it. Qbins 0-9 are used for AutoRoute and 10 through 15 are available for use by a VSI enabled on the virtual interface. The Qbins 10 through 15 support CoS templates on the IGX.
You may enable a virtual switch interface on a port, trunk, or virtual trunk. The virtual switch interface is assigned the resources of the associated virtual interface.
With virtual trunking, a physical trunk can comprise a number of logical trunks called virtual trunks. Each of these virtual trunks (equivalent to a virtual interface) is assigned the resources of one of the 16 virtual interfaces on a UXM (see Figure 1).
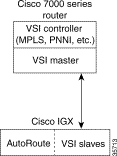
A controller application uses a VSI master to control one or more VSI slaves. For the IGX, the controller application and Master VSI reside in an external router and the VSI slaves exist in UXM cards on the IGX node (see Figure 2).
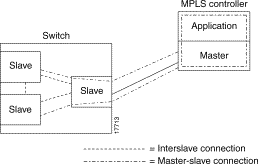
The controller establishes a link between the VSI master and every VSI slave on the associated switch. The slaves in turn establish links between each other (see Figure 3).
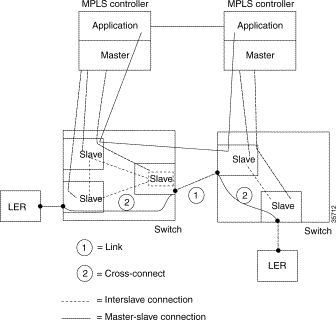
With a number of switches connected together, there are links between switches with cross-connects established within the switch as shown in Figure 4.
When a connection request is received by the VSI slave, it is first subjected to a Connection Admission Control (CAC) process before being forwarded to the FW layer responsible for actually programming the connection. The granting of the connection is based on the following criteria:
After CAC, the VSI slave accepts a connection setup command from the VSI master in the MPLS controller, and receives connection information including service type, bandwidth parameters, and QoS parameters. This information is used to determine an index into the VI's selected Service Template VC Descriptor table which establishes access to the associated extended parameter set stored in the table.
A pre-assigned ingress service template containing CoS Buffer links manages ingress traffic.
A logical switch is configured by enabling and allocating resources to the partition. This must be done for each partition in the interface. The same procedure must be followed to define each logical switch.
The following resources are partitioned among the different logical switches:
Resources are configured and allocated per interface, but the pool of resources may be managed at a different level. The bandwidth is limited by the interface rate, which places the limitation at the interface level. Similarly, the range of VPI is also defined at the interface level.
You configure these parameters on a VSI partition on an interface:
You do partitioning by using the cnfrsrc command.
|
Note Release 9.3 supports up to three partitions. |
Table 2 shows the three resources that must be configured for a partition designated ifc1(interface controller 1).
| ifc1 Parameters | Minimum | Maximum |
|---|---|---|
lcns | min_lcn | max_lcn |
bw | min_bw | max_bw |
vpi | min_vpi | max_vpi |
The controller is supplied with a range of LCNs, VPIs, and bandwidth. Examples of available VPI values for a VPI partition are listed in Table 3.
| UXM | Range |
|---|---|
Trunks | 1-4095 VPI range (UNI/NNI). |
Ports | UNI: 1 - 255/NNI: 1 - 4095. |
Virtual trunk | Only one VPI available per virtual trunk since a virtual trunk is currently delineated by a specific VPI. |
When a trunk is activated, the entire bandwidth is allocated to AutoRoute. To change the allocation to provide resources for a VSI, use the cnfrsrc command on the IGX switch.
You can configure partition resources between Automatic Routing Management PVCs and three VSI LSC controllers. Up to three VSI controllers in different control planes can independently control the switch without communication between controllers. The controllers are unaware of other control planes sharing the switch because different control planes use different partitions of the switch resources.
The following limitations apply to multiple VSI partitioning:
Each logical switch represents a collection of interfaces, each with an associated set of resources.
The following example is an IGX switch with four interfaces:
To display the partitioning resources of an interface use the dsprsrc command as in the following example:
sw188          TN    Cisco           IGX 8420  9.3.10    Aug. 16 2000
16:47 GMT

VSI Partitions on this node

 Interface (slot.port)  Part 1  Part 2  Part 3
  Line   10.1              E       E       D
  VTrunk 10.2.1            D       D       D
  Trunk  11.1              E       E       D
  VTrunk 11.7.1            E       D       D


Last Command:dsprsrc


Next Command:
| Interface | AutoRoute | Partition 1 | Partition 2 | Partition 3 |
|---|---|---|---|---|
4.2 | lcns: 1000 | Enable | Enable | Enable |
The tow redundant pair slaves keep the redundant card in a hot standby state for all VSI connections. This is accomplished by a bulk update (on the standby slave) of the existing connections at the time that Y redundancy is added, and also an incremental update of all subsequent connections.
The Slave Hot Standby Redundancy feature enables the redundant card to fully duplicate all VSI connections on the active card, and prepare for operation on switchover. On bringup, the redundant card initiates a bulk retrieval of connections from the active card for fast sync-up. Subsequently, the active card updates the redundant card on a real-time basis.
The VSI Slave Hot Standby Redundancy feature provides the capability for the slave standby card to be preprogrammed the same as the active card. When the active card fails, the slave card switchover operation can be implemented quickly. Without the VSI portion, the UXM card has already provided the hot standby mechanism by duplicating CommBus messages from the NPM to the standby UXM card.
The following sections describe types of communication between the switch software and firmware to support VSI master and slave redundancy.
To provide a smooth migration of the VSI feature on the UXM card, line and trunk Y-redundancy is supported. You can pair cards with and without the VSI capability as a Y-redundant pair, if the feature is not enabled on the given slot. If the feature is not enabled on a given slot, switch software will not perform "mismatch checking" if the UXM firmware does not support the VSI feature. The VSI capability is treated as a card attribute and added to the attribute list.
In a Y-red pair configuration, the VSI capability is determined by the minimum of the two cards. A card without VSI capabilities will mismatch if any of the interfaces has an active partition on controller. Attempts to enable a partition or add a controller on a logical card that does not support VSI are blocked.
You add an LSC to a node by using the addctrlr command. When adding a controller, you must specify a partition ID. The partition ID identifies the logical switch assigned to the controller. The valid partitions are 1, 2, and 3.
|
Note You can configure partition resources between Automatic Routing Management PVCs and three VSI LSC controllers. |
To display the list of controllers in the node, use the command dspctrlrs. The functionality is also available via SNMP using the switchIfTable in the switch MIB.
The management of resources on the VSI slaves requires that each slave in the node has a communication control PVC to each of the controllers attached to the node. When a controller is added to the IGX by using the addctrlr command, the NPM sets up the set of master-slave connections between the new controller port and each of the active slaves in the switch. The connections are set up using a well known VPI.VCI. The default value of the VPI for the master-slave connection is 0. The default value of the VCI is (40 + [slot - 2]), where slot is the logical slot number of the slave.
Note that once the controllers are added to the node, the connection infrastructure is always present. The controllers may or may not decide to use it, depending on their state. Inter-slave channels are present whether controllers are present or not.
The addition of a controller to a node will fail if there are not enough channels available to set up the control VCs (14 in a 16-slot through 30 in a 32-slot switch) in one or more of the UXM slaves.
The slaves, upon receiving the controller configuration message from the NPM, send a VSI message trap to the controller informing of the slaves existence. This prompts an exchange from the controller that launches the interface discovery process with the slaves.
When the controller is added, the NPM will send a VSI configuration CommBus message to each slave with this controller information, and it will set up the corresponding control VCs between the controller port and each slave.
Use the command delctrlr to delete controllers that have been added to interfaces.
When one of the controllers is deleted by using the delctrlr command, the master-slave connections and connections associated with this controller on all the UXM cards in the switch are also deleted. VSI partitions will remain.
The deletion of the controller triggers a new VSI configuration (internal) CommBus message. This message includes the list of the controllers attached to the node; the deleted controller is removed from the list. This message is sent to all active slaves in the shelf.
While there is at least one controller attached to the node controlling a given partition, the resources in use on this partition should not be affected by a controller having been deleted. Only when a given partition is disabled, the slaves will release all the VSI resources used on that partition.
When a new slave is activated in the node by upping the first line/trunk on a UXM card which supports VSI, the NPM will send a VSI configuration CommBus (internal IGX protocol) message with the list of the controllers attached to the switch.
The NPM will setup master-slave connections from each controller port on the switch to the added slave. It will also setup inter-slave connections between the new slave and the other active VSI slaves.
|
Note Slaves in standby mode are not considered VSI configured and will therefore not be accounted for in the inter-slave connections. |
When a slave is de-activated (by downing the last the line/trunk on a UXM card which supports VSI), the NPM will tear down the master-slave connections between it and each of the controller ports on the node. The NPM will also tear down all the inter-slave connections connecting this slave to the other active VSI slaves.
The maximum number of slaves in a 16-slot switch is 14 and in a 32-slot switch is 30. Therefore a maximum of 14 or 30 LCNs are necessary to connect a slave to all other slaves in the node. This set of LCNs is allocated from the AutoRoute partition.
If a controller is attached to an interface, master-slave connections are set up between the controller port and each of the slaves in the node.
These LCNs will be allocated from the Auto Route Management pool. This pool is used by Auto Route Management to allocate LCNs for connections.
VSI Controllers require a bandwidth of at least 150 cps to be reserved on the port for signalling. This bandwidth is allocated from the free bandwidth available on the port (free bandwidth = port speed - PVC maximum bandwidth - VSI bandwidth).
The hot slave standby preprograms the slave standby card the same as the active card, so that when the active card fails, the slave card switches over operation is implemented within 250 ms. Without the VSI portion, the UXM card already provided the hot standby mechanism by duplicating CommBus (internal IGX protocol) messages from NPM to standby UXM card.
Because the Master VSI controller does not recognize the standby slave card, the active slave card forwards VSI messages that it received from the Master VSI controller to the standby slave VSI card.
In summary, these are the hot standby operations between active and standby card:
1. CommBus messages are duplicated to a hot-standby slave VSI card by the NPM.
2. VSI messages (from master VSI controller or other slave VSI card) are forwarded to the hot-standby slave VSI card by the active slave VSI card.
Operation 2 is normal data transferring, which occurs after both cards are in-sync.
3. When the hot-standby slave VSI card starts up, it retrieves and processes all VSI messages from the active slave VSI card.
Operation 3 is initial data transferring, which occurs when the standby card first starts up.
The data transfer from the active card to the standby card should not affect the performance of the active card. Therefore, the standby card takes most actions and simplifies the operations in the active card. The standby card drives the data transferring and performs the synchronization. The active card forwards VSI messages and responds to the standby card requests.
CoS Templates provide a means of mapping a set of standard connection protocol parameters to extended platform-specific parameters. Full Quality of Service (QoS) implies that each VC is served through one of the CoS buffers (Qbins) which are differentiated by their QoS characteristics.
A Qbin template defines a default configuration for the set of Qbins for a logical interface. When you assign a template to an interface, the corresponding default Qbin configuration is copied to this interface's Qbin configuration and signifies the current Qbin configuration for this interface.
Qbin templates deal only with Qbins that are available to VSI partitions, which are 10 through 15. Qbins 10 through 15 are used by VSI on interfaces configured as trunks or ports. The rest of the Qbins are reserved and configured by Automatic Routing Management.
The service class templates provides a means of mapping a set of extended parameters, which are generally platform specific, based on the set of standard ATM parameters passed to the VSI slave during connection setup.
A set of service templates is stored in each switch (such as IGX) and downloaded to the service modules (such as UXMs) as needed.
The service templates contain two classes of data:
The general types of parameters passed from a VSI master to a slave include:
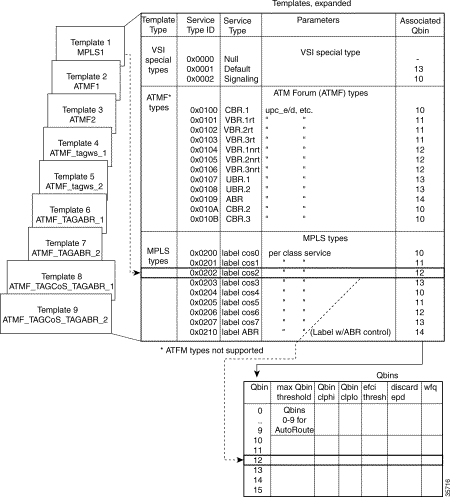
Each VC added by a VSI master is assigned to a specific service class by means of a 32-bit service type identifier. Current identifiers are for:
|
Note ATMF is not supported in this release. Use Template1 as the service template. |
When a connection setup request is received from the VSI master in the Label Switch Controller, the VSI slave (in the UXM, for example) uses the service type identifier to index into a Service Class Template database containing extended parameter settings for connections matching that index. The slave uses these values to complete the connection setup and program the hardware.
One parameter specified for each service type concerns the particular UXM Qbin to use. The Qbin buffers provide separation of service type to match the QoS requirements.
Service templates on the IGX are maintained by the NPM and are downloaded to the UXM cards during card configuration process.
You can assign any of nine templates to a virtual switch interface. (See Figure 6.)
Each template table row includes an entry that defines the Qbin to be used for that CoS. See Figure 6 for an illustration of how service class databases map to Qbins. This mapping defines a relationship between the template and the interface Qbin's configuration.
A Qbin template defines a default configuration for the set of Qbins for the logical interface. When a template assignment is made to an interface, the corresponding default Qbin configuration changes to the interface Qbin configuration.
Some parameters of the interfaces Qbin configuration can be changed on a per interface basis. Such changes affect only that specific interfaces Qbin configuration, and do not affect the Qbin templates.
Qbin templates are used only with Qbins that are available to VSI partitions, specifically, Qbins 10 through 15. Qbins 10 through 15 are used by the VSI on interfaces configured as trunks or ports. The other Qbins (0-9) are reserved for and configured by Automatic Routing Management.
Each template table row includes an entry that defines the Qbin to be used for that CoS. This mapping defines a relationship between the template and the interface Qbin's configuration.
A set of default Qbin configuration is associated with each template. The default Qbin configuration behaves differently from that of the CoS templates. Qbin configuration for a given interface is copied from Qbin templates when the Service Class Template is assigned to the interface. Qbin values are then sent to the card.
The service-type parameter for a connection is specified in the connection bandwidth information parameter group. The service-type and service-category parameters determine the service class to be used from the service template.
The service type identifier is a 32-bit number.
The service types supported are:
The service type identifier appears on the dspsct screen when you specify a service class template number and service type. For example:
dspsct <1> <TagABR>
A list of supported service templates, associated Qbins, and service types is shown in Table 5.
| Template Type | Service Type Identifier | Service Type | Associated Qbin |
|---|---|---|---|
VSI special type | 0x0001 | Default | 13 templates for MPLS1, ATMF1, and ATMF2 |
| 0x0002 | Signaling | 10 templates for MPLS1 |
MPLS type | 0x0001 0x0002 0x0200 0x0201 0x0202 0x0203 0x0204 0x0205 0x0206 0x0207 0x0210 | Default Signaling Tag0 Tag1 Tag2 Tag3 Tag4 Tag5 Tag6 Tag7 TagABR | 13 10 10 11 12 13 10 11 12 13 14 |
ATMF_tagcos_1* ATMF_tagcos_2* | 0x0001 0x0100 0x0101 0x0102 0x0103 0x0104 0x0105 0x0106 0x0107 0x0108 0x0109 0x010A 0x010B 0x0200 0x0201 0x0202 0x0203 0x0204 0x0205 0x0206 0x0207 0x0210 | Default CBR.1 VBR.1-RT VBR.2-RT VBR.3-RT VBR.1-nRT VBR.2-nRT VBR.3-nRT UBR.1 UBR.2 ABR CBR.2 CBR.3 Tag0 Tag1 Tag2 Tag3 Tag4 Tag5 Tag6 Tag7 TagABR | 10 15 11 11 11 12 12 12 10 10 14 15 15 10 10 13 13 10 10 13 13 14 |
ATMF_TagABR_1* ATMF_TagABR_2* | 0x0001 0x0100 0x0101 0x0102 0x0103 0x0104 0x0105 0x0106 0x0107 0x0108 0x0109 0x010A 0x010B 0x0200 0x0201 0x0202 0x0203 0x0204 0x0205 0x0206 0x0207 0x0210 | Default CBR.1 VBR.1-RT VBR.2-RT VBR.3-RT VBR.1-nRT VBR.2-nRT VBR.3-nRT UBR.1 UBR.2 ABR CBR.2 CBR.3 Tag0 Tag1 Tag2 Tag3 Tag4 Tag5 Tag6 Tag7 TagABR | 10 15 11 11 11 12 12 12 10 10 14 15 15 10 10 10 10 10 10 10 10 13 |
ATMF_TagCoS_TagABR_1* ATMF_TagCoS_TagABR_2* | 0x0001 0x0100 0x0101 0x0102 0x0103 0x0104 0x0105 0x0106 0x0107 0x0108 0x0109 0x010A 0x010B 0x0200 0x0201 0x0202 0x0203 0x0204 0x0205 0x0206 0x0207 0x0210 | Default CBR.1 VBR.1-RT VBR.2-RT VBR.3-RT VBR.1-nRT VBR.2-nRT VBR.3-nRT UBR.1 UBR.2 ABR CBR.2 CBR.3 Tag0 Tag1 Tag2 Tag3 Tag4 Tag5 Tag6 Tag7 TagABR | 10 10 10 10 10 11 11 11 12 12 11 10 10 12 13 14 15 12 13 14 15 13 |
* Indicates ATMF Types not supported in this release | |||
|
Note Use the dspsct command to display sample parameters for different service types. |
A summary of the parameters associated with each of the service templates is provided in Table 6.
| Parameter | Default | Signaling | Tag 0/4 | Tag 1/5 | Tag 2/6 | Tag 3/7 | Tag-ABR |
|---|---|---|---|---|---|---|---|
Qbin No. | 13 | 10 | 10 | 11 | 12 | 13 | 14 |
UPC enable | None | None | None | None | None | None | None |
Scaling class | 1 | 1 | 1 | 1 | 1 | 1 | 2 |
CAC treatment | LCN | LCN | LCN | LCN | LCN | LCN | LCN |
VC max | 61440 | 0 | 61440 | 61440 | 61440 | 61440 | 61440 |
VC Discard Selection | EPD | Hystersis | EPD | EPD | EPD | EPD | EPD |
VC CLPhi | 100 | 75 | 100 | 100 | 100 | 100 | 100 |
VC CLPlo | — | 30 | — | — | — | — | — |
VC EPD | 40 | — | 40 | 40 | 40 | 40 | 40 |
Cell delay variation tolerance | 250000 | — | — | — | — | — | — |
UPC CLP selection | — | — | — | — | — | — | — |
Policing Action (GCRA No. 1) | — | — | — | — | — | — | — |
Policing Action (GCRA No. 2) | — | — | — | — | — | — | — |
PCR | — | — | — | — | — | — | — |
MCR | — | — | — | — | — | — | 0 |
SCR | — | — | — | — | — | — | 0 |
ICR | — | — | — | — | — | — | 100 |
MBS | — | — | — | — | — | — | 1024 |
VC EFCI | — | — | — | — | — | — | 20 |
VSVD/FCES | — | — | — | — | — | — | None |
ADTF | — | — | — | — | — | — | 500 |
RDF | — | — | — | — | — | — | 16 |
RIF | — | — | — | — | — | — | 16 |
NRM | — | — | — | — | — | — | 32 |
TRM | — | — | — | — | — | — | 0 |
CDF | — | — | — | — | — | — | 16 |
TBE | — | — | — | — | — | — | 16777215 |
FRTT | — | — | — | — | — | — | 0 |
Table 7 describes the connection parameters that are listed in the preceding tables and the range of values that may be configured, if not preconfigured.
Every service class does not include all parameters. For example, a CBR service type has fewer parameters than an ABR service type.
|
Note Every service class does not have a value defined for every parameter listed in Table 7. |
| Object Name | Range/Values | Template Units |
|---|---|---|
Qbin No. | 10 - 15 | Qbin No. |
Scaling class | 0 - 3 | Enumeration |
CDVT | 0 - 5M (5 sec) | Seconds |
MBS | 1 - 5M | Cells |
ICR | MCR - PCR | Cells |
MCR | 50 - LR | Cells |
SCR | MCR - LineRate | Cells |
UPC enable | 0 - Disable GCRAs 1 - Enabled GCRAs 2 - Enable GCRA No. 1 3 - Enable GCRA No. 2 | Enumeration |
UPC CLP selection | 0 - Bk 1: CLP (0+1) Bk 2: CLP (0) 1 - Bk 1: CLP (0+1) Bk 2: CLP (0+1) 2 - Bk 1: CLP (0+1) Bk 2: Disabled | Enumeration |
Policing Action (GCRA No. 1) | 0 - Discard 1 - Set CLP bit 2 - Set CLP of untagged cells, disc. tagged cells | Enumeration |
Policing Action (GCRA No. 2) | 0 - Discard 1 - Set CLP bit 2 - Set CLP of untagged cells, disc. tagged cells | Enumeration |
VC max |
| Cells |
CLP Lo | 0 - 100 | Percent VC Max |
CLP Hi | 0 - 100 | Percent VC max |
EFCI | 0 - 100 | Percent VC max |
VC discard threshold selection | 0 - CLP Hysteresis 1 - EPD | Enumeration |
VSVD | 0: None 1: VSVD 2: VSVD w / external Segment | Enumeration |
Reduced format ADTF | 0 - 7 | Enumeration |
Reduced format rate decrease factor (RRDF) | 1 - 15 | Enumeration |
Reduced format rate increase factor (RRIF) | 1 - 15 | Enumeration |
Reduced format time between forward RM cells (RTrm) | 0 - 7 | Enumeration |
Cut-off No. of RM cells (CRM) | 1 - 4095 | Cells |
Qbins 10 through 15 are used by VSI on interfaces configured as trunks or ports. The rest of the Qbins are reserved and configured by Automatic Routing Management.
When you execute a dspsct command, it will give you the default service type, and the Qbin number.
The available Qbin parameters are shown in Table 8.
Note that the Qbins available for VSI are restricted to Qbins 10-15 for that interface. All 16 possible virtual interfaces are provided with 16 Qbins.
| Template Object Name | Template Units | Template Range/Values |
|---|---|---|
Qbin No. | Enumeration | 0-15 (10-15 valid for VSI) |
Max Qbin threshold | U sec | 1-2000000 |
Qbin CLP high threshold | Percent of max Qbin threshold | 0-100 |
Qbin CLP low threshold | Percent of max Qbin threshold | 0-100 |
EFCI threshold | Percent of max Qbin threshold | 0 - 100 |
Discard Selection | Enumeration | 1 - CLP Hysteresis 2 - Frame Discard |
Weighted fair queueing | enable/disable | 0: Disable 1: Enable |
The Qbin and Service Class Template default settings for Label Switch Controllers are shown in Table 9.
|
Note Templates 2, 4, 6, and 8 support policing on partial packet discard (PPD). |
| Qbin | Max Qbin Threshold (usec) | CLP High | CLP Low/EPD | EFCI | Discard Selection |
|---|---|---|---|---|---|
| LABEL Template 1 | |||||
10 (Null, Signalling, Tag 0,4) | 300,000 | 100% | 95% | 100% | EPD* |
11 (Tag1,5) | 300,000 | 100% | 95% | 100% | EPD |
12 (Tag2,6) | 300,000 | 100% | 95% | 100% | EPD |
13 (Tag3,7), Default | 300,000 | 100% | 95% | 100% | EPD |
14 (Tag Abr) | 300,000 | 100% | 95% | 6% | EPD |
15 (Tag unused) | 300,000 | 100% | 95% | 100% | EPD |
10 (Tag 0,2,3,4,1,5, Default, UBR, Tag-Abr*) | 300,000 | 100% | 95% | 100% | EPD |
11 (VbrRt) | 53000 | 80% | 60% | 100% | EPD |
12 (VbrNrt) | 53000 | 80% | 60% | 100% | EPD |
13 (Tag 2,6,3,7) | 300,000 | 100% | 95% | 100% | EPD |
14 (Abr) | 105000 | 80% | 60% | 20% | EPD |
15 (Cbr) | 4200 | 80% | 60% | 100% | CLP |
10 (Tag 0,4,1,5,2,6,3,7 UBR) | 300,000 | 100% | 95% | 100% | EPD |
11 (VbrRt) | 53000 | 80% | 60% | 100% | EPD |
12 (VbrNrt) | 53000 | 80% | 60% | 100% | EPD |
13 (Tag-Abr), Default | 300,000 | 100% | 95% | 6% | EPD |
14 (Abr) | 105000 | 80% | 60% | 20% | EPD |
15 (Cbr) | 4200 | 80% | 60% | 100% | CLP |
10 (Cbr, Vbr-rt) | 4200 | 80% | 60% | 100% | CLP |
11 (Vbr-nrt, Abr) | 53000 | 80% | 60% | 20% | EPD |
12 (Ubr, Tag 0,4) | 300,000 | 100% | 95% | 100% | EPD |
13 (Tag 1, 5, Tag-Abr) | 300,000 | 100% | 95% | 6% | EPD |
14 (Tag 2,6) | 300,000 | 100% | 95% | 100% | EPD |
15 (Tag 3, 7) | 300,000 | 100% | 95% | 100% | EPD |
* Indicates early packet discard (EPD)
| |||||
| Mnemonic | Description |
|---|---|
addctrlr | Attach a controller to a node. |
cnfctrlr | Configure a controller. |
cnfqbin | Configure Qbin. |
cnfrsrc | Configure resources, for example, Automatic Routing Management PVCs and MPLS (Multi-Protocol Label Switching) Controller (LSC). |
cnfvsiif | Assign a different class template to an interface. |
delctrlr | Delete a controller, such as MPLS controller, from an IGX node. |
dspchuse | Display a summary of channel distribution in a given slot. |
dspctrlrs | Display the VSI controllers on an IGX node. |
dspqbin | Display Qbin parameters currently configured for the Qbin. |
dspqbint | Display Qbin template. |
dsprsrc | Display partition resources. |
dspsct | Display Service Class Template assigned to an interface. The command has three levels of operation: dspsct dspsct <tmplt_id> dspsct <tmplt_id> <Service_Class> |
dspvsiif | Display service class template assigned to an interface. |
dspvsipartinfo | Display VSI resource status for the trunk and partition. |
Qbin statistics allow network engineers to engineer and overbook the network on a per CoS (or per Qbin) basis. Each connection has a specific CoS and hence, a corresponding Qbin associated with it.
The IGX switch software collects statistics for UXM AutoRoute Qbins 1 through 9 on trunks and Autoroute Qbins 2, 3, 7, 8, and 9 on ports. Statistics are also collected for VSI Qbins 10 through 15 on UXM trunks and ports.
The following statistics types are collected per Qbin:
Since all Qbins provide the same statistical data, the Qbin number together with its statistic forms a unique statistic type. These unique statistic types are displayed in Cisco WAN Manager and may also be viewed by using the CLI.
Trunk and port counter statistics (cell discard statistics only) for the following Qbins can be collected by SNMP:
Qbin summary and counter statistics are automatically collected and TFTP and USER interval statistics can be enabled. The cell discard statistics on UXM trunk Qbins 1 through 9 are AUTO statistics. The cell discard statistics on Qbins 10 through 15 and AutoRoute port Qbins are not AUTO statistics.
Interval statistics (per Qbin) are collected through Cisco WAN Manager's Statistics Collection Manager (SCM) and through CLI.
| Mnemonic | Description |
|---|---|
clrportstats | Reset or clear the summary statistics of all statistics types on a specified port. |
clrtrkstats | Reset or clear the summary statistics of all statistic types on a specified trunk. |
cnfportstats | Collect USER statistics of one statistics type on a specified port. |
cnfstatparms | Enable TFTP statistics from the CLI (the equivalent of using the SCM). |
cnftrkstats | Collect USER statistics of one statistic type on a specific specified trunk. |
dspcntrstats | View all counter statistics of a specified entity in real-time. These statistics cannot be cleared. |
dspportstathist | View statistics of one statistics type on a specified port. |
dspqbinstats | View all Qbin summary statistics on a specified trunk or port. |
dsptrkstathist | View interval statistics of one statistic type on a specific specified trunk. |
Multi-Protocol Label Switching (MPLS) enables routers at the edge of a network to apply simple labels to packets (frames). This allows devices in the network core to switch packets according to the labels with minimal lookup activity. Label switching in the network core can be performed by switches, such as ATM switches, or by existing routers.
MPLS integrates virtual-circuit switching with IP routing to offer scalable IP networks over ATM. MPLS support data, voice, and multimedia service over ATM networks. MPLS summarizes routing decisions so that switches can perform IP forwarding, and bring other benefits that apply even when label switching is used in router-only networks.
Using MPLS techniques, it is possible to set up explicit routes for data flows that are constrained by path, resource availability, and requested Quality of Service (QoS). MPLS also facilitates highly-scalable Virtual Private Networks.
MPLS assigns labels to IP flows, which places them in the IP frames. The frames can then be transported across packet or cell-based networks and switched on the labels, rather than being routed using IP address look-up.
A routing protocol such as OSPF, uses the Label Distribution Protocol (LDP) to set up MPLS virtual connections (VCs) on the switch.
MPLS is a standardized version of Cisco original Tag Switching proposal. MPLS and Tag Switching are identical in principle and similar in operation. MPLS terminology has replaced obsolete Tag Switching terminology.
An exception to the terminology is Tag Distribution Protocol (TDP). TDP and MPLS Label Distribution Protocol (LDP) are nearly identical, but use different message formats and procedures. TDP is used in this design guide only when it is important to distinguish TDP from LDP. Otherwise, any reference to LDP in this test also applies to TDP.
This section provides information for configuring Cisco IGX switches and associated label switching controllers along with edge routers for Multi-Protocol Label Switching (MPLS) operation.
Procedures are provided for initial configuration of a router and its various interfaces, including ATM and Ethernet interfaces.
|
Note UXMs running Model B firmware release prior to ABJ must first upgrade to Model B firmware (ABJ or later Model B firmware) then upgrade to UXM Model C firmware. |
Setting up label switching on a node involves a three-step process:
1. Configuring ATM LSR
a. IGX switch (label switch slaves) configuration.
b. Router (label switch controller) configuration of router extended ATM interfaces on the IGX for tag switching.
2. Setting up edge routers (can include setting up policies).
3. MPLS automatically sets up LVCs across the network.
Figure 8 shows a high-level view of an MPLS network. The packets destined for 204.129.33.127 could be real-time video, while the packets destined for 204.133.44.129 could be data files transmitted when network bandwidth is available.
When MPLS is set up on the nodes shown in Figure 8 (ATM-LSR 1 through ATM-LSR 5, Edge LSR_A, Edge LSR_B, and Edge LSR_C), automatic network discovery is enabled. Then MPLS automatically sets up LVCs across the network. At each ATM LSR (label switch), label swapping transports the cells across the previously set up LVC paths.
("Label swapping" is a name for VCI switching, the underlying capability of an ATM switch.)
At the edge LSRs, labels are added to incoming IP packets, and removed from outgoing packets. Figure 8 shows IP packets with host destination 204.129.33.127 transported as labeled ATM cells across LVC 1. The figure also displays IP packets with host destination 204.133.44.129 transported as labeled ATM cells across LVC 2.
IP addresses shown are for illustrative purposes only and are assumed to be isolated from external networks. Check with your network administrator for appropriate IP addresses for your network.
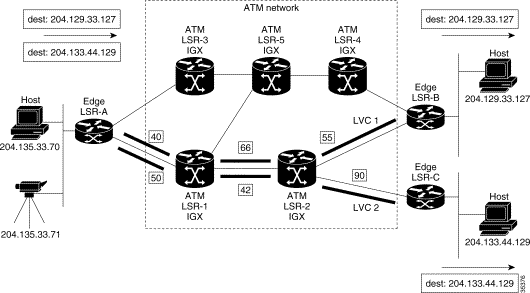
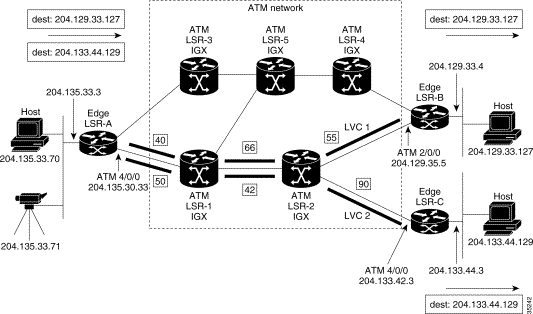
Figure 9 is a detailed diagram showing the MPLS label swapping. This process might take place during the transportation of the IP packets, in the form of ATM cells across the network on the LVC1 and LVC2 virtual circuits:
1. An unlabeled IP packet with destination 204.133.44.129 arrives at edge label switching router (LSR-A).
2. Edge LSR-A checks its Label Forwarding Information Base (LFIB) and matches the destination with prefix 204.133.44.0/8.
3. LSR-A converts the AAL5 frame to cells and sends the frame out as a sequence of cells on 1/VCI 50.
4. ATM-LSR-1 (a Cisco IGX 8410, 8420, and 8430 label switch router), controlled by a routing engine, performs a normal switching operation by checking its LFIB and switching incoming cells on interface 2/VCI 50 to outgoing interface 0/VCI 42.
5. ATM-LSR-2 checks its LFIB and switches incoming cells on interface 2/VCI 42 to outgoing interface 0/VCI 90.
6. Edge LSR-C receives the incoming cells on incoming interface 1/VCI 90, checks its LFIB, converts the ATM cells back to an AAL5 frame, and an IP packet, and then sends the outgoing packet to its LAN destination 204.133.44.129.
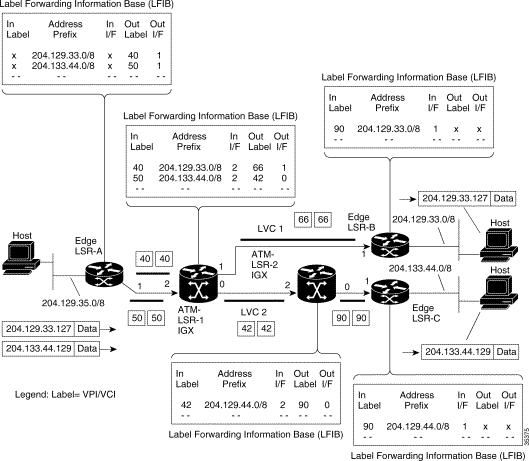
Figure 9 provides an example of configuring Cisco IGX 8410, 8420, and 8430 MPLS label switches (ATM-LSRs) for MPLS switching of IP packets through an ATM network. The figure also shows configuration for Cisco routers for use as label edge routers (Edge LSRs) at the edges of the network.
Figure 9 displays the configuration of:
The configuration of ATM LSR-3, ATM LSR-4, and ATM LSR-5, is not detailed, but is performed in a similar manner for ATM LSR-1 and ATM LSR-2. Also, the configuration of Edge LSR-B is similar to Edge LSR-A and LSR-C.
The configuration of Cisco IGX 8410, 8420, and 8430 ATM-LSRs, consists of two parts:
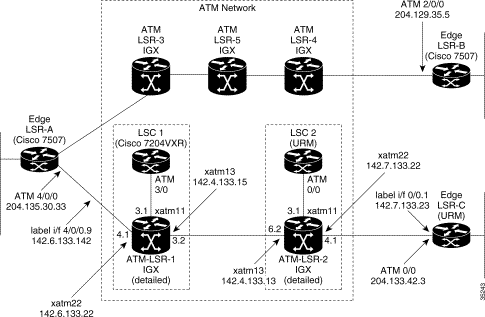
The IGX nodes must be set up and configured in the ATM network, including links to other nodes. Then, they can be configured for MPLS Operation.
To configure the IGX nodes for operation, you set up a virtual interface and associated partition by using the cnfrsrc command.
You link the Cisco router to the IGX by using the addctrlr command. This allows the router label switch controller function to control the MPLS operation of a node.
You can distribute the resources of the partition between the associated ports. Resources include bandwidth, VPI range, and number of LCNs. The VPIs are of local significance, so they do not have to be the same for each port in a node. But it is generally convenient from a tracking standpoint to keep them the same for a given IGX node.
In this example, assume that a single external controller per node is supported, so that the partition chosen is always 1.
Syntax for associated commands, cnfrsrc, cnfqbin, are:
cnfrsrc  slot.port.{virtual trk}  maxpvclcns  maxpvcbw  [Edit VSI parms ? y/n]
partitionID e/d  minvsilcns  maxvsilcns  vsistartvpi vsiendvpi  vsiminbw  vsimaxbw
{if you enter "y", to Edit parms?}
cnfrsrc slot.port.{virtual trk} maxpvclcns maxpvcbw [Edit VSI parms ? y/n]
{accepts defaults if you enter "n" to Edit parms?}
cnfqbin <slot.port> <Qbin_#> <e/d>  y/n  <Qbin discard_thr> <Low EPD threshold> <CLPhi>
<EFCI_thr>
{If you enter "n" to not accept template values}
cnfqbin <slot.port.[virtual trk}> <Qbin_#> <e/d> y/n
{If you enter "y" to accept template values.}
To configure the Cisco IGX 8410, 8420, and 8430 label switch routers, ATM-LSR-1 and ATM-LSR-2:
| Command | Description | |
|---|---|---|
Step 1 | Check card status: dspcds 6
| Display status of the UXM card. UXM cards that you are configuring should be "Standby" or "Active." |
Step 2 | Enable UXM interfaces: upln 6.1
upport 6.2
| In this example, line 6.1 is the link to the LSC controller, and line 6.2 is set up as cross-connect for use by LVCs. Note A UXM interface is a trunk if it connects to another switch or MGX 8220 feeder. The VSI connection to an LSC is either a trunk or line. Other interfaces are ports, typically to service interfaces.
|
Step 3 | Configure VSI partitions on the UXM line interfaces:
cnfrsrc 6.1 256 26000 y 1 e 512 1500 240 255 26000
105000
or if entered individually: cnfrsrc 6.1
256 {PVC LCNs, accept default value}
26000
Note You do not need to specify bandwidth when establishing trunks. y {to edit VSI parameters}
1 {partition}
e {enable partition}
512 {VSI min LCNs}
1500 {VSI max LCNs}
240 {VSI starting VPI}
255 {VSI ending VPI}
26000 {VSI min bandwidth}
105000 {VSI max bandwidth}
Repeat for UXM interfaces 6.2 and 7.1
cnfrsrc 6.2 256 26000 y 1 e 512 1500 240 255 26000
105000
cnfrsrc 7.1 256 26000 y 1 e 512 1500 240 255 26000
105000
| Note PVC LCNs: [256] default value. Reserve space on this link for 256 AutoRoute PVCs (LCNs = Logical Connection Numbers). VSI min LCNs: 512 and VSI max LCNs: 1500. Guarantees that MPLS can set up 512 LVCs on this link, but is allowed to use up to 1500, subject to availability of LCNs. VSI starting VPI: 240 and VSI ending VPI: 255. Reserves VPIs in the range of 240-255 for MPLS. Only one VPI is really required, but a few more can be reserved to save for future use. It is best to always avoid using VPIs "0" and "1" for MPLS on the Cisco IGX 8410, 8420, and 8430. Note VPIs are locally significant. In this example 240 is shown as the starting VPI for each port. A different value could be used for each of the three ports shown, 6.1, 6.2, and 7.1. However, at each end of a trunk, such as, between port 6.2 on ATM LSR-1 and port 6.2 on ATM LSR-2, the same VPI must be assigned. VSI min bandwidth: 26000 and VSI maximum 105000. Guarantees that MPLS can use VSI maximum bandwidth: 26000. Guarantees that PVCs can always use up to 26000 cells per second (about 10 Mbps) on this link. |
Step 4 | Enable MPLS queues on UXM: dspqbin 6.1 10
and verify that it matches the following:
If configuration is not correct, enter
cnfqbin 6.1 10 e n 65536 95 100 40
Repeat as necessary for UXM interfaces 6.2 and 7.1:
cnfqbin 6.2 10 e n 65536 95 100 40
cnfqbin 7.1 10 e n 65536 95 100 40
| MPLS CoS uses Qbins 10-14. |
Step 5 | Enable the VSI control interface: addctrlr 6.1 vsi 1 1 100 200
| The first "1" after "VSI" is the VSI controller ID, which must be set the same on both the Cisco IGX 8410, 8420, and 8430 and the LSC. The default controller ID on the LSC is "1". The second "1" after "VSI" indicates that this is a controller for partition 1. |
Proceed with configuration as follows:
| Command | Description | |
|---|---|---|
Step 1 | Check card status:
dspcds 6
| Display status of the UXM card, UXM cards that you are configuring should be "Standby" or "Active". |
Step 2 | Enable UXM interfaces:
uptrk 6.1
uptrk 6.2
uptrk 7.1
| In this example, trunk 6.1 is the link to the LSC controller, and trunks 6.2 and 7.1 are set up as cross-connects for use by LVCs. |
Step 3 | Configure VSI partitions on the UXM interfaces:
cnfrsrc 6.1 256 26000 y 1 e 512 1500 240 255 26000
105000
or if entered individually: cnfrsrc 6.1
256 {PVC LCNs, accept default value}
26000
y {to edit VSI parameters}
1 {partition}
e {enable partition}
512 {VSI min LCNs}
1500 {VSI max LCNs}
240 {VSI starting VPI}
255 {VSI ending VPI}
26000 {VSI min bandwidth}
105000 {VSI max bandwidth}
Repeat for UXM interfaces 6.2 and 7.1
cnfrsrc 6.2 256 26000 y 1 e 512 1500 240 255 26000
105000


cnfrsrc 7.1 256 26000 y 1 e 512 1500 240 255 26000
105000
|
|
Step 4 | Enable MPLS queues on UXM:
dspqbin 6.1 10
and verify that it matches the following:
If configuration is not correct, enter
cnfqbin 6.1 10 e n 65536 95 100 40
Repeat as necessary for UXM interfaces 6.2 and 7.1:
cnfqbin 6.2 10 e n 65536 95 100 40
cnfqbin 7.1 10 e n 65536 95 100 40
| MPLS CoS uses Qbins 10-14. |
Step 5 | Enable the VSI control interface: addctrlr 6.1 vsi 1 1 100 200
| The first "1" after "vsi" is the vsi controller ID, which must be set the same on both the Cisco IGX 8410, 8420, and 8430 and the LSC. The default controller ID on the LSC is "1". The second "1" after "vsi" is the partition ID that indicates this is a controller for partition 1. |
Before configuring the routers for the label switch (MPLS) controlling function, it is necessary to perform the initial router configuration. As part of this configuration, it is necessary to configure and enable the ATM Adapter interface.
Then the extended ATM interface can be set up for Label Switching. The IGX ports can be configured by the router as extended ATM ports of the physical router ATM interface, according to the following procedures for LSC1 and LSC2.
| Command | Description | |
|---|---|---|
| Preliminary |
|
Step 1 | Router LSC1(config)# ip routing
| {Enable IP routing protocol.} |
Step 2 | Router LSC1(config)# ip cef
| {Enable Cisco express forwarding protocol.} |
Step 3 | Router LSC1(config)# interface ATM3/0
| {Enable physical interface link to IGX.} |
Step 4 | Router LSC1(config-if)# no ip address
|
|
Step 5 | Router LSC1(config-if)# tag-control-protocol vsi
[controller ID}
| {Enable router ATM port ATM3/0 as tag switching controller. Controller ID default is 1, optional values up to 32 for IGX.} |
| Setting up interslave control link |
|
Step 6 | Router LSC1(config-if)# interface XtagATM33
| {Interslave link on 3.3 port of IGX (port 3 os UXM in slot 3). This is an extended port of the router ATM3/0 vsi 0x00010300 port.} |
Step 7 | Router LSC1(config-if)# extended-port ATM3/0 vsi
0x00010300
| {Binding extended port xtagATM13 to IGX slave port 1.3.} |
Step 8 | Router LSC1(config-if)# ip address 142.4.133.13
255.255.0.0
| {Assigning ip address to xtagATM13.} |
Step 9 | Router LSC1(config-if)# tag-switching ip
| {Enable MPLS for xtag interface xtagATM13.} |
| Setting up interslave port |
|
Step 10 | Router LSC1(config-if)# interface XtagATM42
| {Interslave link on 4.2 port of IGX (port 2 os UXM in slot 4). This is an extended port of the router ATM3/0 vsi 0x00010300 port.} |
Step 11 | Router LSC1(config-if)# extended-port ATM3/0 vsi 5.2
| {Binding extended port xtagATM52 to IGX slave port 5.2} |
Step 12 | Router LSC1(config-if)# ip address 142.6.133.22
255.255.0.0
| {Assigning ip address to xtagATM52.} |
Step 13 | Router LSC1(config-if)# tag-switching ip
| {Enable MPLS for xtag interface xtagATM52.} |
Step 14 | Router LSC1 (config-if)# exit
|
|
| Configuring routing protocol | {Configuring Open Shortest Path First (OSPF) routing protocol or Enhanced Interior Gateway Routing Protocol (EIGRP).} |
Step 15 | Router LSC1 (config-if)# Router OSPF 5
| {Setting up OSPF routing and assigning a process ID of 5 which is locally significant. The ID may be chosen from a wide range of available process ID up to approximately 32,000.} |
Step 16 | Router LSC1 (config-router)# network 142.4.0.0
0.0.255.255 area 10
|
|
Step 17 | Router LSC1 (config-router)# network 142.6.0.0
0.0.255.255 area 10
|
|
| Command | Description | |
|---|---|---|
| Preliminary |
|
Step 1 | Router LSC2(config)# ip routing
| {Enable IP routing protocol.} |
Step 2 | Router LSC2(config)# ip cef
| {Enable Cisco express forwarding protocol.} |
Step 3 | Router LSC2(config)# interface ATM3/0
| {Enable physical interface link to IGX.} |
Step 4 | Router LSC2(config-if)# no ip address
|
|
Step 5 | Router LSC2(config-if)# tag-control-protocol vsi
[controller ID]
| {Enable router ATM port ATM3/0 as tag switching controller. Controller ID default is 1, optional values up to 32 for IGX.} |
| Setting up interslave control link |
|
Step 6 | Router LSC2(config-if)# interface XtagATM33
| {Interslave link on 3.3 port of IGX (port 3 os UXM in slot 3). This is an extended port of the router ATM3/0 vsi 0x00010300 port.} |
Step 7 | Router LSC2(config-if)# extended-port ATM3/0 vsi
0x00010300
| {Binding extended port xtagATM33 to IGX slave port 3.3.} |
Step 8 | Router LSC2(config-if)# ip address 142.4.133.15
255.255.0.0
| {Assigning ip address to xtagATM1.} |
Step 9 | Router LSC2(config-if)# tag-switching ip
| {Enable MPLS for xtag interface xtagATM1.} |
| Setting up interslave port |
|
Step 10 | Router LSC2(config-if)# interface XtagATM42
| {Interslave link on 4.2 port of IGX (port 2 os UXM in slot 4). This is an extended port of the router ATM3/0 vsi 0x00010300 port.} |
Step 11 | Router LSC2(config-if)# extended-port ATM3/0 igx vsi
0x00010300
| {Binding extended port xtagATM42 to IGX slave port 2.} |
Step 12 | Router LSC2(config-if)# ip address 142.7.133.22
255.255.0.0
| {Assigning ip address to xtagATM42.} |
Step 13 | Router LSC2(config-if)# tag-switching ip
| {Enable MPLS for xtag interface xtagATM42.} |
Step 14 | Router LSC2 (config-if)# exit
|
|
| Configuring routing protocol | {Configuring Open Shortest Path FIrst (OSPF) routing protocol or Enhanced Interior Gateway Routing Protocol (EIGRP).} |
Step 15 | Router LSC2 (config-if)# Router OSPF 5
| {Setting up OSPF routing and assigning a process ID of 5 which is locally significant. The ID may be chosen from a wide range of available process ID up to approximately 32,000.} |
Step 16 | Router LSC2 (config-router)# network 142.4.0.0
0.0.255.255 area 10
|
|
Step 17 | Router LSC2 (config-router)# network 142.7.0.0
0.0.255.255 area 10
|
|
Before configuring the routers for the MPLS controlling function, it is necessary to perform the initial router configuration. As part of this configuration, you must enable and configure the ATM Adapter interface.
Then you can set up the extended ATM interface for MPLS. The IGX ports can be configured by the router as extended ATM ports of the physical router ATM interface, according to the following procedures for LSR-A and LSR-C.
To configure the routers performing as label edge routers, use the procedures in the following tables.
| Command | Description | |
|---|---|---|
Step 1 | Router LSR-A (config)# ip routing
| {Enable IP routing protocol.} |
Step 2 | Router LSR-A(config)# ip cef distributed switch
| {Enable tag switching for ATM subinterface.} |
Step 3 | Router LSR-A(config)# interface ATM4/0/0
|
|
Step 4 | Router LSR-A(config-if)# no ip address
|
|
Step 5 | Router LSR-A(config-if)# interface ATM4/0/0.9 tag
switching
| {Interface can be basically any number within range limits ATM4/0/0.1, ATM 4/0/0.2.} |
Step 6 | Router LSR-A(config-if)# ip address 142.6.133.142
255.255.0.0
|
|
Step 7 | Router LSR-A(config-if)# tag-switching ip
|
|
| Configuring routing protocol | {Configuring Open Shortest Path FIrst (OSPF) routing protocol or Enhanced Interior Gateway Routing Protocol (EIGRP).} |
Step 8 | Router LSR-A (config-if)# Router OSPF 5
| {Setting up OSPF routing and assigning a process ID of 5 which is locally significant. The ID may be chosen from a wide range of available process IDs up to approximately 32,000.} |
Step 9 | Router LSR-A (config-router)# network 142.6.0.0
0.0.255.255 area 10
|
|
| Command | Description | |
|---|---|---|
Step 1 | Router LSR-C (config)# ip routing
| {Enable IP routing protocol.} |
Step 2 | Router LSR-C(config)# ip cef distributed switch
| {Enable tag switching for ATM subinterface.} |
Step 3 | Router LSR-C(config)# interface ATM2/0/0
|
|
Step 4 | Router LSR-C(config-if)# no ip address
|
|
Step 5 | Router LSR-C(config-if)# interface ATM2/0/0.3
tag-switching
|
|
Step 6 | Router LSR-C(config-if)# ip address 142.7.133.23
255.255.0.0
|
|
Step 7 | Router LSR-C(config-if)# tag-switching ip
|
|
| Configuring routing protocol | {Configuring Open Shortest Path FIrst (OSPF) routing protocol or Enhanced Interior Gateway Routing Protocol (EIGRP).} |
Step 8 | Router LSR-C (config-if)# Router OSPF 5
| {Setting up OSPF routing and assigning a process ID of 5 which is locally significant. The ID may be chosen from a wide range of available process IDs up to approximately 32,000.} |
Step 9 | Router LSR-C (config-router)# network 142.7.0.0
0.0.255.255 area 10
|
|
After you have completed the initial configuration procedures for the Cisco IGX 8410, 8420, and 8430 and Edge Routers, the routing protocol (such as OSPF) sets up the LVCs via MPLS as shown in Figure 11.
Preliminary testing of the MPLS network consists of:
The following are some useful LSC (also referred to as TSC) commands for monitoring and troubleshooting an MPLS network:
show controllers VSI descriptor [descriptor]
show tag int
show tag tdp disc
For a complete description of these LSC commands refer to the related IOS MPLS documentation:
Use the following procedure as a quick checkout of the tag switching configuration and operation with respect to the IGX switch, for example ATM LSR-1:
Step 1 Check whether the controller recognizes the interfaces correctly; on LSC1, for example, enter the following command:
| Command | Description |
Router LSC1# show controllers VSI descriptor
| Shows VSI information for extended ATM interfaces. |
The sample output for ATM-LSC-1 (Cisco IGX 8410, 8420, and 8430 shelves) is:
Phys desc:   3.1
Log intf:    0x00040100 (0.4.1.0)
Interface:   slave control port
IF status:   N/A IFC state: ACTIVE
Min VPI:     0                      Maximum cell rate:  10000
Max VPI:     10                     Available channels: xxx
Min VCI:     0                      Available cell rate (forward):  xxxxxx
Max VCI:     65535                  Available cell rate (backward): xxxxxx

Phys desc:   3.3
Log intf:    0x00040200 (0.4.2.0)
Interface:   ExtTagATM13
IF status:   up                     IFC state: ACTIVE
Min VPI:     0                      Maximum cell rate:  10000
Max VPI:     10                     Available channels: xxx
Min VCI:     0                      Available cell rate (forward):  xxxxxx
Max VCI:     65535                  Available cell rate (backward): xxxxxx

Phys desc:   4.2
Log intf:    0x00040300 (0.4.3.0)
Interface:   ExtTagATM22
IF status:   up                     IFC state: ACTIVE
Min VPI:     0                      Maximum cell rate:  10000
Max VPI:     10                     Available channels: xxx
Min VCI:     0                      Available cell rate (forward):  xxxxxx
Max VCI:     65535                  Available cell rate (backward): xxxxxx
-------
|
Note Check the LSC online documentation for the most current information. |
Step 2 If there are no interfaces present, first check that card 3 is up,
by using this command on the IGX switch:
dspcds
if the card is not up, enter in this example UXM in slot 3 of the IGX shelf:
resetcd 3 h
remove the card to reset if necessary.
|
Note In this example, assume that the controller is connected to card 3 on the switch. Substitute a different card number, as applicable. |
Step 3 Check the line status with the following command:
dsplns
The sample output dsplns is:
sanjose        TN    Cisco           IGX 8430  9.3.10 July 12 2000 09:38 PST

Line        Type   Current Line Alarm Status
 6.6        T3/636 Clear - OK
 7.8        T1/24  Clear - OK

Last Command: dsplns

Next Command:
Step 4 Check the trunk status with the following command:
dsptrks
The dsptrks screen for ATM-LSR-1 should show the 3.1, 3.3 and 4.2 MPLS interfaces, with the "Other End" of 3.1 reading "VSI (VSI)". A typical dsptrks screen displays the following:
n4             TN    SuperUser       IGX 15    9.3      March 4 2000  16:45 PST

TRK     Type     Current Line Alarm Status               Other End
 4.1    OC3      Clear - OK                              j4a/2.1
 5.1    E3       Clear - OK                              j6a/5.2
 5.2    E3       Clear - OK                              j3b/3
 5.3    E3       Clear - OK                              j5c(IPX/AF)
 6.1    T3       Clear - OK                              j4a/4.1
 6.2    T3       Clear - OK                              j3b/4
 3.1    OC3      Clear - OK                              VSI(VSI)
 3.3    OC3      Clear - OK
 4.2    OC3      Clear - OK


Last Command: dsptrks

Next Command:
Step 5 Enter the dspctrlrs command.
dspctrlrs
The resulting screens should show trunk 3.1 (link to LSC on ATM-LSR-1) as type VSI. Here's typical dspctrlrs screen:
sanjose        TN    Cisco           IGX 8430  9.3.10 July 31 2000 20:26 PST

                   VSI Controller Information

CtrlrId   PartId     ControlVC            Intfc    Type     CtrlrIP
                    VPI    VCIRange
   1         1       0      40-70          6.6      MPLS     192.168.254.1

Last Command: dspctrlrs

Next Command:
Step 6 Enter the dsprsrc command:
dsprsrc 6.6
The resulting screen should show these settings:
sanjose        TN    Cisco           IGX 8430  9.3.10 July 31 2000 20:29 PST

Line : 6.6
Maximum PVC LCNS: 256             Maximum PVC Bandwidth: 48000
                                  (Reserved Port Bandwidth: 150)

              State   MinLCN   MaxLCN   StartVPI   EndVPI   MinBW    MaxBW
Partition 1:   E       0        100      2          10       0        48000
Partition 2:   D
Partition 3:   D

Last Command: dsprsrc 6.6


Next Command:
Step 7 Enter the dspqbin command:
dspqbin 3.1 10
The resulting screen should show these settings:
n4             TN    SuperUser       IGX 15    9.3      March 4 2000  16:48 PST

Qbin Database 3.1 on UXM qbin 10

Qbin State:                   Enabled

Minimum Bandwidth:             0
Qbin Discard threshold:       65536
Low CLP threshold:            95%
High CLP threshold:           100%
EFCI threshold:               40%


Last Command: dspqbin 3.1 10


Next Command:
Step 8 If interfaces 3.3 and 4.2 are present, but not enabled, perform the previous debugging steps for interfaces 3.3 and 4.2.
Step 9 Try a ping on the label switch connections. If the ping does not work, but all the label switching and routing configuration appear correct, check that the LSC has found the VSI interfaces correctly by entering the following command on the LSC:
| Command | Description |
Router LSC1# show tag int
| shows the label interfaces. |
If the interfaces are not shown, re-check the configuration of port 3.1 on the IGX switch as described in the previous steps.
Step 10 If the VSI interfaces are shown, but are down, check whether the LSRs connected to the IGX switch show that the lines are up. If not, check such items as cabling and connections.
Step 11 If the LSCs and IGX switches show the interfaces are up, but the LSC does not show this, enter the following command on the LSC:
Router LSC1# reload
If the show tag int command shows that the interfaces are up, but the ping does not work, enter the following command on the LSC:
Router LSC1# sh tag tdp disc
The resulting display should show something similar to this:
Local TDP Identifier:
    30.30.30.30:0
TDP Discovery Sources:
    Interfaces:
        ExtTagATM1.3:   xmit/recv
        ExtTagATM2.2:   xmit/recv
-----------------
Step 12 If the interfaces on the display show "xmit" and not "xmit/recv", then the LSC is sending LDP messages, but not getting responses. Enter this command on the neighboring LSRs.
Router LSC1# sh tag tdp disc
If resulting displays also show "xmit" and not "xmit/recv", then one of two things is likely:
a. The LSC is not able to set up VSI connections.
b. The LSC is able to set up VSI connections, but cells are not transferred because they cannot get into a queue.
Step 13 Check the VSI configuration on the switch again, for interfaces 3.1, 3.3, and 4.2, paying attention to:
a. Maximum bandwidths at least a few thousands cells per second
b. Qbins enabled
c. All Qbin thresholds non-zero
|
Note VSI partitioning and resources must be correctly set up on the interface connected to the LSC, interface 3.1 (in this example), and interfaces connected to other label switching devices. |
This section describes MPLS CoS with the use of the Cisco IGX 8410, 8420, and 8430 ATM label switch router (ATM LSR). A summary example is provided for configuring IGX 8410, 8420, and 8430 ATM LSRs, their associated LSCs, and edge label switch routers.
For additional information, refer to Cisco router and MPLS-related Cisco IOS documentation. Refer to Cisco IOS release notes for supported features.
The MPLS CoS feature enables network administrators to provide differentiated types of service across an MPLS switching network. Differentiated service satisfies a range of requirements by supplying the particular kind of service specified for each packet by its CoS service can be specified in different ways—for example, through use of the IP precedence bit settings in either IP packets or in source and destination addresses.
The MPLS CoS feature can be used optionally with MPLS virtual private networks. MPLS CoS can also be used in any MPLS switching network.
In supplying differentiated service, MPLS CoS offers packet classification, congestion avoidance, and congestion management. Table 12 lists these functions and how they are delivered.
| Service | CoS Function | Description |
|---|---|---|
Packet classification | Committed access rate (CAR). Packets are classified at the edge of the network before labels are assigned. | CAR uses the type of service (TOS) bits in the IP header to classify packets according to input and output transmission rates. CAR is often configured on interfaces at the edge of a network in order to control traffic into or out of the network. You can use CAR classification commands to classify or reclassify a packet. |
Congestion avoidance | Weighted random early detection (WRED). Packet classes are differentiated based on drop probability. | WRED monitors network traffic, trying to anticipate and prevent congestion at common network and internetwork bottlenecks. WRED can selectively discard lower priority traffic when an interface begins to get congested. It can also provide differentiated performance characteristics for different classes of service. |
Congestion management | Weighted fair queueing (WFQ). Packet classes are differentiated based on bandwidth and bounded delay. | WFQ is an automated scheduling system that provides fair bandwidth allocation to all network traffic. WFQ classifies traffic into conversations and uses weights (priorities) to determine how much bandwidth each conversation is allocated, relative to other conversations. |
MPLS CoS lets you duplicate Cisco IOS IP CoS (Layer 3) features as closely as possible in MPLS switching devices, including label switching routers (LSRs), edge LSRS, and ATM label switching routers (ATM LSRs). MPLS CoS functions map nearly one-for-one to IP CoS functions on all interface types.
To use the MPLS CoS feature, your network run these Cisco IOS features:
Also, the Cisco IGX 8410, 8420, and 8430 must have:
In IP+ATM networks, MPLS uses predefined sets of labels for each service class, so switches automatically know which traffic requires priority queuing. A different label is used per destination to designate each service class (see Figure 12).
There can be up to four labels per IP source-destination. Using these labels, core LSRs implement class-based WFQ to allocate specific amounts of bandwidth and buffer to each service class. Cells are queued by class to implement latency guarantees.
On a Cisco IP+ATM LSR, the weights assigned to each service class are relative, not absolute. The switch can therefore borrow unused bandwidth from one class and allocate it to other classes according to weight. This scenario enables very efficient bandwidth utilization. The class-based WFQ solution ensures that customer traffic is sent whenever unused bandwidth is available, whereas ordinary ATM VCs drop cells in oversubscribed classes even when bandwidth is available.
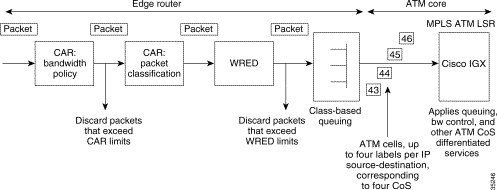
Packets have precedence bits in the Type of Service field of the IP header, set at either the host or an intermediate router, which could be the edge label switch router (LSR). The precedence bits define a CoS 0-3, such as available, standard, premium, or control.
To establish CoS operation when the IGX and the associated LSC router are initially configured, the binding type assigned each LVC interface on the IGX is configured to be multiple LVCs.
Then under the routing protocol (OSPF, for example), four LVCs are set up across the network for each IP source to destination requirement. Depending on the precedence bits set in the packets that are received by the edge LSR, the packet ATM cells that are sent to the ATM LSR will be one of four classes (as determined by the cell label, that is, VPI.VCI). Furthermore, two subclasses are distinguishable within each class by the use of the cell loss priority (CLP) bit in the cells.
Then the ATM LSR performs a MPLS data table look-up and assigns the appropriate CoS template and Qbin characteristics. The default mapping for CoS is listed in Table 13.
| Class of Service Mapping | Class of Service | IP ToS |
|---|---|---|
Available | 0 | ToS 0/4 |
Standard | 1 | ToS 1/5 |
Premium | 2 | ToS 2/6 |
Control | 3 | ToS 3/7 |
Figure 13 shows an example of IP traffic across an ATM core consisting of Cisco IGX 8410, 8420, and 8430 ATM LSRs. The host is sending two types of traffic across the network, interactive video and non-time critical data. Because multiple LVCs have automatically been generated for all IP source-destination paths, traffic for each source destination is assigned to one of four LVCs, based on the precedence bit setting in the IP packet header.
In this case, the video traffic might be assigned to the premium CoS, and transmitted across the network. This starts with the cell label "51" out of the Edge LSR-A, and continues across the network with the cell label "91" applied to the Edge LSR-C. In each Cisco IGX 8410, 8420, and 8430 ATM LSR, the cells are processed with the pre-assigned bandwidth, queuing, and other ATM QoS functions suitable to "premium" traffic.
In a similar fashion, low-priority data traffic cells with the same IP source-destination might be assigned label "53" out of Edge LSR-A and arrive at Edge LSR-C with the label "93", receiving pre-assigned bandwidth, queuing, and other ATM QoS functions suitable to "available" traffic.
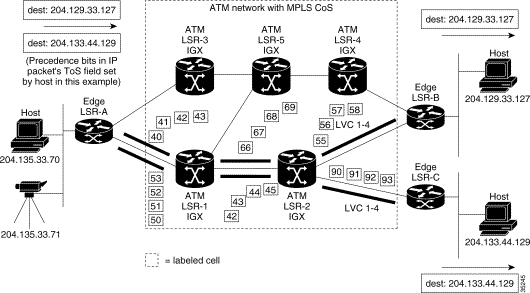
The service class templates provide a means of mapping a set of extended parameters. These are generally platform specific, based on the set of standard ATM parameters passed to the VSI slave in a UXM port interface during the initial setup of the interface.
A set of service templates is stored in each switch (Cisco IGX 8410, 8420, and 8430) and downloaded to the service modules (UXMs) as needed during initial configuration of the VSI interface when a trunk or line is enabled on the UXM.
An MPLS service template is assigned to the VSI interface when the trunk or port is initialized. The label switch controller (LSC) automatically sets up LVCs via a routing protocol (such as OSPF) and the Label Distribution Protocol (LDP), when the CoS Multiple LVC option is enabled at the edge label switch routers (LSRs).
With the Multiple VC option enabled (at edge LSRs), four LVCs are configured for each IP source-destination. Each of the four LVCs is assigned a service template type. For example, one of the four cell labels might be assigned to label cos2 service type category.
Each service template type has an associated Qbin. The Qbins provide the ability to manage bandwidth by temporarily storing cells, and then serving them out as bandwidth is available. This is based on factors including bandwidth availability, and the relative priority of different classes of service.
When ATM cells arrive from the edge LSR at the UXM port with one of four CoS labels, they receive CoS handling based on that label. A table look up is performed, and the cells are processed based on their connection classification. Based on its label, a cell receives the ATM differentiated service associated with its template type, (MPLS1 template), and service type (for example, label cos2 bw), plus associated Qbin characteristics and other associated ATM parameters.
The service template contains two classes of data:
When a connection setup request is received from the VSI master in the Label Switch Controller, the VSI slave (in the UXM, for example) uses the service type identifier to index into a Service Class Template database that contains extended parameter settings for connections matching that index. The slave uses these values to complete the connection setup and program the hardware.
In a typical operation for MPLS CoS, a packet moves from the host on the left side of a network, through the network of conventional routers, label edge routers (LERs), Label Switch Routers (LSRs), and ATM LSRs such as a Cisco IGX 8410, 8420, and 8430.
As the packet progresses, basic functions are applied to it, as shown in Figure 14:
1. Set the IP Type of Service (ToS) for a packet in the host (or router).
2. Apply one or more labels, and copy the IP ToS to Label CoS in the label header at the edge label switch router (LSR).
3. Queue the packet in a label switch router (LSR) according to its CoS.
4. Map the MPLS and MPLS CoS bits to an ATM Label-VC (LSR at the edge of the ATM cloud).
5. Apply ATM CoS bandwidth and queuing to ATM cells based on their CoS in the ATM LSR (Cisco IGX 8410, 8420, and 8430.
6. Receive the packet from the ATM cloud and forward it with appropriate label CoS through a LSR (could be frame-based LSR) at the edge of the ATM cloud.
7. Receive the labeled packet, remove the label, and forward the IP packet with appropriate CoS towards its destination (edge LSR).
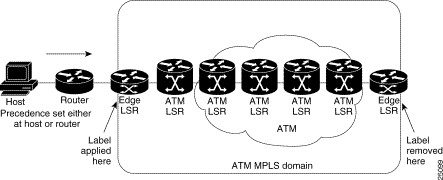
|
Note In Figure 14, the functions are performed by separate entities. In general, one or more functions can be performed by the same entity. For example, the setting of precedence and labeling could be performed in a single label edge router if the host were not participating. |
Table 14 shows four default policy types for MPLS CoS with default relative bandwidth per xtagatm interface.
| Class of Service Mapping | Class of Service | IP ToS | Default Bandwidth Weight |
|---|---|---|---|
Available | 0 | ToS 0/4 | 50 |
Standard | 1 | ToS 1/5 | 0 |
Premium | 2 | ToS 2/6 | 0 |
Control | 3 | ToS 3/7 | 50 |
The relative bandwidth weights determine the proportion of bandwidth available to MPLS which is given to each CoS on each link. If a CoS does not use the bandwidth given to it, then the bandwidth may be shared among the other CoSs.
The Control CoS is important to guarantee a good quality of service for MPLS control traffic. For this reason, it is desirable to reserve a small amount of bandwidth for the Control CoS as shown in Table 15.
| Class of Service Mapping | Class of Service | IP ToS | Bandwidth Weight |
|---|---|---|---|
Available | 0 | ToS 0/4 | 49 |
Standard | 1 | ToS 1/5 | 50 |
Premium | 2 | ToS 2/6 | 0 |
Control | 3 | ToS 3/7 | 1 |
To verify an xtagatm interface after configuration on the LSC, run this command:
show xtagatm cos-bandwidth-allocation xtagatmxx
where xx is the interface number. The maximum value for CoS bandwidth is 100.
The setup for the configuration example is shown in Figure 15.
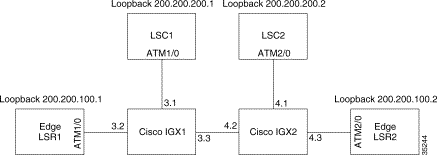
Configure the following resources according to the sample setup shown in Figure 15.
When configuring IGX1 and IGX1, verify that no software, card, or trunk errors are reported on the console. In this example, all VSI resources are allocated to maximum value.
upln 3.1															//LSC1 control port

   uptrk 3.3							//trunk via IGX1

   upln 3.2						//up line for LSR1

   cnfrsrc 3.1 0 352207 y 1 e 0 3000 1 20 0 352207	//LSC1

   cnfrsrc 3.3 0 352207 y 1 e 0 3000 1 20 0 352207	//trunk

   cnfrsrc 3.2 0 353207 y 1 e 0 3000 1 20 0 352307	//LSR1 port

   addctrlr x.y ctrlrid partitionid vpi vci
	upln 4.1						//LSC2 control port

   uptrk 4.2						//trunk via IGX1

   upln 4.3//up line for LSR2

   cnfrsrc 4.1 0 352207 y 1 e 0 3000 1 20 0 352207	//LSC2

   cnfrsrc 4.2 0 352207 y 1 e 0 3000 1 20 0 352207	//trunk

   cnfrsrc 4.3 0 353207 y 1 e 0 3000 1 20 0 352307	//LSR2 port

   addctrlr x.y ctrlrid partitionid vpi vci
Check that VSI resources have been allocated and that the LSC controller was added successfully.
   dsptrks		//successful with no alarms

   dspvsipartinfo 	//verify lcns and bandwidth are allocated successfully

   dsplns		//no alarm

   dspctrlrs		//controller ID is added successfully
There are four default policy parameters for relative bandwidth per xtagatm interface:
Once xtagatm interface has been defined for each LSC, execute the command (where xx is the interface number):
show xtagatm cos-bandwidth-allocation xtagatmxx
Verify that default relative bandwidth is properly assigned in percentage value. The maximum value for CoS bandwidth is 100.
LSC1-1#config t

   LSC1(config)#int atm1/0																				//LSC1LSC1 control port

   LSC1(config-if)#no shut

   LSC1(config-if)#tag-control-protocol vsi

   LSC1(config-if)#exit


   LSC1(config)#int xtagatm12			//LSR1 port 1.2

   LSC1(config-if)#extended-port atm1/0 descriptor 1.2

   LSC1(config-if)#tag-switching ip

   LSC1(config-if)#tag-switching atm cos available 49

   LSC1(config-if)#tag-switching atm cos standard 50

   LSC1(config-if)#tag-switching atm cos premium 0

   LSC1(config-if)#tag-switching atm cos control 1

   LSC1(config-if)ip unnumbered loopback0

   LSC1(config-if)#exit


   LSC1(config)#int xtagatm13			//LSR1 port 1.3

   LSC1(config-if)#extended-port atm1/0 descriptor 0x00010300

   LSC1(config-if)#tag-switching ip

   LSC1(config-if)#tag-switching atm cos available 49

   LSC1(config-if)#tag-switching atm cos standard 50

   LSC1(config-if)#tag-switching atm cos premium 0

   LSC1(config-if)#tag-switching atm cos control 1

   LSC1(config-if)ip unnumbered loopback0

   LSC1(config-if)#exit


   LSC1(config)#int loopback0					//configure loopback0 interface

   LSC1(config-if)#ip address 200.200.200.1 255.255.255.255

   LSC1(config-if)#exit


   LSC1(config)#ip routing					//enable IP routing

   LSC1(config)#ip cef					//enable Cisco Express Forwarding Protocol

   LSC1(config)#router ospf 10

   LSC1(config-router)#network 200.200.200.1 0.0.0.0 area 0

   LSC1(config-router)#end
LSC2#config t

   LSC2(config)#int atm2/0				//LSC2 control port

   LSC2(config-if)#no shut

   LSC2(config-if)#tag-control-protocol vsi id 2

   LSC2(config-if)#exit

LSC2(config)#int xtagatm22			//LSR2 port 2.2

   LSC2(config-if)#extended-port atm1/0 descriptor 2.2

   LSC2(config-if)#tag-switching ip

   LSC2(config-if)#tag-switching atm cos available 49

   LSC2(config-if)#tag-switching atm cos standard 50

   LSC2(config-if)#tag-switching atm cos premium 0

   LSC2(config-if)#tag-switching atm cos control 1

  LSC2(config-if)ip unnumbered loopback0

   LSC2(config-if)#exit


   LSC2(config)#int xtagatm23			//LSR2 port 2.3

   LSC2(config-if)#extended-port atm1/0 descriptor 2.3

   LSC2(config-if)#tag-switching ip

   LSC2(config-if)#tag-switching atm cos available 49

   LSC1(config-if)#tag-switching atm cos standard 50

   LSC1(config-if)#tag-switching atm cos premium 0

   LSC1(config-if)#tag-switching atm cos control 1

   LSC2(config-if)ip unnumbered loopback0

   LSC2(config-if)#exit


   LSC2(config)#int loopback0					//configure loopback0 interface

   LSC2(config-if)#ip address 200.200.200.2 255.255.255.255

   LSC2(config-if)#exit


   LSC2(config)#ip routing					//enable IP routing

   LSC2(config)#ip cef					//enable Cisco Express Forwarding Protocol

   LSC2(config)#router ospf 10

   LSC2(config-router)#network 200.200.200.2 0.0.0.0 area 0

   LSC2(config-router)#end
LSR1#config t

   LSR1(config)#int atm1/0				//LSR1 interface

   LSR1(config-if)#no shut

   LSR1(config-if)#exit

   LSR1(config)#interface atm1/0.1 tag-switching	//create tag sub-interface

   LSR1(config-subif)#ip unnumbered loopback0

   LSR1(config-subif)#tag-switching atm multi-vc	//enable multi-vc mode (4 VCs)

   LSR1(config-subif)#tag-switching ip


   LSR1(config)#int loopback0					//configure loopback0 interface

   LSR1(config-if)#ip address 200.200.100.1 255.255.255.255


   LSR1(config)#ip routing					//enable IP routing

   LSR1(config)#ip cef					//enable Cisco Express Forwarding Protocol

   LSR1(config)#router ospf 10

   LSR1(config-router)#network 200.200.100.1 0.0.0.0 area 0

   LSR1(config-router)#exit
In default multiple LVC mode, there are four MPLS Cos LVCs created by cos-map with clp set to off. The four classes of service include available (0/4), standard (1/5), premium (2/6), and control (3/7).
LSR2#config t

   LSR2LSR2(config)#int atm2/0																				//LSR2 interface

   LSR2(config-if)#no shut

   LSR2(config-if)#exit

   LSR2(config)#interface atm2/0.1 tag-switching	//create tag sub-interface

   LSR2(config-if)#ip unnumbered loopback0

   LSR2(config-if)#tag-switching ip


   LSR2(config)#int loopback0					//configure loopback0 interface

   LSR2(config-if)#ip address 200.200.100.2 255.255.255.255


   LSR2(config)#ip routing					//enable IP routing

   LSR2(config)#ip cef					//enable Cisco Express Forwarding Protocol

   LSR2(config)#router ospf 10

   LSR2(config-router)#network 200.200.100.2 0.0.0.0 area 0

   LSR2(config-router)#end


   LSR2(config)#tag-switching cos-map 1			//configure Cos-Map

   LSR2(config-tag-cos-map)#end				//for now use default 4 VCs

   LSR2#sho tag-switching cos-map				//there should be 4 VCs w/ clp off

   LSR2#config t

   LSR2(config)#access-list 1 permit 200.200.100.1 0.0.0.0 	//create access list for
network 200.200.100.1

   LSR2(config)#tag-switching prefix-map 1 access-list 1 cos-map 1	//map access-list to
cos-map 1

   LSR2(config)#show tag forward 200.200.100.1 32 detail		//verify forwarding table
Verify that the LSC/LSR is operational and IGXs have clear alarms. LSR1 should be able to ping to LSR2 successfully. Check that VSI resources have been allocated and the controller was added successfully. IGXs should have clear alarms and no software log and trunk errors.
dsptrks								//successful with no alarms

   dspvsipartinfo 					//verify lcns and bandwidth are allocated successfully

   dsplns					//no alarm

   dspctrlrs		//controller ID is added successfully
Check that LSC/edge LSR interfaces are operational and TDP bindings are successful.
LSC1#sho tag interface 			//xtagatm interfaces are operational

   LSC1#sho xtag cross-connect		//verify cross-connect

   LSC1#sho xtag vc				//verify tag vc

   LSC1#sho control vsi descriptor		//verify VSI VPI range and Bw

   LSC1#sho control vsi control-interface	//verify number of connections for each
cross-connect

   LSC1#sho control vsi traffic		//verify traffic statistics

   LSC1#sho tag atm binding		              //verify tag atm bindings

   LSC1#sho tag atm sum			//verify local/remote connections
LSR1#sho tag interface 			//xtagatm interfaces are operational

   LSR1#sh tag tdp disc			//verify tdp session rx/tx

   LSR1#sho atm  vc				//verify atm pvc and tvc
|
Note MPLS CoS Multiple LVC mode lets you reconfigure the classes for different traffic configurations. You modify the four LVCs for any CoS. For example, you have the choice of assigning a "high" weight to a "low" class (that is, available CoS = 60 and control CoS = 20). |
You can use MPLS to build an entirely new class of IP VPNs. MPLS-enabled IP VPNs are connectionless networks with the same privacy as VPNs built using Frame Relay or ATM VCs.
Cisco MPLS solutions offer multiple IP service classes to enforce business-based policies. Providers can offer low-cost managed IP services because they can consolidate services over common infrastructure, and improve provisioning and network operations.
Although Frame Relay and multiservice ATM deliver privacy and CoS, IP delivers any-to-any connectivity, and MPLS on Cisco IP+ATM switches, such as the Cisco IGX 8410, 8420, and 8430 ATM LSR, enables providers to offer the benefits of business-quality IP services over their ATM infrastructures.
MPLS VPNs, created in Layer 3, are connectionless, and therefore substantially more scalable and easier to build and manage than conventional VPNs.
In addition, value-added services, such as application and data hosting, network commerce, and telephony services, can easily be added to a particular MPLS VPN, the service provider's backbone recognizes each MPLS VPN as a separate, connectionless IP network. MPLS over IP+ATM VPN networks combine the scalability and flexibility of IP networks with the performance and QoS capabilities of ATM.
From a single access point, it is now possible to deploy multiple VPNs, each of which designates a different set of services (see Figure 16). This flexible way of grouping users and services makes it possible to deliver new services more quickly and cost-effectively. The ability to associate closed groups of users with specific services is critical to service provider value-added service strategies.
The VPN network must be able to recognize traffic by application type, such as voice, mission-critical applications, or e-mail. The network should easily separate traffic based on its associated VPN without configuring complex, point-to-point meshes.
The network must be "VPN aware" so that the service provider can easily group users and services into intranets or extranets with the services they need. In such networks, VPNs offer service providers a technology that is highly scalable and allows subscribers to quickly and securely provision extranets to new partners. MPLS brings "VPN awareness" to switched or routed networks. It enables service providers to quickly and cost-effectively deploy secure VPNs of all sizes over the same infrastructure.
For enabling business IP services, the most significant benefit of MPLS is the ability to assign labels that have special meanings. Sets of labels distinguish destination address and application type or service class (see Figure 17).
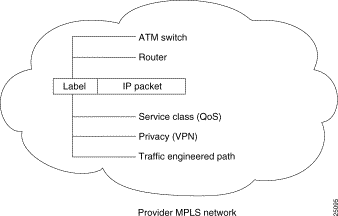
The MPLS label is compared to precomputed switching tables in core devices, such as the IGX ATM LSR, allowing each switch to automatically apply the correct IP services to each packet. Tables are precalculated, to avoid reprocessing packets at every hop. This strategy not only makes it possible to separate types of traffic, such as best-effort traffic from mission-critical traffic, it also makes an MPLS solution highly scalable.
Because MPLS uses different policy mechanisms to assign labels to packets, it decouples packet forwarding from the content of IP headers. Labels have local significance, and they are used many times in large networks. Therefore, it is nearly impossible to run out of labels. This characteristic is essential to implementing advanced IP services such as QoS, large-scale VPNs, and traffic engineering.
As part of their VPN services, service providers can offer premium services defined by SLAs to expedite traffic from certain customers or applications. QoS in IP networks gives devices the intelligence to preferentially handle traffic as dictated by network policy.
The QoS mechanisms give network managers the ability to control the mix of bandwidth, delay, jitter, and packet loss in the network. QoS is not a device feature; it is an end-to-end system architecture. A robust QoS solution includes a variety of technologies that interoperate to deliver scalable, media-independent services throughout the network, with system-wide performance monitoring capabilities.
VPNs are used with the CoS feature for MPLS. MPLS-enabled IP VPN networks provide the foundation for delivering value-added IP services, such as multimedia application support, packet voice, and application hosting, all of which require specific service quality and privacy. Because QoS and privacy are an integral part of MPLS, they no longer require separate network engineering.
Cisco's comprehensive set of QoS capabilities enables providers to prioritize service classes, allocate bandwidth, avoid congestion, and link Layer 2 and Layer 3 QoS mechanisms:
MPLS makes it possible to apply scalable QoS across very large routed networks and Layer 3 IP QoS in ATM networks, because providers can designate sets of labels that correspond to service classes. In routed networks, MPLS-enabled QoS substantially reduces processing throughout the core for optimal performance. In ATM networks, MPLS makes end-to-end Layer 3-type services possible.
Traditional ATM and Frame Relay networks implement CoS with point-to-point virtual circuits, but this is not scalable because of high provisioning and management overhead. Placing traffic into service classes at the edge enables providers to engineer and manage classes throughout the network. If service providers manage networks based on service classes, rather than point-to-point connections, they can substantially reduce the amount of detail they must track, and increase efficiency without losing functionality.
Compared to per-circuit management, MPLS-enabled CoS in ATM networks provides virtually all the benefits of point-to-point meshes with far less complexity. Using MPLS to establish IP CoS in ATM networks eliminates per-VC configuration. The entire network is easier to provision and engineer.
Subscribers want assurance that their VPNs, applications, and communications are private and secure. Cisco offers many robust security measures to keep information confidential:
In intranet and extranet VPNs based on Cisco MPLS, packets are forwarded using a unique route distinguisher (RD). RDs are unknown to end users and uniquely assigned automatically when the VPN is provisioned. To participate in a VPN, a user must be attached to its associated logical port and have the correct RD. The RD is placed in packet headers to isolate traffic to specific VPN communities.
MPLS packets are forwarded using labels attached in front of the IP header. Because the MPLS network does not read IP addresses in the packet header, it allows the same IP address space to be shared among different customers, simplifying IP address management.
Service providers can deliver fully managed, MPLS-based VPNs with the same level of security that users are accustomed to in Frame Relay/ATM services, without the complex provisioning associated with manually establishing PVCs and performing per-VPN customer premises equipment (CPE) router configuration.
QoS addresses two fundamental requirements for applications that run on a VPN: predictable performance and policy implementation. Policies are used to assign resources to applications, project groups, or servers in a prioritized way. The increasing volume of network traffic, along with project-based requirements, results in the need for service providers to offer bandwidth control and to align their network policies with business policies in a dynamic, flexible way.
As service providers build VPNs that include WAN switches, routers, firewalls, and Cisco IOS software, they need to seamlessly manage these devices across the network infrastructure and provide service-level agreements to their customers. Further, providers should enable business customers to personalize their access to network services and applications.
The Cisco Service Management System (CSM) addresses these needs with a suite of service management solutions to enable service providers to effectively plan, provision, operate, and bill VPN services.
VPNs based on Cisco MPLS technology scale to support many thousands of business-quality VPNs over the same infrastructure. MPLS-based VPN services solve peer adjacency and scalability issues common to large virtual circuit (VC) and IP tunnel topologies. Complex permanent virtual circuit/switched virtual circuit (PVC/SVC) meshes are no longer needed, and providers can use new, sophisticated traffic engineering methods to select predetermined paths and deliver IP QoS to premium business applications and services.
Service providers can use MPLS to build intelligent IP VPNs across their existing ATM networks. Because all routing decisions are precomputed into switching tables, MPLS both expedites IP forwarding in large ATM networks at the provider edge, and makes it possible to apply rich Layer 3 services via Cisco IOS technologies in Layer 2 cores.
A service provider with an existing ATM core can deploy MPLS-enabled edge switches or routers (LSRs) to enable the delivery of differentiated business IP services. The service provider needs only a small number of VCs to interconnect provider edge switches or routers to deliver many secure VPNs.
Cisco IP+ATM solutions give ATM networks the ability to intelligently "see" IP application traffic as distinct from ATM/Frame Relay traffic. By harnessing the attributes of both IP and ATM, service providers can provision intranet or extranet VPNs. Cisco enables IP+ATM solutions with MPLS, uniting the application of Cisco IOS software with carrier-class ATM switches (see Figure 18).

Without MPLS, IP transport over ATM networks require a complex hierarchy of translation protocols to map IP addressing and routing into ATM addressing and routing.
MPLS eliminates complexity by mapping IP addressing and routing information directly into ATM switching tables. The MPLS label-swapping paradigm is the same mechanism that ATM switches use to forward ATM cells. This solution has the added benefit of allowing service providers to continue offering their current Frame Relay, leased-line, and ATM services portfolio while enabling them to provide differentiated business-quality IP services.
To cost-effectively provision feature-rich IP VPNs, providers need features that distinguish between different types of application traffic and apply privacy and QoS—with far less complexity than an overlay IP tunnel, Frame Relay, or ATM "mesh."
Compared to an overlay solution, an MPLS-enabled network can separate traffic and provide privacy without tunneling or encryption. MPLS-enabled networks provide privacy on a network-by-network basis, much as Frame Relay or ATM provides it on a connection-by-connection basis. The Frame Relay or ATM VPN offers basic transport, whereas an MPLS-enabled network supports scalable VPN services and IP-based value added applications. This approach is part of the shift in service provider business from a transport-oriented model to a service-focused one.
In MPLS-enabled VPNs, whether over an IP switched core or an ATM LSR switch core, the provider assigns each VPN a unique identifier called a route distinguisher (RD) that is different for each intranet or extranet within the provider network. Forwarding tables contain unique addresses, called VPN-IP addresses (see Figure 19), constructed by linking the RD with the customer IP address. VPN-IP addresses are unique for each endpoint in the network, and entries are stored in forwarding tables for each node in the VPN.
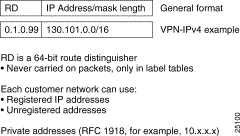
Border Gateway Protocol (BGP) is a routing information distribution protocol that defines who can talk to whom using Multi-Protocol extensions and community attributes. In an MPLS-enabled VPN, BGP distributes information about VPNs only to members of the same VPN, providing native security through traffic separation. Figure 20 shows an example of a service provider network with ATM backbone switches (P), service provider edge label switch routers (PE), and customer edge routers (CE).
Additional security is assured because all traffic is forwarded using LSPs, which define a specific path through the network that cannot be altered. This label-based paradigm is the same property that assures privacy in Frame Relay and ATM connections.
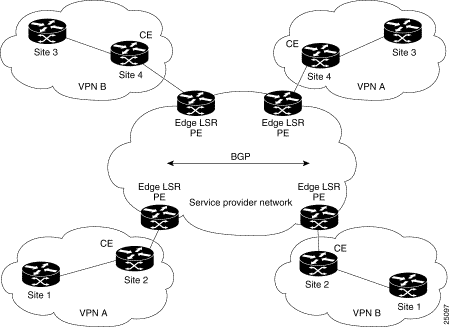
The provider, not the customer, associates a specific VPN with each interface when the VPN is provisioned. Within the provider network, RDs are associated with every packet, so VPNs cannot be penetrated by attempting to "spoof" a flow or packet. Users can participate in an intranet or extranet only if they reside on the correct physical port and have the proper RD. This setup makes Cisco MPLS-enabled VPNs virtually impossible to enter, and provides the same security levels users are accustomed to in a Frame Relay, leased-line, or ATM service.
PN-IP forwarding tables contain labels that correspond to VPN-IP addresses. These labels route traffic to each site in a VPN (see Figure 21).
Because labels are used instead of IP addresses, customers can keep their private addressing schemes, within the corporate Internet, without requiring Network Address Translation (NAT) to pass traffic through the provider network. Traffic is separated between VPNs using a logically distinct forwarding table for each VPN. Based on the incoming interface, the switch selects a specific forwarding table, which lists only valid destinations in the VPN, as specified by BGP. To create Extranets, a provider explicitly configures reachability between VPNs. (NAT configurations may be required.)
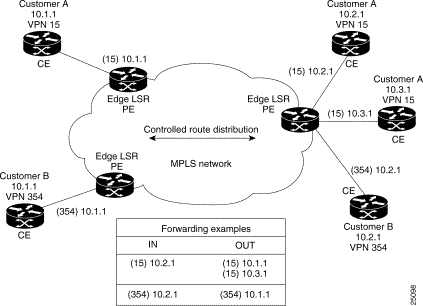
One strength of MPLS is that providers can use the same infrastructure to support many VPNs and do not need to build separate networks for each customer. VPNs loosely correspond to "subnets" of the provider network.
This solution builds IP VPN capabilities into the network itself, so providers can configure a single network for all subscribers that delivers private IP network services such as Intranets and Extranets without complex management, tunnels, or VC meshes. Application-aware QoS makes it possible to apply customer-specific business policies to each VPN. Adding QoS services to MPLS-based VPNs works seamlessly; the provider Edge LSR assigns correct priorities for each application within a VPN.
MPLS-enabled IP VPN networks are easier to integrate with IP-based customer networks. Subscribers can seamlessly interconnect with a provider service without changing their intranet applications, because these networks have application awareness built in, for privacy, QoS, and any-to-any networking. Customers can even transparently use their private IP addresses without NAT.
The same infrastructure can support many VPNs for many customers, removing the burden of separately engineering a new network for each customer, as with overlay VPNs.
It is also much easier to perform adds, moves, and changes. If a company wants to add a new site to a VPN, the service provider only has to tell the CPE router how to reach the network, and configure the LSR to recognize VPN membership of the CPE. BGP updates all VPN members automatically.
This scenario is easier, faster, and less expensive than building a new point-to-point VC mesh for each new site. Adding a new site to an overlay VPN entails updating the traffic matrix, provisioning point-to-point VCs from the new site to all existing sites, updating OSPF design for every site, and reconfiguring each CPE for the new topology.
Each VPN is associated with one or more VPN routing/forwarding instances (VRFs). A VRF table defines a VPN at a customer site attached to a PE router. A VRF table consists of the following:
A 1-to-1 relationship does not necessarily exist between customer sites and VPNs. A specific site can be a member of multiple VPNs. However, a site may be associated with only one VRF. A site VRF contains all the routes available to the site from the VPNs of which it is a member.
Packet forwarding information is stored in the IP routing table and the CEF table for each VRF. (Together, these tables are analogous to the forwarding information base (FIB) used in Label Switching.)
A logically separate set of routing and CEF tables is constructed for each VRF. These tables prevent information from being forwarded outside a VPN, and prevent packets that are outside a VPN from being forwarded to a router within the VPN.
The distribution of VPN routing information is controlled by using VPN route target communities, implemented by BGP extended communities.
Here is how distribution works:
When a VPN route is injected into BGP, it is associated with a list of VPN route target extended communities. Typically the list of VPN communities is set through an export list of extended community-distinguishers associated with the VRF from which the route was learned.
Associated with each VRF is an import list of route-target communities. This list defines the values to be verified by the VRF table, before a route is eligible to be imported into the VPN routing instance.
For example, if the import list for a particular VRF includes community-distinguishers of A, B, and C, then any VPN route that carries any of those extended community-distinguishers—A, B, or C—will be imported into the VRF.
A service provider edge (PE) router can learn an IP prefix from a customer edge (CE) router by static configuration, through a Border Gateway Protocol (BGP) session with the CE router, or through the routing information protocol (RIP) with the CE router.
Once the router learns the prefix, it generates a VPN-IPv4 (vpnv4) prefix based on the IP prefix, by linking an 8-byte route distinguisher to the IP prefix. This extended VPN-IPv4 address uniquely identifies hosts within each VPN site, even if the site is using globally non-unique (unregistered private) IP addresses.
The route distinguisher (RD) used to generate the VPN-IPv4 prefix is specified by a configuration command on the PE.
BGP uses VPN-IPv4 addresses to distribute network reachability information for each VPN within the service provider network. BGP distributes routing information between IP domains (known as autonomous systems) using messages to build and maintain routing tables. BGP communication takes place at two levels: within the domain (interior BGP or IBGP) and between domains (external BGP or EBGP).
BGP propagates vpnv4 information using the BGP Multi-Protocol extensions for handling these extended addresses. (See RFC 2283, Multi-Protocol Extensions for BGP-4.) BGP propagates reachability information (expressed as VPN-IPv4 addresses) among PE routers; the reachability information for a given VPN is propagated only to other members of that VPN. The BGP Multi-Protocol extensions identify the valid recipients for VPN routing information. All the members of the VPN learn routes to other members.
Based on the routing information stored in the IP routing table and the CEF table for each VRF, Cisco label switching uses extended VPN-IPv4 addresses to forward packets to their destinations.
An MPLS label is associated with each customer route. The PE router assigns the label that originated the route, and directs the data packets to the correct CE router.
Label forwarding across the provider backbone, is based on either dynamic IP paths or Traffic Engineered paths. A customer data packet has two levels of labels attached when it is forwarded across the backbone.
The PE router associates each CE router with a forwarding table that contains only the set of routes that should be available to that CE router.
Before configuring VPN operation, your network must run the following Cisco IOS services:
For MPLS VPN operation, you must first configure the Cisco IGX 8410, 8420, and 8430 ATM LSR, including its associated Cisco router LSC for MPLS or for MPLS QoS.
You configure network VPN operation on the edge LSRs that act as PE routers.
The Cisco IGX 8410, 8420, and 8430, including its LSC, requires no configuration beyond enabling MPLS and QoS.
To configure a VRF and associated interfaces, perform these steps on the PE router:
| Command | Purpose | |
|---|---|---|
Step 1 | Router(config)# ip vrf vrf-name
| Enter VRF configuration mode and specify the VRF name to which subsequent commands apply. |
Step 2 | Router(config-vrf)# rd route-distinguisher
| Define the instance by assigning a name and an 8-byte route distinguisher. |
Step 3 | Router(config-if)# | Associate interfaces with the VRF. |
Step 4 | Router(config-router)# address-family ipv4 vrf
vrf-name
| Configure BGP parameters for the VRF CE session to use BGP between the PE and VRF CE. The default setting is off for auto-summary and synchronization in the VRF address-family submode. To ensure that addresses learned through BGP on a PE router from a CE router are properly treated as VPN IPv4 addresses, you must enter the command no bgp default ipv4-activate before configuring and CE neighbors. |
Step 5 | Router(config-router-af)# exit-address-family
| Exit from address-family configuration mode. |
Step 6 | Router(config)# ip route [vrf vrf-name]
| Configure static routes for the VRF. |
To configure a BGP between provider routes for distribution of VPN routing information, perform these steps on the PE router:
| Command | Purpose | |
|---|---|---|
Step 1 | Router(config-router)# address-family {ipv4|vpn4} | Configure BGP address families. |
Step 2 | Router(config-router-af)# neighbor
{address|peer-group} remote-as as-number}
| Define a BGP session. |
Step 3 | Router(config-router)# | Activate a BGP session. Prevents automatic advertisement of address family IPv4 for all neighbors. |
Step 4 | Router(config-router)# neighbor address remote-as
as-number
| Configure a IBGP to exchange VPNv4 NLRIs. |
Step 5 | Router(config-router)# neighbor address
update-source interface
| Define a IBGP session. |
Step 6 | Router(config-router-af)# neighbor address activate
| Activate the advertisement of VPNv4 NLRIs. |
To configure import and export routes to control the distribution of routing information, perform these steps on the PE router:
| Command | Purpose | |
|---|---|---|
Step 1 | Router(config)# ip vrf vrf-name
| Enter VRF configuration mode and specify a VRF. |
Step 2 | Router(config-vrf)# route-target import
community-distinguisher
| Import routing information to the specified extended community. |
Step 3 | Router(config-vrf)# | Export routing information to the specified extended community. |
Step 4 | Router(config-vrf)# import map route-map
| Associate the specified route map with the VRF. |
To verify VPN operation, perform these steps on the PE router:
| Command | Purpose | |
|---|---|---|
Step 1 | Router# show ip vrf
| Display the set of defined VRFs and interfaces. |
Step 2 | Router# show ip vrf detail
| Display VRF information including import and export community lists. |
Step 3 | Router# | Display the IP routing table for a VRF. |
Step 4 | Router# show ip protocols vrf vrf-name
| Display the routing protocol information for a VRF. |
Step 5 | Router# show ip cef vrf vrf-name
| Display the CEF forwarding table associated with a VRF. |
Step 6 | Router# show ip interface interface-number
| Display the VRF table associated with an interface. |
Step 7 | Router# show ip bgp vpnv4 all [tags]
| Display VPNv4 NLRI information. |
Step 8 | Router# show tag-switching forwarding vrf vrf-name
[prefix mask/length][detail]
| Display label forwarding entries that correspond to VRF routes advertised by this router. |
Here is a sample configuration file from a PE router.
! CEF switching is a prerequisite for Tag

ip cef distributed
frame-relay switching
!
! Define two VPN Routing instances, named 'vrf1' and 'vrf2'

ip vrf vrf1 rd 100:1
ip vrf vrf2 rd 100:2
!
! Configure the import and export VPN route-target list for each VRF

ip vrf vrf1 route-target both 100:1
ip vrf vrf2 route-target both 100:2
ip vrf vrf2 route-target import 100:1
! Configure an import route-map for vrf2

ip vrf vrf2 import map vrf2_import
! 'vrf2' should not install PE-CE addresses in the global routing table

no ip vrf vrf2 global-connected-addresses
!
interface lo0
  ip address 10.13.0.13 255.255.255.255
 no shut
! Backbone link to another Provider router

interface atm9/0/0
 !
interface atm9/0/0.1 tag-switching
 tag-switching ip
	ip unnumbered lo0
!
! Set up an Ethernet interface as a VRF link to a CE router

interface Ethernet5/0/1
 ip vrf forwarding vrf1
 ip address 10.20.0.13 255.255.255.0
 !
! Set up a Frame-Relay PVC sub-interface a link to another CE router
interface hssi 10/1/0
  hssi internal-clock
  encaps fr
  frame-relay intf-type dce
  frame-relay lmi-type ansi
!
interface hssi 10/1/0.16 point-to-point
  ip vrf forwarding vrf2
  ip address 10.20.1.13 255.255.255.0
  frame-relay interface-dlci 16
  !
! Configure BGP sessions

router bgp 1
! Define an IBGP session with another PE

  no bgp default ipv4-activate
  neighbor 10.15.0.15 remote-as 1
  neighbor 10.15.0.15 update-source lo0
  no synchronization
! Define some VRF (CE) sessions.

		neighbor 10.20.1.11 remote-as 65535
  neighbor 10.20.1.11 update-source h10/1/0.16
! Deactivate the default IPv4 session

    neighbor 10.20.0.60 remote-as 65535
  neighbor 10.20.0.60 update-source e5/0/1
!
! Activate PE peer for exchange of VPNv4 NLRIs

  address-family vpnv4 unicast
   neighbor 10.15.0.15 activate
   exit-address-family
!
! If exchange of IPv4 NLRI with 10.15.0.15 is desired, activate it:

  address-family ipv4 unicast
   neighbor 10.15.0.15 activate
   exit-address-family
!
! Define BGP parameters for PE - CE sessions

! Activate sessions with peers in VRFs vrf1 and vrf2.

  address-family ipv4 unicast vrf vrf1
   neighbor 10.20.0.60 activate
   no auto-summary
   redistribute static
  exit-address-family
!
  address-family ipv4 unicast vrf vrf2
   neighbor 10.20.1.11 activate
   no auto-summary
   redistribute static
  exit-address-family
!
! Define a VRF static route

ip route vrf vrf1 12.0.0.0 255.0.0.0 e5/0/1 10.20.0.60
This section lists new or modified commands. All other commands used with this feature are documented in the Cisco IOS command references, and in the Cisco WAN Switch Command Reference for Cisco IGX 8410, 8420, and 8430 CLI commands. For information on using the following commands, refer to the Cisco MPLS VPN Feature Guide.
Currently, the Cisco WAN Manager (CWM) discovers the IGX network using the AutoRoute protocol. In an AutoRoute network, the network topology is kept (and updated) in all individual nodes. Thus the CWM only needs to access the gateway node and is able to discover the whole network topology including management IP addresses.
Enhanced Local Management Interface (ELMI) provides a protocol to monitor the status of permanent virtual connections between two Cisco communication devices. Through ELMI for example, the (CWM) can recognize the existing connectivity between an IGX 8400 switch and a Cisco IOS router running ATM or Frame Relay.
Each adjacent node exchanges its management IP address plus interface information via the ILMI protocol. Having ILMI topology discovery implemented on the IGX enables the CWM to also discover other ATM devices such as Cisco routers, that are attached to the IGX (UXM) so long as the devices support ILMI 4.0.
|
Note For ILMI topology discovery to function, ILMI version 4.0 compatible must be run on both the Cisco IGX switch and the Cisco router. |
The CWM starts the topology discovery process for the IGX network by querying the directly attached gateway node. Once CWM has the IP addresses of other nodes in the network, it queries each node in the network for the node's configuration. Each IGX sends its configuration and information of its neighbors through the network. The CWM query for the network topology and information only once when the CWM initially attaches to the node. If any node has updates, that node asynchronously sends a robust update to CWM. Figure 22 shows how the CWM queries the directly attached node.
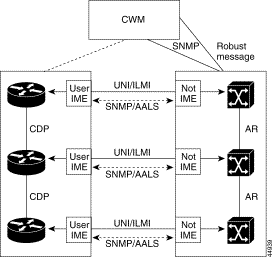
Perform these tasks to enable Neighbor Discovery on the IGX UFM port:
Use the cnfport command to enable the Address Registration protocol. The following configuration displays use of cnfport to set up ELMI and Address Registration:
frg TN    Cisco           IGX 8430  9.3.10 June 7 2000  11:23 GMT

Port: 5.1 [ACTIVE  ] Primary
Interface: HSSI    DCE                      Configured Clock:  1024 Kbps
Clocking:  Normal                           Measured Rx Clock: 1024 Kbps
Neighbor IP Add:1.2.2.3               	 Neighbor IfIndex:5
Port ID                        0       Min Flags / Frames           1
Port Queue Depth           65535       OAM Pkt Threshold            3 pkts
ECN Queue Threshold        65535       T391 Link Intg Timer        10 sec
DE Threshold                 100 %     N391 Full Status Poll        6 cyl
Signalling Protocol    Cisco LMI -E    EFCI Mapping Enabled        No
Asynchronous Status           No       CLLM Enabled/Tx Timer   No/  0 msec
T392 Polling Verif Timer      15       IDE to DE Mapping          Yes
N392 Error Threshold           3       Interface Control Template
N393 Monitored Events Count    4          Lead    CA
Communicate Priority          No          State   ON
Upper/Lower RNR Thresh  75%/ 25%       Neighbor Discovery      Enable

Last Command:cnfport 5.1 DCE 1024 NORMAL 0 65535 65535 100 c N 15 3 4 N 75 25 3
 N N Y 1 Y

Next Command:
|
Note ELMI must first be enabled on the router. To enable ELMI on the router, refer to Cisco Router documentation. |
If Neighbor Discovery is disabled on the IGX, the UFM Frame Relay card will not publish the IP address, and will only receive any neighbor IP address.
To display the neighbor address registration information on all ports of the IGX use the dspnebdisc command. The following configuration displays use of the dspnebdisc command:
bot            TN    Cisco           IGX 8430  9.3.10 June 7 2000  11:26 GMT

 Port Neighbor Discovery
Port     Enable    State     IpAddress           IfIndex/IfName
3.2      No        ACTIVE    0.0.0.0             0
3.3      No        ACTIVE    0.0.0.0             0
3.4      No        ACTIVE    0.0.0.0             0
5.1      Yes       ACTIVE    1.2.2.3             5
5.2      Yes       INACTIVE  0.0.0.0             0
5.3      No        INACTIVE  0.0.0.0             0
5.4      No        INACTIVE  0.0.0.0             0

Last Command:dspnebdisc

Next Command:
To display address registration on a particular port use the dspport command. The following configuration displays use of the dspport command:
bot            TN    Cisco           IGX 8430  9.3.10 June 7 2000  11:33 GMT

Port:      5.1               [ACTIVE  ] Primary
Interface: HSSI    DCE                      Configured Clock:  1024 Kbps
Clocking:  Normal                           Measured Rx Clock: 1024 Kbps
Neighbor IP Add:1.2.2.3               Neighbor IfIndex:5
Port ID                        0       Min Flags / Frames           1
Port Queue Depth           65535       OAM Pkt Threshold            3 pkts
ECN Queue Threshold        65535       T391 Link Intg Timer        10 sec
DE Threshold                 100 %     N391 Full Status Poll        6 cyl
Signalling Protocol    Cisco LMI -E    EFCI Mapping Enabled        No
Asynchronous Status           No       CLLM Enabled/Tx Timer   No/  0 msec
T392 Polling Verif Timer      15       IDE to DE Mapping          Yes
N392 Error Threshold           3       Interface Control Template
N393 Monitored Events Count    4          Lead    CA
Communicate Priority          No          State   ON
Upper/Lower RNR Thresh  75%/ 25%       Neighbor Discovery      Enable

Last Command:dspport 5.1


Next Command:
The IGX sends its management IP address during address registration. The management IP address can be a LAN IP address or a network IP address. To change the IP address, use the cnfnodeparm command with the 53 option.
You determine the validity of the published IP address by using the cnfnodeparm command with the 53 option, however, whether the IP address is valid or not, the IGX sends it to the neighbor if Neighbor Discovery is enabled on the port.
The following configuration displays use of the cnfnodeparm command with the 53 option command:
bot TN    Cisco           IGX 8420  9.3.10 June 7 2000  07:01 GMT

31 FRP Link Status Alarm  [    Y] (Y/N) 46 Modem polling timer    [    1] (D)
32 Job Lock Timeout       [    0] (D)   47 Verify CBA for non-FRP [    N] (Y/N)
33 Max Via LCONs          [20000] (D)   48 Send Abit early        [    N] (Y/N)
34 Max Blind Segment Size [ 3570] (D)   49 Abit Tmr Multiplier  M [    0] (D)
35 Max XmtMemBlks per NIB [ 3000] (D)   50 Abit Tmr Granularity N [    3] (D)
36 Max Mem on Stby Q (%)  [   33] (D)   51 CommBrk Hop Weight     [   25] (D)
37 Trk Cell Rtng Restrict [    Y] (Y/N) 52 CB Fail Penalty Hops   [    2] (D)
38 Stat Config Proc Cnt   [ 1000] (D)   53 Dnld LanIP or NwIP     [ Lan](Lan/Nw)
39 Stat Config Proc Delay [ 2000] (D)
40 Enable Degraded Mode   [    Y] (Y/N)
41 Enable Rrt on Comm Fail[    N] (Y/N)
42 Auto Switch on Degrade [    Y] (Y/N)
43 Max Degraded Aborts    [  100] (D)
44 Max Htls Rebuild Count [  100] (D)
45 Htls Counter Reset Time[ 1000] (D)

This Command: cnfnodeparm 53


Enter 0 (LanIP) or 1 (NwIP):

                   SW
Be aware of these guidelines when downloading the IP address:
To keep the IP address of either the router or the switch from being known outside of the local network, disable ELMI Neighbor Discovery. When neighbor discovery is disabled, the router or switch receives the IP address of the external device but will not publish its own IP address. Table 16 shows the security metrix that explains this security feature.
| IOS with Neighbor Discovery | IGX Switch with Neighbor Discovery | Result |
|---|---|---|
ELMI Disabled | ELMI Disabled | IP address not published by switch or router |
ELMI Enabled | ELMI Disabled | IP address published by router only |
ELMI Disabled | ELMI Enabled | IP address published by switch only |
ELMI Enabled | ELMI Enabled | IP address published by switch and router |
For environment considerations, refer to Table 17.
| Subsystem | Revision/Release |
|---|---|
SWSW | Release Version 9.3.10 or later |
UFM FW | Firmware Version UFMC: ZAT, ZBD or later/UFMU: YAL, YBC or later |
IOS | Release Version 12.1(3)T or later |
CWM | Release Version 10.1 or later |
CW2K | Release Version 3.1 or later |
Enabling ILMI on the UXM enables the capability to support neighbor discovery. In addition, running ILMI on the UXM reduces the processing functions the NPM must perform and improves the NPM performance whose signalling protocols used to be implemented on the NPM.
Running ILMI on the UXM enables Topology Discovery, but to publish the node's management IP address to the user's IME, use the cnfport command.
The following configuration displays use of the cnfport in setting up ILMI and Topology Discovery on a line port:
ss4            TRM   Cisco           IGX 8420  9.3.10 July 12 2000
03:18 GMT

Port:      10.1    [ACTIVE  ]
Interface:         OC3                   CAC Override:         Enabled

Type:              UNI                   %Util Use:
Disabled
Speed:             353208 (cps)          GW LCNs:              200
SIG Queue Depth:   640                   Reserved BW:          0 (cps)

Alloc Bandwidth:   353208 (cps)
Protocol:          ILMI                  Protocol run on the card:Yes
  VPI.VCI:                   0.16        Neighbor Discovery:   Yes
  ILMI Polling Enabled        N
  Trap Enabled                N
  T491 Polling Interval      30
  N491 Error Threshold        3
  N492 Event Threshold        4

Last Command:cnfport 10.1 N i 0 16 N N 30 3 4 N N 200 0 y y

Next Command:
Once ILMI topology discovery is enabled on the UXM, the UXM reports the following information through ILMI:
To run ILMI on the UXM card for virtual trunks, use the cnftrk command
ss4            TRM   Cisco           IGX 8420  9.3.10 July 12 2000
03:34 GMT

TRK  8.3.1 Config     T3/19    [2867  cps]  UXM slot:8
Transmit Trunk Rate: 3000   cps          Connection Channels: 256
Rcv Trunk Rate:      2867   cps          Gateway Channels:    200
Pass sync:           No
Traffic:V,TS,NTS,FR,FST,CBR,N&RVBR,ABR
Loop clock:          No                  Virtual Trunk Type:  CBR
Statistical Reserve: 1000   cps          Virtual Trunk VPI:   1
Header Type:         UNI                 Deroute delay time:  0
seconds
Routing Cost:        10                  VC Shaping:          No
Idle code:           7F hex              ILMI run on the card:Yes
Restrict PCC traffic:No
Link type:           Terrestrial
Line framing:        PLCP
Line cable length:   0-225 ft.
HCS Masking:         Yes
Payload Scramble:    No

Last Command:cnftrk 8.3.1 3000 2867 N N 1000 UNI 10 7F N TERRESTRIAL
PLCP 1 Y N
 200 V,TS,NTS,FR,FST,CBR,NRT-VBR,ABR,RT-VBR CBR 1 N y

Next Command:
To display the management IP address and IfName on all ports of the IGX use the dspnebdisc command. The following configuration displays use of the dspnebdisc command:
dspnebdisc for ilmi and elmi:
port 4.4, 5.1, 5.4 enable ilmi on the card and neighbor discovery:

igxf2          VT    Cisco           IGX 8420  9.3.10 July 12 2000
10:53 PST

 Port Neighbor Discovery
Port     Enable    State     IpAddress           IfIndex/IfName
4.1      No        ACTIVE    N/A                 N/A
4.4      Yes       ACTIVE    172.29.201.158      ATM3/0
5.1      Yes       ACTIVE    0.0.0.0             atmVirtual.9.1.1.1
5.4      Yes       ACTIVE    172.29.31.148       atmVirtual.5.1.4.4
13.1     No        INACTIVE  N/A                 N/A
13.6     No        INACTIVE  N/A                 N/A
13.8     No        FAILED    N/A                 N/A
15.2     No        ACTIVE    N/A                 N/A
15.3     Yes       ACTIVE    172.29.16.144       atmVirtual.11.1.4.4...
SW
|
Note In case of UXM Y-Red switchover, the ILMI session is restarted and the locally stored IP address on the UXM is sent to its neighbor. |
For environment considerations, refer to Table 18.
| Subsystem | Revision/Release |
|---|---|
SWSW | Release version 9.3.10 or later |
UXM FW | Model C or later |
IOS | Release version12.1(3)T or later |
CWM | Release version10.1 or later |
CW2K | Release version3.1 or later |
You can access the most current Cisco documentation on the World Wide Web at http://www.cisco.com, http://www-china.cisco.com, or http://www-europe.cisco.com.
Cisco documentation and additional literature are available in a CD-ROM package, which ships with your product. The Documentation CD-ROM is updated monthly. Therefore, it is probably more current than printed documentation. The CD-ROM package is available as a single unit or as an annual subscription.
Registered CCO users can order the Documentation CD-ROM and other Cisco Product documentation through our online Subscription Services at http://www.cisco.com/cgi-bin/subcat/kaojump.cgi.
Nonregistered CCO users can order documentation through a local account representative by calling Cisco's corporate headquarters (California, USA) at 408 526-4000 or, in North America, call 800 553-NETS (6387).
Cisco provides Cisco Connection Online (CCO) as a starting point for all technical assistance. Warranty or maintenance contract customers can use the Technical Assistance Center. All customers can submit technical feedback on Cisco documentation using the web, e-mail, a self-addressed stamped response card included in many printed docs, or by sending mail to Cisco.
Cisco continues to revolutionize how business is done on the Internet. Cisco Connection Online is the foundation of a suite of interactive, networked services that provides immediate, open access to Cisco information and resources at anytime, from anywhere in the world. This highly integrated Internet application is a powerful, easy-to-use tool for doing business with Cisco.
CCO's broad range of features and services helps customers and partners to streamline business processes and improve productivity. Through CCO, you will find information about Cisco and our networking solutions, services, and programs. In addition, you can resolve technical issues with online support services, download and test software packages, and order Cisco learning materials and merchandise. Valuable online skill assessment, training, and certification programs are also available.
Customers and partners can self-register on CCO to obtain additional personalized information and services. Registered users may order products, check on the status of an order and view benefits specific to their relationships with Cisco.
You can access CCO in the following ways:
You can e-mail questions about using CCO to cco-team@cisco.com.
The Cisco Technical Assistance Center (TAC) is available to warranty or maintenance contract customers who need technical assistance with a Cisco product that is under warranty or covered by a maintenance contract.
To display the TAC web site that includes links to technical support information and software upgrades and for requesting TAC support, use www.cisco.com/techsupport.
To contact by e-mail, use one of the following:
| Language | E-mail Address |
|---|---|
English | tac@cisco.com |
Hanzi (Chinese) | chinese-tac@cisco.com |
Kanji (Japanese) | japan-tac@cisco.com |
Hangul (Korean) | korea-tac@cisco.com |
Spanish | tac@cisco.com |
Thai | thai-tac@cisco.com |
In North America, TAC can be reached at 800 553-2447 or 408 526-7209. For other telephone numbers and TAC e-mail addresses worldwide, consult the following web site: http://www.cisco.com/warp/public/687/Directory/DirTAC.shtml.
If you are reading Cisco product documentation on the World Wide Web, you can submit technical comments electronically. Click Feedback in the toolbar and select Documentation. After you complete the form, click Submit to send it to Cisco.
You can e-mail your comments to bug-doc@cisco.com.
To submit your comments by mail, for your convenience many documents contain a response card behind the front cover. Otherwise, you can mail your comments to the following address:
Cisco Systems, Inc.
Document Resource Connection
170 West Tasman Drive
San Jose, CA 95134-9883
We appreciate and value your comments.
This document is to be used in conjunction with the documents listed in the "Related Documentation" section.
Access Registrar, AccessPath, Any to Any, Are You Ready, AtmDirector, Browse with Me, CCDA, CCDE, CCDP, CCIE, CCNA, CCNP, CCSI, CD-PAC, the Cisco logo, Cisco Certified Internetwork Expert logo, CiscoLink, the Cisco Management Connection logo, the Cisco NetWorks logo, the Cisco Powered Network logo, Cisco Systems Capital, the Cisco Systems Capital logo, Cisco Systems Networking Academy, the Cisco Systems Networking Academy logo, the Cisco Technologies logo, Fast Step, FireRunner, Follow Me Browsing, FormShare, GigaStack, IGX, Intelligence in the Optical Core, Internet Quotient, IP/VC, IQ Breakthrough, IQ Expertise, IQ FastTrack, IQ Readiness Scorecard, The IQ Logo, Kernel Proxy, MGX, Natural Network Viewer, NetSonar, Network Registrar, the Networkers logo, Packet, PIX, Point and Click Internetworking, Policy Builder, Precept, RateMUX, ReyMaster, ReyView, ScriptShare, Secure Script, Shop with Me, SlideCast, SMARTnet, SVX, The Cell, TrafficDirector, TransPath, VlanDirector, Voice LAN, Wavelength Router, Workgroup Director, and Workgroup Stack are trademarks; Changing the Way We Work, Live, Play, and Learn, Empowering the Internet Generation, The Internet Economy, and The New Internet Economy are service marks; and Aironet, ASIST, BPX, Catalyst, Cisco, Cisco IOS, the Cisco IOS logo, Cisco Systems, the Cisco Systems logo, the Cisco Systems Cisco Press logo, CollisionFree, Enterprise/Solver, EtherChannel, EtherSwitch, FastHub, FastLink, FastPAD, FastSwitch, GeoTel, IOS, IP/TV, IPX, LightStream, LightSwitch, MICA, NetRanger, Post-Routing, Pre-Routing, Registrar, StrataView Plus, Stratm, TeleRouter, and VCO are registered trademarks of Cisco Systems, Inc. or its affiliates in the U.S. and certain other countries. All other trademarks mentioned in this document are the property of their respective owners. The use of the word partner does not imply a partnership relationship between Cisco and any other company. (0005R)
Copyright © 2000, Cisco Systems, Inc.
All rights reserved.
![]()
![]()
![]()
![]()
![]()
![]()
![]()
![]()
Posted: Sat Nov 9 08:54:01 PST 2002
All contents are Copyright © 1992--2002 Cisco Systems, Inc. All rights reserved.
Important Notices and Privacy Statement.