|
|

This appendix describes the AT3-6ME Interface Adapter, sometimes referred to as the T3-T2 Interface Adapter, that is used with the BPX switch to provide a 6 Mbps ATM network interface to T2 transmission facilities.
The AT3-6ME Interface Adapter is used with the BPX Broadband ATM Switch or the IPX Narrowband Switch in applications where it is required to interface a 6 Mbps T2 digital network facility to the 45 Mbps T3 ATM port on the BPX, IGX, or IPX node.
Applications include networks where T2 transmission facilities are available. Users with ATM networks who require somewhat more bandwidth than is provided by the T1 or E1 ATM network connections but do not need the full T3 bandwidth provided by the BPX ATM network ports can also benefit from using the AT3-6ME Interface Adapter. See Figure D-1 for a typical application.
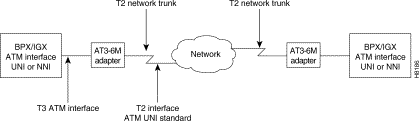
The AT3-6ME Interface Adapter is a bi-directional device which provides a conversion between transmission systems of different transmission rates, the North American T3 (44.736 Mbps) and the Japanese 6M (T2). It is used only in ATM networks. The adapter is transparent to both users and the network.
The T3 interface operates at 44.736 Mbps with the B-ISDN Physical Layer Convergence Protocol (PLCP) and meets the ATM Forum standards. The T2 interface operates at 6 Mbps according to the Japanese Nippon Telephone & Telegraph (NTT) User-Network Interface (UNI) specifications.
ATM cells from one interface are mapped to the other interface enabling users with ATM node equipment with North American T3 ATM ports to operate in a T2 network. The ATM cell throughput on a T2 digital trunk using this adapter is limited to 14,490 cells per second.
The cell transfer rate for T2 is greatly reduced from the T3 cell rate out of a T3 port on an IPX using the ATMT card or from a BPX port. It is very important to restrict the cell rate from the node when using a T2 trunk. Cell rate adaptation is done via software trunk configuration at the T3 ATM interface, where the non null cell throughput is limited to the T2 capacity. In the T2 to the T3 direction, the T3 ATM interface has more than enough capacity to accommodate the T2 cell rate.
The Interface Adapter can buffer a 70-cell burst at the T3 rate before the T2 interface will begin to drop cells. Cells will continue to be dropped until the T3 interface returns to a rate that complies with the bandwidth of the T2 interface.
All alarms and line errors are passed through the Interface Adapter unchanged. Any existing network management system has an instant view of the actual network transmission system. Errors at the ATM layer propagate through from one interface to the other, thus the end user has the complete knowledge and statistical information regarding the network status at all times. Therefore a special network management interface is not required.
Since the T3 interface is asynchronous and the T2 is synchronous, the AT3-6ME can be configured to carry the synchronization information through from one interface to the other. The synchronization is carried through the T3 interface using the PLCP-embedded 8 KHz. The T2 interface clock may be generated locally or it may be slaved to the public network.
The AT3-6ME is fully contained in a metallic housing designed to be mounted in a 19" equipment rack. It occupies only one rack mounting space and is powered from normal AC line powering. The power supply accommodates an input voltage over the range 90 to 240 VAC, 50 or 60 Hz.
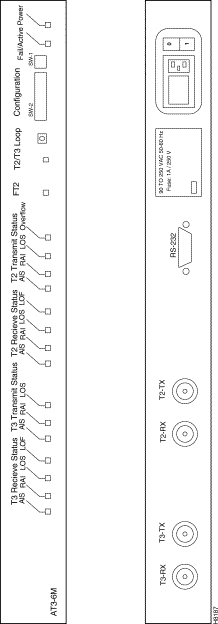
The interface connectors are located on the rear panel (see Table D-1 and Figure D-2). These connectors include:
The control terminal is a standard RS-232 interface DTE interface. No hardware handshake is required for the interface. The diagnostic display comes up immediately. It operates at 9.6 Kbps with any ASCII terminal.
| Connector | Type | Description |
|---|---|---|
T3 RX | BNC | Receive T3 input from BPX, IGX, or IPX ATM port. |
T3 TX | BNC | Transmit T3 output to BPX, IGX, or IPX ATM port. |
T2 RX | BNC | Receive 6 MB input from T2 facility. |
T2 TX | BNC | Transmit 6 MB input to T2 facility. |
RS-232 | DB9 | Control terminal connection. |
Primary Power | IEC | AC power input with fuse. |
The front panel of the system provides LED indicators for the alarm status of the transmit and the receive T3 and the T2 interfaces (refer to Table D-2 and Figure D-2). Also on the front panel are indications for power and for operating status (Fail/Active).
The Overflow LED indicates that the cell rate coming from the T3 interface exceeds the bandwidth of the T2 facility and that the Interface Adapter buffer has overflowed.
| Indicator | Color | Description |
|---|---|---|
T3 Receive Status—AIS | Green | Alarm Indication signal detected on the RCV T3 line. |
T3 Receive Status—RAI | Yellow | Remote Alarm Indication signal detected on the receive T3 line. |
T3 Receive Status—LOS | Red | Loss of receive T3 signal. |
T3 Receive—LOF | Red | Loss of frame on receive T3 signal. |
T3 Transmit Status—AIS | Green | Alarm Indication signal detected on the transmit T3 line. |
T3 Transmit Status—RAI | Yellow | Remote Alarm Indication signal detected on the transmit T3 line. |
T3 Transmit Status—LOS | Red | Loss of transmit T3 signal. |
T2 Receive Status—AIS | Green | Alarm Indication signal detected on the RCV T2 line. |
T2 Receive Status—RAI | Yellow | Remote Alarm Indication signal detected on the receive T2 line. |
T2 Receive Status—LOS | Red | Loss of receive T2 signal. |
T2 Receive—LOF | Red | Loss of frame on receive T2 signal. |
T2 Transmit Status—AIS | Green | Remote Alarm Indication signal detected on the transmit T2 line. |
T2 Transmit Status—RAI | Yellow | Loss of transmit T2 signal. |
T2 Transmit Status—LOS | Red | Loss of frame on transmit signal. |
Overflow | Red | T3 receive cell rate exceeds the T2 line capacity. |
FT2 | Red | Fractional T2 indication for future use. |
T3/T2 loop | Red | Indicates the unit is in loop back mode, external toward the T3 and T2 line interfaces. |
Active/Fail | Green/Red | Upon power up the system will go through extensive self tests. If self-test passes, the Active/Fail LED will be green; if self-test fails the LED will be RED. |
Power | Green | Power ON indication. |
The adapter has two front panel DIP switches, a two-position (SW-1), and a 12-position (SW-2) switch. SW-1 controls the configurations that may interrupt operation and should be done through a two-step operation. SW-2 enables all other configuration parameters.
Install the AT3-6ME in a rack adjacent to the BPX enclosure (allowing room for any AC Power Supply Assembly that may also need to be mounted) or in the IPX enclosure wherever there is space for the AT3-6ME adapter.
Two short BNC-BNC cables are required to connect the AT3-6ME to the BPX or IPX node.
Step 2 Connect the other cable between the associated RX connector on the BPX LM-3T3 or ATMT card and the T3-TX connector on the AT3-6ME back panel.
Step 3 Connect the cable coming from the 6 Mbps facility to the T2-RX connector on the AT3-6ME.
Step 4 Connect the cable going to the 6 Mbps facility to the T2-TX connector on the AT3-6ME.
Step 5 Connect the AC power cord to the IEC connector on the rear of the AT3-6ME.
The adapter configuration is done via a set of DIP switches located on the front panel. There are two sets of switches, a 12-position switch and a two position switch. The two position switch enables the configuration change via the terminal and enable/disable the loop push button located in the front panel (to secure against accidental operation). Review both Table D-3 and Table D-4. Set the appropriate DIP switches with the power off.
| Switch | Position | Function |
|---|---|---|
1 | Down | Enable configuration via the TTY. |
1 | Up | Disable configuration via the TTY (default). |
2 | Down | Enable front panel loop push button. |
2 | Up | Disable front panel loop push button (default). |
| Switches | Position | Function |
|---|---|---|
1 | Up | Internal synchronization source for the T2 transmitter |
1 | Up | Slave T2 transmitter to T3 line |
1 | Down | Slave T2 transmitter to T2 receiver |
3 | Up | Long length T3 cable |
3 | Up | Medium length T3 cable |
3 | Down | Short length T3 cable; system is co located to IPX/IGX/BPX1 (default) |
5, 6 | don't care | Unused |
7 | Up | ATM converter mode |
7 | Down | Test Mode |
8 | Up | Enable BPV relay from T2 to T3 |
8 | Down | Disable PV relay from T2 to T3 |
9 | Up | Long length T2 cable |
9 | Down | Short length T2 cable (default)1 |
10, 11, 12 | Don't care | Unused |
| 1T2 and T3 cable length should be set to "short" upon power-up for self-test. Upon LOS, defaults to "internal synchronization." |
The trunk on the BPX, IGX, or IPX node must be reconfigured from Cisco StrataView Plus or a local control terminal.
Step 2 Use the Configure Trunk (cnftrk) command to select T2 for the Tx Trunk Rate.
Step 3 Set the RCV Trunk Rate to 28980 cps.
Step 4 Repeat steps 1 through 3 for all other nodes using the AT3-6ME.
The following paragraphs describe the various operating modes for the AT3-6ME. The unit is basically designed for unattended operation. Any failures in the unit or any line alarms or errors will be propagated.
During the system power-up, the unit goes through a self test procedure. The Power LED turns green. The Active/ Fail LED stays off until the self test sequence is completed. At the end of the self test the loop LED comes on for about 5 seconds.
Through the self test, all LEDs light up. When the test is completed successfully the Active/Fail LED turns green. If the system fails self test, it will repeat the self-test twice more. If it continues to fail, the Active/Fail LED turns red.
In standard operation the AT3-6ME system relays ATM cells from the T2 6M to the T3 interface. To accommodate for the difference in the transmission rate, the AT3-6ME removes all null cells from the T3 interface. The T3 sources connected to the AT3-6ME must regulate their ATM Cell rate not to exceed the T2 6M cell rate. The AT3-6ME can absorb up to 70 cells in a single burst.
The AT3-6ME Interface Adapter can interface to any ATM UNI or NNI line at the T2 or T3 rate. The AT3-6ME Relays alarms and errors from one interface to the other. It relays the alarm and error conditions as indicated in Table D-5.
| Alarms Passed Thru (both directions) | Errors Relayed Thru (both directions) |
|---|---|
AIS | HEC Error—both directions. |
RAI | BPV (up to 10-5 rate)—6M to T3 only. |
LOS |
|
LOF |
|
The AT3-6ME has the capability of creating a remote loop on both the T3 and the T2 sides for test purposes. The loop can be activated by manually pressing a front-panel switch or through the control terminal. The loopbacks are through looping relays at the two interfaces and they operate simultaneously.
To activate the loop from the front panel, one must first enable the proper DIP switch on SW-1. Then press and hold the front panel push button for one second. This is to prevent accidental operation of the loop. Once the loop is set it can be removed by operating the loop switch a second time or it will automatically remove itself after one hour.
The system is designed to operate without a terminal. There is a terminal interface designed for diagnostics and maintenance purpose only. The terminal interface is always active and continuously displays the user prompt. The terminal interface operating parameters are as follows:
Electrical Interface: | RS232 |
DTE/DCE: | DCE |
Speed: | 9.6 Kbps |
Handshake: | NON |
Connector: | Male DB9 |
Upon power up, the system goes through power up diagnostics. The terminal displays the diagnostics sequence. Upon successful self test the unit is available for operation. The terminal will display the actual set up of the system represented by the DIP switches (see Table D-6). If the configuration was overwritten through the TTY, the terminal will display the actual set up that could be different then the dip switch setting.
| 1 | 2 | 3 | 4 | 5 | 6 | 7 | 8 | 9 | 10 | 11 | 12 | 1 | 2 |
0/1 | 0/1 | 0/1 | 0/1 | 0/1 | 0/1 | 0/1 | 0/1 | 0/1 | 0/1 | 0/1 | 0/1 | 0/1 | 0/1 |
Commands are entered after the user prompt. Commands are available to display the various error counters and alarms associated with the T2 line and the T3 port interface, select the source of timing for the DSU, and to enable and remove the remote loop. Table D-7 lists available commands for use with the AT3-6ME terminal interface while Table D-8 indicates the display format.
| Command | Parameters | Meaning |
|---|---|---|
? |
| Help Menu. |
dspstat |
| Display status. |
dspstat clear |
| Clears the status display. |
Override dipsw | 0 | Disable TTY configuration entry. |
Sync source | 0 | System is slaved to the 6M line. |
Remote loop | No of seconds | Enable remote loop back operation. |
| Status | T31 | T21 |
|---|---|---|
BPV | NNN | NNN |
Parity Errors | NNN | X |
Framing Errors | NNN | NNN |
PLCP Framing Errors | NNN | X |
HEC Errors | NNN | NNN |
RX Cells | NNN | NNN |
TX Cells | NNN | NNN |
AIS | 1/0 | 1/0 |
1/0 | 1/0 | 1/0 |
LOF | 1/0 | 1/0 |
Overflow | X | 1/0 |
| 1X = not available |
The following are the specifications for the AT3-6ME Interface Adapter:
Line rate: | 44.736 Mbps ±20 ppm |
Framing format: | C-bit parity |
Line code: | B3ZS |
Physical layer: | PLCP format |
ATM layer: | UNI per the ATM Forum UNI 3.0 specification |
Cell Rate: | Up to 96,000 cells/sec. |
Connector: | 75 ohm BNC |
Line rate: | 6.312 Mbps |
Line code: | B8ZS |
Synchronization: | Internal 6.312 Mbps ±30 ppm or |
Framing format: | ITU-T G.703 |
ATM Layer: | Per NTT UNI specification dated 1993 |
Queue: | 75 cell FIFO |
Cell Rate: | Up to 14,490 cells/sec. |
Connector: | 75 ohm BNC |
Input Power: | 90 VAC to 250 VAC, 50/60 Hz |
Power consumption: | 30 watts |
Input Power Connector: | Universal power entry module with fuse |
Fuse size: | 1/2A 250 VAC |
Rack Mounting Space: | 1 rack mount space, 19" rack |
Size: | 19" x 1.75" x 8.5" |
Speed: | 9.6 Kbps |
Type: | DTE |
Handshake: | NONE |
Connector: | DB9 |
![]()
![]()
![]()
![]()
![]()
![]()
![]()
![]()
Posted: Sun Jan 14 18:32:16 PST 2001
All contents are Copyright © 1992--2001 Cisco Systems, Inc. All rights reserved.
Important Notices and Privacy Statement.