|
|

This chapter includes a brief overview of the BXM card sets and instructions for configuring the BXM. It also describes resource partitioning for the BPX switch. The resource partitioning section provides procedures for UNI port resource partitioining for the BXM and ASI and procedures for NNI or trunk resource partitioning for the BXM and BNI.
The chapter includes the following:
Starting with switch software release 9.1, the BXM also supports tag switching. Partitions for the BXM can be allocated either between:
For information on Tag Switching, refer to Chapter 13, Configuration, Tag Switching.
Also, for switch software Release 9.1, the BXM card supports dynamic resource partitioning to support the conversion of PVCs to soft permanent virtual circuits (SPVCs). This feature is described in the:
Cisco WAN Service Node Extended Services Processor Installation and Operations for Release 2.2 document.
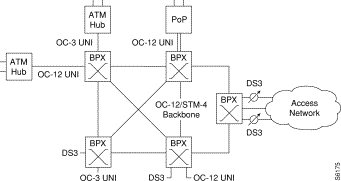
A BXM card set, using Application Specific Integrated Circuit (ASIC) technology, provides high speed ATM connectivity, flexibility, and scalability. The card set is comprised of a front card that provides the processing, management, and switching of ATM traffic and of a back card that provides the physical interface for the card set. An example of a BPX switch network provisioned with BXM-622 cards is shown in Figure 12-1.
The BXM card group includes the BXM-T3/E3, BXM-155, and BXM-622. These cards may be configured to support either trunk (network) or port (service access) interfaces. The BXM T3/E3 is available in 8 or 12 port versions with T3/E3 interfaces. The BXM-155 is available in 4 or 8 port versions with OC3/STM-1 interfaces. The BXM-622 is available in 1 or 2 port versions with OC-12/STM-4 interfaces. The BXM card sets are compliant with ATM UNI 3.1 and Traffic Management 4.0 including ABR VS/VD and provide the capacity to meet the needs of emerging bandwidth driven applications.
For additional information on ATM Connections, refer to Chapter 11, Configuration, ATM Connections.
The BXM cards are designed to support all the following service classes: Constant Bit Rate (CBR), Variable Bit Rate (VBR), Available Bit Rate (ABR with VS/VD, ABR without VS/VD, and ABR using Foresight), and Unspecified Bit Rate (UBR). ABR with VS/VD supports explicit rate marking and Congestion Indication (CI) control.
All software and administration firmware for the BXM card is downloadable from the BCC and is operated by the BXM on-board sub-system processor.
A BXM card set consists of a front and back card. The BXM T3/E3 is available with a universal BPX-T3/E3 backcard in 8 or 12 port versions. The BXM-OC3 is available with 4 or 8 port multi-mode fiber (MMF), single mode fiber (SMF), or single mode fiber long reach (SMFLR) back cards. The BXM-OC12 is available with 1 or 2 port SMF or SMFLR back cards,
Any of the 12 general purpose slots can be used for the BXM cards. The same backcards are used whether the BXM ports are configured as trunks or lines. Table 12-1and Table 12-2 list the available front and back card options for the BXM-T3/E3, BXM-155, and BXM-622.
| Front Card Model Number | No. of Ports | Cell Buffer (ingress/egress) | Connections per card | Back Cards |
|---|---|---|---|---|
T3/E3 (45 Mbps/34Mbps) | ||||
BXM-T3-8 | 8 | 100k/130k | 16k/32k | BPX-T3/E3-BC |
BXM-E3-8 | 8 | 100k/130k | 16k/32k | BPX-T3/E3-BC |
BXM-T3-12 | 12 | 100k/230k | 16k/32k | BPX-T3/E3-BC |
BXM-E3-12 | 12 | 100k/230k | 16k/32k | BPX-T3/E3-BC |
OC3/STM-1 (155.52 Mbps) | ||||
BXM-155-8 | 8 | 230k/230k | 16k | MMF-155-8 SMF-155-8 SMFLR-155-8 |
BXM-155-4 | 4 | 100k/230k | 16K | MMF-155-4 SMF-155-4 SMFLR-155-4 |
OC12/STM-4 (622.08 Mbps) | ||||
BXM-622-2 | 2 | 230k/230k | 16K | SMF-622-2 SMFLR-622-2 SMFXLR-622-2 |
BXM-622 | 1 | 130k/230k | 16K/32K | SMF-622 SMFLR-622 SMFXLR-622 |
*The BXM cards can be configured for either, but not both, trunk or service access (UNI) on a card by card basis. Once a card is so configured, all ports are either trunk or service interfaces until the card is reconfigured.
**The BPX-T3/E3-BC universal backcard supports 8 or 12 ports.
| Back Card Model Number | No. of Ports | Description | Optical Range (less than or equal to) |
|---|---|---|---|
T3/E3 (45 Mbps/34 Mbps) | |||
BPX-T3/E3-BC | 8/12 | Universal T3/E3 backcard for | n/a |
|
|
|
|
OC3/STM-1 (155.520 Mbps) | |||
MMF-155-8 | 8 | Multi-Mode Fiber | 2km |
MMF-155-4 | 4 | Multi-Mode Fiber | 2km |
SMF-155-8 | 8 | Single-Mode Fiber | 20km |
SMF-155-4 | 4 | Single-Mode Fiber | 20km |
SMFLR-155-8 | 8 | Single-Mode Fiber Long Reach | 40km |
SMFLR-155-4 | 4 | Single-Mode Fiber Long Reach | 40km |
OC12/STM-4 (622.08 Mbps) | |||
SMF-622-2 | 2 | Single-Mode Fiber | 20km |
SMF-622 | 1 | Single-Mode Fiber | 20km |
SMFLR-622-2 | 2 | Single-Mode Fiber Long Range | 40km |
SMFLR-622 | 1 | Single-Mode Fiber Long Range | 40km |
This section provides a preliminary summary of configuration, provisioning, and monitoring commands associated with the BXM cards. These commands apply to initial card configuration, line and trunk configuration and provisioning, and connection configuration and provisioning.
New or modified commands include but are not limited to:
Connections are typically provisioned and configured using Cisco StrataView Plus. However, the connections can also be added using the BPX switch command line interface (CLI). This may be appropriate during initial local node setup and when a Strata View Plus workstation is not available.
There are two connection addressing modes supported. The user may enter a unique VPI/VCI address in which case the BPX switch functions as a virtual circuit switch. Or the user may enter only a VPI address in which case all circuits are switched to the same destination port and the BPX switch functions as a virtual path switch in this case. The full ATM address range for VPI and VCI is supported.
Connections are routed between CPE connected to BXM ports. Before adding connections, the BXM is configured for port mode.
A line is upped with the upln command and configured with the cnfln command. Then the associated port is configured with the cnfport command and upped with the upport command. Following this, the ATM connections are added via the addcon command.
The slot number is the BXM card slot on the BPX switch. The port number is one of the ports on the BXM, the VPI is the virtual path identifier, and the VCI is the virtual circuit identifier.
The VPI and VCI fields have significance only to the local BPX switch, and are translated by tables in the BPX switch to route the connection. Connections are automatically routed by the AutoRoute feature once the connection endpoints are specified.
Connections can be either Virtual Path Connections (VPC) or Virtual Circuit Connections (VCC). Virtual Path Connections are identified by an * in the VCI field. Virtual Circuit Connections specify both the VPI and VCI fields.
The following parameters are entered for the BXM addcon command. Depending upon the connection type, the user is prompted with appropriate parameters as shown below.
Syntax:
addcon local_addr node remote_addr traffic_type ...extended parameters
| Field | Value | Description |
|---|---|---|
local/remote_addr | slot.port.vpi.vci | card slot, port, and desired VCC or VPI connection identifier |
node |
| slave end of connection |
traffic_type |
| type of traffic, chosen from CBR, VBR, ABR, and UBR |
extended parameters |
| parameters associated with each connection type |
The following pages have a number of command examples, including configuring BXM lines and trunks and adding connections terminating on BXM cards.
An example of the uptrk command for trunk 1 on a BXM in slot 4 of a BPX switch follows:
pubsbpx1       TN    SuperUser       BPX 15    9.1       Jan. 11 1998 18:52 GMT

TRK     Type   Current Line Alarm Status               Other End
 1.1    T3     Clear - OK                              pubsaxi1(AXIS)
 1.3    T3     Clear - OK                              pubsipx1/8
 4.1    OC3    Clear - OK                              -


Last Command: uptrk 4.1


Next Command:
An example of the cnftrk command for trunk 4.1 of a BXM card follows:
pubsbpx1       TN    SuperUser       BPX 15    9.1       Jan. 11 1998 18:50 GMT

TRK  4.1 Config    OC3   [353207cps]       BXM slot:     4
Transmit Rate:         353208              Restrict CC traffic:   No
Subrate interface:     --                  Link type:             Terrestrial
Subrate data rate:     --                  Line framing:          STS-3C
Line DS-0 map:         --                       coding:           --
Pass sync:             Yes                      CRC:              --
Loop clock:            No                       recv impedance:   --
Statistical Reserve:   1000  cps                cable type:       --
Idle code:             7F hex                         length:     --
Max Channels/Port:     256                 HCS Masking:           Yes
Connection Channels:   256                 Payload Scramble:      Yes
Valid Traffic Classes:                     Frame Scramble:        Yes
         V,TS,NTS,FR,FST,CBR,VBR,ABR       Virtual Trunk Type:    --
SVC Channels:          --                  Virtual Trunk VPI:     --
SVC Bandwidth:         --    cps           Deroute delay time:    0

This Command: cnftrk 4.1


Transmit Rate [T2=14490, E3=80000, T3=96000, OC3 = 353208, OC12=1412830](353208)
An example of the addtrk command follows:
pubsbpx1       TN    SuperUser       BPX 15    9.1       Jan. 11 1998 18:54 GMT

TRK     Type   Current Line Alarm Status               Other End
 1.1    T3     Clear - OK                              pubsaxi1(AXIS)
 1.3    T3     Clear - OK                              pubsipx1/8
 4.1    OC3    Clear - OK                              -


Last Command: dsptrks


Next Command: addtrk 4.1
An example of the upln command for UNI port access on a BXM card follows:
pubsbpx1       TN    YourID:1        BPX 15    9.1       Jan. 11 1998 02:18 GMT

Line    Type   Current Line Alarm Status
 3.1    OC3    Clear - OK
 3.2    OC3    Clear - OK
 3.3    OC3    Clear - OK
 5.1    T3     Clear - OK
 5.2    T3     Clear - OK


Last Command: upln 3.3


Next Command:
An example of the cnfln command follows:
pubsbpx1       TN    YourID:1        BPX 15    9.1       Jan. 11 1998 02:24 GMT

LN   3.3 Config    OC3   [353208cps]       BXM slot:     3
Loop clock:            No                  Idle code:             7F hex

Line framing:          --
     coding:           --
     CRC:              --
     recv impedance:   --
     E1 signalling:    --
     encoding:         --                       cable type:       --
     T1 signalling:    --                       length:           --
                                           HCS Masking:           Yes
                                           Payload Scramble:      Yes
     56KBS Bit Pos:    --                  Frame Scramble:        Yes
     pct fast modem:   --                  Cell Framing:          STS-3C


This Command: cnfln 3.3


Loop clock (N):
An example of the cnfport command for port 3 of a BXM card in slot 3 follows:
pubsbpx1       TN    YourID:1        BPX 15    9.1       Jan. 11 1998 02:25 GMT

Port:       3.3     [INACTIVE]
Interface:          LM-BXM
Type:               UNI                        %Util Use:        Disabled
Speed:              353208 (cps)
Shift:              SHIFT ON HCF (Normal Operation)
VBR Queue Depth:    5000

Protocol:           NONE
  SVC Channels:                       0
  SVC VPI Min:                        0
  SVC VPI Max:                        0
  SVC Bandwidth:                      0 (c/s)


This Command: cnfport 3.3


NNI Cell Header Format? [N]:
An example of the cnfportq command follows:
pubsbpx1       TN    YourID:1        BPX 15    9.1       Jan. 11 1998 02:27 GMT

Port:       3.3     [INACTIVE]
Interface:          LM-BXM
Type:               UNI
Speed:              353208 (cps)

SVC Queue Pool Size:          0
CBR Queue Depth:              600
CBR Queue CLP High Threshold: 80%
CBR Queue CLP Low Threshold:  60%
CBR Queue EFCI Threshold:     80%
VBR Queue Depth:              5000    ABR Queue Depth:               20000
VBR Queue CLP High Threshold: 80%     ABR Queue CLP High Threshold:  80%
VBR Queue CLP Low Threshold:  60%     ABR Queue CLP Low Threshold:   60%
VBR Queue EFCI Threshold:     80%     ABR Queue EFCI Threshold:      80%


This Command: cnfportq 3.3


SVC Queue Pool Size [0]:
An example of the upport command follows:
pubsbpx1       TN    YourID:1        BPX 15    9.1       Jan. 11 1998 02:28 GMT

Port:       3.3     [ACTIVE  ]
Interface:          LM-BXM
Type:               UNI                        %Util Use:        Disabled
Speed:              353208 (cps)
Shift:              SHIFT ON HCF (Normal Operation)
VBR Queue Depth:    5000

Protocol:           NONE
  SVC Channels:                       0
  SVC VPI Min:                        0
  SVC VPI Max:                        0
  SVC Bandwidth:                      0 (c/s)


Last Command: upport 3.3


Next Command:
An example of the cnfcls command for class 1 follows:
pubsbpx1       TN    YourID:1        BPX 15    9.1       Jan. 11 1998 02:31 GMT

                        ATM Connection Classes
Class:  1                                                            Type: ABR
   PCR(0+1)     % Util      MCR            CDVT(0+1)       AAL5 FBTC FST   VSVD
96000/96000    100/100 96000/96000        10000/10000          n      n     n

       Description: "Default ABR 96000"


This Command: cnfcls 1


Enter class type (VBR, CBR, UBR, ABR, ATFR):
An example of the cnfcls command for class 2 follows:
pubsbpx1       TN    YourID:1        BPX 15    9.1       Jan. 11 1998 02:33 GMT

                        ATM Connection Classes
Class:  2                                                            Type: VBR
   PCR(0+1)     % Util       CDVT(0+1)       AAL5 FBTC        SCR
 1000/1000     100/100      10000/10000          n        1000/1000

     MBS         Policing
 1000/1000           3

       Description: "Default VBR 1000 "


This Command: cnfcls 2


Enter class type (VBR, CBR, UBR, ABR, ATFR):
An example of the addcon command for a VBR connection 3.1.105.55 that originates at port 1 of a BXM card in slot 3 follows:
pubsbpx1       TN    YourID:1        BPX 15    9.1       Jan. 11 1998 02:39 GMT

 From            Remote      Remote                             Route
 3.1.105.55      NodeName    Channel         State  Type        Avoid COS O
 3.1.105.55      pubsbpx1    3.2.205.65      Ok     vbr
 3.2.201.61      pubsbpx1    3.1.101.51      Ok     abr
 3.2.201.62      pubsbpx1    3.1.101.52      Ok     abr
 3.2.203.63      pubsbpx1    3.1.103.53      Ok     abr
 3.2.204.64      pubsbpx1    3.1.104.54      Ok     abr
 3.2.205.65      pubsbpx1    3.1.105.55      Ok     vbr
 5.1.30.120      pubsbpx1    5.2.60.240      Ok     abr
 5.1.31.121      pubsbpx1    5.2.61.241      Ok     abr
 5.1.32.122      pubsbpx1    5.2.62.242      Ok     abr
 5.1.33.123      pubsbpx1    5.2.63.242      Ok     abr
 5.2.60.240      pubsbpx1    5.1.30.120      Ok     abr
 5.2.61.241      pubsbpx1    5.1.31.121      Ok     abr
 5.2.62.242      pubsbpx1    5.1.32.122      Ok     abr

Last Command: addcon 3.1.105.55 pubsbpx1 3.2.205.65 v * * * * * * *


Next Command:
An example of the cnfcon command for a VBR connection 3.1.105.55 follows.
pubsbpx1       TN    YourID:1        BPX 15    9.1       Jan. 11 1998 02:41 GMT

Conn:  3.1.105.55       pubsbpx1    3.2.205.65        vbr
Description:

   PCR(0+1)     % Util       CDVT(0+1)       AAL5 FBTC        SCR
   50/50       100/100     250000/250000         n          50/50

     MBS         Policing
 1000/1000           3


This Command: cnfcon 3.1.105.55


PCR(0+1) [50/50]:
An example of the addcon command for an ABR connection follows. In this case, the choice to accept the default parameters was not accepted, and individual parameters were configured for a connection using ABR standard VSVD flow control.
pubsbpx1       TN    YourID       BPX 15    9.1       Jan. 11 1998 01:10 GMT

 From            Remote      Remote                             Route
 3.1.104.54      NodeName    Channel         State  Type        Avoid COS O
 3.1.104.54      pubsbpx1    3.2.204.64      Ok     abr
 3.2.201.61      pubsbpx1    3.1.101.51      Ok     abr
 3.2.201.62      pubsbpx1    3.1.101.52      Ok     abr
 3.2.203.63      pubsbpx1    3.1.103.53      Ok     abr
 3.2.204.64      pubsbpx1    3.1.104.54      Ok     abr
 5.1.30.120      pubsbpx1    5.2.60.240      Ok     abr
 5.1.31.121      pubsbpx1    5.2.61.241      Ok     abr
 5.1.32.122      pubsbpx1    5.2.62.242      Ok     abr
 5.1.33.123      pubsbpx1    5.2.63.242      Ok     abr
 5.2.60.240      pubsbpx1    5.1.30.120      Ok     abr
 5.2.61.241      pubsbpx1    5.1.31.121      Ok     abr
 5.2.62.242      pubsbpx1    5.1.32.122      Ok     abr
 5.2.63.242      pubsbpx1    5.1.33.123      Ok     abr

This Command: addcon 3.1.104.54 pubsbpx1 3.2.204.64 abr 100/100 95/95 50/50 * e
d e d d 70/70 * 3 * 80/80 60/60 30/30 65/65 * 100 16 16 32 10 *

Add these connections (y/n)? y
An example of the cnfcon command for an ABR connection follows:
pubsbpx1       TN    YourID:1       BPX 15    9.1       Jan. 11 1998 01:10 GMT

Conn:  3.1.104.54       pubsbpx1    3.2.204.64        abr
Description:

   PCR(0+1)     % Util      MCR            CDVT(0+1)       AAL5 FBTC FST   VSVD
  100/100       95/95     50/50          250000/250000         y      n     y

FCES      SCR           MBS      Policing   VC Qdepth    CLP Hi  CLP Lo   EFCI
 n      70/70       1000/1000        3    16000/16000    80/80   60/60   30/30

     ICR           ADTF  Trm     RIF      RDF    Nrm     FRTT            TBE
   65/65           1000  100         16    16     32          10        1048320


This Command: cnfcon 3.1.104.54


PCR(0+1) [100/100]:
An example of the cnfabrparm command follows:
pubsbpx1       TN    YourID:1       BPX 15    9.1       Feb. 8 1998  00:21 GMT

ABR Configuration for BXM in slot 3

Egress CI Control  : N
ER Stamping        : N
Weighted Queueing  : N


Last Command: cnfabrparm 3


Next Command:
An example of the dsplns command follows:
pubsbpx1       TN    YourID       BPX 15    9.1       Feb. 8 1998  00:22 GMT

Line    Type   Current Line Alarm Status
 3.1    OC3    Clear - OK
 3.2    OC3    Clear - OK
 3.3    OC3    Clear - OK
 3.4    OC3    Clear - OK
 5.1    T3     Clear - OK
 5.2    T3     Clear - OK


Last Command: dsplns


Next Command:
During the configuration of BPX switch interfaces, you must make sure that the BPX switch IP address, SNMP parameters, and Network IP address are set consistent with your local area network (Ethernet LAN). Use the following BPX switch commands to set these parameters:
The use of these commands is covered in the Cisco WAN Switching Command Reference or the Cisco WAN Switching Super User Command Reference. Super User commands must be used only by authorized personnel, and must be used carefully.
MGX 8220 installation and configuration are covered in theCisco MGX 8220 Reference. During the configuration of BPX switch interfaces, you must make sure that the MGX 8220 IP address is set up consistent with your local area network (Ethernet LAN). Use the following MGX 8220 command to set the proper IP addresses:
cnfifip -ip <ip address> -if <interface type> -msk <subnet mask address> -bc <broadcast address>
The use of this command is covered in the Cisco MGX 8220 Command Reference.
Starting with switch software Release 8.4, resources on BPX switch UNI ports and NNI trunks can be divided between SVCs and PVCs. This is known as resource partitioning and is done through the Command Line Interface for the BPX switch and the MGX 8220.
These resources for BXM, ASI, and BNI cards can be partitioned appropriately between SVCs or PVCs.
Starting with switch software release 9.1, the BXM also supports tag switching. Partitions for the BXM can be allocated either between:
For information on Tag Switching, refer to Chapter 13, Configuration, Tag Switching.
Also, for switch software Release 9.1, the BXM card supports dynamic resource partitioning to support the conversion of PVCs to soft permanent virtual circuits (SPVCs). This feature is described in the Cisco WAN Service Node Extended Services Processor Installation and Operations for Release 2.2 document.
This section provides procedures for:
A BPX switch ATM Service Interface (ASI) card which will support ATM SVCs will have to be added and upped like a standard PVC port. Before adding connections, an ASI line is upped with the upln command and configured with the cnfport command and upped with the upport command. Complete details on using the BPX switch command line interface and applicable commands are described in the Cisco WAN Switching Command Reference manuals. These procedures will concentrate on those commands that are specific to SVC resource partitioning.
Before partitioning SVC resources, you must have determined which ASI will support ATM SVCs. The ASI will have to have its resources partitioned to support SVCs. The following resources must be partitioned for each ASI UNI port:
To partition the ASI UNI port, follow these steps:
Step 2 Using the upln and upport commands, up the line and port which are going to be connected to ATM CPE.
Step 3 Make sure the port is configured as UNI.
Step 4 Enter the cnfport <port num> command, as illustrated in the following example:
Example: ASI cnfport Command
spvc21         VT    SuperUser       BPX 15    9.1    Sep. 24 1997 07:49 GMT

Port:       2.1     [FAILED  ]
Interface:          MMF-2
Type:               UNI                        %Util Use:        Disabled
Speed:              353208 (cps)
Shift:              SHIFT ON HCF (Normal Operation)
SIG Queue Depth:    10

Protocol:           NONE
  SVC Channels:                       500
  SVC VPI Min:                        0
  SVC VPI Max:                        10
  SVC Bandwidth:                      300000 (cps)


This Command: cnfport 2.1


NNI Cell Header Format? [N]:

Virtual Terminal
Step 5 Configure the desired SVC Channels, SVC VPI Min, SVC VPI Max, and SVC Bandwidth as desired.
Step 6 Next configure the SVC Port Queue depth with the cnfportq <port num> command shown in the following example:
Example: ASI cnfportq Command
spvc21         VT    SuperUser       BPX 15    9.1    Sep. 24 1997 07:50 GMT

Port:       2.1     [FAILED ]
Interface:          MMF-2
Type:               UNI
Speed:              353208 (cps)

SVC Queue Pool Size:          400
CBR Queue Depth(64-cell blks):16
CBR Queue CLP High Threshold: 80%
CBR Queue CLP Low Threshold:  60%
CBR Queue EFCI Threshold:     80%
VBR Queue Depth(64-cell blks):50      UBR/ABR Queue Depth(64-cells blks):28
VBR Queue CLP High Threshold: 80%     UBR/ABR Queue CLP High Threshold:  80%
VBR Queue CLP Low Threshold:  60%     UBR/ABR Queue CLP Low Threshold:   60%
VBR Queue EFCI Threshold:     80%     UBR/ABR Queue EFCI Threshold:      80%


This Command: cnfportq 2.1


SVC Queue Pool Size [400]:

Virtual Terminal
Step 7 Configure the SVC Queue Pool Size with this menu. Other parameters are for PVCs.
Step 8 Repeat SVC resource partitioning for every ASI port that you want to support SVCs in the BPX Switch.
A BXM card used as a UNI port can be configured to support ATM SVCs. The BXM will have to be added and upped like a standard PVC port. The BXM port will have to upped as a line (upln) to function as a UNI port.
For additional information on using the BPX switch command line interface and applicable commands, refer to the Cisco WAN Switching Command Reference manual. These procedures will concentrate on those commands that are specific to SVC resource partitioning.
Before partitioning SVC resources, you must determine which BXM UNI ports will support ATM SVCs. The BXM must have its resources partitioned to support SVCs. The following resources must be partitioned:
To partition the BXM port, follow these steps:
Step 2 Using the upln and upport commands, up the line and port which is going to be connected to ATM CPE.
Step 3 Make sure the port is configured as UNI.
Step 4 Enter the cnfport <port num> command, shown in the following example:
Example: BXM cnfport Command
ins-bpx6       TN    SuperUser       BPX 15    9.1    Sep. 24 1997 07:37 GMT

Port:       13.1    [ACTIVE  ]
Interface:          LM-BXM
Type:               UNI                        %Util Use:        Disabled
Speed:              353208 (cps)
Shift:              SHIFT ON HCF (Normal Operation)
SIG Queue Depth:    640

Protocol:           NONE
  SVC Channels:                       1000
  SVC VPI Min:                        0
  SVC VPI Max:                        10
  SVC Bandwidth:                      300000 (cps)


This Command: cnfport 13.1


NNI Cell Header Format? [N]:
Step 5 Configure the SVC Channels, SVC VPI Min, SVC VPI Max, and SVC Bandwidth as desired.
Step 6 Next you need to configure the SVC Port Queue depth with the cnfportq <portnum> command shown in the following example.
ins-bpx6       TN    SuperUser       BPX 15    9.1    Sep. 24 1997 07:39 GMT

Port:       13.1    [ACTIVE  ]
Interface:          LM-BXM
Type:               UNI
Speed:              353208 (cps)

SVC Queue Pool Size:          5000
CBR Queue Depth:              600
CBR Queue CLP High Threshold: 80%
CBR Queue CLP Low Threshold:  60%
CBR Queue EFCI Threshold:     80%
VBR Queue Depth:              5000    UBR/ABR Queue Depth:               20000
VBR Queue CLP High Threshold: 80%     UBR/ABR Queue CLP High Threshold:  80%
VBR Queue CLP Low Threshold:  60%     UBR/ABR Queue CLP Low Threshold:   60%
VBR Queue EFCI Threshold:     80%     UBR/ABR Queue EFCI Threshold:      30%


This Command: cnfportq 13.1


SVC Queue Pool Size [5000]:
Step 7 Configure the SVC Queue Pool Size parameter to a value greater than 0 (zero); the default is 0 and needs to be changed for SVCs to operate.
Step 8 Partition the SVC resources for every BXM which is to support ATM SVCs in the BPX switch.
The BPX switch has two types of trunk cards which may have their resources partitioned to support SVCs.
When the BNI is used as a trunk in a BPX switch network, it will have to have its resources partitioned to support SVCs. The BNI is described in the Cisco BPX 8600 Series Reference. Complete details on using the BPX switch command line interface and applicable commands are described in the Cisco BPX 8600 Series Reference and WAN Switching Command Reference manuals. These procedures will concentrate on those commands that are specific to SVC resource partitioning.
The following BNI trunk resources must be partitioned for SVCs:
To partition the BNI trunk resources, follow these steps:
Step 2 Up the trunk with uptrk <trunk_num> command.
Step 3 Enter the cnftrk <trk num> command as shown in the following example:
Example: BNI cnftrk Command
swong135       VT    SuperUser       BPX 15    9.1    Sep. 24 1997 07:42 GMT

TRK  5.1 Config    T3    [96000 cps]       BNI-T3 slot:  5
Transmit Rate:         96000               Line framing:          PLCP
Subrate data rate:     --                       coding:           --
Line DS-0 map:         --                       CRC:              --
Statistical Reserve:   1000    cps              recv impedance:   --
Idle code:             7F hex                   cable type:
Max Channels/Port:     --                             length:     0-225 ft.
Connection Channels:   1771                Pass sync:             Yes
Traffic:   V,TS,NTS,FR,FST,CBR,VBR,ABR     Loop clock:            No
SVC Vpi Min:           --                  HCS Masking:           Yes
SVC Channels:          --                  Payload Scramble:      No
SVC Bandwidth:         --     cps          Frame Scramble:        --
Restrict CC traffic:   No                  Virtual Trunk Type:    --
Link type:             Terrestrial         Virtual Trunk VPI:     --
Routing Cost:          10                  Deroute delay time:    0 seconds

This Command: cnftrk 5.1


Stat Reserve (1000):

Virtual Terminal
Step 4 Configure the SVC Vpi Min, SVC Channels, and SVC Bandwidth as desired.
Step 5 Next configure the SVC Queue depth with cnftrkparms <trunk_num> command shown in the following example:
Example: BNI cnftrkparm Command
swong135       VT    SuperUser       BPX 15    9.1    Sep. 24 1997 07:44 GMT

TRK 5.1 Parameters
 1 Q Depth - Voice     [  242] (Dec)    15 Q Depth  - CBR      [  600] (Dec)
 2 Q Depth - Non-TS    [  360] (Dec)    16 Q Depth  - VBR      [ 1000] (Dec)
 3 Q Depth - TS        [ 1000] (Dec)    17 Q Depth  - ABR      [ 9070] (Dec)
 4 Q Depth - BData A   [ 1000] (Dec)    18 Low  CLP - CBR      [ 100] (%)
 5 Q Depth - BData B   [ 8000] (Dec)    19 High CLP - CBR      [ 100] (%)
 6 Q Depth - High Pri  [ 1000] (Dec)    20 Low  CLP - VBR      [ 100] (%)
 7 Max Age - Voice     [   20] (Dec)    21 High CLP - VBR      [ 100] (%)
 8 Red Alm - I/O (Dec) [  2500 /  15000]22 Low  CLP - ABR      [  60] (%)
 9 Yel Alm - I/O (Dec) [  2500 /  15000]23 High CLP - ABR      [  80] (%)
10 Low  CLP - BData A  [ 100] (%)       24 EFCN     - ABR      [  30] (%)
11 High CLP - BData A  [ 100] (%)       25 SVC Queue Pool Size [    0] (Dec)
12 Low  CLP - BData B  [  25] (%)
13 High CLP - BData B  [  75] (%)
14 EFCN     - BData B  [  30] (Dec)

This Command: cnftrkparm 5.1


Which parameter do you wish to change:

Virtual Terminal
Step 6 Configure the SVC Queue Pool Size as desired.
Step 7 Partition the SVC resources for all the other BNIs in your BPX switch. This includes the BNI that is used to connect an MGX 8220 shelf to a BPX switch when they are to be used for SVC connections.
When the BXM is used as a trunk in a BPX switch network, it needs to have its resources partitioned to support SVCs. The BXM card will have to upped as a trunk (uptrk).
For additional information on using the BPX switch command line interface and applicable commands refer to the Cisco WAN Switching Command Reference manual. In addition, the Cisco System Overview provides conceptual information about ATM connections and services. These procedures concentrate on those commands that are specific to SVC resource partitioning.
The following BXM trunk resources must be partitioned for SVCs:
To partition the BXM trunk resources for SVCs, follow these steps:
Step 2 Make sure the BXM has been upped as a trunk with uptrk <trunk_num> command.
Step 3 Enter the cnftrk <trk num> command, shown in the following example:
Example: BXM cnftrk Command
ins-bpx6       TN    SuperUser       BPX 15    9.1    Sep. 24 1997 07:45 GMT

TRK  3.1 Config    OC3   [304301cps]       BXM slot:     3
Transmit Rate:         353208              Line framing:          STS-3C
Subrate data rate:     --                       coding:           --
Line DS-0 map:         --                       CRC:              --
Statistical Reserve:   1000    cps              recv impedance:   --
Idle code:             7F hex                   cable type:       --
Max Channels/Port:     256                            length:     --
Connection Channels:   256                 Pass sync:             Yes
Traffic:   V,TS,NTS,FR,FST,CBR,VBR,ABR     Loop clock:            No
SVC Vpi Min:           0                   HCS Masking:           Yes
SVC Channels:          2000                Payload Scramble:      Yes
SVC Bandwidth:         300000 cps          Frame Scramble:        Yes
Restrict CC traffic:   No                  Virtual Trunk Type:    --
Link type:             Terrestrial         Virtual Trunk VPI:     --
Routing Cost:          10                  Deroute delay time:    0 seconds

This Command: cnftrk 3.1


Stat Reserve (1000):
Step 4 Configure the SVC Vpi Min, SVC Channels and SVC Bandwidth as desired.
Step 5 Next configure the SVC Queue depth with cnftrkparms <trunk_num> command shown in the following example:
Example: BXM cnftrkparm Command
ins-bpx6       TN    SuperUser       BPX 15    9.1    Sep. 24 1997 07:46 GMT

TRK 3.1 Parameters
 1 Q Depth - Voice     [  885] (Dec)    15 Q Depth  - CBR      [  600] (Dec)
 2 Q Depth - Non-TS    [ 1324] (Dec)    16 Q Depth  - VBR      [ 5000] (Dec)
 3 Q Depth - TS        [ 1000] (Dec)    17 Q Depth  - ABR      [20000] (Dec)
 4 Q Depth - BData A   [10000] (Dec)    18 Low  CLP - CBR      [ 100] (%)
 5 Q Depth - BData B   [10000] (Dec)    19 High CLP - CBR      [ 100] (%)
 6 Q Depth - High Pri  [ 1000] (Dec)    20 Low  CLP - VBR      [ 100] (%)
 7 Max Age - Voice     [   20] (Dec)    21 High CLP - VBR      [ 100] (%)
 8 Red Alm - I/O (Dec) [  2500 /  10000]22 Low  CLP - ABR      [  60] (%)
 9 Yel Alm - I/O (Dec) [  2500 /  10000]23 High CLP - ABR      [  80] (%)
10 Low  CLP - BData A  [ 100] (%)       24 EFCN     - ABR      [  30] (%)
11 High CLP - BData A  [ 100] (%)       25 SVC Queue Pool Size [ 5000] (Dec)
12 Low  CLP - BData B  [  25] (%)
13 High CLP - BData B  [  75] (%)
14 EFCN     - BData B  [  30] (Dec)

This Command: cnftrkparm 3.1
Step 6 Configure the SVC Queue Pool Size as desired.
Step 7 Partition the SVC resources for all the other BXMs in the BPX switch.
![]()
![]()
![]()
![]()
![]()
![]()
![]()
![]()
Posted: Mon Jan 15 19:56:28 PST 2001
All contents are Copyright © 1992--2001 Cisco Systems, Inc. All rights reserved.
Important Notices and Privacy Statement.