|
|

The addition of a VSI based controller such as the TSC (Tag Switching Controller) to the BPX is similar to the addition of an ESP or an MGX 8220 shelf to the BPX. Use the addshelf command to add the TSC to any BXM trunk. Use the delshelf command to delete the controller from the network after downing the port and trunk with the dnport and dntrk commands.
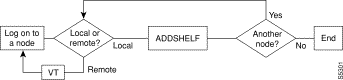
The first step to complete when adding a VSI based controller is the addshelf command. See Figure 17-1 for an illustration of the command sequence for setting up an interface shelf.
IPX/AF is the designation of an IPX node serving as an interface shelf. IGX/AF is the designation of an IGX node serving as an interface shelf. Display commands such as dspnw and dspnode display these designations. The dspnode command identifies the hub and feeder nodes and shows the alarm status. The designation for an MGX 8220 shelf serving as an interface shelf is AXIS. The designation for an Tag Switch Controller serving as an interface shelf is TSC.
To delete a feeder shelf, use delshelf. To view conditions on a feeder trunk, use dspnode. Note that addshelf and addtrk are mutually exclusive commands.
Up until now all the LCNs in a BXM card were managed exclusively by the BCC. With the introduction of VSI, BCC must allocate a range of LCNs for use by the BXM card. The next step to complete when adding a VSI based controller is creating and configuring resource partitions on BXM interfaces to allow the control of BXM interfaces by this controller, the user must create resource partitions on these interfaces. Use the cnfrsrc command (a new command added in Release 9.1) to add, delete and modify a partition on a specified interface. Release 9.1 supports only one partition per interface and one controller per partition.
To add a controller or configure a resource partition, use the following BCC configuration commands:
Table 17-1 shows the command name and starting page for the description of each Tag Switch Controller related command.
| Mnemonic | Description | Page |
|---|---|---|
addshelf | Add a trunk between the hub node and access shelf. | |
cnfqbin | Configure Qbin card | |
cnfrsrc | Configure TSC resources | |
delshelf | Delete a trunk between a hub node and access shelf | |
dnport | Down port | |
dntrk | Down trunk | |
dspnode | Display summary information about interface shelves | |
dspqbin | Display Qbin card | |
dsprsrc | Display TSC resources | |
upport | Up port | |
uptrk | Up trunk |
Adds a trunk between a hub node and an interface shelf in a tiered network. The hub can be either a BPX or an IGX.
The interface shelf can be one of the following:
The signaling protocol that applies to the trunk on an interface shelf is Annex G.
Because tiered network capability is a paid option, personnel in the Cisco Technical Assistance Center (TAC) must telnet to the unit and configure it as an interface shelf before you can execute addshelf.
Each IPX/AF, IGX/AF, or MGX 8220 shelf has one trunk that connects to the BPX or IGX node serving as an access hub. A BPX hub can support up to 16 T3 trunks to the interface shelves. An IGX hub can support up to 4 trunks to the interface shelves.
Before it can carry traffic, the trunk on an interface shelf must be "upped" (using uptrk) on both the interface shelf and the hub node and "added" to the network (using addshelf). Also, a trunk must be free of major alarms before you can add it with the addshelf command.
Add a feeder shelf.
addshelf <trunk> <shelf-type>
delshelf, dspnode, dsptrk
Privilege | 1-4 |
Jobs | Yes |
Log | Yes |
Node | BPX, IGX |
Lock | No |
addshelf 11.1 a
Add trunk 11.1 as an MGX 8220 interface shelf. After you add the shelf, the screen displays a confirmation message and the name of the shelf.
nmsbpx23       TN    SuperUser       BPX 15    9.1 Aug. 16 1997 13:28 PST

                        BPX Interface Shelf Information

Trunk    Name      Type      Alarm
 1.3     AXIS240   AXIS      OK
11.2     A242      AXIS      OK


This Command: addshelf 11.1


Enter Interface Shelf Type: I (IPX/AF), A (AXIS)
| Parameter | Description |
|---|---|
trunk | Specifies the slot and port number of the trunk. |
shelf type | On a BPX node, shelf type specifies the type of interface shelf when you execute addshelf. The choices are I for IPX/AF or IGX/AF, T for Tag Switching Controller, or A for MGX 8220. On an IGX hub, only the IGX/AF is possible, so shelf type does not appear. |
Use the cnfqbin command to create the Qbin configuration on the selected port or trunk. You can configure Qbins on both BXM trunks and ports.
Configure qbin
cnfqbin <slot number>.<port number>
dspqbin
Privilege | 1-6 |
Jobs | No |
Log | No |
Node | BPX |
Lock | No |
cnfqbin 13.1
Create a Qbin configuration on the OC3 trunk on port 1 of slot 13 on the BPX to support Tag Switching.
sw57           TN    SuperUser       BPX 15    9.1.1    Mar. 10 1997 10:41 GMT

Port/Trunk:       13.1    [ACTIVE ]
Qbin Id :
Enable Qbin (Y/N) :
Minimum Bandwidth :
Qbin Discard threshold:
Low CLP threshold: 	[80] %
High CLP threshold: 	[80] %
EFCI threshold:	[30]%


Last Command: cnfqbin 13.1
| Parameter | Description |
|---|---|
slot.port | Specifies the BXM card slot and port number. |
Qbin ID | Specifies the ID number of the Qbin available for use by the TSC (Tag Switch Controller) for VSI. The range is 0 to 255. 0 is the default. Always use 10 in 9.1. |
Enable Qbin | Answer yes or no to enable your Qbin configuration. |
Minimum Bandwidth | Specifies the minimum bandwidth in cps (characters per second) available for the Qbin. The range is 0 to 352207. 0 is the default. |
Qbin Discard Threshold | Specifies the threshold in percentage for Qbin discard. The range is 0 to 100. |
CLP Low Threshold | Specifies the threshold in percentage for CLP low. The range is 0 to 100. 80% is the default. |
CLP High Threshold | Specifies the threshold in percentage for CLP high. The range is 0 to 100. 80% is the default. |
EFCI threshold | Specifies the threshold in percentage for EFCI. The range is 0 to 100. 30% is the default. |
Use the cnfrsrc command to partition resources for AutoRoute PVCs and VSI-Tag Switching.
Configure resource
cnfrsrc <slot>.<port> <maxpvclcns> <maxpvcbw> <partition> <e/d> <minvsilcns> <maxvsilcns> <vsistartvpi> <vsiendvpi><vsiminbw> <vsimaxbw>
dsprsrc
Privilege | 1-6 |
Jobs | No |
Log | No |
Node | BPX |
Lock | No |
cnfrsrc 4.1 256 26000 1 e 512 16384 2 15 26000 100000
Configure the VSI partition for port 4.1.
n4             TN    SuperUser       BPX 15    9.1      Apr. 4 1998  16:40 PST
Port/Trunk : 4.1
Maximum PVC LCNS:             256     Maximum PVC Bandwidth:26000
Min Lcn(1) : 0 Min Lcn(2) : 0
Partition 1
Partition State :             Enabled
Minimum VSI LCNS:             512
Maximum VSI LCNS:             7048
Start VSI VPI:                2
End VSI VPI :                 15
Minimum VSI Bandwidth :       26000       Maximum VSI Bandwidth :        100000

Last Command: cnfrsrc 4.1 256 26000 1 e 512 7048 2 15 26000 100000

Next Command:
| Parameter | Description |
|---|---|
slot.port | Specifies the BXM card slot and port number. |
Maximum PVC LCNs | The maximum number of LCNs allocated for AutoRoute PVCs for this port. The range is 1 to 256. 256 is the default. For trunks, there are additional LCNs allocated for AutoRoute that are not configurable. You can use the dspcd <slot> command to display the maximum number of LCNs you can configure using the cnfrsrc command for the given port. For trunks, "configurable LCNs" represent the LCNs remaining after the BCC has subtracted the "networking LCNs" needed. A trunk has 270 networking LCNs, or channels. For a port card, a larger number is shown, as compared with a trunk card. This is because a trunk uses 270 networking LCNs, as compared with a port card, which uses no networking LCNs. Setting this field to "0" would disable AutoRoute PVCs on the specified port. Note that you must specify a value greater than 0 for the Maximum PVC LCNs, Maximum PVC Bandwidth, and Maximum VSI LCNs parameters. Otherwise, you will not be able to create any AutoRoute connections on a BXM card. Also, if these parameters do not have values greater than 0, you will be unable to change the connection channel amount when you configure the BXM trunk using cnftrk. |
Maximum PVC Bandwidth | Specifies the maximum bandwidth of the port allocated for AutoRoute use. The range is 0 to 352207. 0 is the default. You can configure the Maximum PVC Bandwidth value for ports, but not for trunks. Note that you must specify a value greater than 0 for the Maximum PVC LCNs, Maximum PVC Bandwidth, and Maximum VSI LCNs parameters. Otherwise, you will not be able to create any AutoRoute PVCs on the BXM card. |
Configure Partition | Answer yes or no to begin configuring resources for the partition. |
Partition ID | Specifies the ID number of the partition. 1 is the default. Always use 1 in Release 9.1. |
Enable Partition | Answer yes or no to enable your configured partition. |
Minimum VSI LCNs | The minimum number of LCNs guaranteed for this partition. The range is 1 to 256. 0 is the default.The VSI controller guarantees at least this many connection endpoints in the partition, provided there are sufficient free LCNs in the common pool to satisfy the request at the time the partition is added. When a new partition is added or the value is increased, it may be that existing connections have depleted the common pool so that there are not enough free LCNs to satisfy the request. The BXM gives priority to the request when LCNs are freed. The net effect is that the partition may not receive all the guaranteed LCNs (min LCNs) until other LCNs are returned to the common pool. You can increase this value dynamically when there are enough unallocated LCNs in the port group to satisfy the increase. You may not decrease the value dynamically. All partitions in the same port group must be deleted first and reconfigured in order to reduce this value. To avoid this deficit condition, which could occur with maximum LCN usage by a partition or partitions, it is recommended that all partitions be configured ahead of time before adding connections. Also, it is recommended that all partitions be configured before adding a VSI controller using the addshelf command. |
Maximum VSI LCNs | The total number of LCNs the partition is allowed for setting up connections. The min LCNs is included in this calculation. If max LCNs equals min LCNs, then the max LCNs are guaranteed for this partition. Otherwise, (max - min) LCNs are allocated from the common pool on a FIFO basis. If the common pool is exhausted, new connection setup requests will be rejected for the partition, even though the maximum LCNs has not been reached. You may increase this value dynamically when there are enough unallocated LCNs in the port group to satisfy the increase. You may not decrease the value dynamically. All partitions in the same port group must be deleted first and reconfigured in order to reduce this value. Different types of BXM cards support different maximum values. If you enter a value greater than the allowed maximum, a message is displayed with the allowable maximum value. Note that you must specify a value greater than 0 for the Maximum VSI LCNs, Maximum PVC Channels, and Maximum PVC Bandwidth parameters. Otherwise, you will not be able to add any connections on a BXM card. |
Start VSI VPI | By default the TSC (for example, the 7200 or 7500 series router) will use either a starting VSI VPI of 1 or 2 for tag switching, whichever is available. If both are available, a starting VSI VPI of 1 is used. The VPI range should be 2-15 on a BPX 8620 VSI. The VSI range for tag switching on the BPX 8620 is configured as a VSI partition, usually VSI partition number 1. VSI VPI 1 is reserved for AutoRoute PVCs. (This restriction applies only to trunks, not to ports. For a port, you can use any VPI value.) For a port UNI, the VPI range is 1 to 255. For a port NNI, the range is 1 to 4095. For trunks that do not have AutoRoute configured, the VPI ranges are the same as for ports. The VSI partition for tag switching should start at VPI 2. If VPI 2 is not to be used, you can use the tag switching VPI interface configuration on the TSC to override the defaults. For trunks with AutoRoute configured, the range is 2 to 4095. Always set to 2 for trunks. |
End VSI VPI | Two VPIs are sufficient for Release 9.1, although it may be advisable to reserve a larger range of VPIs for later expansion, for example, VPIs 2-15. The range is the <Start VSI VPI > value to 4095. |
Minimum VSI Bandwidth | The minimum port bandwidth that can be used by this partition in cells/second. The range is 0 to <Maximum Line Rate>. For example, the OC3 line rate is 352207. 0 is the default. |
Maximum VSI Bandwidth | The maximum port bandwidth that can be used by this partition. This value is used for VSI Qbin bandwidth scaling. The range is 0 to <Maximum Line Rate>. For example, the OC3 line rate is 352207. 0 is the default. |
Deletes an interface shelf from a tiered network. The identifier for an interface shelf is either the trunk number or the name of the shelf. Normally, you execute delshelf only at the hub node, but on the IPX/AF or IGX/AF itself, delshelf has the single function of letting you turn off LMI if the trunk is not allowing communication. In contrast to the deltrk command, you can execute delshelf at any time if no connections terminate at the trunk.
Delete an interface shelf.
delshelf <trunk> | <shelf-name>
addshelf, dspnode
Privilege | 1 |
Jobs | Yes |
Log | Yes |
Node | IPX, IGX, BPX |
Lock | Yes |
delshelf 4.1
Delete shelf trunk 4.1 on an IPX/AF.
nmsbpx23       TN    SuperUser       BPX 15    9.1 Aug. 16 1997 13:26 PST

                        BPX Interface Shelf Information

Trunk    Name      Type      Alarm
 1.3     AXIS240   AXIS      OK
11.2     A242      AXIS      OK


Last Command: delshelf A241

Shelf has been deleted
Next Command:
| Parameter | Description | |
|---|---|---|
trunk or shelf name | Specifies the slot and port number of the trunk or the name of the interface shelf. |
|
Deactivates (or "downs") the specified ATM port. Before downing a port, you must remove all connections from the port.
Down port
dnport <port>
cnfport, dspport, upport
Privilege | 1-2 |
Jobs | Yes |
Log | Yes |
Node | BPX |
Lock | Yes |
dnport 4.2
Down port 4.2.
ca19           VT    SuperUser       BPX 15    9.1    Aug. 23 1997 19:49 GMT

ASI Port States
Port  State
4.1   ACTIVE
4.2   INACTIVE


Last Command: dspports


Next Command: dnport 4.2
| Parameter | Description |
|---|---|
port | Specifies the slot number and port number in the format slot.port. |
Downs a trunk, after which it no longer carries framing or statistics. Before you can down a trunk with dntrk, you must remove it must from the network with deltrk (or delshelf in a tiered network).
Down trunk
dntrk <slot.port>[.vtrk]
addtrk, deltrk, uptrk, dsptrks
Privilege | 1-2 |
Jobs | Yes |
Log | Yes |
Node | IPX, IGX, BPX |
Lock | Yes |
dntrk 9
Deactivate trunk 9.
beta           TRM   YourID:1        IPX 32    9.1    Aug. 3 1997 10:53 MST

From Type      Current Line Alarm Status               Other End
13   T1/24     Clear - Line OK                         alpha.14
15   T1/24     Clear - Line OK                         gamma.15
20   T3/3      Major - AIT Missing                     -


Last Command: dntrk 9


Next Command:
| Parameter | Description |
|---|---|
slot.port | Specifies the physical trunk. |
| Parameter | Description |
|---|---|
vtrk | Specifies a virtual trunk number (applies to BNI only). T3/E3 range is 1-32. OC3 range is 1-11. |
Displays a summary of the interface shelves.
The dspnode command can isolate the shelf where an alarm has originated. For example, when you execute dspalms, the display indicates the number of shelves with alarms but does not identify the shelves. Therefore, execute dspnode on the hub node to determine which interface shelf generated the alarm.
The first example shows a screen display with dspnode executed on a BPX node. The second example shows a screen with dspnode executed on an IGX/AF. When executed on an IPX/AF or IGX/AF, dspnode shows the name of the hub node and the trunk number. Note that, to execute a command from an IPX/AF or IGX/AF itself, you must either telnet to the shelf or use a control terminal attached to the shelf.
Display node
dspnode
addshelf, delshelf, dsptrk
Privilege | 1-6 |
Jobs | No |
Log | No |
Node | BPX, IGX, IPX/AF, IGX/AF |
Lock | Yes |
dspnode
Display information about the interface shelves (executed on the BPX hub node).
sw53           TN    SuperUser       BPX 15    9.1 July 21 1997 15:09 GMT

                        BPX Interface Shelf Information

Trunk    Name      Type      Alarm
 1.1     sw89      IPX/AF    OK
 1.2     SW93AXIS  AXIS      UNRCH
 1.3     SW77AXIS  AXIS      MAJ
 3.1     sw92      IPX/AF    OK
 3.2     sw91      IPX/AF    OK
 3.3     sw90      IPX/AF    OK
 4.1     sw24      IPX/AF    MIN
 4.3     sw25      IPX/AF    MIN


Last Command: dspnode


Next Command:
dspnode
Display information about the trunk to the hub node (executed on an IGX/AF).
sw141          TN    SuperUser       IGX 16    9.1 Aug. 20 1997 07:23 PDT

                        Switching Shelf Information

Trunk    Name      Type      Alarm
   3     sw45      BPX       OK


Last Command: dspnode


Next Command:
The dspqbin command displays the qbin resources on the selected port.
Display qbin
dspqbin <slot number>.<port number> [qbin-id]
cnfqbin
Privilege | 1-6 |
Jobs | No |
Log | No |
Node | BPX |
Lock | No |
dspqbin 13.1
Display the current Qbin configuration on the OC3 trunk on port 1 of slot 13 on the BPX to support Tag Switching.
sw57           TN    SuperUser       BPX 15    9.1.1    Mar. 10 1997 10:41 GMT

Port/Trunk:       13.1    [ACTIVE  ]
Qbin Id :
Enable Qbin (Y/N) :
Minimum Bandwidth :
Qbin Discard threshold:
Low CLP threshold: 	[80] %
High CLP threshold: 	[80] %
EFCI threshold:	[30]%


Last Command: dspqbin 13.1
| Parameter | Description |
|---|---|
slot.port | Specifies the BXM card slot and port number. |
Qbin ID | Specifies the ID number of the Qbin available for use by the TSC (Tag Switch Controller) for VSI. The range is 0 to 255. 0 is the default. Always use 10 in 9.1. |
The dsprsrc command displays the partition of all the resources on this port.
Display resource
dsprsrc <slot number>.<port number> [part-id]
cnfrsrc
Privilege | 1-6 |
Jobs | No |
Log | No |
Node | BPX |
Lock | No |
dsprsrc 13.1
Display partition resources on the OC3 trunk on port 1 of slot 13 on the BPX to support Tag Switching.
sw57           TN    SuperUser       BPX 15    9.1.1    Mar. 10 1997 10:41 GMT

Port/Trunk:       13.1    [ACTIVE  ]
Interface:          OC3-2
Available Channels: 16000


  Maximum PVC Channels         :   256 (default)
  Maximum PVC Bandwidth        :   352207 cps

  Partition ID                             : 0
  VSI Signalling VCI                 : 32 (default)
  Minimum VSI LCNs                : 0
  Maximum VSI LCNs                : 0
  Start VSI VPI                          : 0
  End VSI VPI                            : 0
  Minimum VSI Bandwidth         : 0 cps
  Maximum VSI Bandwidth        : 0 cps


Last Command: dsprsrc 13.1
| Parameter | Description |
|---|---|
slot.port | Specifies the BXM card slot and port number. |
Partition ID | Specifies the ID number of the partition available for use by the TSC (Tag Switch Controller) for VSI. The range is 0 to 255. 0 is the default. Always use 0 in 9.1. |
Activates a single port on an ASI. If the port has not been configured, the default configuration values are used to configure the port.
Up port
upport <slot.port>
dnport, cnfport, upln
Privilege | 1-2 |
Jobs | Yes |
Log | Yes |
Node | BPX |
Lock | Yes |
upport 4.2
Activate port 2 on the ASI in slot 4.
ca19           VT    SuperUser       BPX 15    9.1    Aug. 23 1997 19:17 GMT

Port:       4.2     [ACTIVE  ]
Interface:          T3-2
Type:               UNI
Speed:              96000 (cps)

CBR Queue Depth:              200
CBR Queue CLP High Threshold: 80%
CBR Queue CLP Low Threshold:  60%
CBR Queue EFCI Threshold:     80%
VBR Queue Depth:              1000    ABR Queue Depth:               9800
VBR Queue CLP High Threshold: 80%     ABR Queue CLP High Threshold:  80%
VBR Queue CLP Low Threshold:  60%     ABR Queue CLP Low Threshold:   60%
VBR Queue EFCI Threshold:     80%     ABR Queue EFCI Threshold:      80%


Last Command: upport 4.2


Next Command:
| Parameter | Description |
|---|---|
slot.port | Specifies the slot number of the ASI card and the port to activate. |
Activates (or "ups") a trunk and, if you include the optional vtrk parameter for applicable cards, activates the trunk as a virtual trunk.
After you have upped the trunk but not yet added it, the trunk carries line signalling but does not yet carry live traffic. Before you add the trunk with addtrk, the node can monitor the trunk for reliability. Once a trunk has shown reliability and is ready to go into service, add the trunk to the network. If you need to take an active trunk out of service, use dntrk. The dntrk command causes the node to reroute any existing traffic if sufficient bandwidth is available.
You cannot mix physical and virtual trunk specifications. For example, after you up a trunk as a standard trunk, you cannot add it as a virtual trunk when you execute addtrunk. Furthermore, if you want to change trunk types between standard and virtual, you must first down the trunk with dntrk then up it as the new trunk type.
You cannot up a trunk if the required card is not available. Furthermore, if a trunk is executing self-test, a "card in test" message may appear on-screen. If this message appears, re-enter uptrk.
Up trunk
uptrk <slot.port>[.vtrk]
addtrk, dntrk
Privilege | 1-2 |
Jobs | Yes |
Log | Yes |
Node | IPX, IGX, BPX |
Lock | Yes |
uptrk 21
Activate (up) trunk 21—a single-port card, in this case, so only the slot is necessary.
uptrk 6.1.1
Activate (up) trunk 6.1.1—in this case, a virtual trunk, as indicated by the third digit.
| Parameter | Description |
|---|---|
slot.port | Specifies the slot and port of the trunk to activate. If the card has only one port, the port parameter is not necessary. An NTM, for example, has one port. |
| Parameter | Description |
|---|---|
vtrk | Specifies the virtual trunk number. The maximum on a node is 32. The maximum on a T3 or E3 line is 32. The maximum for user traffic on an OC3/STM1 trunk is 11 (so more than one OC3/STM1 may be necessary). |
![]()
![]()
![]()
![]()
![]()
![]()
![]()
![]()
Posted: Thu Aug 22 09:39:16 PDT 2002
All contents are Copyright © 1992--2002 Cisco Systems, Inc. All rights reserved.
Important Notices and Privacy Statement.