|
|

This release note covers new features for version 12.2 of the Access Products Supervisor (APS). The features covered are:
The following are recommendations for the installation of APS on your system.
When installing a new version of APS on your management system, we recommend using the -u option ( aps_install -u). This option removes all network objects, but saves a copy of the aps.conf file. This protects your working configuration (a copy is saved), and all HPOpenView objects remain intact. In large networks this is especially useful, allowing you to install a new version without having to add your nodes to your network maps again.
 | Caution Cisco does not recommend using the aps_uninstall utility before installing a new version of APS. Using the aps_uninstall command will delete your configuration and all network objects, requiring you to add all of your nodes back into your network maps. |
A new feature has been added to APS that saves the version of the APS software that is installed on your system. This file is named VERSION. VERSION is located in the root directory of your system. VERSION is an ASCII format file and can be read by any ASCII capable system.
The Node Event Browser displays events for a specific node in your network. The Node Event Browser displays all categories of events for the selected node only. Events are filtered based on the X.25 address of the selected node. The Node Event Browser is a display-only view of events. The standard HPOpenView event browser is still available to the user for viewing and working with all events.
The Node Event Browser operates in a similar manner to the HPOpenView event browser, but does not save or retrieve event logs, configuration actions, or SNMP configuration actions.
To start the APS Node Event Browser, double click on a node in the Repository Submap window. The Node Event Browser will display events specific to the node on which you double clicked.
The APS Node Event Browser contains the standard Motif menu bar at the top, with a line of static fields listing the selected node's X.25 address, node name, and model. Below the menu line is a display with a scrolling list of events, one event on each line. (See Figure 1.)
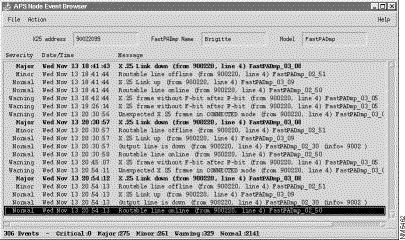
Event information in the Node Event Browser is arranged as follows:
At the bottom of the node event window is a summary of the event log containing total number of events, and a breakdown of events by severity level.
The event browser loads all past events and then begins a continuous update of new events. The events are stored in a buffer, and can be viewed going backward, using the scroll button on the right side. The display can be scrolled horizontally using the scroll button on the bottom of the window.
The size of the buffer can be set by changing the value in the Xdefaults file in the root directory of the workstation. The default size is set to 500 events.
FastPAD statistics provides a graphical user interface that supplements the standard command line interface. The statistics function is still available in the command line interface, now renamed to Statistics (Old CL). The user is provided with access to PAD statistics with no experience in the FastPAD command line interface required.
There are several types of statistics supported by the APS statistics function. Each type is a collection of statistics that covers a functional area. Statistics are displayed at regular intervals (selected by the user), and can be saved to a file for review at a later time. See the chapter "Management Operations," in the Access Products Supervisor Installation and Operations publication for an explanation of the functional areas.
To start the APS statistics function, choose a node from the Repository Submap window, select StrataCom from the menu line, then select APS. From the APS menu item, select Services and then Statistics. The APS Statistics window will then display. (See Figure 2.) If a password is required on the fastPAD system, it will be requested on startup of the APS statistics function.
The APS statistics window contains the standard Motif options with a menu line at the top, with toggle buttons for making selections below the menu line. At the bottom of the window is an area for output to be displayed. APS statistics will startup with General Activity and Module/Inter-Module Link Activity selected with an interval of 1, as a default. (See Figure 2.)

To save your file output you must write a UNIX script that redirects the output of the statistics screen to an ASCII file. The output from the statistics can then be saved to the file system by selecting File from the menu line, and then selecting Save. You may enter a filename (or accept the default) before saving the file.
Statistics types are selected by clicking on the desired toggle button on the statistics window. The statistics are listed at the left of the window. The Types are labeled General Activity, Module/Inter-Module Link Activity, Line Status, and Frame Relay Statistics. The user may select any combination of types followed by the Start toggle button to execute the command.
If no selection is made, the Start button will be inactive.
The Interval setting box is located at the top right of the statistics window. The user must set the interval for updates in decaseconds (tens of seconds), by typing a numerical value in this box. After selection of a time interval, there will be a delay equal to the interval before any statistics will be displayed.
If no value is typed into the interval box, the Start button will be inactive.
After a legal Type is selected, and a legal interval is set in the interval box, the Start button will be activated. To start statistics polling, click on the Start button. After the delay, output from the statistics will be displayed in the output display.
The output display area in the bottom section of the FastPAD statistics window is used to display the data from the statistics polling. The display is in ASCII text and is formatted according to RFC822 with the exception of additional whitespace on the left side for clarity.
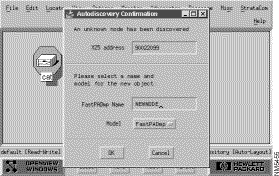
Node autodiscovery detects previously unknown nodes within the network, and then displays them in the FastPADmp Repository Submap and adds them to the HP OpenView database.
When a node is added to your network the autodiscovery function of APS detects the new node and assigns a default name and model. The default name is based on the new node's X.25 address (a serialized number is added to the address if necessary to make the name unique). The default model is always FastPADmp. If notification is enabled (see "Autodiscovery Notification"), the user is offered an opportunity to edit the name and model. If notification is disabled, the defaults are used and autodiscovery adds an object representing the new node to the Repository Submap.
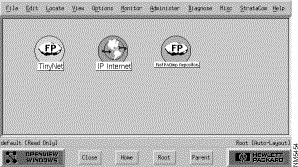
If a repository submap does not exist already, it will be added automatically to the root submap. Figure 3 displays the APS Repository Submap window.
When a node is discovered, a notification window appears if notification has been enabled (see Enabling or Disabling Notification). You can enter a FastPADmp name for the new node, and then enter a model for the new node, or accept the default values. (See Figure 4 and Figure 5.)
After the notification dialog has been displayed, and the name and model entered, the node object is added to the submap. (See Figure 5.)

Autodiscovery notification is enabled as a default, but can be disabled via a checkbox on the APS Map Configuration dialog. The user can gain access to this dialog by clicking on the File menu item, and then selecting Describe/Modify Map. Select APS from the Configurable Applications list, and then press the Configure For This Map... button. Notification can be disabled by selecting False, or enabled by selecting True, under the text Display notification window for each auto discovered node (See Figure 6.)

Disabling notification will mean the user cannot enter the name, or model for a new node. The node will be added using the default settings. (See "Setting Autodiscovery Parameters.")
When a new node is discovered, the application will display its parameters in the confirmation window. Since the only information that is possible to automatically detect is the X.25 address, the address will appear in the configuration window. The user then must enter the node's FastPADmp name (which must be unique within the database) and the new node's model. If these items are not entered by the user, a FastPADmp name will be added based on the X.25 address.
If the user does enter a FastPADmp name for the new node, and if the name is unique within the database, the name is used as it was entered. If the name is not unique, a hyphen and a number is added to the name.
The node must also have a model. If the model is not entered, the default value of FastPADmp is used. If this is not an accurate model for the new node, it may cause inaccuracies in the number of ports and in other areas of the database. It is therefore necessary for the user to enter manually the model according to the standard OpenView Object Description Dialog.
When autodiscovered, nodes are added to the map as independent symbols, without any network topology information. There are no automatically created connections between autodiscovered nodes. The user must create network connections manually to display network connections.
In order to detect an undiscovered node, APS must receive any X.25 alarm from that node. Normally, a node will issue several alarms immediately upon start-up, and will be detected quickly. However, if a node is already running before APS is launched, it may be in an inactive state.
A node that is already running may not be detected immediately. There is no way to probe the network for unknown nodes. The only workaround is for the user to cause an event at the node, such as disconnecting and reconnecting a cable. This should cause the node to be detected immediately.
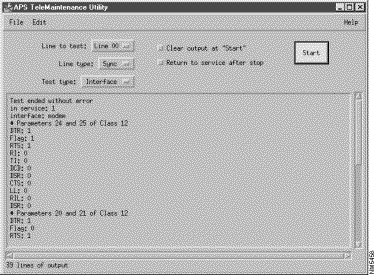
The diagnostics program, Telemaint, provides a graphical user interface that supplements the standard command line interface. The user is provided with access to PAD diagnostics with no experience required in the command line interface required. The diagnostics function is still available in the command line interface, now renamed to "Diagnostics (Old CL)."
To start the diagnostics function, choose a node from the Repository Submap window, select StrataCom from the menu line, then select APS. From the APS menu item, select Services and then Diagnostics. The diagnostics window will then display. If a password is required on the FastPAD system, it will be requested on startup of the diagnostics function.
The diagnostics window contains the standard Motif options with a menu line at the top, with pull-down menus for making selections below the menu line. At the bottom of the window is an area for output to be displayed. diagnostics will default to all lines, and interface for the test field. (See Figure 7.)
To save your file output you must write a UNIX script that redirects the output of the Diagnostics window to an ASCII file. Output from the Diagnostics window can then be saved to the file system by selecting File from the menu line, and then selecting Save. You may enter a filename (or accept the default) before saving the file.
The lines to be tested are selected using the pull-down menu labeled Line. The pull-down menus offers choices of 0 to 35 and all. Not all lines are available for all tests, and will be grayed out if not available for the test being run. Depending on the model of equipment not all 36 lines may be available, and the all applies only to interface tests.
The Test field is located under the legend Test in the diagnostics window. The user must choose from the following tests:
The system defaults to the interface test. All test run until completion, except the loopback test. When the loopback test is run, the Go button is replaced with a Stop button, and the loopback test runs until the stop button is selected.
After a the line field has been set, and the type of test is selected, the Go button will be activated. To start the test, click on the Go button. The test will run to completion, or until it is stopped (in the case of a loopback test), and output from the test will be displayed in the output display.
The output display area in the bottom section of the FastPAD statistics window, is used to display the data from the statistics polling. The display is in ASCII text and is formatted according to RFC822 with the exception of additional whitespace on the left side for clarity.
diagnostics appends the new test results to the previous test output. To save the output refer to the section "Saving File Output," earlier in this release note.
The File Transfer function lets you perform the following tasks:
Figure 8 is an example of the File Transfer window.
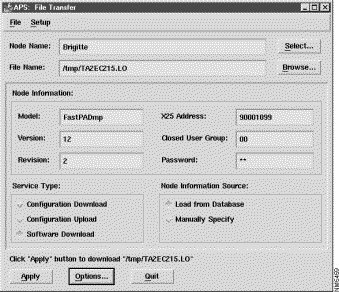
The Configuration Download function transfers a binary configuration file from the APS workstation to the selected FastPADmp/mpr node. The Configuration file name and Configuration download date fields are updated in the database if the operation execution is successful. A reset node command must be issued from the File Transfer Function dialog before this new download takes effect.
The Configuration Upload function copies the configuration of the selected FastPADmp/mpr node to a file specified on the network management workstation. You must have write access to this directory to perform this function.
The Software Download function downloads FastPADmp/mpr operational software from the APS workstation to the flash PROM of the node. Software file name and Software download date fields are displayed in the Attributes for Object dialog and are updated in the database if the operation is successful. There are two modes for software download: online and offline.
Online software download allows the FastPAD to remain operational while it receives the software image. Online software download automatically compresses the file before downloading. The image is downloaded to a reserved area of the node's memory, and then when a reset node command is issued from the File Transfer Function dialog, the image is uncompressed, and loaded into the node's Flash PROM.
Offline software download automatically halts the node, and puts the node into boot mode. Once the node is in boot mode, the previous software image is deleted, and the new image is downloaded from the management workstation. The node is then issued a reset node command from the File Transfer Function dialog, and the new image is loaded into Flash PROM.
It takes about 40 minutes (9600 bit/s, 8 bits, no parity) to transfer operational software (about 1.05 megabytes).
1. Either enter the Node name or click on Select to receive a list of nodes. A highlighted node's name appears in the dialog. The list of nodes consists of only those that have been entered into the database.
2. Select a service to be performed by clicking the desired radio button.
3. Either enter the file name to be used or click the Browse button to receive a list of available files.
4. Click Apply.
When a file transfer is being performed, a progress indicator dialog appears in the screen to indicate the number of bytes transferred and the percentage of work done so far. (See Figure 9.)
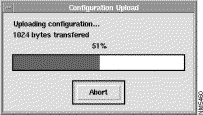
You can abort the operation by clicking the "Abort" button in the progress indicator dialog.
This function resets the node, loading its fixed operational configuration and operational software into the memory. When this is being executed, all communications in progress are interrupted. This function waits until the equipment is responding before returning.
This function erases the operational software from the Flash PROM memory and shifts to boot software. All communications in progress are interrupted. Furthermore, the equipment will not be in service again until new operational software is downloaded and the equipment is reset.
The Equipment Halt function waits until the boot software is loaded into memory before returning. After the operation is completed successfully, the FastPADmp/mpr node is ready to communicate with the APS workstation to perform software downloading.
Equipment halt and reset operations are separated from the downloading/uploading services in the File transfer dialog. These two actions are available under the Options menu selection under File Transfer.
Click on Options in the File Transfer dialog and you receive a the Options dialog. (See Figure 10.)
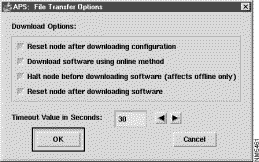
You can select the following options on the File Transfer Options window:
To run aps_ft in batch mode, user supplies the command line option "-b". All parameters other than the options data that are displayed in the non-batch mode graphical user interface window can be specified through other command line options. Once the service is done, aps_ft exits with the status code.
The following program usage message is printed to the standard output with "-h" option.
Usage: aps_ft	[ -bhmp ] [ -c <cug> ] [ -d <level> ] [ -f <name> ]
	[ -r <rev> ] [ -s <type> ] [ -t <model> ]
	[ -v <ver> ] [ -w <passwd> ] [ -x <addr> ]
	[ <node_name> ]
where:
	-b	run in batch mode;
	-c <cug>	specify the closed user group;
	-d <level>	specify the debug level, ranging from 0 to 7, the default is 0;
	-f <name>	specify the configuration or program file name,
		the default is NULL;
	-h	print program usage message on the standard output;
	-m	indicate the node information will be specified manually,
		by default, node information is loaded from the database;
	-p	indicate the downloading service applies to software program,
		meaningful only when the service type is download; if this
		option not specified, download applies to configuration file;
	-r <rev>	specify the revision number;
	-s <type>	specify the service type string, which is one of the following:
			download | upload | reset | halt
		prefix string is acceptable, e.g. "-s d" is equivalent to
		"-s download", the default is download;
	-t <model>	specify the node model type;
	-v <ver>	specify the version number;
	-w <passwd>	specify the password;
	-x <addr>	specify the X25 address;
	<node_name>	is optional, has to be the last argument after all options.
File transfer options are not supported in the command line and batch mode does not support the download options. You must therefore reset or halt the equipment separately in batch mode, as shown in the following example.
This is a sample shell script to halt a node first, then download software and reset the node at the end.
	#!/bin/sh
	#
	# Usage: SoftwareDownload <file_name> <node_name>
	#
	# Using APS file transfer program aps_ft in batch mode to download the
	# given software file to the given FastPADmp/mpr node. It will halt the node
	# first, then download the software, and reset the node at the end
	#

	if [ $# -ne 2 ]
	then
		echo "Usage: $0 <file_name> <node_name>"
		exit 1
	fi

	aps_ft -b -s halt $2
	aps_ft -b -p -s download -f $1 $2
	aps_ft -b -s reset $2
Cisco Connection Online (CCO) is Cisco Systems' primary, real-time support channel. Maintenance customers and partners can self-register on CCO to obtain additional information and services.
Available 24 hours a day, 7 days a week, CCO provides a wealth of standard and value-added services to Cisco's customers and business partners. CCO services include product information, product documentation, software updates, release notes, technical tips, the Bug Navigator, configuration notes, brochures, descriptions of service offerings, and download access to public and authorized files.
CCO serves a wide variety of users through two interfaces that are updated and enhanced simultaneously: a character-based version and a multimedia version that resides on the World Wide Web (WWW). The character-based CCO supports Zmodem, Kermit, Xmodem, FTP, and Internet e-mail, and it is excellent for quick access to information over lower bandwidths. The WWW version of CCO provides richly formatted documents with photographs, figures, graphics, and video, as well as hyperlinks to related information.
You can access CCO in the following ways:
For a copy of CCO's Frequently Asked Questions (FAQ), contact cco-help@cisco.com. For additional information, contact cco-team@cisco.com.

![]()
![]()
![]()
![]()
![]()
![]()
![]()
![]()
Posted: Wed Jan 24 11:44:18 PST 2001
All contents are Copyright © 1992--2001 Cisco Systems, Inc. All rights reserved.
Important Notices and Privacy Statement.