|
|

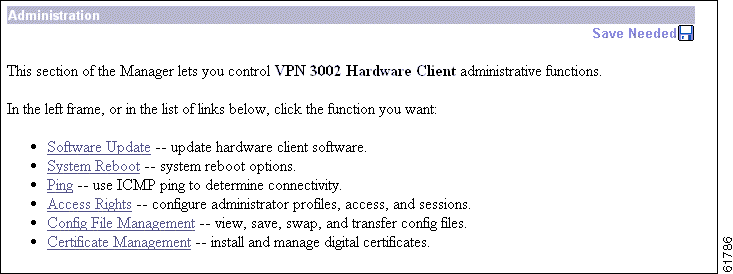
This section of the Manager lets you control administrative functions on the VPN 3002.
This section of the Manager lets you update the VPN 3002 executable system software. This process uploads the file to the VPN 3002, which then verifies the integrity of the file.
The new image file must be accessible by the workstation you are using to manage the VPN 3002. Software image files ship on the Cisco VPN 3002 CD-ROM. Updated or patched versions are available from the Cisco Website, www.cisco.com, under Service & Support > Software Center.
It takes a few minutes to upload and verify the software, and the system displays the progress. Please wait for the operation to finish.
To run the new software image, you must reboot the VPN 3002. The system prompts you to reboot when the update is finished.
We also recommend that you clear your browser cache after you update the software image: delete all the temporary internet files, history files, and location bar references.
 |
Note The VPN 3002 has two locations for storing image files: the active location, which stores the image currently running on the system; and the backup location. Updating the image overwrites the stored image file in the backup location and makes it the active location for the next reboot. Updating twice, therefore, overwrites the image file in the active location; and the current image file is lost. The Manager displays a warning on this screen if you have already updated the image without rebooting. |
 |
Caution You can update the software image while the system is still operating as a VPN device. Rebooting the system, however, terminates all active sessions. |
 |
Caution While the system is updating the image, do not perform any other operations that affect Flash memory (listing, viewing, copying, deleting, or writing files.) Doing so might corrupt memory. |
Updating the software image also makes available any new Cisco-supplied configurable selections. When you reboot with the new image, the system updates the active configuration in memory with these new selections, but it does not write them to the CONFIG file until you click the Save Needed icon in the Manager window.
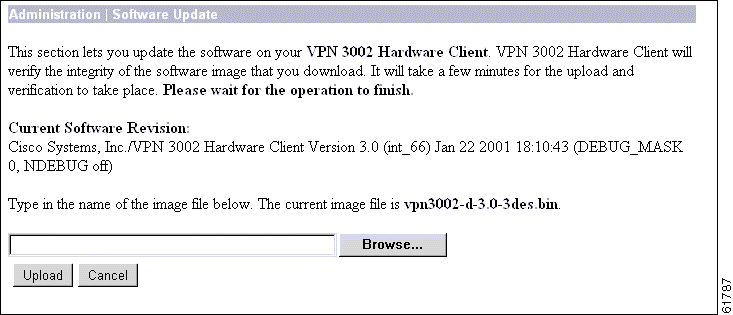
The name, version number, and date of the software image currently running on the system.
Enter the complete pathname of the new image file, or click Browse... to find and select the file from your workstation or network. Cisco-supplied VPN 3002 software image files are named:
vpn3002 <Major Version> .<Minor Version>.<Patch Version>.bin; for example, vpn3002-3.5.Rel-k9.bin.
The Major and Minor Version numbers are always present; the Sustaining and Patch Version numbers are present only if needed.
Be sure you select the correct file for your VPN 3002; otherwise the update will fail.
To upload the new image file to the VPN3002, click Upload.
To cancel your entries on this screen, or to stop a file upload that is in progress, click Cancel. The Manager returns to the main Administration screen. If you then return to the Administration | Software Update screen, you might see a message that a file upload is in progress. Click the highlighted link to stop it and clear the message.
This window shows the progress of the software upload. It refreshes the number of bytes transferred at 10-second intervals.
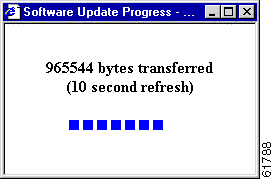
When the upload is finished, or if the upload is cancelled, the progress window closes.
The Manager displays this screen when it completes the software upload and verifies the integrity of the software. To go to the Administration | System Reboot screen, click the highlighted link.
We strongly recommend that you clear your browser cache after you update the software image: delete all the temporary internet files, history files, and location bar references.

This screen appears if there was an error in uploading or verifying the image file. You might have selected the wrong file. Click the highlighted link to return to the Administration | Software Update screen and try the update again, or contact Cisco support.

This screen lets you reboot or shutdown (halt) the VPN 3002 with various options.
We strongly recommend that you shut down the VPN 3002 before you turn power off. If you just turn power off without shutting down, you might corrupt Flash memory and affect subsequent operation of the system.
If you are logged in the Manager when the system reboots or halts, it automatically logs you out and displays the main login screen. The browser might appear to hang during a reboot; that is, you cannot log in and you must wait for the reboot to finish. You can log back in while the VPN 3002 is in a shutdown state, before you turn power off.
If a delayed reboot or shutdown is pending, the Manager also displays a message that describes when the action is scheduled to occur.
 |
Note Reboot or shutdown that does not wait for sessions to terminate, terminates all active sessions without warning and prevents new user sessions. |
The VPN 3002 automatically saves the current event log file as SAVELOG.TXT when it reboots, and it overwrites any existing file with that name. See Configuration | System | Events | General, Administration | Config File Management, and Monitoring | Filterable Event Log for more information on the event log file.
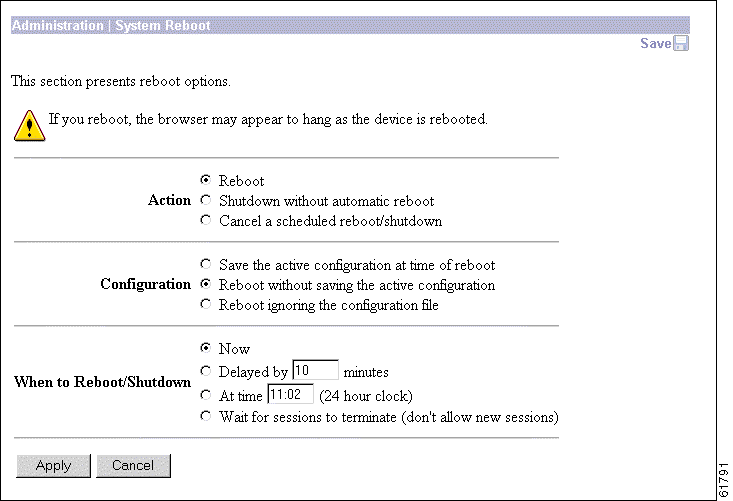
Click a radio button to select the desired action. You can select only one action.
Click a radio button to select the configuration file handling at reboot. These selections apply to reboot only. You can select only one option.
CONFIG file, and reboot using that new file.CONFIG file and without saving the active configuration. (This is the default selection.)CONFIG file. You will need to go through all the Quick Configuration steps described in the VPN 3002 Getting Started manual, including setting the system date and time and supplying an IP address for the Ethernet 1 (private) interface, using the system console. This option does not destroy any existing CONFIG file, and it does not reset Administrator parameter settings.Click a radio button to select when to reboot or shutdown. You can select only one option.
NN minutes from when you click Apply, based on system time. Enter the desired number in the field; the default is 10 minutes. (FYI: 1440 minutes = 24 hours.)To take action with the selected options, click Apply. The Manager returns to the main Administration screen if you do not reboot or shutdown now.
To cancel your settings on this screen, click Cancel. The Manager returns to the main Administration screen. (Note that this Cancel button does not cancel a scheduled reboot or shutdown.)
You can also Ping hosts from the Administration | Sessions screen.

Enter the IP address or hostname of the system you want to test. (If you configured a DNS server, you can enter a hostname; otherwise, enter an IP address.) Maximum is 64 characters.
To send the ping message, click Ping. The Manager pauses during the test, which might take a few moments; please wait for the operation to finish. The Manager then displays either a Success or Error screen; see below.
To cancel your entry on this screen, click Cancel. The Manager returns to the main Administration screen.
If the system is reachable, the Manager displays a Success screen with the name of the tested host.

To return to the Administration | Ping screen, click Continue.
If the system is unreachable for any reason, host down, ICMP not running on host, route not configured, intermediate router down, network down or congested, etc., the Manager displays an Error screen with the name of the tested host. To troubleshoot the connection, try to Ping other hosts that you know are working.

To return to the Administration | Ping screen, click Retry the operation.
To go to the main Manager screen, click Go to main menu.
This section of the Manager lets you configure and control administrative access to the VPN 3002.

Administrators are special users who can access and change the configuration, administration, and monitoring functions on the VPN 3002. Only administrators can use the VPN 3002 Hardware Client Manager.
This section of the Manager lets you change administrator properties and rights. Any changes take effect as soon as you click Apply.
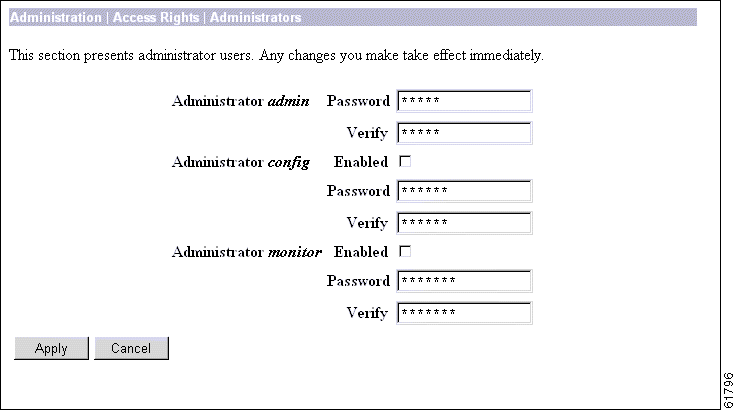
The VPN 3002 has three predefined administrators:
 |
Note The VPN 3002 saves Administrator parameter settings from this screen in nonvolatile memory, not in the active configuration (CONFIG) file. Thus, these settings are retained even if the system loses power. These settings are also retained even if you reboot the system with the factory configuration file. |
Enter or edit the unique password for this administrator. Maximum is 31 characters. The field displays only asterisks.
 |
Note The default password that Cisco supplies is the same as the username. We strongly recommend that you change this password. |
Re-enter the password to verify it. The field displays only asterisks.
Check the box to enable, or clear the box to disable, an administrator. Only enabled administrators can log in to, and use, the VPN 3002 Hardware Client Manager. You must enable at least one administrator, and you can enable all administrators. By default, only admin is enabled.
To save this screen settings in nonvolatile memory, click Apply. The settings immediately affect new sessions. The Manager returns to the Administration | Access Rights screen.
To discard your settings or changes, click Cancel. The Manager returns to the Administration | Access Rights screen.
This screen lets you configure general options for administrator access to the Manager.
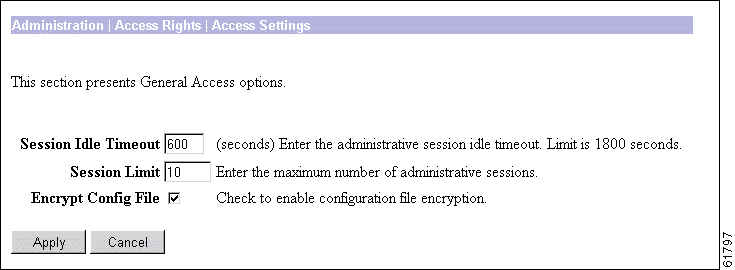
The Manager resets the inactivity timer only when you click an action button (Apply, Add, Cancel, etc.) or a link on a screen—that is, when you invoke a different screen. Entering values or setting parameters on a given screen does not reset the timer.
Enter the maximum number of simultaneous administrative sessions allowed. Minimum is 1, default is 10, and maximum is 50 sessions.
To encrypt sensitive entries in the CONFIG file, check the box (default). The CONFIG file is in ASCII text format (.INI format). Check this box to encrypt entries such as passwords, keys, and user information.
To use clear text for all CONFIG file entries, clear the box. For maximum security, we do not recommend this option.
To save your settings in the active configuration, click Apply. The Manager returns to the
Administration | Access Rights screen.
To cancel your settings, click Cancel. The Manager returns to the Administration | Access Rights screen.
This section of the Manager lets you manage files in VPN 3002 Flash memory. (Flash memory acts like a disk.) These files include CONFIG, CONFIG.BAK, saved log files, and copies of any of these files that you have saved under different names.

View Files lets you view configuration and saved log files. You can also save these files to the PC on which you are viewing them.
To view a file, click View next to the type of file you want to see. The Manager opens a new browser window to display the file, and the browser address bar shows the filename.
You can also save a copy of the file on the PC that is running the browser. Click the File menu on the new browser window and select Save As.... The browser opens a dialog box that lets you save the file. The default filename is the same as on the VPN 3002.
 |
Note Be sure to save a configuration file as a .TXT file, not a .HTM file. Some browser versions default to saving the file as an .HTM file, so you may need to change the file type. Saving the file as an .HTM file causes some data to be added to the top of the configuration file that is not valid configuration data. If you subsequently upload the file containing the invalid data to the VPN Concentrator or VPN 3002, it may cause unpredictable results. |
Alternatively, you can use the secondary mouse button to click View on this Manager screen. A pop-up menu presents choices whose exact wording depends on your browser, but among them are:
When you are finished viewing or saving the file, close the new browser window.
Delete lets you delete configuration and saved log files. To delete a file, click Delete nest to the type of file you want to delete. When you select this option, a pop-up window displays asking you to confirm or cancel. If you confirm, the file is deleted; the Manager refreshes the screen and shows the revised list of files. There is no undo.
Swap Config Files lets you swap the boot configuration file with the backup configuration file. When you select this option, the Administration | File Management | Swap Config Files window displays.
Config File Upload allows you to upload a configuration file. When you select this option, the
Administration | File Management | Config File Upload window displays.
This screen lets you swap the boot configuration file with the backup configuration file. Every time you save the active configuration, the system writes it to the CONFIG file, which is the boot configuration file; and it saves the previous CONFIG file as CONFIG.BAK, the backup configuration file.
To reload the boot configuration file and make it the active configuration, you must reboot the system. When you click OK, the system automatically goes to the Administration | System Reboot screen, where you can reboot the system. You can also click the highlighted link to go to that screen.

To swap CONFIG and CONFIG.BAK files, click OK. The Manager goes to the Administration | System Reboot screen.
To leave the files unchanged, click Cancel. The Manager returns to the Administration | File Management | View screen.
This screen lets you use HTTP (Hypertext Transfer Protocol) to transfer a configuration file from your PC, or a system accessible from your PC, to the VPN 3002 Flash memory.
To use these functions, you must have Administrator or Configuration Access Rights. See the Administration | Access Rights | Administrators screen.

Enter the name of the file on your PC. In a Windows environment, enter the complete pathname using MS-DOS syntax; for example, c:\vpn3002\config0077. You can also click the Browse button to open a file navigation window, find the file, and select it.
To upload the file to the VPN 3002, click Upload. The Manager opens the File Upload Progress window.
To cancel your entries on this screen, or to stop a file upload that is in progress, click Cancel. The Manager returns to the Administration | File Management | View screen. Stopping an upload might leave a temporary file in VPN 3002 Flash memory. Such files are named TnnnF.nnn (for example, T003F.002). You can delete them on the Administration | File Management | View Config Files screen.
This window shows the progress of the file upload. It refreshes the number of bytes transferred at 10-second intervals.
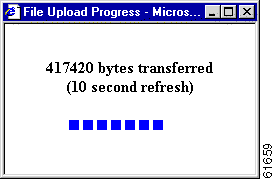
When the upload is finished, or if the upload is cancelled, the progress window closes.
The Manager displays this screen to confirm that the file upload was successful.

To go to the Administration | Config File Management | View screen and examine files in flash memory, click the highlighted link.
The Manager displays this screen if there was an error during the file upload and the transfer was not successful. Flash memory might be full, or the file transfer might have been interrupted or cancelled.

Click the link, Click here to see the list of files, to go to the Administration | File Management | View screen and examine space and files in Flash memory.
Click the link, Click here to return to File Upload, to return to the Administration | File Management | File Upload screen.
Digital certificates are a form of digital identification used for authentication. Certificate Authorities (CAs) issue them in the context of a Public Key Infrastructure (PKI), which uses public-key/private-key encryption to ensure security. CAs are trusted authorities who "sign" (issue) certificates to verify their authenticity.
A CA certificate is one used to sign other certificates. A CA certificate that is self-signed is called a root certificate; one issued by another CA certificate is called a subordinate certificate. CAs also issue identity certificates, which are the certificates for specific systems or hosts. There can be up to six root or subordinate CA certificates (including supporting RA certificates) but only one identity certificate on a VPN 3002.
The VPN 3002 supports X.509 digital certificates (International Telecommunications Union Recommendation X.509), including SSL (Secure Sockets Layer) certificates that are self-signed or issued in a PKI context.
The VPN 3002 can have only one SSL certificate installed. If you generate a self-signed SSL certificate, it replaces any installed PKI-context SSL certificate; and vice-versa.
To obtain a digital certificate for the VPN 3002 you must first enroll with a CA. To enroll with a CA, create an enrollment request and submit it to your CA. The CA enrolls the VPN 3002 into the PKI and issues you a certificate. Once you have the certificate, you then have to install it on the VPN 3002.
 |
Note You must first install a CA certificate before you enroll identity certificates from that CA. |
You can enroll and install digital certificates on the VPN 3002 automatically or manually. The automatic method uses the Simple Certificate Enrollment Protocol (SCEP) to streamline enrollment and installation. SCEP is a secure messaging protocol that requires minimal user intervention. This method is quicker and allows you to enroll and install certificates using only the Manager, but is only available if you are both enrolling with a CA that supports SCEP and enrolling via the web. If your CA does not support SCEP or if you do not have network connectivity to your CA, then you cannot use the automatic method; you must use the manual method.
The manual method involves more steps. You can do some of the steps using the Manager. Other steps require that you exchange information with the CA directly. (You deliver your enrollment request and receive the certificate from the CA via the Internet, email, or a floppy disk.)
Whether you use the automatic or manual method, you follow the same overall certificate management procedure:
Step 1 Install one or more CA certificates.
Step 2 Enroll and install identity and SSL certificates.
Step 3 Enable digital certificates on the VPN 3002.
If you plan to use SCEP to enroll for identity or SSL certificates, you must obtain the associated CA certificate using SCEP. The Manager does not let you enroll for a certificate from a CA unless that CA was installed using SCEP. A certificate that is obtained via SCEP and therefore capable of issuing other SCEP certificates is called SCEP-enabled.
 |
Tip In order to obtain CA certificates using SCEP, you need to know the URL of your CA. Find out your CA's URL before beginning the following steps. |
Step 1 Using the VPN 3002 Hardware Client Manager, display the Administration | Certificate Management screen.
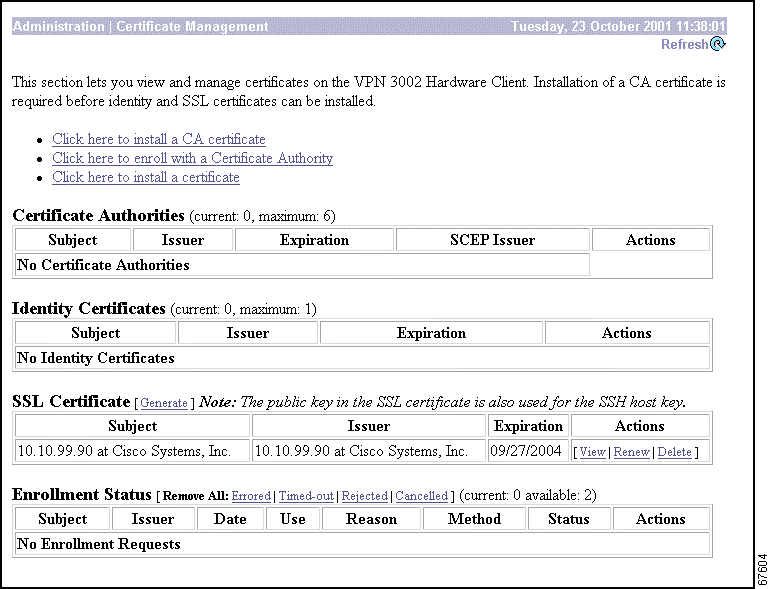
Step 2 Click Click here to install a CA certificate.
 |
Note The Click here to install a CA certificate option is only available from this window when no CA certificates are installed on the VPN 3002. If you do not see this option, click Click here to install a certificate. The Manager displays the Administration | Certificate Management | Install screen. Then click Install CA Certificate. |
The Manager displays the Administration | Certificate Management | Install | CA Certificate screen.

Step 3 Click SCEP (Simple Certificate Enrollment Protocol). The Manager displays the Administration | Certificate Management | Install | CA Certificate | SCEP screen.

Step 4 Fill in the fields and click Retrieve. For more information on this screen, see the "Administration | Certificate Management | Install | Certificate Type" section.
The Manager installs the CA certificate on the VPN 3002 and displays the Administration | Certificate Management screen. Your new CA certificate appears in the Certificate Authorities table.
 |
Note If you install a CA certificate using the manual method, you cannot use this CA later to request identity or SSL certificates with SCEP. If you want to be able to use SCEP to request certificates, obtain the CA certificate using SCEP. |
Step 1 Retrieve a CA certificate from your CA and download it to your PC.
Step 2 Using the VPN 3002 Hardware Client Manager, display the Administration | Certificate Management screen. (See Figure 12-19.)
Step 3 Click Click here to install a CA certificate.
 |
Note The Click here to install a CA certificate option is available from this window only when no CA certificates are installed on the VPN 3002. If you do not see this option, click Click here to install a certificate. The Manager displays the Administration | Certificate Management | Install screen. Then click Install CA Certificate. |
The Manager displays the Administration | Certificate Management | Install | CA Certificate screen.

Step 4 Choose either of the following installation methods: Cut & Paste Text or Upload File from Workstation.
Step 5 The Manager displays a screen appropriate to your choice. Include the certificate information according to your chosen method. Click Install.The Manager installs the CA Certificate on the VPN 3002 and displays the Administration | Certificate Management screen. Your new CA Certificate appears in the Certificate Authorities table.
When you generate a request for an identity certificate, you need to provide the following information.
 |
Tip Check to be sure that you have this information before you begin. |
| Field Name | Abbrev- iation | Manual | SCEP | Recommended Content |
Common Name | CN | Yes | Yes | The primary identity of the entity associated with the certificate, for example, Engineering VPN. Spaces are allowed. You must enter a name in this field. If you are requesting an SSL certificate, enter the IP address or domain name you use to connect to this VPN 3002, for example: 10.10.147.2. |
Organizational Unit | OU | Yes | Yes | The name of the department or other organizational unit to which this VPN 3002 belongs, for example: CPU Design. Spaces are allowed. |
Organization | O | Yes | Yes | The name of the company or organization to which this VPN 3002 belongs, for example: Cisco Systems. Spaces are allowed. |
Locality | L | Yes | Yes | The city or town where this VPN 3002 is located, for example: San Jose. Spaces are allowed. |
State/Province | SP | Yes | Yes | The state or province where this VPN 3002 is located, for example: California. Spell the name out completely; do not abbreviate. Spaces are allowed. |
Country | C | Yes | Yes | The country where this VPN 3002 is located, for example: US. Use two characters, no spaces, and no periods. This two-character code must conform to ISO 3166 country codes. |
Subject Alternative Name (Fully Qualified Domain Name) | FQDN | Yes | Yes | The fully qualified domain name that identifies this VPN 3002 in this PKI, for example: vpn3030.cisco.com. This field is optional. The alternative name is an additional data field in the certificate that provides interoperability with many Cisco IOS and PIX systems in LAN-to-LAN connections. |
Subject Alternative Name (E-mail Address) | Yes | Yes | The e-mail address of the VPN 3002 user. | |
Challenge Password | - | No | Yes | This field appears if you are requesting a certificate using SCEP. Use this field according to the policy of your CA:
|
Verify Challenge Password | - | No | Yes | Re-enter the challenge password. |
Key Size | - | Yes | Yes | The algorithm for generating the public-key/private-key pair, and the key size. If you are requesting an SSL certificate, of if you are requesting an identity certificate using SCEP, only the RSA options are available.
|
Yes | No |
|
Follow these steps for each identity certificate you want to obtain:
Step 1 Display the Administration | Certificate Management screen. (See Figure 12-19.)
Step 2 Click Click here to enroll with a Certificate Authority. The Manager displays the Administration | Certificate Management | Enroll screen.

Step 3 Click Identity Certificate. The Manager displays the Administration | Certificate Management | Enroll | Identity Certificate screen.

Notice that a link appears corresponding to each SCEP-enabled CA certificate on the VPN 3002. The title of the link depends on the name of the CA certificate: Enroll via SCEP at Certificate Name. For example, if you have a CA certificate on your VPN 3002 named "TestCA6-8," the following link appears: Enroll via SCEP at TestCA6-8.
If you do not see any Enroll via SCEP options, there are no SCEP-enabled CA certificates on the VPN 3002. Follow the steps in the "Installing CA Certificates Automatically Using SCEP" section to obtain a CA certificate via SCEP before you proceed.
Step 4 Click Enroll via SCEP at Certificate Name. The Administration | Certificate Management | Enroll | Identity Certificate | SCEP screen appears.

Step 5 Fill in the fields and click Enroll. (For information on the fields on this screen, see Table 12-1.) The VPN 3002 sends the certificate request to the CA.
If the CA does not issue the certificate immediately (some CAs require manual verification of credentials and this can take time), the certificate request could enter polling mode. In polling mode, the VPN 3002 re-sends the certificate request to the CA a specified number of times at regular intervals until the CA responds or the process times out. (For information on configuring the polling limit and interval, see the Administration | Certificate Management | Configure CA Certificate screen.) The certificate request appears in the Enrollment Status table on the Administration | Certificate Management screen until the CA responds. Once the CA responds and issues the certificate, the VPN 3002 checks to see if it already has an active certificate. If there is no active certificate, the VPN 3002 installs the new certificate automatically. If there already is an active certificate, the new certificate appears in the Enrollment Status table; you have to activate it manually.
If the CA responds immediately, the Manager installs the identity certificate on the VPN 3002 and displays the Administration | Certificate Management | Enrollment | Request Generated screen.

Step 6 Click Go to Certificate Management. The Manager displays the Administration | Certificate Management screen. Your new identity certificate appears in the Identity Certificates table.
If you need to obtain identity certificates using the manual process, use the following general procedure:
Follow these steps to generate a certificate enrollment request (PKCS-10):
Step 1 Using the Manager, display the Administration | Certificate Management screen. (See Figure 12-19.)
Step 2 Click Click here to enroll with a Certificate Authority. The Manager displays the Administration | Certificate Management | Enroll screen. (See Figure 12-23.)
Step 3 Click Identity Certificate. The Manager displays the Administration | Certificate Management | Enroll | Identity Certificate screen. (See Figure 12-24.)
Step 4 Click Enroll via PKCS10 Request (Manual). The Manager displays the Administration | Certificate Management | Enroll | Identity Certificate | PKCS10 screen.
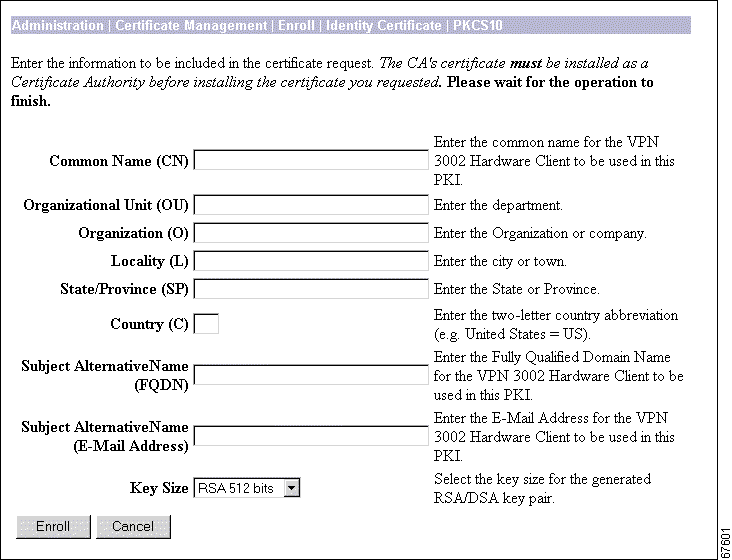
Step 5 Fill in the fields and click Enroll. (For information on the fields on this screen, see Table 12-1.) The Manager displays the Administration | Certificate Management | Enrollment | Request Generated screen.

Step 6 Copy the enrollment request to the clipboard.
Step 7 Using the enrollment request you just generated, retrieve an identity certificate from your CA and download it to your PC according to the procedures outlined by the CA.
Step 8 Using the Manager, display the Administration | Certificate Management screen. (See Figure 12-19.)
Step 9 Click Click here to install a certificate. The Manager displays the Administration | Certificate Management | Install screen.

Step 10 Click Install certificate obtained via enrollment. The Manager displays the Administration | Certificate Management | Install | Certificate Obtained via Enrollment screen.
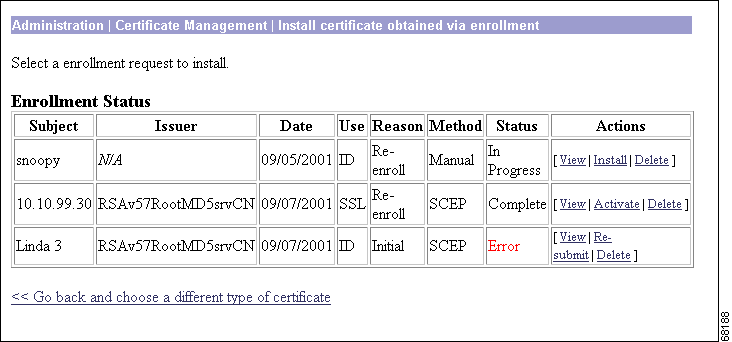
Step 11 Find your enrollment request in the Enrollment Status table. Click Install. The Manager displays the Administration | Certificate Management | Install | Identity Certificate screen.

Step 12 Choose either installation method: Cut & Paste Text or Upload File from Workstation
Step 13 The Manager displays a screen appropriate to your choice. Include the certificate information according to your chosen method. Click Install. The Manager installs the identity certificate on the VPN 3002 and displays the Administration | Certificate Management screen. Your new identity Certificate appears in the Identity Certificates table.
If you use a secure connection between your browser and the VPN 3002, the VPN 3002 requires an SSL certificate. You only need one SSL certificate on your VPN 3002.
When you initially boot the VPN 3002, a self-signed SSL certificate is automatically generated. Because a self-signed certificate is self-generated, this certificate is not verifiable. No CA has guaranteed its identity. But this certificate allows you to make initial contact with the VPN 3002 using the browser. If you want to replace it with another self-signed SSL certificate, follow these steps:
Step 1 Display the Administration | Certificate Management screen. (See Figure 12-19.)
Step 2 Click Generate above the SSL Certificate table. The new certificate appears in the SSL Certificate table, replacing the existing one.
If you want to obtain a verifiable SSL certificate (that is, one issued by a CA), follow the same procedure you used to obtain identity certificates. (See the Enrolling and Installing Identity Certificates section.) But this time, on the Administration | Certificate Management | Enroll screen, click SSL certificate (instead of Identity certificate).
Some web servers export their SSL certificates with the private key attached. If you have a PEM-encoded certificate with a corresponding private key that you want to install, follow the same procedure you used to obtain identity certificates. (See the Enrolling and Installing Identity Certificates section.) But this time, on the Administration | Certificate Management | Installation screen, click Install SSL certificate with private key (instead of Install certificate obtained via enrollment).
 |
Note Before you enable digital certificates on the VPN 3002, you must obtain at least one CA and one identity certificate. If you do not have a CA and an identity certificate installed on your VPN 3002, follow the steps in the previous section ("Enrolling and Installing Digital Certificates") before beginning this section. |
For the VPN 3002 to use the digital certificates you obtained, you must enable authentication using digital certificates.
Step 1 Display the Configuration | System | Tunneling Protocols | IPSec screen.
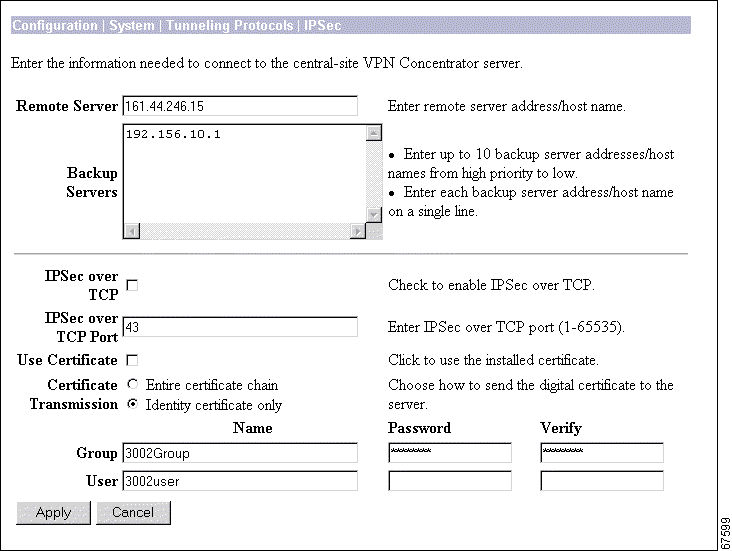
Step 2 Check the Use Certificate check box.
Step 3 Select a Certificate Transmission option. If you want the VPN 3002 to send the peer the identity certificate and all issuing certificates (including the root certificate and any subordinate CA certificates), click Entire certificate chain. If you want to send the peer only the identity certificate, click Identity certificate only.
Step 4 Click Apply. The Manager returns to the Configuration | System | Tunneling Protocols screen.
Step 5 Click the Save Needed icon.
Delete digital certificates in the following order:
1. Identity or SSL certificates
2. Subordinate certificates
3. Root certificates
 |
Note You cannot delete a certificate if it is in use by an SA, if it is the issuer of another installed certificate, or if it is referenced in an active certificate request. |
Follow these steps to delete certificates:
Step 1 Display the Administration | Certificate Management screen. (See Figure 12-19.)
Step 2 Find the certificate you want to delete and click Delete. The Administration | Certificate Management | Delete screen appears.

Step 3 Click Yes. The Manager returns to the Administration | Certificate Management window.
This section of the Manager shows outstanding enrollment requests and all the certificates installed on the VPN 3002, and it lets you manage them.
The links at the top of this screen guide you step-by-step through the process of enrolling and installing certificates. For more information on the certificate management process, see the "Enrolling and Installing Digital Certificates" section.
 |
Note The Click here to install a CA certificate option is only available from this window when no CA certificates are installed on the VPN 3002. If you do not see this option, click Click here to install a certificate. The Manager displays the Administration | Certificate Management | Install. Then click Install CA Certificate. |
The VPN 3002 notifies you (by issuing a severity 3 CERT class event) if any of the installed certificates are within one month of expiration.
The Manager displays this screen each time you install a digital certificate.
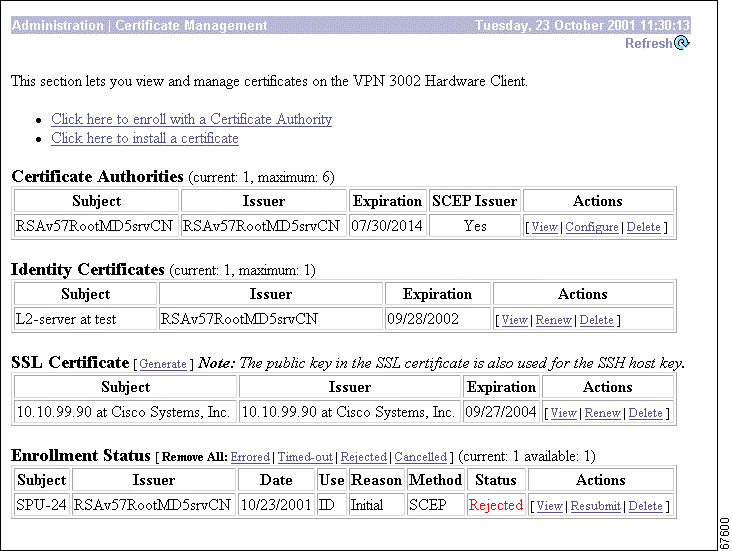
This table shows root and subordinate CA certificates installed on the VPN 3002.
These fields appear in the Certificate Authorities table:
| Field | Content | ||
|---|---|---|---|
Subject/Issuer | The Common Name (CN) or Organizational Unit (OU) (if present), plus the Organization (O) in the Subject and Issuer fields of the certificate. The format is CN at O, OU at O, or just O; for example, Root 2 at CyberTrust. The CN, OU, and O fields display a maximum of 33 characters each. See Administration | Certificate Management | Certificates | View. | ||
Expiration | The expiration date of the certificate. The date format is MM/DD/YYYY. | ||
SCEP Issuer | In order for a certificate to be available for SCEP enrollment, it must be installed via SCEP. This field indicates if the certificate is SCEP-enabled.
| ||
Actions | This column allows you to manage particular certificates. The actions available vary with type and status of the certificate.
|
This table shows installed server identity certificates. For a description of the fields in this table, see the "Certificate Authorities Table" section, above.
This table shows the SSL server certificate installed on the VPN 3002. The system can have only one SSL server certificate installed: either a self-signed certificate or one issued in a PKI context.
For a description of the fields in this table, see the "Certificate Authorities Table".
These fields appear in the Certificate Authorities, Identity Certificates, or SSL Certificate tables:
| Field | Content | ||
|---|---|---|---|
Subject/Issuer | The Common Name (CN) or Organizational Unit (OU) (if present), plus the Organization (O) in the Subject and Issuer fields of the certificate. The format is CN at O, OU at O, or just O; for example, Root 2 at CyberTrust. The CN, OU, and O fields display a maximum of 33 characters each. See Administration | Certificate Management | Certificates | View. | ||
Expiration | The expiration date of the certificate. The date format is MM/DD/YYYY. | ||
SCEP Issuer | In order for a certificate to be available for SCEP enrollment, it must be installed via SCEP. This field indicates if the certificate is SCEP-enabled.
| ||
Actions | This column allows you to manage particular certificates. The actions available vary with type and status of the certificate.
|
This table tracks the status of active enrollment requests.
The VPN 3002 supports one (installed) identity certificate and one (outstanding) enrollment request. If you currently have an identity certificate on your VPN 3002 and you want to change it, you can request a second certificate, but the VPN 3002 does not install this certificate immediately. The new certificate appears in the Enrollment Status table; you must activate it manually.
The VPN 3002 automatically deletes entries that have the status "Timedout," "Failed," "Cancelled," or "Error" and are older than one week.
Click a Remove All option to delete all enrollment requests of a particular status.
These fields appear in the Enrollment Status table:
| Field | Content |
|---|---|
Subject/Issuer | The Common Name (CN) or Organizational Unit (OU) (if present), plus the Organization (O) in the Subject and Issuer fields of the certificate. The format is CN at O, OU at O, or just O; for example, Root 2 at CyberTrust. The CN, OU, and O fields display a maximum of 33 characters each. See Administration | Certificate Management | Certificates | View. |
Date | The original date of enrollment. |
Use | The type of certificate: identity or SSL. |
Reason | The type of enrollment: initial, re-enrollment, or re-key. |
Method | The method of enrollment: SCEP or manual. |
Status |
|
Actions | This column allows you to manage enrollments requests. The actions available vary with the type and status of the enrollment request.
|
Choose whether you are creating an enrollment request for an identity certificate or an SSL certificate.

Click Identity Certificate to create a certificate request for an identity certificate. The Manager displays the Administration | Certificate Management | Enroll | Identity Certificate screen.
Click SSL Certificate to create a certificate request for an SSL certificate. The Manager displays the Administration | Certificate Management | Enroll | SSL Certificate screen.
Choose the method for enrolling the (identity or SSL) certificate.

Click Enroll via PKCS10 Request (Manual) to enroll the certificate manually.
You can enroll certificates using SCEP only if you installed the CA certificate using SCEP. One Enroll via SCEP at [Name of SCEP CA] link appears on this screen for each CA certificate on the VPN 3002 that was installed using SCEP. To see which CA certificates on your VPN 3002 were installed using SCEP, see the Certificate Authorities table on the Administration | Certificate Management screen. "Yes" in the SCEP Issuer column indicates that the CA certificate was installed using SCEP; "No" indicates it was installed manually.
If no CA certificate on the VPN 3002 was installed using SCEP, then no Enroll via SCEP at [Name of SCEP CA] link appears on this screen. You do not have the option of using SCEP to enroll the certificate.
Click Enroll via SCEP at [Name of SCEP CA] to enroll the certificate automatically using SCEP.
If you want to install a certificate using SCEP, but no Enroll via SCEP at [Name of SCEP CA] link appears here, click Install a new SA Using SCEP before Enrolling. Install a CA certificate using SCEP, then return to this screen to install the certificate. A SCEP link now appears.
Click << Go back and choose a different type of certificate to return to the Administration | Certificate Management | Enroll screen. (See Figure 12-35.)
To generate an enrollment request for an SSL or identity certificate, you need to provide information about the VPN 3002.

For an explanation of each of the fields on this screen, see Table 12-1.
To generate the certificate request, click Enroll. The Manager displays the Administration | Certificate Management | Enrollment | Request Generated screen (See Figure 12-38.) with the text of your certificate.
To discard your entries and cancel the request, click Cancel. The Manager returns to the Administration | Certificate Management screen.
The Manager displays this screen when the system has successfully generated a certificate request. The request is a Base-64 encoded file in PKCS-10 format (Public Key Certificate Syntax-10), which most CAs recognize or require. The system automatically saves this file in Flash memory with the filename shown in the screen (pkcsNNNN.txt). You can select and copy the request to the clipboard, or you can save it as a file on your PC or a network host. Some CAs let you paste the request in a web interface, some ask you to send a file; use the method your CA requires.
In generating the request, the system also generates the private key used in the PKI process. That key remains on the VPN 3002, and it is not visible.
 |
Note You must complete the enrollment and certificate installation process within one week of generating the request. |

To go to the Administration | File Management | Files screen, click the highlighted File Management page link. From there you can view, copy, or delete the file in Flash memory.
If you want to view the certificate request, click Go to Certificate Management. The Manager displays the Administration | Certificate Management screen. (See Figure 12-19.)
If you want to enroll another certificate, click Go to Certificate Enrollment. The Manager displays the Administration | Certificate Management | Enroll screen.
If you want to install the certificate you have just enrolled, click Go to Certificate Installation. The Manager displays the Administration | Certificate Management | Install screen.
To generate an enrollment request for an identity certificate, you need to provide information about the VPN 3002.

For an explanation of each of the fields on this screen, see Table 12-1.
To generate the certificate request and install the identity certificate on the VPN 3002, click Enroll. The Manager displays the Administration | Certificate Management | Enrollment | Request Generated screen. (See Figure 12-38.)
To discard your entries and cancel the request, click Cancel. The Manager returns to the Administration | Certificate Management screen. (See Figure 12-19.)
To generate an enrollment request for an SSL certificate, you need to provide information about the VPN 3002.
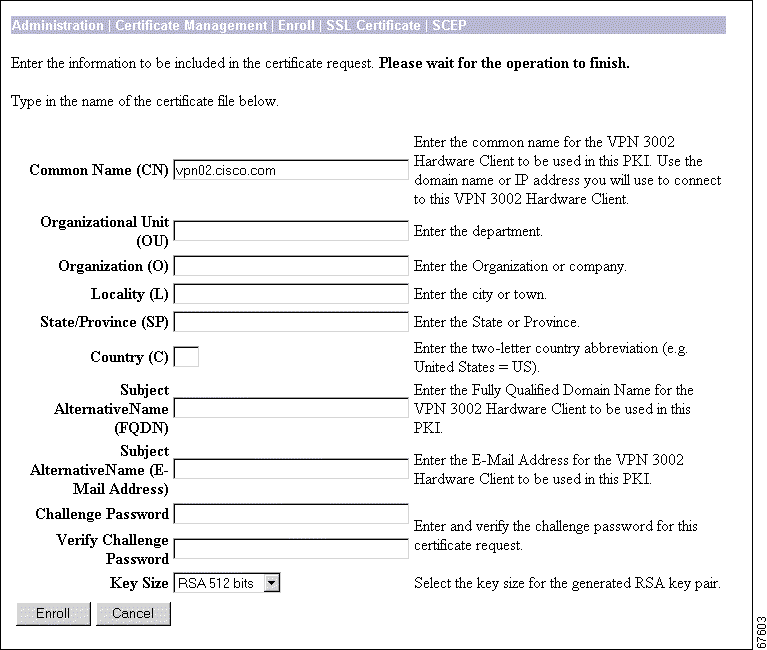
For an explanation of each of the fields on this screen, see Table 12-1.
To generate the certificate request and install the SSL certificate on the VPN 3002, click Enroll. The Manager displays the Administration | Certificate Management | Enrollment | Request Generated screen.
If there is already an active request for an SSL certificate, this error message appears.

To return to the Administration | Certificate Management | Enroll | SSL Certificate | SCEP screen, click Retry the operation.
To return to the Main screen, click Return to main menu.
To discard your entries and cancel the request, click Cancel. The Manager displays the Administration | Certificate Management screen.
Choose the type of certificate you want to install.

If you want to install a CA certificate, click Install CA Certificate. The Manager displays the Administration | Certificate Management | Install | CA Certificate screen.
Some web servers export their SSL certificates with the private key attached. If you have a PEM-encoded certificate with a corresponding private key that you want to install, click Install SSL Certificate with Private Key. The Manager displays the Administration | Certificate Management | Install | SSL Certificate with Private Key screen.
If you want to install a certificate manually that you have obtained by enrolling a certificate request with a CA, click Install Certificate Obtained via Enrollment. The Manager displays the Administration | Certificate Management | Install Certificate Obtained via Enrollment screen.
Once you have enrolled a certificate, you can install it. This screen allows you to install an enrolled certificate.

For a description of the fields in this table, see the "Enrollment Status Table" section.
If you do not want to install a certificate that you have obtained via filing an enrollment request with your CA, click << Go back and choose a different type of certificate. The Manager returns to the Administration | Certificate Management | Install screen.
Choose the method you want to use to install the certificate.

 |
Note This option is available only for CA certificates. |
If you want to install the CA certificate automatically using SCEP, click SCEP (Simple Certificate Enrollment Protocol). The Manager displays the Administration | Certificate Management | Install | CA Certificate | SCEP screen. (See Figure 12-44.)
If you want to cut and paste the certificate using a browser window, click Cut & Paste Text. The Manager displays the Administration | Certificate Management | Install | Certificate Type | Cut & Paste Text screen. (See Figure 12-45.)
If your CA certificate is stored in a file, click Upload File from Workstation. The Manager displays the Administration | Certificate Management | Install | Certificate Type | Upload File from Workstation screen. (See Figure 12-46.)
If you do not want to install a CA certificate, click << Go back and choose a different type of certificate to display the Administration | Certificate Management | Install screen. (See Figure 12-41.)
In this screen, provide information about the certificate authority in order to retrieve and install a CA certificate automatically using SCEP.

Enter the URL of the SCEP interface of the CA.
Some CAs use descriptors to further identify the certificate. If your CA gave you a descriptor, enter it here. Otherwise enter a descriptor of your own. You must enter something in this field.
To retrieve a CA certificate from the CA and install it on the VPN 3002, click Retrieve.
To discard your entries and cancel the request, click Cancel. The Manager returns to the Administration | Certificate Management screen. (See Figure 12-19.)
To install the certificate using the manual method, cut and paste the certificate text into the Certificate Text window.
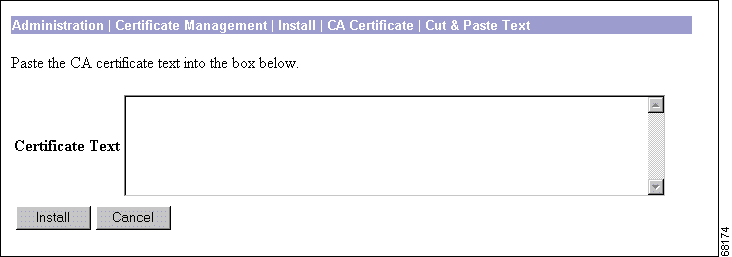
Paste the PEM or base-64 encoded certificate text from the clipboard into this window.
If you are installing an SSL certificate with a private key, include the encrypted private key.
 |
Note This field appears only if you are installing an SSL certificate with a private key. |
Enter a password for decrypting the private key.
To install the certificate on the VPN 3002, click Install.
To discard your entries and cancel the request, click Cancel. The Manager returns to the Administration | Certificate Management screen. (See Figure 12-19.)
If you want to install a certificate stored on your PC, use this screen to upload the certificate file to the VPN 3002.

Enter the name of the CA certificate file that is on your PC. In a Windows environment, enter the complete pathname using MS-DOS syntax, for example: c:\Temp\certnew.cer. You can also click the Browse button to open a file navigation window, find the file, and select it.
 |
Note This field appears only if you are installing an SSL certificate with a private key. |
Enter a password for decrypting the private key.
To install the certificate on the VPN 3002, click Install.
To discard your entries and cancel the request, click Cancel. The Manager returns to the Administration | Certificate Management screen. (See Figure 12-19.)
The Manager displays this screen of certificate details when you click View for a certificate on the Administration | Certificate Management | Certificates screen. The details vary depending on the certificate content.
The content and format for certificate details are governed by ITU (International Telecommunication Union) X.509 standards, specifically RFC 2459. The Subject and Issuer fields conform to ITU X.520.
This screen is read-only; you cannot change any information here.
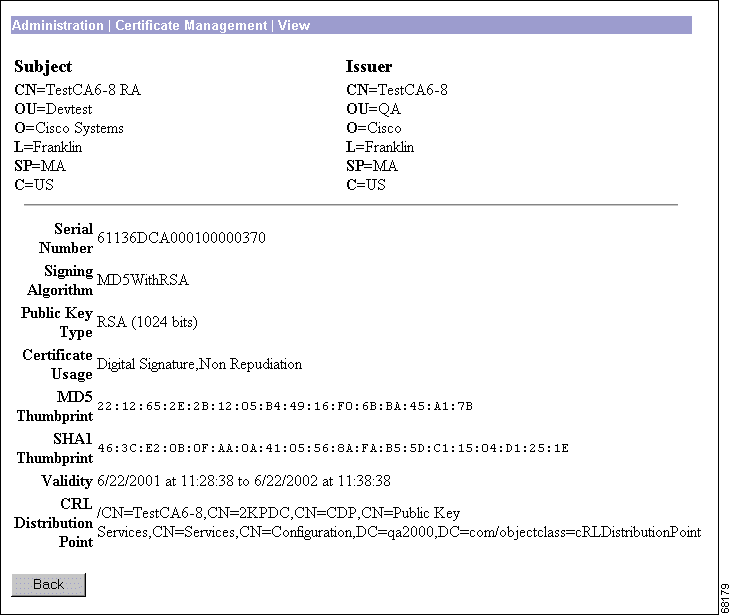
A certificate contains some or all of the following fields:
| Field | Content |
|---|---|
Subject | The person or system that uses the certificate. For a CA root certificate, the Subject and Issuer are the same. |
Issuer | The CA or other entity (jurisdiction) that issued the certificate. Subject and Issuer consist of a specific-to-general identification hierarchy: CN, OU, O, L, SP, and C. These labels and acronyms conform to X.520 terminology, and they echo the fields on the Administration | Certificate Management | Enrollment screen. |
CN | Common Name: the name of a person, system, or other entity. This is the lowest (most specific) level in the identification hierarchy. For the VPN 3002 self-signed SSL certificate, the CN is the IP address on the Ethernet 1 (Private) interface at the time the certificate is generated. SSL compares this CN with the address you use to connect to the VPN 3002 via HTTPS, as part of its validation. |
OU | Organizational Unit: the subgroup within the organization (O). |
O | Organization: the name of the company, institution, agency, association, or other entity. |
L | Locality: the city or town where the organization is located. |
SP | State/Province: the state or province where the organization is located. |
C | Country: the two-letter country abbreviation. These codes conform to ISO 3166 country abbreviations. |
Serial Number | The serial number of the certificate. Each certificate issued by a CA must be unique among all certificates issued by that CA. CRL checking uses this serial number. |
Signing Algorithm | The cryptographic algorithm that the CA or other issuer used to sign this certificate. |
Public Key Type | The algorithm and size of the certified public key. |
Certificate Usage | The purpose of the key contained in the certificate, for example: digital signature, certificate signing, nonrepudiation, key or data encipherment, etc. |
MD5 Thumbprint | A 128-bit MD5 hash of the complete certificate contents, shown as a 16-byte string. This value is unique for every certificate, and it positively identifies the certificate. If you question a root certificate's authenticity, you can check this value with the issuer. |
SHA1 Thumbprint | A 160-bit SHA-1 hash of the complete certificate contents, shown as a 20-byte string. This value is unique for every certificate, and it positively identifies the certificate. If you question a certificate's authenticity, you can check this value with the issuer. |
Validity | The time period during which this certificate is valid. Format is MM/DD/YYYY at HH:MM:SS to MM/DD/YYYY at HH:MM:SS. Time uses 24-hour notation, and is local system time. The Manager checks the validity against the VPN 3002 system clock, and it flags expired certificates in event log entries. |
Subject Alternative Name (Fully Qualified Domain Name) | The fully qualified domain name for this VPN 3002 that identifies it in this PKI. The alternative name is an optional additional data field in the certificate, and it provides inter operability with many Cisco IOS and PIX systems in LAN-to-LAN connections. |
CRL Distribution Point | The distribution point for CRLs from the issuer of this certificate. If this information is included in the certificate in the proper format, and you enable CRL checking, you do not have to provide it on the Administration | Certificate Management | Configure CA Certificate screen. |
To return to the Administration | Certificate Management screen, click Back.
This screen lets you configure this CA certificate to be able to issue identity certificates via SCEP.
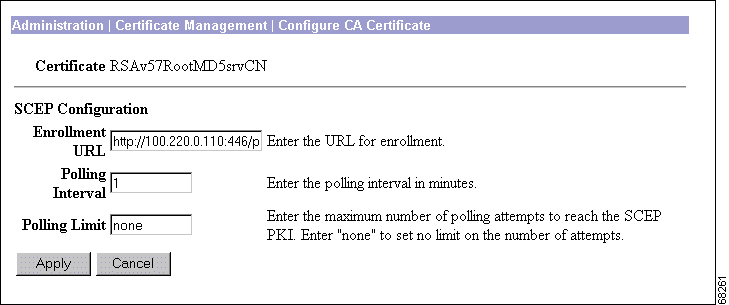
The certificate for which you are configuring SCEP parameters. This is the name in the Subject field of the Certificate Authorities table on the Administration | Certificate Management screen.
Enter the URL where the VPN 3002 should send SCEP enrollment requests made to this CA certificate. The default value of this field is the URL used to download this CA certificate.
If the CA does not issue the certificate immediately (some CAs require manual verification of credentials and this can take time), the certificate request could enter polling mode. In polling mode, the VPN 3002 re-sends the certificate request to the CA over a specified period until the CA responds or the process times out.
Enter the number of minutes the VPN 3002 should wait between re-sends. The minimum number of minutes is 1; the maximum number of minutes is 60. The default value is 1.
Enter the number of times the VPN 3002 should re-send an enrollment request if the CA does not issue the certificate immediately. The minimum number of re-sends is 0; the maximum number is 100. If you do not want any polling limit (in other words you want infinite re-sends), enter none.
To configure CRL checking for this certificate, click Apply. The Manager returns to the Administration | Certificate Management screen.
To discard your settings, click Cancel. The Manager returns to the Administration | Certificate Management screen.
Certificate renewal is a shortcut that allows you to generate an enrollment request based on the content of an existing certificate.
When you renew a certificate via SCEP, the new certificate does not automatically overwrite the original certificate. It remains in the Enrollment Request table until the administrator manually activates it. For more information on activating certificates, see the "Administration | Certificate Management | Activate or Re-Submit | Status" section.
Use this screen to re-enroll or re-key a certificate. If you re-enroll the certificate, the new certificate uses the same key pair as the expiring certificate. If you re-key the certificate, it uses a new key pair.
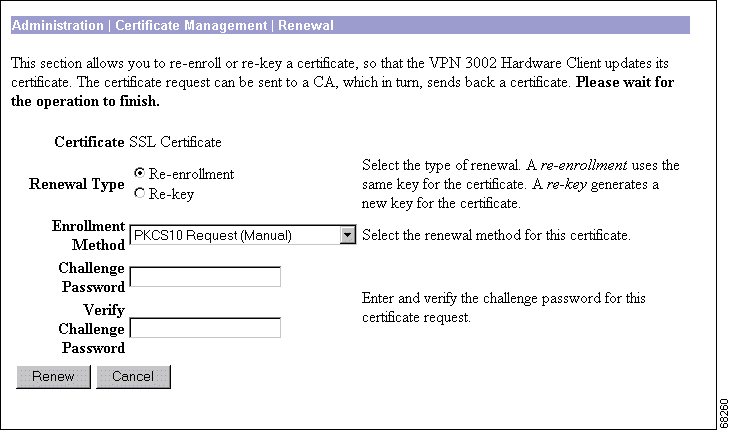
This field displays the type of certificate that you are re-enrolling or re-keying.
Specify the type of request:
Choose an enrollment method:
Your CA might have given you a password as a means of verifying your identity. If you have a password from your CA, enter it here.
If you did not receive a password from your CA, choose a password now. You can use this password in the future to identify yourself to your CA.
Re-type the challenge password you just entered.
To renew the certificate, click Renew.
To discard your settings, click Cancel. The Manager returns to the Administration | Certificate Management screen.
This status screen appears after you activate or re-submit an enrollment request. It displays the status of the request.
If you are installing an SSL certificate with a private key, include the encrypted private key.

If you want to view the certificate request, click Go to Certificate Management. The Manager displays the Administration | Certificate Management screen.
If you want to enroll another certificate, click Go to Certificate Enrollment. The Manager displays the Administration | Certificate Management | Enroll screen. (See Figure 12-35.)
If you want to install the certificate you have just enrolled, click Go to Certificate Installation. The Manager displays the Administration | Certificate Management | Install screen. (See Figure 12-41.)
The Manager displays this confirmation screen when you click Delete for a certificate on the Administration | Certificate Management screen. The screen shows the same certificate details as on the Administration | Certificate Management | View screen.
Please note:

For a description of the fields in this certificate, see the "Certificate Fields"section.
To delete this certificate, click Yes.
 |
Note There is no undo. |
The Manager returns to the Administration | Certificate Management screen and shows the remaining certificates.
To retain this certificate, click No. The Manager returns to the Administration | Certificate Management screen, and the certificates are unchanged.
This screen allows you to view the details of an enrollment request.

An enrollment request contains some or all of the following fields:
| Field | Content |
|---|---|
Subject | The person or system that uses the certificate. |
Issuer | The CA or other entity (jurisdiction) from whom the certificate is being requested. Subject and Issuer consist of a specific-to-general identification hierarchy: CN, OU, O, L, SP, and C. These labels and acronyms conform to X.520 terminology, and they echo the fields on the Administration | Certificate Management | Enrollment screen. |
CN | Common Name: the name of a person, system, or other entity. This is the lowest (most specific) level in the identification hierarchy. For the VPN 3002 self-signed SSL certificate, the CN is the IP address on the Ethernet 1 (Private) interface at the time the certificate is generated. SSL compares this CN with the address you use to connect to the VPN 3002 via HTTPS, as part of its validation. |
OU | Organizational Unit: the subgroup within the organization (O). |
O | Organization: the name of the company, institution, agency, association, or other entity. |
L | Locality: the city or town where the organization is located. |
SP | State/Province: the state or province where the organization is located. |
C | Country: the two-letter country abbreviation. These codes conform to ISO 3166 country abbreviations. |
Public Key Type | The algorithm and size of the public key that the CA or other issuer used in generating this certificate. |
Request Usage | The type of certificate: Identity or SSL. |
MD5 Thumbprint | A 128-bit MD5 hash of the complete certificate contents, shown as a 16-byte string. This value is unique for every certificate, and it positively identifies the certificate. If you question a certificate's authenticity, you can check this value with the issuer. |
SHA1 Thumbprint | A 160-bit SHA-1 hash of the complete certificate contents, shown as a 20-byte string. This value is unique for every certificate, and it positively identifies the certificate. If you question a certificate's authenticity, you can check this value with the issuer. |
Generated | The date the request was initiated. |
Enrollment Type | The type of enrollment: initial, re-enroll, or re-key. |
Enrollment Method | The method of enrollment: SCEP or manual. |
Enrollment Status | The current status of the enrollment: complete, rejected, error, and so on. |
Click Back to display the Administration | Certificate Management screen.
This screen shows you the details of the enrollment request and allows you to cancel it.
You can cancel only a SCEP enrollment request, and you can do so only when the request is in polling mode. Once a request is cancelled, you can then remove it, re-submit it, or view its details.
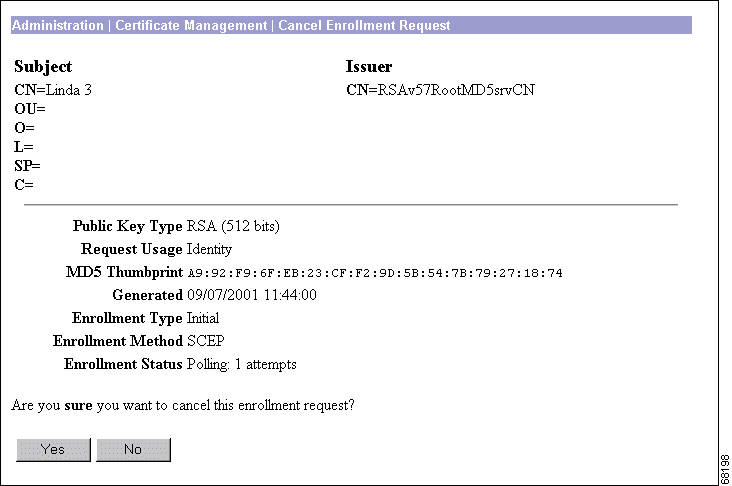
For a description of the fields in this enrollment request, see the "Enrollment Request Fields" section.
To cancel this enrollment request, click Yes.
 |
Note There is no undo. |
The Manager returns to the Administration | Certificate Management screen.
To retain this enrollment request, click No. The Manager returns to the Administration | Certificate Management screen, and the enrollment requests are unchanged.
This screen shows you details of the enrollment request and allows you to delete it. Deleting an enrollment request removes it from the Enrollment Request table (on the Administration | Certificate Management page) and destroys all record of it.
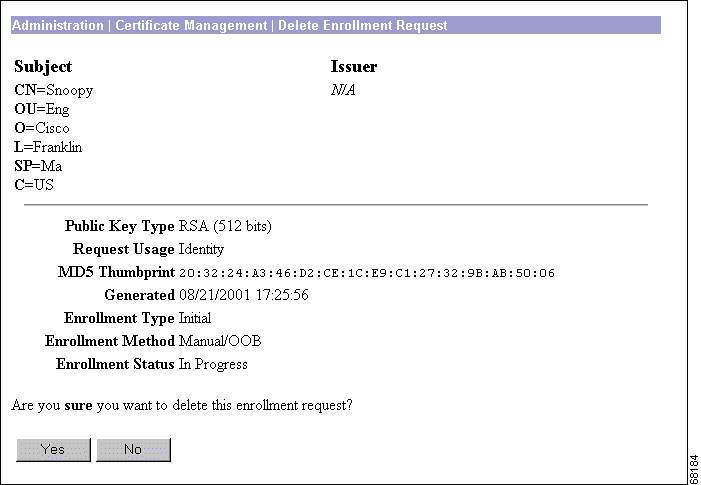
For a description of the fields in this enrollment request, see the "Enrollment Request Fields" section.
To delete this enrollment request, click Yes.
 |
Note There is no undo. |
The Manager returns to the Administration | Certificate Management screen and shows the remaining enrollment requests.
To retain this enrollment request, click No. The Manager returns to the Administration | Certificate Management screen, and the enrollment requests are unchanged.
![]()
![]()
![]()
![]()
![]()
![]()
![]()
![]()
Posted: Tue Oct 29 11:52:20 PST 2002
All contents are Copyright © 1992--2002 Cisco Systems, Inc. All rights reserved.
Important Notices and Privacy Statement.