|
|

This section of the VPN 3002 Hardware Client Manager applies functions that are interface-specific, rather than system-wide.
You configure two network interfaces for the VPN 3002 to operate as a VPN device: the private interface and the public interface. If you used Quick Configuration as described in the VPN 3002 Hardware Client Getting Started manual, the system supplied many default parameters for the interfaces. Here you can configure them explicitly.
The VPN 3002 includes some IP routing functions: static routes, DHCP, and PPPoE. You configure static routes, the default gateway, and DHCP in the IP Routing section; see the Configuration | System | IP Routing screens. PPPoE requires no further configuration than supplying a username and password in the Public Interface parameter.
This section lets you configure the private and public interfaces.
Configuring an Ethernet interface includes supplying an IP address and subnet mask, and setting speed and transmission mode.
 |
Note Interface settings take effect as soon as you apply them. If the system is in active use, changes might affect tunnel traffic. |
The table on the Configuration | Interfaces screen shows all installed interfaces and their status.

To configure a module, either click the appropriate link in the status table; or use the mouse pointer to select the module on the back-panel image, and click anywhere in the highlighted area.
The VPN 3002 interface installed in the system. To configure an interface, click the appropriate link.
To configure Ethernet interface parameters, click the appropriate highlighted link in the table or click in a highlighted module on the back-panel image. See Configuration | Interfaces | Private/Public.
To configure DNS Server(s), click the highlighted link in the table. See Configuration | System |
Servers | DNS.
To configure DNS Server(s), click the highlighted link in the table. See Configuration | System |
Servers | DNS.
The operational status of this interface:
Configured, enabled, and operational; ready to pass data traffic. The IP address configured on this interface.
The subnet mask configured on this interface.
This is the unique hardware MAC (Media Access Control) address for this interface, displayed in 6-byte hexadecimal notation. You cannot change this address.
The IP routing subsystem routes data packets first using static routes, then the default gateway. If you do not specify a default gateway, the system drops packets it cannot otherwise route.
To configure a default gateway, click the appropriate highlighted link in the table or click in a highlighted module on the back-panel image. See Configuration | System | IP Routing | Default Gateways.
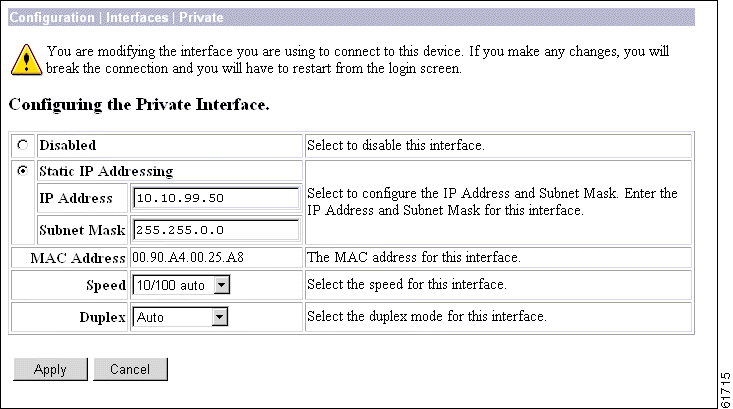
This screen lets you configure parameters for the private interface. It displays the current parameters, if any.
 |
Caution If you modify any parameters of the private interface that you are currently using to connect to the VPN 3002, you will break the connection, and you will have to restart the Manager from the login screen. |
To make the interface offline, click Disabled. This state lets you retain or change its configuration parameters.
If the interface is configured but disabled (offline), the appropriate Ethernet Link Status LED blinks green on the VPN 3002 front panel.
To change the IP address of the private interface, click Static IP Addressing.
Enter the IP address for this interface, using dotted decimal notation (for example, 192.168.12.34). Note that 0.0.0.0 is not allowed. Be sure no other device is using this address on the network.
Enter the subnet mask for this interface, using dotted decimal notation (for example 255.255.255.0). The Manager automatically supplies a standard subnet mask appropriate for the IP address you just entered. For example, the IP address 192.168.12.34 is a Class C address, and the standard subnet mask is 255.255.255.0. You can accept this entry or change it. Note that 0.0.0.0 is not allowed.
This is the unique hardware MAC (Media Access Control) address for this interface, displayed in 6-byte hexadecimal notation. You cannot change this address.
click the drop-down menu button and select the interface speed:
click the drop-down menu button and select the interface transmission mode:
To apply your settings to the system and include them in the active configuration, click Apply. The Manager returns to the Configuration | Interfaces screen.
To save the active configuration and make it the boot configuration, click the Save Needed icon at the top of the Manager window.
To discard your settings, click Cancel. The Manager returns to the Configuration | Interfaces screen.
This screen lets you select a connection method—DHCP, PPPoE, or static IP addressing—for the public interface. It also allows you to disable the public interface.
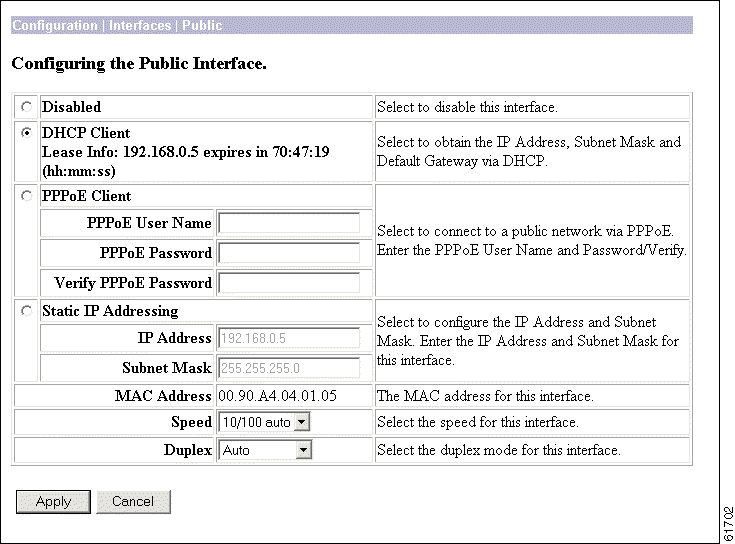
To make the interface offline, click Disabled. This state lets you retain or change its configuration parameters.
click this radio button if you want to obtain the IP address and subnet mask for this interface via DHCP. If you click this button, you do not make entries in the IP address and subnet mask parameters that follow.
click this radio button if you want to connect using PPPoE. If you select PPPoE, you do not make entries in the static IP addressing parameters that follow.
If you have selected PPPoE, enter a valid PPPoE username.
If you have selected PPPoE, enter the PPPoE password for the username you entered above.
If you have selected PPPoE, enter the PPPoE password again to verify it.
click this radio button if you want to use a static IP address.
If you are using static IP addressing, enter the IP address for this interface, using dotted decimal notation (for example, 192.168.12.34). Note that 0.0.0.0 is not allowed. Be sure no other device is using this address on the network.
If you are using static IP addressing, enter the subnet mask for this interface, using dotted decimal notation (for example, 255.255.255.0). The Manager automatically supplies a standard subnet mask appropriate for the IP address you just entered. For example, the IP address 192.168.12.34 is a Class C address, and the standard subnet mask is 255.255.255.0. You can accept this entry or change it. Note that 0.0.0.0 is not allowed.
This is the unique hardware MAC (Media Access Control) address for this interface, displayed in 6-byte hexadecimal notation. You cannot change this address.
If you are using static IP addressing, click the drop-down menu button and select the interface speed:
If you are using static IP addressing, click the drop-down menu button and select the interface transmission mode:
To apply your settings to this interface and include your settings in the active configuration, click Apply. The Manager returns to the Configuration | Interfaces screen.
To save the active configuration and make it the boot configuration, click the Save Needed icon at the top of the Manager window.
To discard your settings, click Cancel. The Manager returns to the Configuration | Interfaces screen.
![]()
![]()
![]()
![]()
![]()
![]()
![]()
![]()
Posted: Wed Nov 20 10:49:53 PST 2002
Copyright 1989-2000©Cisco Systems Inc.