|
|

Table Of Contents
Upgrading Memory to 512 MB
in the VPN 3000 Series ConcentratorUpdating the VPN Concentrator Software Image to Version 4.x
Updating the VPN Concentrator Boot Code to Version 4.x
Troubleshooting the Boot Code Upgrade
Installing the 256 Mb Memory Modules
Shutting Down and Powering Off
Testing and Configuring the Upgrade Modules
Troubleshooting the Memory Installation
Upgrading Memory to 512 MB
in the VPN 3000 Series Concentrator
It is now possible to upgrade your VPN Concentrator memory to 512 MB. If your VPN Concentrator is running low on memory resources, upgrading to 512 MB will help. If you are running into either of the following problems and the VPN Concentrator events point to low memory resources as the cause, we recommend upgrading to 512 MB.
•
VPN Concentrator is unable to support the necessary number of tunnels.
•
To determine the amount of memory currently installed in your VPN Concentrator, use the Monitoring | Status screen.
The VPN Concentrator model 3005 and the VPN 3002 Hardware Client do not support 512 MB memory upgrade.
This document does not include instructions on downgrading the bootcode from version 4.0 or higher to an earlier version. If you need to downgrade your bootcode, contact your Cisco Technical Assistance Center (TAC) representative for instructions.
Caution
Upgrade Procedure Overview
Upgrading the memory to 512 MB involves the following steps. It is important to do these steps in order:
1.
2.
3.
Updating the VPN Concentrator Software Image to Version 4.x
Check the Administration | Software Update | Concentrator screen to see which version of software your VPN Concentrator is running. If your VPN Concentrator is running a version earlier than 4.0 or higher, update it now.
The software image file must be accessible by the workstation you are using to manage the VPN Concentrator. Software image files ship on the Cisco VPN 3000 Concentrator CD-ROM. Updated or patched versions are available from the Cisco website, www.cisco.com.
Save the current VPN Concentrator configuration file and copy it to a remote system before you proceed. See the Administration | File Management | TFTP Transfer screen in the VPN Concentrator Manager.
Step 1
Step 2
Step 3
Step 4
Step 5
Updating the VPN Concentrator Boot Code to Version 4.x
Check the Monitoring | System Status screen to see which version of the boot code your VPN Concentrator is running. If your VPN Concentrator is running a version earlier than 4.0 or higher, update it now.
The boot image file must be accessible by the workstation you are using to manage the VPN Concentrator. Boot code image files ship on the Cisco VPN 3000 Concentrator CD-ROM and also are available from the Cisco website, www.cisco.com.
Warning
Step 1
Step 2
Step 3
Step 4
Step 5
1) Configuration2) Administration3) Monitoring4) Save changes to Config file5) Help Information6) ExitMain ->Step 6
1) Administer Sessions2) Software Update3) System Reboot4) Reboot Status5) Ping6) Access Rights7) File Management8) Certificate Management9) BackAdmin ->Step 7
1) Concentrator2) Clients3) Bootloader4) BackAdmin ->Step 8
WARNING:-- Before beginning the bootloader upgrade, be aware of the following:o You must first download the latest bootloader from the Cisco website toyour local disk and upload it to the device.o Before the upgrade, all network interfaces to the device are automaticallyshut down and restored afterwards. Because of this, you may want to warnusers of the pending disconnect.o During the upgrade, reboots are automatically disallowed.o Do not power off the device during the bootloader upgrade process.Powering off the device will render it unusable.Do you really want to upgrade the bootloader? (Y/N) [N]Step 9
The network interfaces are down...[List of files.]Name of the file for bootloader upgrade?Step 10
Bootloader upgrade in process. This should take about 30 seconds.DO NOT POWER DOWN THE SYSTEM DURING THIS POCEDURE.When the upgrade completes, you see the following message:
The network interfaces are restored ...update success: New bootloader will become active on next reboot!Reboot now? (Y/N) [Y]Step 11
Step 12
Step 13
Troubleshooting the Boot Code Upgrade
Installing the 256 Mb Memory Modules
Caution
Parts Cisco Supplies
The upgrade kit includes these parts:
•
•
Tools You Need
No. 2 Phillips screwdriver.
Shutting Down and Powering Off
Shut down and power off the VPN Concentrator before you install the module.
Step 1
Step 2
Step 3
Step 4
Warning
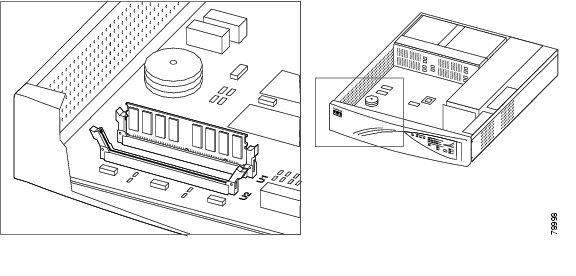
Adding the Upgrade Modules
After you shut down the VPN Concentrator and disconnect the power cord, you can add the memory modules, following these steps:
Step 1
Caution
Step 2
Step 3
Step 4
Step 5
Step 6
Step 7
Step 8
Step 9
Step 10
Warning
Step 11
Step 12
Step 13
Step 14
Testing and Configuring the Upgrade Modules
After you have installed the new memory module, follow these steps.
Step 1
Step 2
Step 3
Step 4
Step 5
Step 6
Troubleshooting the Memory Installation
Copyright © 2003, Cisco Systems, Inc.
All rights reserved
![]()
![]()
![]()
![]()
![]()
![]()
![]()
![]()
Posted: Tue Apr 12 10:14:56 PDT 2005
All contents are Copyright © 1992--2005 Cisco Systems, Inc. All rights reserved.
Important Notices and Privacy Statement.