|
|

This chapter tells you how to complete quick configuration of the system using the VPN Concentrator Manager.
Quick configuration supplies the minimal parameters needed to make the VPN Concentrator operational, while the Main menu lets you configure all the features of the VPN 3000 Concentrator. For example, a configured remote user with a PC and modem can use Microsoft PPTP (point-to-point tunneling protocol) and a local ISP to connect securely—in a VPN tunnel through the Internet—with resources on a private, internal corporate network.
The VPN Concentrator Manager is an HTML-based configuration, administration, and monitoring system built into the VPN Concentrator. To use it, you need only to connect to the VPN Concentrator using a PC and browser on the same private network with the VPN Concentrator.
Before beginning the procedures in this section, you should have completed Steps 1 through 12 under Using the Console. As you proceed, refer to the data you recorded in the table of Quick Configuration Parameters.
The figures that follow show only the main frame of the Manager window. To use features in the other frames, see Understanding the VPN Concentrator Manager Window.
 |
Note You can go through the steps of quick configuration only once, unless you reboot the system with the Reboot ignoring the configuration file option. |
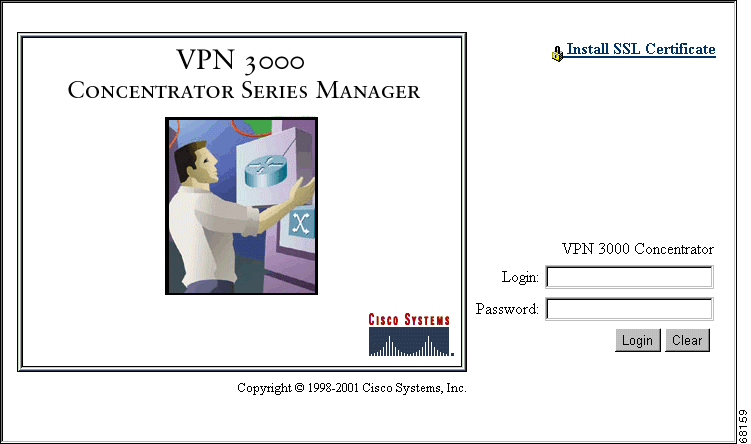
To access and log in to the VPN Concentrator Manager, follow these steps:
Step 2 With the browser, connect to the IP address of the VPN Concentrator on your private network (the address you entered in Step 7 under Using the Console). You can just enter the IP address (for example, 10.10.4.6) in the Address or Location field. The browser displays the login screen.
Step 3 Log in. Entries are case-sensitive, so type them exactly as shown. With Microsoft Internet Explorer, you can press the Tab key to move from field to field; with other browsers, you might have to change fields with the mouse. If you make a mistake, click Clear and start over.
a. Click in the Login field and type admin. (Do not press Enter.)
b. Click in the Password field and type admin. (The field shows *****.)
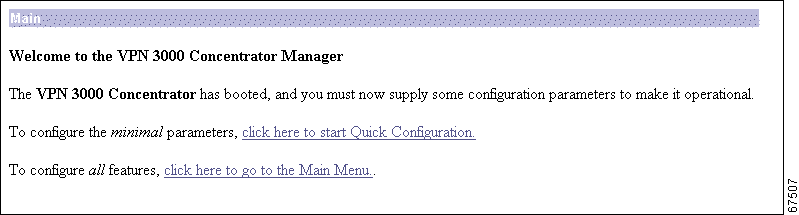
The VPN Concentrator Manager displays the initial configuration screen (see Figure 3-2 ).
To start quick configuration, click the highlighted link that says click here to start Quick Configuration.
Text entries are case-sensitive; for example, admin and ADMIN are different passwords.
After you make an entry in a field, do not press Enter. Just move the cursor from field to field. With Microsoft Internet Explorer, you can press Tab to move from field to field; other browsers may work differently.
On any screen where it appears, click Back to return to the previous screen.
Configuration entries take effect as soon as you click Apply or Continue, and they constitute the active or running configuration. To save the active configuration and make it the boot configuration, click the Save Needed icon on the Manager toolbar in the top frame of the browser window. To remind you to save your settings, the icon changes from Save to Save Needed as soon as the active configuration differs from the boot configuration.
If you make a mistake and see an Error screen with the message, "An error has occurred while attempting to perform the operation," and you return to the screen where you were working, carefully check all your previous entries on that screen. The Manager attempts to retain valid entries, but invalid entries are lost. See "Troubleshooting and System Errors" for more details.
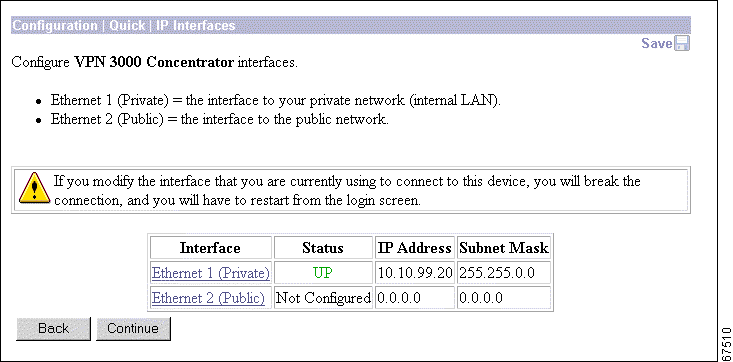
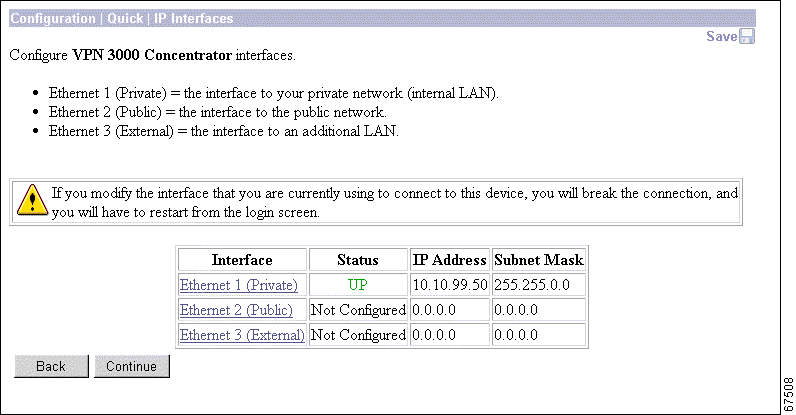
The Manager displays the Configuration | Quick | IP Interfaces screen appropriate to the model you are configuring.
This screen lets you configure the VPN Concentrator Ethernet interfaces.
Model 3005 comes with two Ethernet interfaces. Models 3015-3080 come with three Ethernet interfaces.
For the VPN Concentrator to become fully operational, you must configure the two interfaces you physically connected to your network under Connecting Network Cables.
The screen displays the current configuration settings. You entered the IP address and subnet mask for Ethernet 1 in Step 7 and Step 8 under Using the Console. We assume that is the interface you are using to connect to the device and configure it.
 |
Caution If you modify any parameters of the interface that you are currently using to connect to the VPN Concentrator, you will break the connection, and you will have to restart the Manager and quick configuration from the login screen. |
If you are not modifying an interface, click Continue to proceed, and skip to Configuring Tunneling Protocols and Options.
When you click on an Ethernet interface, the Manager displays the Configuration | Quick | IP Interfaces | Ethernet 1 2 3 screen for the interface you selected (see Figure 3-4 ).
The screen displays the current parameters, if any, for an Ethernet interface. If you are modifying Ethernet 1, the Manager also displays a caution message. To configure parameters for an Ethernet interface, follow these steps:
Step 2 To make this interface a public interface, check the Public Interface check box. A public interface is an interface to a public network, such as the Internet. You should designate only one VPN Concentrator interface as a public interface.
Step 3 The MAC Address is the unique hardware MAC (Medium Access Control) address for this interface, in 6-byte hexadecimal notation. The screen shows this address only after you first configure an interface, and you cannot change it.
Step 4 In the Filter field, click the drop-down menu button and select the filter that applies to this interface. The filter rules govern the handling of data packets through this interface—whether to forward or drop, according to configured criteria. You can customize filters under regular system configuration on the Configuration | Policy Management | Traffic Management screens. Cisco supplies the following default filters with the VPN Concentrator:
Step 5 In the Speed field, click the drop-down menu button and select the interface speed:
Step 6 In the Duplex field, click the drop-down menu button and select one of the following interface transmission modes:
Step 7 In the MTU field, either accept the default value, 1500, as the maximum transmission unit (in bytes) or specify a value in the range 68 to 1500. The standard MTU for Ethernet is 1500 bytes.
Step 8 Click Apply to apply your choices to the interface. Click Cancel to discard your choices.
The Manager returns to the Configuration | Quick | IP Interfaces screen. If you have entered new parameters for an interface, the screen displays your entries.
Step 9 If you want to modify another Ethernet interface, click on the interface and continue.
If you do not want to modify another interface, click Continue to proceed, and skip to Configuring System Information.
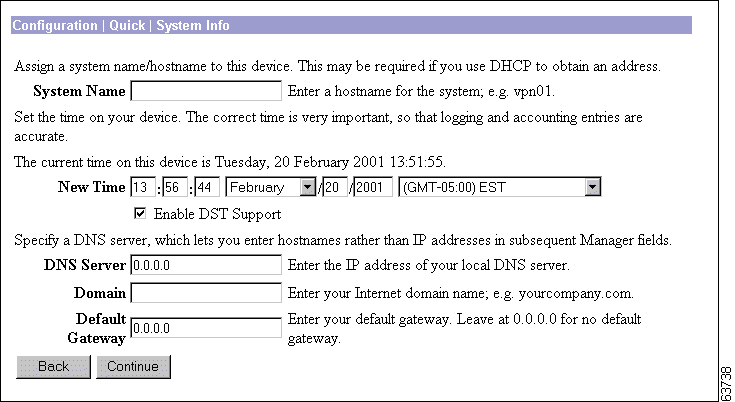
The Manager displays the Configuration | Quick | System Info screen.
To configure basic information that identifies your VPN Concentrator on the network, refer to the data you recorded in Table 2-2 as you follow these steps:
The system name you entered earlier appears in the System Name field. If no system name appears, enter a name (such as VPN01) for the VPN Concentrator. This name must uniquely identify this device on your network.
Step 2 You previously set the time and date on the VPN Concentrator under Using the Console, but you can change them here if you want. The screen shows the current date and time on the device. The values shown in the New Time fields are the time on the browser PC, but any entries you make apply to the VPN Concentrator.
In the appropriate fields, make any changes. The fields are, in order: Hour : Minute : Second Month / Day / Year Time Zone. Click the drop-down menu buttons to select Month and Time Zone. The time zone selections are offsets in hours relative to Greenwich Mean Time (GMT), which is the basis for Internet time synchronization. Enter the Year as a four-digit number.
To Enable DST Support, check the box. During DST (Daylight-Saving Time), clocks are set one hour ahead of standard time. Enabling DST support means that the VPN Concentrator automatically adjusts the time zone for DST or standard time. If your system is in a time zone that uses DST, you must enable DST support.
Step 3 In the DNS Server field, enter the IP address of your local DNS (Domain Name System) server, using dotted decimal notation (for example, 10.10.0.11).
Specifying a DNS server lets you enter Internet hostnames (for example, mail01) rather than IP addresses for servers as you configure and manage the VPN Concentrator. While hostnames are easier to remember, using IP addresses avoids problems that might arise with the DNS server offline, congested, or similarly indisposed.
Step 4 In the Domain field, enter the registered domain in which the VPN Concentrator is located (for example, cisco.com), sometimes called the domain name suffix or subdomain.
Step 5 In the Default Gateway field, enter the IP address or hostname of the system to which the VPN Concentrator should route packets that are not explicitly routed. In other words, if the VPN Concentrator has no IP routing parameters (such as RIP, OSPF, or static routes) that specify where to send packets, it will send them to this gateway. (When you first start the VPN Concentrator, it has no IP routing configuration parameters.) This address must not be the same as the IP address configured on any VPN Concentrator interface. To specify no default gateway, leave the field at 0.0.0.0, which means the VPN Concentrator drops unrouted packets.
You can configure IP routing with regular system configuration. For RIP and interface-specific OSPF, see the Configuration | Interfaces screens. For global OSPF and static routes, see the Configuration | System | IP Routing screens. See the VPN 3000 Series Concentrator Reference Volume I: Configuration for more information.
Step 6 Click Continue to proceed.
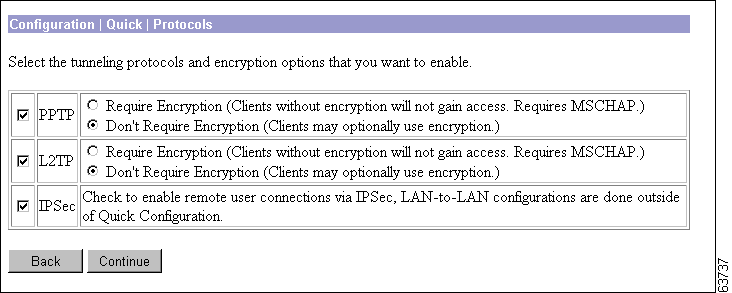
The Manager displays the Configuration | Quick | Protocols screen.
You must enable at least one of these protocols for the device to function as a VPN device. PPTP and L2TP are popular with Microsoft Windows-based clients, and the VPN 3000 Client uses IPSec. To enable, disable, and configure virtual private network tunneling protocols and encryption options on the VPN Concentrator, follow these steps:
Step 2 If you enable PPTP, click one of the radio buttons to select the encryption option:
Step 3 Check L2TP to enable Layer 2 Tunneling Protocol. (This box is checked by default.)
Step 4 If you enable L2TP, click one of the radio buttons to select the encryption option:
Step 5 Check IPSec to enable remote-access user connections using Internet Protocol Security protocol. (This box is checked by default.) This option supports only remote-access IPSec connections from the VPN 3000 Client or a similar protocol-compliant client. To configure IPSec LAN-to-LAN connections, see Configuration | System | Tunneling Protocols | IPSec LAN-to-LAN under regular system configuration.
Step 6 Click Continue to proceed.
If you enable none of the protocols, skip to the section on Changing Admin Password.
If you enable at least one protocol, continue to the next section.
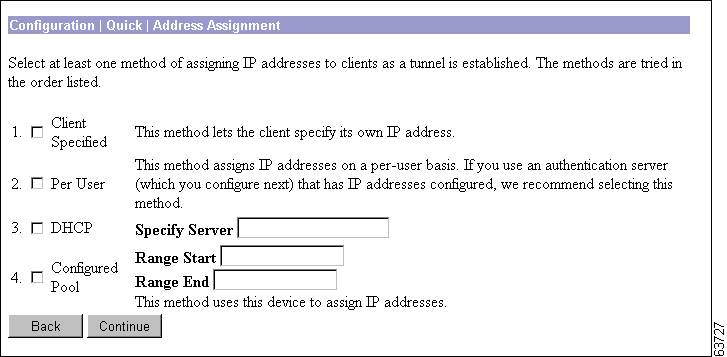
The Manager displays the Configuration | Quick | Address Assignment screen. This screen appears only when you enable at least one tunneling protocol.
You can select prioritized methods for assigning IP addresses to clients as a tunnel is established. The methods are tried in the order listed. You must select at least one method. You can select any and all methods. There are no default methods.
To select a method, follow these steps.
Step 2 Check Per User to enable this method, which assigns IP addresses on a per-user basis. If you use an authentication server that has IP addresses configured, we recommend using this method. You configure an authentication server on the next screen.
Step 3 Check DHCP (Dynamic Host Configuration Protocol) to enable this method, which uses a DHCP server to assign IP addresses.
Step 4 If you enable DHCP, enter the DHCP server hostname or IP address in the Specify Server field. (If you configured a DNS server, you can enter a hostname in this field; otherwise, enter an IP address.)
Step 5 Check Configured Pool to enable this method, which uses the VPN Concentrator to assign IP addresses from an internally configured pool.
Step 6 If you enable Configured Pool, enter the starting and ending IP addresses available in the initial pool, in the Range Start and Range End fields. Enter these addresses in dotted decimal notation; for example, 10.10.147.77.
Step 7 Click Continue to proceed.
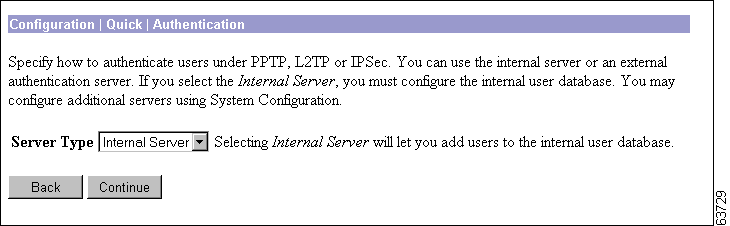
The Manager displays the Configuration | Quick | Authentication screen. This screen appears only when you enable at least one tunneling protocol.
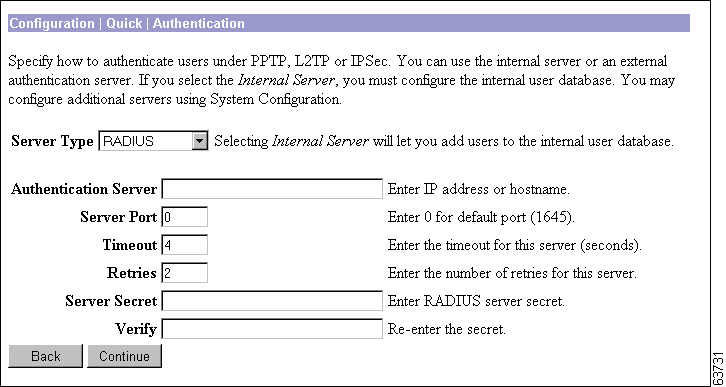
You can choose how to authenticate users. You can select the VPN Concentrator internal server or one of three external server types. You must select one server type. You can configure additional authentication servers on the Configuration | System | Servers | Authentication screen using regular system configuration.
Click the drop-down menu button and select the Server Type. The screen and its configurable fields change depending on the Server Type. Choose one of the following:
Before you configure an external server here, be sure that the external server you reference is itself properly configured and that you know how to access it (IP address or hostname, TCP/UDP port, secret/password, and so forth). The VPN Concentrator functions as the client of these servers.
Find your selected Server Type in the following sections and follow the configuration instructions there.
The VPN Concentrator internal authentication server lets you enter a maximum of 100 groups and users (combined) in its database, which is adequate for a small user base. For larger numbers of users, we recommend using a RADIUS authentication server. See the Configuration | User Management screens under regular System Configuration.
The internal server has no configurable parameters.
Skip to the section Configuring Internal Server User Database.
External RADIUS servers can return group and user authentication parameters that match those on the VPN Concentrator; other authentication servers do not. The VPN 3000 software CD-ROM includes a trial copy of the CiscoSecure ACS RADIUS authentication server and instructions for using it with the VPN Concentrator.
We suggest you accept the default values. To configure these parameters for a RADIUS (Remote Authentication Dial-In User Service) authentication server, follow these steps:
Step 2 In the Server Port field, enter the UDP port number by which you access the server. Enter 0 to have the system supply the default port number, 1645.
Step 3 In the Timeout field, enter the time in seconds to wait after sending a query to the server and receiving no response, before trying again. Minimum is 1 second, default is 4 seconds, maximum is 30 seconds.
Step 4 In the Retries field, enter the number of times to retry sending a query to the server after the timeout period. If there is still no response after this number of retries, the VPN Concentrator declares this server inoperative. Minimum is 0, default is 2, maximum is 10 retries.
Step 5 In the Server Secret field, enter the RADIUS server secret (also called the shared secret); for example, C8z077f. The maximum is 64 characters. The field shows only asterisks.
Step 6 In the Verify field, re-enter the RADIUS server secret to verify it. The field shows only asterisks.
Step 7 Click Continue to proceed.
If you selected the IPSec tunneling protocol, skip to the section Configuring the IPSec Group. Otherwise, skip to the section Changing Admin Password.
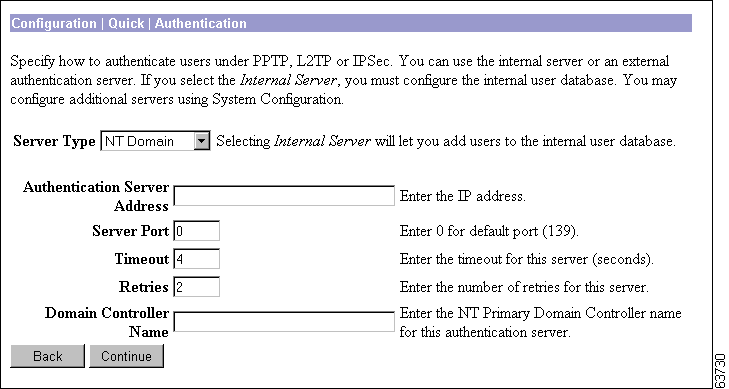
Configure these parameters for an external Windows NT Domain authentication server. We suggest you accept the default values. (See Figure 3-10.)
To configure the parameters for the NT authentication server, follow these steps:
Step 2 In the Server Port field, enter the TCP port number by which you access the server. Enter 0 (the default) to have the system supply the default port number, 139.
Step 3 In the Timeout field, enter the time in seconds to wait after sending a query to the server and receiving no response, before trying again. The minimum is 1 second, default is 4 seconds, maximum is 30 seconds.
Step 4 In the Retries field, enter the number of times to retry sending a query to the server after the timeout period. If there is still no response after this number of retries, the VPN Concentrator declares this server inoperative. The minimum is 0, default is 2, maximum is 10 retries.
Step 5 In the Domain Controller Name field, enter the NT Primary Domain Controller hostname for this server; for example, PDC01.The maximum is 16 characters. You must enter this name, and it must be the correct hostname for the server whose IP address you entered in Authentication Server Address above; if it is incorrect, authentication will fail.
Step 6 Click Continue to proceed.
If you selected the IPSec tunneling protocol, skip to the section Configuring the IPSec Group. Otherwise, skip to the section Changing Admin Password.
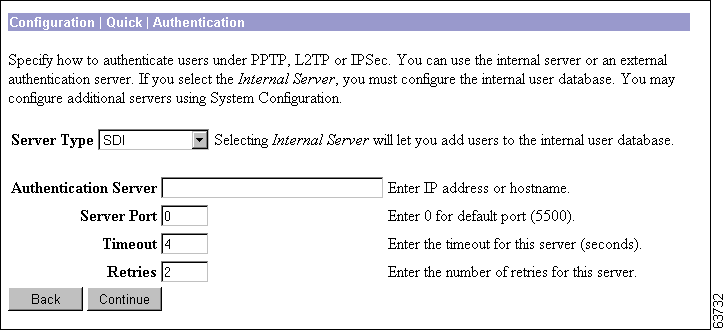
Configure these parameters for an external SDI (RSA Security Inc. SecurID) authentication server. We suggest you accept the defaults.
To configure the parameters for the SDI authentication server, follow these steps:
Step 2 In the Server Port field, enter the UDP port number by which you access the server. Enter 0 (the default) to have the system supply the default port number, 5500.
Step 3 In the Timeout field, enter the time in seconds to wait after sending a query to the server and receiving no response, before trying again. The minimum is 1 second, default is 4 seconds, maximum is 30 seconds.
Step 4 In the Retries field, enter the number of times to retry sending a query to the server after the timeout period. If there is still no response after this number of retries, the VPN Concentrator declares this server inoperative. The minimum is 0, default is 2, maximum is 10 retries.
Step 5 Click Continue to proceed.
If you selected the IPSec tunneling protocol, skip to the section Configuring the IPSec Group. Otherwise, skip to the section Changing Admin Password.
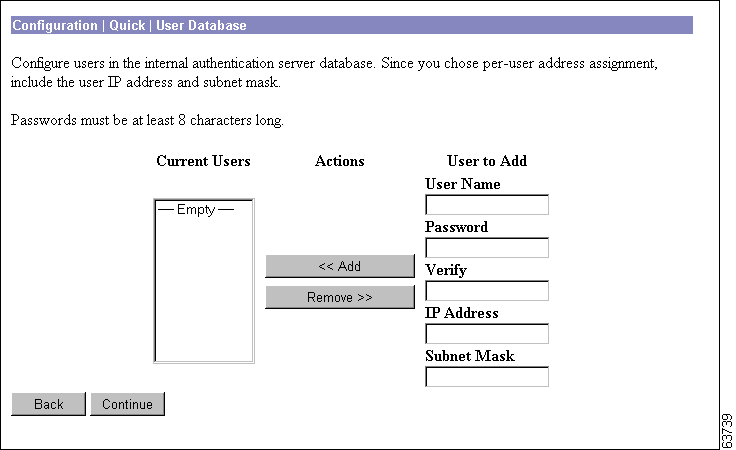
The Manager displays the Configuration | Quick | User Database screen. This screen displays only when you select the internal authentication server.
This screen lets you add and remove users in the internal authentication server database. When you first do quick configuration, the Current Users list is empty. To use the internal server, you must add at least one user to the database. As you add or remove users, the system updates and refreshes the screen with the appropriate entries in the Current Users list.
You can change user parameters on the regular Configuration | User Management | Users screens, but on this quick configuration screen, you can only add and remove users. Follow these steps to add or remove a user:
a. Type a unique name in the User Name field. Maximum is 32 characters, case-sensitive. To be authenticated, the user must log in from the client using this name.
b. Move to the Password field and type the password. The password must be at least 8 characters long; maximum is 32 characters, case-sensitive. The field shows only asterisks. To be authenticated, the user must log in from the client using this password. Each user name / password combination must be unique.
c. Move to the Verify field and retype the password. The field shows only asterisks.
d. If you selected per-user address assignment:
Step 2 Click << Add.
Step 3 Repeat Steps 1 and 2 for each user. The screen refreshes each time you add a user.
Step 4 To remove a user, select the user in the Current Users list and click Remove >>. The screen refreshes each time you remove a user. There is no confirmation or undo; to reinstate a user, enter the data in Step 1.
Step 5 When you have finished entering users, click Continue to proceed.
If you selected the IPSec tunneling protocol, proceed to the section "Configuring the IPSec Group" below. Otherwise, skip to the section Changing Admin Password.
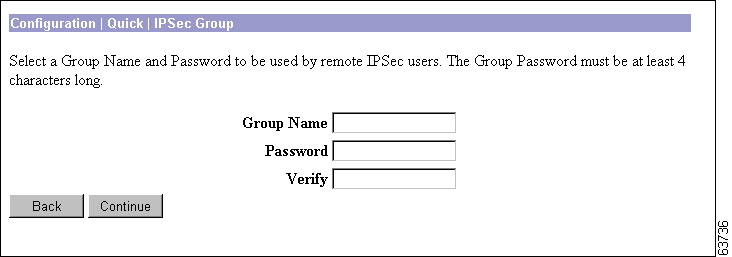
The Manager displays the Configuration | Quick | IPSec Group screen. This screen appears only when you select the IPSec tunneling protocol, and you must configure these parameters to complete quick configuration.
The remote-access IPSec client connects to the VPN Concentrator using this group name and password, which are automatically configured on the internal authentication server. This is the IPSec group that creates the tunnel. Users then log in, and are authenticated, through their usernames and passwords. (See Figure 3-13.)
Step 2 In the Password field, enter a unique password for this group. The minimum field length is 4 characters. The maximum length is 32 characters. Entries are case-sensitive. The field displays only asterisks.
Step 3 In the Verify field, reenter the group password to verify it. The field displays only asterisks.
Step 4 Click Continue to proceed. You must configure these parameters before you can proceed.
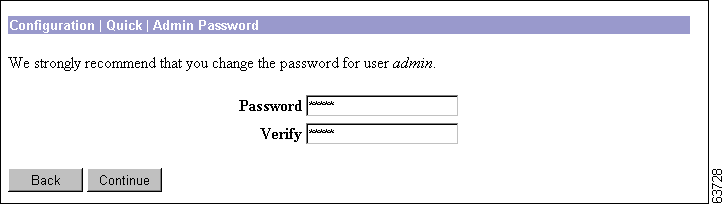
The Manager displays the Configuration | Quick | Admin Password screen.
This screen lets you change the password for the admin administrator user. For ease of use during startup, the default admin password supplied with the VPN Concentrator is also admin. Since the admin user has full access to all management and administration functions on the device, we strongly recommend you change this password to improve device security. You can further configure all administrator users on the regular Administration | Access Rights | Administrators Manager screen.
To change the password for the admin administrator user, follow these steps:
Step 2 In the Verify field, re-enter the new password to verify it.
Step 3 Click Continue to proceed.
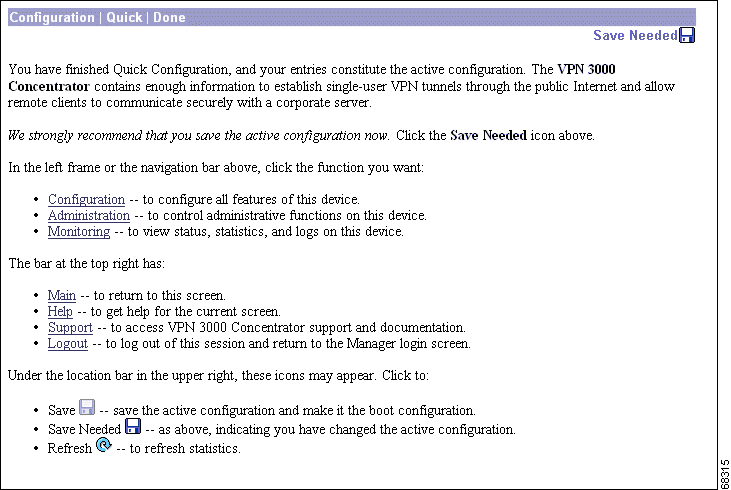
The Manager displays the Configuration | Quick | Done screen.
You have finished quick configuration, and your entries constitute the active or running configuration. The VPN Concentrator now has enough information, and it is operational. For example, a configured remote user with a PC and modem can use Microsoft PPTP and a local ISP to connect securely—in a VPN tunnel through the Internet—with resources on a private, internal corporate network.
We strongly recommend that you save the active configuration before you proceed.
As you make configuration entries, they take effect immediately and are included in the active, or running, configuration. However, if you reboot the VPN Concentrator without saving the active configuration, any configuration changes are lost.
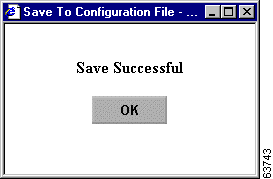
To remind you to save your settings, the Save icon on the Manager toolbar at the top of the Manager screen changes to Save Needed as soon as the active configuration differs from the boot configuration. Click either icon to save the active configuration as the boot configuration. A pop-up window displays a status message.
Click OK to close the window. Should you need to restart the VPN Concentrator, it will then boot with your configured parameters.
We strongly recommend that, as you configure the VPN Concentrator, you make it a habit to click Save Needed whenever you finish setting parameters on a Manager screen.
Now that the VPN Concentrator is operational, you can proceed to the following functions:
To use other VPN Concentrator Manager functions, listed below, click the topic in the left frame of the Manager window or on the Manager toolbar in the top frame of the Manager window.
For details on the frames, functions, and icons in the Manager window, see the following section, "Understanding the VPN Concentrator Manager Window".
For details on the VPN Concentrator hardware, all the functions available in the VPN Concentrator Manager, or using the CLI, see the VPN 3000 Concentrator Series User Guide.
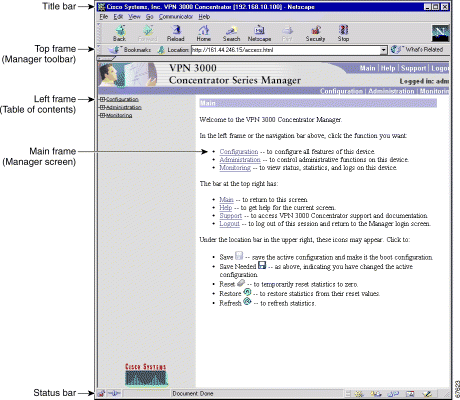
The VPN Concentrator Manager window on your browser consists of three frames—top, left, and main—and it provides helpful messages and tips as you move the mouse pointer over window items. The title bar and status bar also provide useful information.
![]()
![]()
![]()
![]()
![]()
![]()
![]()
![]()
Posted: Fri Apr 18 17:43:10 PDT 2003
All contents are Copyright © 1992--2002 Cisco Systems, Inc. All rights reserved.
Important Notices and Privacy Statement.