|
|

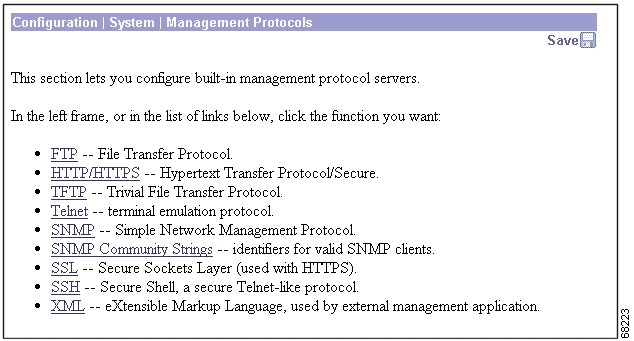
The VPN 3000 Concentrator Series includes various built-in servers, using various protocols, that let you perform typical network and system management functions. This section explains how you configure and enable those servers.
This section of the Manager lets you configure and enable built-in VPN Concentrator servers that provide management functions using:
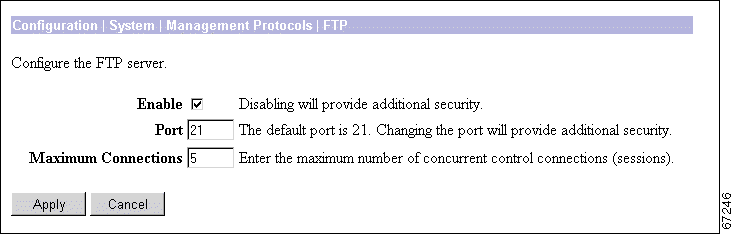
This screen lets you configure and enable the VPN Concentrator's FTP (File Transfer Protocol) server. When the server is enabled, you can use an FTP client to upload and download files in VPN Concentrator Flash memory.
FTP server login usernames and passwords are the same as those enabled and configured on the Administration | Access Rights | Administrators screens. To protect security, the VPN Concentrator does not allow anonymous FTP login.
The settings here have no effect on FTP backup of event log files. (See Configuration | System | Events | General and FTP Backup.) For those operations, the VPN Concentrator acts as an FTP client.
Check the Enable check box to enable the FTP server. The box is checked by default. Disabling the FTP server provides additional security.
Enter the port number that the FTP server uses. The default value is 21.
Enter the maximum number of concurrent control connections (sessions) that the FTP server allows. (FTP uses separate connections for control and data transfer during a session.) The minimum number is 1. The default is 5. The maximum is 20.
To apply your FTP server settings, and to include your settings in the active configuration, click Apply. The Manager returns to the Configuration | System | Management Protocols screen.
To save the active configuration and make it the boot configuration, click the Save Needed icon at the top of the Manager window.
To discard your settings, click Cancel. The Manager returns to the Configuration | System | Management Protocols screen.
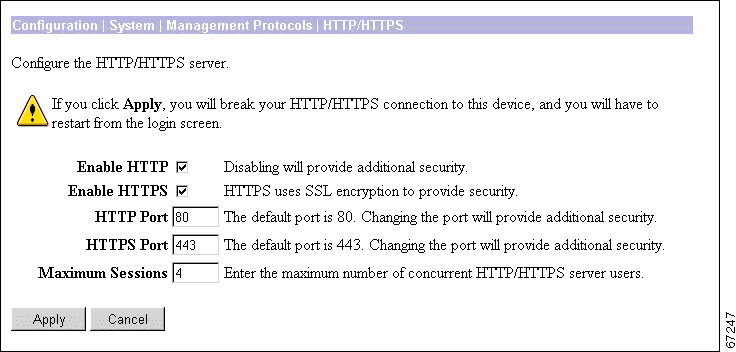
This screen lets you configure and enable the VPN Concentrator's HTTP/HTTPS server: Hypertext Transfer Protocol and HTTP over SSL (Secure Sockets Layer) protocol. When the server is enabled, you can use a web browser to communicate with the VPN Concentrator. HTTPS lets you use a web browser over a secure, encrypted connection.
 |
Note The VPN Concentrator Manager requires the HTTP/HTTPS server. If you click Apply, even if you
have made no changes on this screen, you will break your HTTP/HTTPS connection and you must
restart the Manager session from the login screen. If you disable either HTTP or HTTPS, and that is the protocol you are currently using, you can reconnect with the other protocol if it is enabled and configured. If you disable both HTTP and HTTPS, you cannot use a web browser to connect to the VPN Concentrator. Use the Cisco Command Line Interface from the console or a Telnet session. |
Check the Enable HTTP check box to enable the HTTP server. The box is checked by default. You must enable HTTP to install the SSL certificate in the browser initially, so you can thereafter use HTTPS. Disabling the HTTP server provides additional security, but makes system management less convenient. See the preceding notes.
Check the Enable HTTPS check box to enable the HTTPS server. The box is checked by default. HTTPS—also known as HTTP over SSL—lets you use the VPN Concentrator Manager over an encrypted connection.
Enter the port number that the HTTP server uses. The default value is 80.
Enter the port number that the HTTPS server uses. The default value is 443.
Enter the maximum number of concurrent, combined HTTP and HTTPS sessions (users) that the server allows. The minimum number of sessions is 1. The default number is 4. The maximum number is 10.
To apply your HTTP/HTTPS server settings, to include your settings in the active configuration, and to break the current HTTP/HTTPS connection, click Apply. If HTTP or HTTPS is still enabled, the Manager returns to the main login screen. If both HTTP and HTTPS are disabled, you can no longer use the Manager.
To save the active configuration and make it the boot configuration, click the Save Needed icon at the top of the Manager window.
To discard your settings, click Cancel. The Manager returns to the Configuration | System | Management Protocols screen.
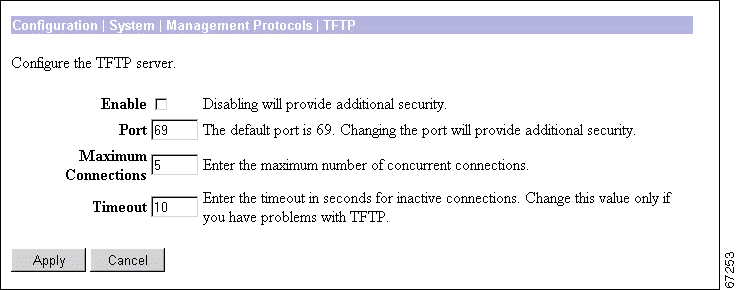
This screen lets you configure and enable the VPN Concentrator's TFTP (Trivial File Transfer Protocol) server. When the server is enabled, you can use a TFTP client to upload and download files in VPN Concentrator Flash memory.
TFTP is similar to FTP, but it has no login procedure and no user interface commands. It allows only file transfers. The lack of a login procedure makes it relatively insecure.
The settings here have no effect on TFTP file transfer from the Administration | File Management | TFTP Transfer screen. For those operations, the VPN Concentrator acts as a TFTP client.
Check the Enable check box to enable the TFTP server. The box is unchecked by default. Disabling the TFTP server provides additional security.
Enter the port number that the TFTP server uses. The default port number is 69.
Enter the maximum number of simultaneous connections that the TFTP server allows. The minimum number is 1. The default number is 5. The maximum number is 20.
Enter the timeout in seconds for inactive TFTP connections. The minimum timeout is 1 second. The default is 10 seconds. The maximum is 30 seconds. Change the default value only if you have problems with TFTP transfers.
To apply your TFTP settings, and to include your settings in the active configuration, click Apply. The Manager returns to the Configuration | System | Management Protocols screen.
To save the active configuration and make it the boot configuration, click the Save Needed icon at the top of the Manager window.
To discard your settings, click Cancel. The Manager returns to the Configuration | System | Management Protocols screen.
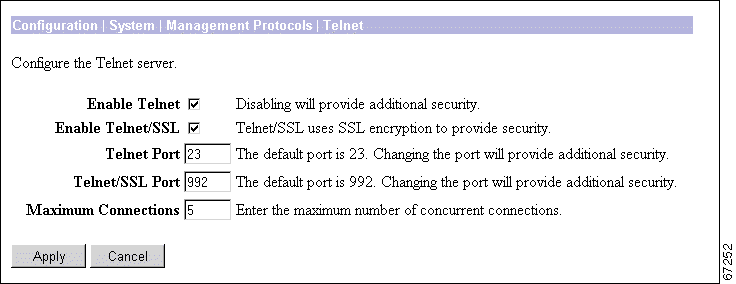
This screen lets you configure and enable the VPN Concentrator's Telnet terminal emulation server, and Telnet over SSL (Secure Sockets Layer protocol). When the server is enabled, you can use a Telnet client to communicate with the VPN Concentrator. You can fully manage and administer the VPN Concentrator using the Cisco Command Line Interface via Telnet.
Telnet server login usernames and passwords are the same as those enabled and configured on the Administration | Access Rights | Administrators screens.
Telnet/SSL uses a secure, encrypted connection. Although we are not aware of commercial Telnet/SSL clients, there are some working shareware applications. For example, see ftp://ftp.gbnet.net/pub/security/Crypto/SSLapps for ssltel02.zip, an "SSL Telnet for Windows" shareware application. (Please note that this application is mentioned for information only and that Cisco Systems does not supply, support, or endorse it in any way.)
See the Configuration | System | Management Protocols | SSL screen to configure SSL parameters. See the Administration | Certificate Management | Certificates screen to manage the SSL digital certificate.
Check the Enable Telnet check box to enable the Telnet server. The box is checked by default. Disabling the Telnet server provides additional security, but doing so prevents using the Cisco Command-Line Interface via Telnet.
Check the Enable Telnet/SSL check box to enable Telnet over SSL. The box is checked by default. Telnet/SSL uses Telnet over a secure, encrypted connection.
Enter the port number that the Telnet server uses. The default value is 23.
Enter the port number that Telnet over SSL uses. The default value is 992.
Enter the maximum number of concurrent, combined Telnet and Telnet/SSL connections that the server allows. The minimum number is 1. The default number is 5. The maximum number is 10.
To apply your Telnet settings, and to include the settings in the active configuration, click Apply. The Manager returns to the Configuration | System | Management Protocols screen.
To save the active configuration and make it the boot configuration, click the Save Needed icon at the top of the Manager window.
To discard your settings, click Cancel. The Manager returns to the Configuration | System | Management Protocols screen.
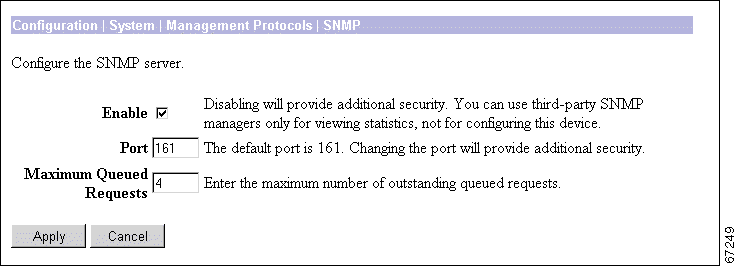
This screen lets you configure and enable the VPN Concentrator's SNMP (Simple Network Management Protocol) server. When the server is enabled, you can use an SNMP client to collect information from the VPN Concentrator but not to configure it.
To use the SNMP server, you must also configure an SNMP Community on the Configuration | System | Management Protocols | SNMP Communities screen.
The settings on this screen have no effect on sending system events to SNMP trap destinations (see Configuration | System | Events | General and Trap Destinations). For those functions, the VPN Concentrator acts as an SNMP client.
Check the Enable check box to enable the SNMP server. The box is checked by default. Disabling the SNMP server provides additional security.
Enter the port number that the SNMP server uses. The default value is 161.
Enter the maximum number of outstanding queued requests that the SNMP server allows. The minimum number is 1. The default number is 4. The maximum number is 200.
To apply your SNMP settings, and to include the settings in the active configuration, click Apply. The Manager returns to the Configuration | System | Management Protocols screen.
To save the active configuration and make it the boot configuration, click the Save Needed icon at the top of the Manager window.
To discard your settings, click Cancel. The Manager returns to the Configuration | System | Management Protocols screen.
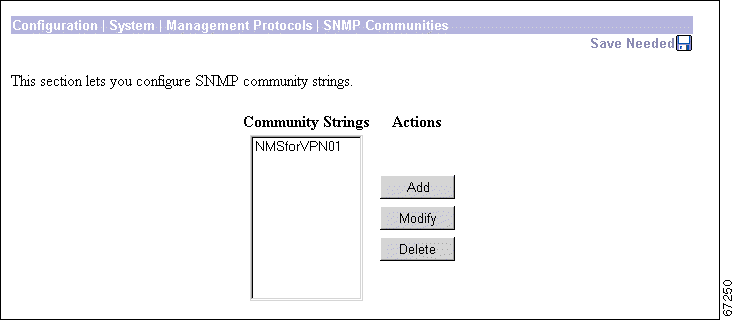
This section of the Manager lets you configure and manage SNMP community strings, which identify valid communities from which the SNMP server will accept requests. A community string is like a password: it validates messages between an SNMP client and the server.
To use the VPN Concentrator SNMP server, you must configure and add at least one community string. You can configure a maximum of 10 community strings. To protect security, the SNMP server does not include the usual default public community string, and we recommend that you not configure it.
The Community Strings list shows SNMP community strings that have been configured. If no strings have been configured, the list shows --Empty--.
To configure and add a new community string, click Add. The Manager opens the Configuration | System | Management Protocols | SNMP Communities | Add screen.
To modify a configured community string, select the string from the list and click Modify. The Manager opens the Configuration | System | Management Protocols | SNMP Communities | Modify screen.
To delete a configured community string, select the string from the list and click Delete. There is no confirmation or undo. The Manager refreshes the screen and shows the remaining entries in the list.
The Manager immediately includes your changes in the active configuration. To save the active configuration and make it the boot configuration, click the Save Needed icon at the top of the Manager window.
These Manager screens let you:
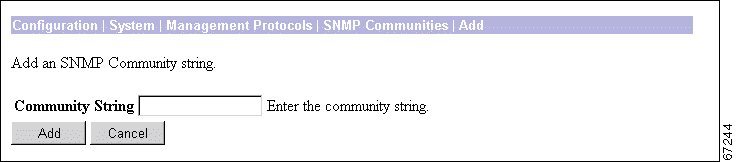
Enter the SNMP community string. Maximum 31 characters, case-sensitive.
To add this entry to the list of configured community strings, click Add. Or to apply your changes to this community string, click Apply. Both actions include your entry in the active configuration. The Manager returns to the Configuration | System | Management Protocols | SNMP Communities screen; a new entry appears at the bottom of the Community Strings list.
To save the active configuration and make it the boot configuration, click the Save Needed icon at the top of the Manager window.
To discard your entry or changes, click Cancel. The Manager returns to the Configuration | System | Management Protocols | SNMP Communities screen, and the Community Strings list is unchanged.
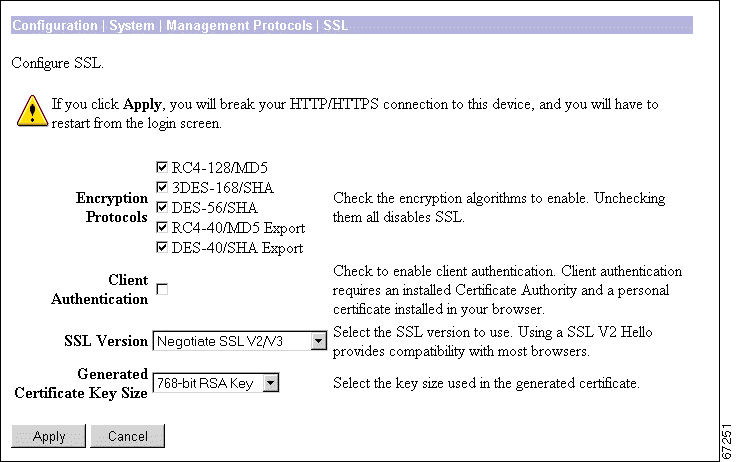
This screen lets you configure the VPN Concentrator SSL (Secure Sockets Layer) protocol server. These settings apply to both HTTPS and Telnet over SSL. HTTPS lets you use a web browser over a secure, encrypted connection to manage the VPN Concentrator.
SSL creates a secure session between the client and the VPN Concentrator server. The client first authenticates the server, they negotiate session security parameters, and then they encrypt all data passed during the session. If, during negotiation, the server and client cannot agree on security parameters, the session terminates.
SSL uses digital certificates for authentication. The VPN Concentrator creates a self-signed SSL server certificate when it boots; or you can install in the VPN Concentrator an SSL certificate that has been issued in a PKI context. This certificate must then be installed in the client (for HTTPS; Telnet does not usually require it). You need to install the certificate from a given VPN Concentrator only once.
The default SSL settings should suit most administration tasks and network security requirements. We recommend that you not change them unless advised to do so.
|
Note To ensure the security of your connection to the VPN Concentrator Manager, if you click Apply on this screen—even if you have made no changes—you will break your connection to the Manager and you must restart the Manager session from the login screen. |
Check the Encryption Protocols check boxes for the encryption algorithms that the VPN Concentrator SSL server can negotiate with a client and use for session encryption. All are checked by default. You must check at least one algorithm to enable SSL. Unchecking all algorithms disables SSL.
The algorithms are negotiated in the order shown. You cannot change the order, but you can enable or disable selected algorithms.
This parameter applies to HTTPS only; it is ignored for Telnet/SSL.
Check the Client Authentication check box to enable SSL client authentication. The box is unchecked by default. In the most common SSL connection, the client authenticates the server, not vice-versa. Client authentication requires personal certificates installed in the browser, and trusted certificates installed in the server. Specifically, the VPN Concentrator must have a root CA certificate installed; and a certificate signed by one of the VPN Concentrator's trusted CAs must be installed in the web browser. See Administration | Certificate Management.
Click the drop-down menu button and choose the SSL version to use. SSL Version 3 has more security options than Version 2, and TLS (Transport Layer Security) Version 1 has more security options than SSL Version 3. Some clients that send an SSL Version 2 "Hello" (initial negotiation), can actually use a more secure version during the session. Telnet/SSL clients usually can use only SSL Version 2.
Click the drop-down menu button and choose the size of the RSA key that the VPN Concentrator uses in its self-signed (generated) SSL server certificate. A larger key size increases security, but it also increases the processing necessary for all transactions over SSL. The increases vary, depending on the type of transaction (encryption or decryption).
To apply your SSL settings, and to include your settings in the active configuration, click Apply. The Manager returns to the Configuration | System | Management Protocols screen.
To save the active configuration and make it the boot configuration, click the Save Needed icon at the top of the Manager window.
To discard your settings, click Cancel. The Manager returns to the Configuration | System | Management Protocols screen.
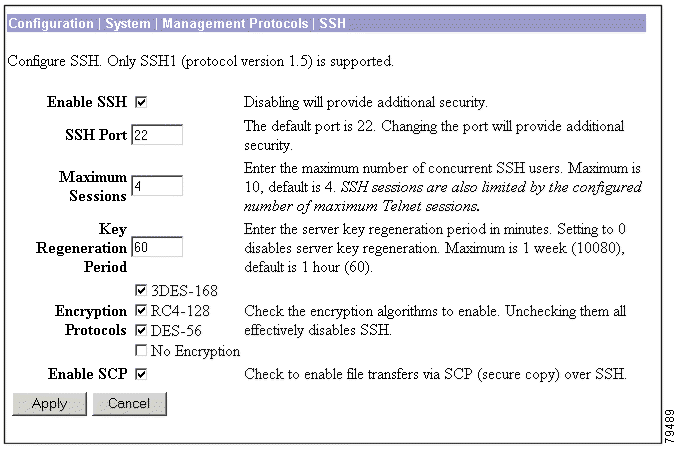
This screen lets you configure the VPN Concentrator SSH (Secure Shell) protocol server. SSH is a secure Telnet-like terminal emulator protocol that you can use to manage the VPN Concentrator, using the Command Line Interface, over a remote connection. The VPN Concentrator supports SSH1 (protocol version 1.5), which uses two RSA keys for security. All communication over the connection is encrypted.
At the start of an SSH session, the VPN Concentrator sends both a host key and a server key to the client, which responds with a session key that it generates and encrypts using the host and server keys. The RSA key of the SSL certificate is used as the host key, which uniquely identifies the VPN Concentrator. See Configuration | System | Management Protocols | SSL.
Check the Enable SSH check box to enable the SSH server. The box is checked by default. Disabling the SSH server provides additional security by preventing SSH access.
Enter the port number that the SSH server uses. The default value is 22.
Enter the maximum number of concurrent SSH sessions allowed. The minimum number is 1. The default number is 4. The maximum number is 10. The maximum number of concurrent SSH sessions is also limited by the maximum number of Telnet connections configured on the Configuration | System | Management Protocols | Telnet screen.
Enter the server key regeneration period in minutes. If the server key has been used for an SSH session, the VPN Concentrator regenerates the key at the end of this period. The minimum is 0 minutes (which disables key regeneration), the default is 60 minutes, and the maximum is 10080 minutes (1 week). Use 0 (disable key regeneration) only for testing, since it lessens security.
Check the Encryption Protocols check boxes for the encryption algorithms that the VPN Concentrator SSH server can negotiate with a client and use for session encryption. You must check at least one encryption algorithm to enable a secure session. Unchecking all algorithms disables SSH.
|
Note The VPN Concentrator does not support the IDEA or Blowfish algorithms. |
Check the Enable SCP check box to enable file transfers using secure copy (SCP) over SSH.
To apply your SSH settings, and to include your settings in the active configuration, click Apply. The Manager returns to the Configuration | System | Management Protocols screen.
To save the active configuration and make it the boot configuration, click the Save Needed icon at the top of the Manager window.
To discard your settings, click Cancel. The Manager returns to the Configuration | System | Management Protocols screen.
This screen lets you configure the VPN Concentrator to support an XML-based management interface. Enabling XML management allows VPN 3000 Concentrators to be more easily managed by a centralized management system. XML is enabled by default. To disable the XML option, clear the check box. To re-enable the XML option, click the check box.
On this screen, you can also configure the VPN Concentrator to enable HTTPS or SSH (or both) on the Concentrator's Public interface and to lock the XML interface to a specific HTTPS or SSH IP address.
Check the Enable check box, the default, to enable the XML management capability. You must also enable HTTPS or SSH on the VPN 3000 Concentrator's Public interface. Because enabling the XML management capability facilitates managing the VPN 3000 Concentrator by an external management application, do not disable the XML management capability unless you have a specific reason for
doing so.
Check the Enable HTTPS on Public check box to allow HTML or XML management over HTTPS on the VPN Concentrator's Public interface.
Enter the IP address from which to allow HTTPS access on the VPN Concentrator's Public interface.
Enter the wildcard mask for the HTTPS IP address.
|
Note Enter a wildcard mask, which is the reverse of a subnet mask. A wildcard mask has 1s in bit positions to ignore, and 0s in bit positions to match. For example, entering 0.0.0.0 matches the specified address; entering 255.255.255.255 matches all addresses. |
Check the Enable SSH on Public check box to allow command-line or XML management over Secure Shell (SSH) on the VPN Concentrator's Public interface.
Enter the IP address from which to allow SSH access on the VPN Concentrator's Public interface.
Enter the wildcard mask for the SSH IP address.
|
Note Enter a wildcard mask, which is the reverse of a subnet mask. A wildcard mask has 1s in bit positions to ignore, and 0s in bit positions to match. For example, entering 0.0.0.0 matches the specified address; entering 255.255.255.255 matches all addresses. |
![]()
![]()
![]()
![]()
![]()
![]()
![]()
![]()
Posted: Fri Apr 18 18:12:50 PDT 2003
All contents are Copyright © 1992--2002 Cisco Systems, Inc. All rights reserved.
Important Notices and Privacy Statement.