|
|

Digital certificates are a form of digital identification used for authentication. Certificate Authorities (CAs) issue them in the context of a Public Key Infrastructure (PKI), which uses public-key/private-key encryption to ensure security. CAs are trusted authorities who "sign" certificates to verify their authenticity.
A CA certificate is one used to sign other certificates. A CA certificate that is self-signed is called a root certificate; one issued by another CA certificate is called a subordinate certificate. CAs also issue identity certificates, which are the certificates for specific systems or hosts.
For authentication using digital certificates, there must be at least one identity certificate (and its root certificate) on a given VPN Concentrator; there may be more. The maximum number of CA and identity certificates allowed depends on the VPN Concentrator model. Model 3005 allows a maximum of 6 root or subordinate CA certificates (including supporting RA certificates) and 2 identity certificates. The other VPN Concentrator models allow a maximum of 20 root or subordinate CA certificates (including supporting RA certificates) and 20 identity certificates.
The VPN Concentrator supports X.509 digital certificates (International Telecommunications Union Recommendation X.509), including SSL (Secure Sockets Layer) certificates that are self-signed or issued in a PKI context.
The VPN Concentrator stores digital certificates and private keys in Flash memory. You do not need to click Save Needed to store them, and they are not visible under Administration | File Management. All stored private keys are encrypted.
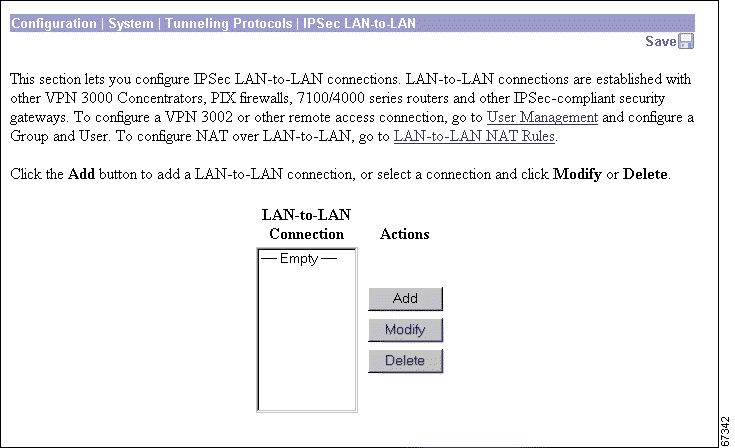
After you install an identity certificate on the VPN Concentrator, it is available in the Digital Certificate list for configuring IPSec LAN-to-LAN connections and IPSec SAs. See Configuration | System | Tunneling Protocols | IPSec LAN-to-LAN and Configuration | Policy Management | Traffic Management | Security Associations.
You can also configure the VPN Concentrator to store certificate revocation list (CRL) information in volatile memory (RAM). CRL caching can potentially speed up the process of verifying the revocation status of certificates. With CRL caching enabled, when the VPN Concentrator needs to check the revocation status of a certificate, it first checks whether the required CRL exists in the cache and has not expired. Then the VPN Concentrator checks the serial number of the certificate against the list of revoked serial numbers in the CRL. If a match exists, the authentication fails. For detailed information about CRL caching, see the section "Enabling CRL Checking and Caching".
The VPN Concentrator can have only one SSL certificate installed. If you generate a self-signed SSL certificate, it replaces any installed PKI-context SSL certificate; and vice-versa.
For information on using SSL certificates, see the "Installing the SSL Certificate in your Browser" section in Chapter 1 of the VPN 3000 Series Concentrator Reference Volume I: Configuration. See also Configuration | System | Management Protocols | HTTP/HTTPS and Telnet, and Configuration | System | Management Protocols | SSL.
To obtain a digital certificate for the VPN Concentrator you must first enroll with a CA. To enroll with a CA, create an enrollment request and submit it to your CA. The CA enrolls the VPN Concentrator into the PKI and issues you a certificate. Once you have the certificate, you then have to install it on the VPN Concentrator.
 |
Note You must first install a CA certificate before you enroll identity certificates from that CA. |
You can enroll and install digital certificates on the VPN Concentrator automatically or manually. The automatic method uses Cisco's Simple Certificate Enrollment Protocol (SCEP) to streamline enrollment and installation. SCEP is a secure messaging protocol that requires minimal user intervention. This method is quicker and allows you to enroll and install certificates using only the VPN Concentrator Manager, but is only available if you are both enrolling with a CA that supports SCEP and enrolling via the web. If your CA does not support SCEP or if you do not have network connectivity to your CA, then you cannot use the automatic method; you must use the manual method.
The manual method involves more steps. You can do some of the steps using the Manager. Other steps require that you exchange information with the CA directly. (You deliver your enrollment request and receive the certificate from the CA via the Internet, email, or a floppy disk.)
Whether you use the automatic or manual method, you follow the same overall certificate management procedure:
Step 2 [Optional] Enable certificate revocation list (CRL) checking.
Step 3 Enroll and install identity certificates and an SSL certificate.
Step 4 Enable digital certificates on the VPN Concentrator.
If you have trouble enrolling or installing digital certificates via SCEP, enable both the CLIENT and CERT event classes to assist in troubleshooting.
Digital certificates indicate the time frame during which they are valid. Therefore, it is essential that the time on the VPN Concentrator is correct and synchronized with network time. Refer to Configuration | System | Servers | NTP and Configuration | System | General | Time and Date in VPN 3000 Series Concentrator Reference Volume I: Configuration.
You must complete the enrollment and certificate installation process within one week of generating the request. If you do not, the pending request is deleted.
If you plan to use SCEP to enroll for identity or SSL certificates, you must obtain the associated CA certificate using SCEP. The Manager does not let you enroll for a certificate from a CA unless that CA certificate was installed using SCEP. A certificate that is obtained via SCEP and therefore capable of issuing other SCEP certificates, is called SCEP-enabled.
 |
Tip To obtain CA certificates using SCEP, you need to know the URL of your CA. Find out your CA's SCEP URL before beginning the following steps. |
Step 2 Click Click here to install a CA certificate.
|
Note The Click here to install a CA certificate option is available from this window only when no CA certificates are installed on the VPN Concentrator. If you do not see this option, click Click here to install a certificate. The Manager displays the Administration | Certificate Management | Install screen. Then click Install CA Certificate. |
The Manager displays the Administration | Certificate Management | Install | CA Certificate screen. (See Figure 9-2.)
Step 3 Click SCEP (Simple Certificate Enrollment Protocol). The Manager displays the Administration | Certificate Management | Install | CA Certificate | SCEP screen. (See Figure 9-3.)
Step 4 Fill in the fields and click Retrieve. For more information on this screen, see the "Administration | Certificate Management | Install | Certificate Type" section.
The Manager installs the CA certificate on the VPN Concentrator and displays the Administration | Certificate Management screen. Your new CA certificate appears in the Certificate Authorities table.
Step 5 If you want to change any of the SCEP parameters of this certificate, click the SCEP link associated with the certificate (under Actions in the Certificate Authorities table). The Administration | Certificate Management | Configure SCEP window appears. For more information on the SCEP parameters, see the "Administration | Certificate Management | Configure SCEP" section.
|
Note If you install a CA certificate using the manual method, you cannot use this CA later to request identity or SSL certificates with SCEP. If you want to be able to use SCEP to request certificates, obtain the CA certificate using SCEP. |
Step 2 Using the VPN Concentrator Manager, display the Administration | Certificate Management screen. (See Figure 9-1.)
Step 3 Click Click here to install a CA certificate.
|
Note The Click here to install a CA certificate option is available from this window only when no CA certificates are installed on the VPN Concentrator. If you do not see this option, click Click here to install a certificate. The Manager displays the Administration | Certificate Management | Install screen. Then click Install CA Certificate. |
The Manager displays the Administration | Certificate Management | Install | CA Certificate screen.
(See Figure 9-4.)
Step 4 Choose either of the following installation methods: Cut & Paste Text or Upload File from Workstation.
Step 5 The Manager displays a screen appropriate to your choice. Include the certificate information according to your chosen method. Click Install.The Manager installs the CA Certificate on the VPN Concentrator and displays the Administration | Certificate Management screen. Your new CA Certificate appears in the Certificate Authorities table.
When a certificate is issued, it is valid for a fixed period of time. Sometimes a CA revokes a particular certificate before this time period expires. Certificates can be revoked for many reasons, such as security concerns or a change of name or association. A CA might issue a list of certificates that have been revoked and are no longer valid. This list is called a certificate revocation list (CRL). To ensure that received peer certificates are valid, configure the VPN Concentrator to check them against the CRL.
To avoid having to retrieve the same CRL from a CA again and again, the VPN Concentrator can store retrieved CRLs locally. Storing CRLs locally is called CRL caching.
Follow these steps to enable CRL checking and caching on the VPN Concentrator:
Step 2 CRL checking is disabled by default. Choose the method to use to retrieve the CRL.
For information on these fields, see the "Administration | Certificate Management | Configure CA Certificate" section.
Step 3 To enable CRL caching, check the Enabled check box. In the Refresh Time field, specify a time period for updating the CRL.
Step 4 Check the appropriate check boxes to indicate whether you want to accept Subordinate CA Certificates or accept Identity Certificates signed by this issuer.
Step 5 Click Apply. The Manager displays the Administration | Certificate Management screen.
(See Figure 9-1.)
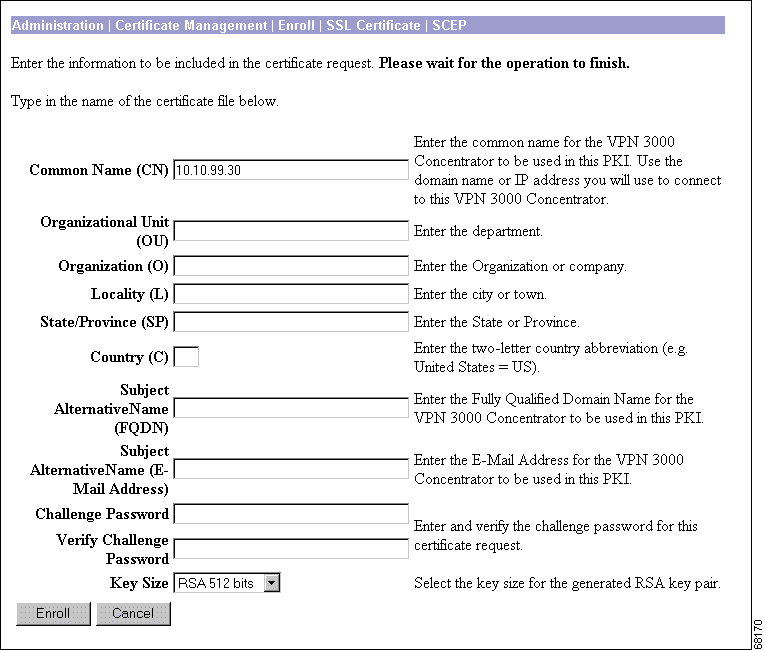
When you generate a request for an identity certificate, you need to provide the following information.
|
Tip Check to be sure that you have this information before you begin. |
Table 9-1 Fields in a Certificate Request
Follow these steps for each identity certificate you want to obtain:
Step 2 Click Click here to enroll with a Certificate Authority. The Manager displays the Administration | Certificate Management | Enroll screen. (See Figure 9-6.)
Step 3 Click Identity Certificate. The Manager displays the Administration | Certificate Management | Enroll | Identity Certificate screen. (See Figure 9-7.)
Notice that a link appears corresponding to each SCEP-enabled CA certificate on the VPN Concentrator. The title of the link depends on the name of the CA certificate: Enroll via SCEP at Certificate Name. For example, if you have a CA certificate on your VPN Concentrator named "TestCA6-8," the following link appears: Enroll via SCEP at TestCA6-8.
If you do not see any Enroll via SCEP options, there are no SCEP-enabled CA certificates on the VPN Concentrator. Follow the steps in the "Installing CA Certificates Automatically Using SCEP" section to obtain a CA certificate via SCEP before you proceed.
Step 4 Click Enroll via SCEP at Certificate Name. The Administration | Certificate Management | Enroll | Identity Certificate | SCEP screen appears. (See Figure 9-8.)
Step 5 Fill in the fields and click Enroll. (For information on the fields on this screen, see Table 9-1.) The VPN Concentrator sends the certificate request to the CA.
If the CA does not issue the certificate immediately (some CAs require manual verification of credentials and this can take time), the certificate request could enter polling mode. In polling mode, the VPN Concentrator re-sends the certificate request to the CA a specified number of times at regular intervals until the CA responds or the process times out. (For information on configuring the polling limit and interval, see the Administration | Certificate Management | Configure CA Certificate screen.) The certificate request appears in the Enrollment Status table on the Administration | Certificate Management screen until the CA responds. Once the CA responds and issues the certificate, the VPN Concentrator installs it automatically.
If the CA responds immediately, the Manager installs the identity certificate on the VPN Concentrator and displays the Administration | Certificate Management | Enrollment | Request Generated screen.
(See Figure 9-9.)
Step 6 Click Go to Certificate Management. The Manager displays the Administration | Certificate Management screen. Your new identity certificate appears in the Identity Certificates table.
If you need to obtain identity certificates using the manual process, use the following general procedure:
Follow these steps to generate a certificate enrollment request (PKCS-10):
Step 2 Click Click here to enroll with a Certificate Authority. The Manager displays the Administration | Certificate Management | Enroll screen. (See Figure 9-6.)
Step 3 Click Identity Certificate. The Manager displays the Administration | Certificate Management | Enroll | Identity Certificate screen. (See Figure 9-7.)
Step 4 Click Enroll via PKCS10 Request (Manual). The Manager displays the Administration | Certificate Management | Enroll | Identity Certificate | PKCS10 screen. (See Figure 9-10.)
Step 5 Fill in the fields and click Enroll. (For information on the fields on this screen, see Table 9-1.) The Manager displays the Administration | Certificate Management | Enrollment | Request Generated screen. (See Figure 9-11.)
Step 6 A few seconds later, a browser appears containing the text of the certificate request. (See Figure 9-12.)
Step 7 Save the enrollment request to a file, or copy it to the clipboard.
Step 8 Using the enrollment request you just generated, retrieve an identity certificate from your CA and download it to your Management workstation according to the procedures outlined by the CA.
Step 9 Using the Manager, display the Administration | Certificate Management screen. (See Figure 9-1.)
Step 10 Click Click here to install a certificate. The Manager displays the Administration | Certificate Management | Install screen. (See Figure 9-13.)
Step 11 Click Install certificate obtained via enrollment. The Manager displays the Administration | Certificate Management | Install | Certificate Obtained via Enrollment screen. (See Figure 9-14.)
Step 12 Find your enrollment request in the Enrollment Status table. Click Install. The Manager displays the Administration | Certificate Management | Install | Identity Certificate screen. (See Figure 9-15.)
Step 13 Choose either installation method: Cut & Paste Text or Upload File from Workstation.
Step 14 The Manager displays a screen appropriate to your choice. Include the certificate information according to your chosen method. Click Install. The Manager installs the identity certificate on the VPN Concentrator and displays the Administration | Certificate Management screen. Your new identity Certificate appears in the Identity Certificates table.
If you use a secure connection between your browser and the VPN Concentrator, the VPN Concentrator requires an SSL certificate. You only need one SSL certificate on your VPN Concentrator.
When you initially boot the VPN Concentrator, a self-signed SSL certificate is automatically generated. Because a self-signed certificate is self-generated, this certificate is not verifiable. No CA has guaranteed its identity. But this certificate allows you to make initial contact with the VPN Concentrator using the browser. If you want to replace it with another self-signed SSL certificate, follow these steps:
Step 2 Click Generate above the SSL Certificate table. The new certificate appears in the SSL Certificate table, replacing the existing one.
If you want to obtain a verifiable SSL certificate (that is, one issued by a CA), follow the same procedure you used to obtain identity certificates. (See the "Enrolling and Installing Identity Certificates" section.) But this time, on the Administration | Certificate Management | Enroll screen, click SSL certificate (instead of Identity certificate).
Some web servers export their SSL certificates with the private key attached. If you have a PEM-encoded certificate with a corresponding private key that you want to install, follow the same procedure you used to obtain identity certificates. (See the "Enrolling and Installing Identity Certificates" section.) But this time, on the Administration | Certificate Management | Installation screen, click Install SSL certificate with private key (instead of Install certificate obtained via enrollment).
|
Note Before you enable digital certificates on the VPN Concentrator, you must obtain at least one root and one identity certificate. If you do not have a root and an identity certificate installed on your VPN Concentrator, follow the steps in the previous sections (beginning with "Enrolling and Installing Identity Certificates") before beginning this section. |
For the VPN Concentrator to use the digital certificates you obtained, you must enable authentication using digital certificates. Table 9-2 outlines this procedure.
Table 9-2 Enabling Digital Certificates on the VPN Concentrator
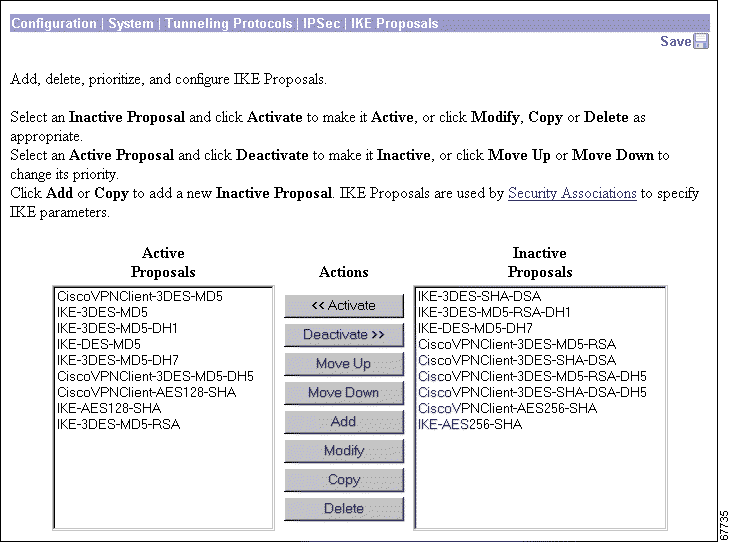
To enable digital certificates for remote access connections, you must first edit and activate the appropriate IKE proposal:
Step 2 Select an IKE proposal (or create a new one) for which you want to enable digital certificates.
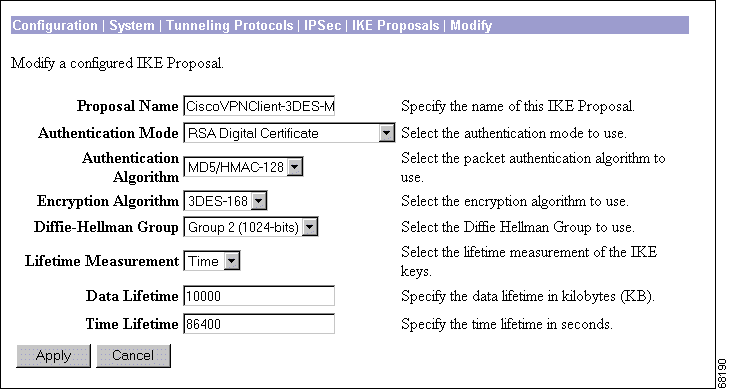
Step 3 Click Modify (or Add). The Manager displays the Configuration | System | Tunneling Protocols | IPSec | IKE Proposals | Modify (or Add) screen. (See Figure 9-17.)
Step 4 Click the Authentication Mode drop-down menu. Choose any of the Digital Certificates options.
Step 5 Click Apply (or Add). The Manager returns to the Configuration | System | Tunneling Protocols | IPSec | IKE Proposals screen. (See Figure 9-16.)
Step 6 Verify that the IKE proposal you just edited is in the Active Proposals column. If it is not, select the proposal and click << Activate.
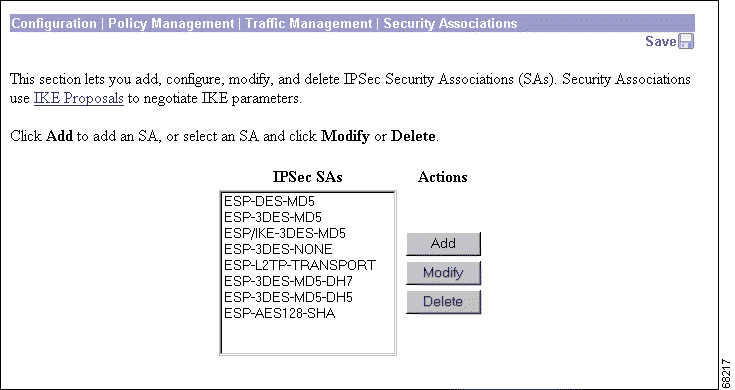
Next, follow these steps to configure the SA:
Step 2 Do one of the following:
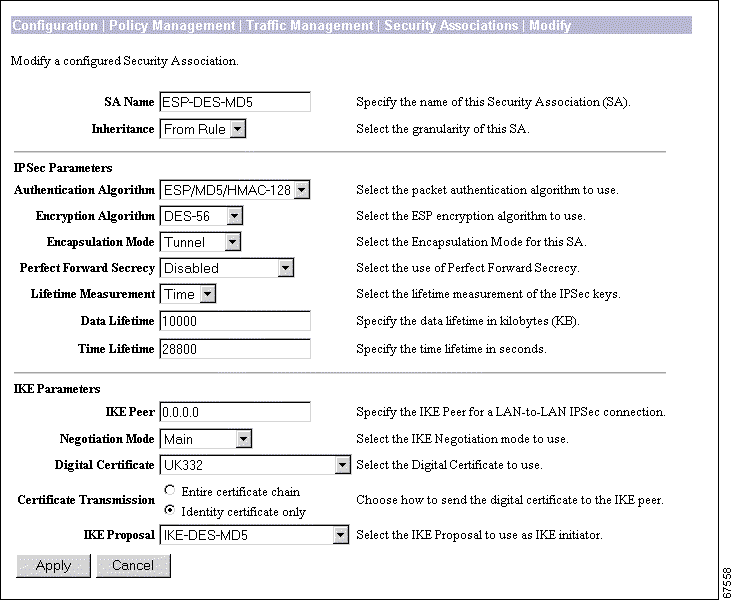
The Manager displays the Configuration | Policy Management | Traffic Management | Security Associations | Modify (or Add) screen. (See Figure 9-19.)
Step 3 Under IKE Parameters, choose the digital certificate you want to use from the Digital Certificate drop-down menu.
Step 4 Select a Certificate Transmission option. If you want the VPN Concentrator to send the peer the identity certificate and all issuing certificates (including the root certificate and any subordinate CA certificates), click Entire certificate chain. If you want to send the peer only the identity certificate, click Identity certificate only.
Step 5 Choose the name of the IKE proposal you just configured from the IKE Proposal drop-down menu.
Step 6 Click Apply (or Add). The Manager returns to the Configuration | Policy Management | Traffic Management | Security Associations screen.
Finally, follow these steps to configure the group to use the SA:
Step 2 Do one of the following:
The Manager displays the Configuration | User Management | Groups | Modify (or Add) screen.
Step 3 Click the IPSec tab. (See Figure 9-21.)
Step 4 Choose the name of the SA you just configured from the IPSec SA drop-down menu.
Step 5 Click Apply (or Add). The Manager displays the Configuration | User Management | Groups screen.
Step 6 Click the Save Needed icon to save your changes.
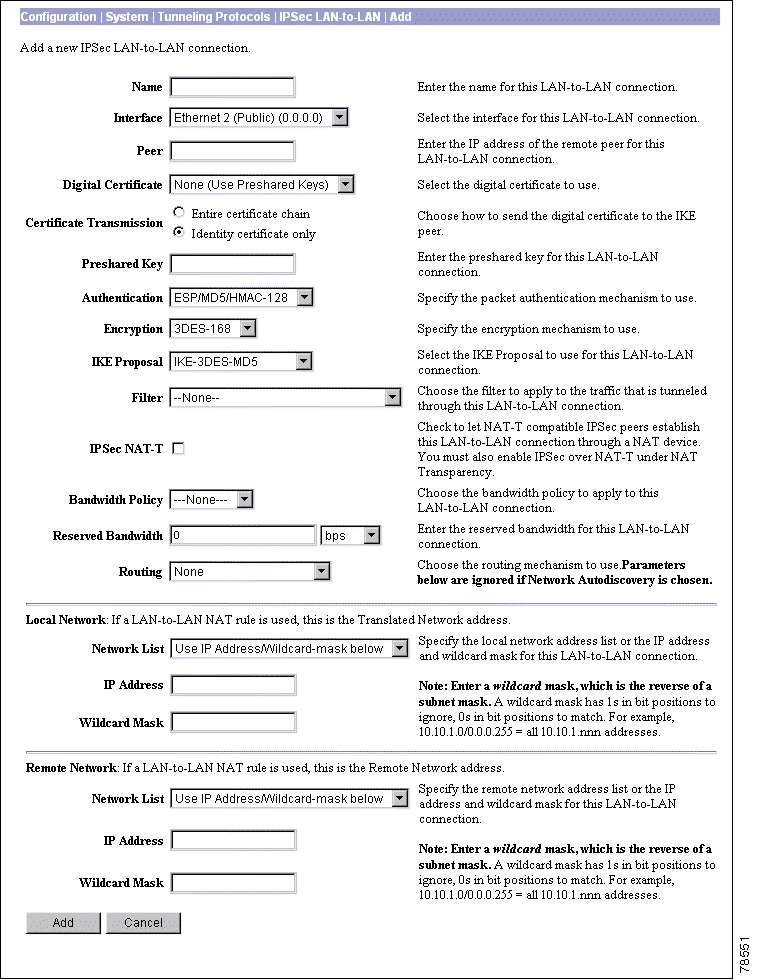
To enable digital certificates for IPSec LAN-to-LAN connections, first edit and activate the appropriate IKE proposal. (Follow steps 1-6 in the "Enabling Digital Certificates for Remote Access Connections" section.) Then continue, following these steps:
Step 2 Select the LAN-to-LAN connection (or create a new one) for which you want to enable digital certificates.
Step 3 Click Modify (or Add). The Manager displays the Configuration | System | Tunneling Protocols | IPSec LAN-to-LAN | Modify (or Add) screen. (See Figure 9-23.)
Step 4 Click the Digital Certificate drop-down menu and choose a digital certificate to use for this LAN-to-LAN connection.
Step 5 Select a Certificate Transmission option. If you want the VPN Concentrator to send the peer the identity certificate and all issuing certificates (including the root certificate and any subordinate CA certificates), click Entire certificate chain. If you want to send the peer only the identity certificate, click Identity certificate only.
Step 6 Click the IKE Proposal drop-down menu and choose an activate IKE proposal that is configured for digital certificate authentication.
Step 7 Click Modify (or Add). The Manager returns to the Configuration | System | Tunneling Protocols | IPSec LAN-to-LAN screen. (See Figure 9-22.)
Step 8 Click the Save Needed icon to save your changes.
Delete digital certificates in the following order:
1. Identity or SSL certificates
|
Note You cannot delete a certificate if it is in use by an SA, if it is the issuer of another installed certificate, or if it is referenced in an active certificate request. |
Follow these steps to delete certificates:
Step 2 Find the certificate you want to delete and click Delete. The Administration | Certificate Management | Delete screen appears.
Step 3 Click Yes. The Manager returns to the Administration | Certificate Management window.
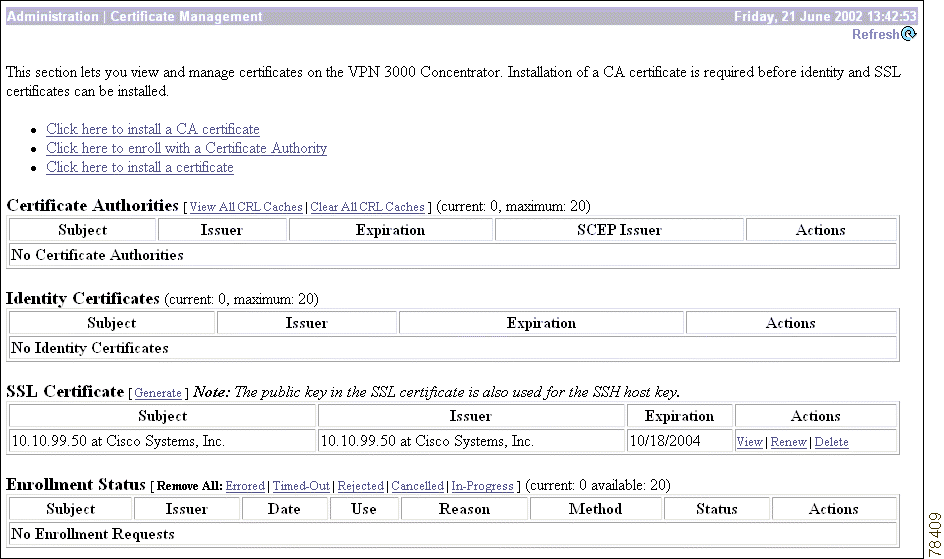
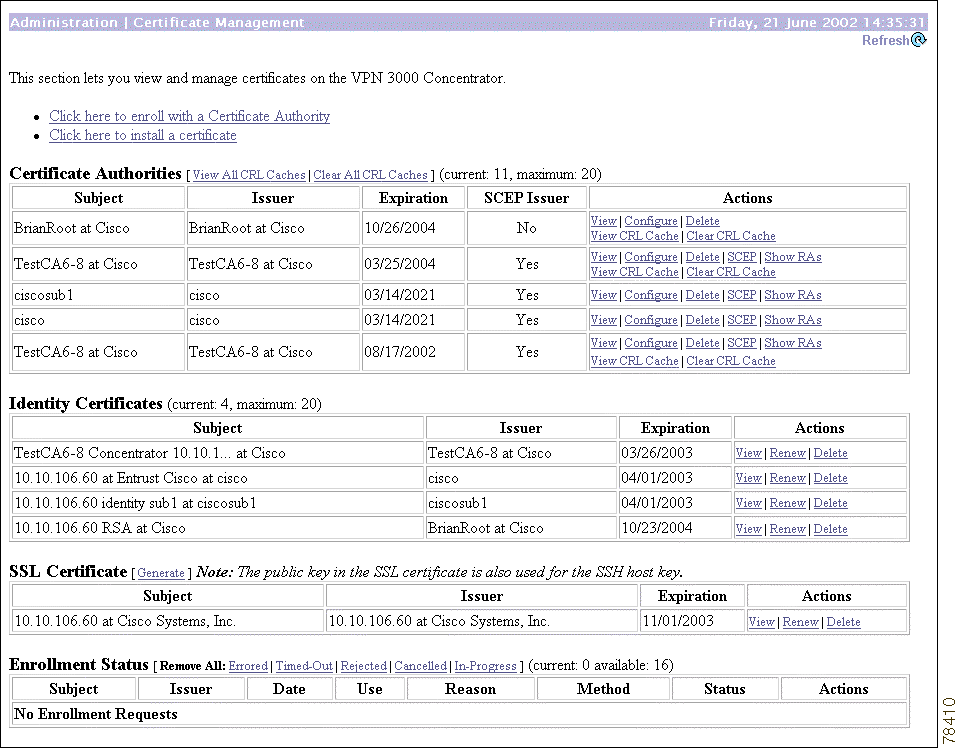
This section of the Manager shows outstanding enrollment requests and all the certificates installed on the VPN Concentrator, and it lets you manage them.
The links at the top of this screen guide you step-by-step through the process of enrolling and installing certificates. For more information on the certificate management process, see the "Enrolling and Installing Digital Certificates" section.
|
Note The Click here to install a CA certificate option is only available from this window when no CA certificates are installed on the VPN Concentrator. If you do not see this option, click Click here to install a certificate. The Manager displays the Administration | Certificate Management | Install. Then click Install CA Certificate. |
The VPN Concentrator notifies you (by issuing a severity 3 CERT class event) if any of the installed certificates are within one month of expiration.
The Manager displays this screen each time you install a digital certificate.
To update the screen and its data, click Refresh. The date and time indicate when the screen was last updated.
This table shows root and subordinate CA certificates installed on the VPN Concentrator.
Click the View All CRL Caches link to see details of all CRLs cached on the VPN Concentrator.
When you delete a CRL from the cache, the next authentication attempt updates it. Use this option to force a cache refresh.
Click the Clear All CRL Caches link to delete all the CRLs cached on the VPN Concentrator and force a cache refresh.
The actual number of CA certificates installed on the VPN Concentrator.
The maximum possible number of CA certificates allowed on this VPN Concentrator. This limit varies by VPN Concentrator model.
These fields appear in the Certificate Authorities table:
This table shows installed server identity certificates. For a description of the fields, see the "Certificate Authorities Table" section.
This table shows the SSL server certificate installed on the VPN Concentrator. The system can have only one SSL server certificate installed: either a self-signed certificate or one issued in a PKI context.
To generate a self-signed SSL server certificate, click Generate. The system uses parameters set on the Configuration | System | Management Protocols | SSL screen and generates the certificate. The new certificate replaces any existing SSL certificate.
This table shows installed server identity certificates. For a description of the fields, see the "Certificate Authorities Table" section.
This table tracks the status of active enrollment requests.
The number of enrollment requests you can make at any given time is limited to the VPN Concentrator's identity certificate capacity. Most VPN Concentrator models allow a maximum of 20 identity certificates. Thus, for example, if you already have five identity certificates installed, you will only be able to create up to 15 enrollment requests. The VPN 3005 Concentrator is an exception, supporting only two identity certificates. On the VPN 3005 Concentrator only, you can request a third certificate, even if there are already two certificates installed, but the VPN Concentrator does not install this certificate immediately. First you must delete one of the existing certificates. Then, activate the new certificate to replace the one you just deleted.
The VPN Concentrator automatically deletes entries that have the status "Timed-out," "Failed," "Cancelled," or "Error" and are older than one week.
Click a Remove All option to delete all enrollment requests of a particular status.
The number of enrollment requests currently outstanding.
The number of enrollment requests still available.
These fields appear in the Enrollment Status table:
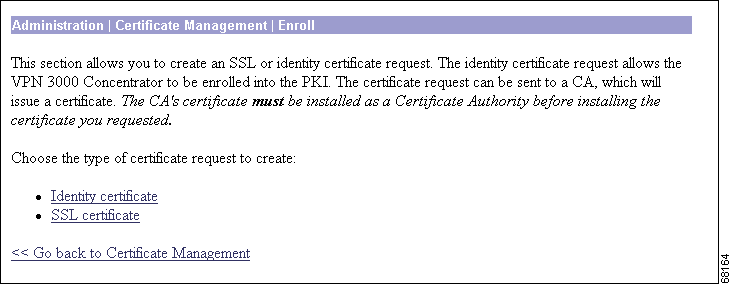
Choose whether you are creating an enrollment request for an identity certificate or an SSL certificate.
Click Identity Certificate to create a certificate request for an identity certificate. The Manager displays the Administration | Certificate Management | Enroll | Identity Certificate screen.
Click SSL Certificate to create a certificate request for an SSL certificate. The Manager displays the Administration | Certificate Management | Enroll | SSL Certificate screen.
Choose the method for enrolling the (identity or SSL) certificate.
Click Enroll via PKCS10 Request (Manual) to enroll the certificate manually.
Click Enroll via SCEP at [Name of SCEP CA] to enroll the certificate automatically using SCEP.
You can enroll certificates using SCEP only if you installed the CA certificate using SCEP. One Enroll via SCEP at [Name of SCEP CA] link appears on this screen for each CA certificate on the VPN Concentrator that was installed using SCEP. To see which CA certificates on your VPN Concentrator were installed using SCEP, see the Certificate Authorities table on the Administration | Certificate Management screen. "Yes" in the SCEP Issuer column indicates that the CA certificate was installed using SCEP; "No" indicates it was installed manually. If no CA certificate on the VPN Concentrator was installed using SCEP, then no Enroll via SCEP at [Name of SCEP CA] link appears on this screen. You do not have the option of using SCEP to enroll the certificate.
If you want to install a certificate using SCEP, but no Enroll via SCEP at [Name of SCEP CA] link appears here, click Install a new SA Using SCEP before Enrolling. Install a CA certificate using SCEP, then return to this screen to install the certificate. A SCEP link now appears.
Click << Go back and choose a different type of certificate to return to the Administration | Certificate Management | Enroll screen. (See Figure 9-26.)
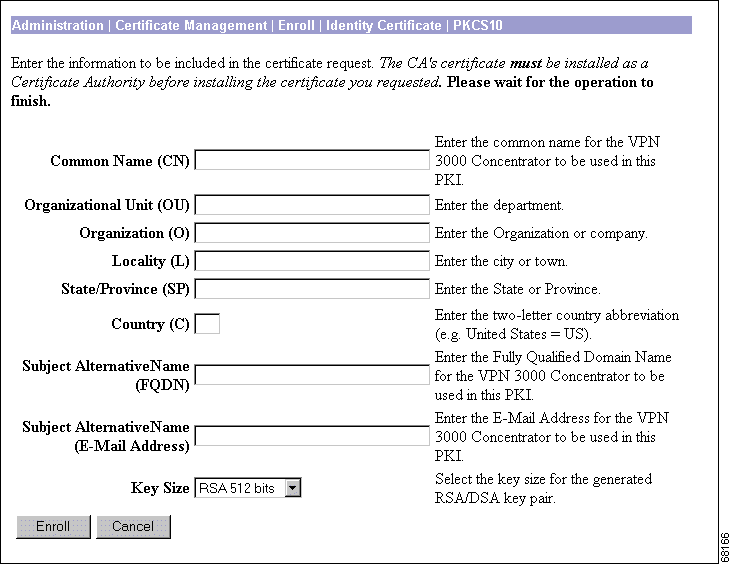
To generate an enrollment request for an SSL or identity certificate, you need to provide information about the VPN Concentrator.
For an explanation of each of the fields on this screen, see Table 9-1.
To generate the certificate request, click Enroll. The Manager displays the Administration | Certificate Management | Enrollment | Request Generated screen (See Figure 9-29.), and then opens a browser window showing the certificate request. (See Figure 9-30.) To discard your entries and cancel the request, click Cancel. The Manager returns to the Administration | Certificate Management screen.
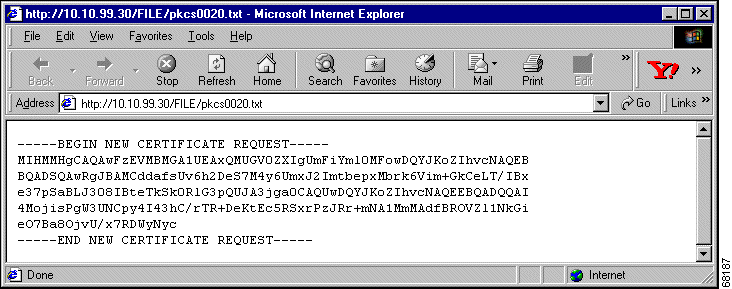
The Manager displays this screen when the system has successfully generated a certificate request. The request is a Base-64 encoded file in PKCS-10 format (Public Key Certificate Syntax-10), which most CAs recognize or require. The system automatically saves this file in Flash memory with the filename shown in the screen (pkcsNNNN.txt).
In generating the request, the system also generates the private key used in the PKI process. That key remains on the VPN Concentrator in encrypted form.
|
Note You must complete the enrollment and certificate installation process within one week of generating the request. If you do not, the pending request is deleted. |
To go to the Administration | File Management | Files screen, click the highlighted File Management page link. From there you can view, copy, or delete the file in Flash memory.
The system also automatically opens a new browser window and displays the certificate request. You can select and copy the request to the clipboard, or you can save it as a file on your PC or a network host. Some CAs let you paste the request in a web interface, some ask you to send a file; use the method your CA requires.
Close this browser window when you have finished.
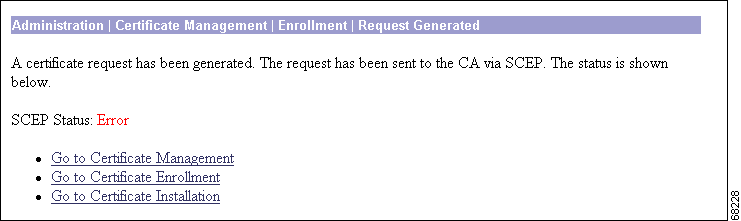
If there is an error in generating your certificate request, a different version of this screen appears. (See Figure 9-31.) You can view the certificate request and re-submit it from the Administration | Certificate Management screen.
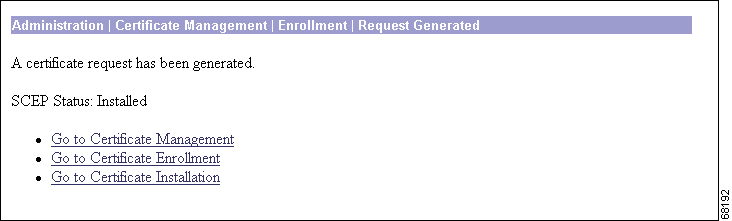
If you want to view the certificate request, click Go to Certificate Management. The Manager displays the Administration | Certificate Management screen. (See Figure 9-1.)
If you want to enroll another certificate, click Go to Certificate Enrollment. The Manager displays the Administration | Certificate Management | Enroll screen.
If you want to install the certificate you have just enrolled, click Go to Certificate Installation. The Manager displays the Administration | Certificate Management | Install screen.
To generate an enrollment request for an identity certificate, you need to provide information about the VPN Concentrator.
For an explanation of each of the fields on this screen, see Table 9-1.
To generate the certificate request and install the identity certificate on the VPN Concentrator, click Enroll. The Manager displays the Administration | Certificate Management | Enrollment | Request Generated screen. (See Figure 9-29.) To discard your entries and cancel the request, click Cancel. The Manager returns to the Administration | Certificate Management screen. (See Figure 9-1.)
To generate an enrollment request for an SSL certificate, you need to provide information about the VPN Concentrator.
For an explanation of each of the fields on this screen, see Table 9-1.
To generate the certificate request and install the SSL certificate on the VPN Concentrator, click Enroll. The Manager displays the Administration | Certificate Management | Enrollment | Request Generated screen.
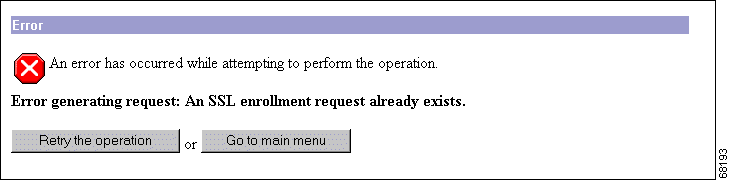
If there is already an active request for an SSL certificate on the VPN Concentrator, this error message appears.
To return to the Administration | Certificate Management | Enroll | SSL Certificate | SCEP screen, click Retry the operation.
To return to the Main screen, click Return to main menu.
To discard your entries and cancel the request, click Cancel. The Manager displays the Administration | Certificate Management screen.
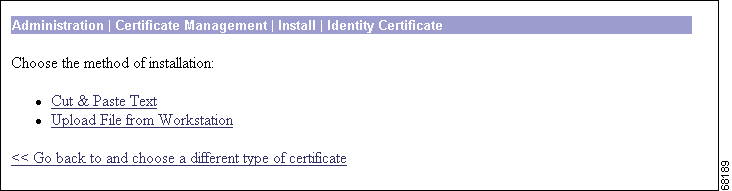
Choose the type of certificate you want to install.
If you want to install a CA certificate, click Install CA Certificate. The Manager displays the Administration | Certificate Management | Install | CA Certificate screen.
Some web servers export their SSL certificates with the private key attached. If you have a PEM-encoded certificate with a corresponding private key that you want to install, click Install SSL Certificate with Private Key. The Manager displays the Administration | Certificate Management | Install | SSL Certificate with Private Key screen.
If you want to install a certificate manually that you have obtained by enrolling a certificate request with a CA, click Install Certificate Obtained via Enrollment. The Manager displays the Administration | Certificate Management | Install Certificate Obtained via Enrollment screen.
Once you have enrolled a certificate, you can install it. This screen allows you to install an enrolled certificate.
For a description of the fields in this table, see the "Enrollment Status Table".
If you do not want to install a certificate that you have obtained via filing an enrollment request with your CA, click << Go back and choose a different type of certificate. The Manager returns to the Administration | Certificate Management | Install screen.
Choose the method you want to use to install the certificate.
|
Note This option is available only for CA certificates. |
If you want to install the CA certificate automatically using SCEP, click SCEP (Simple Certificate Enrollment Protocol). The Manager displays the Administration | Certificate Management | Install | CA Certificate | SCEP screen. (See Figure 9-37.)
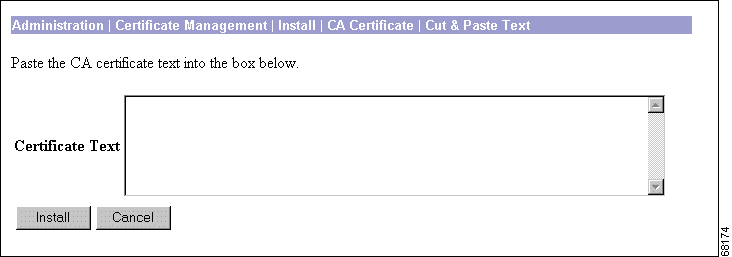
If you want to cut and paste the certificate using a browser window, click Cut & Paste Text. The Manager displays the Administration | Certificate Management | Install | Certificate Type | Cut & Paste Text screen. (See Figure 9-38.)
If your certificate is stored in a file, click Upload File from Workstation. The Manager displays the Administration | Certificate Management | Install | Certificate Type | Upload File from Workstation screen. (See Figure 9-39.)
If you do not want to install a certificate, click << Go back and choose a different type of certificate to display the Administration | Certificate Management | Install screen. (See Figure 9-34.)
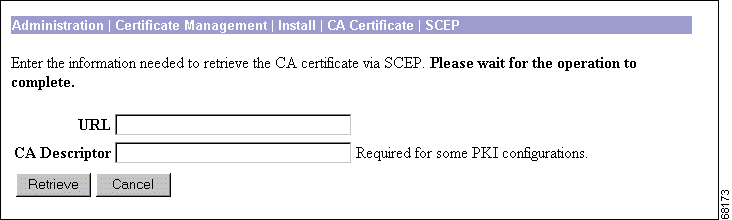
In this screen, provide information about the certificate authority in order to retrieve and install a CA certificate automatically using SCEP.
Enter the URL of the SCEP interface of the CA.
Some CAs use descriptors to further identify the certificate. If your CA gave you a descriptor, enter it here. Otherwise enter a descriptor of your own. You must enter something in this field.
To retrieve a CA certificate from the CA and install it on the VPN Concentrator, click Retrieve.
To discard your entries and cancel the request, click Cancel. The Manager returns to the Administration | Certificate Management screen. (See Figure 9-1.)
To install the certificate using the manual method, cut and paste the certificate text into the Certificate Text window.
Paste the PEM or base-64 encoded certificate text from the clipboard into this window.
If you are installing an SSL certificate with a private key, include the encrypted private key.
|
Note This field appears only if you are installing an SSL certificate with a private key. |
Enter a password for decrypting the private key.
To install the certificate on the VPN Concentrator, click Install.
To discard your entries and cancel the request, click Cancel. The Manager returns to the Administration | Certificate Management screen. (See Figure 9-1.)
If you want to install a certificate stored on your PC, use this screen to upload the certificate file to the VPN Concentrator.
Enter the name of the certificate file that is on your PC. In a Windows environment, enter the complete pathname using MS-DOS syntax, for example: c:\Temp\certnew.cer. You can also click the Browse button to open a file navigation window, find the file, and select it.
|
Note This field appears only if you are installing an SSL certificate with a private key. |
Enter a password for decrypting the private key.
To install the certificate on the VPN Concentrator, click Install.
To discard your entries and cancel the request, click Cancel. The Manager returns to the Administration | Certificate Management screen. (See Figure 9-1.)
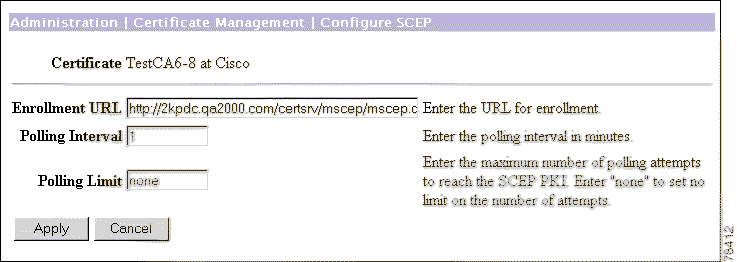
The SCEP Configuration parameters are available only for CA certificates that support SCEP enrollment.
Enter the URL where the VPN Concentrator should send SCEP enrollment requests made to this CA. The default value of this field is the URL used to download this CA certificate.
If the CA does not issue the certificate immediately (some CAs require manual verification of credentials and this can take time), the certificate request will enter polling mode. In polling mode, the VPN Concentrator re-sends the certificate request to the CA for a specified period until the CA responds or the process times out.
Enter the number of minutes the VPN Concentrator should wait between re-sends. The minimum number of minutes is 1; the maximum number of minutes is 60. The default value is 1
Enter the number of times the VPN Concentrator should re-send an enrollment request if the CA does not issue the certificate immediately. The minimum number of re-sends is 0; the maximum number is 100. If you did not want any polling limit, (in other words, you want infinite re-sends), enter none.
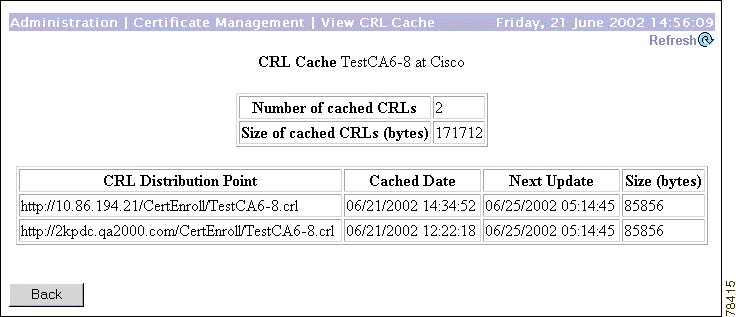
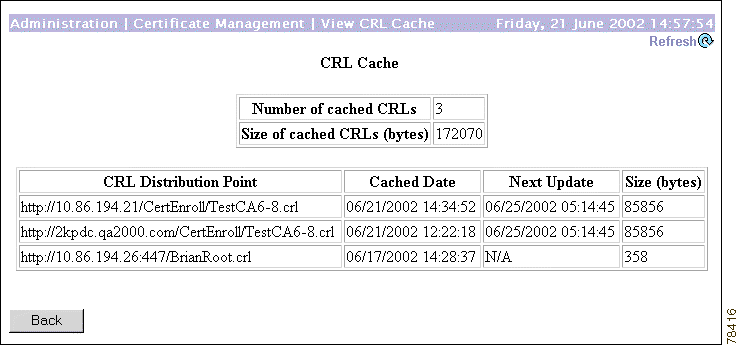
This window shows details of CRLs cached on the VPN Concentrator issued by a particular CA. If you clicked the View All CRL Caches link on the Administration | Certificate Management window to invoke this window, then the window shows details of all CRLs cached on the VPN Concentrator.
The number of cached CRLs issued by a particular CA. Or, the number of cached CRLs issued by all CAs.
The total size of all the CRLs issued by a particular CA. Or, the total size of all the CRLs issued by all CAs.
The location from which the CRL was retrieved.
The date and time the CRL was retrieved.
The date and time when the CA is expected to issue an updated CRL.
|
Note During tunnel establishment the VPN Concentrator checks to see if the CRL associated with the connecting user is current. If the CRL has expired, the VPN Concentrator automatically reloads an updated CRL from that CA before attempting to validate the user. |
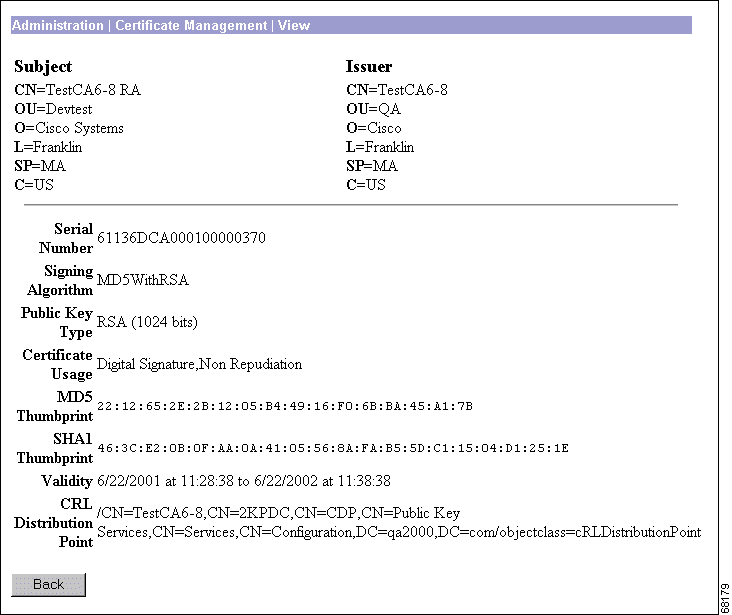
The Manager displays this screen of certificate details when you click View for a certificate on the Administration | Certificate Management | Certificates screen. The details vary depending on the certificate content.
The content and format for certificate details are governed by ITU (International Telecommunication Union) X.509 standards, specifically, RFC 2459. The Subject and Issuer fields conform to ITU X.520.
This screen is read-only; you cannot change any information here.
A certificate contains some or all of the following fields:
To return to the Administration | Certificate Management screen, click Back.
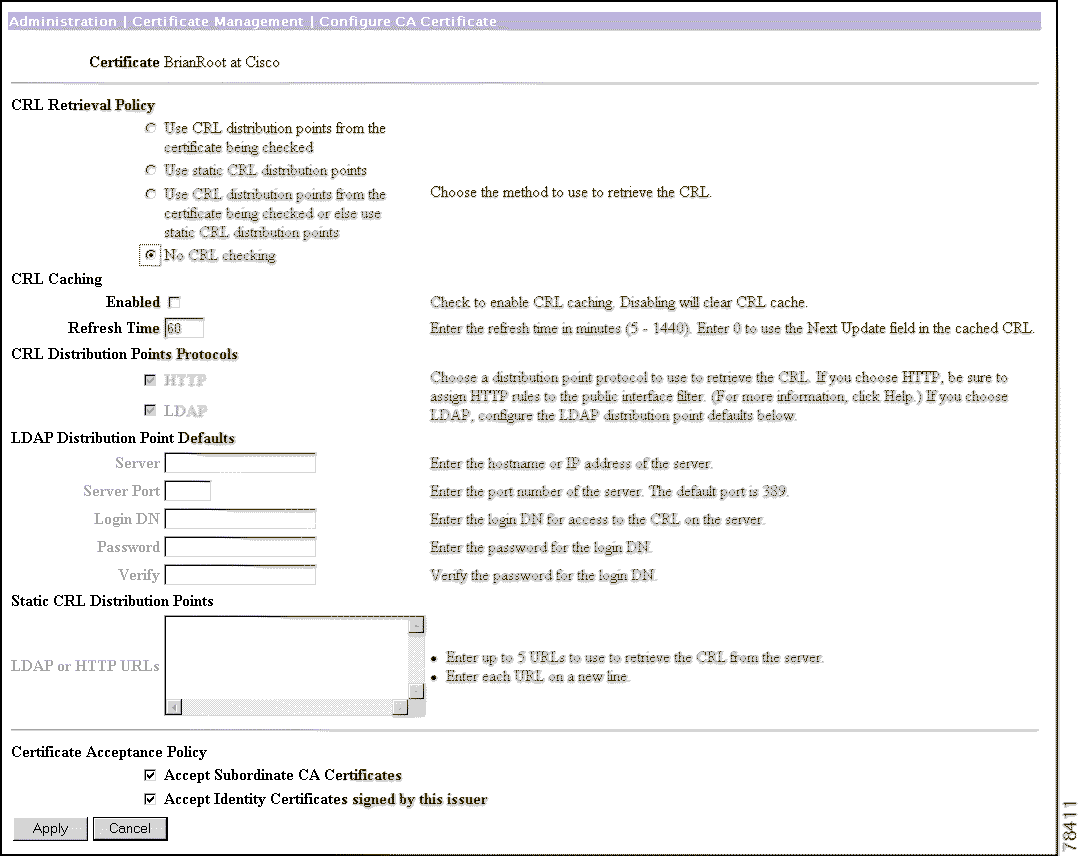
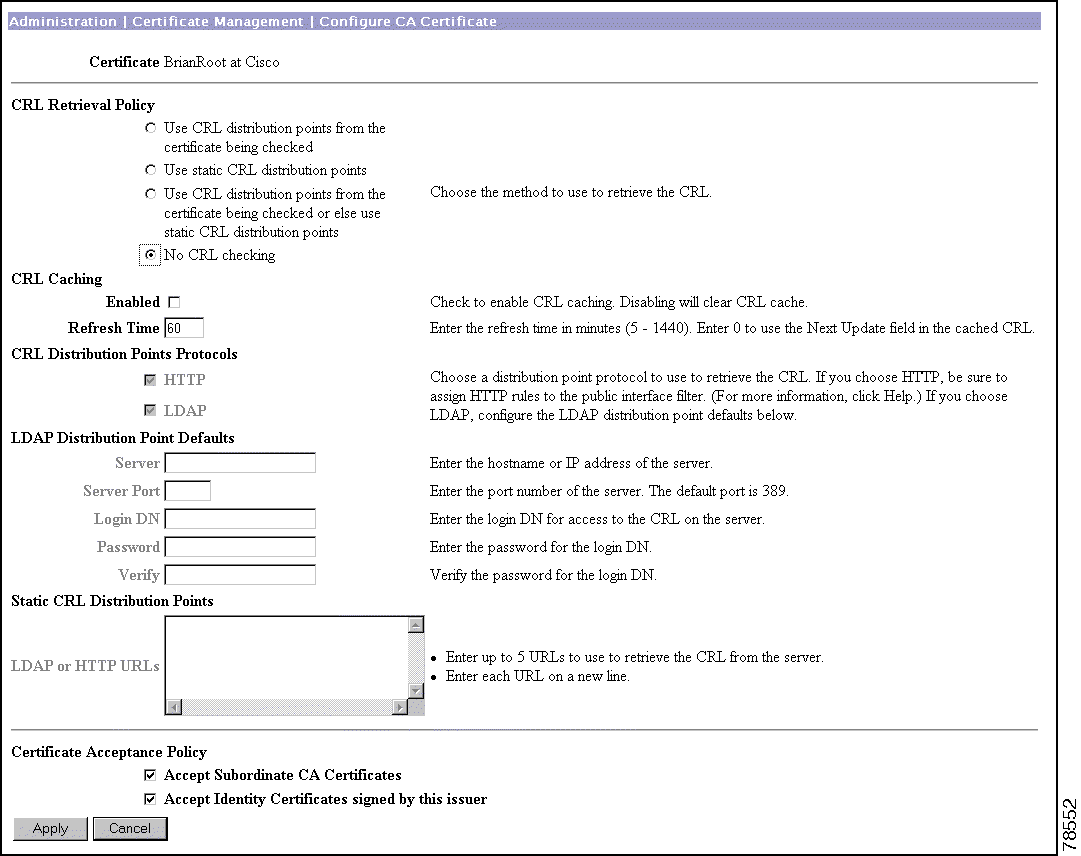
This screen lets you enable certificate revocation list (CRL) checking for CA certificates installed in the VPN Concentrator.
A certificate is normally expected to be valid for its entire validity period. However, if a certificate becomes invalid due to a name change, change of association between the subject and the CA, security compromise, etc., the CA revokes the certificate. Under X.509, CAs revoke certificates by periodically issuing a signed certificate revocation list (CRL), where each revoked certificate is identified by its serial number. Enabling CRL checking means that every time the VPN Concentrator uses the certificate for authentication, it also checks the CRL to ensure that the certificate being verified has not been revoked.
CAs use LDAP/HTTP databases to store and distribute CRLs. They might also use other means, but the VPN Concentrator relies on LDAP/HTTP access.
During IKE phase 1 negotiation, if CRL checking is enabled, the VPN Concentrator verifies the revocation status of the IKE peer certificate before allowing the tunnel to be established. CRLs exist on external servers maintained by Certificate Authorities. To verify the revocation status, the VPN Concentrator retrieves the CRL using one of the available CRL distribution points and checks the peer certificate serial number against the list of serial numbers in the CRL. If there are no matches, the VPN Concentrator assumes that the peer certificate has not been revoked.
The default is No CRL Checking. In this case, the VPN Concentrator neither retrieves a CRL nor performs revocation checking.
To enable CRL checking, choose the method to use to retrieve the CRL. A CRL distribution point is the location on a server from which a CRL can be downloaded.
You can configure the VPN Concentrator to retrieve the CRL from the distribution points specified in the certificate being checked, from a user-specified list of static CRL distribution points, or from a combination of these.
Since the system has to fetch and examine the CRL from a network distribution point, enabling CRL checking might slow system response times. Also, if the network is slow or congested, CRL checking might fail. To mitigate these potential problems, you can enable CRL caching. This stores the retrieved CRLs in local volatile memory, thus allowing the VPN Concentrator to verify the revocation status of certificates more quickly.
With CRL Caching enabled, when the VPN Concentrator needs to check the revocation status of a certificate, it first checks whether the required CRL exists in the cache and checks the serial number of the certificate against the list of serial numbers in the CRL. The certificate is considered revoked if its serial number is found. The VPN Concentrator retrieves a CRL from an external server either when it does not find the required CRL in the cache, when the validity period of the cached CRL has expired, or when the configured refresh time has elapsed. When the VPN Concentrator receives a new CRL from an external server, it updates the cache with the new CRL. The cache can contain up to 64 CRLs.
The total memory allocated for all combined CRL caches varies by VPN Concentrator model. Model 3005 can cache up to 128 KB. Models 3015 and 3030 can cache up to 256 KB. Models 3060 and 3080 can cache up to 1 MB.
|
Note The CRL cache exists in memory, so rebooting the VPN Concentrator clears the CRL cache. The VPN Concentrator repopulates the CRL cache with updated CRLs as it processes new peer authentication requests. |
The certificate for which you are configuring CRL checking. This is the name in the Subject field of the Certificate Authorities table on the Administration | Certificate Management screen.
Choose the appropriate option to enable or disable CRL checking on all certificates issued by this CA. The VPN Concentrator can:
If you choose this option, be sure to enable at least one CRL Distribution Point Protocol. If you choose a LDAP protocol, be sure to set the LDAP Distribution Point Defaults as well.
If you choose this option, you must enter at least one (and no more than five) URLs.
If you choose this option, be sure to enable at least one CRL Distribution Point Protocol. If you choose a LDAP protocol, be sure to set the LDAP Distribution Point Defaults as well. You also must enter at least one (and no more than five) Static CRL Distribution Points.
Specify whether you want to enable CRL caching, and if so, what the cache refresh period is.
Check the Enabled check box to allow the VPN Concentrator to cache retrieved CRLs. The default is not to enable CRL caching. Disabling CRL caching (unchecking the check box) clears the CRL cache.
Specify the refresh time in minutes for the CRL cache. The range is 5 to 1440 minutes; the default value is 60 minutes.
Enter 0 to use the Next Update field, if present, in the cached CRL. If the Next Update field is not present in the CRL, the CRL is not cached.
If you configured a CRL retrieval policy that uses CRL distribution points from the certificate being checked, choose a distribution point protocol to use to retrieve the CRL.
If you chose to support LDAP distribution points, enter the following information. If the distribution point extension of the certificate being checked is missing any of the following fields, the VPN Concentrator uses these values.
Enter the IP address or hostname of the CRL distribution server (LDAP server). Maximum 32 characters.
Enter the port number for the CRL server. Enter 0 (the default) to have the system supply the default port number, 389 (LDAP).
Enter the login DN (Distinguished Name)), which defines the directory path to access this CRL database, for example: cn=crl,ou=certs,o=CANam,c=US. The maximum field length is 128 characters.
Enter the password for the Login DN. Maximum 128 characters.
Re-enter the password to verify it. Maximum 128 characters.
Enter HTTP or LDAP URLs that identify CRLs located on external servers. If you chose a CRL Retrieval Policy that uses static distribution points, you must enter at least one (and not more than five) valid URLs. Enter each URL on a single line. (Scroll right to enter longer values.) Examples of valid URLs are:
HTTP URL: http://1.1.1.2/CertEnroll/TestCA6-8.crl
LDAP URL: ldap://100.199.7.6:389/CN=TestCA6-8,CN=2KPDC,CN=CDP,CN=Public Key Services,CN=Services,CN=Configuration,DC=qa2000,DC=com?certficateRevocationList?base?objectclass=cRLDistributionPoint
During Phase 1 processing, an IKE peer might deliver a certificate subordinate to this one. This subordinate certificate might not be installed on the VPN Concentrator. Check the Accept Subordinate CA Certificates check box to allow the VPN Concentrator to use such subordinate certificates in certificate path validation. Uncheck the check box to disallow the feature.
Check the Accept Identity Certificates Signed by this Issuer check box to allow the VPN Concentrator to accept identity certificates signed by this issuer. Uncheck the check box to disallow the feature. If you disallow the feature, any IKE peer certificate signed by this issuer will be rejected.
To configure the CA Certificate parameters for this certificate, click Apply. The Manager returns to the Administration | Certificate Management screen.
To discard your settings, click Cancel. The Manager returns to the Administration | Certificate Management screen.
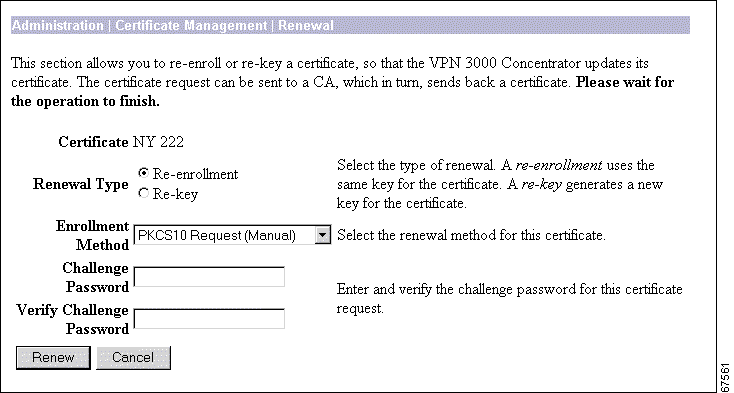
Certificate renewal is a shortcut that allows you to generate an enrollment request based on the content of an existing certificate.
When you renew a certificate via SCEP, the new certificate does not automatically overwrite the original certificate. It remains in the Enrollment Request table until you manually activate it.
Use this screen to re-enroll or re-key a certificate. If you re-enroll the certificate, the new certificate uses the same key pair as the expiring certificate. If you re-key the certificate, it uses a new key pair.
This field displays the type of certificate that you are re-enrolling or re-keying.
Your CA might have given you a password as a means of verifying your identity. If you have a password from your CA, enter it here.
If you did not receive a password from your CA, choose a password now. You can use this password in the future to identify yourself to your CA.
Re-type the challenge password you just entered.
To renew the certificate, click Renew.
To discard your settings, click Cancel. The Manager returns to the Administration | Certificate Management screen.
This status screen appears after you activate or re-submit an enrollment request. It displays the status of the request.
If you are installing an SSL certificate with a private key, include the encrypted private key.
If you want to view the certificate request, click Go to Certificate Management. The Manager displays the Administration | Certificate Management screen. (See Figure 9-1.)
If you want to enroll another certificate, click Go to Certificate Enrollment. The Manager displays the Administration | Certificate Management | Enroll screen. (See Figure 9-26.)
If you want to install the certificate you have just enrolled, click Go to Certificate Installation. The Manager displays the Administration | Certificate Management | Install screen. (See Figure 9-34.)
The Manager displays this confirmation screen when you click Delete for a certificate on the Administration | Certificate Management screen. The screen shows the same certificate details as on the Administration | Certificate Management | View screen.
For a description of the fields in this certificate, see "Certificate Fields".
To delete this certificate, click Yes.
|
Note There is no undo. |
The Manager returns to the Administration | Certificate Management screen and shows the remaining certificates.
To retain this certificate, click No. The Manager returns to the Administration | Certificate Management screen, and the certificates are unchanged.
This screen allows you to view the details of an enrollment request.
An enrollment request contains some or all of the following fields:
Click Back to display the Administration | Certificate Management screen.
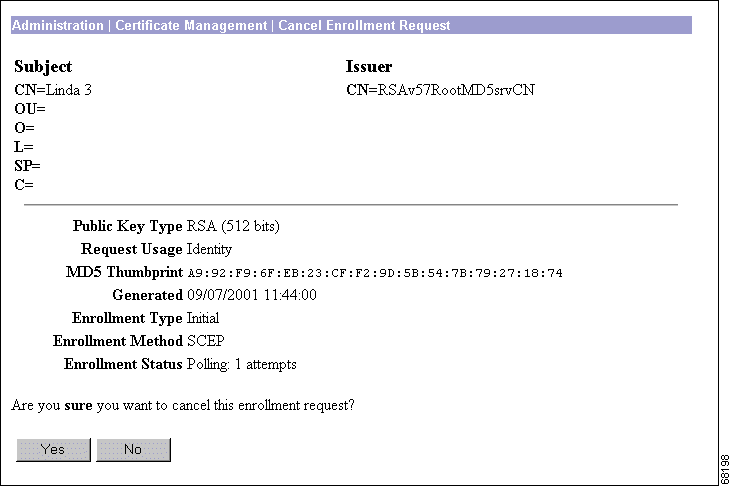
This screen shows you the details of the enrollment request and allows you to cancel it.
You can cancel only a SCEP enrollment request, and you can do so only when the request is in polling mode. Once a request is cancelled, you can then remove it, re-submit it, or view its details.
For a description of the fields in this enrollment request, see "Enrollment Request Fields".
To cancel this enrollment request, click Yes. There is no undo.
The Manager returns to the Administration | Certificate Management screen.
To retain this enrollment request, click No. The Manager returns to the Administration | Certificate Management screen, and the enrollment requests are unchanged.
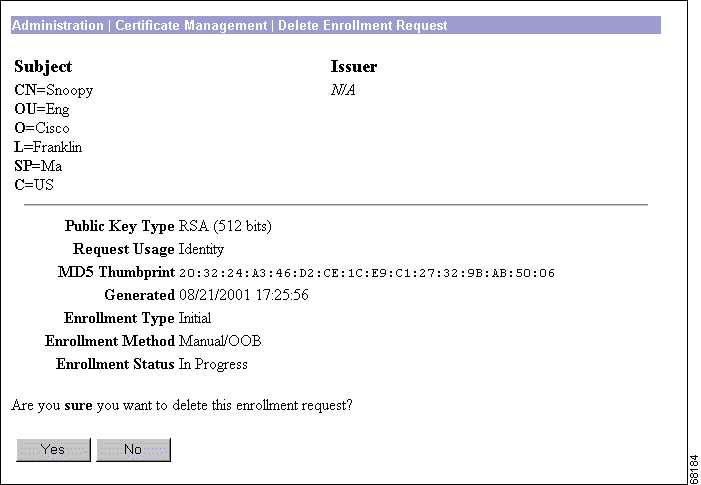
This screen shows you details of the enrollment request and allows you to delete it. Deleting an enrollment request removes it from the Enrollment Request table (on the Administration | Certificate Management page) and destroys all record of it.
For a description of the fields in this enrollment request, see "Enrollment Request Fields".
To delete this enrollment request, click Yes. There is no undo.
The Manager returns to the Administration | Certificate Management screen and shows the remaining enrollment requests.
To retain this enrollment request, click No. The Manager returns to the Administration | Certificate Management screen, and the enrollment requests are unchanged.
![]()
![]()
![]()
![]()
![]()
![]()
![]()
![]()
Posted: Fri Apr 18 18:59:03 PDT 2003
All contents are Copyright © 1992--2002 Cisco Systems, Inc. All rights reserved.
Important Notices and Privacy Statement.