|
|

Table Of Contents
Release Notes for Cisco SSL VPN Client,
Release 1.1.0Security Appliances and Software Supported
Compression over SVC Connections to the ASA 5500
Installing SVC Software on an ASA 5500
Installing SVC Software on a VPN 3000 Concentrator
SVC and New Windows 2000 Installations
Enabling Automatic Installation of SVCs for Non-Privileged Users
Automatic Installation of SVCs
Adding an ASA 5500 or VPN Concentrator to the List of Trusted Sites (IE)
Adding a Security Certificate in Response to Browser Alert Windows
Internet Explorer Proxy With SVC
Setting the Secure Connection (Key) Icon
Cisco Secure Desktop and the SVC
Cisco Security Agent Version Requirements
PC Wireless Client Configurations
Certificate Revocation List Processing
Zyxel Modem SSH Incompatibility
Resolved Caveats in the Cisco SSL VPN Client Release 1.1.0
Cisco Product Security Overview
Reporting Security Problems in Cisco Products
Obtaining Technical Assistance
Cisco Technical Support & Documentation Website
Definitions of Service Request Severity
Obtaining Additional Publications and Information
Release Notes for Cisco SSL VPN Client,
Release 1.1.0
CCO Date: February 6, 2006
Part Number: OL-7819-03
Introduction
These release notes are for the Cisco SSL VPN Client (SVC), Release 1.1.0, running on the Cisco ASA 5500 Series Adaptive Security Appliance and the Cisco VPN 3000 Series Concentrator.
The Cisco SVC provides end users running Microsoft Windows XP or Windows 2000 with the benefits of a Cisco IPSec VPN client without the administrative overhead required to install and configure an IPSec client. It supports applications and functions unavailable to a standard WebVPN connection.
These release notes describe new features, changes to existing features, limitations and restrictions, open and resolved caveats, and related documentation. They also include procedures you should follow before loading this release. The section Usage Notes describes interoperability considerations and other issues you should be aware of when installing and using the Cisco SVC. Read these release notes carefully prior to installing this software.
Contents
This document includes the following sections:
Cisco Product Security Overview
Obtaining Technical Assistance
Obtaining Additional Publications and Information
System Requirements
The following sections describe the system requirements for Cisco SVC Release 1.1.0.
Hardware Supported
Cisco SVC, Release 1.1.0, is supported on the following hardware platforms:
•
Cisco ASA 5500 Series Adaptive Security Appliances
•
•
Security Appliances and Software Supported
Table 1 shows the supported security appliances and the software that is required in order to use this SVC release.
Upgrading to Release 1.1.0
This section contains information about upgrading from earlier releases to Cisco SVC, Release 1.1.0.
Before You Begin
Be aware of the following considerations before you upgrade. These are known product behaviors, and knowing about them at the beginning of the process should expedite the upgrade. Where appropriate, the number of the caveat documenting the issue appears at the end of the item. See the "Caveats" section for a description of using this number to locate a particular caveat.
New Features in Release 1.1.0
This section describes the new features in SVC Release 1.1.0. For detailed instructions about how to configure and use these features, see the documentation associated with the security appliance on which you are installing the SVC software.
Compression over SVC Connections to the ASA 5500
Compression can reduce the size of the transferring packets to the ASA 5500, and increase the communication performance, especially for connections with bandwidth limitations, such as with dialup modems and handheld devices used for remote access.
Compression is enabled by default SVC connections. You can configure compression on the ASA 5500 using ASDM or CLI commands.
You can disable compression for all SVC connections to the ASA 5500 with the compression command from global configuration mode. You can disable compression for a specific group or user for SVC connections with the svc compression command, in the group policy or username webvpn modes.
Installation Notes
This section describes installation-specific issues and procedures for SVC Release 1.1.0, and contains the following sections:
•
•
•
•
•
Installing SVC Software on an ASA 5500
This section contains procedures for installing the SVC software on the ASA5500 using the Adaptive Security Device Manager (ASDM) or through the CLI command interface.
Installing SVC with ASDM
Installing SVC with ASDM consists of uploading the SVC images to the flash memory, identifying to the security appliance the files on the flash memory to be used as SVC images, and setting the order in which it downloads the images to the remote computer.
Perform the following steps to install SVC:
Step 1
In the navigation pane, click VPN. The navigation pane displays VPN features.
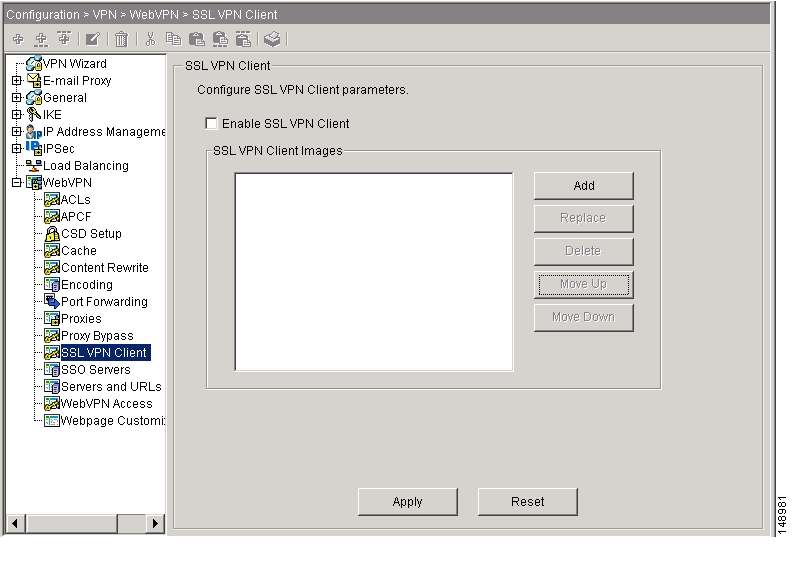
Choose WebVPN > SSL VPN Client. The SSL VPN Client panel displays. ( Figure 1).
This panel lists any SVC files that have been identified as SVC images. The order in which they appear in the table reflects the order that they download to the remote computer.
Figure 1 SSL VPN Client Panel
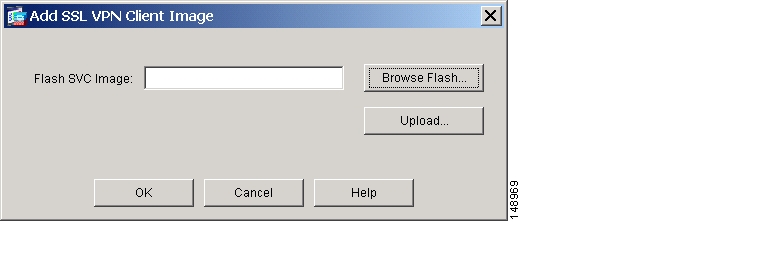
To add an SVC image, Click Add. The Add SSL VPN Client Image dialog displays ( Figure 2).
Figure 2 Add SSL VPN Client Image Dialog
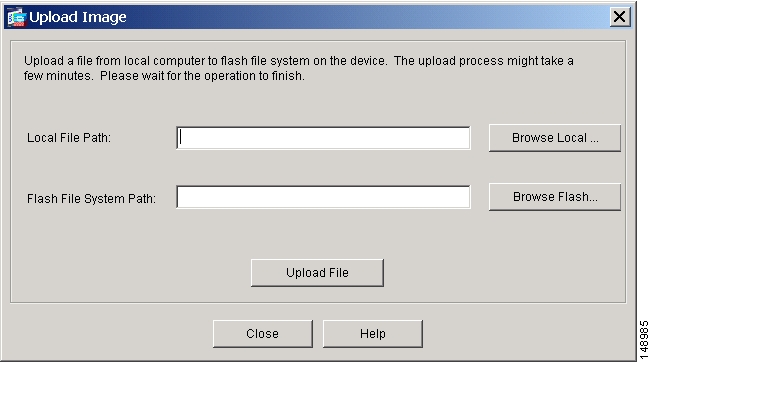
If you already have an image located in the flash memory of the security appliance, you can enter the name of the image in the Flash SVC Image field, and click OK. Otherwise, click Upload to browse the computer that is running ASDM. The Upload Image dialog displays ( Figure 3).
Figure 3 Upload Image Dialog
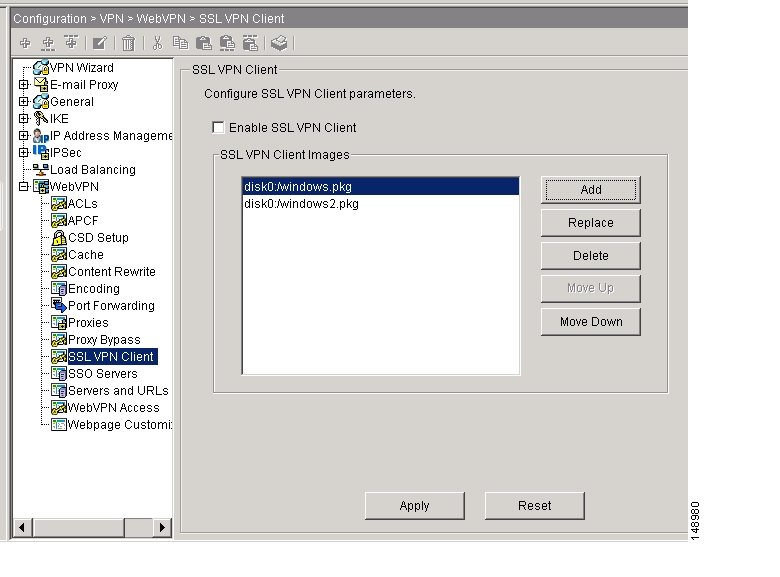
Enter the paths for the Local File Path and the Flash File System Path, or browse for the paths, and click Upload File. The SSL VPN Client panel now shows the SVC images you identified ( Figure 4).
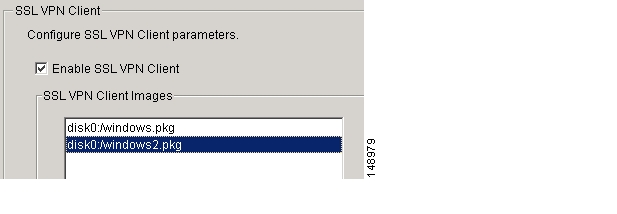
Figure 4 SSL VPN Client Panel with SVC Images
Step 2
This establishes the order in which the security appliance downloads them to the remote computer. It downloads the SVC image at the top of the list of images first. Therefore, you should move the image used by the most commonly-encountered operating system to the top of the list.
Step 3
Figure 5 Enable SSL VPN Client Check Box
For more information on configuring SVC using ASDM, see
Selected ASDM VPN Configuration Procedures for the Cisco ASA 5500 Series.Installing SVC Using the CLI Command Interface
Installing SVC through the CLI command interface consists of copying the SVC images to the security appliance and assigning an order to the images. Perform the following steps to install SVC:
Step 1
hostname# copy tftp flashAddress or name of remote host []? 209.165.200.226Source filename []? sslclient-win-1.0.2.127.pkgDestination filename []? sslclient-win-1.0.2.127.pkgAccessing tftp://209.165.200.226/sslclient-win-1.0.2.127.pkg...!!!!!!!!!!!!!!!!!!!!!!!!!!Writing file disk0:/cdisk71...!!!!!!!!!!!!!!!!!!!!!!!!!!!!!!!!!!!!!!!!!!!!!!!!!!!!!!!!!!!!!!!!!!!!!!!!319662 bytes copied in 3.695 secs (86511 bytes/sec)Step 2
svc image filename order
Numbering of the SVC images establishes the order in which the security appliance downloads them to the remote computer. It downloads the SVC image with the lowest number first. Therefore, you should assign the lowest number to the image used by the most commonly-encountered operating system.
In the following example, the output of the show webvpn svc command indicates that the windows.pkg image has an order number of 1, and the windows2.pkg image has an order number of 2. When a remote computer attempts to establish an SVC connection, the windows.pkg image downloads first. If the image does not match the operating system, the windows2.pkg image downloads:
hostname(config)# webvpnhostname(config-webvpn)# show webvpn svc1. disk0:/windows.pkg 1CISCO STC win2k+ 1.0.01,0,2,132Thu 08/25/2005 21:51:30.432. disk0:/windows2.pkg 2CISCO STC win2k+ 1.0.01,0,0,164Thu 02/17/2005 20:09:22.432 SSL VPN Client(s) installedThen the SVC archive images are re-ordered using the svc image command, with the windows2.pkg image as the first image downloaded to the remote PC, and the windows.pkg image downloaded second:
hostname(config-webvpn)# no svc imagehostname(config-webvpn)# svc image windows2.pkg 1hostname(config-webvpn)# svc image windows.pkg 2Reentering the show webvpn svc command shows the new order of the images:hostname(config-webvpn)# show webvpn svc1. disk0:/windows2.pkg 1CISCO STC win2k+ 1.0.01,0,2,132Thu 08/25/2005 21:51:30.432. disk0:/windows.pkg 2CISCO STC win2k+ 1.0.01,0,0,164Thu 02/17/2005 20:09:22.432 SSL VPN Client(s) installedFor more information on configuring SVC through the CLI command interface on the ASA 5500 Series, see the Cisco Security Appliance Command Line Configuration Guide, Version 7.1.
Installing SVC Software on a VPN 3000 Concentrator
To install the SVC software on a VPN Concentrator, follow these steps:
Step 1
Step 2
Step 3
Step 4
Step 5
Step 6
Step 7
Note
SVC and New Windows 2000 Installations
In rare circumstances, if you install the SVC on a computer that has a new or clean Windows 2000 installation, the SVC may fail to connect, and your computer may display the following message:
The installer failed to execute successfully. Your computer may be missing a
required Microsoft library.
This could occur if the computer does not have the file MSVCP60.dll located in the winnt\system32 directory. If you find this is the case, download a copy of the MSVCP60.dll file from the Microsoft website at www.microsoft.com. Then move the file to the winnt\system32 directory. (CSCsc91440)
Enabling Automatic Installation of SVCs for Non-Privileged Users
Users must have Administrator privileges on client PCs that use SVC. Clients connecting without Administrator privileges cannot receive and install an SVC. However, Cisco provides an Install Enabler utility to pre-load a client service that lets non-privileged users load SVC. This utility (STCIE.EXE) is useful if you do not typically configure client PC users with Administrator privileges. It is available within the sslclient-win-<release>.zip file on your distribution media or on the software download area on Cisco.com.
You must have Administrator privileges on the client PC to run the Install Enabler and install the service. Once the service is installed, it loads at system startup and facilitates SVC setup for non privileged users.
To set up the client service, unzip the sslclient-win-<release>.zip file and then start the STCIE.EXE executable file. It creates or updates the SVC in the Program Files\Cisco System folder, which the ASA 5500 or VPN 3000 concentrator pushes to the client.
The following command line switches are available:
•
•
•
•
Automatic Installation of SVCs
The following recommendations and caveats apply to the automatic installation of SVC software on client PCs:
•
–
–
The procedure varies by browser. See the procedures that follow this section.
–
•
•
•
Adding an ASA 5500 or VPN Concentrator to the List of Trusted Sites (IE)
Use Microsoft Internet Explorer to add an ASA 5500 or VPN Concentrator to the list of trusted sites as follows:
1.
The Internet Options window opens.
2.
3.
4.
The Trusted Sites window opens.
5.
6.
7.
The Trusted Sites window closes.
8.
Adding a Security Certificate in Response to Browser Alert Windows
This section explains how to install a self-signed certificate as a trusted root certificate on a client in response to the browser alert windows.
In Response to a Microsoft Internet Explorer "Security Alert" Window
The following procedure explains how to install a self-signed certificate as a trusted root certificate on a client in response to a Microsoft Internet Explorer Security Alert window. This window opens when you establish a Microsoft Internet Explorer connection to a ASA 5500 or VPN Concentrator that is not recognized as a trusted site. The upper half of the Security Alert window shows the following text:
Information you exchange with this site cannot be viewed or changed by others.
However, there is a problem with the site's security certificate. The security
certificate was issued by a company you have not chosen to trust. View the certificate
to determine whether you want to trust the certifying authority.
Install the certificate as a trusted root certificate as follows:
1.
The Certificate window opens.
2.
The Certificate Import Wizard Welcome opens.
3.
The Certificate Import Wizard - Certificate Store window opens.
4.
5.
The Certificate Import Wizard - Completing window opens.
6.
Another Security Warning window prompts "Do you want to install this certificate?"
7.
The Certificate Import Wizard window indicates the import is successful.
8.
9.
10.
The ASA 5500 or VPN Concentrator window opens, signifying the certificate is trusted.
In Response to a Netscape, Mozilla, or Firefox "Certified by an Unknown Authority" Window
The following procedure explains how to install a self-signed certificate as a trusted root certificate on a client in response to a "Web Site Certified by an Unknown Authority" window. This window opens when you establish a Netscape, Mozilla, or Firefox connection to a ASA 5500 or VPN Concentrator that is not recognized as a trusted site. This window shows the following text:
Unable to verify the identity of <Hostname_or_IP_address> as a trusted site.Install the certificate as a trusted root certificate as follows:
1.
The Certificate Viewer window opens.
2.
3.
The ASA 5500 or VPN Concentrator window opens, signifying the certificate is trusted.
Usage Notes
This section lists the following interoperability considerations and other issues to consider before installing and using SVC Release 1.0.2:
•
•
•
•
•
•
•
NTLM Authentication
If there is a proxy server between the SVC (running on a PC) and the ASA 5500 or VPN 3000 Concentrator, and the proxy server is expecting NTLM authentication instead of basic authentication, the SVC must support NTLM Authentication. Therefore, you must use SVC Release 1.0.2 or later.
WINS and DNS
The SVC supports group configured primary and secondary Windows Internet Naming Services (WINS) or Domain Naming Services (DNS). In general, the IPSec Group-based parameters apply to the SVC. The exception is the Authentication, Authorization, and Accounting configuration, which is always global. Table 2 summarizes the group and global settings that the SVC supports.
Table 2 SVC Group and Global Settings
Authentication
No
Yes1
Authorization
No
Yes
Accounting
Yes
Yes2
DNS and WINS
Yes
N/A
MSIE Proxy Server Setting
Yes
N/A
Default Domain
Yes
N/A
Split DNS
Yes
N/A
Split Tunneling
Yes
N/A
Local LAN
Yes
N/A
1 In this release WebVPN does not support RADIUS with Expiry authentication.
2 If no accounting servers are defined in the group, the system servers apply.
Internet Explorer Proxy With SVC
If you have Internet Explorer configured with a proxy, you must activate the "Use HTTP 1.1 through proxy connections" setting to use the SVC. If this option is not set, the SVC connection does not come up.
In Internet Explorer, choose Internet Options from the Tools menu. Click the Advanced tab, and under the HTTP 1.1 Settings, check "Use HTTP 1.1 through proxy connections."
Setting the Secure Connection (Key) Icon
The Key icon indicates a secure connection. Microsoft Windows XP automatically hides this icon among those that have not been recently used. The end user can prevent XP from hiding this icon as follows:
1.
2.
3.
Cisco Secure Desktop and the SVC
To ensure proper operation of the SVC, follow the instructions of the DSL or cable router manufacturer to upgrade to the latest available firmware revision.
End users of the SVC who establish an SVC connection should not click Launch Login Page in the CSD interface.
Cisco Security Agent Version Requirements
Cisco Security Agent (CSA) Version 4.5 and higher is the only version compatible with the SVC. The appropriate CSA policy ships with CSA and is attached to the group "Remote desktops and laptops." These policies are not enabled by default; you must select them to prevent the SVC from failing with CSA version 4.5.
PC Wireless Client Configurations
If a client wireless adapter profile supports scanning for a better access point, and you use the SSL VPN Client (SVC) or Cisco VPN Client (IPSec) with that profile, disable such scanning. These scans can cause disconnections or stall traffic on the tunnel. To support scanning for non-SVC/IPSec connections, create another profile.
Certificate Revocation List Processing
A certificate revocation list (CRL) contains a number of certificate serial numbers that have been revoked. The client downloads this list from a CRL server, then looks up the certificate of the ASA 5500 or VPN Concentrator in the list. The client displays a window to indicate one of the following if it detects an error:
•
CRL server is offlineThis message signifies that the server is inside a private network or is down.
•
Download or lookup of the CRL has failedTherefore, the SVC requires a CertificateRevocation key with a value of 1 to enable the checking of the certificate revocation list. Otherwise, a dialog window prompts the end user to accept or deny the certificate that has the revocation error. The following path shows the CertificateRevocation key and value on the end user's PC:
My Computer | HKEY_USERS | <Secure ID_of_Logged_User> | Software | Microsoft | Windows |
CurrentVersion | CertificateRevocation REG_DWORD 0x00000001
The SVC attempts to read the value of the "CertificateRevocation" flag shown above to determine whether the client checks for revocation of the ASA 5500 or VPN Concentrator certificate. It logs the following application events to the system Application event log if the registry flag is missing:
Function: User Secure ID: S-1-5-21-1801674531-2025429265-839522115-14761Return code: 0File: f:\temp\build\workspace\SSLClient\Agent\ssl.cppLine: 1404Description: unknownFunction: ReqQueryValueExReturn code: 2File: f:\temp\build\workspace\SSLClient\Agent\ssl.cppLine: 1435Description: The system cannot find the file specified.Function: FailedToGetCertRevocationFlagReturn code: 0xFE1B0045File: f:\temp\build\workspace\SSLClient\Agent\ssl.cppLine: 1494Description: SSL_ERROR_WINDOWS_REGISTRY_FAILEDTo view the Application log, select Control Panel | Administrative Tools | Event Viewer, and select Application Log.
To restore the missing flag, select Control Panel | Internet Options, click on the Advanced tab, and do either of the following:
•
This option restores all of the options under the Advanced tab to the original settings. To avoid doing so, use the second option.
•
Zyxel Modem SSH Incompatibility
The SVC is not compatible with the Zyxel Prestige 643 V2.50 (AP.3) DSL modem running the Putty SSH protocol.
Caveats
Caveats describe unexpected behavior or defects in Cisco software releases. The open caveats in Release 1.1.0 appear first in this list. The second section lists caveats that have been resolved in Release 1.1.0. Each list is sorted by identifier number.
Note
Resolved Caveats in the Cisco SSL VPN Client Release 1.1.0
Table 3 lists the caveats that are resolved in Cisco SSL VPN Client (SVC) Release 1.1.0:
Related Documentation
Related documents for the Cisco ASA 5500 Series Adaptive Security Appliance include:
•
•
•
•
•
•
•
•
•
•
•
Related documents for the Cisco 3000 VPN Concentrator include:
•
•
•
•
•
•
Obtaining Documentation
Cisco documentation and additional literature are available on Cisco.com. Cisco also provides several ways to obtain technical assistance and other technical resources. These sections explain how to obtain technical information from Cisco Systems.
Cisco.com
You can access the most current Cisco documentation at this URL:
http://www.cisco.com/techsupport
You can access the Cisco website at this URL:
You can access international Cisco websites at this URL:
http://www.cisco.com/public/countries_languages.shtml
Product Documentation DVD
The Product Documentation DVD is a comprehensive library of technical product documentation on a portable medium. The DVD enables you to access multiple versions of installation, configuration, and command guides for Cisco hardware and software products. With the DVD, you have access to the same HTML documentation that is found on the Cisco website without being connected to the Internet. Certain products also have .PDF versions of the documentation available.
The Product Documentation DVD is available as a single unit or as a subscription. Registered Cisco.com users (Cisco direct customers) can order a Product Documentation DVD (product number DOC-DOCDVD= or DOC-DOCDVD=SUB) from Cisco Marketplace at this URL:
http://www.cisco.com/go/marketplace/
Ordering Documentation
Registered Cisco.com users may order Cisco documentation at the Product Documentation Store in the Cisco Marketplace at this URL:
http://www.cisco.com/go/marketplace/
Nonregistered Cisco.com users can order technical documentation from 8:00 a.m. to 5:00 p.m. (0800 to 1700) PDT by calling 1 866 463-3487 in the United States and Canada, or elsewhere by calling 011 408 519-5055. You can also order documentation by e-mail at tech-doc-store-mkpl@external.cisco.com or by fax at 1 408 519-5001 in the United States and Canada, or elsewhere at 011 408 519-5001.
Documentation Feedback
You can rate and provide feedback about Cisco technical documents by completing the online feedback form that appears with the technical documents on Cisco.com.
You can submit comments about Cisco documentation by using the response card (if present) behind the front cover of your document or by writing to the following address:
Cisco Systems
Attn: Customer Document Ordering
170 West Tasman Drive
San Jose, CA 95134-9883We appreciate your comments.
Cisco Product Security Overview
Cisco provides a free online Security Vulnerability Policy portal at this URL:
http://www.cisco.com/en/US/products/products_security_vulnerability_policy.html
From this site, you will find information about how to:
•
•
•
A current list of security advisories, security notices, and security responses for Cisco products is available at this URL:
To see security advisories, security notices, and security responses as they are updated in real time, you can subscribe to the Product Security Incident Response Team Really Simple Syndication (PSIRT RSS) feed. Information about how to subscribe to the PSIRT RSS feed is found at this URL:
http://www.cisco.com/en/US/products/products_psirt_rss_feed.html
Reporting Security Problems in Cisco Products
Cisco is committed to delivering secure products. We test our products internally before we release them, and we strive to correct all vulnerabilities quickly. If you think that you have identified a vulnerability in a Cisco product, contact PSIRT:
•
An emergency is either a condition in which a system is under active attack or a condition for which a severe and urgent security vulnerability should be reported. All other conditions are considered nonemergencies.
•
In an emergency, you can also reach PSIRT by telephone:
•
•
Tip
Never use a revoked or an expired encryption key. The correct public key to use in your correspondence with PSIRT is the one linked in the Contact Summary section of the Security Vulnerability Policy page at this URL:
http://www.cisco.com/en/US/products/products_security_vulnerability_policy.html
The link on this page has the current PGP key ID in use.
If you do not have or use PGP, contact PSIRT at the aforementioned e-mail addresses or phone numbers before sending any sensitive material to find other means of encrypting the data.
Obtaining Technical Assistance
Cisco Technical Support provides 24-hour-a-day award-winning technical assistance. The Cisco Technical Support & Documentation website on Cisco.com features extensive online support resources. In addition, if you have a valid Cisco service contract, Cisco Technical Assistance Center (TAC) engineers provide telephone support. If you do not have a valid Cisco service contract, contact your reseller.
Cisco Technical Support & Documentation Website
The Cisco Technical Support & Documentation website provides online documents and tools for troubleshooting and resolving technical issues with Cisco products and technologies. The website is available 24 hours a day, at this URL:
http://www.cisco.com/techsupport
Access to all tools on the Cisco Technical Support & Documentation website requires a Cisco.com user ID and password. If you have a valid service contract but do not have a user ID or password, you can register at this URL:
http://tools.cisco.com/RPF/register/register.do
Note
Submitting a Service Request
Using the online TAC Service Request Tool is the fastest way to open S3 and S4 service requests. (S3 and S4 service requests are those in which your network is minimally impaired or for which you require product information.) After you describe your situation, the TAC Service Request Tool provides recommended solutions. If your issue is not resolved using the recommended resources, your service request is assigned to a Cisco engineer. The TAC Service Request Tool is located at this URL:
http://www.cisco.com/techsupport/servicerequest
For S1 or S2 service requests, or if you do not have Internet access, contact the Cisco TAC by telephone. (S1 or S2 service requests are those in which your production network is down or severely degraded.) Cisco engineers are assigned immediately to S1 and S2 service requests to help keep your business operations running smoothly.
To open a service request by telephone, use one of the following numbers:
Asia-Pacific: +61 2 8446 7411 (Australia: 1 800 805 227)
EMEA: +32 2 704 55 55
USA: 1 800 553-2447For a complete list of Cisco TAC contacts, go to this URL:
http://www.cisco.com/techsupport/contacts
Definitions of Service Request Severity
To ensure that all service requests are reported in a standard format, Cisco has established severity definitions.
Severity 1 (S1)—An existing network is down, or there is a critical impact to your business operations. You and Cisco will commit all necessary resources around the clock to resolve the situation.
Severity 2 (S2)—Operation of an existing network is severely degraded, or significant aspects of your business operations are negatively affected by inadequate performance of Cisco products. You and Cisco will commit full-time resources during normal business hours to resolve the situation.
Severity 3 (S3)—Operational performance of the network is impaired, while most business operations remain functional. You and Cisco will commit resources during normal business hours to restore service to satisfactory levels.
Severity 4 (S4)—You require information or assistance with Cisco product capabilities, installation, or configuration. There is little or no effect on your business operations.
Obtaining Additional Publications and Information
Information about Cisco products, technologies, and network solutions is available from various online and printed sources.
•
•
http://www.cisco.com/go/marketplace/
•
•
•
http://www.cisco.com/go/iqmagazine
or view the digital edition at this URL:
http://ciscoiq.texterity.com/ciscoiq/sample/
•
•
http://www.cisco.com/en/US/products/index.html
•
http://www.cisco.com/discuss/networking
•
http://www.cisco.com/en/US/learning/index.html
This document is to be used in conjunction with the documents listed in the "Related Documentation" section.
Any Internet Protocol (IP) addresses used in this document are not intended to be actual addresses. Any examples, command display output, and figures included in the document are shown for illustrative purposes only. Any use of actual IP addresses in illustrative content is unintentional and coincidental.
© 2006 Cisco Systems, Inc. All rights reserved.
Printed in the USA on recycled paper containing 10% postconsumer waste.
![]()
![]()
![]()
![]()
![]()
![]()
![]()
![]()
Posted: Tue Feb 7 08:03:55 PST 2006
All contents are Copyright © 1992--2006 Cisco Systems, Inc. All rights reserved.
Important Notices and Privacy Statement.