|
|

This chapter explains the tasks you can perform to manage connection entries, view and manage event reporting, and upgrade or uninstall the VPN Client software.
This chapter includes the following sections:
To configure properties of connection entries, see "Configuring and Managing Connection Entries."
 |
Note If you are a system administrator, refer to the VPN Client Administrator Guide for information on configuring the VPN 3000 Concentrator and preparing preconfigured profiles for VPN Client users. |
|
Note The VPN Client displays Windows Logon Properties only on Windows NT, Windows 2000, and Windows XP. |
The VPN Client includes an integrated stateful firewall that provides protection when split tunneling is in effect and protects the VPN Client PC from Internet attacks while the VPN Client is connected to a VPN Concentrator through an IPSec tunnel. This integrated firewall includes a feature called Stateful Firewall (Always On).
Stateful Firewall (Always On) provides even tighter security. When enabled, this feature allows no inbound sessions from all networks, regardless of whether a VPN connection is in effect. Also, the firewall is active for both encrypted and unencrypted traffic. There are two exceptions to this rule:
To enable or disable the stateful firewall, use the following procedure:
When the stateful firewall is enabled, you see a check in front of the option. This feature is disabled by default.
Step 2 During a VPN connection, to view the status of this feature, right-click the lock icon in the system tray.
You can configure the dialer to launch an application automatically before establishing a connection. Some examples of why you would want to use this feature follow:
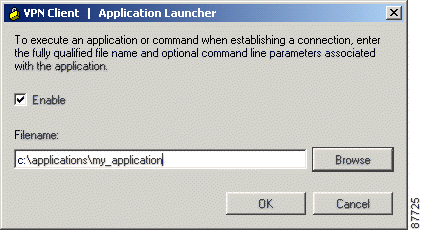
To configure the VPN Client to launch an application from the logon desktop, use the Application Launcher.
The Application Launcher starts the specified application once per session. To launch an application again, you must exit from the VPN Client, restart the VPN Client, and launch the application.
To activate Application Launcher, follow these steps:
The VPN Client displays a dialog box prompting for the name of the application. (See Figure 7-2.)
Step 2 To enable the feature, click Enable.
Step 3 Either type the complete pathname of the application or click Browse to locate the application. (See Figure 7-2.)
Step 4 Click Apply to activate the application or click Cancel to cancel the operation.
To disable Application Launcher, follow these steps:
Step 2 When the Application Launcher dialog box displays, click the Enable check box to uncheck it.
This section describes special logon features for the Windows NT platform, which includes Windows NT 4.0, Windows 2000, and Windows XP. These features include:
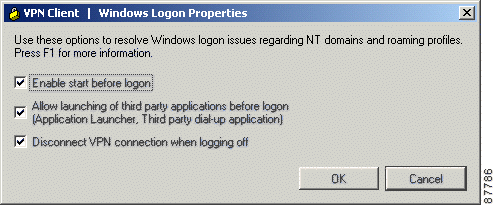
To access the Windows logon properties, open the VPN Client Options menu (shown in Figure 7-1) and choose Windows Logon Properties. The VPN Client displays a dialog box containing three parameters. (See Figure 7-3.)
|
Note The VPN Client displays Windows Logon Properties only on Windows NT, Windows 2000, and Windows XP. |
On a Windows NT platform, you can connect to the private network before you log on to your system. This feature is called start before logon and its purpose is primarily to let you log in to the domain and run login scripts.
Your administrator may have set this up for you. Once you establish a VPN connection, your credentials are sent to a domain controller for logging on to your system. If you need to launch an application before you log on, see the section "Launching an Application" for information.
When you have established a successful VPN connection, the VPN Client window closes, and your logon window displays. If the connection is not successful, the VPN Client window continues to display. Your administrator might have set up a banner that lets you know when you have a successful connection.
To activate start before logon, follow these steps:
Step 2 Click Enable start before logon and then click OK or to cancel the operation, click Cancel.
(See Figure 7-3.)
When start before logon is active, the following events occur when your system starts:
|
Note You can use certificates for authentication with start before logon when your personal certificate, along
with the CA or intermediary certificate(s), are in your Cisco certificate store and the Microsoft local
machine but not your personal Microsoft store (CAPI certificates). However, to use a CAPI certificate,
you can log on using cached credentials, connect using your CAPI certificate, and disable the
"Disconnect VPN connection when logging off" parameter (see
"Disconnecting When Logging Off of a Windows
NT Platform," following). This action keeps your connection open. Now you can log back on to the
system. For information on enrolling certificates and importing certificates into your Cisco store, see "Enrolling and Managing Certificates." For information about using start before logon with the Entrust SignOn feature, see "Connecting with an Entrust Certificate." |
To turn this feature off, use the following procedure:
Step 2 Click to uncheck Enable start before logon and then click OK or to cancel, thus keeping the feature enabled, click Cancel.
Step 3 To make these changes take effect, reboot your PC.
Your system administrator determines whether you can launch applications and third-party dialers before you log on to a Windows NT platform. To protect system and network security, your system administrator might have disabled this feature. If this feature is greyed out, you cannot launch applications and third-party dialers before logging on to a Windows NT platform. You must have system administrator privileges to change this parameter.
This parameter controls whether your VPN Client connection automatically disconnects when you log off your Windows NT system.
To always automatically terminate your connection when you log off, check this parameter. This parameter is checked by default.
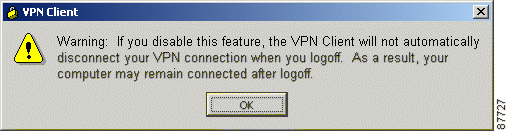
To disable auto-disconnect while logging off, uncheck this parameter. When you uncheck the parameter, the VPN Client displays the warning message shown in Figure 7-4.
Disabling this parameter allows your connection to remain up during and after log off, which allows profiles or folders to be synchronized during log off. You would disable this parameter when using the Windows roaming profiles feature.
|
Note With this feature disabled, you must completely shut down your system to disconnect your VPN Client connection. |
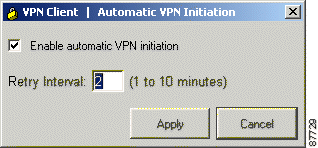
When your network administrator has configured your VPN Client for automatic VPN initiation (by including it in the vpnclient.ini file), the Options menu includes the option Automatic VPN Initiation (auto initiation). (See Figure 7-5.) When you select this option, the VPN Client displays a dialog box that lets you enable/disable auto initiation and change the setting of the retry interval. Disabling auto initiation in this way does not remove it from your configuration. If you need to enable auto initiation after you have disabled it, you can return to this dialog box and enable it again. The only way you can remove auto initiation from your configuration is through editing the vpnclient.ini file.
For complete information on auto initiation, see "Using Automatic VPN Initiation".
To disable or enable auto initiation, follow these steps:
The VPN Client displays the Automatic VPN Initiation Dialog Box (Figure 7-6).
Step 2 To enable auto initiation after it has been disabled, click Enable automatic VPN initiation (or to disable auto initiation, click to uncheck Enable automatic VPN initiation).
Step 3 To change the setting of the retry interval, enter the new value (1 to 10) in the Retry Interval box.
Step 4 Click Apply.
Step 5 If you are enabling auto initiation, you then must close the VPN Client. The authentication dialog then prompts you to enter your authentication information.
|
Note You can also enable/disable, resume, and suspend auto initiation from the right-click menu, depending on the state of your connection. |
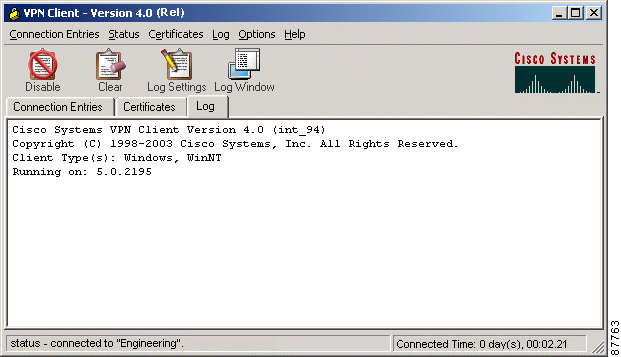
When you start the VPN Client and enable logging, the VPN Client creates a new, empty log file for your session. The log collects event messages from all processes that contribute to the client-peer connection. Examining the event log can often help a network administrator diagnose problems with an IPSec connection between a VPN Client and a peer device. During a session, you can view the log from the Log tab and the Log Window. You can also view a saved log file with a text editor. This section shows how to use the log to retrieve and manage this information.
You can manage and also view the log from the Log tab (Figure 7-7).
Enabling and disabling the log does not clear the events from the log file. To control the flow of information logged, use the following procedure. You can also control the amount of information collected by changing the log filtering settings.
The log is disabled by default.
Step 2 To end collecting event messages into the log file, you must disable the log in one of the following ways:
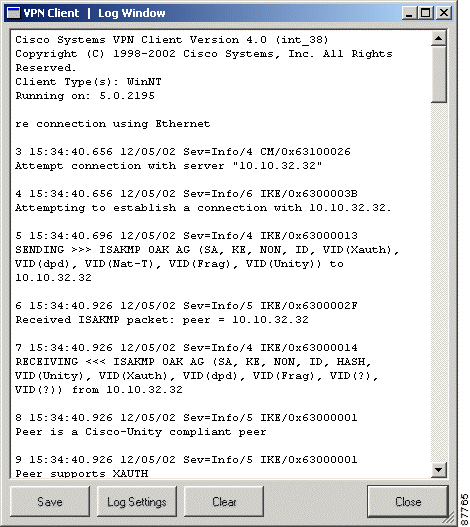
You can see a complete view of the log file by using the Log Window, which is scrollable.
The Log Window appears on the screen. (See Figure 7-9.) By default, the filter is set to low, so you might not see any events displayed in this window (see "Filtering Events").
Each message in the log file comprises at least two lines containing the following fields:
Table 7-1 describes the fields in an event message. Table 7-2 describes Event types and severity levels.
Table 7-1 Fields in an Event Message
Table 7-2 Event Types and Severity Levels
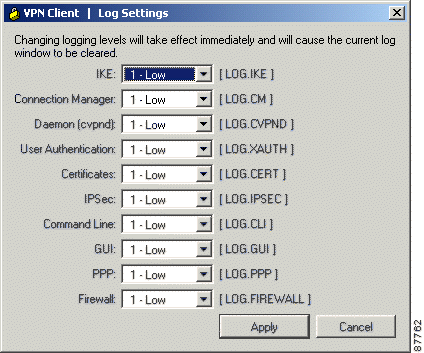
To control the amount of information collected in the log, use the following procedure:
The VPN Client displays the log settings dialog box (See Figure 7-10.)
To change the filter level, do the following:
Step 2 For each of the logs you want to change, click the down arrow and choose from the following options that the Log Settings dialog box displays:
Disabled—Inhibits event reporting for the chosen class.
Low—Provides the least amount of information. This choice includes severity levels 1 through 3 (all faults and warnings). Low is the default for all classes.
Medium—Includes severity levels 1 through 4; all in Low plus the first level informational events, which provide general information about the connection. Note that a first level informational event is level 4 and appears in the event display as Info/4.
High—Includes severity levels 1 through 6, thus adding two levels of informational events (Info/5 and
Info/6). This setting can lower the performance of all applications on your system, so use it only when your network administrator or a support engineer suggests that you do so.
Step 3 After making your changes, click Apply to save or Cancel to cancel your changes.
Table 7-3 defines the classes (modules) that generate events.
Table 7-3 Classes That Generate Events in the VPN Client
If you change the log filter levels, the change takes effect immediately for the events shown in both the Log Window and the Log tab, but while this change clears the events display on the Log tab, it does not clear the events in the log file.
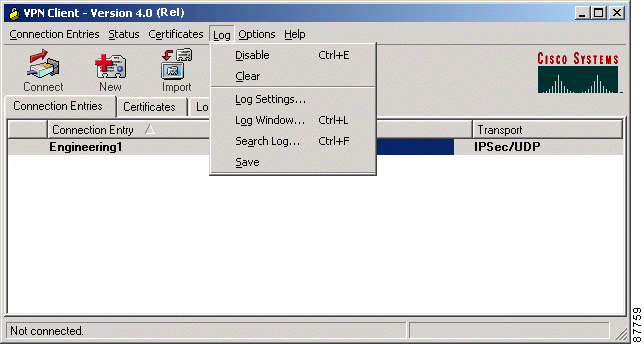
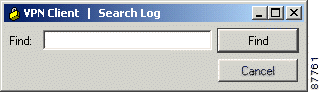
You can search the log file for the occurrence of a string of characters. From the Log menu, select Search Log. This displays a dialog box (Figure 7-11) into which you enter the exact string to be matched.
The search string is not case-sensitive, and wildcards are not supported. Search terms are highlighted only on the log tab display, not in the log window, even if the log tab was not the active tab.
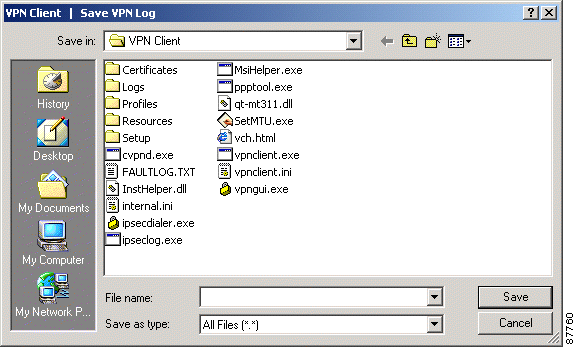
To save the currently displayed events in the log file on your hard drive, use the following procedure:
The VPN Client saves the information to the Client install directory, which by default is the pathname Program Files\Cisco Systems VPN Client\VPN Client\Logs. The default file name includes the word "LOG" and is based on the date and time (in 24-hour format) that the log file was created; for example, LOG-yyyy-MM-dd-hh-mm-ss.txt. This new format complies with the ISO 8601 extended specification for representations of dates and times and avoids issues with localization.
The new log file names have a chronological order that is the same as their alphanumeric order. This provides for a method of enumerating only the log files generated by the GUI.
|
Note You can save the contents of the present log to a different directory and filename, but you cannot change the default log directory and filename. (See Figure 7-12.) |
Step 2 After typing in the name of the file, click Save or Cancel.
To eliminate all the events currently displayed in the Log Window and the Log tab, do one of the following:
Clearing the log display does not reset event numbering, nor does it clear the log file itself.
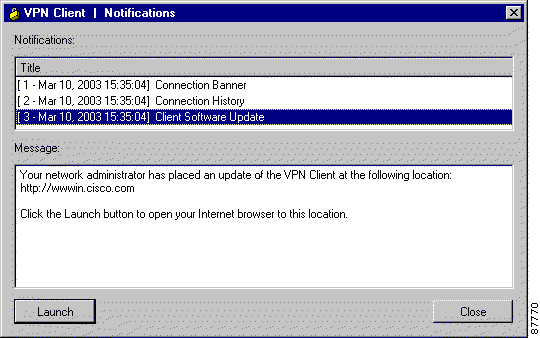
The VPN device (secure gateway) through which you connect to the private network at your organization can send you notifications. You can receive a notification from your network administrator when it is time to update the VPN Client software, when the VPN device detects that a required firewall is not running, or when the VPN Client receives a disconnect-with-reason notification. Other notifications are essentially documentary and can include connection history, client disconnect notices, and an administrator-defined banner. A notification showing the login sequence typically appears when you start your dialer connection.
Figure 7-14 shows the Notifications dialog box.
Remote users receive a notification message when it is time to upgrade the VPN Client software. The notification includes the location where the remote user can obtain the upgrade. When you receive an upgrade notification that includes a URL, click Launch to go to the site and retrieve the upgrade software. You will receive an upgrade notification every time you connect until you have installed the upgrade software.
If the VPN Client and VPN Concentrator firewall configurations do not match, the VPN Concentrator notifies the VPN Client while negotiating the connection. The notification includes the policy that the VPN Concentrator requires. The message states that the policy required is AYT and the firewall required is any Zone Labs product.
In addition, in Release 4.0, when a VPN 3000 Concentrator disconnects the VPN Client and tears down the tunnel, the VPN Client displays a popup window showing the reason for the disconnect and also logs a message to the Notifications log and the IPSec log file. For IPSec deletes that do not tear down the connection, the event message appears only in the log file. These disconnect events include:
For a shutdown or reboot scheduled at a future time, the VPN 3000 Concentrator sends the disconnect notification at the time of the actual shutdown or reboot. This feature does not provide advanced or early notification of a future event; for example, it does not send messages such as "The Concentrator is going to shut down in 30 minutes."
The disconnect-with-reason feature is enabled by default, but an administrator can configure the VPN 3000 Concentrator to turn off these disconnect notifications. This feature is not configurable on the VPN Client. When this feature is enabled, the VPN 3000 Concentrator and the VPN Client negotiate whether to display these messages.
Upgrading the VPN Client software using this method retains existing connection entries and their parameters.
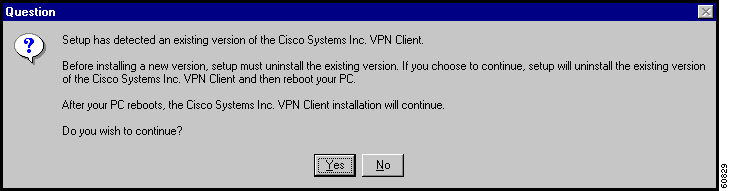
To install an upgrade of the VPN Client over an existing version on your system, use the following procedure, which first uninstalls the existing version, and then reboots your PC and installs the new version.
When it starts, the installation wizard detects the existing version and asks you to confirm that you want to remove that version and reboot your PC. (See Figure 7-15.)
Step 2 To continue, click Yes.
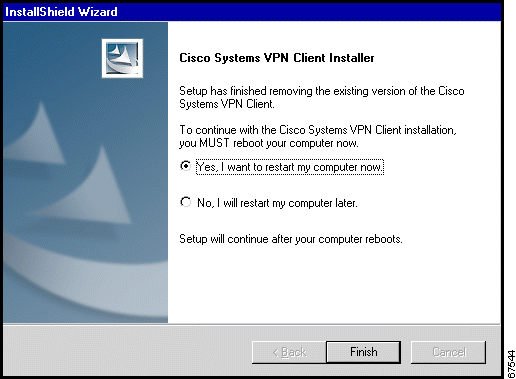
The installation program removes the old version and asks you to confirm the system restart. (See Figure 7-16.)
Be sure to remove any diskette from its drive before you restart your system.
If you are installing from diskettes, reinsert Disk 1 after your system restarts and displays the Windows logo screen, but before the desktop appears.
Step 3 To restart your system, click Yes, I want to restart my computer now (the default) and click Finish.
The installation wizard restarts your system. Once your system has restarted, installation continues automatically.
Step 4 Follow the instructions as if you were installing for the first time. See "Installing the VPN Client Through InstallShield."
Upgrading the VPN Client software using MSI in this recommended way retains existing connection entries and their parameters. You must remove any version of the Cisco VPN Client or any other VPN Client before upgrading the Cisco VPN Client with MSI.
To install an upgrade of the VPN Client to replace an existing version on your system, use the following procedure.
Step 2 Install the VPN Client using the MSI installer (vpnclient_en.msi).
This option is available only if you have installed the VPN Client via InstallShield. Uninstalling the VPN Client means completely removing all VPN Client software from your computer. For example, if you are changing or upgrading your PC, you might want to uninstall the VPN Client. Also, if you are getting ready to install Cisco VPN Client 4.0 using Microsoft Windows Installer (MSI), you can run the Uninstall application to remove previous versions of the Cisco VPN Client.
|
Note Do not attempt to uninstall or upgrade the VPN Client software from a mapped network drive. |
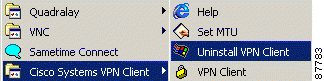
Before you run the uninstall program, make sure you have closed all of your remote access (Dial-Up Networking) connections and all VPN Client applications. Then use the following procedure. (See Figure 7-17.)
|
Note If you installed the VPN Client via the Microsoft Windows Installer, the Cisco Systems VPN Client menu does not include the Uninstall VPN Client option. |
The Uninstall Wizard runs and asks if you want to really want to remove the VPN Client applications. (See Figure 7-18.)
Step 2 To completely remove the VPN Client software from your system, click Yes. Otherwise, click No.
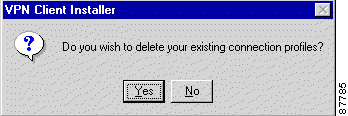
Next, the Uninstall Wizard asks if you want to delete your connection profiles. (See Figure 7-19.)
Step 3 To preserve your connection profiles (which contain configured connection entries), click No.
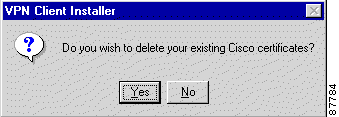
Then the Uninstall Wizard asks if you want to delete your certificates. (See Figure 7-20.)
Step 4 To keep your certificates, click No.
Finally, the Uninstall Wizard prompts you to restart your system. To complete the uninstallation, you must restart your system.
Step 5 To restart your system, click Yes (the default) and then click Finish.
The installation program restarts your system.
Be sure to remove any diskette from its drive before you restart your system.
|
Note When you uninstall the VPN Client software and you have clicked yes to remove your certificate and profile directories, the vpnclient.ini and log files remain on your system. Since these files were generated after you installed the software, they are not removed when you uninstall the software. You must remove them manually. |
![]()
![]()
![]()
![]()
![]()
![]()
![]()
![]()
Posted: Wed May 14 11:02:09 PDT 2003
All contents are Copyright © 1992--2003 Cisco Systems, Inc. All rights reserved.
Important Notices and Privacy Statement.