|
|

Table Of Contents
Cisco Unified CallManager Express Security Best Practices
System Administrator Account Authentication via AAA
Using HTTPS for Cisco Unified CME GUI Management
Configuring Basic Cisco Unified CME Access Security
Setting Local and Remote System Access
Disabling Cisco Discovery Protocol
Configuring COR for Incoming and Outgoing Calls
Restricting Outgoing Calling Patterns
Cisco Unified CME Security for IP Telephony
Monitoring IP Phone Registration
Call Activity Monitoring and Call History Logging
COR for Incoming/Outgoing Calls to Prevent Toll Fraud
After-hours Blocking to Restrict Outgoing Calling Pattern-Toll Fraud
Cisco Unified CME with NAT and Firewall
Remote Phones with Public IP Addresses
Remote Phones with Private IP Addresses
Cisco Unified CME with Cisco IOS Firewall Implementation Considerations
Cisco Unified CME Commonly Used Ports
Cisco Unified CallManager Express Security Best Practices
Cisco Unified CallManager Express (Cisco Unified CME) provides integrated IP communications on Cisco IOS routers. Therefore, the same security best practices recommended for all Cisco IOS voice-enabled routers also apply to Cisco Unified CME. In addition, you should implement Cisco Unified CME system-specific security practices to provide additional security protection.
This chapter describes how you can set up the Cisco Unified CME using the CLI to prevent users from intentionally or accidentally gaining system-level control from the GUI and local or remote CLI access. Specific sections presented in this chapter address the following Cisco Unified CME security considerations:
•
Using HTTPS for Cisco Unified CME GUI Management
•
•
•
•
•
Note
Securing GUI Access
A Cisco IOS router authenticates an administrator CLI login against the enable password only, and the default setting for HTTP access is ip http authentication enable. If the system administrator, customer administrator, or phone user has the same password as the router's enable password, he or she can gain level 15 EXEC privilege access to Cisco IOS software by HTTP. A normal IP phone user can then accidentally change the Cisco Unified CME configuration, erase Flash, or reload the router when logging on to this URL:
http://cme-ip-address/
You should configure the following commands for Cisco Unified CME to use AAA or local authentication to prevent a normal user from gaining access to the enable password and therefore having access to the system administrator page:
ip http authentication aaa
or
ip http authentication local
System Administrator Account Authentication via AAA
Cisco Unified CME allows the system administrator username/password be authenticated by AAA. Use the following configuration to use AAA for system administrator user login:
ip http authenticationaaa new-modelaaa authentication login default group tacacs+ localtacacs-server host 10.1.2.3
Note
Using HTTPS for Cisco Unified CME GUI Management
HTTP over SSL (HTTPS) provides Secure Socket Layer (SSL) version 3.0 support for the HTTP 1.1 server and HTTP 1.1 client within Cisco IOS software. SSL provides server authentication, encryption, and message integrity to allow secure HTTP communications. SSL also provides HTTP client authentication. This feature is supported only in Cisco IOS software images that include the SSL feature. Specifically, SSL is supported in the Advanced Security, Advanced IP Services, and Advanced Enterprise Services images. Use the Advanced IP Services or Advanced Enterprise Services Cisco IOS images to get both the Cisco Unified CME and SSL features.
IP phones do not serve as HTTPS clients. If HTTPS is enabled on the Cisco Unified CME router, IP phones still attempt to connect to HTTP using port 80. Because the SSL default port is 443, the phones cannot display local directory and system speed dials. IP phones using HTTP can work with a system configured for SSL by enabling both HTTP and HTTPS, as shown in the following example.
ip http serverip http secure-serverip http secure-port port_number!if https port is changed from default 443ip http authentication AAA | TACACS | localUse the following command to generate an RSA usage key pair with a length of 1024 bits or greater:
crypto key generate rsa usage 1024
If you do not generate an RSA usage key pair manually, an RSA usage key pair with a length of 768 bits is generated automatically when you connect to the HTTPS server for the first time. These auto generated RSA keys are not saved to the startup configuration; therefore, they are lost when the device is rebooted unless you save the configuration manually.
You should obtain an X.509 digital certificate with digital signature capabilities for the device from a certification authority (CA). If you do not obtain a digital certificate in advance, the device creates a self-signed digital certificate to authenticate itself.
If you change the device hostname after obtaining a device digital certificate, HTTPS connections to the device fail because the hostname does not match the hostname specified in the digital certificate. Obtain a new device digital certificate using the new hostname to fix this problem.
The ip http secure-server command prevents clear-text passwords from traveling across the network when a Cisco Unified CME administrator logs into the Cisco Unified CME GUI. However, communications between the phone and router remain in clear text.
The following are the suggested best practices for using HTTP interactive access to the Cisco Unified CME router:
•
•
•
Configuring Basic Cisco Unified CME Access Security
This section summarizes the measures available to ensure only authorized users and systems can access Cisco Unified CME system-based resources. The following topics are addressed in this section:
•
•
•
•
Setting Local and Remote System Access
When in privileged EXEC mode, the configure terminal and telephony-service commands take a user into Cisco Unified CME configuration mode. The show running-config and show telephony-service commands show all registered phones and users, extension numbers, usernames, and passwords for Cisco Unified CME GUI access. An initial step to security control is at the system access level. Password encryption, user authentication, and command auditing are all critical to prevent security breaches.
Enabling Secret and Encrypt Passwords
The Enable password is presented in cleartext to provide access control to privileged EXEC mode of the router. Use Enable Secret to encrypt the enable password.
The following example illustrates this configuration:
enable secret secretword1no enable passwordThe enable secret command takes precedence over the enable password command if both are configured; they cannot be used simultaneously.
To increase security access, passwords can be encrypted to prevent any unauthorized users from viewing the passwords when packets are examined by protocol analyzers:
The following example illustrates this configuration:
Service password-encryptionCreating Multiple Privilege Levels
By default, Cisco IOS software has two levels of access to commands: User EXEC mode (level 1) and privileged EXEC mode (level 15). Configuring up to 16 privilege levels (from 0, the most restricted level, to 15, the least restricted level) to protect the system from unauthorized access. Use the privilege mode level command.
The following example illustrates this configuration:
privilege exec level 14enable secret level 2 secretword2Restrict Access to VTY
Allow only certain users/locations to Telnet to the router via vty by defining and applying an access list for permitting or denying remote Telnet sessions.
The following example illustrates this configuration:
line vty 0 4access-class 10 inaccess-list 10 permit 10.1.1.0 0.0.0.255Using AAA to Secure Access
An authentication server can be used to validate user access to the system. The following commands allow an AAA server, TACACS+ server, to be used for authentication services.
The following example illustrates this configuration:
aaa new-modelaaa authentication login default tacacs+ enableaaa authentication enable default tacacs+ enableip tacacs source-interface Loopback0tacacs-server host 10.17.1.2tacacs-server host 10.17.34.10tacacs-server key xyz! Defines the shared encryption key to be xyzConfiguring Accounting and Auditing on AAA
The following commands use a TACACS+ server for command accounting and auditing purposes.
aaa new-modelaaa authentication login default tacacs+ enable(login uses TACACS+, if not available, use enable password)
aaa authentication enable default tacacs+ enableaaa accounting command 1 start-stop tacacs+(runs accounting for commands at the specified privilege level 1)aaa accounting exec start-stop tacacs+ip tacacs source-interface Loopback0tacacs-server host 10.17.1.2tacacs-server host 10.17.34.10tacacs-server key xyz (defines the shared encryption key to be xyz)The example command log shows the information contained in a TACACS+ command accounting record for privilege level 1.
Wed Jun 25 03:46:47 1997 192.168.25.15 fgeorge tty3 5622329430/4327528 stoptask_id=3 service=shell priv-lvl=1 cmd=show version <cr>Wed Jun 25 03:46:58 1997 192.168.25.15 fgeorge tty3 5622329430/4327528 stoptask_id=4 service=shell priv-lvl=1 cmd=show interfaces Ethernet 0 <cr>Wed Jun 25 03:47:03 1997 192.168.25.15 fgeorge tty3 5622329430/4327528 stoptask_id=5 service=shell priv-lvl=1 cmd=show ip route <cr>Configuring Local User Authentication When AAA Is Not Available
You should always require login-based authentication of users—even when the external AAA server is unreachable.
The following example illustrates this configuration:
username joe password 7 045802150C2Eusername jim password 7 0317B21895FE!line vty 0 4login localRestricting Access to tty
You can allow only certain users and locations to Telnet to the router by using its terminal (tty) or virtual terminal (vty) lines. Define and apply an access list for permitting or denying remote Telnet sessions to your Cisco Unified CME router as shown in the following example.
line vty 0 4access-class 10 inaccess-list 10 permit 10.1.1.0 0.0.0.255Configuring SSH Access
Use the following command to generate RSA key pairs for the router:
crypto key generate rsa
By default the vty's transport is Telnet. The following command disables Telnet and supports only SSH to the vty lines.
line vty 0 4transport input sshUsing ACLs for SNMP Access
The community access string can be set up to permit access to the Simple Network Management Protocol (SNMP). The following example assigns the changeme-rw string to SNMP, allowing read-write access and specifies that IP access list 10 can use the community string:
access-list 10 remark SNMP filteraccess-list 10 permit 10.1.1.0 0.0.0.255snmp-server community changeme-rw RW 10snmp-server community changeme-ro RO 10Because read and write are two common community strings for read and write access, respectively, change the community strings to different ones.
Disabling Cisco Discovery Protocol
Because Cisco Discovery Protocol (CDP) automatically discovers the neighboring network devices supporting CDP, disable CDP in an untrusted domain so that Cisco Unified CME routers will not appear in the CDP table of other devices. Disable CDP with the following command:
no cdp run
If CDP is needed, then consider disabling CDP on a per-interface basis, as in the following example:
Interface FastEthernet0/0no cdp enableConfiguring COR for Incoming and Outgoing Calls
One of the ways to restrict unauthorized incoming and outgoing calls is to use the Class or Restriction (COR) commands. The configuration shown in the following example defines two groups of users: user and superuser. Superuser is allowed to make any calls, including local, long-distance, 411 directory lookup, and 911 calls. User is restricted from making 900, 411, and international calls.
dial-peer cor customname 911name 1800name local-callname ld-callname 411name int-callname 1900!dial-peer cor list call911member 911!dial-peer cor list call1800member 1800!dial-peer cor list calllocalmember local-call!dial-peer cor list callintmember int-call!dial-peer cor list callldmember ld-call!dial-peer cor list call411member 411!dial-peer cor list call1900member 1900!dial-peer cor list usermember 911member 1800member local-callmember ld-call!dial-peer cor list superusermember 911member 1800member local-callmember ld-callmember 411member int-callmember 1900!dial-peer voice 9 potscorlist outgoing calllddestination-pattern 91..........port 1/0prefix 1!dial-peer voice 911 potscorlist outgoing call911destination-pattern 9911port 1/0prefix 911!dial-peer voice 11 potscorlist outgoing callintdestination-pattern 9011Tport 2/0prefix 011!dial-peer voice 732 potscorlist outgoing calllocaldestination-pattern 9732.......port 1/0prefix 732!dial-peer voice 800 potscorlist outgoing call1800destination-pattern 91800.......port 1/0prefix 1800!dial-peer voice 802 potscorlist outgoing call1800destination-pattern 91877.......port 1/0prefix 1877!dial-peer voice 805 potscorlist outgoing call1800destination-pattern 91888.......port 1/0prefix 1888!dial-peer voice 411 potscorlist outgoing call411destination-pattern 9411port 1/0prefix 411!dial-peer voice 806 potscorlist outgoing call1800destination-pattern 91866.......port 1/0prefix 1866ephone-dn 1number 2000cor incoming userephone-dv 2number 2001cor incoming superuserRestricting Outgoing Calling Patterns
You might use the after-hours block command to restrict incoming or outgoing calls after certain hours. You can also use after-hours blocking to restrict calls to numbers or area codes known to be fraudulent calling patterns. The commands shown in the following example block all calls at all times for patterns 2 to 6. Pattern 7 is blocked only during the configured after-hours period.
telephony-serviceafter-hours block pattern 2 .1264 7-24after-hours block pattern 3 .1268 7-24after-hours block pattern 4 .1246 7-24after-hours block pattern 5 .1441 7-24after-hours block pattern 6 .1284 7-24after-hours block pattern 7 9011after-hours day Sun 19:00 07:00after-hours day Mon 19:00 07:00after-hours day Tue 19:00 07:00after-hours day Wed 19:00 07:00after-hours day Thu 19:00 07:00after-hours day Fri 19:00 07:00after-hours day Sat 19:00 07:00Cisco Unified CME Security for IP Telephony
The following topics are addressed in this section:
•
•
•
•
•
IP Phone Registration Control
Configure Cisco Unified CME to allow IP phones in the trusted domain for registration. Assuming that the local segment is a trusted domain, use the strict-match option in the ip source-address command, so that only locally attached IP phones will be able to register to the Cisco Unified CME router and get telephony services.
CME-3.0(config-telephony)#ip source-address 10.1.1.1 port 2000 strict-matchYou can group a set of IP phones into one VLAN (such as 10.1.1.0/24), so that only IP phones in the specified VLAN can register to the Cisco Unified CME.
Block port 2000 access from the WAN side to prevent external SCCP phones from registering with Cisco Unified CME. Use the following access-list to block port 2000 access from WAN interfaces. The following example illustrates this configuration:
access-list 101 deny tcp any any eq 2000
You can also prevent unknown or unconfigured IP phones from being registered by disabling automatic registration using the following command:
CME-4.0(config-telephony)#no auto-reg-ephone
Note
Prior to Cisco Unified CME 4.0, unknown phones or phones that are not configured in Cisco Unified CME are allowed to register with Cisco Unified CME by default for ease of management, but these phones do not provide a dial tone until you configure them by associating the buttons with the ephone-dns or configuring auto assign (from telephony-service configuration mode).
The following commands illustrates configuring ephone-dns with the ephone-dn command.
ephone-dn 1number 1001ephone-dn 2number 1002ephone 1mac-address 1111.2222.3333button 1:1 2:2The following commands illustrate configuring the auto assign command:
CMEtest4-3745(config)# telephony-serviceCMEtest4-3745(config-telephony)# auto assign 1 to 500With Cisco Unified CME 4.0, you can configure no auto-reg-ephone in telephony-service configuration mode so that IP phones that are not explicitly configured with their MAC addresses in ephone configuration mode are prevented from automatically registering with the Cisco Unified CME system.
Monitoring IP Phone Registration
Cisco Unified CME 3.0 added the following syslog messages to generate and display all registration/deregistration events:
%IPPHONE-6-REG_ALARM%IPPHONE-6-REGISTER%IPPHONE-6-REGISTER_NEW%IPPHONE-6-UNREGISTER_ABNORMAL%IPPHONE-6-REGISTER_NORMALThe following message indicates that a phone has registered and is not part of the explicit router configuration (ephone configuration has not been created or the MAC address has not been assigned):
%IPPHONE-6-REGISTER_NEW: ephone-3:SEP003094C38724 IP:10.4.170.6 Socket:1 DeviceType:Phone
has registered.
Note
Cisco Unified CME allows unconfigured phones to register in order to make provisioning of the Cisco Unified CME system more convenient. By default, phones designated as "new" are not assigned phone lines and cannot make calls.
You can use the following configuration to enable syslogging to a router's buffer/console or a syslog server:
logging console | bufferedlogging 192.168.153.129! 192.168.153.129 is the syslog serverCall Activity Monitoring and Call History Logging
The Cisco Unified CME GUI provides call history table information so that a network administrator can monitor the call history information for unknown callers and use this information to disallow calling activities based on select calling patterns. The call history log should be configured to perform forensics and accounting and allow the administrator to track down fraudulent calling patterns. Configure the following commands to log call activity and call history:
dial-control-mib retain-timer 10080dial-control-mib max-size 500!gw-accounting syslogCOR for Incoming/Outgoing Calls to Prevent Toll Fraud
The following configuration example illustrates COR. There are two classes of service in the configuration: user and superuser along with various permissions allowed such as local calling, long distance calling, 911 access, and 411 access. In this example, superuser has access to everything and user has access to all resources with the exception of toll 1900, directory assistance 411, and international calling.
dial-peer cor customname 911name 1800name local-callname ld-callname 411name int-callname 1900dial-peer cor list call911member 911!dial-peer cor list call1800member 1800!dial-peer cor list calllocalmember local-call!dial-peer cor list callintmember int-call!dial-peer cor list callldmember ld-call!dial-peer cor list call411member 411!dial-peer cor list call1900member 1900dial-peer cor list usermember 911member 1800member local-callmember ld-call!dial-peer cor list superusermember 911member 1800member local-callmember ld-callmember 411member int-callmember 1900dial-peer voice 9 potscorlist outgoing calllddestination-pattern 91..........port 1/0prefix 1!dial-peer voice 911 potscorlist outgoing call911destination-pattern 9911port 1/0prefix 911!dial-peer voice 11 potscorlist outgoing callintdestination-pattern 9011Tport 2/0prefix 011!dial-peer voice 732 potscorlist outgoing calllocaldestination-pattern 9732.......port 1/0prefix 732!dial-peer voice 800 potscorlist outgoing call1800destination-pattern 91800.......port 1/0prefix 1800!dial-peer voice 802 potscorlist outgoing call1800destination-pattern 91877.......port 1/0prefix 1877!dial-peer voice 805 potscorlist outgoing call1800destination-pattern 91888.......port 1/0prefix 1888!dial-peer voice 411 potscorlist outgoing call411destination-pattern 9411port 1/0prefix 411!dial-peer voice 806 potscorlist outgoing call1800destination-pattern 91866.......port 1/0prefix 1866ephone-dn 1number 2000cor incoming userEphone-dn 2number 2001cor incoming superuserAfter-hours Blocking to Restrict Outgoing Calling Pattern-Toll Fraud
After-hours blocking can be added to restrict incoming calls after certain hours. After-hours blocking can also be used to restrict calls to numbers/area codes known as fraudulent calling patterns. The following configuration example can be used to restrict calls to certain area codes:
telephony-serviceafter-hours block pattern 1 .1242after-hours block pattern 2 .1264after-hours block pattern 3 .1268after-hours block pattern 4 .1246after-hours block pattern 5 .1441after-hours block pattern 6 .1284after-hours block pattern 7 .1345after-hours block pattern 8 .1767after-hours block pattern 9 .1809after-hours block pattern 10 .1473after-hours block pattern 11 .1876after-hours block pattern 12 .1664after-hours block pattern 13 .1787after-hours block pattern 14 .1869after-hours block pattern 15 .1758after-hours block pattern 16 .1900after-hours block pattern 17 .1976after-hours block pattern 18 .1868after-hours block pattern 19 .1649after-hours block pattern 20 .1340after-hours block pattern 21 .1784after-hours block pattern 22 .1684after-hours block pattern 23 .1590after-hours block pattern 24 .1456after-hours day Sun 00:00 23:59after-hours day Mon 00:00 23:59after-hours day Tue 00:00 23:59after-hours day Wed 00:00 23:59after-hours day Thu 00:00 23:59after-hours day Fri 00:00 23:59after-hours day Sat 00:00 23:59Cisco Unified CME with NAT and Firewall
The following topics are addressed in this section:
•
•
•
Cisco Unified CME with NAT
Typically, Cisco Unified CME router's LAN interface (Ethernet interface) is used as a source IP address used by the IP phones and the Cisco Unified CME router to communicate with each other. However, when an internal switch module is used to connect IP phones, the VLAN's IP address can be used as a source IP address. A loopback interface's IP address is another option for a source IP address.
The IP addresses of the IP phones are internal addresses to the Cisco Unified CME router and are in a different segment that is not visible by the external devices or callers. Other devices including Cisco gateways or gatekeeper use the Cisco Unified CME router's IP address to communicate instead of directly communicating with the IP phones. The Cisco Unified CME router translates IP addresses back and forth for the traffic to route to the IP phones or outside of the network area. Therefore, no NAT configuration is needed for two-way voice/audio from/to the IP phones locally attached to the Cisco Unified CME router. We recommend that NAT be deployed for data traffic only with Cisco Unified CME.
NAT may be required for IP phones deployed remotely which do not have routable IP addresses.
Note
Remote Phones with Public IP Addresses
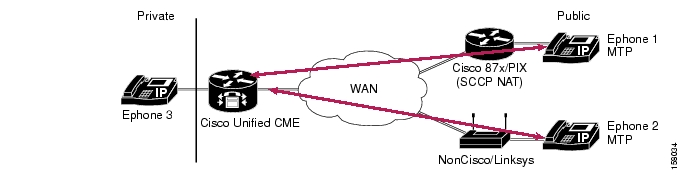
Remote phone support introduced in Cisco Unified CME 4.0 allows IP phones to be connected to Cisco Unified CME across a WAN link such as Frame Relay, DSL, and cable. Figure 10-1 shows a typical scenario for this connectivity arrangement.
Figure 10-1 Remote Phones with Public IP Addresses
In the scenario in Figure 10-1, ephone 3 is in a private VLAN and uses Cisco Unified CME to reach ephone 1 and ephone 2 in remote sites with public IP addresses. However, because media streams are sent between the phones connected to the same Cisco Unified CME, Media Termination Point (MTP) should be configured on the remote phones in order to have Cisco Unified CME terminate the media stream—thereby ensuring two-way audio between ephone 3 and ephone 1 or ephone 2. Codec G729r8 is required for the remote phones. The configuration on ephone 1 or ephone 2 is as follows:
ephone 1mtpcodec g729r8The MTP option under ephone 1 causes the Cisco Unified CME router to act as a proxy. The Cisco Unified CME forwards media packets to other IP phones with the Cisco Unified CME router's address in the source address field. If another phones in the call is not an IP phone, Cisco Unified CME forwards the media packets.
Note
Remote Phones with Private IP Addresses
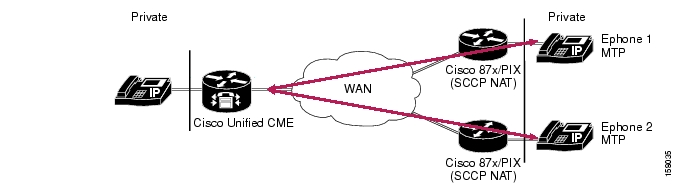
Figure 10-2 illustrates a typical scenario when remote phones are deployed with private IP addresses in the remote site.
Figure 10-2 Remote Phone Connection with Private IP Addresses
Remote phones can be connected via a traditional Cisco router (such as Cisco 87x or Cisco PIX) or using an alternative routing device (such as Linksys router). Both implementation require that NAT be configured if routable IP addresses are not used on the remote phones. NAT SCCP support is required to implement two-way audio between IP phones connected to the Cisco Unified CME. With NAT allowing for the translation of the embedded IP addresses and port numbers presented in the SCCP messages, a full NAT entry can be created to allow RTP traffic to flow between IP Phones. As a result, two-way voice/audio is permitted between the IP phones being connected via NAT. For a device such as Linksys router, which is not SCCP aware, a one-way audio issue exists between the two IP phone endpoints. A workaround is to connect the remote IP phone attached to the Linksys via a DMZ port with routable IP addresses or to establish a VPN connection to the Cisco Unified CME router to avoid having a one-way audio issue.
Caveats:
•
•
•
•
Note
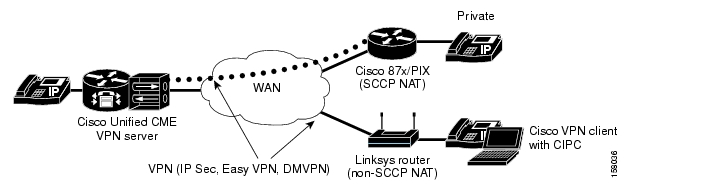
Remote Phones over VPN
Remote phones with private IP addresses can be connected to phones attached to a Cisco Unified CME using a nonCisco router. However, in order to support two-way audio between these privately addressed remote phones and phones attached to a Cisco Unified CME (which have public IP addresses), a VPN IP Sec tunnel must be established between Cisco Unified CME and the nonCisco router.
VPN can also be used to connect Cisco Unified CME and Cisco SCCP NAT aware routers such as Cisco 87x/PIX, allowing for connections supported by QoS and VPN acceleration.
Figure 10-3 illustrates examples of these VPN-related environments.
Note
Figure 10-3 Remote Phone Connection using VPN
Cisco Unified CME with Cisco IOS Firewall Implementation Considerations
This description of the Cisco Unified CME implementation with Cisco IOS firewall addresses the following topics:
•
•
•
•
Overview of Cisco IOS Firewall with Cisco Unified CME
The Cisco IOS Firewall, running on Cisco IOS routers, provides a network-based firewall solution with the functionality of Context-based Access Control (CBAC) or protocol inspection, Cisco Intrusion Detection System (Cisco IDS), authentication proxy, and URL filtering. A firewall provides access control between internal and external networks. It identifies networks as inside (private) or outside (public) in which packets can get from the inside to the outside, be blocked by default from outside to inside, and packets associated with an inside-originated connection are allowed to pass in. Many firewalls work only if all outside traffic originates from well-known sockets and do not handle asymmetric traffic (such as UDP media). Cisco IOS firewalls allow packets to pass through based on source and destination IP addresses and the configured firewall policy.
Cisco Unified CME is a software feature added to the Cisco IOS routers that provides call processing for IP phones using Skinny Client Control Protocol (SCCP) for branch/SMB, and managed SP environments. There can be instances of SMB or branch office implementations in which a single router is required to provide Internet access, IP telephony service, and Cisco IOS Firewall functions. Cisco Unified CME requires that all IP phones be attached to the Cisco Unified CME router locally —before remote phone support was introduced.
Therefore, H.323 and SCCP support on the Cisco IOS Firewall are needed for locally generated traffic.
Previous Problems on Cisco Unified CME with Cisco IOS Firewall
SCCP is a Cisco proprietary small version of H.323. H.323 traffic can be classified into call signalling, call control, and media communication. H.323 uses Q.931, H.225, and H.245 to set up, manage/control, and tear down calls. The following descriptions address how signaling and media streams are affected by the Cisco IOS firewall.
Signaling Stream
An H.323 call requires a TCP connection for H.245 signalling that does not have an associated well-known port. The H.245 port is dynamically assigned. Because this port is not known ahead of time and cannot be configured when defining firewall policy, the Cisco IOS Firewall will block the H.245 message and the call signalling procedure will fail. When NAT is used in the H.323 signalling path, an inside IP address (which is behind the NAT and is not known to the rest of the world), will be used as the "calling party" information element in the H.225 signalling stream. As a result, an incoming call (attempts to make an H.225 connection back to that address) will fail.
Media Streams (RTP streams)
RTP streams run on top of UDP and do not have any fixed ports associated with them. Each type of media stream has one or more channels with dynamically assigned source, destination, and port numbers, which are not known ahead of time and cannot be preconfigured in the firewall policy. For the media stream to traverse the firewall, the firewall must open many UDP ports with source and destination pairs for each call session. This can open vulnerabilities to the network behind the firewall.
Because the Cisco IOS Firewall does not allow outside traffic to transverse to the inside destinations, VoIP calls (inbound calls) will fail. Furthermore, dynamic RTP/RTCP ports used by the endpoints are not automatically opened and allowed without modification of the security policy. The problems are summarized as follows:
•
•
–
–
–
•
–
–
–
–
Note
Cisco Unified CME and Cisco IOS Firewall on the Same Router
As long as Cisco IOS Firewall is not applied to the interfaces that have voice traffic (signaling and media) coming in, Cisco Unified CME and Cisco IOS Firewall can co-exist on the same router. The inspection of router-generated traffic, available in Cisco Release IOS 12.3(14) T and later, enhances Cisco IOS Firewall functionality to inspect TCP, UDP, and H.323 connections that have a router or firewall as one of the connection endpoints. Inspection of TCP and UDP channels initiated from the router enables dynamic opening of pinholes on the interface access control list (ACL) to allow return traffic. Inspection of local H.323 connections enables the deployment of Cisco Unified CME and Cisco IOS Firewall on the same router. This also simplifies ACL configuration on Cisco Unified CME interface through which H.323 connections are made. Before this feature, multiple ACLs were required to allow all dynamically negotiated data and media channels—in addition to ACLs required to allow H.323 connections on a standard port such as 1720. With this feature, you configure the ACLs to allow H.323 control channels on port 1720. The Cisco IOS Firewall inspects all the traffic on the control channel and opens pinholes to allow dynamically negotiated data and media channels.
The following procedure illustrates ACL configuration to support this capability:
Step 1
access-list 120 permit tcp host 10.168.11.1 any eq 1720access-list 121 permit tcp host 192.168.11.50 host 10.168.11.1 eq 1720access-list 121 permit tcp host 192.168.100.1 host 10.168.11.1 eq 1720Step 2
ip inspect name LOCAL-H323 tftp timeout 180ip inspect name LOCAL-H323 h323 router-traffic timeout 180Step 3
interface Serial0/3/0ip address 10.168.11.2 255.255.255.0ip access-group 121 inip access-group 120 outip inspect LOCAL-H323 inip inspect LOCAL-H323 outencapsulation frame-relayframe-relay map ip 10.168.11.1 168 broadcastno frame-relay inverse-arpframe-relay intf-type dceStep 4
voice service voiph323session transport tcp calls-per-connection 1h245 tunnel disableh245 caps mode restrictedh225 timeout tcp call-idle value 0Other Alternatives for Ensuring Cisco Unified CME Security
The following are four alternative solutions that you can use to provide security to the Cisco Unified CME users:
•
•
dial-peer voice 10 voip; max-conn 5limits calls to five connections).•
•
Secure SCCP Signaling via TLS
Cisco Unified CME 4.0 introduced in Cisco IOS Release 12.4(4)XC provides phone authentication and secure SCCP signalling with Transport Layer Security (TLS).
Phone authentication is a security infrastructure for providing secure SCCP between Cisco Unified CME and IP phones. Phone authentication addresses the following security needs:
•
•
•
•
Note
The secure phone authentication feature is supported in the following two Cisco IOS feature sets:
•
•
Supported phones are Cisco Unified IP Phone 7911G, Cisco Unified IP Phone 7941G, Cisco 7961G, and Cisco Unified IP Phone7970/71G-GE.
Key considerations for secure SCCP signaling via TLS are as follows:
•
•
•
•
•
•
Use the following procedure to configure support for SCCP signaling using TLS:
Step 1
clock timezone PST -8clock summer-time PDT recurringntp clock-period 17247042ntp server 171.68.10.80ntp server 171.68.10.150Step 2
The CA can be on the same Cisco Unified CME router or on an external router. The following example illustrates configuring a CA on the same Cisco Unified CME router:
crypto pki server laverda-cagrant autodatabase url flash:!crypto pki trustpoint laverda-caenrollment url http://192.168.1.1:80revocation-check crlrsakeypair laverda-caStep 3
a.
!configuring a trust pointcrypto pki trustpoint capf-serverenrollment url http://192.168.1.1:80revocation-check none!authenticate w/ the CA and download its certificatecrypto pki authenticate capf-server! enroll with the CA and obtain this trustpoint's certificatecrypto pki enrollment capf-serverb.
crypto pki trustpoint cme-serverenrollment url http://192.168.1.1:80revocation-check nonecrypto pki authenticate cme-servercrypto pki enrollment cme-serverc.
crypto pki trustpoint tftp-serverenrollment url http://192.168.1.1:80revocation-check nonecrypto pki authenticate tftp-servercrypto pki enrollment tftp-serverd.
crypto pki trustpoint sast1enrollment url http://192.168.1.1:80revocation-check nonecrypto pki authenticate sast1crypto pki enrollment sast1e.
crypto pki trustpoint sast2enrollment url http://192.168.1.1:80revocation-check nonecrypto pki authenticate sast2crypto pki enrollment sast2Step 4
a.
secure-signaling trustpoint cme-serverb.
tftp-server-credentials trustpoint tftp-serverc.
server-security-mode securedevice-security-mode authenticatedThe authenticated option will instruct the device to establish a TLS connection with no encryption. In this mode, there is no SRTP in the media path.
The encrypted option will instruct the device to establish a encrypted TLS connection to secure Media path using SRTP.
Note
d.
cnf-file perphonee.
ephone 1device-security-mode authenticatedStep 5
The CTL client can either be run on the same Cisco Unified CME router or another standalone router. Here is an example for a CTL client on a local Cisco Unified CME router:
ctl-clientserver capf 192.168.1.1 trustpoint capf-serverserver tftp 192.168.1.1 trustpoint tftp-serverserver cme 192.168.1.1 trustpoint cme-serversast1 trustpoint sast1sast2 trustpoint sast2After you have configured all the info above, use the regenerate command to create the CTL file:
regenerate
Step 6
capf-serverport 3804auth-mode null-stringcert-enroll-trustpoint laverda-ca password 1 1511021F07257A767Btrustpoint-label capf-serversource-addr 192.168.1.1!Troubleshooting and Debugging
Use the following commands for troubleshooting and debugging your secure SCCP signaling via TLS setup:
•
•
•
•
•
•
•
•
Note
http://www.cisco.com/en/US/products/sw/voicesw/ps4625/products_command_reference_book09186a00805b6c70.html
Cisco Unified CME Commonly Used Ports
Table 10-1 and Table 10-2 illustrate Cisco Unified CME commonly used ports.
![]()
![]()
![]()
![]()
![]()
![]()
![]()
![]()
Posted: Thu Sep 14 16:50:50 PDT 2006
All contents are Copyright © 1992--2006 Cisco Systems, Inc. All rights reserved.
Important Notices and Privacy Statement.