|
|

Table Of Contents
Phone Authentication Components
Configuration File Maintenance
Manually Importing MIC Root Certificate
Feature Design of Media Encryption
Secure Transcoding for Remote Phones with DSP Farm Transcoding Configured
Secure Cisco Unified CME with Cisco Unity Express
Secure Cisco Unified CME with Cisco Unity
Configuring the Cisco IOS Certification Authority
Verifying the Cisco IOS Certification Authority
Configuring the Registration Authority
Verifying the Registration Authority
Authenticating Certificates for Server Functions
Verifying Certificates for Server Functions
Manually Importing MIC Root Certificate
Configuring Telephony-Service Security Parameters
Verifying Telephony-Service Security Parameters
Entering the Authentication String on the Phone
Verifying the Authentication String on the Phone
Configuring Secure Calls Between Cisco Unified CMEs Across an H.323 Trunk
Configuring Cisco Unified CME SRTP Fallback for H.323 Dial Peers
Configuring Cisco Unity for Secure Cisco Unified CME Operation
Configuration Examples for Security
Enabling a Registration Authority: Example
Manually Importing MIC Root Certificate on the Cisco Unified CME Router: Example
Obtaining a Certificate for Cisco Unified CME Server Functions: Example
Telephony-Service Security Parameters: Example
CTL Client Running on Cisco Unified CME Router: Example
CTL Client Running on Another Router: Example
Secure Cisco Unified CME: Example
Feature Information for Security
Configuring Security
Last Updated: July 30, 2007This chapter describes the phone authentication support in Cisco Unified Communications Manager Express (Cisco Unified CME) and the Media Encryption (SRTP) on Cisco Unified CME feature which provide the following secure voice call capabilities:
•
Secure call control signaling and media streams in Cisco Unified CME networks using Secure Real-Time Transport Protocol (SRTP) and H.323 protocols.
•
•
Finding Feature Information in This Module
Your Cisco Unified CME version may not support all of the features documented in this module. For a list of the versions in which each feature is supported, see the "Feature Information for Security" section.
Contents
•
•
Prerequisites for Security
Phone Authentication
•
•
–
–
Both methods are explained in the " Performing Basic System Management" chapter of the Cisco IOS Network Management Configuration Guide for your Cisco IOS release.
Media Encryption
•
•
•
Restrictions for Security
Phone Authentication
•
Media Encryption
•
•
•
•
•
•
•
•
•
Table 23 lists supported gateways, network modules, and codecs for Media Encryption (SRTP) on Cisco Unified CME.
Table 23 Supported Gateways, Network Modules, and IP Phones for Media Encryption (SRTP) on Cisco Unified CME
Information About Security
To enable security, you should understand the following concepts:
Phone Authentication
•
•
•
•
•
Media Encryption
•
•
•
•
•
Phone Authentication Overview
Phone authentication is a security infrastructure for providing secure SCCP signaling between Cisco Unified CME and IP phones. The goal of Cisco Unified CME phone authentication is to create a secure environment for a Cisco Unified CME IP telephony system.
Phone authentication addresses the following security needs:
•
•
•
•
Cisco Unified CME phone authentication implements authentication and encryption to prevent identity theft of the phone or Cisco Unified CME system, data tampering, call-signaling tampering, or media-stream tampering. To prevent these threats, the Cisco Unified IP telephony network establishes and maintains authenticated communication streams, digitally signs files before they are transferred to phones, and encrypts call signaling between Cisco Unified IP phones.
Cisco Unified CME phone authentication depends upon the following processes:
Phone Authentication
The phone authentication process occurs between the Cisco Unified CME router and a supported device when each entity accepts the certificate of the other entity; only then does a secure connection between the entities occur. Phone authentication relies on the creation of a Certificate Trust List (CTL) file, which is a list of known, trusted certificates and tokens. Phones communicate with Cisco Unified CME using a secure transport-layer-session (TLS) connection, which requires that the following criteria be met:
•
•
File Authentication
The file authentication process validates digitally signed files that a phone downloads from a Trivial File Transfer Protocol (TFTP) server—for example, configuration files, ring list files, locale files, and CTL files. When the phone receives these types of files from the TFTP server, the phone validates the file signatures to verify that file tampering did not occur after the files were created.
Signaling Authentication
The signaling authentication process, also known as signaling integrity, uses the TLS protocol to validate that signaling packets have not been tampered with during transmission. Signaling authentication relies on the creation of the CTL file.
Public Key Infrastructure
Cisco Unified CME phone authentication uses the public-key-infrastructure (PKI) capabilities in Cisco IOS software for certificate-based authentication of IP phones. PKI provides customers with a scalable, secure mechanism for distributing, managing, and revoking encryption and identity information in a secured data network. Every entity (a person or a device) participating in the secured communication is enrolled in the PKI using a process in which the entity generates a Rivest-Shamir-Adleman (RSA) key pair (one private key and one public key) and has its identity validated by a trusted entity (also known as a certification authority [CA] or trustpoint).
After each entity enrolls in a PKI, every peer (also known as an end host) in a PKI is granted a digital certificate that has been issued by a CA.
When peers must negotiate a secured communication session, they exchange digital certificates. Based on the information in the certificate, a peer can validate the identity of another peer and establish an encrypted session with the public keys contained in the certificate.
For more information about PKI, see the " Implementing and Managing a PKI" section of the Cisco IOS Security Configuration Guide for your Cisco IOS release.
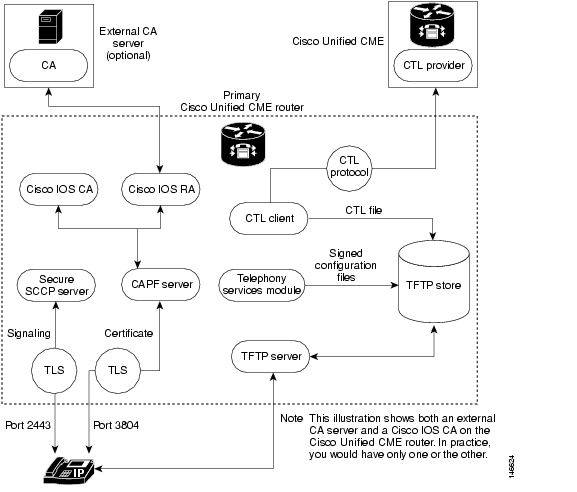
Phone Authentication Components
A variety of components work together to ensure secure communications in a Cisco Unified CME system. Table 24 describes the Cisco Unified CME phone authentication components.
Figure 19 shows the components in a Cisco Unified CME phone authentication environment.
Figure 19 Cisco Unified CME Phone Authentication
Phone Authentication Process
The following is a high-level summary of the phone-authentication process.
To enable Cisco Unified CME phone authentication:
1.
The CA issues certificates to Cisco Unified CME, SAST, CAPF, and TFTP functions.
2.
a.
b.
c.
3.
4.
5.
6.
Startup Messages
If the certificate server is part of your startup configuration, you may see the following messages during the boot procedure:
% Failed to find Certificate Server's trustpoint at startup
% Failed to find Certificate Server's cert.
These messages are informational messages that show a temporary inability to configure the certificate server because the startup configuration has not been fully parsed yet. The messages are useful for debugging, if the startup configuration has been corrupted.
Configuration File Maintenance
In a secure environment, several types of configuration files must be digitally signed before they can be hosted and used. The filenames of all signed files have a .sgn suffix.
The Cisco Unified CME telephony service module creates phone configuration files (.cnf.xml suffix) and hosts them on a Cisco IOS TFTP server. These files are signed by the TFTP server's credentials.
In addition to the phone configuration files, other Cisco Unified CME configuration files such as the network and user-locale files must be signed. These files are internally generated by Cisco Unified CME, and the signed versions are automatically created in the current code path whenever the unsigned versions are updated or created.
Other configuration files that are not generated by Cisco Unified CME, such as ringlist.xml, distinctiveringlist.xml, audio files, and so forth, are often used for Cisco Unified CME features. Signed versions of these configuration files are not automatically created. Whenever a new configuration file that has not been generated by Cisco Unified CME is imported into Cisco Unified CME, use the load-cfg-file command, which does all of the following:
•
•
•
You can also use the load-cfg-file command instead of the tftp-server command when only the unsigned version of a file needs to be hosted on the TFTP server.
CTL File Maintenance
The CTL file contains the SAST records and other records. (A maximum of two SAST records may exist.) The CTL file is digitally signed by one of the SAST credentials that are listed in the CTL file before the CTL file is downloaded by the phone and saved in its flash. After receiving the CTL file, a phone trusts a newer or changed CTL file only if it is signed by one of the SAST credentials that is present in the original CTL file.
For this reason, you should take care to regenerate the CTL file only with one of the original SAST credentials. If both SAST credentials are compromised and a CTL file must be generated with a new credential, you must reset the phone to its factory defaults.
CTL Client and Provider
The CTL client generates the CTL file. The CTL client must be provided with the names of the trustpoints it needs for the CTL file. It can run on the same router as Cisco Unified CME or on another, standalone router. When the CTL client runs on a standalone router (not a Cisco Unified CME router), you must configure a CTL provider on each Cisco Unified CME router. The CTL provider securely communicates the credentials of the Cisco Unified CME server functions to the CTL client that is running on another router.
When the CTL client is running on either a primary or secondary Cisco Unified CME router, you must configure a CTL provider on each Cisco Unified CME router on which the CTL client is not running.
The CTL protocol is used to communicate between the CTL client and a CTL provider. Using the CTL protocol ensures that the credentials of all Cisco Unified CME routers are present in the CTL file and that all Cisco Unified CME routers have access to the phone certificates that were issued by the CA. Both elements are prerequisites to secure communications.
To enable CTL clients and providers, see the "Configuring the CTL Client" section and the "Configuring the CTL Provider" section.
Manually Importing MIC Root Certificate
When a phone uses a MIC for authentication during the TLS handshake with the CAPF server, the CAPF server must have a copy of the MIC in order to verify it. Different certificates are used for different types of IP phones.
A phone uses a MIC for authentication when it has a MIC but no LSC. For example, you have a Cisco Unified IP Phone 7970 that has a MIC by default but no LSC. When you schedule a certificate upgrade with the authentication mode set to MIC for this phone, the phone presents its MIC to the Cisco Unified CME CAPF server for authentication. The CAPF server must have a copy of the MIC's root certificate to verify the phone's MIC. Without this copy, the CAPF upgrade operation fails.
To ensure that the CAPF server has copies of the MICs it needs, you must manually import certificates to the CAPF server. The number of certificates that you must import depends on your network configuration. Manual enrollment refers to copy-and-paste or TFTP transfer methods.
For more information on certificate enrollment, see the " Configuring Cut-and-Paste Certificate Enrollment" section of the " Configuring Certificate Enrollment for a PKI" chapter in the Cisco IOS Security Configuration Guide for your Cisco IOS release.
To manually import the MIC root certificate, see the "Manually Importing MIC Root Certificate" section.
Feature Design of Media Encryption
Companion voice security Cisco IOS features provide an overall architecture for secure end-to-end IP telephony calls on supported network devices that enable the following:
•
•
•
•
We implement these features using media and signaling authentication and encryption in Cisco IOS H.323 networks. H.323, the ITU-T standard that describes packet-based video, audio, and data conferencing, refers to a set of other standards, including H.450, to describe its actual protocols. H.323 allows dissimilar communication devices to communicate with each other by using a standard communication protocol, and defines a common set of codecs, call setup and negotiating procedures, and basic data transport methods. H.450, a component of the H.323 standard, defines signaling and procedures that are used to provide telephony-like supplementary services. We use H.450 messages in H.323 networks to implement secure supplementary service support, and also empty capability set (ECS) messaging for media capability negotiation.
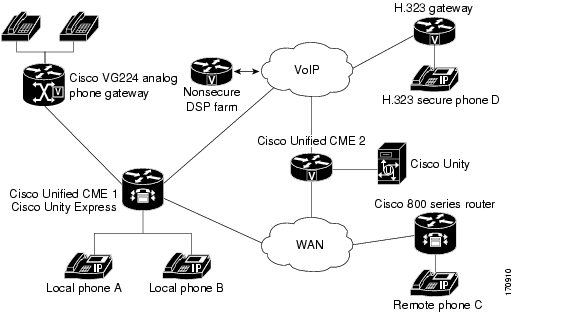
Secure Cisco Unified CME
The secure Cisco Unified CME solution includes secure-capable voice ports, SCCP endpoints, and a secure H.323 trunk between Cisco Unified CME and Cisco Unified Communications Manager for audio media. SIP trunks are not supported. Figure 20 shows the components of a secure Cisco Unified CME system.
Figure 20 Secure Cisco Unified CME System
Secure Cisco Unified CME implements call control signaling using Transport Layer Security (TLS) or IPsec (IP Security) for the secure channel, and uses SRTP for media encryption. Secure Cisco Unified CME manages the SRTP keys to endpoints and to gateways.
The Media Encryption (SRTP) on Cisco Unified CME feature supports the following features:
•
•
•
–
–
–
–
–
Note
•
•
•
•
These features are discussed in the following sections.
Secure Supplementary Services
The Media Encryption (SRTP) feature supports secure supplementary services in both H.450 and nonH.450 Cisco Unified CME networks. A secure Cisco Unified CME network should be either H.450 or nonH.450, not a hybrid.
Secure Cisco Unified CME in an H.450 Environment
Signaling and media encryption among secure endpoints is supported, enabling supplementary services such as call transfer (H.450.2) and call forward (H.450.3) between secure endpoints. Call park and pick up use H.450 messages. Secure Cisco Unified CME is H.450-enabled by default; however, secure music on hold (MOH) and secure conferences (three-way calling) are not supported. For example, when supplementary services are initiated as shown in Figure 21, ECS and Terminal Capabilities Set (TCS) are used to negotiate the initially secure call between A and B down to RTP so A can hear MOH. When B resumes the call to A, the call goes back to SRTP. Similarly, when a transfer is initiated, the party being transferred is put on hold, and the call is negotiated down to RTP. When the call is transferred, it goes back to SRTP if the other end is SRTP capable.
Figure 21 Music on Hold in an H.450 Environment
Secure Cisco Unified CME in a NonH.450 Environment
Security for supplementary services requires midcall key negotiation or midcall media renegotiation. In an H.323 network where there are no H.450 messages, media renegotiation is implemented using ECS for scenarios such as mismatched codecs and secure calls. If you disable H.450 on the router globally, the configuration is applied to RTP and SRTP calls. The signaling path is hairpin on XOR for Cisco Unified CME and Cisco Unified Communications Manager. For example, in Figure 22 the signaling path goes from A through B, the supplementary services initiator, to C. When deploying voice security in this scenario, consider that the media security keys will pass through XOR, that is, through B, the endpoint that issued the transfer request. To avoid the man-in-the-middle attack, the XOR must be a trusted entity.
Figure 22 Transfer in a NonH.45 Environment
The media path is optional. The default media path for Cisco Unified CME is hairpin. However, whenever possible media flow around can be configured on Cisco Unified CME. When configuring media flow through, which is the default, remember that chaining multiple XOR gateways in the media path introduces more delay and thus reduces voice quality. Router resources and voice quality limit the number of XOR gateways that can be chained. The requirement is platform dependent, and may vary between signaling and media. The practical chaining level is three.
A transcoder is inserted when there is a codec mismatch and ECS and TCS negotiation fails. For example, if Phone A and Phone B are SRTP capable, but Phone A uses the G.711 codec and Phone B uses the G.729 codec, a transcoder is inserted if Phone B has one. However, the call is negotiated down to RTP to fulfill the codec requirement, so the call is not secure.
Secure Transcoding for Remote Phones with DSP Farm Transcoding Configured
Transcoding is supported for remote phones that have the dspfarm-assist keyword of the codec command configured. A remote phone is a phone that is registered to a Cisco Unified CME and that is residing on a remote location across the WAN. To save bandwidth across the WAN connection, calls to such a phone can be made to use the G.729r8 codec by configuring the codec g729r8 dspfarm assist command for the ephone. The g729r8 keyword forces calls to such a phone to use the G.729 codec. The dspfarm-assist keyword enables using available DSP resources, if an H.323 call to the phone needs to be transcoded.
Note
Secure transcoding for point-to-point SRTP calls can only occur when both the SCCP phone which is to be serviced by Cisco Unified CME transcoding and its peer in the call are SRTP-capable and have successfully negotiated the SRTP keys. Secure transcoding for point-to-point SRTP calls cannot occur when only one of the peers in the call is SRTP-capable.
If Cisco Unified CME transcoding is to be performed on a secure call, the Media Encryption (SRTP) on Cisco Unified CME feature allows Cisco Unified CME to provide the DSP farm with the encryption keys for the secure call as additional parameters, so that Cisco Unified CME transcoding can be performed successfully. Without the encryption keys, the DSP farm would not be able to read the encrypted voice data in order to transcode it.
Note
Cisco Unified CME transcoding is different from IP-to-IP gateway transcoding because it is invoked for an SCCP endpoint only, instead of for bridging VoIP call legs. Cisco Unified CME transcoding and IP-to-IP gateway transcoding are mutually exclusive, that is, only one type of transcoding can be invoked for a call. If no DSP farm capable of SRTP transcoding is available, Cisco Unified CME secure transcoding is not performed and the call goes through using G.711.
Secure Cisco Unified CME with Cisco Unity Express
Note
In a typical Cisco Unity Express deployment with Cisco Unified CME in a secure H.323 network, Session Initiation Protocol (SIP) is used for signaling, and the media path is G.711 with RTP. For Call Forward No Answer (CFNA) and Call Forward All (CFA), before the media path is established, signaling messages are sent to negotiate an RTP media path. If codec negotiation fails, a transcoder is inserted. The Media Encryption (SRTP) on Cisco Unified CME feature's H.323 service provider interface (SPI) supports fast start calls. In general, calls transferred or forwarded back to Cisco Unified CME from Cisco Unity Express fall into existing call flows and are treated as regular SIP and RTP calls.
The Media Encryption (SRTP) on Cisco Unified CME feature supports blind transfer back to Cisco Unified CME only. When midcall media renegotiation is configured, the secure capability for the endpoint is renegotiated regardless of which transfer mechanism, H.450.2 or Empty Capability Set (ECS), was used.
Secure Cisco Unified CME with Cisco Unity
The Media Encryption (SRTP) on Cisco Unified CME feature supports Cisco Unity 4.2 or a later version and Cisco Unity Connection 1.1 or a later version using SCCP. Secure Cisco Unity for Cisco Unified CME acts like a secure SCCP phone. Some provisioning is required before secure signaling can be established. Cisco Unity receives Cisco Unified CME device certificates from the Certificate Trust List (CTL) and Cisco Unity certificates are inserted into Cisco Unified CME manually. Cisco Unity with SIP is not supported.
The certificate for the Cisco Unity Connection is in the Cisco Unity administration web application under the "port group settings."
How to Configure Security
This section contains the following tasks:
Phone Authentication
•
•
•
•
•
•
•
•
•
•
•
•
•
•
•
•
•
Media Encryption
•
•
•
Configuring the Cisco IOS Certification Authority
To configure a root certificate server, also called a certification authority (CA), on a Cisco IOS router, perform the following steps. The router can be the Cisco Unified CME router or an external router.
Setting up a Cisco IOS CA is a standard PKI task. The basic steps are included here for ease of use. For more information, see the " Configuring and Managing a Cisco IOS Certificate Server for PKI Deployment" section in " Part 5: Implementing and Managing a PKI" in the Cisco IOS Security Configuration Guide for your Cisco IOS release.
Note
SUMMARY STEPS
1.
2.
3.
4.
5.
6.
7.
8.
9.
10.
11.
12.
13.
14.
15.
16.
DETAILED STEPS
Step 1
enable
Example:Router> enable
Enables privileged EXEC mode.
•
Step 2
configure terminal
Example:Router# configure terminal
Enters global configuration mode.
Step 3
ip http server
Example:Router(config)# ip http server
Enables the Cisco web-browser user interface on the local Cisco Unified CME router.
Step 4
crypto pki server label
Example:Router(config)# crypto pki server sanjose1
Defines a label for the certificate server and enters certificate-server configuration mode.
•
Step 5
database level {minimal | names | complete}
Example:Router(config-cs-server)# database level complete
(Optional) Controls the type of data stored in the certificate enrollment database.
•
•
•
Note
Step 6
database url root-url
Example:Router(config-cs-server)# database url nvram:
(Optional) Specifies the location where all database entries for the certificate server are to be written out. If this command is not specified, all database entries are written to NVRAM.
•
Note
Note
Step 7
lifetime certificate time
Example:Router(config-cs-server) lifetime certificate 888
(Optional) Specifies the lifetime, in days, of certificates issued by this CA server.
•
Note
Step 8
issuer-name CN=name
Example:Router(config-cs-server)# issuer-name CN=sanjose1
(Optional) Specifies a distinguished name (DN) as the certification-authority (CA) issuer name for the certificate server.
If the issuer name is not configured, CN = CA label.
Step 9
exit
Example:Router(config-cs-server)# exit
Exits certificate-server configuration mode.
Step 10
crypto pki trustpoint label
Example:Router(config)# crypto pki trustpoint sanjose1
(Optional) Declares a trustpoint and enters ca-trustpoint configuration mode.
•
•
Note
Step 11
enrollment url ca-url
Example:Router(config-ca-trustpoint)# enrollment url http://ca-server.company.com
Specifies the enrollment URL of the issuing CA certificate server (root certificate server).
•
Step 12
exit
Example:Router(config-ca-trustpoint)# exit
Exits ca-trustpoint configuration mode.
Step 13
crypto pki server label
Example:Router(config)# crypto pki server sanjose1
Enters certificate-server configuration mode.
•
Step 14
grant auto
Example:Router(config-cs-server)# grant auto
(Optional) Allows certificates to be issued automatically to any requester.
•
TipStep 15
no shutdown
Example:Router(config-cs-server)# no shutdown
(Optional) Enables the CA.
Note
Step 16
end
Example:Router(config-cs-server)# end
Returns to privileged EXEC mode.
Verifying the Cisco IOS Certification Authority
Step 1
Step 2
The following example defines a CA named authority1 running locally on the Cisco Unified CME router:
ip http server
crypto pki server authority1
database level complete
database url nvram:
crypto pki trustpoint authority1
enrollment url http://ca-server.company.com
crypto pki server authority1
no grant auto
no shutdown
Configuring the Registration Authority
This task is required if the CA is a third-party CA or if the CA is on a Cisco IOS router external to the Cisco Unified CME router. In these cases, the CAPF server requires an RA to issue certificates to phones.
The RA is the authority charged with recording or verifying some or all of the data required for the CA to issue certificates. In many cases the CA undertakes all of the RA functions itself, but where a CA operates over a wide geographical area or when there is security concern over exposing the CA at the edge of the network, it may be advisable to delegate some of the tasks to an RA and let the CA concentrate on its primary tasks of signing certificates.
You can configure a Cisco IOS certificate server to run in RA mode. When the RA receives a manual or Simple Certificate Enrollment Protocol (SCEP) enrollment request, the administrator can either reject or grant it on the basis of local policy. If the request is granted, it is forwarded to the issuing CA, and the CA automatically generates the certificate and returns it to the RA. The client can later retrieve the granted certificate from the RA.
To configure an RA, perform the following steps on the Cisco Unified CME router.
SUMMARY STEPS
1.
2.
3.
4.
5.
6.
7.
8.
9.
10.
11.
12.
13.
14.
DETAILED STEPS
Step 1
enable
Example:Router> enable
Enables privileged EXEC mode.
•
Step 2
configure terminal
Example:Router# configure terminal
Enters global configuration mode.
Step 3
crypto pki trustpoint label
Example:Router(config)# crypto pki trustpoint ra12
Declares the trustpoint that your RA mode certificate server should use and enters CA-trustpoint configuration mode.
•
Note
Step 4
enrollment url ca-url
Example:Router(config-ca-trustpoint)# enrollment url http://ca-server.company.com
Specifies the enrollment URL of the issuing CA certificate server (root certificate server).
•
Step 5
revocation-check method1 [method2 [method3]]
Example:Router(config-ca-trustpoint)# revocation-check none
(Optional) Checks the revocation status of a certificate and specifies one or more methods to check the status. If a second and third method are specified, each method is used only if the previous method returns an error, such as a server being down.
Valid values for methodn are as follows:
•
•
•
Step 6
serial-number [none]
Example:Router(config-ca-trustpoint)# serial-number
(Optional) Specifies whether the router serial number should be included in the certificate request. When this command is not used, you are prompted for the serial number during certificate enrollment.
•
Step 7
rsakeypair key-label [key-size [encryption-key-size]]
Example:Router(config-ca-trustpoint)# rsakeypair exampleCAkeys 1024 1024
(Optional) Specifies an RSA key pair to use with a certificate.
•
•
•
Note
Step 8
exit
Example:Router(config-ca-trustpoint)# exit
Exits ca-trustpoint configuration mode.
Step 9
crypto pki server label
Example:Router(config)# crypto pki server ra12
Defines a label for the certificate server and enters certificate-server configuration mode.
•
Step 10
mode ra
Example:Router(config-cs-server)# mode ra
Places the PKI server into certificate-server mode for the RA.
Step 11
lifetime certificate time
Example:Router(config-cs-server)# lifetime certificate 1800
(Optional) Specifies the lifetime, in days, of a certificate.
•
Note
Step 12
grant auto
Example:Router(config-cs-server)# grant auto
Allows a certificate to be issued automatically to any requester.
Note
Step 13
no shutdown
Example:Router(config-cs-server)# no shutdown
(Optional) Enables the certificate server.
You are prompted to provide input regarding acceptance of the CA certificate, the router certificate, the challenge password, and a password for protecting the private key.
Note
Step 14
end
Example:Router(config-cs-server)# end
Returns to privileged EXEC mode.
Verifying the Registration Authority
Step 1
Step 2
Step 3
Authenticating Certificates for Server Functions
The Cisco Unified CME router needs certificates for the following server functions:
•
•
•
•
To obtain a certificate for each of these functions, perform the following steps for each server function.
SUMMARY STEPS
1.
2.
3.
4.
5.
6.
7.
8.
9.
10.
DETAILED STEPS
Verifying Certificates for Server Functions
Step 1
Step 2
Manually Importing MIC Root Certificate
The MIC root certificate must be present in the Cisco Unified CME router to allow Cisco Unified CME to authenticate the MIC that is presented to it. To manually import the MIC root certificate on the Cisco Unified CME router, perform the following steps for each type of phone that requires a MIC for authentication.
Prerequisites
One of the following situations must be true before you perform this task:
•
•
SUMMARY STEPS
1.
2.
3.
4.
5.
6.
7.
8.
9.
10.
11.
DETAILED STEPS
Configuring Telephony-Service Security Parameters
To enable telephony-service security parameters, perform the following steps.
SUMMARY STEPS
1.
2.
3.
4.
5.
6.
7.
8.
9.
10.
11.
12.
13.
14.
15.
16.
17.
DETAILED STEPS
Step 1
enable
Example:Router> enable
Enables privileged EXEC mode.
•
Step 2
configure terminal
Example:Router# configure terminal
Enters global configuration mode.
Step 3
telephony-service
Example:Router(config)# telephony-service
Enters telephony-service configuration mode.
Step 4
secure-signaling trustpoint label
Example:Router(config-telephony)# secure-signaling trustpoint cme-sccp
Specifies the name of the PKI trustpoint that has the valid certificate to be used for TLS handshakes with IP phones on TCP port 2443.
•
Step 5
tftp-server-credentials trustpoint label
Example:Router(config-telephony)# tftp-server-credentials trustpoint cme-tftp
Specifies the name of the PKI trustpoint to be used to sign the phone configuration files. This can be the CAPF-server trustpoint that was used in the previous step or any trustpoint with a valid certificate.
•
Step 6
device-security-mode {authenticated | none | encrypted}
Example:Router(config-telephony)# device-security-mode authenticated
Enables security mode for all security-capable phones in the system.
•
•
•
Note
Step 7
cnf-file perphone
Example:Router(config-telephony)# cnf-file perphone
Specifies the generation of a separate configuration file for each individual phone. Separate configuration files for each endpoint are required for security.
Step 8
load-cfg-file file-url alias file-alias [sign] [create]
Example:Router(config-telephony)# load-cfg-file slot0:Ringlist.xml alias Ringlist.xml sign create
(Optional) Signs configuration files that are not created by Cisco Unified CME. Also loads the signed and unsigned versions of a file on the TFTP server. To serve an already signed file on the TFTP server, use this command without the sign and create keywords.
•
•
•
•
Note
Step 9
server-security-mode {secure | non-secure}
Example:Router(config-telephony)# server-security-mode secure
(Optional) Changes the security mode of the server.
•
•
Note
Note
Step 10
exit
Example:Router(config)# exit
Exits telephony-service configuration mode.
Step 11
ephone phone-tag
Example:Router(config)# ephone 24
Enters ephone configuration mode.
•
Step 12
device-security-mode {authenticated | none | encrypted}
Example:Router(config-ephone)# device-security-mode authenticated
(Optional) Sets the security mode for SCCP signaling for an ephone communicating with the Cisco Unified CME router.
•
•
•
Note
Step 13
codec {g711ulaw | g729r8 [dspfarm-assist]}
Example:Router(config-ephone)# codec g711ulaw dspfarm-assist
(Optional) Sets the security mode for SCCP signaling for a phone communicating with the Cisco Unified CME router.
•
Note
Step 14
capf-auth-str digit-string
Example:Router(config-ephone)# capf-auth-str 2734
(Optional) Defines a string to use as a personal identification number (PIN) for CAPF authentication. Use the show capf-server auth-string command to display configured strings. For instructions on how to enter the string from the phone, see the "Entering the Authentication String on the Phone" section.
•
Note
Step 15
cert-oper {delete | fetch | upgrade} auth-mode {auth-string | LSC | MIC | null-string}
Example:Router(config-ephone)# cert-oper upgrade auth-mode auth-string
(Optional) Initiates the indicated certificate operation on this ephone.
•
•
•
•
•
•
•
•
Note
Step 16
reset
Example:Router(config-ephone)# reset
Performs a complete reboot of the phone.
Step 17
end
Example:Router(config-ephone)# end
Returns to privileged EXEC mode.
Verifying Telephony-Service Security Parameters
Step 1
Use this command to display the security-related information that is configured in telephony-service configuration mode.
Router# show telephony-service security-info
Skinny Server Trustpoint for TLS: cme-sccp
TFTP Credentials Trustpoint: cme-tftp
Server Security Mode: Secure
Global Device Security Mode: Authenticated
Step 2
Use this command to display authentication strings for phones.
Router# show capf-server auth-string
Authentication Strings for configured Ephones
Mac-Addr Auth-String
-------- -----------
000CCE3A817C 2734
001121116BDD 922
000D299D50DF 9182
000ED7B10DAC 3114
000F90485077 3328
0013C352E7F1 0678
Step 3
Use this command to display the running configuration to verify telephony and per-phone security configuration.
Router# show running-config
telephony-service
secure-signaling trustpoint cme-sccp
server-security-mode secure
device-security-mode authenticated
tftp-server-credentials trustpoint cme-tftp
.
.
.
Configuring the CTL Client
The tasks to configure the CTL client differ slightly depending on whether the CTL client is running on the same router as Cisco Unified CME. Choose the appropriate procedure based on your network:
•
•
Configuring the CTL Client on a Cisco Unified CME Router
The credentials of various functions are included in the CTL file, which is created and hosted on the TFTP server. To configure a CTL client on a Cisco Unified CME router, perform the following steps.
If you have primary and secondary Cisco Unified CME routers, you can configure the CTL client on either one of them.
SUMMARY STEPS
1.
2.
3.
4.
5.
6.
7.
8.
9.
DETAILED STEPS
What to do Next
When you have more than one Cisco Unified CME router in your network, you must configure a CTL provider on each Cisco Unified CME router that is not running the CTL client. See the "Configuring the CTL Provider" section.
Configuring the CTL Client on a Router Other Than a Cisco Unified CME Router
To configure a CTL client on an external router that is not a Cisco Unified CME router, perform the following steps.
SUMMARY STEPS
1.
2.
3.
4.
5.
6.
7.
8.
DETAILED STEPS
What to do Next
You must configure a CTL provider on each Cisco Unified CME router. See the "Configuring the CTL Provider" section.
Verifying the CTL Client
Step 1
The following sample output from the show ctl-client command displays the trustpoints in the system.
Router# show ctl-client
CTL Client Information
-----------------------------
SAST 1 Certificate Trustpoint: cmeserverSAST 1 Certificate Trustpoint: sast2List of Trusted Servers in the CTLCME 10.1.1.1 cmeserverTFTP 10.1.1.1 cmeserverCAPF 10.1.1.1 cmeserverConfiguring the CTL Provider
If you have more than one Cisco Unified CME router in your network, perform the following steps to configure a CTL provider on each Cisco Unified CME router on which the CTL client is not running.
SUMMARY STEPS
1.
2.
3.
4.
5.
6.
7.
DETAILED STEPS
Verifying the CTL Provider
Step 1
Use this command to display credentials settings.
Router# show credentials
Credentials IP: 172.19.245.1
Credentials PORT: 2444
Trustpoint: ctlpv
Configuring the CAPF Server
A certificate must be obtained for the CAPF server so that it can establish a TLS session with the phone during certificate operation. The CAPF server can install, fetch, or delete locally significant certificates (LSCs) on security-enabled phones. To enable the CAPF server on the Cisco Unified CME router, perform the following steps.
Tip
SUMMARY STEPS
1.
2.
3.
4.
5.
6.
7.
8.
9.
10.
11.
12.
13.
14.
DETAILED STEPS
Step 1
enable
Example:Router> enable
Enables privileged EXEC mode.
•
Step 2
configure terminal
Example:Router# configure terminal
Enters global configuration mode.
Step 3
capf-server
Example:Router(config)# capf-server
Enters CAPF-server configuration mode.
Step 4
trustpoint-label label
Example:Router(config-capf-server)# trustpoint-label tp1
Specifies the label of the trustpoint whose certificate is to be used for TLS connection between the CAPF server and the phone.
•
Step 5
cert-enroll-trustpoint trustpoint-label password {0 | 1} password-string
Example:Router(config-capf-server)# cert-enroll-trustpoint ra1 password 0 x8oWiet
Enrolls the CAPF with the CA (or RA if the CA is not local to the Cisco Unified CME router).
•
•
•
Step 6
source-addr ip-address
Example:Router(config-capf-server)# source addr 10.10.10.1
Defines the IP address of the CAPF server on the Cisco Unified CME router.
•
Step 7
port tcp-port
Example:Router(config-capf-server)# port 3804
(Optional) Defines the TCP port number on which the CAPF server listens for socket connections from the phones.
•
Step 8
auth-mode {auth-string | LSC | MIC | none | null-string}
Example:Router(config-capf-server)# auth-mode auth-string
Specifies the type of authentication to use during CAPF sessions to verify endpoints that request certificates.
•
•
•
•
•
Step 9
auth-string {delete | generate} {all | ephone-tag} [digit-string]
Example:Router(config-capf-server)# auth-string generate all
(Optional) Creates or removes authentication strings for all the secure ephones or for specified secure ephones. Use this command if the auth-string keyword is specified in the auth-mode command. Strings become part of the ephone configuration. Use the show capf-server auth-string command to view authentication strings.
•
•
•
•
•
Note
Step 10
phone-key-size {512 | 1024 | 2048}
Example:Router(config-capf-server)# phone-key-size 2048
(Optional) Specifies the size of the RSA key pair that is generated on the phone for the phone's certificate, in bits.
•
•
•
Step 11
keygen-retry number
Example:Router(config-capf-server)# keygen-retry 5
(Optional) Specifies the number of times that the server sends a key generation request.
•
Step 12
keygen-timeout minutes
Example:Router(config-capf-server)# keygen-timeout 45
(Optional) Specifies the amount of time that the server waits for a key generation response from the phone, in minutes.
•
Step 13
cert-oper {delete all | fetch all | upgrade all}
Example:Router(config-capf-server)# cert-oper upgrade all
Initiates the indicated certificate operation on all configured endpoints in the system.
•
•
•
Note
Step 14
end
Example:Router(config-capf-server)# end
Returns to privileged EXEC mode.
What to Do Next
If you select the authentication-string method of authentication in the auth-mode command, you must also enter an authentication string on each phone that is receiving an updated LSC. For instructions on this task, see the "Entering the Authentication String on the Phone" section.
Verifying the CAPF Server
Step 1
Use this command to display CAPF-server configuration information.
Router# show capf-server summaryCAPF Server Configuration DetailsTrustpoint for TLS With Phone: tp1Trustpoint for CA operation: ra1Source Address: 10.10.10.1Listening Port: 3804Phone Key Size: 1024Phone KeyGen Retries: 3Phone KeyGen Timeout: 30 minutesStep 2
Use this command to display configured strings (PINs) that users enter at the phone to establish CAPF authentication:
Router# show capf-server auth-string
Authentication Strings for configured Ephones
Mac-Addr Auth-String
-------- -----------
000CCE3A817C 7012
001121116BDD 922
000D299D50DF 9182
000ED7B10DAC 3114
000F90485077 3328
0013C352E7F1 0678
Entering the Authentication String on the Phone
This procedure is required only for the one-time installation of an LSC on a phone and only if you specify the authentication string method of authentication.
If an authentication string is defined using the auth-string command in CAPF-server configuration mode or the capf-auth-str command in ephone configuration mode, the authentication string must be communicated to the phone user so that it can be entered on the phone before the LSC is installed.
The phone user can perform the following procedure to install the certificate. The authentication string applies for one-time use only.
Note
Prerequisites
•
•
•
•
DETAILED STEPS
Step 1
On the Cisco Unified IP Phone 7921, use the down arrow key to access the Settings menu.
Step 2
Step 3
Step 4
On the Cisco Unified IP Phone 7921, press **# to unlock the Security Configuration menu.
Step 5
The phone installs, updates, deletes, or fetches the certificate, depending on the CAPF configuration.
You can monitor the progress of the certificate operation by viewing the messages that display on the phone. After you press Submit, the message "Pending" displays under the LSC option. The phone generates the public and private key pair and displays the information on the phone. When the phone successfully completes the process, the phone displays a successful message. If the phone displays a failure message, you entered the wrong authentication string or did not enable the phone for upgrade.
You can stop the process by choosing the Stop option at any time.
Verifying the Authentication String on the Phone
Step 1
Configuring Secure Calls Between Cisco Unified CMEs Across an H.323 Trunk
To configure the network for secure calls between Cisco Unified CME systems across an H.323 trunk, perform the following steps on the Cisco Unified CME router.
Prerequisites
To make secure H.323 calls, telephony-service security parameters must be configured. See the "Configuring Telephony-Service Security Parameters" section.
SUMMARY STEPS
1.
2.
3.
4.
5.
6.
7.
8.
DETAILED STEPS
Step 1
enable
Example:Router> enable
Enables privileged EXEC mode.
•
Step 2
configure terminal
Example:Router# configure terminal
Enters global configuration mode.
Step 3
voice service voip
Example:Router(config)# voice service voip
Enters voice-service configuration mode.
•
Step 4
supplementary-service media-renegotiate
Example:Router(conf-voi-serv)# supplementary-service media-renegotiate
Enables midcall renegotiation of SRTP cryptographic keys.
Step 5
srtp fallback
Example:Router(conf-voi-serv)# srtp fallback
Enables security policies.
•
•
•
Note
If fallback is not configured it will drop all calls that are not secure so only secure phones can call you.
This step configures fallback globally. To configure fallback for individual dial peers, see the "Configuring Cisco Unified CME SRTP Fallback for H.323 Dial Peers" section. Skip this step if you are going to configure fallback on individual dial peers.
Step 6
h323
Example:Router(conf-voi-serv)# h323
Enters H.323 voice-service configuration mode.
Step 7
emptycapability
Example:Router(conf-serv-h323)# emptycapability
Eliminates the need for identical codec capabilities for all dial peers in the rotary group.
Step 8
exit
Example:Router(conf-serv-h323)# exit
Exits H.323 voice-service configuration mode.
Configuring Cisco Unified CME SRTP Fallback for H.323 Dial Peers
To configure SRTP fallback for an individual dial peer, perform the following steps on the Cisco Unified CME router.
Note
SUMMARY STEPS
1.
2.
3.
4.
5.
6.
7.
8.
9.
DETAILED STEPS
Step 1
enable
Example:Router> enable
Enables privileged EXEC mode.
•
Step 2
configure terminal
Example:Router# configure terminal
Enters global configuration mode.
Step 3
voice class codec tag
Example:Router(config)# voice class codec 1
Enters voice-class configuration mode and assigns an identification tag number for a codec voice class.
Step 4
codec preference value codec-type
Example:Router(config-voice-class)# codec preference 1 g711alawSpecifies a list of preferred codecs to use on a dial peer.
•
•
Step 5
exit
Example:Router(config-voice-class)# exit
Exits voice-class configuration mode.
Step 6
dial-peer voice tag voip
Example:Router(config)# dial-peer voice 101 voip
Enters dial peer voice configuration mode.
Step 7
srtp fallback
Example:Router(config-dial-peer)# srtp fallback
Enables secure calls that use SRTP for media encryption and authentication and specifies fallback capability. Using the no srtp command disables security and causes the dial peer to fall back to RTP mode.
•
•
Note
Step 8
voice-class codec tag
Example:Router(config-dial-peer)# voice-class codec 1
Assigns a previously configured codec selection preference list (codec voice class) to a Voice over IP (VoIP) dial peer.
•
Step 9
exit
Example:Router(config-dial-peer)# exit
Exits dial-peer voice configuration mode.
Configuring Cisco Unity for Secure Cisco Unified CME Operation
This section contains the following tasks:
•
•
•
•
Configuring Integration Between Cisco Unified CME and Cisco Unity
To change the settings for the integration between Cisco Unified CME and Cisco Unity, perform the following steps on the Cisco Unity server:
Step 1
Step 2
Step 3
Step 4
Step 5
Step 6
Step 7
If you clicked the Authenticated or the Encrypted settings, the Security tab and the Add TFTP Server dialog box appear. In the Add TFTP Server dialog box, in the IP Address or Host Name field, enter the IP address (or DNS name) of the primary TFTP server for the Cisco Unified Communications Manager cluster, and click OK.
Step 8
Step 9
Step 10
Cisco Unity creates the voice messaging port device certificates, exports the Cisco Unity server root certificate, and displays the Export Cisco Unity Root Certificate dialog box.
Step 11
Step 12
Step 13
Step 14
Step 15
Step 16
Importing the Cisco Unity Root Certificate to Cisco Unified CME
To import the Cisco Unity root certificate to Cisco Unified CME, perform the following steps on the Cisco Unified CME router:
SUMMARY STEPS
1.
2.
3.
4.
5.
6.
7.
8.
9.
DETAILED STEPS
Configuring Cisco Unity Ports for Secure Registration
To configure Cisco Unity ports for registration in secure mode, perform the following steps:
Step 1
Step 2
Step 3
Verifying that Cisco Unity are Registering Securely
Use the show sccp connections command to verify that Cisco Unity ports are registered securely with Cisco Unified CME.
show sccp connection: Example
In the following example, the secure value of the stype field shows that the connections are secure.
Router# show sccp connections
sess_id conn_id stype mode codec ripaddr rport sport
16777222 16777409 secure-xcode sendrecv g729b 10.3.56.120 16772 19534
16777222 16777393 secure-xcode sendrecv g711u 10.3.56.50 17030 18464
Total number of active session(s) 1, and connection(s) 2
Configuration Examples for Security
This section contains the following examples:
Phone Authentication
•
•
•
•
•
•
•
Media Encryption
•
Cisco IOS CA Server: Example
!
crypto pki server iosca
grant auto
database url flash:
!
crypto pki trustpoint iosca
revocation-check none
rsakeypair iosca
!
crypto pki certificate chain iosca
certificate ca 01
308201F9 30820162 ...
Enabling a Registration Authority: Example
The following example sets up an RA and trustpoint named ra12:
Router(config)# crypto pki trustpoint ra12
Router(config-ca-trustpoint)# enrollment url http://ca-server.company.com
Router(config-ca-trustpoint)# revocation-check none
Router(config-ca-trustpoint)# rsakeypair exampleCAkeys 1024 1024
Router(config-ca-trustpoint)# exit
Router(config)# crypto pki server ra12
Router(config-cs-server)# mode ra
Router(config-cs-server)# lifetime certificate 1800
Router(config-cs-server)# no grant auto
Router(config-cs-server)# no shutdown
Router(config-cs-server)# exit
The following example sets up a trustpoint named sast2 that periodically generates a CRL instead of having it generated manually. Third-party CAs may require this functionality.
Router(config)# crypto pki trustpoint sast2
Router(config-ca-trustpoint)# enrollment url http://NTP-ab11:80
Router(config-ca-trustpoint)# serial-number
Router(config-ca-trustpoint)# revocation-check crl
Router(config-ca-trustpoint)# rsakeypair sast2
Manually Importing MIC Root Certificate on the Cisco Unified CME Router: Example
The following example shows three certificates imported to the router (7970, 7960, PEM).
Router(config)# crypto pki trustpoint 7970
Router(ca-trustpoint)# revocation-check none
Router(ca-trustpoint)# enrollment terminal
Router(ca-trustpoint)# exit
Router(config)# crypto pki authenticate 7970
Enter the base 64 encoded CA certificate.
End with a blank line or the word "quit" on a line by itself
MIIDqDCCApCgAwIBAgIQNT+yS9cPFKNGwfOprHJWdTANBgkqhkiG9w0BAQUFADAu
MRYwFAYDVQQKEw1DaXNjbyBTeXN0ZW1zMRQwEgYDVQQDEwtDQVAtUlRQLTAwMjAe
Fw0wMzEwMTAyMDE4NDlaFw0yMzEwMTAyMDI3MzdaMC4xFjAUBgNVBAoTDUNpc2Nv
IFN5c3RlbXMxFDASBgNVBAMTC0NBUC1SVFAtMDAyMIIBIDANBgkqhkiG9w0BAQEF
AAOCAQ0AMIIBCAKCAQEAxCZlBK19w/2NZVVvpjCPrpW1cCY7V1q9lhzI85RZZdnQ
2M4CufgIzNa3zYxGJIAYeFfcRECnMB3f5A+x7xNiEuzE87UPvK+7S80uWCY0Uhtl
AVVf5NQgZ3YDNoNXg5MmONb8lT86F55EZyVac0XGne77TSIbIdejrTgYQXGP2MJx
Qhg+ZQlGFDRzbHfM84Duv2Msez+l+SqmqO80kIckqE9Nr3/XCSj1hXZNNVg8D+mv
Hth2P6KZqAKXAAStGRLSZX3jNbS8tveJ3Gi5+sj9+F6KKK2PD0iDwHcRKkcUHb7g
lI++U/5nswjUDIAph715Ds2rn9ehkMGipGLF8kpuCwIBA6OBwzCBwDALBgNVHQ8E
BAMCAYYwDwYDVR0TAQH/BAUwAwEB/zAdBgNVHQ4EFgQUUpIr4ojuLgmKTn5wLFal
mrTUm5YwbwYDVR0fBGgwZjBkoGKgYIYtaHR0cDovL2NhcC1ydHAtMDAyL0NlcnRF
bnJvbGwvQ0FQLVJUUC0wMDIuY3Jshi9maWxlOi8vXFxjYXAtcnRwLTAwMlxDZXJ0
RW5yb2xsXENBUC1SVFAtMDAyLmNybDAQBgkrBgEEAYI3FQEEAwIBADANBgkqhkiG
9w0BAQUFAAOCAQEAVoOM78TaOtHqj7sVL/5u5VChlyvU168f0piJLNWip2vDRihm
E+DlXdwMS5JaqUtuaSd/m/xzxpcRJm4ZRRwPq6VeaiiQGkjFuZEe5jSKiSAK7eHg
tup4HP/ZfKSwPA40DlsGSYsKNMm3OmVOCQUMH02lPkS/eEQ9sIw6QS7uuHN4y4CJ
NPnRbpFRLw06hnStCZHtGpKEHnY213QOy3h/EWhbnp0MZ+hdr20FujSI6G1+L39l
aRjeD708f2fYoz9wnEpZbtn2Kzse3uhU1Ygq1D1x9yuPq388C18HWdmCj4OVTXux
V6Y47H1yv/GJM8FvdgvKlExbGTFnlHpPiaG9tQ==
quit
Certificate has the following attributes:
Fingerprint MD5: F7E150EA 5E6E3AC5 615FC696 66415C9F
Fingerprint SHA1: 1BE2B503 DC72EE28 0C0F6B18 798236D8 D3B18BE6
% Do you accept this certificate? [yes/no]: y
Trustpoint CA certificate accepted.
% Certificate successfully imported
Router(config)# crypto pki trustpoint 7960
Router(ca-trustpoint)# revocation-check none
Router(ca-trustpoint)# enrollment terminal
Router(ca-trustpoint)# exit
Router(config)# crypto pki authenticate 7960
Enter the base 64 encoded CA certificate.
End with a blank line or the word "quit" on a line by itself
MIICKDCCAZGgAwIBAgIC8wEwDQYJKoZIhvcNAQEFBQAwQDELMAkGA1UEBhMCVVMx
GjAYBgNVBAoTEUNpc2NvIFN5c3RlbXMgSW5jMRUwEwYDVQQDEwxDQVBGLTdEN0Qw
QzAwHhcNMDQwNzE1MjIzODMyWhcNMTkwNzEyMjIzODMxWjBAMQswCQYDVQQGEwJV
UzEaMBgGA1UEChMRQ2lzY28gU3lzdGVtcyBJbmMxFTATBgNVBAMTDENBUEYtN0Q3
RDBDMDCBnzANBgkqhkiG9w0BAQEFAAOBjQAwgYkCgYEA0hvMOZZ9ENYWme11YGY1
it2rvE3Nk/eqhnv8P9eqB1iqt+fFBeAG0WZ5bO5FetdU+BCmPnddvAeSpsfr3Z+h
x+r58fOEIBRHQLgnDZ+nwYH39uwXcRWWqWwlW147YHjV7M5c/R8T6daCx4B5NBo6
kdQdQNOrV3IP7kQaCShdM/kCAwEAAaMxMC8wDgYDVR0PAQH/BAQDAgKEMB0GA1Ud
JQQWMBQGCCsGAQUFBwMBBggrBgEFBQcDBTANBgkqhkiG9w0BAQUFAAOBgQCaNi6x
sL6M5NlDezpSBO3QmUVyXMfrONV2ysrSwcXzHu0gJ9MSJ8TwiQmVaJ47hSTlF5a8
YVYJ0IdifXbXRo+/EEO7kkmFE8MZta5rM7UWj8bAeR42iqA3RzQaDwuJgNWT9Fhh
GgfuNAlo5h1AikxsvxivmDlLdZyCMoqJJd7B2Q==
quit
Certificate has the following attributes:
Fingerprint MD5: 4B9636DF 0F3BA6B7 5F54BE72 24762DBC
Fingerprint SHA1: A9917775 F86BB37A 5C130ED2 3E528BB8 286E8C2D
% Do you accept this certificate? [yes/no]: y
Trustpoint CA certificate accepted.
% Certificate successfully imported
Router(config)# crypto pki trustpoint PEM
Router(ca-trustpoint)# revocation-check none
Router(ca-trustpoint)# enrollment terminal
Router(ca-trustpoint)# exit
Router(config)# crypto pki authenticate PEM
Enter the base 64 encoded CA certificate.
End with a blank line or the word "quit" on a line by itself
MIIDqDCCApCgAwIBAgIQdhL5YBU9b59OQiAgMrcjVjANBgkqhkiG9w0BAQUFADAu
MRYwFAYDVQQKEw1DaXNjbyBTeXN0ZW1zMRQwEgYDVQQDEwtDQVAtUlRQLTAwMTAe
Fw0wMzAyMDYyMzI3MTNaFw0yMzAyMDYyMzM2MzRaMC4xFjAUBgNVBAoTDUNpc2Nv
IFN5c3RlbXMxFDASBgNVBAMTC0NBUC1SVFAtMDAxMIIBIDANBgkqhkiG9w0BAQEF
AAOCAQ0AMIIBCAKCAQEArFW77Rjem4cJ/7yPLVCauDohwZZ/3qf0sJaWlLeAzBlq
Rj2lFlSij0ddkDtfEEo9VKmBOJsvx6xJlWJiuBwUMDhTRbsuJz+npkaGBXPOXJmN
Vd54qlpc/hQDfWlbrIFkCcYhHws7vwnPsLuy1Kw2L2cP0UXxYghSsx8H4vGqdPFQ
NnYy7aKJ43SvDFt4zn37n8jrvlRuz0x3mdbcBEdHbA825Yo7a8sk12tshMJ/YdMm
vny0pmDNZXmeHjqEgVO3UFUn6GVCO+K1y1dUU1qpYJNYtqLkqj7wgccGjsHdHr3a
U+bw1uLgSGsQnxMWeMaWo8+6hMxwlANPweufgZMaywIBA6OBwzCBwDALBgNVHQ8E
BAMCAYYwDwYDVR0TAQH/BAUwAwEB/zAdBgNVHQ4EFgQU6Rexgscfz6ypG270qSac
cK4FoJowbwYDVR0fBGgwZjBkoGKgYIYtaHR0cDovL2NhcC1ydHAtMDAxL0NlcnRF
bnJvbGwvQ0FQLVJUUC0wMDEuY3Jshi9maWxlOi8vXFxjYXAtcnRwLTAwMVxDZXJ0
RW5yb2xsXENBUC1SVFAtMDAxLmNybDAQBgkrBgEEAYI3FQEEAwIBADANBgkqhkiG
9w0BAQUFAAOCAQEAq2T96/YMMtw2Dw4QX+F1+g1XSrUCrNyjx7vtFaRDHyB+kobw
dwkpohfkzfTyYpJELzV1r+kMRoyuZ7oIqqccEroMDnnmeApc+BRGbDJqS1Zzk4OA
c6Ea7fm53nQRlcSPmUVLjDBzKYDNbnEjizptaIC5fgB/S9S6C1q0YpTZFn5tjUjy
WXzeYSXPrcxb0UH7IQJ1ogpONAAUKLoPaZU7tVDSH3hD4+VjmLyysaLUhksGFrrN
phzZrsVVilK17qpqCPllKLGAS4fSbkruq3r/6S/SpXS6/gAoljBKixP7ZW2PxgCU
1aU9cURLPO95NDOFN3jBk3Sips7cVidcogowPQ==
quit
Certificate has the following attributes:
Fingerprint MD5: 233C8E33 8632EA4E 76D79FEB FFB061C6
Fingerprint SHA1: F7B40B94 5831D2AB 447AB8F2 25990732 227631BE
% Do you accept this certificate? [yes/no]: y
Trustpoint CA certificate accepted.
% Certificate successfully imported
Use the show crypto pki trustpoint status command to show that enrollment has succeeded and that five CA certificates were granted. The five certificates include the three certificates just entered and the CA server certificate and the router certificate.
Router# show crypto pki trustpoint status
Trustpoint 7970:
Issuing CA certificate configured:
Subject Name:
cn=CAP-RTP-002,o=Cisco Systems
Fingerprint MD5: F7E150EA 5E6E3AC5 615FC696 66415C9F
Fingerprint SHA1: 1BE2B503 DC72EE28 0C0F6B18 798236D8 D3B18BE6
State:
Keys generated ............. Yes (General Purpose)
Issuing CA authenticated ....... Yes
Certificate request(s) ..... None
Trustpoint 7960:
Issuing CA certificate configured:
Subject Name:
cn=CAPF-508A3754,o=Cisco Systems Inc,c=US
Fingerprint MD5: 6BAE18C2 0BCE391E DAE2FE4C 5810F576
Fingerprint SHA1: B7735A2E 3A5C274F C311D7F1 3BE89942 355102DE
State:
Keys generated ............. Yes (General Purpose)
Issuing CA authenticated ....... Yes
Certificate request(s) ..... None
Trustpoint PEM:
Issuing CA certificate configured:
Subject Name:
cn=CAP-RTP-001,o=Cisco Systems
Fingerprint MD5: 233C8E33 8632EA4E 76D79FEB FFB061C6
Fingerprint SHA1: F7B40B94 5831D2AB 447AB8F2 25990732 227631BE
State:
Keys generated ............. Yes (General Purpose)
Issuing CA authenticated ....... Yes
Certificate request(s) ..... None
Trustpoint srstcaserver:
Issuing CA certificate configured:
Subject Name:
cn=srstcaserver
Fingerprint MD5: 6AF5B084 79C93F2B 76CC8FE6 8781AF5E
Fingerprint SHA1: 47D30503 38FF1524 711448B4 9763FAF6 3A8E7DCF
State:
Keys generated ............. Yes (General Purpose)
Issuing CA authenticated ....... Yes
Certificate request(s) ..... None
Trustpoint srstca:
Issuing CA certificate configured:
Subject Name:
cn=srstcaserver
Fingerprint MD5: 6AF5B084 79C93F2B 76CC8FE6 8781AF5E
Fingerprint SHA1: 47D30503 38FF1524 711448B4 9763FAF6 3A8E7DCF
Router General Purpose certificate configured:
Subject Name:
serialNumber=F3246544+hostname=c2611XM-sSRST.cisco.com
Fingerprint: 35471295 1C907EC1 45B347BC 7A9C4B86
State:
Keys generated ............. Yes (General Purpose)
Issuing CA authenticated ....... Yes
Certificate request(s) ..... Yes
Obtaining a Certificate for Cisco Unified CME Server Functions: Example
The following example establishes a trustpoint for the CAPF server called capf.
Router(config)# crypto pki trustpoint capf
Router(config-ca-trustpoint)# enrollment url http://ca-server.company.com
Router(config-ca-trustpoint)# revocation-check none
Router(config-ca-trustpoint)# rsakeypair capf 1024 1024
Router(config-ca-trustpoint)# exit
Router(config)# crypto pki authenticate capf
Router(config)# crypto pki enroll capf
Telephony-Service Security Parameters: Example
The following example shows Cisco Unified CME security parameters.
telephony-service
device-security-mode authenticated
secure-signaling trustpoint cme-sccp
tftp-server-credentials trustpoint cme-tftp
load-cfg-file slot0:Ringlist.xml alias Ringlist.xml sign create
ephone 24
device-security-mode authenticated
capf-auth-str 2734
cert-oper upgrade auth-mode auth-string
CTL Client Running on Cisco Unified CME Router: Example
ctl-client
server capf 10.1.1.1 trustpoint cmeserver
server cme 10.1.1.1 trustpoint cmeserver
server tftp 10.1.1.1 trustpoint cmeserver
sast1 trustpoint cmeserver
sast2 trustpoint sast2
CTL Client Running on Another Router: Example
ctl-client
server cme 10.1.1.100 trustpoint cmeserver
server cme 10.1.1.1 username cisco password 1 0822455D0A16544541
sast1 trustpoint cmeserver
sast2 trustpoint sast1
CAPF Server: Example
!
ip dhcp pool cme-pool
network 10.1.1.0 255.255.255.0
option 150 ip 10.1.1.1
default-router 10.1.1.1
!
capf-server
port 3804
auth-mode null-string
cert-enroll-trustpoint iosra password 1 00071A1507545A545C
trustpoint-label cmeserver
source-addr 10.1.1.1
!
crypto pki server iosra
grant auto
mode ra
database url slot0:
!
crypto pki trustpoint cmeserver
enrollment url http://10.1.1.100:80
serial-number
revocation-check none
rsakeypair cmeserver
!
crypto pki trustpoint sast2
enrollment url http://10.1.1.100:80
serial-number
revocation-check none
rsakeypair sast2
!
!
crypto pki trustpoint iosra
enrollment url http://10.1.1.200:80
revocation-check none
rsakeypair iosra
!
!
crypto pki certificate chain cmeserver
certificate 1B
30820207 30820170 A0030201 0202011B 300D0609 2A864886 F70D0101 04050030
....
quit
certificate ca 01
3082026B 308201D4 A0030201 02020101 300D0609 2A864886 F70D0101 04050030
...
quit
crypto pki certificate chain sast2
certificate 1C
30820207 30820170 A0030201 0202011C 300D0609 2A864886 F70D0101 04050030
....
quit
certificate ca 01
3082026B 308201D4 A0030201 02020101 300D0609 2A864886 F70D0101 04050030
.....
quit
crypto pki certificate chain capf-tp
crypto pki certificate chain iosra
certificate 04
30820201 3082016A A0030201 02020104 300D0609 2A864886 F70D0101 04050030
......
certificate ca 01
308201F9 30820162 A0030201 02020101 300D0609 2A864886 F70D0101 04050030
....
quit
!
!
credentials
ctl-service admin cisco secret 1 094F471A1A0A464058
ip source-address 10.1.1.1 port 2444
trustpoint cmeserver
!
!
telephony-service
no auto-reg-ephone
load 7960-7940 P00307010200
load 7914 S00104000100
load 7941GE TERM41.7-0-0-129DEV
load 7970 TERM70.7-0-0-77DEV
max-ephones 20
max-dn 10
ip source-address 10.1.1.1 port 2000 secondary 10.1.1.100
secure-signaling trustpoint cmeserver
cnf-file location flash:
cnf-file perphone
dialplan-pattern 1 2... extension-length 4
max-conferences 8 gain -6
transfer-pattern ....
tftp-server-credentials trustpoint cmeserver
server-security-mode secure
device-security-mode encrypted
load-cfg-file slot0:Ringlist.xml alias Ringlist.xml sign
load-cfg-file slot0:P00307010200.bin alias P00307010200.bin
load-cfg-file slot0:P00307010200.loads alias P00307010200.loads
load-cfg-file slot0:P00307010200.sb2 alias P00307010200.sb2
load-cfg-file slot0:P00307010200.sbn alias P00307010200.sbn
load-cfg-file slot0:cnu41.2-7-4-116dev.sbn alias cnu41.2-7-4-116dev.sbn
load-cfg-file slot0:Jar41.2-9-0-101dev.sbn alias Jar41.2-9-0-101dev.sbn
load-cfg-file slot0:CVM41.2-0-0-96dev.sbn alias CVM41.2-0-0-96dev.sbn
load-cfg-file slot0:TERM41.DEFAULT.loads alias TERM41.DEFAULT.loads
load-cfg-file slot0:TERM70.DEFAULT.loads alias TERM70.DEFAULT.loads
load-cfg-file slot0:Jar70.2-9-0-54dev.sbn alias Jar70.2-9-0-54dev.sbn
load-cfg-file slot0:cnu70.2-7-4-58dev.sbn alias cnu70.2-7-4-58dev.sbn
load-cfg-file slot0:CVM70.2-0-0-49dev.sbn alias CVM70.2-0-0-49dev.sbn
load-cfg-file slot0:DistinctiveRingList.xml alias DistinctiveRingList.xml sign
load-cfg-file slot0:Piano1.raw alias Piano1.raw sign
load-cfg-file slot0:S00104000100.sbn alias S00104000100.sbn
create cnf-files version-stamp 7960 Aug 13 2005 12:39:24
!
!
ephone 1
device-security-mode encrypted
cert-oper upgrade auth-mode null-string
mac-address 000C.CE3A.817C
type 7960 addon 1 7914
button 1:2 8:8
!
!
ephone 2
device-security-mode encrypted
capf-auth-str 2476
cert-oper upgrade auth-mode null-string
mac-address 0011.2111.6BDD
type 7970
button 1:1
!
!
ephone 3
device-security-mode encrypted
capf-auth-str 5425
cert-oper upgrade auth-mode null-string
mac-address 000D.299D.50DF
type 7970
button 1:3
!
!
ephone 4
device-security-mode encrypted
capf-auth-str 7176
cert-oper upgrade auth-mode null-string
mac-address 000E.D7B1.0DAC
type 7960
button 1:4
!
!
ephone 5
device-security-mode encrypted
mac-address 000F.9048.5077
type 7960
button 1:5
!
!
ephone 6
device-security-mode encrypted
mac-address 0013.C352.E7F1
type 7941GE
button 1:6
!
Secure Cisco Unified CME: Example
Router# show running-config
Building configuration...
Current configuration : 12735 bytes
!
! No configuration change since last restart
!
version 12.4
service timestamps debug datetime msec
service timestamps log datetime msec
no service password-encryption
service internal
!
hostname Router
!
boot-start-marker
boot-end-marker
!
card type e1 1 1
logging queue-limit 10000
logging buffered 9999999 debugging
logging rate-limit 10000
no logging console
!
aaa new-model
!
!
aaa accounting connection h323 start-stop group radius
!
aaa session-id common
!
resource policy
!
clock timezone IST 5
no network-clock-participate slot 1
!
!
ip cef
!
!
isdn switch-type primary-net5
!
voice-card 0
no dspfarm
!
voice-card 1
no dspfarm
!
!
ctl-client
server capf 10.13.32.11 trustpoint mytrustpoint1
server tftp 10.13.32.11 trustpoint mytrustpoint1
server cme 10.13.32.11 trustpoint mytrustpoint1
sast1 trustpoint mytrustpoint1
sast2 trustpoint sast2
!
capf-server
port 3084
auth-mode null-string
cert-enroll-trustpoint iosra password 1 mypassword
trustpoint-label mytrustpoint1
source-addr 10.13.32.11
phone-key-size 512
!
voice call debug full-guid
!
voice service voip
srtp fallback
allow-connections h323 to h323
no supplementary-service h450.2
no supplementary-service h450.3
no supplementary-service h450.7
supplementary-service media-renegotiate
h323
emptycapability
ras rrq ttl 4000
!
!
voice class codec 2
codec preference 1 g711alaw
codec preference 2 g711ulaw
!
voice class codec 3
codec preference 1 g729r8
codec preference 8 g711alaw
codec preference 9 g711ulaw
!
voice class codec 1
codec preference 1 g729r8
codec preference 2 g728
codec preference 3 g723ar63
codec preference 4 g711ulaw
!
!
voice iec syslog
voice statistics type iec
voice statistics time-range since-reset
!
!
!
crypto pki server myra
database level complete
grant auto
lifetime certificate 1800
!
crypto pki trustpoint myra
enrollment url http://10.13.32.11:80
revocation-check none
rsakeypair iosra
!
crypto pki trustpoint mytrustpoint1
enrollment url http://10.13.32.11:80
revocation-check none
rsakeypair mytrustpoint1
!
crypto pki trustpoint sast2
enrollment url http://10.13.32.11:80
revocation-check none
rsakeypair sast2
!
!
crypto pki certificate chain myra
certificate ca 01
308201F9 30820162 A0030201 02020101 300D0609 2A864886 F70D0101 04050030
10310E30 0C060355 04031305 696F7372 61301E17 0D303630 37303730 35343031
375A170D 30393037 30363035 34303137 5A301031 0E300C06 03550403 1305696F
73726130 819F300D 06092A86 4886F70D 01010105 0003818D 00308189 02818100
D8CE29F9 C9FDB1DD 0E1517E3 6CB4AAF7 52B83DE2 1C017ACA DFC4AF42 F9D10D08
E74BF95B 29378902 B49E32C4 85907384 84CAE4B2 7759BB84 8AB1F578 580793C4
B11A2DBE B2ED02CC DA0C3824 A5FCC377 18CE87EA C0C297BA BE54530F E62247D8
1483CD14 9FD89EFE 05DFBB37 E03FD3F8 B2B1C0B8 A1931BCC B1174A9E 6566F8F5
02030100 01A36330 61300F06 03551D13 0101FF04 05300301 01FF300E 0603551D
0F0101FF 04040302 0186301F 0603551D 23041830 168014B7 16F6FD67 29666C90
D0C62515 E14265A9 EB256230 1D060355 1D0E0416 0414B716 F6FD6729 666C90D0
C62515E1 4265A9EB 2562300D 06092A86 4886F70D 01010405 00038181 002B7F41
64535A66 D20D888E 661B9584 5E3A28DF 4E5A95B9 97E57CAE B07A7C38 7F3B60EE
75C7E5DE 6DF19B06 5F755FB5 190BABFC EF272CEF 865FE01B 1CE80F98 F320A569
CAFFA5D9 3DB3E7D8 8A86C66C F227FF81 6C4449F2 AF8015D9 8129C909 81AFDC01
180B61E8 85E19873 96DB3AE3 E6B70726 9BF93521 CA2FA906 99194ECA 8F
quit
crypto pki certificate chain mytrustpoint1
certificate 02
308201AB 30820114 A0030201 02020102 300D0609 2A864886 F70D0101 04050030
10310E30 0C060355 04031305 696F7372 61301E17 0D303630 37303730 35343233
385A170D 30393037 30363035 34303137 5A301A31 18301606 092A8648 86F70D01
09021609 32383531 2D434D45 32305C30 0D06092A 864886F7 0D010101 0500034B
00304802 4100B3ED A902646C 3851B7F6 CF94887F 0EC437E3 3B6FEDB2 2B4B45A6
3611C243 5A0759EA 1E8D96D1 60ABE028 ED6A3F2A E95DCE45 BE0921AF 82E53E57
17CC12F0 C1270203 010001A3 4F304D30 0B060355 1D0F0404 030205A0 301F0603
551D2304 18301680 14B716F6 FD672966 6C90D0C6 2515E142 65A9EB25 62301D06
03551D0E 04160414 4EE1943C EA817A9E 7010D5B8 0467E9B0 6BA76746 300D0609
2A864886 F70D0101 04050003 81810003 564A6DA1 868B2669 7C096F9A 41173CFC
E49246EE C645E30B A0753E3B E1A265D1 6EA5A829 F10CD0E8 3F2E3AD4 39D8DFE8
83525F2B D19F5E15 F27D6262 62852D1F 43629B68 86D91B5F 7B2E2C25 3BD2CCC3
00EF4028 714339B2 6A7E0B2F 131D2D9E 0BE08853 5CCAE47C 4F74953C 19305A20
B2C97808 D6E01351 48366421 A1D407
quit
certificate ca 01
308201F9 30820162 A0030201 02020101 300D0609 2A864886 F70D0101 04050030
10310E30 0C060355 04031305 696F7372 61301E17 0D303630 37303730 35343031
375A170D 30393037 30363035 34303137 5A301031 0E300C06 03550403 1305696F
73726130 819F300D 06092A86 4886F70D 01010105 0003818D 00308189 02818100
D8CE29F9 C9FDB1DD 0E1517E3 6CB4AAF7 52B83DE2 1C017ACA DFC4AF42 F9D10D08
E74BF95B 29378902 B49E32C4 85907384 84CAE4B2 7759BB84 8AB1F578 580793C4
B11A2DBE B2ED02CC DA0C3824 A5FCC377 18CE87EA C0C297BA BE54530F E62247D8
1483CD14 9FD89EFE 05DFBB37 E03FD3F8 B2B1C0B8 A1931BCC B1174A9E 6566F8F5
02030100 01A36330 61300F06 03551D13 0101FF04 05300301 01FF300E 0603551D
0F0101FF 04040302 0186301F 0603551D 23041830 168014B7 16F6FD67 29666C90
D0C62515 E14265A9 EB256230 1D060355 1D0E0416 0414B716 F6FD6729 666C90D0
C62515E1 4265A9EB 2562300D 06092A86 4886F70D 01010405 00038181 002B7F41
64535A66 D20D888E 661B9584 5E3A28DF 4E5A95B9 97E57CAE B07A7C38 7F3B60EE
75C7E5DE 6DF19B06 5F755FB5 190BABFC EF272CEF 865FE01B 1CE80F98 F320A569
CAFFA5D9 3DB3E7D8 8A86C66C F227FF81 6C4449F2 AF8015D9 8129C909 81AFDC01
180B61E8 85E19873 96DB3AE3 E6B70726 9BF93521 CA2FA906 99194ECA 8F
quit
crypto pki certificate chain sast2
certificate 03
308201AB 30820114 A0030201 02020103 300D0609 2A864886 F70D0101 04050030
10310E30 0C060355 04031305 696F7372 61301E17 0D303630 37303730 35343331
375A170D 30393037 30363035 34303137 5A301A31 18301606 092A8648 86F70D01
09021609 32383531 2D434D45 32305C30 0D06092A 864886F7 0D010101 0500034B
00304802 4100C703 840B11A7 81FCE5AE A14FE593 5114D3C2 5473F488 B8FB4CC5
41EAFA3A D99381D8 21AE6AA9 BA83A84E 9DF3E8C6 54978787 5EF6CC35 C334D55E
A3051372 17D30203 010001A3 4F304D30 0B060355 1D0F0404 030205A0 301F0603
551D2304 18301680 14B716F6 FD672966 6C90D0C6 2515E142 65A9EB25 62301D06
03551D0E 04160414 EB2146B4 EE24AA61 8B5D2F8D 2AD3B786 CBADC8F2 300D0609
2A864886 F70D0101 04050003 81810057 BA0053E9 8FD54B25 72D85A4C CAB47F26
8316F494 E94DFFB9 8E9D065C 9748465C F54719CA C7724F50 67FBCAFF BC332109
DC2FB93D 5AD86583 EDC3E648 39274CE8 D4A5F002 5F21ED3C 6D524AB7 7F5B1876
51867027 9BD2FFED 06984558 C903064E 5552015F 289BA9BB 308D327A DFE0A3B9
78CF2B02 2DD4C208 80CDC0A8 43A26A
quit
certificate ca 01
308201F9 30820162 A0030201 02020101 300D0609 2A864886 F70D0101 04050030
10310E30 0C060355 04031305 696F7372 61301E17 0D303630 37303730 35343031
375A170D 30393037 30363035 34303137 5A301031 0E300C06 03550403 1305696F
73726130 819F300D 06092A86 4886F70D 01010105 0003818D 00308189 02818100
D8CE29F9 C9FDB1DD 0E1517E3 6CB4AAF7 52B83DE2 1C017ACA DFC4AF42 F9D10D08
E74BF95B 29378902 B49E32C4 85907384 84CAE4B2 7759BB84 8AB1F578 580793C4
B11A2DBE B2ED02CC DA0C3824 A5FCC377 18CE87EA C0C297BA BE54530F E62247D8
1483CD14 9FD89EFE 05DFBB37 E03FD3F8 B2B1C0B8 A1931BCC B1174A9E 6566F8F5
02030100 01A36330 61300F06 03551D13 0101FF04 05300301 01FF300E 0603551D
0F0101FF 04040302 0186301F 0603551D 23041830 168014B7 16F6FD67 29666C90
D0C62515 E14265A9 EB256230 1D060355 1D0E0416 0414B716 F6FD6729 666C90D0
C62515E1 4265A9EB 2562300D 06092A86 4886F70D 01010405 00038181 002B7F41
64535A66 D20D888E 661B9584 5E3A28DF 4E5A95B9 97E57CAE B07A7C38 7F3B60EE
75C7E5DE 6DF19B06 5F755FB5 190BABFC EF272CEF 865FE01B 1CE80F98 F320A569
CAFFA5D9 3DB3E7D8 8A86C66C F227FF81 6C4449F2 AF8015D9 8129C909 81AFDC01
180B61E8 85E19873 96DB3AE3 E6B70726 9BF93521 CA2FA906 99194ECA 8F
quit
!
!
username admin password 0 mypassword2
username cisco password 0 mypassword2
!
!
controller E1 1/0
pri-group timeslots 1-31
!
controller E1 1/1
pri-group timeslots 1-31
gw-accounting aaa
!
!
!
!
!
interface GigabitEthernet0/0
ip address 10.13.32.11 255.255.255.0
duplex auto
speed auto
fair-queue 64 256 32
h323-gateway voip interface
h323-gateway voip id GK1 ipaddr 10.13.32.13 1719
h323-gateway voip id GK2 ipaddr 10.13.32.16 1719
h323-gateway voip h323-id 2851-CiscoUnifiedCME
h323-gateway voip tech-prefix 1#
ip rsvp bandwidth 1000 100
!
interface GigabitEthernet0/1
no ip address
shutdown
duplex auto
speed auto
!
interface Serial1/0:15
no ip address
encapsulation hdlc
isdn switch-type primary-net5
isdn protocol-emulate network
isdn incoming-voice voice
no cdp enable
!
interface Serial1/1:15
no ip address
encapsulation hdlc
isdn switch-type primary-net5
isdn protocol-emulate network
isdn incoming-voice voice
no cdp enable
!
ip route 0.0.0.0 0.0.0.0 10.13.32.1
!
!
ip http server
ip http authentication local
no ip http secure-server
ip http path flash:
!
!
!
!
!
!
tftp-server flash:music-on-hold.au
tftp-server flash:TERM70.DEFAULT.loads
tftp-server flash:TERM71.DEFAULT.loads
tftp-server flash:P00308000300.bin
tftp-server flash:P00308000300.loads
tftp-server flash:P00308000300.sb2
tftp-server flash:P00308000300.sbn
tftp-server flash:SCCP70.8-0-3S.loads
tftp-server flash:cvm70sccp.8-0-2-25.sbn
tftp-server flash:apps70.1-1-2-26.sbn
tftp-server flash:dsp70.1-1-2-26.sbn
tftp-server flash:cnu70.3-1-2-26.sbn
tftp-server flash:jar70sccp.8-0-2-25.sbn
radius-server host 10.13.32.241 auth-port 1645 acct-port 1646
radius-server timeout 40
radius-server deadtime 2
radius-server key cisco
radius-server vsa send accounting
!
control-plane
!
no call rsvp-sync
!
!
voice-port 1/0/0
!
voice-port 1/0/1
!
voice-port 1/0:15
!
voice-port 1/1:15
!
!
!
!
!
dial-peer voice 1 voip
destination-pattern ........
voice-class codec 2
session target ras
incoming called-number 9362....
dtmf-relay h245-alphanumeric
req-qos controlled-load audio
!
dial-peer voice 2 pots
destination-pattern 93621101
!
dial-peer voice 3 pots
destination-pattern 93621102
!
dial-peer voice 10 voip
destination-pattern 2668....
voice-class codec 1
session target ipv4:10.13.46.200
!
dial-peer voice 101 voip
shutdown
destination-pattern 5694....
voice-class codec 1
session target ipv4:10.13.32.10
incoming called-number 9362....
!
dial-peer voice 102 voip
shutdown
destination-pattern 2558....
voice-class codec 1
session target ipv4:10.13.32.12
incoming called-number 9362....
!
dial-peer voice 103 voip
shutdown
destination-pattern 9845....
voice-class codec 1
session target ipv4:10.13.32.14
incoming called-number 9362....
!
dial-peer voice 104 voip
shutdown
destination-pattern 9844....
voice-class codec 1
session target ipv4:10.13.32.15
incoming called-number 9362....
!
dial-peer voice 201 pots
destination-pattern 93625...
no digit-strip
direct-inward-dial
port 1/0:15
!
dial-peer voice 202 pots
destination-pattern 93625...
no digit-strip
direct-inward-dial
port 1/1:15
!
!
gateway
timer receive-rtp 1200
!
!
!
telephony-service
load 7960-7940 P00308000300
max-ephones 4
max-dn 4
ip source-address 10.13.32.11 port 2000
auto assign 1 to 4
secure-signaling trustpoint mytrustpoint1
cnf-file location flash:
cnf-file perphone
voicemail 25589000
max-conferences 4 gain -6
call-forward pattern .T
moh flash:music-on-hold.au
web admin system name admin password mypassword2
dn-webedit
time-webedit
transfer-system full-consult
transfer-pattern ........
tftp-server-credentials trustpoint mytrustpoint1
server-security-mode secure
device-security-mode encrypted
create cnf-files version-stamp 7960 Oct 25 2006 07:19:39
!
!
ephone-dn 1
number 93621000
name 2851-PH1
call-forward noan 25581101 timeout 10
!
!
ephone-dn 2
number 93621001
name 2851-PH2
call-forward noan 98441000 timeout 10
!
!
ephone-dn 3
number 93621002
name 2851-PH3
!
!
ephone-dn 4
number 93621003
name 2851-PH4
!
!
ephone 1
no multicast-moh
device-security-mode encrypted
mac-address 0012.4302.A7CC
type 7970
button 1:1
!
!
!
ephone 2
no multicast-moh
device-security-mode encrypted
mac-address 0017.94CA.9CCD
type 7960
button 1:2
!
!
!
ephone 3
no multicast-moh
device-security-mode encrypted
mac-address 0017.94CA.9833
type 7960
button 1:3
!
!
!
ephone 4
no multicast-moh
device-security-mode none
mac-address 0017.94CA.A141
type 7960
button 1:4
!
!
!
line con 0
logging synchronous level all limit 20480000
line aux 0
line vty 0 4
!
scheduler allocate 20000 1000
ntp clock-period 17179791
ntp server 10.13.32.12
!
webvpn context Default_context
ssl authenticate verify all
!
no inservice
!
!
end
Where to Go Next
PKI Management
Cisco IOS public key infrastructure (PKI) provides certificate management to support security protocols such as IP Security (IPsec), secure shell (SSH), and secure socket layer (SSL). For more information, see the following documents:
•
•
Cisco VG224 Analog Phone Gateway
•
Additional References
The following sections provide references related to Cisco Unified CME features.
Related Documents
Cisco Unified CME configuration
•
Cisco IOS commands
•
Cisco IOS configuration
•
•
Phone documentation for Cisco Unified CME
Cisco VG224 Analog Phone Gateway
•
Technical Assistance
Feature Information for Security
Table 25 lists the features in this module and enhancements to the features by version.
To determine the correct Cisco IOS release to support a specific Cisco Unified CME version, see the Cisco Unified CME and Cisco IOS Software Version Compatibility Matrix at http://www.cisco.com/en/US/products/sw/voicesw/ps4625/products_documentation_roadmap09186a0080189132.html.
Use Cisco Feature Navigator to find information about platform support and software image support. Cisco Feature Navigator enables you to determine which Cisco IOS software images support a specific software release, feature set, or platform. To access Cisco Feature Navigator, go to http://www.cisco.com/go/cfn. An account on Cisco.com is not required.
Note
![]()
![]()
![]()
![]()
![]()
![]()
![]()
![]()
Posted: Fri Oct 12 09:15:24 PDT 2007
All contents are Copyright © 1992--2007 Cisco Systems, Inc. All rights reserved.
Important Notices and Privacy Statement.