|
|

Similar to Microsoft Terminal Services, Virtual Network Computing (VNC) allows a system administrator to use a server to install applications or perform configuration tasks on a remote server while the user on the remote server views the tasks that occur.
Review the following information before you install VNC:
In this document, master server refers to the server where the user initiates, performs, and manages tasks; the remote server(s) receives the software or configuration information from the master server.
Make sure that you have installed Cisco-provided operating system version 2000.2.3 on all servers that will use VNC. For information on upgrading the operating system, refer to the documentation for the version of the Cisco CallManager upgrade that runs in the cluster.
If an earlier version of VNC is installed on the server, uninstall the older version before performing the procedures in this document.
Be aware that using VNC poses a security risk by making the cluster vulnerable to attacks.
Installing VNC opens a network port, which may make the server vulnerable to attacks. A network scanner will show port 5800 "VNC => Remote Control Software" and allow an attacker to access the server.
During the VNC installation, enter a complex alphanumeric password for VNC. VNC limits the password to eight characters.
To minimize security risks, set the VNC service to Manual startup and start it only during remote management. This action ensures that users must enter a Windows user name/password that the server can authenticate before starting the service.
Disable Terminal Services if you no longer plan to use it for remote management.
When you upgrade the operating system or run an operating system patch on the server, make sure that you review the operating system readme document for information on upgrading VNC. Cisco provides the VNC upgrade files in the operating system upgrade and/or operating system support patch, although Cisco does not automatically install these files on the server.
Perform the following procedure to install and configure VNC Version 3.3.3r9 on all servers that will use VNC.
C:\utils\VNC\vnc_x86_win32\winvnc
Step 2 In the winvnc folder, double-click Setup.exe.
Step 3 The welcome window displays. Click Next.
Step 4 Click Yes to accept the software license agreement.
Step 5 Accept the default location or choose a new location for installing the application, and then click Next.
Step 6 Accept the default folder name or choose a new folder; then, click Next.
Step 7 In the Setup Complete window, click Finish.
Step 8 Choose Start > Programs > VNC > Administrative Tools > Install WinVNC Service.
A message box indicates that the service has been successfully installed.
Step 9 Start the VNC service by choosing Start > Programs > Administrative Tools > Services.
Right-click VNC service; then, click Start.
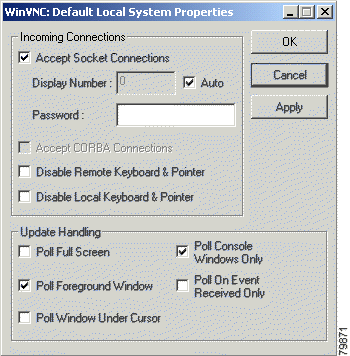
Step 10 For new installations, a message indicates that you must set the default password for VNC. Click OK.
The WinVNC: Default Local System Properties dialog box displays, as shown in Figure 1.
Step 11 In the Incoming Connections pane, enter a password in the Password field. You can choose any password of up to eight characters that you want to use. You will use this password to open a VNC session between servers.
Step 13 Set the VNC service to Manual startup type by choosing Start > Programs > Administrative Tools > Services.
Step 14 Double-click VNC Server.
Step 15 In the Startup type field on the General tab, choose Manual.
Step 16 In the Service status area, click Stop if the service is running.
Step 17 Click OK.
Step 18 If you do not want to use Microsoft Windows Terminal Services, double-click Terminal Services in the Services pane. In the Startup type field on the General tab, choose Disabled.
The service does not stop until you reboot the server.
Step 20 Repeat Step 1 through Step 19 on all servers that will use VNC to interact.
You can use Terminal Services to download and install VNC on the servers, or you can ask someone with access to the servers to perform the installation procedure.
If you want to start a remote server via VNC, perform the following procedure:
Step 2 Right-click My Computer and choose Manage.
Step 3 Choose Action > Connect to another computer.
The Select Computer dialog box displays.
Step 4 In the Name field, enter the name of the server in which you want to connect; then, click OK.
Step 5 In the Computer Management window, double-click Services and Applications.
Step 6 If an Internet Services Manager dialog displays, click Yes.
Step 7 Click Services.
Step 8 Right-click VNC Server; then, choose Start.
Perform the following procedure to complete installation or configuration tasks via VNC:
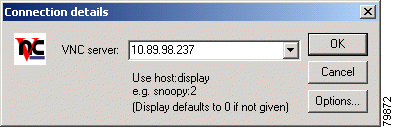
The Connection Details dialog box displays, as shown in Figure 2.
Step 2 In the VNC server field, enter the IP address of the remote server on which you want to install the software or perform a configuration task.
Step 3 Click OK.
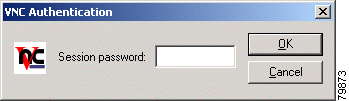
The VNC Authentication dialog box displays, as shown in Figure 3.
Step 4 In the Session password field, enter the password that you specified in Step 11 in the "Installing and Configuring VNC" section.
Step 5 Click OK.
The desktop of the remote server displays.
Step 6 From the master server, install software or perform configuration tasks on the remote server.
 |
Caution Make sure that you insert installation CD-ROMs into the CD-ROM drive of the remote server or download the files from the web onto the remote server. |
 |
Note When you are using a remote terminal over VNC to install Cisco CallManager on an IBM server, the procedure may seem to stall or hang during the installation. On the remote terminal, if you move (drag) the VNC window or refresh the screen by choosing Request screen refresh from the VNC application window menu (the menu that appears when you click on the VNC icon in the left corner of the window title), the procedure will continue. |
Step 7 Stop the VNC Server service.
Step 8 Perform the procedures in "Starting a Remote Server from the Master Server" and "Using the Master Server to Perform Tasks on the Remote Server" for each remote server on which you want to perform installation or configuration tasks.
If you run VNC to install/upgrade Cisco CallManager on IBM xSeries servers, the installation may appear to hang when the server is copying the files during the installation. Move the mouse to continue the installation.
These sections explain how to obtain documentation from Cisco Systems.
You can access the most current Cisco documentation on the World Wide Web at this URL:
Translated documentation is available at this URL:
http://www.cisco.com/public/countries_languages.shtml
Cisco documentation and additional literature are available in a Cisco Documentation CD-ROM package, which is shipped with your product. The Documentation CD-ROM is updated monthly and may be more current than printed documentation. The CD-ROM package is available as a single unit or through an annual subscription.
You can order Cisco documentation in these ways:
http://www.cisco.com/cgi-bin/order/order_root.pl
http://www.cisco.com/go/subscription
You can submit comments electronically on Cisco.com. In the Cisco Documentation home page, click the Fax or Email option in the "Leave Feedback" section at the bottom of the page.
You can e-mail your comments to bug-doc@cisco.com.
You can submit your comments by mail by using the response card behind the front cover of your document or by writing to the following address:
Cisco Systems, Inc.
Attn: Document Resource Connection
170 West Tasman Drive
San Jose, CA 95134-9883
Cisco provides Cisco.com as a starting point for all technical assistance. Customers and partners can obtain online documentation, troubleshooting tips, and sample configurations from online tools by using the Cisco Technical Assistance Center (TAC) Web Site. Cisco.com registered users have complete access to the technical support resources on the Cisco TAC Web Site.
Cisco.com is the foundation of a suite of interactive, networked services that provides immediate, open access to Cisco information, networking solutions, services, programs, and resources at any time, from anywhere in the world.
Cisco.com is a highly integrated Internet application and a powerful, easy-to-use tool that provides a broad range of features and services to help you with these tasks:
If you want to obtain customized information and service, you can self-register on Cisco.com. To access Cisco.com, go to this URL:
The Cisco Technical Assistance Center (TAC) is available to all customers who need technical assistance with a Cisco product, technology, or solution. Two levels of support are available: the Cisco TAC Web Site and the Cisco TAC Escalation Center.
Cisco TAC inquiries are categorized according to the urgency of the issue:
The Cisco TAC resource that you choose is based on the priority of the problem and the conditions of service contracts, when applicable.
You can use the Cisco TAC Web Site to resolve P3 and P4 issues yourself, saving both cost and time. The site provides around-the-clock access to online tools, knowledge bases, and software. To access the Cisco TAC Web Site, go to this URL:
All customers, partners, and resellers who have a valid Cisco service contract have complete access to the technical support resources on the Cisco TAC Web Site. The Cisco TAC Web Site requires a Cisco.com login ID and password. If you have a valid service contract but do not have a login ID or password, go to this URL to register:
http://www.cisco.com/register/
If you are a Cisco.com registered user, and you cannot resolve your technical issues by using the Cisco TAC Web Site, you can open a case online by using the TAC Case Open tool at this URL:
http://www.cisco.com/tac/caseopen
If you have Internet access, we recommend that you open P3 and P4 cases through the Cisco TAC Web Site.
The Cisco TAC Escalation Center addresses priority level 1 or priority level 2 issues. These classifications are assigned when severe network degradation significantly impacts business operations. When you contact the TAC Escalation Center with a P1 or P2 problem, a Cisco TAC engineer automatically opens a case.
To obtain a directory of toll-free Cisco TAC telephone numbers for your country, go to this URL:
http://www.cisco.com/warp/public/687/Directory/DirTAC.shtml
Before calling, please check with your network operations center to determine the level of Cisco support services to which your company is entitled: for example, SMARTnet, SMARTnet Onsite, or Network Supported Accounts (NSA). When you call the center, please have available your service agreement number and your product serial number.
CCIP, the Cisco Arrow logo, the Cisco Powered Network mark, the Cisco Systems Verified logo, Cisco Unity, Follow Me Browsing, FormShare, iQ Breakthrough, iQ Expertise, iQ FastTrack, the iQ Logo, iQ Net Readiness Scorecard, Networking Academy, ScriptShare, SMARTnet, TransPath, and Voice LAN are trademarks of Cisco Systems, Inc.; Changing the Way We Work, Live, Play, and Learn, Discover All That's Possible, The Fastest Way to Increase Your Internet Quotient, and iQuick Study are service marks of Cisco Systems, Inc.; and Aironet, ASIST, BPX, Catalyst, CCDA, CCDP, CCIE, CCNA, CCNP, Cisco, the Cisco Certified Internetwork Expert logo, Cisco IOS, the Cisco IOS logo, Cisco Press, Cisco Systems, Cisco Systems Capital, the Cisco Systems logo, Empowering the Internet Generation, Enterprise/Solver, EtherChannel, EtherSwitch, Fast Step, GigaStack, Internet Quotient, IOS, IP/TV, LightStream, MGX, MICA, the Networkers logo, Network Registrar, Packet, PIX, Post-Routing, Pre-Routing, RateMUX, Registrar, SlideCast, StrataView Plus, Stratm, SwitchProbe, TeleRouter, and VCO are registered trademarks of Cisco Systems, Inc. and/or its affiliates in the U.S. and certain other countries.
All other trademarks mentioned in this document or Web site are the property of their respective owners. The use of the word partner does not imply a partnership relationship between Cisco and any other company. (0208R)
Copyright © 2002. Cisco Systems, Inc.
All rights reserved.
![]()
![]()
![]()
![]()
![]()
![]()
![]()
![]()
Posted: Thu Mar 20 19:16:21 PST 2003
All contents are Copyright © 1992--2002 Cisco Systems, Inc. All rights reserved.
Important Notices and Privacy Statement.