|
|

Table Of Contents
Cisco IP Phone BTXML Version 2.0 Application Development Guide
Obtaining Technical Assistance
Cisco IP Phone BTXML Version 2.0 Application Development Guide
This document serves as a reference guide for developers who want to modify the user interface (UI) of Cisco IP phones equipped with BTXML support. Currently, BTXML is available only on the Cisco 7960 and 7940 IP phones with MGCP software.
Note
Although the Cisco 7960 and 7940 IP phones are backward compatible with BTXML Version 1.0, Version 1.0 is obsolete. Anyone currently using Version 1.0 should migrate to Version 2.0.
This guide contains the following information:
•
•
About This Guide
This section discusses how to obtain additional documentation and technical assistance.
Obtaining Documentation
These sections explain how to obtain documentation from Cisco Systems.
World Wide Web
You can access the most current Cisco documentation on the World Wide Web at this URL:
Translated documentation is available at this URL:
http://www.cisco.com/public/countries_languages.shtml
Documentation CD-ROM
Cisco documentation and additional literature are available in a Cisco Documentation CD-ROM package, which is shipped with your product. The Documentation CD-ROM is updated monthly and may be more current than printed documentation. The CD-ROM package is available as a single unit or through an annual subscription.
Ordering Documentation
You can order Cisco documentation in these ways:
•
http://www.cisco.com/cgi-bin/order/order_root.pl
•
http://www.cisco.com/go/subscription
•
Documentation Feedback
You can submit comments electronically on Cisco.com. In the Cisco Documentation home page, click the Fax or Email option in the "Leave Feedback" section at the bottom of the page.
You can e-mail your comments to bug-doc@cisco.com.
You can submit your comments by mail by using the response card behind the front cover of your document or by writing to the following address:
Cisco Systems
Attn: Document Resource Connection
170 West Tasman Drive
San Jose, CA 95134-9883We appreciate your comments.
Obtaining Technical Assistance
Cisco provides Cisco.com as a starting point for all technical assistance. Customers and partners can obtain online documentation, troubleshooting tips, and sample configurations from online tools by using the Cisco Technical Assistance Center (TAC) Web Site. Cisco.com registered users have complete access to the technical support resources on the Cisco TAC Web Site.
Cisco.com
Cisco.com is the foundation of a suite of interactive, networked services that provides immediate, open access to Cisco information, networking solutions, services, programs, and resources at any time, from anywhere in the world.
Cisco.com is a highly integrated Internet application and a powerful, easy-to-use tool that provides a broad range of features and services to help you with these tasks:
•
•
•
•
•
If you want to obtain customized information and service, you can self-register on Cisco.com. To access Cisco.com, go to this URL:
Technical Assistance Center
The Cisco Technical Assistance Center (TAC) is available to all customers who need technical assistance with a Cisco product, technology, or solution. Two levels of support are available: the Cisco TAC Web Site and the Cisco TAC Escalation Center.
Cisco TAC inquiries are categorized according to the urgency of the issue:
•
•
•
•
The Cisco TAC resource that you choose is based on the priority of the problem and the conditions of service contracts, when applicable.
Cisco TAC Web Site
You can use the Cisco TAC Web Site to resolve P3 and P4 issues yourself, saving both cost and time. The site provides around-the-clock access to online tools, knowledge bases, and software. To access the Cisco TAC Web Site, go to this URL:
All customers, partners, and resellers who have a valid Cisco service contract have complete access to the technical support resources on the Cisco TAC Web Site. The Cisco TAC Web Site requires a Cisco.com login ID and password. If you have a valid service contract but do not have a login ID or password, go to this URL to register:
http://www.cisco.com/register/
If you are a Cisco.com registered user, and you cannot resolve your technical issues by using the Cisco TAC Web Site, you can open a case online by using the TAC Case Open tool at this URL:
http://www.cisco.com/tac/caseopen
If you have Internet access, we recommend that you open P3 and P4 cases through the Cisco TAC Web Site.
Cisco TAC Escalation Center
The Cisco TAC Escalation Center addresses priority level 1 or priority level 2 issues. These classifications are assigned when severe network degradation significantly impacts business operations. When you contact the TAC Escalation Center with a P1 or P2 problem, a Cisco TAC engineer automatically opens a case.
To obtain a directory of toll-free Cisco TAC telephone numbers for your country, go to this URL:
http://www.cisco.com/warp/public/687/Directory/DirTAC.shtml
Before calling, please check with your network operations center to determine the level of Cisco support services to which your company is entitled: for example, SMARTnet, SMARTnet Onsite, or Network Supported Accounts (NSA). When you call the center, please have available your service agreement number and your product serial number.
Introduction to BTXML
What Is BTXML?
BTXML (Basic Telephony Extended Markup Language) is a scripting language and system that allows for enhanced control of IP phones. It provides an application infrastructure for IP telephony, independent of protocol and terminal.
This infrastructure provides the following benefits:
•
•
•
BTXML is based on the eXtensible Markup Language (XML) standard but is tailored to the needs of telephone handsets.
Note
What BTXML Can Do
The core of the BTXML system is an XML-based microbrowser that has support for text, graphics, and input processing. The microbrowser processes all user interaction through Cards, which contain BTXML language commands. This allows the user interface to be tailored to match the user's needs.
The Microbrowser
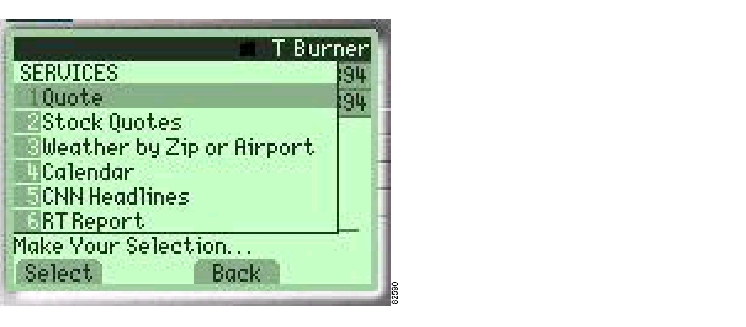
The idea behind using a microbrowser on a telephone is nothing new. Wireless Application Protocol (WAP)-based phones, which require a gateway to translate special web pages, have minibrowsers. The BTXML browser goes beyond this usage to provide integrated telephony features. With BTXML, a much higher degree of interactivity and formatting control is available, as shown in the following application sample screens.
Figure 1 shows how BTXML can be used to display a list of custom services for a series of phones from a common server.
Figure 1 BTXML Services Screen
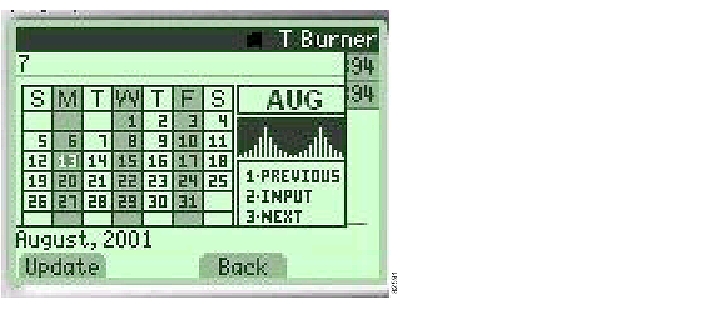
When the user selects one of these services (either by typing the item number or by highlighting an item and using the Select softkey), BTXML displays the selected application. For example, if item 4 is selected, the phone links to the calendar application as shown in Figure 2.
Figure 2 The Calendar Application
The BTXML microbrowser supports the following functionality:
•
•
•
•
•
Note
•
This functionality leads to a wide variety of applications that can interact with the phone. Figure 3 shows an application that could display a bit-mapped representation of the calling party on an incoming call.
Figure 3 Incoming Call Bitmap
What BTXML Cannot Do
BTXML is not a general-purpose programming language. It cannot be used for the following:
•
•
•
BTXML Overview
To maintain simplicity, BTXML has only a few elements, as described in the following sections:
Structural Elements
The following are BTXML structural elements:
•
•
•
•
•
•
•
•
Component Elements
The following are BTXML component elements:
•
•
•
•
•
•
•
•
•
•
Control Elements
The following is a BTXML control element:
•
Modifier Elements
The following are BTXML modifier elements:
•
•
XML Rules
Some rules to remember regarding XML are:
•
•
•
•
•
•
•
BTXML Syntax
This section describes the syntax used in BTXML cards. Before looking at the syntax details, we will look at the general format of a BTXML file. In the example below, notice that BTXML syntax looks a lot like standard XML 1.0 syntax, which in turn looks very much like HTML.
Note
•
•
•
The program or script is made up of tokens, which are enclosed in brackets < >, and text strings, which specify attributes for the various tokens. Nesting (indenting) may optionally be used to make the program more readable, but the BTXML parser does not require indenting.
All tokens follow a similar pattern:
•
•
•
The opening <token> phrase establishes what token or keyword you want to use. The attributes modify the token or provide additional details. The content would normally be a text string or other data the token can use. The whole script is closed with the </token> phrase. See Example 1.
Example 1 Example BTXML file
<?xml version="1.0" ?><btxml><deck id="examp"><card id="exampcard"><timer value="0" /><keybindings><item id="EXAMP_KEY" onpick="event=EXAMP_TEST">Test</item></keybindings><window>This is some text</window><status>Please press the Test key</status></card><card id="nextcard"><!-- Your card contents here --></card></deck></btxml>BTXML Specifications
This section provides a reference for the graphic elements used in a BTXML application and the associated syntax.
BTXML Environment
This section explains the physical environment in which BTXML runs.
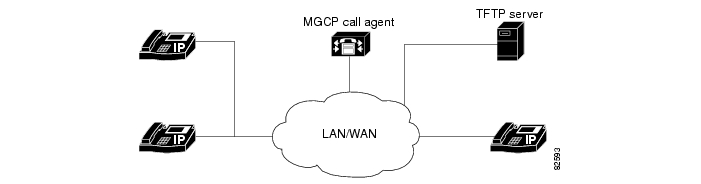
The BTXML environment consists of telephone handsets, servers, and the network that connects them. The handsets consist of a GUI display and a keypad. See Figure 4.
Figure 4 BTXML Environment
GUI Display
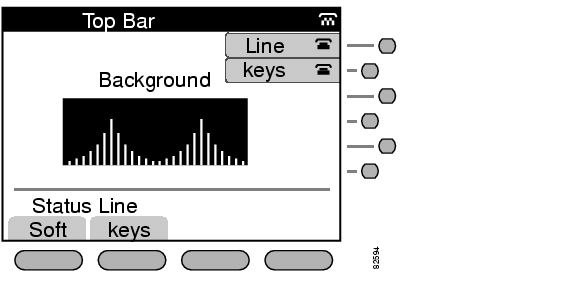
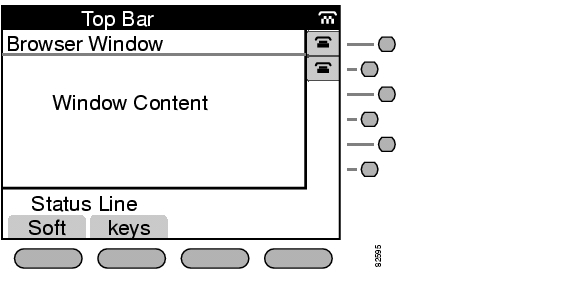
The basic GUI display consists of three planes or levels.
•
•
•
Each layer overlays the preceding layer. This means that anything that appears in the middle plane overwrites anything in the corresponding area of the background plane. This simplifies interaction with the phone and guarantees a standard interface across all phone platforms.
Figure 5 shows a basic telephone screen with the some of the basic display elements in place.
Figure 5 Basic Telephone Screen
Figure 6 shows the same screen with the browser window open. Note how the content of the browser overlays the line keys and the background. When the browser window is closed, the line keys and the background are restored automatically.
Figure 6 Screen with Browser Window Open
•
•
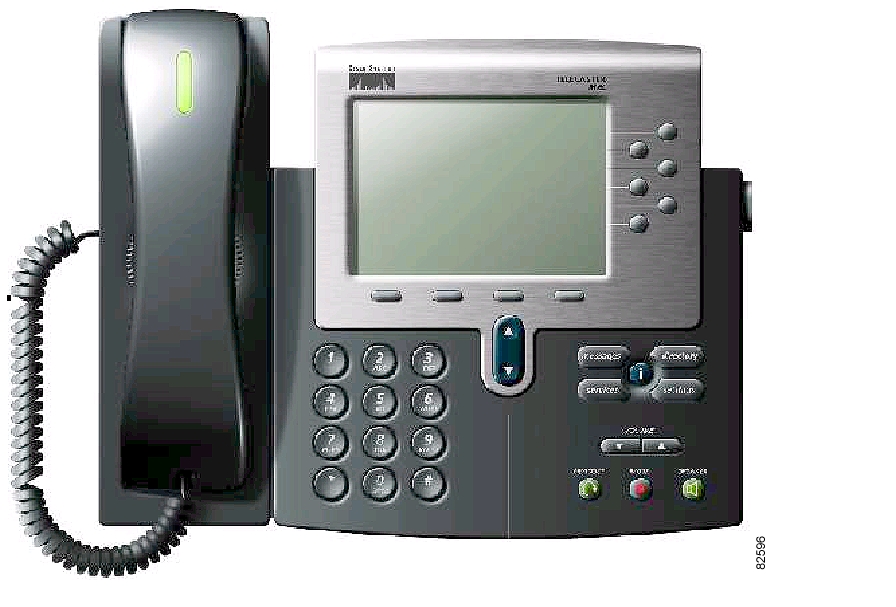
The Keypad
The keypad allows the user to input data and events into the telephone. A typical Cisco 7960 IP phone is shown in Figure 7.
Figure 7 Cisco 7960 IP Phone
Note
Although the phones may have different keypads, several standard keys are common to all:
•
•
•
•
•
•
•
•
•
•
•
Call Agent
Each MGCP network has a call agent that controls a number of associated phones. The call agent may communicate with the phone's BTXML system using MGCP request and notify messages.
HTTP Server
A network may have one or more application servers that host user applications. A user application can, for example, be used to format a list of sales contacts and route the resulting list to a specific phone display. The phone communicates with the HTTP server using the Cisco Call Manager 3.0 scripting language and is typically accessed through the Services or Directory keys.
In smaller networks, the application server can be hosted on the same physical computer as the TFTP server.
For more information on the Cisco Call Manager 3.0 scripting language, refer to the following links:
•
www.hotdispatch.com/cisco-ip-telephony
•
http://www.cisco.com/warp/public/570/avvid/voice_ip/cm_xml/cm_xmldown.shtml
Also refer to the book Developing Cisco IP Phone Services, by Darrick Deel, Mark Nelson, and Anne Smith, ISBN 1-58705-060-9.
BTXML Entities
This section discusses the basic entities that are supported in the BTXML language.
Tip
The standard BTXML screen contains a combination of the following elements and widgets:
•
•
•
•
•
•
•
•
•
•
•
•
•
•
•
•
BTXML Elements
This section discusses the basic elements that are supported in the BTXML language.
btxml
The btxml keyword encapsulates a deck of one or more cards, as in the following example:
<btxml><!-- Deck goes here --></btxml>deck
The deck keyword encapsulates one or more cards, as in the following example:
<deck id="deckid"><!-- Deck content goes here --></deck>The id attribute names the deck and must be unique within the script. See Table 6 for a list of containment rules for this element.
card
The card keyword encapsulates a single card, as in the example that follows:
<card id="cardid"><!-- Card content goes here --></card>The id attribute names the card and must be unique within the card deck. Any elements that are specified in the card replace elements that are currently on screen. For example, if a <status> element is included in the card, the current status area is overwritten with the new content. See Table 6 for a list of containment rules for this element.
status
The status keyword is used to display a message in the status area of the screen, as in the following
example:
<card id="prompter"><status>Your Current Options</status></card>This keyword is typically used to prompt the user for information or to display an error or status message. See Table 6 for a list of containment rules for this element.
window
The window keyword is used to build a display window composed of one or more other elements, as in the following example:
<window width="wide|narrow"onhilite="href"href="href"><!-- Window content goes here --></window>The window keyword has the following attributes:
•
•
•
See Table 6 for a list of containment rules for this element.
background
The background keyword is used to control the content of the background plan, as in the following example:
<background href="href"><!-- Background content goes here --></background>The background keyword has the following attribute:
•
See Table 6 for a list of containment rules for this element.
keybindings
The keybindings keyword is used to bind individual keys to corresponding actions, as in the following example:
<keybindings><!-- Keybinding Items go here --><item id="asdf" onpick="href" flags="flags">Name</item></keybindings>When a new card is loaded into the system, some or all of the keys on the phone may be changed to perform new functions.
The keybindings keyword has the following attributes:
•
•
•
Keybindings may be divided into a few basic classes:
•
•
•
•
Key types may be freely intermixed within a card.
Tip
When a keybinding element is encountered and processed within a card, all previous nonsticky keybindings (from other cards) are deleted before the new keys take effect. If a keybinding is encountered for a key that was previously a sticky-key, the sticky-key binding is removed and the new binding takes effect.
Tip
The predefined hard-key IDs available through BTXML are listed below. Any other key used by the application that is not recognized is automatically placed on the list of softkeys.
Keys are split into three subgroups (see Table 1 to Table 3):
•
•
•
Table 3 Platform Specific Keys, Cisco 7960/7940 (Tier 3)
KEY_INFO
I key
KEY_DIRECTORY
Directory key
KEY_MESSAGES
Messages key
KEY_SERVICES
Services key
KEY_SETTINGS
Settings Key
To understand the keybindings keyword more fully, it is helpful to examine a few basic examples.
The following example is a simple card that opens a wide window and fills it with the image found in the file im1.bmp:
<card id="thiscard"><window width="wide"><image href="http://server/dir/images/im1.bmp" /></window><keybindings><item id="Ask" onpick="event=EVENT_ASK">Ask?</item></keybindings></card>The card then creates a softkey on the display. The softkey has the ASK? label visible and posts an EVENT_ASK event whenever it is pressed. The EVENT_ASK event is a user-defined event sent to the application, causing an action to take place.
Note
The use of an empty content section when defining softkeys has special significance. It tells BTXML that you would like to skip (leave blank) one key on the screen. In the next example, two softkeys are defined with an empty space between them:
<card id="thiscard"><window width="wide"><image href="http://server/dir/images/im1.bmp" /></window><keybindings><item id="Ask" onpick="event=EVENT_ASK">Ask?</item><item id="Foo" onpick="null"></item><item id="Exit" onpick="event=APP_RELEASE">Exit</item></keybindings></card>Notice that the second key, Foo, has no content defined after the initial <item> token. A blank space is, therefore, left on the second softkey location. If the user presses this key, no action is taken.
Note
Tip
One other special use of keys involves the creation of on-screen menus. In the next example, a very simple menu is created:
<card id="MYMENU"><window width="wide"><title>My First Menu</title><item type="menu" onpick="event=THIS">This</item><item type="menu" onpick="event=THAT">That</item><item type="menu" onpick="event=THEOTHER">Other</item></window><keybindings><item id="KEY_ACCEPT" onpick="event=KEY_ACCEPT">Select</item><item id="NULL" onpick="null" /><item id="KEY_CANCEL" onpick="event=GO_BACK">Back</item></keybindings></card>When this card is invoked, a three-item menu is displayed. The menu items are this, that, and other. The user can choose one of these items in two ways. The first is to simply press the 1, 2, or 3 key. Doing this sends the associated event to BTXML.
The second way to access an item is to use the navigation (scroll) keys, which causes each item to be highlighted in turn. When the desired item is highlighted, the user can press the "select" softkey. When this is done, BTXML finds the highlighted key and sends the associated onpick event to the application. The key_accept event is not seen by the application.
title
The title keyword allows you to define a title for the current window, as in the following example:
<window width="wide|narrow"><title><icon id="INFO">Information</title></window>Notice that the icon with the INFO identifier is displayed to the left of the title text, Information. See Table 6 for a list of containment rules for this element.
item
The item keyword is used to define any user interface (UI) component that receives user input and responds accordingly, as in the following examples:
<item type="menu|input"id="keyID"name="varName"value="varValue"onhilite="href"onpick="href"flags="flags">TEXT of Item</item><item id="KEY_ACCEPT" onpick="event=KEY_ACCEPT">Select</item><item type="menu" onpick="event=THIS">This</item>Items include menu items, key bindings, and input fields. See Table 6 for a list of containment rules for this element.
The attributes for the item keyword change according to the context in which the item is being used. See Table 3. The descriptions of each item follow:
•
•
•
Note
•
•
•
•
•
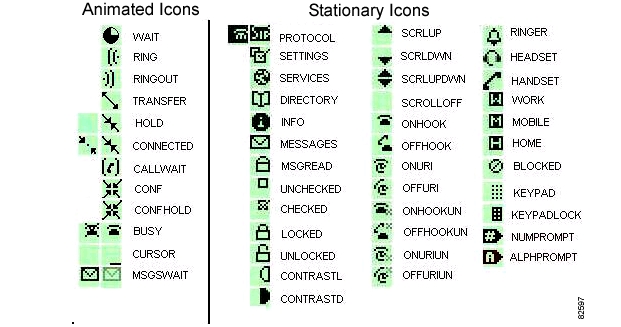
icon
The icon keyword is used to display a graphic icon on the screen, as in the following example:
<icon id="icon_name"/>
Note
Figure 8 shows the icons that can be used in the phone. Icons are indexed by using the text name shown next to each one.
Figure 8 Icon IDs
image
The image keyword is used to display a graphic bitmap on the screen, as in the following example:
<image height="#pixels"width="#pixels"href="image_href"></image>This command causes an image to be displayed on the phone, scaled the size indicated by height and width parameters.
Caution
Note
Note
calltimer
The calltimer keyword is used to display a running timer for a call, as in the following examples:
Syntax:<window><calltimer value="#seconds" callid="unique_id"/></window>Example:<window><calltimer value="&timer2;" callid="&id;"/></window>Example:<window><calltimer value="03:21:00" callid="&id;"/></window>The value attribute defaults to 0 and is the value that is displayed in seconds in the call timer field.
The callid attribute is a string that identifies the call and must be unique if more than one calltimers are displayed at the same time.
In the first coding example above, variables are being used (&id) to pass application variables into the card. See variables (&x), for more information on this technique.
In the second example above, an absolute time value is passed into the timer in the HH:MM:SS format. One can also pass a time into the timer formatted as a number of seconds, such as "23122". No matter which format is passed in to set the timer, the time is always displayed in HH:MM:SS format.
Note
font
The font keyword is used to adjust the appearance of text on the display, as in the following examples:
Syntax:<window><font fore="WHITE|BLACK|LTGREY|DKGREY"back="WHITE|BLACK|LTGREY|DKGREY">Text to be displayed</font></window>Example:<window><font fore="DKGREY" back="LTGREY"> Hello World! </font></window>See Table 6 for a list of containment rules for this element.
br
The br keyword forces a line break in the text on the display, as in the following example:
<window>This text is on one line<br/> This text on another line</window>
Note
rj
The rj keyword changes the default justification so that all text after the tag is right justified, as in the following example:
<window>This text left justified<rj/> This text is right justified<br/> This is left justified</window>This applies to text and icons only. The right justification lasts until any of the following situations occur:
•
•
•
Text normally defaults to left justification.
set
The set keyword creates a permanent variable in the current application's context, as in the following example:
<window><set name="shift" value="alpha"></window>The attributes for this tag are:
•
•
timer
The timer keyword creates a timer that counts down a specified number of seconds, then executes the specified href, as in the following example:
<card id = "mycard"><timer value="2" href="event=APP_RELEASE"> </timer><window>This is a test</window></card>The time can be canceled by posting a new timer with the value set to 0.
The attributes for this tag are:
•
•
slider
The slider keyword creates an on-screen slider that displays an analog value from 0 to 100, as in the following example:
<status><slider id="SLIDE1" value="&slideval;" /></status>The attributes for this tag are:
•
•
update
The update keyword allows the user to modify the attributes and content of existing elements, as in the following example:
<update><item id="olditemid"onpick="newonpick"onhilite="newonhilite"name="newname"value="newvalue">New Content </item></update>Also, see Table 6 for a list of containment rules for this element.
<?xml> (Card Update)
While the update keyword is useful for updating existing elements, the Card Update token <?> allows you to replace existing cards in the phone.
When card decks are sent to the phone, they are loaded into memory for later reference. At times, it might be convenient to change some of the existing cards. This is what the <?> token allows you to do.
For example, assume that there is a deck named basic in a phone and in this deck there is a card called VoiceMail. If we want to change that card, we can do it with the syntax listed in the following example:
<?xml version="1.0" ?><btxml><deck id="basic"><card="VoiceMail"><!-- New contents go here --></card></deck></btxml>When the cards have been updated, the phone always executes the card called load in the current application deck. The load card performs the necessary actions to utilize the new cards.
variables (&x)
Although they are not tokens as such, it is important to mention variables as part of the basic syntax of BTXML. Almost all of the tokens in BTXML accept static text strings as arguments or attributes. These variables allow the card to be changed dynamically by the current application.
Variables have the general format of &var, where var is the variable name. When the BTXML parser processes a card with a variable in it, the parser automatically substitutes the variable value into the card before rendering it on the display.
In the following example, the variable volume_value is used to set the slider to a given position:
<card id="MyVolumeCard"><status><icon id="LTSPACE16" /><slider id="Volume1" value="&volume_value" /></status></card>Whenever the application wants to change the position of the slider thumb, it reposts the card with a new value.
Tip
The Truth About Ampersand &
If anything is likely to confuse a new BTXML programmer, it is the use of the ampersand (&) character. The following discussion helps explain the proper use of this character and its close relative, the & token.
At its lowest level, the BTXML parser is very adept at processing lists of variables, which are sent to it as name/value pairs. Each of these pairs uses the form name = value, which is the standard syntax for HTML. If only a single variable were allowed, things would be very simple for the parser. Unfortunately, the parser is often called upon to process multiple name/value pairs within one request. To keep these pairs separated, a delimiter is required and based upon the precedence set in HTML, that delimiter is the ampersand.
The parser expects values in a list of the format name1=value1&name2=value2, and so on. If the ampersand were not present, value1 would blend into name2, leading to confusion for the parser.
BTXML also uses the ampersand character to identify variables within cards. The dual use of this character can, therefore, lead to a some confusion for the parser. If, for example, we pass the list name1=value&name2=value2, the parser would get very confused. The parser sees &name2 and interprets it as a variable that requires immediate substitution. Because it probably will not have a string to substitute in place of name2, the parser issues an error and stops processing.
Therefore, we must do something to make the parser pass the variable list through the system intact. To do this, we use the special & token.
To understand the use of the & token, create an example card and process it through the system. For example, this card creates a simple softkey on the screen:
Note
(Assume that an internal variable exists called Name,with the value "George")<card id="MyCard"><keybindings><item id="&Name"onpick="href=info&amp;event=APP_RELEASE">Exit</item></keybindings></card>So, if the application requests MyCard, this card comes into the phone and the BTXML parser generates its first approximation of the final card, as shown in the following example:
<card id="MyCard"><keybindings><item id="George"onpick="href=info&event=APP_RELEASE">Exit</item></keybindings></card>In the first pass, the parser replaced the &Name variable with the value, George. The first & is also transformed into the single character &. Now the card is passed into the application, where it is parsed again, resulting in the BTXML code shown in the following example:
<card id="MyCard"><keybindings><item id="George"onpick="href=info&event=APP_RELEASE">Exit</item></keybindings></card>In this pass, the remaining & is reduced to the single & character expected by the HTML application in the phone.
Tip
Other Escape Sequences
In addition to the special & token, there are several other escape sequences that must be used when sending BTXML. See Table 5. These are common among BTXML, CMXML, and standard XML.
Syntax Hierarchy
This section provides details concerning BXTML attributes, as well as information on which tokens can be used within other tokens.
Table 6 contains all of the BTXML elements and the attributes that they support. It also includes the attribute sizes and default values (where applicable).
Table 7 lists the containment rules for the various BTXML elements. For example, a <background> element can contain a <br> element. A <br> element cannot contain any other element.
Troubleshooting BTXML Scripts
Errors and mistakes are a normal part of the development process. This section helps you isolate problems in BTXML scripts.
The Command-Line Interpreter
The command-line interpreter (CLI) is available through the Telnet facility of the phone and the serial console port.
The following sections describe the CLI debug commands that are supported in the Cisco 7940/7960 IP telephones.
Note
debug http
The debug http command is used to monitor the HTTP transfers into and out of the phone, as in the following example:
SIP Phone> debug httpEnabling bug logging on this terminal - use 'tty mon 0' to disabledebugs: httpSIP Phone>SIP Phone>SIP Phone> Connect2WWWIPPort called IpAddr[1080450446], port[80],hostname[12.34.5.67.890]HTTP RECV (ACK CMD)HTTP RECV (OPEN CMD)HTTP Send [147] Bytes of DataData Packet is:===============GET /btxml/index.pl?prodid=7960&event=APP_INIT HTTP/1.1User-Agent: Allegro-Software-WebClient/3.10b1Host: 12.345.67.890Connection: Close===============HTTP RECV (Data Packet)Http Recv [126] Bytes of DataData Packet is:===============HTTP/1.1 200 OKServer: Microsoft-IIS/5.0Date: Tue, 25 Jun 2002 19:18:54 GMTConnection: closeContent-type: text/xml===============HTTP RECV (Data Packet)Http Recv [956] Bytes of DataData Packet is:===============<card><set name="prodid" value="7960"/><window width="wide"><item type="menu" onpick="event=APP_REQUEST&a....<item type="menu" onpick="event=APP_REQUEST&a....<item type="menu" onpick="event=APP_REQUEST&am....<item type="menu" onpick="event=APP_REQUEST&a...</window><status/><keybindings><item id="Ask" onpick="event=KEY_ACCEPT">Select</item><item id="NULL" onpick="null"></item><item id="Exit" onpick="event=APP_RELEASE">Exit</item></keybindings></card>===============HTTP RECV (CLOSE CMD)Platform_Close_Socket conn[3]Platform_Close_Socket conn[3]The example above is the output produced when the services key is pressed. The lines in the downloaded card were truncated to make the output easier to read. The debug http command provides a very simple way to see the data being sent back and forth between the phone and server. This can help resolve cases in which a URL is specified incorrectly or in which a problem exists with the server.
debug xml-events
The debug xml-events command is used to monitor the events being generated in the phone. Events are used internally to pass information between applications.
This example shows the output of the debug xml-events command as a result of pressing the services key:
SIP Phone>SIP Phone> debug xml-eventsdebugs: xml-eventsSIP Phone> XML Event: href=basic, event=SKEY, target=(null), action=services,card=(null)XML Event: href=services, event=(null), target=(null), action=(null),card=servicesXML Event: href=(null), event=APP_REQUEST,target=btxml://12.345.67.890/btxml/index.pl, action=(null), card=(null)XML Event: href=basic, event=APP_SUSPEND, target=(null), action=(null),card=(null)XML Event: href=btxml://12.345.67.890/btxml/index.pl, event=APP_INIT,target=(null), action=(null), card=(null)The significant events are as follows:
1.
2.
3.
4.
5.
The debug xml-events command can be used to determine why a certain action is not taking place as expected. For example, suppose you placed code in your application to react in a certain way when the APP_SUSPEND event is sent. The debug xml-events command helps verify that the event is actually sent when expected.
debug xml-deck
The debug xml-deck command is used to monitor the decks and cards being referenced by applications. The following example shows the output of the debug xml-deck command that results from pressing the services key. It then shows what happens when the exit key is pressed to return to the basic phone application:
SIP Phone> debug xml-deckdebugs: xml-deckSIP Phone> Deck Found: servicesCard Found: servicesDeck Found: basicCard Found: bphomeDeck Found: basicCard Found: bpbackgroundThis tool is useful for determining whether the cards you are trying to use actually exist and are being accessed properly.
debug xml-vars
The debug xml-vars command is used to monitor the variables being used by applications. The following example shows the output of the debug xml-deck command as a result of pressing the services key:
SIP Phone> debug xml-varsdebugs: xml-varsSIP Phone> ---LIST---href=basicevent=SKEYaction=services---------LIST---href=servicescard=services---------LIST---event=APP_REQUESTtarget=btxml://12.345.67.890/btxml/index.plprodid=7960---------LIST---href=basicevent=APP_SUSPEND---------LIST---href=btxml://12.345.67.890/btxml/index.plprodid=7960event=APP_INIT------debug xml-post
The debug xml-post command is used to monitor the text strings sent into the event parser. The following example shows the output of the debug xml-post command that results from pressing the services key:
SIP Phone> debug xml-postdebugs: xml-postSIP Phone> XML POST: <event=SKEY&action=services>VAR: <>=<>XML POST: <href=services&card=services>VAR: <(null)>=<(null)>XML POST: <event=APP_REQUEST&target=btxml://12.345.67.890/btxml/index.pl&prodid=7960>VAR: <(null)>=<(null)>XML POST: <event=APP_SUSPEND>VAR: <(null)>=<(null)>XML POST: <prodid=7960&event=APP_INIT>VAR: <href>=<btxml://12.345.67.890/btxml/index.pl>This command would normally be used in combination with the debug xml-events command to ensure that event strings are being parsed as expected.
Parser Errors
In addition to the debug commands shown above, the BTXML parser produces output when syntax errors are found in the cards, as in the following example:
SIP Phone> ERROR: Could not find token xyz in current element tableGlossary
This section contains a list of terms used in this document. For a more comprehensive list of common terms and acronyms, see Internetworking Terms and Acronyms.
CCIP, the Cisco Arrow logo, the Cisco Powered Network mark, the Cisco Systems Verified logo, Cisco Unity, Follow Me Browsing, FormShare, iQ Breakthrough, iQ Expertise, iQ FastTrack, the iQ Logo, iQ Net Readiness Scorecard, Networking Academy, ScriptShare, SMARTnet, TransPath, and Voice LAN are trademarks of Cisco Systems, Inc.; Changing the Way We Work, Live, Play, and Learn, Discover All That's Possible, The Fastest Way to Increase Your Internet Quotient, and iQuick Study are service marks of Cisco Systems, Inc.; and Aironet, ASIST, BPX, Catalyst, CCDA, CCDP, CCIE, CCNA, CCNP, Cisco, the Cisco Certified Internetwork Expert logo, Cisco IOS, the Cisco IOS logo, Cisco Press, Cisco Systems, Cisco Systems Capital, the Cisco Systems logo, Empowering the Internet Generation, Enterprise/Solver, EtherChannel, EtherSwitch, Fast Step, GigaStack, Internet Quotient, IOS, IP/TV, LightStream, MGX, MICA, the Networkers logo, Network Registrar, Packet, PIX, Post-Routing, Pre-Routing, RateMUX, Registrar, SlideCast, StrataView Plus, Stratm, SwitchProbe, TeleRouter, and VCO are registered trademarks of Cisco Systems, Inc. and/or its affiliates in the U.S. and certain other countries.
All other trademarks mentioned in this document or Web site are the property of their respective owners. The use of the word partner does not imply a partnership relationship between Cisco and any other company. (0208R)
![]()
![]()
![]()
![]()
![]()
![]()
![]()
![]()
Posted: Fri Aug 24 13:09:20 PDT 2007
All contents are Copyright © 1992--2007 Cisco Systems, Inc. All rights reserved.
Important Notices and Privacy Statement.