|
|

Table Of Contents
Configuring the Bulk Administration Tool (BAT)
Creating the CSV File for Phones
Adding Phones to Cisco CallManager
Creating the CSV File for Users
Adding Users to Cisco CallManager
Adding Phones and Users Combinations
Creating the CSV File for Phones and Users Combinations
Adding Phones and Users Combinations to Cisco CallManager
Viewing Insert Phones/Users Results
Configuring the Bulk Administration Tool (BAT)
This document describes the Bulk Administration Tool (BAT) and includes the following sections:
•
Adding Phones and Users Combinations
BAT Overview
The Bulk Administration Tool (BAT) is a plug-in application to the Cisco CallManager. BAT enables you to add up to 10,000 phones and users to the Cisco CallManager application. Using BAT, you can also perform bulk modifications to phones and delete several phones at one time.
This document provides you with information about using the BAT application.
Audience
This document is written for network administrators and engineers responsible for managing the Cisco CallManager system. A knowledge of telephony and IP networking technology is required.
Related Documents
Refer to the following documents for more information on Cisco CallManager and related applications:
•
•
BAT Specifications
The following specifications apply to BAT Release 3.0:
•
•
•
•
•
•
–
–
User Interface
BAT is accessible through Cisco CallManager Administration using Internet Explorer 4.01 Service Pack 2 or later, or Netscape 4.5. BAT has a common look and feel to the Cisco CallManager Administration window.
From the BAT Application menu, you can go to the Cisco CallManager Administration window.
Launching BAT
Procedure
Step 1
The Cisco CallManager Administration main window displays.
Step 2
The Cisco CallManager Bulk Administration Tool window displays.
Obtaining Online Help
You can access the BAT online Help system from any of the BAT pages by selecting:
Help > Contents and Index
Using BAT
As shown in Figure 1, BAT has three main menu options:
•
–
–
–
–
•
•
–
–
Figure 1 BAT Window and Menu Options
From the BAT window, the administrator can add, update, and delete devices, change system configurations, install option components, and view online documentation.
Caution
BAT provides statistical data on the time it takes to complete a bulk transaction. The statistics are approximations for a standard recommended configuration.
Adding Phones
You can use BAT to add hardware-based Cisco IP Phones to the Cisco CallManager database in batches, rather than adding each phone individually.
To add phones to Cisco CallManager, you must:
•
•
Related Topics
•
•
Creating a Phone Template
The phone template and Comma Separate Values (CSV) files work together in bulk transactions. Based on the type of phone you want to add in batch, you can create a template that has the common features for all the phones in a batch, such as the Model, Device Pool, and so on. These templates are stored and are reusable for other phone batches. For example, you can configure a template for the Cisco 30 VIP Model with only two lines configured and another with four lines configured.
The CSV file has the details of all the phones that are individualistic in nature to a phone, such as its Name, Description, and so on. See "Creating the CSV File for Phones" section for more details on the CSV file.
To create a phone template, you must first enter the required phone settings and then add the appropriate number of lines to the phone.
Related Topics
Entering Phone Settings
The phone settings required for the phone template are similar to the phone settings required when adding a phone to Cisco CallManager.
Procedure
Step 1
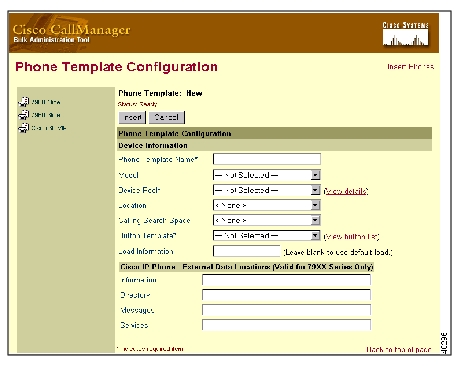
Figure 2 displays the Phone Template window.
Figure 2 Phone Template Window
Step 2
These settings are not available for all phone types. Only the settings appropriate to the model selected appear on your screen.
Step 3
Step 4
Adding Line Information
For each template, add only the number of lines you want to define for all phones. Figure 3 illustrates the template for a Cisco IP Phone 7960.
Figure 3 Add Line Window
Procedure
Step 1
Step 2
Step 3
Step 4
Step 5
After setting up the lines for the template, use the template to add phones with CSV files.
Creating the CSV File for Phones
The Comma Separate Values (CSV) file is a common textual way of providing tabular information. The CSV file for phones contains information about each phone as a record. All phones in a CSV file should be of the same model and number of configured lines. For example, you might create a CSV file for all the Cisco IP Phone 7960 two line phones and another for all the Cisco IP Phone 30 VIP ten line phones.
The CSV file for phones can contain multiple directory numbers depending on whether the phone template in question supports multiple lines. The number of directory numbers entered in the CSV file must be equal to the number of lines configured in the phone template.
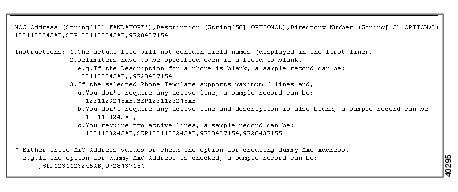
Figure 4 shows an example phone CSV file.
Figure 4 Phone CSV File
Procedure
Step 1
Step 2
MAC Address,Description,Directory NumberYou must enter the MAC address or use the dummy MAC address option on the Insert Phones page (the MAC address updates when a phone is plugged in). You can leave the other fields empty, but you must include the comma separators.
Note
Step 3
Adding Phones to Cisco CallManager
Follow this procedure to add several phones to Cisco CallManager.
Before You Begin
You must create a phone template and CSV file before you add phones to Cisco CallManager.
Procedure
Step 1
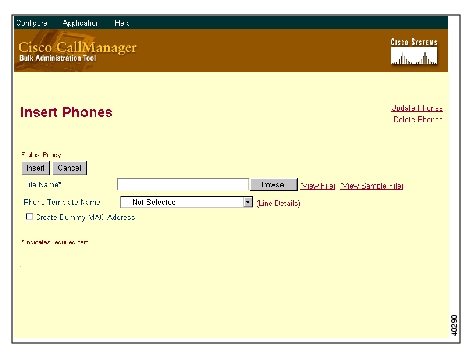
The Insert Phones window displays as shown in Figure 5.
Figure 5 Insert Phones Window
Step 2
Step 3
Step 4
The fields are described in Table 3.
Table 3 Insert Phones Settings
File Name
Indicates the CSV file that includes the phones to be added.
•
•
Phone Template Name
Indicates the phone template to be used for this set of phones.
•
•
•
Create Dummy MAC Addresses
Automatically generates fake MAC addresses in this format:
XXXXXXXXXXXX
where X is any 12-character hexadecimal (0-9 and A-F) number.
Note
•
•
Step 5
Step 6
Related Topics
•
•
Viewing Insert Phones Results
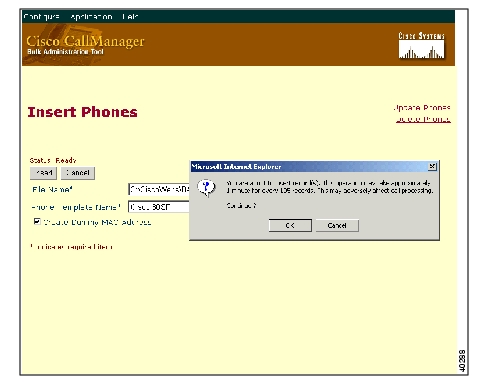
Figure 6 shows a sample of the Insert Phones confirmation window.
Figure 6 Sample Insert Phones Confirmation Window
After the phones are added, the BAT application generates a log file indicating the number of records added and the number of records failed, including an error code. For more information on log files, see the "Troubleshooting" section.
Modifying Phones
You can update and delete several phone records from the Cisco CallManager database simultaneously.
Related Topics
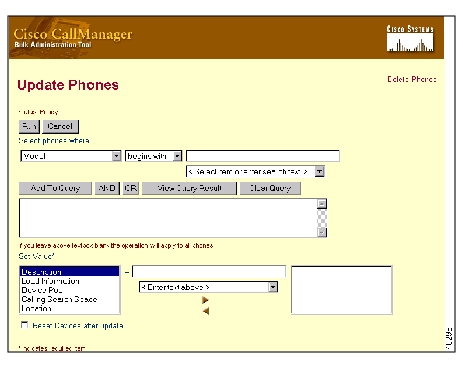
Updating Phone Records
The administrator can create a query to update a set of records. To create a query, a filter must be defined. The administrator can also create multiple queries by clicking either the AND or OR button.
Figure 7 shows the Update Phones window.
Figure 7 Update Phones Window
Procedure
Step 1
Step 2
Step 3
a.
b.
c.
In Figure 7, the filter is currently set to Device Pool = Default.
d.
Caution
e.
f.
Step 4
a.
b.
c.
Step 5
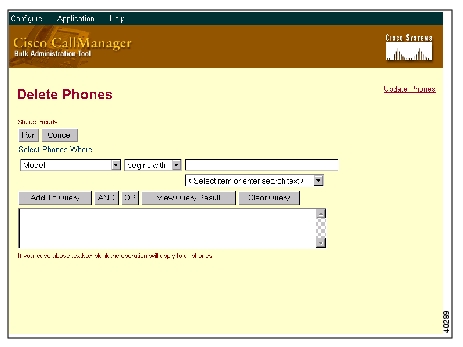
Deleting Phone Records
You can delete multiple phone records from the Cisco CallManager database. See Figure 8.
Figure 8 Delete Phones Window
Procedure
Step 1
Step 2
Step 3
Step 4
Step 5
Step 6
Caution
Step 7
Step 8
Step 9
Viewing Update Phones Results
After the phones are updated in Cisco CallManager, the application generates a log file indicating the number of records updated and the number of records failed, including an error code. See the "Viewing Insert Phones Results" section for information on confirmation windows.
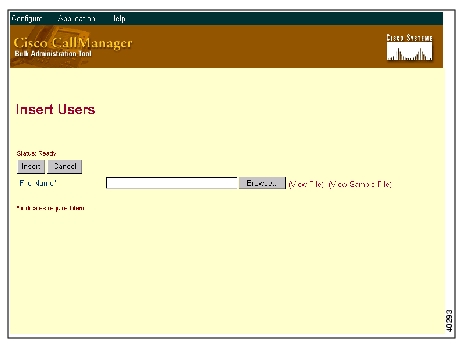
Adding Users
You can add multiple users to the Cisco CallManager database using the following procedures. Figure 9 shows the Insert Users window.
Figure 9 Insert Users Window
Related Topics
•
•
•
Creating the CSV File for Users
To add users into the Cisco CallManager, you must create a CSV file. See Figure 10 for a sample CSV file for users.
Figure 10 Users CSV File
Procedure
Step 1
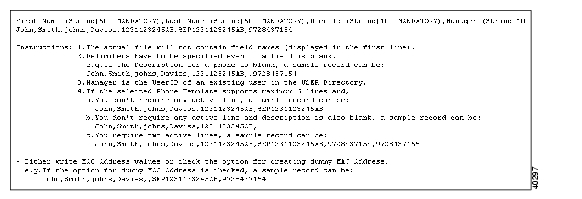
Step 2
First Name,Last Name,User ID,Manager,MAC Address,Directory NumberYou must enter the Name, User ID, and MAC Address or use the dummy MAC address option on the Insert Users page (the MAC address updates when a phone is plugged in). You can leave other fields empty, but you must include the comma separators.
Step 3
Adding Users to Cisco CallManager
Follow this procedure to add several users to Cisco CallManager.
Before You Begin
You must create a CSV file before you add phones to Cisco CallManager.
Procedure
Step 1
Step 2
Step 3
Step 4
Viewing Insert Users Results
After the users are added to Cisco CallManager, the application generates a log file indicating the number of records added and the number of records failed, including an error code. See the "Viewing Insert Phones Results" section for information on the confirmation screen.
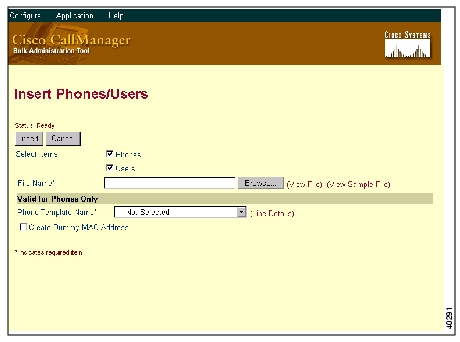
Adding Phones and Users Combinations
You can add combinations of multiple phones and users to the Cisco CallManager database using the following procedures. Figure 11 shows the Insert Phones/Users window.
Figure 11 Insert Phones/Users Window
Related Topics
•
•
•
•
Creating the CSV File for Phones and Users Combinations
To add users into the Cisco CallManager, you must create a CSV file. See Figure 12 for a sample CSV file for phones and users combinations.
Figure 12 Phones/Users CSV file
Procedure
Step 1
Step 2
First Name,Last Name,User ID,Manager,MAC Address,Description,Directory NumberYou must enter the Name, User ID, and MAC address or use the dummy MAC address option on the Insert Phones/Users page (the MAC address updates when a phone is plugged in). Other fields may remain empty, but you must include the comma separators.
Step 3
Adding Phones and Users Combinations to Cisco CallManager
Follow this procedure to add several phone and user combinations to Cisco CallManager.
Before You Begin
You must create a CSV file before you add phones and users to Cisco CallManager.
Procedure
Step 1
Step 2
Step 3
Step 4
Viewing Insert Phones/Users Results
After the users are added to Cisco CallManager, the application generates a log file indicating the number of records added and the number of records failed, including an error code. See the "Viewing Insert Phones Results" section for information on the confirmation screen.
Important Notes
The latest documentation and release notes for Cisco CallManager are available on Cisco Connection Online (CCO) at:
http://www.cisco.com/kobayashi/sw-center/internet/callmgr/callmgr.html
Cisco Year 2000 product compliance information can be found at:
http://www.cisco.com/warp/public/752/2000/
A local copy of the Help is installed with Cisco CallManager and is available by clicking Start > Programs > Cisco CallManager > Cisco Help > System Guide. However, the most current Cisco CallManager documentation can be found on the Web at:
http://www.cisco.com/documentation/ccm/v24/index.htm
Troubleshooting
Log files are generated for each bulk transaction and stored in a log file folder for viewing.
The log file will also show the key value of a record so the administrator may re-examine the record. The key value when adding, updating, or modifying phones is the MAC address of the phone. When adding users, the key value is the User ID.
A confirmation screen occurs after each bulk transaction. The confirmation screen shows the summary view for the bulk transaction as well as the detail view for the failures.
Note
If the administrator performs several mouse clicks while waiting for the bulk transaction to complete, the BAT application concludes with the last mouse click and you lose the ability to view the confirmation message.
To view the log file for the bulk operation, go to the following location:
C:\CiscoWebs\BAT\LogFile
Note
The time-stamp format for the log file name is "mmddyyyyhhmmss".
Table 4shows examples of commands and LogFiles names.
Service and Support
Service and support is provided by the Cisco Technical Assistance Center (TAC) at:
http://www.cisco.com/warp/public/687/Directory/DirTAC.shtml
Cisco Connection Online
Cisco Connection Online (CCO) is Cisco Systems' primary, real-time support channel. Maintenance customers and partners can self-register on CCO to obtain additional information and services.
Available 24 hours a day, 7 days a week, CCO provides a wealth of standard and value-added services to Cisco customers and business partners. CCO services include product information, product documentation, software updates, release notes, technical tips, the Bug Navigator, configuration notes, brochures, descriptions of service offerings, and download access to public and authorized files.
CCO serves a wide variety of users through two interfaces that are updated and enhanced simultaneously: a character-based version and a multimedia version that resides on the World Wide Web (WWW). The character-based CCO supports Zmodem, Kermit, Xmodem, FTP, and Internet e-mail, and it is excellent for quick access to information over lower bandwidths. The WWW version of CCO provides richly formatted documents with photographs, figures, graphics, and video, as well as hyperlinks to related information.
You can access CCO in the following ways:
•
•
•
•
•
For a copy of CCO's Frequently Asked Questions (FAQ), contact cco-help@cisco.com.
For additional information, contact cco-team@cisco.com.
Note
Documentation CD-ROM
Cisco documentation and additional literature are available in a CD-ROM package, which ships with your product. The Documentation CD-ROM, a member of the Cisco Connection Family, is updated monthly. Therefore, it might be more current than printed documentation. To order additional copies of the Documentation CD-ROM, contact your local sales representative or call customer service. The CD-ROM package is available as a single package or as an annual subscription. You can also access Cisco documentation on the World Wide Web at http://www.cisco.com, http://www-china.cisco.com, or http://www-europe.cisco.com.
If you are reading Cisco product documentation on the World Wide Web, you can submit comments electronically. Click Feedback in the toolbar and select Documentation. After you complete the form, click Submit to send it to Cisco. We appreciate your comments.
![]()
![]()
![]()
![]()
![]()
![]()
![]()
![]()
Posted: Tue May 24 07:31:08 PDT 2005
All contents are Copyright © 1992--2005 Cisco Systems, Inc. All rights reserved.
Important Notices and Privacy Statement.