|
|

These sections help you use Cisco IP Phone Productivity Services:
You access Cisco IP Phone Services through the Services button on the Cisco IP Phone Models 7960 and 7940 (see Figure 3-1). The Services button on your Cisco IP Phone works in tandem with the Cisco IP Phone User Options web page. When you press the Services button, the phone displays a menu of services that has been configured for that telephone.
You navigate around the services options and provide input using:
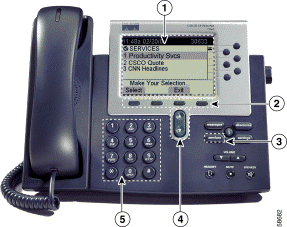
Here are some tips for using the LCD screen on your Cisco IP Phone. These tips can help you navigate menus and soft key options that display on your phone's LCD screen when you press the Services button.
Related Topics:
To access Cisco IP Phone Productivity Services, perform these steps:
Procedure
The screen displays your list of services.
Step 2 Select Productivity Svcs in one of two ways:
 |
Tips The item number next to Productivity Svcs varies depending on the number of services you have configured on your phone. |
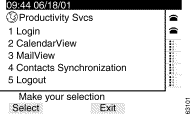
The screen displays the services available with Cisco IP Phone Productivity Services (see Figure 3-2).
 |
Note To check the version of Cisco IP Phone
Productivity Services: use the Navigation button to scroll to item 6 About Productivity Svcs and press the Select soft key or enter 6 on the dialing pad. |
Step 3 Proceed to the"Logging in to Cisco IP Phone Productivity Services" section.
Related Topics:
Cisco IP Phone Productivity Services Login allows you to access these services from your own Cisco IP Phone Model 7960 or 7940 or any Cisco IP Phone Model 7960 or 7940 that is configured for Cisco IP Phone Productivity Services.
Cisco Phone Productivity Services Login from your Cisco IP Phone:
Cisco IP Phone Productivity Services Login from another Cisco IP Phone:
To log in to Cisco IP Phone Productivity Services, perform these steps:
Procedure
The UserID screen displays (see Figure 3-3).
 |
Note If you have not already logged in to Cisco IP Phone Productivity Services, the Login screen displays when you first select one of its applications: 2 CalendarView, 3 MailView or 4 Contacts Synchronization. |
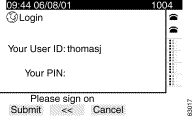
Step 2 At the UserID screen:
a. If you are using your own Cisco IP Phone:
Enter your PIN (if prompted) and press the Submit soft key.
b. If you are using someone else's Cisco IP Phone:
Login successful for user <your user name> Please wait
Redirecting.....
Login failed for user <userID>. Please make sure the UserID and
PIN are correct.
Re-enter your information. Contact your system administrator if you continue to have password problems.
After you log in successfully, the Cisco IP Phone Productivity Services main menu displays (see Figure 3-2).
You are now ready to use your Cisco IP Phone Productivity Services.
Proceed to:
Or, to log out of Cisco IP Phone Productivity Services, go to the "Ending a Session" section.
Related Topics:
To end a session of Cisco IP Phone Productivity Services, perform the following steps:
You can select 5 Logout in one of two ways:
Step 2 When prompted, press the Services button to exit.
 |
Note After 20 minutes, you are automatically logged out of Cisco IP Phone Productivity Services. If you would like this time extended, contact your system administrator. |
Related Topics:
With CalendarView, you can keep track of your appointments on your Cisco IP Phone. You can be notified of new meetings, and you can view your meetings for today, for a week, for any day of the current week, or for a specific date.
You can define which of your meetings display and accept. tentatively accept or decline meetings. If the meeting notice has a phone number included with it, you can click a soft key to dial the number to join the meeting. If you are the originator of the meeting notice, you can cancel the meeting from your phone.
CalendarView also allows you to set up reminders for meetings and choose how to be notified of an upcoming event, by pager/e-mail or by the phone display.
To use CalendarView, perform these steps:
Procedure
The screen displays your list of services.
Step 2 Select Productivity Svcs in one of two ways:
 |
Tips The item number next to Productivity Services will vary depending on the number of services you have configured on your phone. |
The screen displays the services available with Cisco IP Phone Productivity Services (see Figure 3-2).
Step 3 Select 2 CalendarView in one of two ways:
 |
Note If you have not already logged in to Cisco IP Phone Productivity Services, you may be prompted to enter your PIN now. See the "Logging in to Cisco IP Phone Productivity Services" section. |
The phone displays the CalendarView Main Menu (see Figure 3-4).
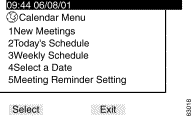
See Table 3-1 to help you determine which CalendarView service you want to use.
| CalendarView Service | From Your Cisco IP Phone You Can | To Use the CalendarView Service |
|---|---|---|
1 New Meetings | Check new meetings and accept or decline them. | |
2 Today's Schedule | View your meetings for today and accept or decline them. | |
3 Weekly Schedule | Check your schedule for the current week displayed on one screen, and view your schedule for the previous week, and the following week. | |
4 Select a Date | Check your schedule quickly for a specific date. | |
5 Meeting Reminder Setting | Set which meetings display, based on their importance, and choose how you are notified of meetings: by pager/e-mail or by phone display. |
Related Topics:
With the New Meetings service, you can quickly view your new meeting notices. You can accept, tentatively decline or decline them from your Cisco IP Phone. If the meeting notice includes a phone number for the meeting, you can call into the meeting with the click of the DialNum soft key.
To use this service, perform the following steps:
Procedure
The phone displays your new meetings (see Figure 3-5).
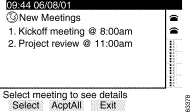
Step 2 On the New Meetings screen:
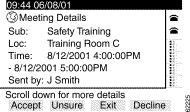
Step 3 On the Meeting Details screen, you can:
You have accepted the meeting.
You have tentatively accepted the meeting.
You have declined the meeting.
Step 4 Press Exit to return to the New Meetings menu (see Figure 3-5).
Related Topics:
To view your appointments for today, perform the following steps:
Procedure
Your scheduled meetings display on your phone (see Figure 3-7).
If you have no meetings scheduled, the phone displays:
No appointments scheduled.
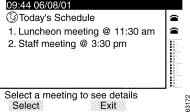
Step 2 Select the meeting for which you want to view information in one of two ways:
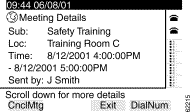
The Meeting Details screen displays the meeting subject, location, time, and sender (see Figure 3-8).
Step 3 Use the Navigation button to scroll to view the complete message text.
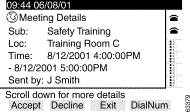
In the Meeting Details screen, the first soft key may display a soft key of Accept or Unsure, depending on how you have responded to the meeting notice. This allows you to change your response to a meeting notice:
Step 4 To manage your meetings you can:
Step 5 On the Meeting Detail screen (see Figure 3-9):
Related Topics:
With the Weekly Schedule service, you can view your schedule for this week, next week or last week on one screen. You can also choose to view your schedule for a specific day of the week, from Monday to Friday. To check your weekly schedule, perform the following steps:
Procedure
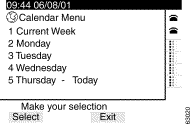
You can select 1Current Week or any day from Monday to Friday. Use the Navigation button to scroll to 6 Friday (Figure 3-10). "Today" displays next to the current day, if it falls Monday through Friday. In Figure 3-10, the current day is Thursday.
Step 2 Choose a menu item in one of two ways:
Step 3 On the Calendar Menu screen:
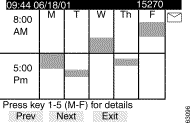
Step 4 Keys 1 through 5 correspond to the days of the week.
Enter a number from 1 through 5 on the dialing pad to see details of your schedule on that specific day. For example, enter 3 to see Wednesday's schedule.
The screen displays the details of your meeting (see Figure 3-12).
Step 5 Use the Navigation button to scroll down and view meeting information.
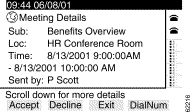
In the Meeting Details screen, the first soft key may display Accept or Unsure, depending on how you have responded to the meeting notice. This allows you to change your previous response to a meeting notice:
Step 6 To manage your meetings you can:
You have accepted the meeting.
You have tentatively accepted the meeting.
You have declined the meeting.
Step 7 From the Current Week screen:
Weekly Schedule menu (see Figure 3-10).
Related Topics:
With CalendarView's Select a Date service, you can specify a date and view your appointments for that date. To do this, perform the following steps:
Procedure
The phone displays today's date (see Figure 3-13).
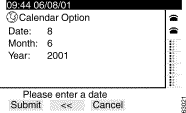
Step 2 Change the date to the calendar date you want to see:
Press the << soft key to backspace and delete the displayed date.
Use the dialing pad to enter the new date.
Use the Navigation button to scroll to the month and year and change them, if necessary.
Step 3 Press the Submit soft key.
Changing the date results in a phone display of:
Schedule for <xx/xx/xx>
and a list of your appointments for that date.
Step 4 Press the Exit soft key to return to the Select a Date menu.
Related Topics:
Use your Meeting Reminder Setting to choose:
Set up your Meeting Reminder Setting service when you first start using Cisco IP Phone Productivity Services. You must re-enter your setting choices any time you change your PIN.
 |
Tips If you are planning to change your PIN, change it before you set up your Meeting Reminder Setting service. |
To use this application, you must first define your meetings as High importance and High and Normal importance in Microsoft Exchange.
To use the Meeting Reminder Setting service, perform the following steps:
Procedure
The Meeting Reminder Setting screen displays (see Figure 3-14).
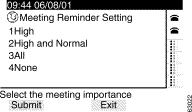
Step 2 On the Meeting Reminder Setting screen:
Step 3 Press the Submit soft key to set your choice of Meeting Reminder Setting.
The screen displays your choices meeting notification (see Figure 3-15).
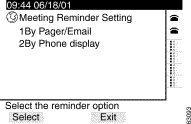
Step 4 Select either 1 By Pager/Email or 2 By Phone display.
If you choose Reminder by Pager/Email, the service uses the e-mail account you entered when you subscribed to Cisco IP Phone Productivity Services (see "Subscribing to Cisco IP Phone Productivity Services").
Once you make your selection, a message displays notifying you that your meeting reminder is set.
Step 5 Press the Exit soft key to return to the CalendarView menu (see Figure 3-4).
Related Topics:
These topics help you use MailView from your Cisco IP Phone to access your Cisco Unity voice mail, your Cisco Unity e-mail and up to two additional e-mail accounts.
When you access each of your MailView accounts the first time, you must enter your MailView name and password for that account. The Login screen does not display if you have already entered this information.
Contact your system administrator if you do not have your MailView name and password.
To log in to MailView, perform the following steps:
Procedure
The screen displays your list of services.
Step 2 Select Productivity Svcs in one of two ways:
 |
Tips The item number next to Productivity Svcs will vary depending on the number of services you have configured on your phone. |
Step 3 Select 3 MailView in one of two ways:
Step 4 If you have not already logged in to Cisco IP Phone Productivity Services, enter your PIN, when prompted. See the "Logging in to Cisco IP Phone Productivity Services" section for details.
The phone displays the MailView main menu (see Figure 3-16).
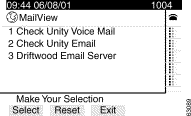
Step 5 Select one of your accounts in one of two ways:
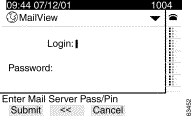
Step 6 At the Login screen (see Figure 3-17), enter your username and password:
Step 7 You are now logged in to MailView.
Related Topics:
If you change your MailView accounts or change your user name and password for any of your MailView accounts, you must change them within MailView also. To change your MailView login, perform the following steps:
Procedure

Step 2 Select the account to reset your Login information.
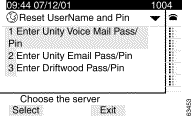
The Reset UserName and Pin screen displays (see Figure 3-19).
Step 3 Enter your new user name and new password. Press the Submit soft key.
Related Topics:
With MailView, you can view, listen to, record a reply, forward, and delete your Cisco Unity voice mail, all from your Cisco IP Phone. Any operation you perform on your messages using MailView is reflected in your PC-based traditional voicemail interface automatically.
To review your Cisco Unity voice mail, perform these tasks:
Procedure
The screen displays your list of services.
Step 2 Select Productivity Svcs in one of two ways:
 |
Tips The item number next to Productivity Svcs will vary depending on the number of services you have configured on your phone. |
Step 3 Select 3 MailView in one of two ways:
Step 4 If you have not already logged in to Cisco IP Phone Productivity Services, enter your PIN, when prompted. See the "Logging in to Cisco IP Phone Productivity Services" section for details.
The phone displays the MailView main menu (see Figure 3-20).

Step 5 Select 1 Check Unity Voice Mail in one of two ways:
Step 6 If this is the first time you are accessing this MailView account, you are prompted to log in. For details, see the "Logging in to MailView" section.
After successful login, the phone displays a list of your Cisco Unity voice mail (see Figure 3-21). By default, your voice mail first displays unheard messages.
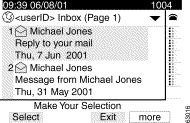
Step 7 Press the more soft key to change the sort order or to select a message to review.
The screen displays your voicemail inbox (see Figure 3-22).
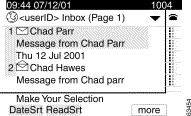
Step 8 From the DateSort/ReadSort screen:
a. Press the DateSrt soft key to view your voice mail in the order in which it was received.
b. Press the ReadSrt soft key to view your voice mail in the order in which you read it.
Step 9 If you do not want to change the sort order, select a voice mail from your voice mail inbox (see Figure 3-21). Use one of two ways:
Step 10 Proceed to the "Using MailView's Options for Cisco Unity Voice Mail" section.
Related Topics:
After you have selected a voice mail message, the MailView inbox screen displays the following options for handling your Cisco Unity voice mail (see Figure 3-23):
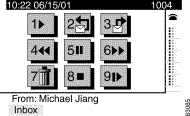
1. play voice mail | 2. reply to sender | 3. forward to a third party |
4. fast rewind | 5. pause | 6. fast forward |
7. delete | 8. stop | 9. review next message |
Use Table 3-2 to help you manage your Cisco Unity voice mail in MailView.
| Voice Mail Options | Instructions |
|---|---|
1. Press 1 on the dialing pad to play your voice mail. 2. Press 4 on the dialing pad to fast rewind the message. 3. Press 6 on the dialing pad to fast forward the message. 4. Press the Exit soft key to return to the voice mail inbox. | |
1. Press 5 on the dialing pad to pause a voice mail. 2. Press 1 on the dialing pad to resume playing the voice mail. 3. Press 8 to stop the voice mail. 4. Press the Exit soft key to return to the voice mail inbox. | |
1. Press 8 on the dialing pad to stop playing your voice mail. 2. Press the Exit soft key to return to the voice mail inbox. | |
1. Press 2 on the dialing pad to record a reply to the voice mail sender. 2. Press the Send soft key to send the reply. The phone displays a sent reply screen. 3. Press the Redo soft key record the reply then press the Send soft key to change your reply. 4. Press the Cancel soft key to cancel your reply. 5. Press the Exit soft key to return to the voice mail inbox. | |
1. Press 3 on the dialing pad to forward a voice mail to someone other than the originator. 2. Enter the recipient's user name and e-mail address: a. Enter the letters of the alphabet using your dialing pad. b. Press the phone key associated with a letter. Tips To scroll through the letters associated with each key, press the key rapidly. For example, press 2 to display the letter "a." To enter the letter "b", press 2 again without pausing. Press the << soft key to back up and make corrections. The phone displays a forwarded message screen. 3. Press the Exit soft key to return to the voice mail inbox. | |
1. Press 7 to delete a voice mail. Your phone displays: Mail deleted. 2. Press the Exit soft key to return to the voice mail inbox. | |
1. Press 9. The screen displays the next voice mail message header and then automatically plays the voice mail. You can easily review all your voice mail without going back to the inbox. 2. Press the Exit soft key to stop playing the voice mail and to return to the voice mail inbox. |
Related Topics:
With MailView, you can scroll through your e-mail messages and read them right on the phone display. You can also forward and delete e-mails from your phone. Any operation you perform on your messages using MailView is reflected in your PC-based e-mail client automatically.
MailView provides you with a list of your Cisco Unity e-mail and up to two additional IMAP-compliant e-mail accounts.
To check your e-mail using MailView, perform these steps:
Procedure
The screen displays your list of services.
Step 2 Select Productivity Svcs in one of two ways:
 |
Tips The item number next to Productivity Svcs will vary depending on the number of services you have configured on your phone. |
Step 3 Select 3 MailView in one of two ways:
Step 4 If you have not already logged in to Cisco IP Phone Productivity Services, enter your PIN, when prompted. See the "Logging in to Cisco IP Phone Productivity Services" section for details.
The phone displays the MailView main menu (see Figure 3-24). Item 2 will always be your Cisco Unity e-mail. Items 3 and 4 are your optional (IMAP-compliant) e-mail accounts. In Figure 3-24, Driftwood is the optional e-mail account.

Step 5 Select an e-mail service in one of two ways:
For example, in Figure 3-24, select 2 Check Unity Email or 3 Driftwood.
Step 6 If this is the first time you are accessing this MailView account, you are prompted to login. For details, see the "Logging in to MailView" section.
After successful login, the phone displays your e-mail inbox with a list of your e-mail (see Figure 3-25).
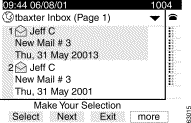
Step 7 Select the e-mail that you want to read in one of two ways:
The screen displays the e-mail body screen (Figure 3-26).
Use the Navigation button to scroll down the screen to read the text of the complete message below the dotted line.
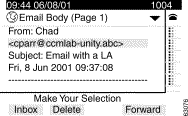
Step 8 On the E-mail body screen:
Mail deleted.
This message was successfully deleted.
Related Topics:
With Contacts Synchronization, you can synchronize the entries in the Personal Address Book in Cisco CallManager with your Outlook Contacts.
To set up synchronization of your directory entries, perform the following steps:
Procedure
The screen displays your list of services.
Step 2 Select Productivity Svcs in one of two ways:
 |
Tips The item number next to Productivity Services will vary depending on the number of services you have configured on your phone. |
The screen displays the services available with Cisco IP Phone Productivity Services (see Figure 3-2).
Step 3 Select 4 Contacts Synchronization in one of two ways:
 |
Note If you have not already logged in to Cisco IP Phone Productivity Services, you may be prompted to enter your PIN now. See the "Logging in to Cisco IP Phone Productivity Services" section. |
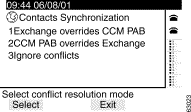
The phone displays the Contacts Synchronization main menu with the choice of three conflict resolution modes (see Figure 3-27).
Step 4 In the Contacts Synchronization main menu (see Figure 3-27), choose a conflict resolution mode:
 |
Note If the entries have the same first name, last name, e-mail, and work phone number but have different mobile and home phone numbers, they are considered conflicting entries. |
Step 5 When the synchronization is complete, a message displays to notify you that the synchronization is done a nd the number of entries added to each directory.
Step 6 Press the Report soft key for details of the entries that have been added to the directory.
Step 7 Press the Exit soft key to return to the Contacts Synchronization main menu.
Related Topics:
![]()
![]()
![]()
![]()
![]()
![]()
![]()
![]()
Posted: Wed Sep 12 13:50:22 PDT 2001
All contents are Copyright © 1992--2001 Cisco Systems, Inc. All rights reserved.
Important Notices and Privacy Statement.