|
|

The Internet Protocol (IP) is a packet-based protocol used to exchange data over computer networks. IP handles addressing, fragmentation, reassembly, and protocol demultiplexing. It is the foundation on which all other Internet protocols, collectively referred to as the IP suite, are built. IP is a network-layer protocol that contains addressing information and some control information that allows data packets to be routed.
The Transmission Control Protocol (TCP) is built upon the IP layer. TCP is a connection-oriented protocol that specifies the format of data and acknowledgments used in the transfer of data. TCP also specifies the procedures that the computers use to ensure that the data arrives correctly. TCP allows multiple applications on a system to communicate concurrently because it handles all demultiplexing of the incoming traffic among the application programs.
Use the commands in this chapter to configure TCP/IP on your protocol translator. For configuration information and examples, refer to the Protocol Translator Configuration Guide.
To restrict incoming and outgoing connections between a particular virtual terminal line (into a Cisco device) and the addresses in an access list, use the access-class line configuration command. To remove access restrictions on the line for the specified connections, use the no form of the command.
access-class access-list-number {in | out}| access-list-number | Number of the access list. It is a decimal integer from 1 through 99 that identifies a specific access list of Internet addresses. |
| in | Restricts incoming connections between a particular Cisco device and the addresses in the access list. |
| out | Restricts outgoing connections between a particular Cisco device and the addresses in the access list. |
None
Line configuration command
You must set identical restrictions on all the virtual terminal lines, because a user can connect to any of them.
To display the access lists for a particular terminal line, use the show line EXEC command and specify the line number.
The following example defines an access list that permits only hosts on network 192.89.55.0 to connect to the virtual terminal ports on the protocol translator:
access-list 12 permit 192.89.55.0 0.0.0.255
line 1 5
access-class 12 in
The following example defines an access list that denies connections to networks other than network 36.0.0.0 on terminal lines 1 through 5:
access-list 10 permit 36.0.0.0 0.255.255.255
line 1 5
access-class 10 out
A dagger (+) indicates that the command is documented in the Router Products Command Reference publication.
show line +
To create an access list, use the access-list global configuration command. To delete an entire access lists, use the no form of the command.
access-list access-list-number {permit | deny} source source-mask| access-list-number | Number of the access list. This is a decimal integer from 1 through 99 that you assign to identify one or more permit/deny conditions as an access list. Access list 0 (zero) is predefined; it permits any address and is the default access list for all interfaces. |
| permit | Permits access for matching conditions. |
| deny | Denies access to matching conditions. |
| source | Source address. It is a 32-bit quantity written in dotted-decimal format. See the examples later in this section. |
| source-mask | Source address mask. It is 32-bit quantity written in dotted-decimal format. Address bits corresponding to wildcard mask bits set to 1 are ignored in comparisons; address bits corresponding to wildcard mask bits set to zero are used in comparisons. See the examples later in this section. |
The access list defaults to an implicit deny statement for everything that has not been permitted.
Global
Plan your access conditions carefully and be aware of the implicit deny.
You can use access lists to control the transmission of packets on an interface, to control virtual terminal line access, and to restrict contents of routing updates.
To display the contents of all access lists, use the show access-lists EXEC command.
The following example allows access for only those hosts on the three specified networks. It assumes that subnetting is not used; the masks apply to the host portions of the network addresses. Any hosts with a source address that does not match the access list statements will be rejected.
access-list 1 permit 192.5.34.0 0.0.0.255
access-list 1 permit 128.88.1.0 0.0.255.255
access-list 1 permit 36.0.0.0 0.255.255.255
! (Note: all other access implicitly denied)
To specify a large number of individual addresses more easily, you can omit the address mask; that is, all zeros from the access-list global configuration command. Thus, the following two configuration commands are identical in effect:
access-list 2 permit 36.48.0.3
access-list 2 permit 36.48.0.3 0.0.0.0
access-list (extended)
show access-lists
To create an extended access list, use the extended access-list global configuration command. To remove the access lists, use the no form of the command.
access-list access-list-number {permit | deny} protocol source source-mask| access-list-number | Number of the access list. This is a decimal integer from 100 through 199 that you assign to identify one or more extended permit/deny conditions as an extended access list. Note that a list number in the range 100 to 199 distinguishes an extended access list from a standard access list. |
| permit | Permits access to matching conditions. |
| deny | Denies access to matching conditions. |
| protocol | Protocol name. It can be one of the following: ip, tcp, udp, icmp, or igrp or an integer in the range of 0 to 255 representing an IP protocol number. The keyword ip to matches any Internet protocol, including TCP, UDP, and ICMP. |
| source | Source address in dotted-decimal format. |
| source-mask | Source address mask. It is 32-bit quantity written in dotted-decimal format. Address bits corresponding to wildcard mask bits set to 1 are ignored in comparisons; address bits corresponding to wildcard mask bits set to zero are used in comparisons. See the example later in this section. |
| destination | Destination address in dotted-decimal format. |
| destination-mask | Destination address mask. It is 32-bit quantity written in dotted-decimal format. Address bits corresponding to wildcard mask bits set to 1 are ignored in comparisons; address bits corresponding to wildcard mask bits set to zero are used in comparisons. See the example later in this section. |
| operator | (Optional.) Compares destination ports, service access points, or contact names. Note that the ip and icmp protocol keywords do not allow port distinctions. Possible operands include lt (less than), gt (greater than), eq (equal), and neq (not equal). |
| operand | (Optional.) Decimal destination port, service access point, or contact name to compare. Note that the ip and icmp protocol keywords do not allow port distinctions. |
| established | (Optional.) Used for the TCP protocol only to indicate an established connection. A match occurs if the TCP datagram has the ACK or RST bits set. The nonmatching case is that of the initial TCP datagram to form a connection. |
An extended access list defaults to an implicit deny statement for everything that has not been permitted.
Global configuration
You can use extended access lists to control the transmission of packets on an interface, to control virtual terminal line access, and to restrict contents of routing updates. The protocol translator stops checking the extended access list after a match occurs.
After an access list is created initially, any subsequent additions (possibly entered from the terminal) are placed at the end of the list. In other words, you cannot selectively add or remove access list command lines from a specific access list.
In the following example, the Ethernet network is a Class B network with the address 128.88.0.0, and the mail host's address is 128.88.1.2. The keyword established is used only for the TCP protocol to indicate an established connection. A match occurs if the TCP datagram has the ACK or RST bits set, which indicate that the packet belongs to an existing connection.
access-list 102 permit tcp 0.0.0.0 255.255.255.255 128.88.0.0 0.0.255.255 established
access-list 102 permit tcp 0.0.0.0 255.255.255.255 128.88.1.2 0.0.0.0 eq 25
interface ethernet 0
ip access-group 102
access-list (standard)
ip access-group
show access-lists
To add a permanent entry to the ARP cache, use the arp global configuration command. To remove an entry from the ARP cache, use the no form of the command.
arp internet-address hardware-address type [alias]| internet-address | IP address in dotted-decimal format corresponding to the local data link address. |
| hardware-address | Local data link address (a 48-bit address). |
| type | Encapsulation description. This is typically the arpa keyword for Ethernet and is always snap for FDDI and Token Ring interfaces. |
| alias | (Optional.) Indicates that the protocol translator should respond to ARP requests as if it were the owner of the specified address. |
None
Global configuration
The protocol translator ARP cache entries to translate 32-bit IP addresses into 48-bit hardware addresses.
Because most hosts support dynamic resolution, you generally do not need to specify static ARP cache entries.
To remove all nonstatic entries from the ARP cache, use the clear arp-cache privileged EXEC command.
The following is an example of a static ARP entry for a typical Ethernet host:
arp 192.31.7.19 0800.0900.1834 arpa
clear arp-cache
To control the interface-specific handling of IP address resolution into 48-bit Ethernet, FDDI, and Token Ring hardware addresses, use the arp interface configuration command. To disable an encapsulation type, use the no form of the command.
arp {arpa | probe | snap}| arpa | Standard Ethernet style ARP (RFC 826). |
| probe | HP Probe protocol for IEEE-802.3 networks. |
| snap | ARP packets conforming to RFC 1042. |
arpa
Interface configuration
Unlike most commands that take multiple arguments, arguments to the arp interface command are not mutually exclusive. Each command enables or disables a specific type of ARP. For example, if you enter the arp arpa command followed by the arp probe command, the protocol translator would send three packets (two for probe and one for arpa) each time it needed to discover a MAC address.
The arp probe command allows the protocol translator to use the Probe protocol (in addition to ARP) whenever it attempts to resolve an IEEE-802.3 or Ethernet local data link address. The subset of Probe that performs address resolution is called Virtual Address Request and Reply. Using Probe, the protocol translator can communicate transparently with Hewlett-Packard IEEE-802.3 hosts that use this type of data encapsulation.
The show interfaces EXEC command displays the type of ARP being used on a particular interface. To remove all nonstatic entries from the ARP cache, use the clear arp-cache privileged EXEC command.
The following example enables Probe services:
interface ethernet 0
arp probe
clear arp-cache
To control how long an ARP cache entry will stay in the cache, use the arp timeout interface configuration command. To restore the default timeout value, use the no form of the command.
arp timeout seconds| seconds | Time, in seconds, that entries remain in the ARP cache before they are removed. A value of 0 (zero) seconds sets no timeout; then cache entries are never cleared. |
14400 seconds (four hours)
Interface configuration
This command is ignored when issued on interfaces that do not use ARP. The show interfaces EXEC command displays the ARP timeout value. The value follows the "Entry Timeout:" heading, as seen in this sample show interfaces display:
ARP type: ARPA, PROBE, Entry Timeout: 14400 sec
The following example illustrates how to set the ARP timeout to 12000 seconds to allow entries to time out more quickly than the default.
interface ethernet 0
arp timeout 12000
To remove all dynamic entries from the ARP cache, clear the fast-switching cache, and clear the IP route cache, use the clear arp-cache EXEC command.
clear arp-cacheThis command has no arguments or keywords.
Privileged EXEC
The following example removes all dynamic entries from the ARP cache and clears the fast-switching cache:
clear arp-cache
arp (global)
arp (interface)
To remove one or all entries from the host name-and-address cache, use the clear host EXEC command.
clear host {name | *}| name | Particular host entry to remove. |
| * | Remove all entries. |
EXEC
The clear host command removes host name entries from running memory, but not from NVRAM.
The following example clears all entries from the host name-and-address cache:
clear host *
show hosts
To control access to an interface, use the ip access-group interface configuration command. To remove an access group, use the no form of the command.
ip access-group access-list-number {in | out}| access-list-number | Number of an access list. This is a decimal integer from 1 through 199. |
| in | Filters on inbound packets. |
| out | Filters on outbound packets. |
None
Interface configuration
For inbound access lists, after receiving a packet, the protocol translator checks the source address of the packet against the access list. If the access list permits the address, the protocol translator continues to process the packet. If the access list rejects the address, the protocol translator discards the packet and returns an ICMP "Host Unreachable" message.
For outbound access lists, after receiving and routing a packet to a controlled interface, the protocol translator checks the source address of the packet against the access list. If the access list permits the address, the protocol translator transmits the packet. If the access list rejects the address, the protocol translator discards the packet and returns an ICMP "Host Unreachable" message.
An access lists is applied either on an outbound or on an inbound interfaces.
The following example applies list 101 on packets outbound from Ethernet 0:
interface ethernet 0
ip access-group 101 out
access-list (extended)
ip access-list
show ip access-list
To set an IP address for an interface, use the ip address interface configuration command. To remove an address, use the no form of the command.
ip address IP-address mask| IP-address | IP address |
| mask | Mask for the associated IP subnet |
None
Interface configuration
Hosts can determine subnet masks using the Internet Control Message Protocol (ICMP) Mask Request message. Protocol translators respond to this request with an ICMP Mask Reply message.
To disable IP processing on a particular interface, remove its IP address with the no ip address command. If the protocol translator detects another host using one of its IP addresses, it will print an error message on the console.
In the following example, 131.108.1.27 is the primary address for Ethernet 0:
interface ethernet 0
ip address 131.108.1.27 255.255.255.0
To assign an IP address to the service provided on a TCP port, use the ip alias global configuration command. To disable the address assignment, use the no form of this command.
ip alias IP-address tcp-port
| IP-address | Internet address of the host providing the service. It must be on the same network or subnet as the protocol translator's main address and must not be used by another host on the network or subnet. |
| TCP-port | Number of the TCP port to which to connect. |
None
Global configuration
You can use the ip alias command to assign multiple IP addresses to the protocol translator. For example, in addition to the primary alias address, you can specify addresses that correspond to lines or rotary groups. Using the ip alias command in this way makes the process of connecting to a specific rotary group transparent to the user.
The following example configures connections to IP address 131.108.0.1 to act identically to connections made to the server's primary IP address on TCP port 3001. In other words, users trying to connect will get connected to the first free line in rotary group 1 using the Telnet protocol.
ip alias 131.108.0.1 3001
To define a broadcast address for an interface, use the ip broadcast-address interface configuration command. To restore the IP broadcast address to the default, use the no form of the command.
ip broadcast-address [address]| address | (Optional.) IP broadcast address for a network. |
255.255.255.255 (all ones)
Interface configuration
The following example specifies an IP broadcast address of 0.0.0.0:
ip broadcast-address 0.0.0.0
To define a default gateway (protocol translator) when IP routing is disabled, use the ip default-gateway global configuration command. To disable this function, use the no form of the command.
ip default-gateway address| address | IP address of the protocol translator. |
Disabled
Global configuration
The host sends any packets that need the assistance of a gateway to the address you specify. If another gateway has a better route to the requested host, the default gateway sends an ICMP redirect message to the server. The ICMP redirect message indicates which local protocol translator the server should use.
The following example defines the protocol translator on Internet address 192.31.7.18 as the default protocol translator:
ip default-gateway 192.31.7.18
show ip redirects
To define a list of default domain names to complete unqualified host names, use the ip domain-list global configuration command. To delete a name from the list, use the no form of the command.
ip domain-list name| name | Domain name. Do not include the initial period that separates an unqualified name from the domain name. |
None
Global configuration
If there is no domain list, the domain name that you specified with the ip domain-name global configuration command is used. The ip domain-list command is similar to the ip domain-name command, except that with ip domain-list you can define a list of domains, each to be tried in turn.
The following example adds several domain names to a list:
ip domain-list martinez.com
ip domain-list stanford.edu
The following example adds a name to and then deletes a name from the list:
ip domain-list sunya.edu
no ip domain-list stanford.edu
ip domain-name
To enable the IP Domain Name System-based host name-to-address translation, use the ip domain-lookup global configuration command. To disable the Domain Name System, use the no form of the command.
ip domain-lookupThis command has no arguments or keywords.
Enabled
Global configuration
The following example enables the IP Domain Name System-based host name-to-address translation.
ip domain-lookup
ip domain-name
ip ipname-lookup
ip name-server
To define a default domain name that the protocol translator uses to complete unqualified host names (names without a dotted-decimal domain name), use the ip domain-name global configuration command. To disable the use of the Domain Name System, use the no form of the command.
ip domain-name name| name | Default domain name used to complete unqualified host names. Do not include the initial period that separates an unqualified name from the domain name. |
Enabled
Global configuration
Any IP host name that does not contain a domain name (that is, any name without a dot) will have the dot and cisco.com appended to it before being added to the host table.
The following example defines cisco.com as the default domain name:
ip domain-name cisco.com
ip domain-list
ip domain-lookup
ip name-server
To configure the router discovery feature using the Cisco GDP routing protocol, use the ip gdp gdp interface configuration command. To disable this feature, use the no form of the command.
ip gdp gdpThis command has no arguments or keywords.
Disabled
Interface configuration
The following example configures router discovery using GDP on the Ethernet 0 interface:
interface ethernet 0
ip gdp gdp
To configure the router discovery feature using the Cisco IGRP routing protocol, use the ip gdp igrp interface configuration command. To disable this feature, use the no form of the command.
ip gdp igrpThis command has no arguments or keywords.
Disabled
Interface configuration
IP routing must be disabled before you can configure this feature.
The following example configures router discovery using IGRP on the Ethernet 1 interface:
interface ethernet 1
ip gdp igrp
To configure the router discovery feature using the ICMP Router Discovery Protocol (IRDP), use the ip gdp irdp interface configuration command. To disable this feature, use the no form of the command.
ip gdp irdpThis command has no arguments or keywords.
Disabled
Interface configuration
IP routing must be disabled before you can configure this feature.
The following example configures router discovery using IRDP on the Ethernet 0 interface:
interface ethernet 0
ip gdp irdp
To configure the router discovery feature using the RIP routing protocol, use the ip gdp rip interface configuration command. To disable this feature, use the no form of the command.
ip gdp ripThis command has no arguments or keywords.
Disabled
Interface configuration
IP routing must be disabled before you can configure this feature.
The following example configures router discovery using RIP on the Ethernet 1 interface:
interface ethernet 1
ip gdp rip
To define a static host name-to-address mapping in the host cache, use the ip host global configuration command. To remove the name-to-address mapping, use the no form of this command.
ip host name [TCP-port-number] address1 [address2...address8]| name | Name of the host. |
| TCP-port-number | (Optional.) TCP port number--Telnet by default (port 23). |
| address | Associated IP address. You can associate up to eight addresses with a host name. |
Disabled
Global configuration
The following example uses the ip host command to define two static mappings:
ip host croff 192.31.7.18
ip host bisso-gw 10.2.0.2 192.31.7.33
To have the protocol translator respond to ICMP mask requests by sending ICMP Mask Reply messages, use the ip mask-reply interface configuration command. To disable this function, use the no form of this command.
ip mask-replyThis command has no arguments or keywords.
Disabled
Interface configuration
The following example enables the sending of ICMP Mask Reply messages on Ethernet interface 0:
interface ethernet 0
ip mask-reply
To set the maximum transmission unit (MTU) size of IP packets sent on an interface, use the ip mtu interface configuration command. To restore the default MTU, use the no form of this command.
ip mtu bytes| bytes | IP MTU in bytes. The minimum size is 128 bytes. The maximum size depends on the interface medium type. |
Varies according to media type. See the mtu command in the Router Products Command Reference publication for default values.
Interface configuration
If an IP packet exceeds the MTU set for the protocol translator's interface, the protocol translator will fragment it.
All devices on a physical medium must have the same protocol MTU in order to interoperate.
Changing the MTU value with the mtu interface configuration command can affect the IP MTU value. If the current IP MTU value is the same as the MTU value and you change the MTU value, the IP MTU value will be modified automatically to match the new MTU. However, the reverse is not true: changing the IP MTU value has no effect on the value for the mtu interface configuration command.
The following example sets the maximum IP packet size for the first serial interface to 300 bytes:
interface serial 0
ip mtu 300
A dagger (+) indicates that the command is documented in the Router Products Command Reference publication.
mtu +
To specify the IP address of one or more name servers to use for name and address resolution, use the ip name-server global configuration command. To remove the addresses specified and restore the default, use the no form of the command.
ip name-server server-address1 [server-address2... server-address6]| server-address1...6 | IP addresses of up to six name servers |
None
Global configuration
The following example specifies host 131.108.1.111 as the primary name server and host 131.108.1.2 as the secondary server:
ip name-server 131.108.1.111 131.108.1.2
ip domain-lookup
ip domain-name
To enable the sending of redirect messages if the protocol translator is forced to resend a packet through the same interface on which it was received, use the ip redirects interface configuration command. To disable the sending of redirect messages, use the no form of this command.
ip redirectsThis command has no arguments or keywords.
Enabled
Interface configuration
The protocol translator sends an ICMP Redirect message to the originator of any packet that it is on a subnet directly connected to the protocol translator when it would otherwise forward the packet to another system on the same subnet. It does so because the originating host presumably could have sent that packet to the next hop without involving the protocol translator at all.
The following example disables the sending of IP redirects on Ethernet interface 0:
interface ethernet 0
no ip redirects
show ip redirects
To add a basic security option to all outgoing packets, use the ip security add interface configuration command. To disable the adding of a basic security option to all outgoing packets use the no form of this command.
ip security addThis command has no arguments or keywords.
Disabled
Interface configuration
If an outgoing packet does not have a security option present, the ip security add command will add one as the first IP option. The security label added to the option field is the label that was computed for this packet when it first entered the protocol translator. Because this action is performed after all the security tests have been passed, this label will either be the same as or will fall within the range of the interface. This action is always enforced on multilevel interfaces.
The following example adds a basic security option to each packet leaving Ethernet interface 0:
interface ethernet 0
ip security add
ip security dedicated
ip security extended-allowed
ip security first
ip security ignore-authorities
ip security implicit-labelling
ip security multilevel
ip security reserved-allowed
ip security strip
To set the requested level of classification and authority, use the ip security dedicated interface configuration command. To reset the interface to the default classification and authorities, use the no form of this command.
ip security dedicated level authority [authority...]| level | Degree of sensitivity of information. The possible values of level are listed in Table 1-1. |
| authority | Organization that defines the set of security levels that will be used in a network. The possible values of authority are listed in Table 1-2. |
Disabled
Interface configuration
All traffic entering the protocol translator on this interface must have a security option that exactly matches this label. Any outgoing traffic on this interface will have this label attached to it. A label is a combination of a security level and one or more authorities.
Table 1-1 explains the values of the argument level. Table 1-2 explains the values of the argument authority. In both tables, the values are listed in order from highest degree of sensitivity or agency, to lowest. These definitions apply to all the other ip security commands that have these arguments.
| Level Keyword | Bit Pattern |
|---|---|
| Reserved4 | 0000 0001 |
| TopSecret | 0011 1101 |
| Secret | 0101 1010 |
| Confidential | 1001 0110 |
| Reserved3 | 0110 0110 |
| Reserved2 | 1100 1100 |
| Unclassified | 1010 1011 |
| Reserved1 | 1111 0001 |
| Authority Keyword | Bit Pattern |
|---|---|
| Genser | 1000 0000 |
| Siop-Esi | 0100 0000 |
| DIA | 0010 0000 |
| NSA | 0001 0000 |
| DOE | 0000 1000 |
The following example sets a confidential level with Genser authority:
ip security dedicated confidential Genser
ip security add
ip security extended-allowed
ip security first
ip security ignore-authorities
ip security implicit-labelling
ip security multilevel
ip security reserved-allowed
ip security strip
To accept packets on an interface that has an extended security option, use the ip security extended-allowed interface configuration command. To reject packets immediately, use the no form of this command.
ip security extended-allowedThis command has no arguments or keywords.
Reject the packet immediately
Interface configuration
The following example allows Ethernet interface 0 to accept packets that have an extended security option present:
interface ethernet 0
ip security extended-allowed
ip security add
ip security dedicated
ip security first
ip security ignore-authorities
ip security implicit-labelling
ip security multilevel
ip security reserved-allowed
ip security strip
To prioritize the presence of security options on a packet, use the ip security first interface configuration command. To disable this function, use the no form of this command.
ip security firstThis command has no arguments or keywords.
Disabled
Interface configuration
If a basic security option is present on an outgoing packet, but it is not the first IP option, then it is moved to the front of the options field when this interface configuration command is used.
The following example ensures that, if a basic security option is present in the options field of a packet exiting Ethernet interface 0, it is moved to the front of the options field:
interface ethernet 0
ip security first
ip security add
ip security dedicated
ip security extended-allowed
ip security ignore-authorities
ip security implicit-labelling
ip security multilevel
ip security reserved-allowed
ip security strip
To configure the protocol translator to ignore the authorities field of all incoming packets, use the ip security ignore-authorities interface configuration command. To disable this function, use the no form of this command.
ip security ignore-authoritiesThis command has no arguments or keywords.
Disabled
Interface configuration
The value used in place of the authorities field is the authority value declared for the specified interface. This action is only allowed for single-level interfaces.
The following example causes Ethernet interface 0 to ignore the authorities field on all incoming packets:
interface ethernet 0
ip security ignore-authorities
ip security add
ip security dedicated
ip security extended-allowed
ip security first
ip security implicit-labelling
ip security multilevel
ip security reserved-allowed
ip security strip
To force the protocol translator to accept packets on the interface, even if the packets do not include a security option, use the ip security implicit-labelling interface configuration command. To disable this function, use the no form of this command.
ip security implicit-labelling [level authority [authority...]]| level | (Optional.) Degree of sensitivity of information. If your interface has multilevel security set, you must specify this argument. You can specify more than one. The level keywords are listed in Table 1-1 (in the discussion of the ip security dedicated command). |
| authority | (Optional.) Organization that defines the set of security levels that will be used in a network. If your interface has multilevel security set, you must specify this argument. You can specify more than one. The authority keywords are listed in Table 1-2 (in the discussion of the ip security dedicated command). |
Disabled
Interface configuration
If your interface has multilevel security set, you must use the expanded form of the command (with the optional arguments as noted in brackets) because the arguments are used to specify the precise level and authority to use when labeling the packet.
In the following example, an interface is set for security and will accept unlabeled packets:
ip security dedicated confidential genser
ip security implicit-labelling
ip security add
ip security dedicated
ip security extended-allowed
ip security first
ip security ignore-authorities
ip security multilevel
ip security reserved-allowed
ip security strip
To set the interface to the requested range of classifications and authorities, use the ip security multilevel interface configuration command. To disable this function, use the no form of this command.
ip security multilevel level1 [authority1...] to level2 authority2 [authority2...]| level1 | Degree of sensitivity of information. The classification level of incoming packets must be equal to or greater than this value for processing to occur. The level keywords are found in Table 1-1 (in the discussion of the ip security dedicated command). |
| authority1 | Organization that defines the set of security levels that will be used in a network. The authority bits must be a superset of this value. The authority keywords are listed in Table 1-2 (in the discussion of the ip security dedicated command). |
| to | Separates the range of classifications and authorities. |
| level2 | Degree of sensitivity of information. The classification level of incoming packets must be equal to or less than this value for processing to occur. The level keywords are found in Table 1-1 (in the discussion of the ip security dedicated command). |
| authority2 | Organization that defines the set of security levels that will be used in a network. The authority bits must be a proper subset of this value. The authority keywords are listed in Table 1-2 (in the discussion of the ip security dedicated command). |
Disabled
Interface configuration
All traffic entering or leaving the protocol translator must have a security option that falls within the range you define with the ip security multilevel command.
Being within range requires that the following two conditions be met:
The following example specifies levels Unclassified to Secret and NSA authority:
ip security multilevel unclassified to secret nsa
ip security add
ip security dedicated
ip security extended-allowed
ip security first
ip security ignore-authorities
ip security implicit-labelling
ip security reserved-allowed
ip security strip
To treat as valid any packets that have Reserved1 to Reserved4 security levels, use the ip security reserved-allowed interface configuration command. To disable this feature, use the no form of this command.
ip security reserved-allowedThis command has no arguments or keywords.
Disabled
Interface configuration
When you set multilevel security on an interface, and indicate, for example, that the highest range allowed is Confidential and the lowest is Unclassified, the protocol translator neither allows nor operates on packets that have security levels of Reserved3 and Reserved2 because they are undefined.
If you use the IP Security Option (IPSO) to block transmission out of unclassified interfaces, and you use one of the Reserved security levels, you enable this feature to preserve network security.
The following example allows a security level of Reserved through Ethernet interface 0:
interface ethernet 0
ip security reserved-allowed
ip security add
ip security dedicated
ip security extended-allowed
ip security first
ip security ignore-authorities
ip security implicit-labelling
ip security multilevel
ip security strip
To remove any basic security option on outgoing packets on an interface, use the ip security strip interface configuration command. To disable this function, use the no form of this command.
ip security stripThis command has no arguments or keywords.
Disabled
Interface configuration
This procedure is performed after all security tests in the protocol translator have been passed. This command is not allowed for multilevel interfaces.
The following example removes any basic security options on outgoing packets on Ethernet interface 0:
interface ethernet 0
ip security strip
ip security add
ip security dedicated
ip security extended-allowed
ip security first
ip security ignore-authorities
ip security implicit-labelling
ip security multilevel
ip security reserved-allowed
To allow the protocol translator to handle IP datagrams with source routing header options, use the ip source-route global configuration command. To have the protocol translator discard any IP datagram containing a source-route option, use the no form of this command.
ip source-routeThis command has no arguments or keywords.
Enabled
Global configuration
The following example enables the handling of IP datagrams with source routing header options:
ip source-route
To optimize response to Telnet user interrupt characters, use the ip tcp chunk-size global configuration command.
ip tcp chunk-size number| number | Number of characters output before the interrupt executes. The suggested value of number is 80, which will typically abort output within a line or two of where the user types the interrupt character. Values of less than 50 are not recommended for efficiency reasons. |
None
Global configuration
When used with a correctly operating host, protocol translators implement the Telnet Synchronize and Abort Output signals, which can stop output within one packet's worth of data from the time the user types the interrupt character. The ip tcp chunk-size command allows you to configure a faster response to user interrupt characters.
Changing the chunk size affects neither the size of the packet used nor the TCP window size, either of which would cause serious efficiency problems for the remote host as well as for the protocol translator. Instead, the Telnet status is checked after the number of characters specified, causing only a relatively minor performance loss.
The following example allows the protocol translator to react more quickly when the user types an interrupt character or sequence (such as Ctrl-C):
ip tcp chunk-size 100
To set the time the protocol translator will wait to attempt to establish a TCP connection before it times out, use the ip tcp synwait-time global configuration command. To restore the default time, use the no form of this command.
ip tcp synwait-time seconds| seconds | Number of seconds the protocol translator will wait when attempting to establish a TCP connection. It can be a value in the range 5 to 300 seconds. |
30 seconds
Global configuration
In previous versions of protocol translator software, the system would wait a fixed 30 seconds when attempting to establish a TCP connection. If your network contains Public Switched Telephone Network Dial on Demand Routing (PSTN DDR), it is possible that the call setup time will exceed 30 seconds. This amount of time is not sufficient in networks that have dial-up asynchronous connections because it will affect your ability to Telnet over the link (from the protocol translator) if the link must be brought up. If you have this type of network, you might want to set this value to the UNIX value of 75.
Because this is a host parameter, it does not pertain to traffic going through the protocol translator, just for traffic originating at the protocol translator. Because UNIX has a fixed 75-second timeout, hosts are unlikely to see this problem.
The following example configures the protocol translator to continue attempting to establish a TCP connection for 180 seconds:
ip tcp synwait-time 180
To enable the generation of ICMP Unreachable messages, use the ip unreachables interface configuration command. To disable this function, use the no ip form of this command.
ip unreachablesThis command has no arguments or keywords.
Enabled
Interface configuration
If the protocol translator receives a nonbroadcast packet destined for itself that uses a protocol it does not recognize, it sends an ICMP Protocol Unreachable message to the source.
If the protocol translator receives a datagram that it cannot deliver to its ultimate destination because it knows of no route to the destination address, it replies to the originator of that datagram with an ICMP Host Unreachable message.
The following example disables the generation of ICMP Unreachable messages:
interface ethernet 0
no ip unreachables
To check host reachability and network connectivity, use the ping (IP packet internet groper function) user-level EXEC command.
ping [protocol] {host | address}| protocol | (Optional.) Protocol keyword. IP is the default. |
| host | Host name of the system to ping. |
| address | IP address of the system to ping. |
User-level EXEC
The ping command sends ICMP Echo messages. If the protocol translator receives an ICMP Echo message, it sends an ICMP Echo Reply message to the source of the ICMP Echo message.
The user-level ping command provides a basic ping facility for IP users who do not have system privileges. This feature allows the protocol translator to perform the simple default ping functionality for the IP protocol. Only the nonverbose form of the ping command is supported for user-level pings.
If the system cannot map an address for a host name, it will return an "%Unrecognized host or address" error message.
Multicast and broadcast pings are fully supported. When you ping the broadcast address of 255.255.255.255, the system will send out pings and print a list of all stations responding. You can also ping a local network to get a list of all systems that respond, as in the following example, where 128.111.3 is a local network:
ping 128.111.3.255
As a side-effect, you also can get a list of all multicast-capable hosts that are connected directly to the protocol translator from which you are pinging, as in the following example:
ping 224.0.0.1
To abort a ping session, type the escape sequence (by default, Ctrl-^ X, which is done by simultaneously pressing the Ctrl, Shift, and 6 keys, letting go, then pressing the X key).
Table 1-3 describes the test characters that the ping facility sends.
| Char | Description |
|---|---|
| ! | Each exclamation point indicates receipt of a reply. |
| . | Each period indicates the network server timed out while waiting for a reply. |
| U | Destination unreachable. |
| N | Network unreachable. |
| P | Protocol unreachable. |
| Q | Source quench. |
| M | Could not fragment. |
| ? | Unknown packet type. |
The following display shows sample ping output when you ping a host named fred:
pt> ping fred
Type escape sequence to abort.
Sending 5, 100-byte ICMP Echos to 192.31.7.27, timeout is 2 seconds:
!!!!!
Success rate is 100 percent, round-trip min/avg/max = 1/3/4 ms
The following display shows sample ping output when you ping the broadcast address of 255.255.255.255:
pt> ping 255.255.255.255
	Type escape sequence to abort.
	Sending 5, 100-byte ICMP Echos to 255.255.255.255, timeout is 2 seconds:
	Reply to request 0 from 160.89.48.15 (4 ms)
	Reply to request 0 from 160.89.48.10 (4 ms)
	Reply to request 0 from 160.89.48.19 (4 ms)
	Reply to request 0 from 160.89.49.15 (4 ms)
	Reply to request 1 from 160.89.48.15 (4 ms)
	Reply to request 1 from 160.89.48.10 (4 ms)
	Reply to request 1 from 160.89.48.19 (4 ms)
	Reply to request 1 from 160.89.49.15 (4 ms)
	Reply to request 2 from 160.89.48.15 (4 ms)
	Reply to request 2 from 160.89.48.10 (4 ms)
	Reply to request 2 from 160.89.48.19 (4 ms)
	Reply to request 2 from 160.89.49.15 (4 ms)
	Reply to request 3 from 160.89.48.15 (4 ms)
	Reply to request 3 from 160.89.48.10 (4 ms)
	Reply to request 3 from 160.89.48.19 (4 ms)
	Reply to request 3 from 160.89.49.15 (4 ms)
	Reply to request 4 from 160.89.48.15 (4 ms)
	Reply to request 4 from 160.89.48.10 (4 ms)
	Reply to request 4 from 160.89.48.19 (4 ms)
	Reply to request 4 from 160.89.49.15 (4 ms)
ping (privileged level)
To check host reachability and network connectivity, use the ping (IP packet internet groper function) privileged-level EXEC command.
ping [protocol] {host | address}| protocol | (Optional.) Protocol keyword. IP is the default. |
| host | Host name of the system to ping. |
| address | IP address of the system to ping. |
Privileged EXEC
The ping command sends ICMP Echo messages. If the protocol translator receives an ICMP Echo message, it sends an ICMP Echo Reply message to the source of the ICMP Echo message.
You can use the IP ping command to diagnose serial line problems. By placing the local or remote CSU/DSU into loopback mode and pinging your own interface, you can isolate the problem to the protocol translator or leased line.
To abort a ping session, type the escape sequence (by default, Ctrl-^ X, which is done by simultaneously pressing the Ctrl, Shift, and 6 keys, letting go, then pressing the X key).
Table 1-4 describes the test characters that the ping facility sends.
| Char | Description |
|---|---|
| ! | Each exclamation point indicates receipt of a reply. |
| . | Each period indicates the network server timed out while waiting for a reply. |
| U | Destination unreachable. |
| N | Network unreachable. |
| P | Protocol unreachable. |
| Q | Source quench. |
| M | Could not fragment. |
| ? | Unknown packet type. |
You can use the extended command mode of the ping command to specify the supported Internet header options, as shown in the following sample display.
To enter ping extended command mode, enter yes at the extended commands prompt of the ping command. The following display shows a sample ping extended command sequence:
Protocol [ip]:
Target IP address: 192.31.7.27
Repeat count [5]:
Datagram size [100]:
Timeout in seconds [2]:
Extended commands [n]: y
Source address: 131.108.1.1
Type of service [0]:
Set DF bit in IP header? [no]:
Data pattern [0xABCD]:
Loose, Strict, Record, Timestamp, Verbose[none]:
Sweep range of sizes [n]:
Type escape sequence to abort.
Sending 5, 100-byte ICMP Echos to 192.31.7.27, timeout is 2 seconds:
!!!!!
Success rate is 100 percent, round-trip min/avg/max = 1/3/4 ms
Table 1-5 describes the fields shown in the display.
| Field | Description |
|---|---|
| Protocol [ip]: | Default is IP. |
| Target IP address: | Prompts for the IP address or host name of the destination node you plan to ping. |
| Repeat count [5]: | Number of ping packets that will be sent to the destination address. Default: 5. |
| Datagram size [100]: | Size of the ping packet (in bytes). Default: 100 bytes. |
| Timeout in seconds [2]: | Timeout interval (in seconds). Default: 2. |
| Extended commands [n]: | Specifies whether or not a series of additional commands appears. Many of the following displays and tables show and describe these commands. Default: no. |
| Source address: | IP address that appears in the ping packet as the source address. |
| Type of service [0]: | Internet service quality selection. See RFC 791 for more information. Default: 0. |
| Set DF bit in IP header? [no]: | Don't Fragment. Specifies that if the packet encounters a node in its path that is configured for a smaller MTU than the packet's MTU, that the packet is to be dropped and an error message is to be sent to the protocol translator at the packet's source address. If performance problems are encountered on the network, a node configured for a small MTU could be a contributing factor. This feature can be used to determine the smallest MTU in the path. Default: no. |
| Data pattern [0xABCD]: | Sets 16-bit hexadecimal data pattern. Default: 0xABCD. Varying the data pattern in this field (to all ones or all zeros for example) can be useful when debugging data sensitivity problems on CSU/DSUs, or detecting cable-related problems such as cross talk. |
| Loose, Strict, Record, Timestamp, Verbose [none]: | Supported IP header options. The protocol translator examines the header options to every packet that passes through it. If it finds a packet with an invalid option, the protocol translator sends an ICMP Parameter Problem message to the source of the packet and discards the packet. The IP header options follow:
Default: none. For more information on these header options, see RFC 791. |
| Sweep range of sizes [n]: | Allows you to vary the sizes of the echo packets being sent. This capability is useful for determining the minimum sizes of the MTUs configured on the nodes along the path to the destination address. Packet fragmentation contributing to performance problems can then be reduced. |
| !!!!! | Each exclamation point (!) indicates receipt of a reply. A period (.) indicates the network server timed out while waiting for a reply. Other characters may appear in the ping output display, depending on the protocol type. |
| Success rate is 100 percent | Percentage of packets successfully echoed back to the protocol translator. Anything less than 80 percent is usually considered problematic. |
| round-trip min/avg/max = 1/3/4 ms | Round-trip travel time intervals for the protocol echo packets, including minimum/average/maximum (in milliseconds). |
Using the Record Route option to trace a path to a particular destination address. Be aware, however, that the trace EXEC command performs a similar function, but the latter does not have the nine-hop limitation.
The following display shows sample extended ping output when the Record Route option is specified.
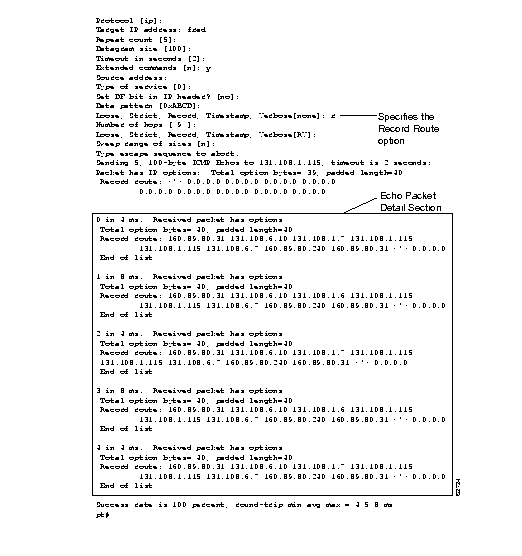
In this display, five ping echo packets are sent to the destination address 131.108.1.115. The echo packet detail section includes specific information about each of these echo packets.
The lines of ping output that are unique when the Record Route option is specified are described as follows:
Number of hops [ 9 ]:
Packet has IP options: Total option bytes= 39, padded length=40
Record route: <*> 0.0.0.0 0.0.0.0 0.0.0.0 0.0.0.0
         0.0.0.0 0.0.0.0 0.0.0.0 0.0.0.0 0.0.0.0
0 in 4 ms. Received packet has options
 Total option bytes= 40, padded length=40
 Record route: 160.89.80.31 131.108.6.10 131.108.1.7 131.108.1.115
     131.108.1.115 131.108.6.7 160.89.80.240 160.89.80.31 <*> 0.0.0.0
Record route: 160.89.80.31 131.108.6.10 131.108.1.7 131.108.1.115
131.108.1.115 131.108.6.7 160.89.80.240 160.89.80.31 <*> 0.0.0.0
ping (user level)
To display the contents of all current access lists, use the show access-lists EXEC command.
show access-listsThis command has no arguments or keywords.
EXEC
The following is sample output from the show access-lists command:
Standard IP access list 19
    	permit 131.108.19.0
    	deny   0.0.0.0, wildcard bits 255.255.255.255
Standard IP access list 49
    	permit 131.108.31.0, wildcard bits 0.0.0.255
	    permit 131.108.194.0, wildcard bits 0.0.0.255
    	permit 131.108.195.0, wildcard bits 0.0.0.255
	    permit 131.108.196.0, wildcard bits 0.0.0.255
	    permit 131.108.197.0, wildcard bits 0.0.0.255
Extended IP access list 101
	    permit tcp 0.0.0.0 255.255.255.255 0.0.0.0 255.255.255.255 eq 23
Type code access list 201
	    permit 0x6001 0x0000
Type code access list 202
	    permit 0x6004 0x0000
	    deny   0x0000 0xFFFF
access-list (standard)
access-list (extended)
To display the default domain name, the style of name lookup service, a list of name server hosts, and the cached list of host names and addresses, use the show hosts EXEC command.
show hostsThis command has no arguments or keywords.
EXEC
The following is sample output from the show hosts command:
Default domain is CISCO.COM
Name/address lookup uses domain service
Name servers are 255.255.255.255
Host	              Flag        	Age	   Type	       Address(es)
SLAG.CISCO.COM	    (temp, OK)  	1     	IP         	131.108.4.10
CHAR.CISCO.COM    	(temp, OK)  	8     	IP	         192.31.7.50
CHAOS.CISCO.COM	   (temp, OK)  	8     	IP         	131.108.1.115
DIRT.CISCO.COM	    (temp, EX)  	8     	IP         	131.108.1.111
DUSTBIN.CISCO.COM	 (temp, EX)  	0     	IP         	131.108.1.27
DREGS.CISCO.COM	   (temp, EX)  	24    	IP         	131.108.1.30
Table 1-6 describes the fields shown in the display.
| Field | Description |
|---|---|
| Flag | A temp entry is entered by a name server; the protocol translator removes the entry after 72 hours of inactivity. A perm entry is entered by a configuration command and is not timed out. Entries marked OK are believed to be valid. Entries marked ?? are considered suspect and subject to revalidation. Entries marked EX are expired. |
| Age | Indicates the number of hours since the protocol translator last referred to the cache entry. |
| Type | Identifies the type of address, for example, IP, CLNS, or X.121. |
| Address(es) | Shows the address of the host. One host can have up to eight addresses. |
clear host
To display the protocol translator's IP addresses mapped to TCP ports (aliases) and SLIP addresses, which are treated similarly to aliases, use the show ip aliases EXEC command.
show ip aliasesThis command has no arguments or keywords.
EXEC
To distinguish a SLIP address from a normal alias address, the command output uses the form SLIP TTY1 for the "port" number, where 1 is the auxiliary port.
The following is sample output from the show ip aliases command:
  IP Address    Port
131.108.29.245  SLIP TTY1
The display lists the IP address and corresponding port number.
A dagger (+) indicates that the command is documented in the Router Products Command Reference publication.
show line +
To display the Address Resolution Protocol (ARP) cache, where SLIP addresses appear as permanent TRP table entries, use the show ip arp EXEC command.
show ip arpThis command has no arguments or keywords.
EXEC
ARP establishes correspondences between network addresses (an IP address, for example) and LAN hardware addresses (Ethernet addresses). A record of each correspondence is kept in a cache for a predetermined amount of time and then discarded.
The following is sample output from the show ip arp command:
Protocol  Address          Age (min)     Hardware Addr   Type      Interface
Internet  131.108.62.192         187     0800.2010.a3b6  ARPA      Ethernet3
Internet  131.108.62.245          68     0800.200e.28f8  ARPA      Ethernet3
Internet  131.108.1.140          139     0000.0c01.2812  ARPA      Ethernet0
Internet  131.108.62.160         187     0800.200e.4dab  ARPA      Ethernet3
Internet  131.108.1.111           27     0800.2007.8866  ARPA      Ethernet0
Internet  131.108.1.117          119     0000.0c00.f346  ARPA      Ethernet0
Internet  131.108.1.115           28     0000.0c01.0509  ARPA      Ethernet0
Internet  131.108.1.77             1     0800.200e.57ce  ARPA      Ethernet0
Internet  192.31.7.29            225     aa00.0400.0234  ARPA      Ethernet2
Internet  192.31.7.17            118     2424.c01f.0711  ARPA      Ethernet2
Internet  192.31.7.18            135     0000.0c01.2817  ARPA      Ethernet2
Internet  192.31.7.21            119     2424.c01f.0715  ARPA      Ethernet2
Internet  131.108.1.33             1     0800.2008.c52e  ARPA      Ethernet0
Internet  131.108.62.1             -     0000.0c00.750f  ARPA      Ethernet3
Internet  131.108.31.35          119     0800.2010.8c5b  ARPA      Ethernet7
Internet  131.108.62.7            14     0000.0c00.33ce  ARPA      Ethernet3
Internet  131.108.1.55           155     0800.200e.e443  ARPA      Ethernet0
Table 1-7 describes the fields shown in the display.
| Field | Description |
|---|---|
| Protocol | Protocol for network address in the Address field. |
| Address | The network address that corresponds to Hardware Addr. |
| Age (min) | Age, in minutes, of the cache entry. |
| Hardware Addr | LAN hardware address a MAC address that corresponds to network address. |
| Type | Type of encapsulation:
|
|
Interface | Interface to which this address mapping has been assigned. |
To display the usability status of interfaces, use the show ip interface EXEC command.
show ip interface [interface unit]| interface unit | (Optional.) Used to display information for a particular interface. For example, e 0 specifies the first Ethernet interface; e 1 specifies the second Ethernet interface. You must specify both the interface type and unit number. |
EXEC
A protocol translator automatically enters a directly connected route in the routing table if the interface is usable. A usable interface is one through which the protocol translator can send and receive packets. If the protocol translator determines that an interface is not usable, it removes the directly connected routing entry from the routing table. Removing the entry allows the protocol translator to use dynamic routing protocols to determine backup routes to the network (if any).
If the interface can provide two-way communication, the line protocol is marked "up." If the interface hardware is usable, the interface is marked "up."
If you specify an optional interface type, you will see only information on that specific interface.
If you specify no optional parameters you will see information on all the interfaces.
The following is sample output from the show ip interface command.
Ethernet 0 is up, line protocol is up
    	Internet address is 192.54.222.2, subnet mask is 255.255.255.0
    	Broadcast address is 192.54.222.0
    	Address determined by non-volatile memory
    	MTU is 1500 bytes
    	Helper address is 192.52.71.4
    	Secondary address 131.192.115.2, subnet mask 255.255.255.0
	    Outgoing access list is not set
    	Proxy ARP is enabled
    	Security level is default
    	Split horizon is enabled
	    ICMP redirects are always sent
    	ICMP unreachables are always sent
    	ICMP mask replies are never sent
    	IP fast switching is enabled
    	Gateway Discovery is disabled
    	IP accounting is disabled
    	TCP/IP header compression is disabled
    	Probe proxy name replies are disabled
Table 1-8 describes the fields shown in the display.
| Field | Description |
|---|---|
| Ethernet 0 is up | If the interface hardware is usable, the interface is marked "up." For an interface to be usable, both the interface hardware and line protocol must be up. |
| line protocol is up | If the interface can provide two-way communication, the line protocol is marked "up." For an interface to be usable, both the interface hardware and line protocol must be up. |
| Broadcast address | Broadcast address. |
| Helper address | Helper address, if one has been set. |
| Outgoing access list | Indicates whether or not the interface has an outgoing access list set. |
| Proxy ARP | Indicates whether Proxy ARP is enabled for the interface. |
| Security level | IPSO security level set for this interface. |
| ICMP redirects | Indicates whether redirects will be sent on this interface. |
| ICMP unreachables | Indicates whether unreachable messages will be sent on this interface. |
| ICMP mask replies | Indicates whether mask replies will be sent on this interface. |
| IP fast switching | Indicates whether fast switching has been enabled for this interface. It is generally enabled on serial interfaces, such as this one. |
| Gateway Discovery | Indicates whether the discovery process has been enabled for this interface. It is generally disabled on serial interfaces, such as this one. |
| IP accounting | Indicates whether IP accounting is enabled for this interface and what the threshold (maximum number of entries) is. |
| TCP/IP header compression | Indicates whether compression is enabled or disabled. |
| Probe proxy name | Indicates whether HP Probe proxy name replies are generated. |
To display the address of a default gateway (protocol translator), use the show ip redirects EXEC command.
show ip redirectsThis command has no arguments or keywords.
EXEC
The following is sample output from the show ip redirects command:
Default gateway is 160.89.80.29
Host               Gateway           Last Use    Total Uses  Interface
131.108.1.111      160.89.80.240         0:00             9  Ethernet0
128.95.1.4         160.89.80.240         0:00             4  Ethernet0
ip default-gateway
To display IP protocol statistics, use the show ip traffic EXEC command.
show ip trafficThis command has no arguments or keywords.
EXEC
The following is sample output from the show ip traffic command:
IP statistics:
  	Rcvd:	 98 total, 98 local destination
        		0 format errors, 0 checksum errors, 0 bad hop count
        		0 unknown protocol, 0 not a gateway
        		0 security failures, 0 bad options
  		Frags:	0 reassembled, 0 timeouts, 0 too big
        		0 fragmented, 0 couldn't fragment
  	Bcast:	38 received, 52 sent
  	Sent: 44 generated, 0 forwarded
        		0 encapsulation failed, 0 no route
	ICMP statistics:
  	Rcvd:	 0 checksum errors, 0 redirects, 0 unreachable, 0 echo
        		0 echo reply, 0 mask requests, 0 mask replies, 0 quench
        		0 parameter, 0 timestamp, 0 info request, 0 other
  	Sent: 	0 redirects, 3 unreachable, 0 echo, 0 echo reply
        		0 mask requests, 0 mask replies, 0 quench, 0 timestamp
        		0 info reply, 0 time exceeded, 0 parameter problem
	UDP statistics:
  	Rcvd:	 56 total, 0 checksum errors, 55 no port
  	Sent:	 18 total, 0 forwarded broadcasts
	TCP statistics:
	  Rcvd:	 0 total, 0 checksum errors, 0 no port
  	Sent:	 0 total
	EGP statistics:
  	Rcvd:	 0 total, 0 format errors, 0 checksum errors, 0 no listener
	  Sent: 	0 total
	IGRP statistics:
  	Rcvd:	 73 total, 0 checksum errors
	  Sent:	 26 total
	HELLO statistics:
  	Rcvd:	 0 total, 0 checksum errors
  	Sent: 	0 total
	ARP statistics:
  	Rcvd: 	20 requests, 17 replies, 0 reverse, 0 other
  	Sent: 	0 requests, 9 replies (0 proxy), 0 reverse
	Probe statistics:
  	Rcvd: 	6 address requests, 0 address replies
	0 proxy name requests, 0 other
  	Sent:	 0 address requests, 4 address replies (0 proxy)
        		0 proxy name replies
Table 1-9 describes the fields shown in the display.
| Field | Description |
|---|---|
| format errors | A gross error in the packet format, such as an impossible IP header length. |
| bad hop count | Occurs when a packet is discarded because its time-to-live (TTL) field was decremented to zero. |
| encapsulation failed | Usually indicates that the protocol translator had no ARP request entry and therefore did not send a datagram. |
| no route | Counted when the protocol translator discards a datagram it did not know how to route. |
| proxy name reply | Counted when the protocol translator sends an ARP or Probe Reply on behalf of another host. The display shows the number of Probe Proxy requests that have been received and the number of responses that have been sent. |
To discover the IP routes the protocol translator's packets will actually take when traveling to their destination, use the trace EXEC command.
trace ip [destination]| destination | (Optional.) Destination address or host name on the command line. The default parameters for the appropriate protocol are assumed and the tracing action begins. |
User-level EXEC
The trace command works by taking advantage of the error messages generated by protocol translators when a datagram exceeds its time-to-live (TTL) value.
The trace command starts by sending probe datagrams with a TTL value of one. This causes the first protocol translator to discard the probe datagram and send back an error message. The trace command sends several probes at each TTL level and displays the round-trip time for each.
The trace command sends out one probe at a time. Each outgoing packet may result in one or two error messages. A time exceeded error message indicates that an intermediate protocol translator has seen and discarded the probe. A destination unreachable error message indicates that the destination node has received the probe and discarded it because it could not deliver the packet. If the timer goes off before a response comes in, trace prints an asterisk (*).
The trace command terminates when the destination responds, when the maximum TTL is exceeded, or when the user interrupts the trace with the escape sequence. By default, to invoke the escape sequence, press Ctrl-^ X--which is done by simultaneously pressing the Ctrl, Shift, and 6 keys, letting go, then pressing the X key.
Due to bugs in the IP implementation of various hosts and protocol translators, the IP trace command might behave in odd ways.
Not all destinations will respond correctly to a probe message by sending back an ICMP port unreachable message. A long sequence of TTL levels with only asterisks, terminating only when the maximum TTL has been reached, might indicate this problem.
There is a known problem with the way some hosts handle an ICMP TTL exceeded message. Some hosts generate an ICMP message but they reuse the TTL of the incoming packet. Since this is zero, the ICMP packets do not make it back. When you trace the path to such a host, you might see a set of TTL values with asterisks (*). Eventually the TTL gets high enough that the ICMP message can get back. For example, if the host is six hops away, trace will time out on responses 6 through 11.
The following display shows sample IP trace output when a destination host name (ABA.NYC. mil) has been specified:
Type escape sequence to abort.
Tracing the route to ABA.NYC.mil (26.0.0.73)
  	1 DEBRIS.CISCO.COM (131.108.1.6) 1000 msec 8 msec 4 msec
  	2 BARRNET-GW.CISCO.COM (131.108.16.2) 8 msec 8 msec 8 msec
  	3 EXTERNAL-A-GATEWAY.STANFORD.EDU (192.42.110.225) 8 msec 4 msec 4 msec
  	4 BB2.SU.BARRNET.NET (131.119.254.6) 8 msec 8 msec 8 msec
  	5 SU.ARC.BARRNET.NET (131.119.3.8) 12 msec 12 msec 8 msec
  	6 MOFFETT-FLD-MB.in.MIL (192.52.195.1) 216 msec 120 msec 132 msec
  	7 ABA.NYC.mil (26.0.0.73) 412 msec 628 msec 664 msec
Table 1-10 describes the fields shown in the display.
| Field | Description |
|---|---|
| 1 | Indicates the sequence number of the protocol translator in the path to the host. |
| DEBRIS.CISCO.COM | Host name of this protocol translator. |
| 131.108.1.6 | IP address of this protocol translator. |
| 1000 msec 8 msec 4 msec | Round-trip time for each of the three probes that are sent. |
Table 1-11 describes the characters that can appear in trace output.
| Char | Description |
|---|---|
| nn msec | For each node, the round-trip time in milliseconds for the specified number of probes. |
| * | The probe timed out. |
| ? | Unknown packet type. |
| Q | Source quench. |
| P | Protocol unreachable. |
| N | Network unreachable. |
| U | Port unreachable. |
| H | Host unreachable. |
trace (privileged level)
To discover the routes the protocol translator's packets will actually take when traveling to their destination, use the trace EXEC command.
trace [destination]| destination | (Optional.) Destination address or host name. The default parameters for the appropriate protocol are assumed and the tracing action begins. |
Privileged EXEC
The trace command works by taking advantage of the error messages generated by protocol translators when a datagram exceeds its time-to-live (TTL) value.
The trace command starts by sending probe datagrams with a TTL value of one. This causes the first protocol translator to discard the probe datagram and send back an error message. The trace command sends several probes at each TTL level and displays the round-trip time for each.
The trace command sends out one probe at a time. Each outgoing packet may result in one or two error messages. A time exceeded error message indicates that an intermediate protocol translator has seen and discarded the probe. A destination unreachable error message indicates that the destination node has received the probe and discarded it because it could not deliver the packet. If the timer goes off before a response comes in, trace prints an asterisk (*).
The trace command terminates when the destination responds, when the maximum TTL is exceeded, or when the user interrupts the trace with the escape sequence. By default, to invoke the escape sequence, press Ctrl-^ X--which is done by simultaneously pressing the Ctrl, Shift, and 6 keys, letting go, then pressing the X key.
To use nondefault parameters and invoke an extended trace test, enter the command without a destination argument. You will be stepped through a dialog to select the desired parameters.
Due to bugs in the IP implementation of various hosts and protocol translators, the IP trace command may behave in odd ways.
Not all destinations will respond correctly to a probe message by sending back an ICMP port unreachable message. A long sequence of TTL levels with only asterisks, terminating only when the maximum TTL has been reached, might indicate this problem.
There is a known problem with the way some hosts handle an ICMP TTL exceeded message. Some hosts generate an ICMP message but they reuse the TTL of the incoming packet. Since this is zero, the ICMP packets do not make it back. When you trace the path to such a host, you might see a set of TTL values with asterisks (*). Eventually the TTL gets high enough that the ICMP message can get back. For example, if the host is six hops away, trace will time out on responses 6 through 11.
The following display shows sample IP trace output when a destination host name (ABA.NYC.mil) has been specified:
Type escape sequence to abort.
Tracing the route to ABA.NYC.mil (26.0.0.73)
  	1 DEBRIS.CISCO.COM (131.108.1.6) 1000 msec 8 msec 4 msec
  	2 BARRNET-GW.CISCO.COM (131.108.16.2) 8 msec 8 msec 8 msec
  	3 EXTERNAL-A-GATEWAY.STANFORD.EDU (192.42.110.225) 8 msec 4 msec 4 msec
  	4 BB2.SU.BARRNET.NET (131.119.254.6) 8 msec 8 msec 8 msec
  	5 SU.ARC.BARRNET.NET (131.119.3.8) 12 msec 12 msec 8 msec
  	6 MOFFETT-FLD-MB.in.MIL (192.52.195.1) 216 msec 120 msec 132 msec
  	7 ABA.NYC.mil (26.0.0.73) 412 msec 628 msec 664 msec
Table 1-12 describes the fields shown in the display.
| Field | Description |
|---|---|
| 1 | Indicates the sequence number of the protocol translator in the path to the host. |
| DEBRIS.CISCO.COM | Host name of this protocol translator. |
| 131.108.1.6 | IP address of this protocol translator. |
| 1000 msec 8 msec 4 msec | Round-trip time for each of the three probes that are sent. |
The following display shows a sample trace session involving the extended dialog of the trace command:
Protocol [ip]:
Target IP address: mit.edu
Source address:
Numeric display [n]:
Timeout in seconds [3]:
Probe count [3]:
Minimum Time to Live [1]:
Maximum Time to Live [30]:
Port Number [33434]:
Loose, Strict, Record, Timestamp, Verbose[none]:
Type escape sequence to abort.
Tracing the route to MIT.EDU (18.72.2.1)
  1 ICM-DC-2-V1.ICP.NET (192.108.209.17) 72 msec 72 msec 88 msec
  2 ICM-FIX-E-H0-T3.ICP.NET (192.157.65.122) 80 msec 128 msec 80 msec
  3 192.203.229.246 540 msec 88 msec 84 msec
  4 T3-2.WASHINGTON-DC-CNSS58.T3.ANS.NET (140.222.58.3) 84 msec 116 msec 88 msec
  5 T3-3.WASHINGTON-DC-CNSS56.T3.ANS.NET (140.222.56.4) 80 msec 132 msec 88 msec
  6 T3-0.NEW-YORK-CNSS32.T3.ANS.NET (140.222.32.1) 92 msec 132 msec 88 msec
  7 T3-0.HARTFORD-CNSS48.T3.ANS.NET (140.222.48.1) 88 msec 88 msec 88 msec
  8 T3-0.HARTFORD-CNSS49.T3.ANS.NET (140.222.49.1) 96 msec 104 msec 96 msec
  9 T3-0.ENSS134.T3.ANS.NET (140.222.134.1) 92 msec 128 msec 92 msec
 10 W91-CISCO-EXTERNAL-FDDI.MIT.EDU (192.233.33.1) 92 msec 92 msec 112 msec
 11 E40-RTR-FDDI.MIT.EDU (18.168.0.2) 92 msec 120 msec 96 msec
 12 MIT.EDU (18.72.2.1) 96 msec 92 msec 96 msec
Table 1-13 describes the fields that are unique to the extended trace sequence, as shown in the display.
| Field | Description |
|---|---|
| Target IP address | You must enter a host name or an IP address. There is no default. |
| Source address | One of the interface addresses of the protocol translator to use as a source address for the probes. The protocol translator normally selects the best source address to use. |
| Numeric display | The default is to have both a symbolic and numeric display; however, you can suppress the symbolic display. |
| Timeout in seconds | The number of seconds to wait for a response to a probe packet. The default is 3 seconds. |
| Probe count | The number of probes to be sent at each TTL level. The default count is 3. |
| Minimum Time to Live [1] | The TTL value for the first probes. The default is 1, but it can be set to a higher value to suppress the display of known hops. |
| Maximum Time to Live [30] | The largest TTL value that can be used. The default is 30. The trace command terminates when the destination is reached or when this value is reached. |
| Port Number | The destination port used by the UDP probe messages. The default is 33434. |
| Loose, Strict, Record, Timestamp, Verbose | IP header options. You can specify any combination. The trace command issues prompts for the required fields. Note that trace places the requested options in each probe; however, there is no guarantee that all protocol translators (or end nodes) will process the options. |
| Loose Source Routing | Allows you to specify a list of nodes that must be traversed when going to the destination. |
| Strict Source Routing | Allows you to specify a list of nodes that must be the only nodes traversed when going to the destination. |
| Record | Allows you to specify the number of hops to leave room for. |
| Timestamp | Allows you to specify the number of time stamps to leave room for. |
| Verbose | If you select any option, the verbose mode is automatically selected and trace prints the contents of the option field in any incoming packets. You can prevent verbose mode by selecting it again, toggling its current setting. |
Table 1-14 describes the characters that can appear in trace output.
| Char | Description |
|---|---|
| nn msec | For each node, the round-trip time in milliseconds for the specified number of probes. |
| * | The probe timed out. |
| ? | Unknown packet type. |
| Q | Source quench. |
| P | Protocol unreachable. |
| N | Network unreachable. |
| U | Port unreachable. |
| H | Host unreachable. |
trace (user level)
|
|