|
|

This chapter begins with an introduction to Cisco's implementation of the IP protocol for its line of routing products, and continues with an in-depth view of configuration options, IP addressing and its various protocols, and examples of well-designed networks. These tasks and topics are covered in this chapter:
See the chapter "The IP Routing Protocols" for information on the various routing protocols, how they have evolved, and how they are best used in complex internetworks.
Cisco's implementation of TCP/IP provides all major services contained in the various protocol specifications. Cisco routers also provide the TCP and UDP little services called Echo service and Discard. These services are described in RFC 862 and RFC 863.
Cisco supports both TCP and UDP at the Transport Layer, for the maximum flexibility in services. Some Cisco global and interface commands require UDP packets to be sent (see the section "Configuring ICMP and Other IP Services"). Cisco supports all standards for IP broadcasts.
The process of configuring your router for IP routing differs from the procedures for configuring other protocols in that you do not have to initially enable IP routing. All Cisco routers are shipped with IP already enabled. The ip routing global configuration command is described later in this chapter to allow you to re-enable IP routing if you have disabled it. You should follow the steps on the next page to configure individual interfaces and other options.
Step 2: Consider addressing options and broadcast packet handling, using commands described in the "Setting IP Interface Addresses" and "Broadcasting in the Internet" sections.
Step 3: Optionally, configure packet sizes and other performance parameters as well as ICMP and other IP services. Information for these tasks are in the section "Configuring ICMP and Other IP Services."
Step 4: Configure access lists and other security options, if desired.
Step 5: Configure routing. The IP routing protocols are discussed in the chapter "IP Routing Protocols."
Each task is described in the following sections, and are followed by descriptions of the EXEC commands to maintain, monitor, and debug an IP network. Summaries of the global configuration commands, interface subcommands, and line subcommands described in this section appear at the end of this chapter.
The ip routing global configuration command enables IP routing for the router. Its full syntax follows.
ip routingIf the system is running bridging software, the no ip routing subcommand turns off IP routing when setting up a system to bridge (as opposed to route) IP datagrams. (See the explanations on bridging options in the chapters in Part Four.) The default setting is to perform IP routing.
The official description of Internet addresses is found in RFC 1166, "Internet Numbers." The Network Information Center (NIC), which maintains and distributes the RFC documents, also assigns Internet addresses and network numbers. Upon application from an organization, NIC assigns a network number or range of addresses appropriate to the number of hosts on the network.
As described in RFC 1020, Internet addresses are 32-bit quantities, divided into five classes. The classes differ in the number of bits allocated to the network and host portions of the address. For this discussion, consider a network to be a collection of devices (hosts) that have the same network field value in their Internet addresses.
The Class A Internet address format allocates the highest eight bits to the network field and sets the highest-order bit to 0 (zero). The remaining 24 bits form the host field. Only 126 Class A networks can exist, but each Class A network can have almost 17 million hosts. Figure 1-1 illustrates the Class A address format.

The Class B Internet address format allocates the highest 16 bits to the network field and sets the two highest-order bits to 1,0. The remaining 16 bits form the host field. Over 16,000 Class B networks can exist, and each Class B network can have over 65,000 hosts. Figure 1-2 illustrates the Class B address format.

The Class C Internet address format allocates the highest 24 bits to the network field and sets the three highest-order bits to 1,1,0. The remaining eight bits form the host field. Over two million Class C networks can exist, and each Class C network can have up to 254 hosts. Figure 1-3 illustrates the Class C address format.

The Class D Internet address format is reserved for multicast groups, as discussed in RFC 988. In Class D addresses, the four highest-order bits are set to 1,1,1,0.
The Class E Internet address format is reserved for future use. In Class E addresses, the four highest-order bits are set to 1,1,1,1. The router currently ignores Class D and Class E Internet addresses, except the global broadcast address 255.255.255.255.
The notation for Internet addresses consists of four numbers separated by dots (periods). Each number, written in decimal, represents an 8-bit octet. When strung together, the four octets form the 32-bit Internet address. This notation is called dotted decimal.
These samples show 32-bit values expressed as Internet addresses:
192.31.7.19
10.7.0.11
255.255.255.255
0.0.0.0
Note that 255, which represents an octet of all ones, is the largest possible value of a field in a dotted-decimal number.
Some Internet addresses are reserved for special uses and cannot be used for host, subnet, or network addresses. Table 1-1 lists ranges of Internet addresses and shows which addresses are reserved and which are available for use.
| Class | Address or Range | Status |
|---|---|---|
A | 0.0.0.0 | Reserved |
B | 128.0.0.0 | Reserved |
C | 192.0.0.0 | Reserved |
D, E | 224.0.0.0 through 255.255.255.254 | Reserved |
To create an address that refers to a specific network, the bits in the host portion of the address must all be zero. For example, the Class C address 192.31.7.0 refers to a particular network (no local or host component).
Conversely, if you want a local address only, without a network portion, all the bits in the network portion of an address must be 0. For example, the Class C address 0.0.0.234 refers to a particular host (local address).
If you want to send a packet to all hosts on the network specified in the network portion of the address, the local address must be all ones. For example, the Class B address 128.1.255.255 refers to all hosts on network 128.1.0.0. Sending a packet to all specified hosts on a network is called a broadcast, which is described in the section "Broadcasting in the Internet." You can also find general information on broadcasts in the chapter "IP Routing Protocols."
Subnetting is a scheme for imposing a simple two-level hierarchy on host addresses, allowing multiple logical networks to exist within a single Class A, B, or C network. The usual practice is to use a few of the contiguous leftmost bits in the host portion of the network addresses for a subnet field. For example, Figure 1-4 shows a Class B address with five bits of the host portion used as the subnet field. The official description of subnetting is contained in RFC 950, "Internet Standard Subnetting Procedure."

Routers and hosts can use the subnet field for routing. The rules for routing on subnets are identical to the rules for routing on networks. However, correct routing requires that all subnets of a network be physically contiguous. In other words, the network must be set up such that it does not require traffic between any two subnets to cross another network. The current Cisco implementation requires that all subnets of a network have the same number of subnet bits.
You can create a single network from subnets that are physically separated by another network by using a secondary address. An example is shown in the section "Setting IP Interface Addresses."
A subnet mask identifies the subnet field of network addresses. All subnets of a given class, A, B, or C, should use the same subnet mask. This mask is a 32-bit Internet address written in dotted-decimal notation with all ones in the network and subnet portions of the address. For the example shown in Figure 1-4, the subnet mask is 255.255.248.0. Table 1-2 shows the subnet masks you can use to divide an octet into subnet and host fields. The subnet field can consist of any number of the host field bits; you do not need to use multiples of eight. However, you should use three or more bits for the subnet field—a subnet field of two bits yields only four subnets, two of which are reserved (the 1,1 and 0,0 values).
| Subnet Bits | Host Bits | Hex Mask | Decimal Mask |
|---|---|---|---|
0 | 8 | 0 | 0 |
1 | 7 | 0x80 | 128 |
2 | 6 | 0xC0 | 192 |
3 | 5 | 0xE0 | 224 |
4 | 4 | 0xF0 | 240 |
5 | 3 | 0xF8 | 248 |
6 | 2 | 0xFC | 252 |
7 | 1 | 0xFE | 254 |
8 | 0 | 0xFF | 255 |
Use the ip address interface subcommand to set an IP address for an interface. The full command syntax follows:
ip address address mask [secondary]The two required arguments are address, which is an IP address, and mask, the network mask for the associated IP network. The subnet mask must be the same for all interfaces connected to subnets of the same network. Hosts can determine subnet masks using the Internet Control Message Protocol (ICMP) Mask Request message. Routers respond to this request with an ICMP Mask Reply message. (See the section "Configuring ICMP and Other IP Services" for more details.)
You can disable IP processing on a particular interface by removing its IP address with the no ip address subcommand. If the router detects another host using one of its IP addresses, it will print an error message on the console. The software supports multiple IP addresses per interface.
You may use this command to specify additional secondary IP addresses by including the keyword secondary after the IP address and subnet mask.
In the sample below, 131.108.1.27 is the primary address; 192.31.7.17 and 192.31.8.17 are secondary addresses for Ethernet 0.
interface ethernet 0
ip address 131.108.1.27 255.255.255.0
ip address 192.31.7.17 255.255.255.0 secondary
ip address 192.31.8.17 255.255.255.0 secondary
Subnetting with a subnet address of zero is generally not allowed because of the confusion inherent in having a network and a subnet with indistinguishable addresses. For example, if network 131.108.0.0 is subnetted as 255.255.255.0, subnet zero would be written as 131.108.0.0—which is identical to the network address.
To enable or disable the use of subnet zero for interface addresses and routing updates, use the global configuration command ip subnet-zero. Its full command syntax follows:
ip subnet-zeroThe default is for this command to be disabled.
In the example below, subnet-zero is enabled for the router:
ip subnet-zero
A device in the Internet may have both a local address, which uniquely identifies the device on its local segment or LAN, and a network address which identifies the network the device belongs to. The local address is more properly known as a data link address because it is contained in the data link layer (Layer 2 of the OSI Model) part of the packet header and is read by data link devices (bridges and all device transceivers, for example). The more technically inclined will refer to local addresses as MAC addresses because the Media Access Control (MAC) sublayer within the data link layer processes addresses for the layer.
To communicate with a device on Ethernet, the router must first determine the 48-bit MAC or local data link address of that device. The process of determining the local data link address from an Internet address is called address resolution. The process of determining the Internet address from a local data link address is called reverse address resolution. The router uses three forms of address resolution: Address Resolution Protocol (ARP), proxy ARP, and Probe (which is similar to ARP). The router also uses the Reverse Address Resolution Protocol (RARP). The ARP, proxy ARP, and RARP protocols, which are used on Ethernet, are defined in RFCs 826, 1027, and 903, respectively. Probe is a protocol developed by the Hewlett-Packard Company for use on IEEE-802.3 networks.
To send an Internet data packet to a local host with which it has not previously communicated, the router first broadcasts an ARP Request packet. The ARP Request packet requests the MAC local data link address corresponding to an Internet address. All hosts on the network receive this request, but only the host with the specified Internet address will respond.
If present and functioning, the host with the specified Internet address responds with an ARP Reply packet containing its local data link address. The router receives the ARP Reply packet, stores the local data link address in the ARP cache for future use, and begins exchanging packets with the host.
Use the EXEC command show arp to examine the contents of the ARP cache. The show ip arp command will show IP entries.
The function of ARP is to provide a dynamic mapping between 32-bit IP addresses and 48-bit local hardware (Ethernet, FDDI, Token Ring) addresses. ARP may also be used for protocols other than IP and media that have other than 48-bit addresses.
Because most hosts support dynamic resolution, you generally do not need to specify static ARP cache entries. If you do need to define static ARP cache entries, you can do so globally.
When used as a global configuration command, the arp command installs a permanent entry in the ARP cache. The router uses this entry to translate 32-bit Internet Protocol addresses into 48-bit hardware addresses. The full syntax follows:
arp internet-address hardware-address type [alias]The argument internet-address is the Internet address in dotted decimal format corresponding to the local data link address specified by the argument hardware-address.
The argument type is an encapsulation description. This is typically the arpa keyword for Ethernets and is always snap for FDDI and Token Ring interfaces, and ultra for the UltraNet interfaces. See the discussions of the individual interface types for more information on possible encapsulations.
The following is a sample of a static ARP entry for a typical Ethernet host.
arp 192.31.7.19 0800.0900.1834 arpa
The no arp subcommand removes the specified entry from the ARP cache. To remove all nonstatic entries from the ARP cache, use the privileged EXEC command clear arp-cache.
When used as an interface subcommand, the arp command controls the interface-specific handling of IP address resolution into 48-bit Ethernet hardware addresses. The full syntax of the arp interface subcommand follows:
arp {arpa|probe|snap}The keyword arpa, which is the default, specifies standard Ethernet style ARP (RFC 826), probe specifies the HP Probe protocol for IEEE-802.3 networks, and snap specifies ARP packets conforming to RFC 1042. The show interfaces monitoring command displays the type of ARP being used on a particular interface. Probe is described in more detail later in this chapter.
To set the number of seconds an ARP cache entry will stay in the cache, use the arp timeout interface subcommand. The full syntax of this command follows:
arp timeout secondsThe value of the argument seconds is used to age an ARP cache entry related to that interface. By default, the seconds argument is set to four hours (14,400 seconds). A value of zero seconds sets no timeout, and the cache entries are then never cleared.
Use the no arp timeout command to return to the default value.
This command is ignored when issued on interfaces that do not use ARP. Use the EXEC command show interfaces to display the ARP timeout value. The value follows the Entry Timeout: heading, as seen in this sample display:
ARP type: ARPA, PROBE, Entry Timeout: 14400 sec
The following example illustrates how to set the ARP timeout to 12000 seconds, to allow entries to time out more quickly than the default.
arp timeout 12000
The router uses proxy ARP, as defined in RFC 1027, to help hosts with no knowledge of routing determine the hardware addresses of hosts on other networks or subnets. Under proxy ARP, if the router receives an ARP Request for a host that is not on the same network as the ARP Request sender, and if the router has the best route to that host, then the router sends an ARP Reply packet giving its own local data link address. The host that sent the ARP Request then sends its packets to the router, which forwards them to the intended host.
The ip proxy-arp interface subcommand enables proxy ARP on the interface. The full command syntax for this command follows.
ip proxy-arpProxy ARP is enabled by default.
The router can be made to use the Probe protocol (in addition to ARP) whenever it attempts to resolve an IEEE-802.3 or Ethernet local data link address. Use the arp probe interface subcommand to enable use of the Probe protocol. The subset of Probe that performs address resolution is called Virtual Address Request and Reply. Using Probe, the router can communicate transparently with Hewlett-Packard IEEE-802.3 hosts that use this type of data encapsulation.
The syntax for this command, which enables or disables Probe for IEEE-802.3 and Ethernet networks, is as follows.
arp probeThe other options of the arp command are discussed under ARP, earlier in this chapter. This command is disabled by default.
Reverse ARP (RARP) was defined in RFC 903. If a router does not know the IP address of one of its Ethernet interfaces, it will try RARP during start up processing to attempt to determine the Internet address, based on its interface local data link address. Diskless hosts also use RARP at boot time to determine their protocol addresses. RARP works in the same way as ARP, except that the RARP Request packet requests an Internet address instead of a local data link address. Use of RARP requires a RARP server on the same network segment as the router interface.
The current standard for an Internet broadcast address requires that the host portion of the address consist of all ones. If the network portion of the broadcast address is also all ones, the broadcast applies to the local network only. If the network portion of the broadcast address is not all ones, the broadcast applies to the network or subnet specified.
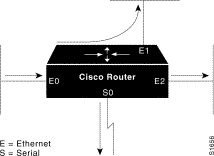
Cisco routers support two kinds of broadcasting: directed broadcasting and flooding. A directed broadcast is a packet sent to a specific network or series of networks, while a flooded broadcast packet is sent to every network. as shown in Figure 1-5 shows an example in which the packets coming into the router through interface E0 are flooded out of interfaces E1, E2 and Serial 0. A directed-broadcast address includes the network or subnet fields.
For example, if the network address is 128.1.0.0, then the address 128.1.255.255 indicates all hosts on network 128.1.0.0. This would be a directed broadcast. If network 128.1.0.0 has a subnet mask of 255.255.255.0 (the third octet is the subnet field), then the address 128.1.5.255 specifies all hosts on subnet 5 of network 128.1.0.0, another directed broadcast.
The ip directed-broadcast interface subcommand is used to enable forwarding of directed broadcasts on an interface. The full syntax of this command follows.
ip directed-broadcastUse the no ip broadcast-address command to remove the broadcast address. To change from another broadcast address to the default broadcast address of 255.255.255.255, you must enter the following command:
ip broadcast-address 255.255.255.255
You cannot use a command in the format no ip broadcast-address x.x.x.x (where x.x.x.x is not 255.255.255.255) to return to the default broadcast address.
The argument address is the desired IP broadcast address for a network. If a broadcast address is not specified, the system defaults to a broadcast address of all ones or 255.255.255.255.
Use the no ip broadcast-address command to remove the broadcast address or addresses.
If the router does not have nonvolatile memory, and you want the specify the broadcast address to use before the router has been configured, you can change the Internet broadcast address by setting jumpers in the processor configuration register. Setting bit 10 causes the router to use all zeros. Bit 10 interacts with bit 14, which controls the network and subnet portions of the broadcast address. Setting bit 14 causes the router to include the network and subnet portions of its address in the broadcast address. Table 1-3 shows the combined effect of setting bits 10 and 14.
| Bit 14 | Bit 10 | Address (<net><host>) |
|---|---|---|
out | out | <ones><ones> |
out | in | <zeros><zeros> |
in | in | <net><zeros> |
in | out | <net><ones> |
For more information about the configuration register, see the Cisco Systems hardware reference guide for your system.
To correct this situation, configure the interface of your Cisco router to forward certain classes of UDP broadcasts to a helper address. See the description of the ip helper-address interface subcommand and the ip forward-protocol global configuration commands in this chapter for more information.
There are circumstances in which you want to control which broadcast packets and which protocols are forwarded. You do this with helper addresses and the forward-protocol commands.
The ip helper-address interface subcommand tells the router to forward UDP broadcasts, including BootP, received on the interface. (UDP is the connectionless alternative to TCP at the Transport Layer.) Use the ip helper-address interface subcommand to specify the destination address for forwarding broadcast packets. Full command syntax follows.
ip helper-address addressThe address argument specifies a destination broadcast or host address to be used when forwarding such datagrams. You can have more than one helper address per interface. You remove the list with no ip helper-address.
If you do not specify a helper address command, the router will not forward UDP broadcasts. The no version disables the forwarding of broadcast packets to specific addresses.
This example defines an address that act as a helper address.
interface ethernet 1
ip helper-address 121.24.43.2
The ip forward-protocol global configuration command allows you to specify which protocols and ports the router will forward. Its full syntax is listed next.
ip forward-protocol {udp|nd} [port]The keyword nd is the ND protocol used by older diskless Sun workstations. The keyword udp is the UDP protocol. A UDP destination port can be specified to control which UDP services are forwarded. By default both UDP and ND forwarding are enabled if a helper address has been defined for an interface. If no ports are specified, these datagrams are forwarded, by default:
Use the no ip forward-protocol command with the appropriate keyword and argument to remove the protocol.
The example below first defines a helper address, then uses the ip forward-protocol command to specify forwarding of UDP only.
ip forward-protocol udp
!
interface ethernet 1
ip helper-address 131.120.1.0
To permit IP broadcasts to be flooded throughout the internetwork in a controlled fashion, use the global configuration command ip forward-protocol spanning-tree. The full command syntax follows:
ip forward-protocol spanning-treeThis command is an extension of the ip helper-address interface command, in that the same packets that may be subject to the helper address and forwarded to a single network may now be flooded. Only one copy of the packet will be put on each network segment.
The ip forward-protocol spanning-tree command uses the database created by the bridging spanning-tree protocol.
If an interface does not have bridging configured, it will still be able to receive broadcasts, but it will never forward broadcasts received on that interface, and it will never use that interface to send broadcasts received on a different interface.
If no actual bridging is desired, then a type-code bridging filter may be configured which will deny all packet types from being bridged. Refer to the chapter "Configuring Transparent Bridging" for more information about using access lists to filter bridged traffic. The spanning-tree database is still available to the IP forwarding code to use for the flooding.
Packets must meet the following criteria to be considered for flooding (these are the same conditions for IP helper addresses):
A flooded UDP datagram is given the destination address specified by the ip broadcast command on the output interface. This can be set to any desired address. Thus, the destination address may change as the datagram propagates through the network. The source address is never changed. The TTL value is decremented.
After a decision has been made to send the datagram out on an interface (and the destination address possibly changed), the datagram is handed to the normal IP output routines and is therefore subject to access lists, if they are present on the output interface.
Use the no ip forward-protocol spanning-tree command to prevent flooding of IP broadcasts.
Several early TCP/IP implementations do not use the current broadcast address standard. Instead, they use the old standard, which calls for all zeros instead of all ones to indicate broadcast addresses. Many of these implementations do not recognize an all-ones broadcast address and fail to respond to the broadcast correctly. Others forward all-ones broadcasts, which causes a serious network overload known as a broadcast storm. Implementations that exhibit these problems include UNIX systems based on versions of BSD UNIX prior to Version 4.3.
Routers provide some protection from broadcast storms by limiting their extent to the local cable. Bridges, because they are Layer 2 devices, even intelligent bridges, forward broadcasts to all network segments, thus propagating all broadcast storms.
The best solution to the broadcast storm problem is to use a single broadcast address scheme on a network. Most modern TCP/IP implementations allow the network manager to set the address to be used as the broadcast address. Many implementations, including that on the Cisco router, can accept and interpret all possible forms of broadcast addresses.
The Internet Control Message Protocol (ICMP) is a special protocol within the IP protocol suite that focuses exclusively on control and management of IP connections. ICMP messages are generated by routers that discover a problem with the IP part of a packet's header; these messages could be alerting another router, or they could be sent to the source or destination device (host). Characteristics of the ICMP messages follow.
The ip mask-reply interface subcommand tells the router to respond to mask requests. The full syntax of this command follows.
ip mask-replyThe default is not to send a Mask Reply, and this default is restored with the no ip mask-reply command.
Each router interface has an output hold queue with a limited number of entries that it can store. Upon reaching this limit, the interface sends an ICMP Source Quench message to the source host of any additional packets and discards the packet. When the interface empties the hold queue by one or more packets, the interface can accept new packets again. The router limits the rate at which it sends Source Quench and Unreachable messages to one per second.
If the router receives a nonbroadcast packet destined for itself that uses a protocol the router does not recognize, it sends an ICMP Protocol Unreachable message to the source.
If the router receives a datagram which it is unable to deliver to its ultimate destination because it knows of no route to the destination address, it replies to the originator of that datagram with an ICMP Host Unreachable message. Use the ip unreachables interface subcommand to enable or disable the sending of these messages. The full syntax for this command follows.
ip unreachablesThe default is to send unreachable messages. The no ip unreachables subcommand disables sending ICMP unreachable messages on an interface.
The Cisco router sends an ICMP Redirect message to the originator of any datagram that it is forced to resend through the same interface on which it was received, since the originating host could presumably have sent that datagram to the ultimate destination without involving the router at all. The router ignores Redirect messages that have been sent to it by other routers. Use the ip redirects interface subcommand to enable or disable the sending of these messages, as follows:
ip redirectsThe default is to send redirects. The no version disables the sending of redirect messages.
The default maximum MTU depends on the interface medium type. The minimum MTU is 128 bytes. The no ip mtu subcommand restores the default MTU for that interface.
The CTR card does not support the switching of frames larger than 4472 bytes. Interoperability problems may occur if CTRcards are intermixed with other Token Ring cards on the same network. These problems can be minimized by lowering the IP and CLNS maximum packet sizes (MTUs) to be the same on all devices on the network, using the ip mtu and clns mtu interface commands.
In the following example, you are setting the maximum IP packet size for the first serial interface to 300 bytes.
interface serial 0
ip mtu 300
All Cisco routers running software Release 8.3 or later have the IP MTU Path Discovery mechanism running by default. IP Path MTU Discovery allows a host to dynamically discover and cope with differences in the maximum allowable MTU size of the various links along the path. Sometimes a router is unable to forward a datagram because fragmentation of the datagram is required (the packet is larger than the MTU you set for the interface with the ip mtu command), but the "Don't fragment" bit is set. If you have Path Discovery enabled, the router sends a message to the sending host, alerting it to the problem. The host will have to replicate packets destined for the receiving interface so that they fit the smallest packet size of all the links along the path. This technique is defined by RFC 1191 and shown in Figure 1-6.

MTU Path Discovery is useful when a link in a network goes down, forcing use of another, different MTU-sized link (and different routers). As an example, suppose one were trying to send IP packets over a network where the MTU in the first router is set to 1500 bytes, but then reaches a router where the MTU is set to 512 bytes. If the datagram's "Don't fragment" bit is set, the datagram would be dropped because the 512-router is unable to forward it. The router returns an ICMP Destination Unreachable message to the source of the datagram with its Code field indicating "Fragmentation needed and DF set." To support Path MTU Discovery, it would also include the MTU of the next-hop network link in the low-order bits of an unused header field.
MTU Path Discovery is also useful when a connection is first being established and the sender has no information at all about the intervening links. It is always advisable to use the largest MTU that the links will bear; the larger the MTU, the fewer packets the host needs to send.
When you use the privileged EXEC command ping (IP packet internet groper function), the router sends ICMP Echo messages to check host reachability and network connectivity. If the router receives an ICMP Echo message, it sends an ICMP Echo Reply message to the source of the ICMP Echo message. See the section "The IP Ping Command" later in this chapter for more information about the use of the ping command.
The router supports the Internet header options Strict Source Route, Loose Source Route, Record Route, and Time Stamp.
The router examines the header options to every packet that passes through it. If it finds a packet with an invalid option, the router sends an ICMP Parameter Problem message to the source of the packet and discards the packet.
The router maintains a cache of host-name-to-address mappings for use by the EXEC connect or telnet commands and related Telnet support operations. This cache speeds the process of converting names to addresses.
To define a static host-name-to-address mapping in the host cache, use the ip host global configuration command, as shown below:
ip host name [TCP-port-number] address1 [address2...address8]The argument name is the host name, and the argument address is the associated IP address. Up to eight addresses may be bound to a host name. The no version removes names-to-address mapping.
The following example uses the ip host command to define two static mappings.
ip host croff 192.31.7.18
ip host bisso-gw 10.2.0.2 192.31.7.33
You can specify that the Domain Name System (DNS) or IEN-116 Name Server automatically determines host-name-to-address mappings. Use these global configuration commands to establish different forms of dynamic name lookup:
To specify one or more hosts that supply name information, use the ip name-server global configuration command, as follows:
ip name-server server-address1 [server-address2 . . . server-address6]The arguments server-address are the Internet addresses of up to six name servers.
This command specifies host 131.108.1.111 as the primary name server, and host 131.108.1.2 as the secondary server.
ip name-server 131.108.1.111 131.108.1.2
The global configuration command ip domain-name defines a default domain name the router uses to complete unqualified host names (names without a dotted domain name appended to them). The full syntax of this command follows:
ip domain-name nameThe argument name is the domain name; do not include the initial period that separates an unqualified name from the domain name. The no ip domain-name command disables use of the Domain Name System.
This command defines cisco.com as the default name.
ip domain-name cisco.com
Any IP host name that does not contain a domain name, that is, any name without a dot (.), will have the dot and cisco.com appended to it before being added to the host table.
By default, the IP Domain Name System (DNS)-based host-name-to-address translation is enabled. To enable or disable this feature, use the ip domain-lookup global configuration command as follows:
ip domain-lookupThe default is for DNS lookup to be enabled. The no version disables DNS host-name lookup.
To specify the IP IEN-116 Name Server host-name-to-address translation, use the ip ip name-lookup global configuration command as follows:
ip ipname-lookupThe default is for IEN-116 lookup to be enabled. This command is disabled by default; the no ip ipname-lookup command restores the default.
HP Probe Proxy support allows a router to respond to HP Probe Proxy Name requests. These are typically used at sites that have HP equipment and are already using HP Probe. Use the interface subcommand ip probe proxy to enable or disable HP Proxy Probe, as follows:
ip probe proxyThis command is disabled by default. To use the proxy service, you must first enter the host name of the HP host into the host table through the global configuration command ip hp-host. Full syntax follows:
ip hp-host hostname ip-addressThe hostname argument specifies the host's name and the argument ip-address specifies its IP address. Use the no ip hp-host command with the appropriate arguments to remove the host name.
The following example specifies an HP host's name and address, and then enables Probe Proxy.
ip hp-host BCWjo 131.108.1.27
interface ethernet 0
ip probe proxy
Commands that will help you to maintain and debug your HP-based network are listed in the sections "Monitoring the IP Network" and "Debugging the IP Network" at the end of this chapter.
To define a list of default domain names to complete unqualified host names, use the ip domain-list global configuration command. The full syntax of this command follows.
ip domain-list nameThe ip domain-list command is similar to the ip domain-name command, except that with ip domain-list you can define a list of domains, each to be tried in turn.
The argument name is the domain name; do not enter an initial period. Specify only one name when you enter the ip domain-list command.
Use the no ip domain-list command with the appropriate argument to delete a name from the list.
In the example below, several domain names are added to a list:
ip domain-list martinez.com
ip domain-list stanford.edu
The example below adds a name to, and then deletes a name from the list:
ip domain-list sunya.edu
no ip domain-list stanford.edu
An access list is a sequential collection of permit and deny conditions that apply to Internet addresses. The router tests addresses against the conditions in an access list one by one. The first match determines whether the router accepts or rejects the address. Because the router stops testing conditions after the first match, the order of the conditions is critical. If no conditions match, the router rejects the address.
The two steps involved in using access lists are:
Step 2: Apply the list to interfaces to implement a policy.
You can use access lists in several ways:
The Cisco software supports two styles of access lists for IP:
To create an access list, use the access-list global configuration command. Full command syntax follows:
access-list list {permit|deny} source source-maskThe argument list is an integer from 1 through 99 that you assign to identify one or more permit/deny conditions as an access list. Access list 0 (zero) is predefined; it permits any address and is the default access list for all interfaces.
The router compares the source address being tested to source, ignoring any bits specified in source-mask. If you use the keyword permit, a match causes the address to be accepted. If you use the keyword deny, a match causes the address to be rejected.
The arguments source and source-mask are 32-bit quantities written in dotted-decimal format. Address bits corresponding to wildcard mask bits set to 1 are ignored in comparisons; address bits corresponding to wildcard mask bits set to zero are used in comparisons. See the examples later in this section.
An access list can contain an indefinite number of actual and wildcard addresses. A wildcard address has a nonzero address mask and thus potentially matches more than one actual address. The router examines first the actual address, then the wildcard (source-mask) addresses. The order of the wildcard addresses is important because the router stops examining access-list entries after it finds a match.
The no access-list subcommand deletes the entire access list. To display the contents of all access lists, use the EXEC command show access-lists.
There are implicit masks in IP access lists. For instance, if you omit the mask from an associated IP host address access-list specification, 0.0.0.0 is assumed to be the mask.Consider the following example configuration:
access-list 1 permit 0.0.0.0
access-list 1 permit 131.108.0.0
access-list 1 deny 0.0.0.0 255.255.255.255
For this example, the following masks are implied in the first two lines:
access-list 1 permit 0.0.0.0 0.0.0.0
access-list 1 permit 131.108.0.0 0.0.0.0
The last line in the configuration (using the deny keyword) can be left off since IP access-lists implicitly deny all other access; this is equivalent to finishing the access list with the following command statement:
access-list 1 deny 0.0.0.0 255.255.255.255
The following access list allows access for only those hosts on the three specified networks. It assumes that subnetting is not used; the masks apply to the host portions of the network addresses. Any hosts with a source address that does not match the access list statements will be rejected.
access-list 1 permit 192.5.34.0  0.0.0.255
access-list 1 permit 128.88.1.0  0.0.255.255
access-list 1 permit 36.0.0.0  0.255.255.255
! (Note: all other access implicitly denied)
To specify a large number of individual addresses more easily, you can omit the address mask that is all zeros from the access-list configuration command. Thus, the following two configuration commands are identical in effect:
access-list 2 permit 36.48.0.3
access-list 2 permit 36.48.0.3  0.0.0.0
Extended access lists allow finer granularity of control. They allow you to specify both source and destination addresses and some protocol and port number specifications.
To define an extended access list, use the extended version of the access-list subcommand.
access-list list {permit|deny} protocol source source-mask destination destination-mask [operator operand] [established]The argument list is an integer from 100 through 199 that you assign to identify one or more extended permit/deny conditions as an extended access list. Note that a list number in the range 100 to 199 distinguishes an extended access list from a standard access list. The condition keywords permit and deny determine whether the router allows or disallows a connection when a packet matches an access condition. The router stops checking the extended access list after a match occurs. All conditions must be met to make a match.
The argument protocol is one of the following keywords:
Use the keyword ip to match any Internet protocol, including TCP, UDP, and ICMP.
The argument source is an Internet source address in dotted-decimal format. The argument source-mask is a mask, also in dotted-decimal format, of source address bits to be ignored. The router uses the source and source-mask arguments to match the source address of a packet. For example, to match any address on a Class C network 192.31.7.0, the argument source-mask would be 0.0.0.255. The arguments destination and destination-mask are dotted-decimal values for matching the destination address of a packet.
To differentiate further among packets, you can specify the optional arguments operator and operand to compare destination ports, service access points, or contact names. Note that the ip and icmp protocol keywords do not allow port distinctions.
For the tcp and udp protocol keywords, the argument operator can be one of these keywords:
The argument operand is the decimal destination port for the specified protocol.
For the TCP protocol there is an additional keyword, established, that does not take an argument. A match occurs if the TCP datagram has the ACK or RST bits set, indicating an established connection. The nonmatching case is that of the initial TCP datagram to form a connection; the software goes on to other rules in the access list to determine if a connection is allowed in the first place.
For an example of using an extended access list, suppose you have an Ethernet-to-Internet routing network, and you want any host on the Ethernet to be able to form TCP connections to any host on the Internet. However, you do not want Internet hosts to be able to form TCP connections into the Ethernet except to the mail (SMTP) port of a dedicated mail host.
To do this, you must ensure that the initial request for an SMTP connection is made on TCP destination port 25 from port X where X is a number greater than 1023. The two port numbers continue to be used throughout the life of the connection, with the originator always using port 25 as the destination, and the acceptor always using port X as the destination. The fact that the secure system behind the router will always be accepting mail connections on port 25, with a foreign port number greater than 1023, is what makes it possible to separately allow/disallow incoming and outgoing services. Also remember that the access list used is that of the interface on which the packet would ordinarily be transmitted.
In the following example, the Ethernet network is a Class B network with the address 128.88.0.0 and the mail host's address is 128.88.1.2.
access-list 101 permit tcp  128.88.0.0 0.0.255.255 0.0.0.0 255.255.255.255
access-list 102 permit tcp 0.0.0.0 255.255.255.255 128.88.0.0 0.0.255.255 established
access-list 102 permit tcp 0.0.0.0 255.255.255.255 128.88.1.2 eq 25
interface serial 0
ip access-group 101
interface ethernet 0
ip access-group 102
This is a complex example, designed to show the power of all the options just discussed. The ip access-group interface subcommand is described in a section that follows.
To restrict incoming and outgoing connections between a particular virtual terminal line (into a Cisco device) and the addresses in an access list, use the access-class line configuration subcommand. Full command syntax for this command follows:
access-class list {in|out}This command restricts connections on a line or group of lines to certain Internet addresses.
The argument list is an integer from 1 through 99 that identifies a specific access list of Internet addresses.
The keyword in applies to incoming connections, such as virtual terminals. The keyword out applies to outgoing Telnet connections.
The no access-class line configuration subcommand removes access restrictions on the line for the specified connections.
The following example defines an access list that permits only hosts on network 192.89.55.0 to connect to the virtual terminal ports on the router.
access-list 12 permit 192.89.55.0  0.0.0.255
line 1 5
access-class 12 in
Use the access-class keyword out to define the access checks made on outgoing connections. (A user who types a host name at the router prompt to initiate a Telnet connection is making an outgoing connection.)
The following example defines an access list that denies connections to networks other than network 36.0.0.0 on terminal lines 1 through 5.
access-list 10 permit 36.0.0.0   0.255.255.255
line 1 5
access-class 10 out
To display the access lists for a particular terminal line, use the EXEC command show line and specify the line number.
To control access to an interface, use the ip access-group interface subcommand, as shown below:
ip access-group listThe argument list is an integer from 1 through 199 that specifies an access list.
After receiving and routing a packet to a controlled interface, the router checks the source address of the packet against the access list. If the access list permits the address, the router transmits the packet. If the access list rejects the address, the router discards the packet and returns an ICMP Destination Unreachable message. Access lists are applied on outbound interfaces, to outbound traffic. The no version removes the access group specified.
The following example applies list 101:
interface ethernet 0
ip access-group 101
All aspects of the IP security option (IPSO) are set up using configuration commands. The Cisco IPSO support addresses both the Basic and Extended security options described in a draft of the IPSO circulated by the Defense Communications Agency. This draft document is an early version of RFC 1108. The following list summarizes the differences between Cisco's implementation and RFC 1108:
The following list describes some of the abilities of the IP security option (IPSO).
The following definitions apply to the descriptions of IPSO in this section.
| Level Keyword | Bit Pattern |
|---|---|
Reserved4 | 0000 0001 |
TopSecret | 0011 1101 |
Secret | 0101 1010 |
Confidential | 1001 0110 |
Reserved3 | 0110 0110 |
Reserved2 | 1100 1100 |
Unclassified | 1010 1011 |
Reserved1 | 1111 0001 |
| Authority Keyword | Bit Pattern |
|---|---|
Genser | 1000 0000 |
Siop-Esi | 0100 0000 |
SCI | 0010 0000 |
NSA | 0001 0000 |
The no ip security interface subcommand resets an interface to its default state, dedicated, unclassified Genser; no extended state is allowed.
ip securityUse one of the ip security commands, described in the following sections, to enable other kinds of security.
The ip security dedicated interface subcommand sets the interface to the requested classification and authorities.
ip security dedicated level authority [authority . . .]All traffic entering the system on this interface must have a security option that exactly matches this label. Any traffic leaving via this interface will have this label attached to it. The levels and authorities were listed previously in Table 1-4 and Table 1-5.
The following example sets a confidential level with Genser authority:
ip security dedicated confidential Genser
The ip security multilevel interface subcommand sets the interface to the requested range of classifications and authorities. All traffic entering or leaving the system must have a security option that falls within this range. The levels are set with this command:
ip security multilevel level1 [authority1...] to level2 authority2 [authority2...]Being within range requires that the following two conditions be met:
The following example specifies levels Unclassified to Secret and NSA authority.
ip security multilevel unclassified to secret nsa
IPSO allows you to choose from several interface subcommands to modify your security levels.
The ip security ignore-authorities interface subcommand ignores the authorities field of all incoming datagrams. The value used in place of this field will be the authority value declared for the given interface. Full syntax for this command follows.
ip security ignore-authoritiesThis action is only allowed for single-level interfaces. Enter the no ip security ignore-authorities command to turn this function off.
The ip security implicit-labelling interface subcommand accepts datagrams on the interface, even if they do not include a security option. If your interface has multilevel security set, you must use the second form of the command, because it specifies the precise level and authority to use when labeling the datagram, just like your original ip security multilevel subcommand. The full syntax of the ip security implicit-labelling command follows.
ip security implicit-labellingEnter the ip security implicit-labelling command (optionally, with the appropriate arguments) to turn these functions off.
In the example below, an interface is set for security and will accept unlabeled datagrams.
ip security dedicated confidential genser
ip security implicit-labelling
The ip security extended-allowed interface subcommand accepts datagrams on the interface that have an extended security option present. Full syntax is shown below:
ip security extended-allowedThe default condition rejects the datagram immediately; the no ip security extended-allowed command restores this default.
The ip security add interface subcommand ensures that all datagrams leaving the router on this interface contain a basic security option. Its full syntax follows.
ip security addIf an outgoing datagram does not have a security option present, this subcommand will add one as the first IP option. The security label added to the option field is the label that was computed for this datagram when it first entered the router. Because this action is performed after all the security tests have been passed, this label will either be the same as or will fall within the range of the interface. This action is always enforced on multilevel interfaces.
The ip security strip interface subcommand removes any basic security option that may be present on a datagram leaving the router through this interface. The full syntax of this command follows.
ip security stripThis is performed after all security tests in the router have been passed. This command is not allowed for multilevel interfaces.
The ip security first interface subcommand prioritizes the presence of security options on a datagram. The full syntax of this command is as shown:
ip security firstIf a basic security option is present on an outgoing datagram, but it is not the first IP option, then it is moved to the front of the options field when this subcommand is used.
In order to fully comply with IPSO, the default values for the minor keywords have become complex:
Table 1-6 provides a list of all default values.
| Type | Level | Authority | Implicit | Add |
|---|---|---|---|---|
None | (none) | (none) | On | Off |
Dedicated | Unclassified | Genser | On | Off |
Dedicated | Any | Any | Off | On |
Multilevel | Any | Any | Off | On |
The default value for an interface is "dedicated, unclassified genser." Note that this implies implicit labeling. This may seem unusual, but it makes the system entirely transparent to datagrams without options. This is the setting generated when the no ip security subcommand is given.
In this first example, three Ethernet interfaces are presented. These interfaces are running at security levels of Confidential Genser, Secret Genser, and Confidential to Secret Genser, as shown in Figure 1-7.

The following commands set up interfaces for the configuration in Figure 1-7.
interface ethernet 0
ip security dedicated confidential genser
interface ethernet 1
ip security dedicated secret genser
interface ethernet 2
ip security multilevel confidential genser to secret genser
It is possible for the set up to be much more complex.
In this next example, there are devices on Ethernet 0 that cannot generate a security option, and so must accept datagrams without a security option. These hosts also crash when they receive a security option, therefore, never place one on such interfaces. Furthermore, there are hosts on the other two networks that are using the extended security option to communicate information, so you must allow these to pass through the system. Finally, there is also a host on Ethernet 2 that requires the security option to be the first option present, and this condition must also be specified. The new configuration follows.
interface ethernet 0
ip security dedicated confidential genser
ip security implicit-labelling
ip security strip
interface ethernet 1
ip security dedicated secret genser
ip security extended-allowed
!
interface ethernet 2
ip security multilevel confidential genser to secret genser
ip security extended-allowed
ip security first
Debugging of security-related problems can be performed by using the EXEC command debug ip-packet. Each time a datagram fails any security test in the system, a message is logged describing the exact cause of failure.
Security failure is also reported to the sending host when allowed by the configuration. This calculation on whether to send an error message can be somewhat confusing. It depends upon both the security label in the datagram and the label of the incoming interface. First, the label contained in the datagram is examined for anything obviously wrong. If nothing is wrong, it should be assumed to be correct. If there is something wrong, then the datagram should be treated as unclassified genser. Then this label is compared to the interface range, and the appropriate action is taken. See Table 1-7.
| Classification | Authorities | Action Taken |
|---|---|---|
Too low | Too low | No Response |
In range | Too low | No Response |
Too high | Too Low | No Response |
The range of ICMP error messages that can be generated by the security code is very small. The only possible error messages are:
IP accounting is enabled on a per-interface basis. The IP accounting support records the number of bytes and packets switched through the system on a source and destination IP address basis. Only transit IP traffic is measured, and only on an outbound basis; traffic generated by the router or terminating in the router is not included in the accounting
statistics.
The interface subcommand ip accounting enables or disables IP accounting for transit traffic outbound on an interface. Full syntax of this command follows.
ip accountingIt does not matter whether or not IP fast switching or IP access lists are being used on that interface. The numbers will be accurate; however, IP accounting does not keep statistics if autonomous switching is set.
The global configuration command ip accounting-threshold enables or disables IP accounting for transit traffic outbound on an interface, as follows.
ip accounting-threshold thresholdThe accounting threshold defines the maximum number of entries (source and destination address pairs) that the router accumulates, preventing IP accounting from possibly consuming all available free memory. This level of memory consumption could occur in a router that is switching traffic for many hosts. The default threshold value is 512 entries. Overflows will be recorded; see the monitoring commands for display formats.
The following example sets the IP accounting threshold to only 500 entries.
ip accounting-threshold 500
Use the ip accounting-list global configuration command to filter accounting information for hosts. The full syntax for this command follows.
ip accounting-list ip-address maskThe source and destination address of each IP datagram is logically ANDed with the mask and compared with the ip-address. If there is a match, the information about the IP datagram will be entered into the accounting database. If there is no match, then the IP datagram is considered a transit datagram and will be counted according to the setting of the ip accounting-transits command described next.
Use the no ip accounting-list command with the appropriate argument to remove this function.
The ip accounting-transits global configuration command controls the number of transit records that will be stored in the IP accounting database. The full syntax of this command is as follows.
ip accounting-transits countTransit entries are those that do not match any of the filters specified by ip accounting-list commands. If you do not define filters, the router will not maintain transit entries. To maintain accurate accounting totals, the router software maintains two accounting databases: an active and a checkpointed database.
Use the no ip accounting-transits command to remove this function. The default is zero (0), which is equivalent to the no version of the command.
The following example specifies that no more than 100 transit records are stored.
ip accounting-transit 100
Use the EXEC command show ip accounting to display the active accounting database. The EXEC command show ip accounting checkpoint displays the checkpointed database. The EXEC command clear ip accounting clears the active database and creates the checkpointed database. See the sections "Maintaining the IP Network" and "Monitoring the IP Network" later in this chapter for more options on monitoring your network's accounting.
This section discusses how to configure static routes and source routing, how to control IP processing on serial interfaces, and how to manage fast switching.
The command no ip source-route causes the system to discard any IP datagram containing a source-route option. The ip source-route global configuration subcommand allows the router to handle IP datagrams with source routing header options.
ip source-routeThe default behavior is to perform the source routing.
The ip unnumbered interface subcommand enables IP processing on a serial interface, but does not assign an explicit IP address to the interface. The full command syntax is shown below:
ip unnumbered interface-nameThe argument interface-name is the name of another interface on which the router has an assigned IP address.
Whenever the unnumbered interface generates a packet (for example, for a routing update), it uses the address of the specified interface as the source address of the IP packet. It also uses the address of the specified interface in determining which routing processes are sending updates over the unnumbered interface. Restrictions include:
In the example below, the first serial interface is given Ethernet 0's address.
     interface ethernet 0
     ip address 131.108.6.6 255.255.255.0
     interface serial 0
     ip unnumbered ethernet 0
When a route is learned on this receive-only interface, the interface designated as the source of the route is converted to interface-name. This is useful in setting up dynamic IP routing over a simplex circuit, that is, a circuit that receives only or transmits only. When packets are routed out interface-name, they are sent to the IP address of the source of the routing update. To reach this IP address on a transmit-only Ethernet link, a static ARP entry mapping this IP address to the hardware address of the other end of the link is required.
Figure 1-8 shows two routers sharing transmit only and receive only Ethernet connections using IP.

interface ethernet 0
ip address 128.9.1.1
!
interface ethernet 1
ip address 128.9.1.2
transmit-interface ethernet 0
!
!use show interfaces command to find router2-MAC-address-E0
arp router2-MAC-address-E0 128.9.1.4 arpa
interface ethernet 0
ip address 128.9.1.3
transmit-interface ethernet 1
!
interface ethernet 1
ip address 128.9.1.4
!
!use show interfaces command to find router1-MAC-address-E1
arp router1-MAC-address-E1 128.9.1.1 arpa
To enable load-balancing on a per-packet basis, use the no ip route-cache command to disable fast switching.
Cisco routers generally offer better packet transfer performance when fast switching is enabled with one exception. On networks using slow serial links (56K and below) disabling fast switching to enable the per-packet load-sharing is usually the better choice.
Autonomous switching gives a router faster packet processing by allowing the cBus to switch packets independently, without interrupting the system processor. It works only in AGS+ systems with high-speed network controller cards, such as the CSC-HSCI, CSC-MEC, and CSC-FCI, and with a cBus controller card running microcode Version 1.4 or later. (See the "Microcode Revisions" section in the release notes accompanying this publication for other microcode revision requirements.)
Autonomous switching is enabled by adding the cbus keyword to the existing ip route-cache interface subcommand. The syntax to enable and disable this function follows.
ip route-cache [cbus]By default, IP autonomous switching is not enabled. The ip route-cache command sets up fast switching, and by default, fast switching is enabled on all MCI/cBus interfaces.
To turn on both fast switching and autonomous switching use this syntax:
ip route-cache cbusTo turn off both fast switching and autonomous switching on an interface, add the no keyword:
no ip route-cacheTo turn off autonomous switching only on an interface, use this syntax:
no ip route-cache cbusTo return to the default, use the standard ip route-cache command. This turns fast switching on and autonomous switching off.
ip route-cacheYou can compress the headers of your TCP/IP packets in order to reduce the size of your packets. TCP header compression is only supported on serial lines using HDLC encapsulation. RFC1144 specifies the compression process. Compressing the TCP header can speed up Telnet connections dramatically. In general, TCP header compression is advantageous when your traffic consists of many small packets, not for traffic that consists of large packets. Transaction processing (using terminals, usually) tends to use small packets while file transfers use large packets. This feature only compresses the TCP header, of course, so it has no effect on UDP packets or other protocol headers.
The ip tcp header-compression interface subcommand enables header compression. Full command syntax for this command follows:
ip tcp header-compression [passive]If you use the optional passive keyword, outgoing packets are only compressed if TCP incoming packets on the same interface are compressed. Without the passive keyword, the router will compress all traffic. The no ip tcp header-compression command (the default) disables compression. You must enable compression on both ends of a serial connection.
When compression is enabled, fast switching is disabled. This means that fast interfaces like T-1 can overload the router. Think about your network's traffic characteristics before using this command. See the section "Monitoring the IP Network" for more information on commands for monitoring your compressed traffic.
The ip tcp compression-connections interface subcommand specifies the total number of header compression connections that can exist on an interface. Each connection sets up a compression cache entry, so you are in effect specifying the maximum number of cache entries and the size of the cache.
ip tcp compression-connections numberThe argument number specifies the number of connections the cache will support. The default is 16; number can vary between 3 and 256, inclusive. Too few cache entries for the specific interface can lead to degraded performance while too many cache entries leads to wasted memory.
In the following example, the first serial interface is set for header compression with a maximum of ten cache entries.
interface serial 0
ip tcp header-compression
ip tcp compression-connections 10
This section shows complete configuration examples for the most common configuration situations.
In the example below, the second serial interface is given interface Ethernet 0's address. The serial interface is unnumbered.
interface ethernet 0
ip address 145.22.4.67 255.255.255.0
interface serial 1
ip unnumbered ethernet 0
In this example, flooding of IP broadcasts is enabled on all interfaces (two Ethernet and two serial). No bridging is permitted. The access list denies all protocols. No specific UDP protocols are listed by a separate ip forward-protocol udp interface subcommand, so the default protocols (TFTP, DNS, IEN-116, Time, NetBIOS, and BootP) will be flooded.
ip forward-protocol spanning-tree
bridge 1 protocol dec
access-list 201 deny 0x0000 0xFFFF
interface ethernet 0
bridge-group 1
bridge-group 1 input-type-list 201
interface ethernet 1
bridge-group 1
bridge-group 1 input-type-list 201
interface serial 0
bridge-group 1
bridge-group 1 input-type-list 201
interface serial 1
bridge-group 1
bridge-group 1 input-type-list 201
In the following example, networks 131 and 192 are separated by a backbone, as shown in Figure 1-9. The two networks are brought into the same logical network through the use of secondary addresses.
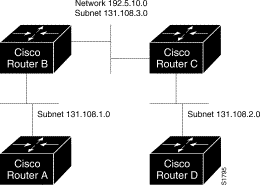
interface ethernet 2
ip address 192.5.10.1 255.255.255.0
ip address 131.108.3.1 255.255.255.0 secondary
interface ethernet 1
ip address 192.5.10.2 255.255.255.0
ip address 131.108.3.2 255.255.255.0 secondary
The example below changes some of the ICMP defaults for the first Ethernet interface. Disabling the sending of redirects could mean you do not think your routers on this segment will ever have to send a redirect. Lowering the error-processing load on your router would increase efficiency. Disabling the unreachables messages will have a secondary effect—it will also disable MTU path discovery because path discovery works by having routers send unreachables messages. If you have a network segment with a small number of devices and an absolutely reliable traffic pattern—which could easily happen on a segment with a small number of little-used user devices—this would disable options your router would be unlikely to need to use anyway.
interface ethernet 0
no ip unreachables
no ip redirects
In this example, one server is on network 191.24.1.0. and the other is on network 110.44.0.0, and you want to permit IP broadcasts from all hosts to reach these servers.Figure 1-10 illustrates how to configure the router that connects network 110 to network 191.
ip forward-protocol udp

!

interface ethernet 1

ip helper-address 110.44.23.7

interface ethernet 2

ip helper-address 191.24.1.19

The following example has a network segment with Hewlett-Packard devices on it. The commands listed customize the router's first Ethernet port to accommodate the HP devices.
ip hp-host bl4zip 131.24.6.27
interface ethernet 0
arp probe
ip probe proxy
The example below establishes a domain list with several alternate domain names.
ip domain-list cisco.com
ip domain-list telecomprog.edu
ip domain-list merit.edu
In the next example, network 36.0.0.0 is a Class A network whose second octet specifies a subnet; that is, its subnet mask is 255.255.0.0. The third and fourth octets of a network 36.0.0.0 address specify a particular host. Using access list 2, the router would accept one address on subnet 48 and reject all others on that subnet. The router would accept addresses on all other network 36.0.0.0 subnets; that is the purpose of the last line of the list.
access-list 2 permit 36.48.0.3  0.0.0.0
access-list 2 deny 36.48.0.0  0.0.255.255
access-list 2 permit 36.0.0.0  0.255.255.255
interface ethernet 0
ip access-group 2
In the example below, the first line permits any incoming TCP connections with destination port greater than 1023. The second line permits incoming TCP connections to the SMTP port of host 128.88.1.2. The last line permits incoming ICMP messages for error feedback.
access-list 102 permit tcp 0.0.0.0 255.255.255.255 128.88.0.0 0.0.255.255 gt 1023
access-list 102 permit tcp 0.0.0.0 255.255.255.255 128.88.1.2 0.0.0.0 eq 25
access-list 102 permit icmp 0.0.0.0 255.255.255.255 128.88.0.0 255.255.255.255
interface ethernet 0
ip access-group 102
This section describes the Serial Line Internet Protocol (SLIP) and its implementation on the Cisco router. Information provided here includes the following:
SLIP defines a method of sending Internet packets over standard RS-232 asynchronous serial lines. It is a de facto standard used for point-to-point serial connections running TCP/IP. SLIP is commonly used on dedicated serial links with line speeds between 1,200 and 19,200 bps. It allows mixes of hosts and routers to communicate with one another, so that host-to-host, host-to-router and router-to-router are all common SLIP network configurations.
The version of SLIP described in this manual was originally implemented by researchers at the University of California at Berkeley in their 4.2 BSD version of the UNIX operating system. Although variants have been proposed, the Berkeley version has emerged as a de facto standard. Refer to RFC 1055 for more information about SLIP.
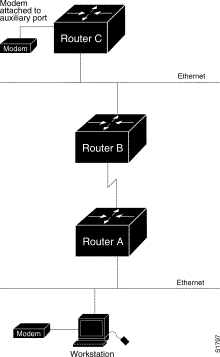
Cisco has provided an implementation of SLIP over the auxiliary port (asynchronous serial line) of its chassis-based router products. Its intended use is to provide access by a network management workstation to a router in a network where one or more routers are inaccessible.
For example, Figure 1-11 illustrates a workstation and a portion of a network with three routers, A, B, and C. If Router A or B should go offline, the network management workstation would not be able to monitor events between itself and Router C, or even reach Router C for that matter. However, by dialing in to the modem connected to the auxiliary port on Router C and enabling SLIP, the workstation can run SNMP transparently and continue its job of failure isolation from both sides.
You need to order a special cable from Cisco Systems for connections to the auxiliary port; see the section "Configuring Console and Virtual Terminal Lines" in the chapter "Configuring the System" for more information.
In addition to implementing the de facto standard, Cisco's implementation of SLIP offers both dedicated and dynamic address assignment, configurable hold queue and IP packet sizes, extended BootP requests, and permit/deny conditions for controlling access to the line.
Cisco routers recognize a variety of Internet broadcast addresses. When a router receives an Internet packet with one of these addresses from a SLIP client, it rebroadcasts the packet onto the network without changing the Internet header. The router does not alter the packet's broadcast address to match the form of broadcast address it prefers.
The router receives a copy of SLIP client broadcasts, and responds to BootP requests with the Internet address of the line that received them. This facility allows the SLIP client software to automatically determine its own Internet address.
Use one of two EXEC commands to make a SLIP connection, depending on how your line is set up:
slipIt is also possible to configure a dedicated SLIP line, in which case no EXEC command is required to make the connection.
The following paragraphs describe the ways in which the SLIP lines can be configured and which command to use to make the connection.
A line can be permanently configured for SLIP using the slip dedicated and slip address line configuration commands. In this case, an EXEC is not started on the line, so users need not enter a command to initiate SLIP. They need only to make the physical connection to the line and then are immediately placed in SLIP mode. No prompt or status message is issued.
A line can be assigned a permanent SLIP address with the slip address line configuration command. In this case, the user issues the slip EXEC command to put the line into SLIP mode. If the server has been configured to authenticate SLIP connections, the user is prompted for a password before the line is placed in SLIP mode.
This sample illustrates how to enter the slip EXEC command to make a connection when a permanent SLIP address has been assigned. Once a correct password is entered, SLIP mode is entered, and the IP address is displayed.
Router>slip


Password:
Entering SLIP mode.
Your IP address is 192.31.7.28, MTU is 1524 bytes
A line can be configured for dynamic assignment of SLIP addresses with the slip address dynamic command. In this case, the user enters the slip EXEC command and is prompted for the IP address or a logical host name to use. This address is validated via TACACS (when enabled) and the line is put into SLIP mode using the address requested.
This feature is useful in a situation where the user needs to know the IP address of a line. A personal computer running an application that automatically dials in using SLIP and polls for electronic mail messages would be an example of this. The application can be set up to dial in periodically and enter the required IP address and password.
This sample illustrates the "IP address or hostname?" prompt displayed and the response required when dynamic addressing is used to assign the SLIP address.
Router>slip


IP address or hostname? 192.31.6.15

Password:
Entering SLIP mode
Your IP address is 192.31.6.15, MTU is 1524 bytes
A line can also be given a default address to use. In this case, the user issues the slip default EXEC command, the transaction is validated by the TACACS server (when enabled), and the line is put into SLIP mode using the address configured with the IP address argument of the slip address dynamic configuration command.
This feature is useful when it is not reasonable for all users to know the IP address to use to gain access to a system. A server that is available to many students on a campus would be an example of this. Instead of requiring each to know an IP address, they need only enter the EXEC slip default command and let the server select the line to use.
In this sample session, the address 192.31.6.15 has been assigned as the default. Password verification is still required before SLIP mode can be enabled.
Router>slip default


Password:
Entering SLIP mode
Your IP address is 192.31.6.15, MTU is 1524 bytes
Following are the basic steps for configuring SLIP on the Cisco router.
Step 2: Make the appropriate settings for the line. Line settings include baud rate, addressing, and packet size limits.
Step 3: Specify access lists for control of traffic to or from the SLIP-enabled auxiliary port, if needed.
Step 4: Specify extended BootP requests, if needed.
The following sections describe how to configure the router. The EXEC commands used to monitor and maintain a SLIP link are described at the end of this chapter.
Once a line is configured for SLIP, the EXEC responds to the slip or slip default EXEC commands by turning on SLIP, displaying the Internet address and the size of the largest Internet packet the SLIP support can handle. The line exits SLIP mode when the modem is hung up or a clear line command is issued.
The no slip line subcommand disables SLIP mode. It has this syntax:
no slipUse this command to disable SLIP on the auxiliary port that has previously had SLIP enabled.
The slip address line subcommand specifies the Internet address assigned to the SLIP client at the other end of the serial line connection. The command has this syntax:
slip address internet-addressThe argument internet-address must be on the same network or subnet as one of the router's network interfaces.
To put the auxiliary port into SLIP mode, use the EXEC command slip; see "Making SLIP Connections" in this chapter.
This example sets IP address 182.32.7.51 on the auxiliary line.
line aux 0
slip address 182.32.7.51
The slip dedicated line subcommand puts the auxiliary port in SLIP mode permanently. It has this simple syntax:
slip dedicatedThe router will not create an EXEC on this port, so it is not available for normal interactive use. No slip EXEC command is necessary to enable SLIP mode.
The slip dedicated command permanently places the auxiliary port into SLIP mode.
line aux 0
slip address 182.32.7.5
slip dedicated
The slip interactive line subcommand allows the port to be used in either SLIP mode or interactive mode.
slip interactiveThe slip interactive subcommand is generally used to void a slip dedicated line subcommand. It is the equivalent in function to a no slip dedicated command (although there is no such command). To put the port into SLIP mode, use the EXEC command slip; see "Making SLIP Connections" in this chapter.
Hanging up the modem or clearing the port puts it back into interactive mode.
Dynamic address assignment requires that the user enter an IP address to enter SLIP mode. The full syntax of the line subcommand to set this up follows:
slip address dynamicTo put the port into SLIP mode, use the EXEC command slip.
This feature is supported when a TACACS server is used. The host name sent in a TACACS request will be in all uppercase letters.
In the following example, the auxiliary port is configured for dynamic address assignment.
line aux 0
slip address dynamic
If a line is configured for dynamic address assignment, it can also be given a default address to use. With this configuration, the user enters the EXEC command slip default to make connection. The syntax for this is as follows:
slip address dynamic IP-addressThe argument IP-address is the IP address to use.
This example illustrates how to enter a default SLIP address.
line aux 0
slip address dynamic 108.91.3.4
Use the speed line subcommand to set the transmit and receive speeds for the SLIP line.
speed baudThe argument baud can be 100, 1200, 2400, 4800, 9600, 19200, or 38400. Whether or not a higher baud rate improves performance depends on the SLIP client's ability to handle the interrupt load. The default is 9600 baud.
This example sets the baud rate to 9600.
line aux 0
slip address 182.32.7.5
speed 9600
The slip hold-queue line subcommand specifies the limit of the SLIP output queue, which stores packets received from the network waiting to be sent to the SLIP client.
slip hold-queue packetsThe argument packets is the maximum number of packets. The default is three packets; it is recommended that the queue size not exceed 10.
This command changes the packet queue length to five packets.
line aux 0
slip address 182.32.7.5
slip hold-queue 5
The argument bytes is the maximum number of bytes. The default is 1500 MTU.
You might want to change to a smaller MTU size if the SLIP application at the other end does not support packets of that size, or you want to assure a lower delay by using shorter packets. This can be desirable when the host Telnet echoing takes longer than 0.2 seconds. For instance, at 9600 baud, a 1500 byte packet takes about 1.5 seconds to transmit, so this delay would indicate that you want an MTU size of about 200.
On the other hand, the MTU size can be negotiated by TCP, regardless of what the terminal settings are, and this is the better way to do it. The router performs IP fragmentation of packets larger than the specified MTU. Therefore, do not use this command unless the SLIP implementation supports re-assembly of IP fragments. Since each fragment occupies a spot in the output queue, it may also be necessary to increase the size of the SLIP hold queue.
These commands set the packet MTU size to 200 bytes.
line aux 0
slip address 182.32.7.5
slip mtu 200
Access lists allow the system administrator to control the hosts that may access a router. As SLIP is different than a connection, separate access lists may be defined for SLIP and for normal connections. The software allows separate access lists to be defined for use when the line is running SLIP.
To configure an access list to be used on packets from the SLIP host, use this line subcommand:
slip access-class number inWhen this command is entered, the IP destination address of each packet is run through the access list for acceptability, and dropped or passed. The argument number is the IP access list number (see the section "Configuring IP Access Lists" in this chapter for information about IP access lists).
To specify an access list to be used on packets being sent to the SLIP host, use this line subcommand:
slip access-class number outWhen this command is entered, the IP source address is compared against the access list, and only those packets allowed by the access list are transmitted on the asynchronous line. The argument number is the IP access list number (see the section "Configuring IP Access Lists" in this chapter for more information about IP access lists).
This example assumes that SLIP users are restricted to certain devices designated as SLIP servers, but that other users can access anything on the local network.
! access list for normal connections
access-list 1 permit 131.108.0.0 0.0.255.255
!
! access list for SLIP packets.
access-list 2 permit 131.108.42.55
access-list 2 permit 131.108.111.1
access-list 2 permit 131.108.55.99
!
!Define the line with the SLIP address and appropriate access list
line aux 0
slip address dynamic
access-class 1 out
slip access-class 2 in
!
The Boot Protocol (BootP) server for SLIP supports the extended BootP requests specified in RFC#1084. These requests are specified with the async-bootp global configuration command. The full syntax for this command follows:
async-bootp tag [:hostname] data ...The argument tag is the item being requested, and is one of the following expressed as file name, integer, or IP dotted decimal address:
Use the optional argument :hostname to indicate that this entry applies only to the host specified. The argument :hostname accepts both an IP address and logical host name.
The argument data can be a list of IP addresses entered in dotted decimal notation or as logical host names, a number, or a quoted string.
If no extended BootP commands are entered, by default the software generates a gateway and subnet mask appropriate for the local network.
Use the EXEC command show async-bootp to list the configured parameters. Use the no async-bootp command to clear the list.
This example illustrates how to specify different boot files:one for a PC, and one for a Macintosh.
async-bootp bootfile :128.128.1.1 "pcboot"
async-bootp bootfile :mac "macboot"
With this configuration, a BootP request from the host on 128.128.1.1 results in a reply listing the boot file name as pcboot. A BootP request from the host named mac results in a reply listing the boot file name as macboot.
This example specifies a subnet mask of 255.255.0.0.
async-bootp subnet-mask 255.255.0.0
This example specifies a negative time offset of the local subnetwork of -3600 seconds.
async-bootp time-offset -3600
This example specifies the IP address of a time server.
async-bootp time-server 128.128.1.1
The following configuration example assigns an Internet address to a SLIP line and puts the line in SLIP mode permanently.
line aux 0
location auxiliary port
speed 9600
slip address 182.32.7.51
slip dedicated
Use the EXEC commands described in this section to maintain IP routing caches, tables, and databases.
Use the EXEC command clear host to remove one or all entries from the host-name-and-address cache, depending upon the argument you specify.
clear host {name|*}To remove a particular entry, use the argument name to specify the host. To clear the entire cache, use the asterisk (*) argument. The host name entries will not be removed from NVRAM, but will be cleared in running memory.
Use the clear ip accounting command to clear the active database when IP accounting is enabled. Use the clear ip accounting checkpoint command to clear the checkpointed database when IP accounting is enabled. You may also clear the checkpointed database by issuing the clear ip accounting command twice in succession. Enter one of these commands at the EXEC prompt.
clear ip accountingThe optional argument network is the network or subnet address of the route that you want to remove. Use the asterisk (*) argument to clear the entire routing table.
This section describes the EXEC commands for maintaining SLIP support on the router.
clear line line-numberThe argument line-number specifies the line. This command is the only way to exit SLIP mode on a line without modem control.
Use the EXEC commands described in this section to obtain displays of activity on the IP network.
Use the show ip ? command to display a list of all the available EXEC commands for monitoring the IP network. Following is sample output:
accounting <checkpoint>	Accounting statistics

arp 	IP ARP table

bgp <address>	Border Gateway Protocol

cache	Fast switching cache

egp  	EGP peers

interface <name> 	Interface settings

protocols 	Routing processes

route <network>	Routing table

tcp <keyword> 	TCP information, type "show ip tcp ?" for list

traffic 	Traffic statistics
A listing is available at both the user and privileged levels. The display will show relevant commands for each level.
To display the IP ARP cache, use the following EXEC command:
show ip arpThis command displays the contents of the IP ARP cache. ARP establishes correspondences between network addresses (an IP address, for example) and LAN hardware addresses (Ethernet addresses). A record of each correspondence is kept in a cache for a predetermined amount of time and then discarded. Following is sample output. Table 1-8 describes the fields seen.
Protocol  Address          Age (min)     Hardware Addr   Type      Interface
Internet  131.108.62.192         187     0800.2010.a3b6  ARPA      Ethernet3
Internet  131.108.62.245          68     0800.200e.28f8  ARPA      Ethernet3
Internet  131.108.1.140          139     0000.0c01.2812  ARPA      Ethernet0
Internet  131.108.62.160         187     0800.200e.4dab  ARPA      Ethernet3
Internet  131.108.1.111           27     0800.2007.8866  ARPA      Ethernet0
Internet  131.108.1.117          119     0000.0c00.f346  ARPA      Ethernet0
Internet  131.108.1.115           28     0000.0c01.0509  ARPA      Ethernet0
Internet  131.108.1.77             1     0800.200e.57ce  ARPA      Ethernet0
Internet  192.31.7.29            225     aa00.0400.0234  ARPA      Ethernet2
Internet  192.31.7.17            118     2424.c01f.0711  ARPA      Ethernet2
Internet  192.31.7.18            135     0000.0c01.2817  ARPA      Ethernet2
Internet  192.31.7.21            119     2424.c01f.0715  ARPA      Ethernet2
Internet  131.108.1.33             1     0800.2008.c52e  ARPA      Ethernet0
Internet  131.108.62.1             -     0000.0c00.750f  ARPA      Ethernet3
Internet  131.108.31.35          119     0800.2010.8c5b  ARPA      Ethernet7
Internet  131.108.62.7            14     0000.0c00.33ce  ARPA      Ethernet3
Internet  131.108.1.55           155     0800.200e.e443  ARPA      Ethernet0
| Field | Description |
|---|---|
Protocol | Protocol for network address in the Address field |
Address | The network address that corresponds to Hardware Addr |
Age (min) | Age, in minutes, of the cache entry |
Hardware Addr | LAN hardware address a MAC address that corresponds to network address |
Type | Type of encapsulation: |
The show ip accounting command displays the active accounting database. The show ip accounting checkpoint command displays the checkpointed database.
show ip accountingFollowing is sample output for the show ip accounting and show ip accounting checkpoint commands:
   Source           Destination              Packets               Bytes
 131.108.19.40    192.67.67.20                     7                 306
 131.108.13.55    192.67.67.20                    67                2749
 131.108.2.50     192.12.33.51                    17                1111
 131.108.2.50     130.93.2.1                       5                 319
 131.108.2.50     130.93.1.2                     463               30991
 131.108.19.40    130.93.2.1                       4                 262
 131.108.19.40    130.93.1.2                      28                2552
 131.108.20.2     128.18.6.100                    39                2184
 131.108.13.55    130.93.1.2                      35                3020
 131.108.19.40    192.12.33.51                  1986               95091
 131.108.2.50     192.67.67.20                   233               14908
 131.108.13.28    192.67.67.53                   390               24817
 131.108.13.55    192.12.33.51                214669             9806659
 131.108.13.111   128.18.6.23                  27739             1126607
 131.108.13.44    192.12.33.51                 35412             1523980
 192.31.7.21      130.93.1.2                      11                 824
 131.108.13.28    192.12.33.2                     21                1762
 131.108.2.166    192.31.7.130                   797              141054
 131.108.3.11     192.67.67.53                     4                 246
 192.31.7.21      192.12.33.51                 15696              695635
 192.31.7.24      192.67.67.20                    21                 916
 131.108.13.111   128.18.10.1                     16                1137
The output lists the source and destination addresses, as well as total number of packets and bytes for each address pair.
The show hosts command displays the default domain name, the style of name lookup service, a list of name server hosts, and the cached list of host names and addresses.
show hostsEnter show hosts at the user-level (or privileged-level) prompt.
Following is sample output:
show hosts
Default domain is CISCO.COM
Name/address lookup uses domain service
Name servers are 255.255.255.255
Host                     Flags      Age Type   Address(es)
SLAG.CISCO.COM           (temp, OK)  1   IP    131.108.4.10
CHAR.CISCO.COM           (temp, OK)  8   IP    192.31.7.50
CHAOS.CISCO.COM          (temp, OK)  8   IP    131.108.1.115
DIRT.CISCO.COM           (temp, EX)  8   IP    131.108.1.111
DUSTBIN.CISCO.COM        (temp, EX)  0   IP    131.108.1.27
DREGS.CISCO.COM          (temp, EX) 24   IP    131.108.1.30
In the display:
The show ip cache command displays the routing table cache that is used to fast-switch Internet traffic. Enter this command at the EXEC prompt:
show ip cacheFollowing is sample output:
IP routing cache version 435, entries 19/20, memory 880

 Hash   Destination     Interface  MAC Header
*6D/0   128.18.1.254    Serial0    0F000800
*81/0   131.108.1.111   Ethernet0  00000C002C83AA00040002340800
*8D/0   131.108.13.111  Ethernet0  AA0004000134AA00040002340800
 99/0   128.18.10.1     Serial0    0F000800
*9B/0   128.18.10.3     Serial0    0F000800
*B0/0   128.18.5.39     Serial0    0F000800
*B6/0   128.18.3.39     Serial0    0F000800
*C0/0   131.108.12.35   Ethernet0  AA0004000134AA00040002340800
*C4/0   131.108.2.41    Ethernet0  00000C002C83AA00040002340800
*C9/0   192.31.7.17     Ethernet0  2424C01F0711AA00040002340800
*CD/0   192.31.7.21     Ethernet0  2424C01F0715AA00040002340800
*D5/0   131.108.13.55   Ethernet0  AA0004006508AA00040002340800
*DC/0   130.93.1.2      Serial0    0F000800
*DE/0   192.12.33.51    Serial0    0F000800
*DF/0   131.108.2.50    Ethernet0  AA0004000134AA00040002340800
*E7/0   131.108.3.11    Ethernet0  00000C002C83AA00040002340800
*EF/0   192.12.33.2     Serial0    0F000800
*F5/0   192.67.67.53    Serial0    0F000800
*F5/1   131.108.1.27    Ethernet0  AA0004006508AA00040002340800
*FE/0   131.108.13.28   Ethernet0  AA0004006508AA00040002340800
In the display:
To display the usability status of interfaces, use the EXEC command show interfaces. If the interface hardware is usable, the interface is marked "up." If the interface can provide two-way communication, the line protocol is marked "up." For an interface to be usable, both the interface hardware and line protocol must be up.
show ip interface [interface unit]If you specify an optional interface type, you will see only information on that specific interface.
If you specify no optional parameters you will see information on all the interfaces.
The following sample output was obtained by specifying the serial 0 interface:
Serial 0 is up, line protocol is up
  Internet address is 192.31.7.129, subnet mask is 255.255.255.240
  Broadcast address is 255.255.255.255
  Address determined by non-volatile memory
  MTU is 1500 bytes
  Helper address is 131.108.1.255
  Outgoing access list is not set
  Proxy ARP is enabled
  Security level is default
  ICMP redirects are always sent
  ICMP unreachables are always sent
  ICMP mask replies are never sent
  IP fast switching is enabled
  Gateway Discovery is disabled
  IP accounting is enabled, system threshold is 512
  TCP/IP header compression is disabled
  Probe proxy name replies are disabled
In the display:
The show ip route command displays the IP routing table. Enter this command at the EXEC prompt:
show ip route [network]A specific network in the routing table is displayed when the optional network argument is entered.
Following is sample output with the optional network argument:
Routing entry for 131.108.1.0
  Known via "igrp 109", distance 100, metric 1200
  Redistributing via igrp 109
  Last update from 131.108.6.7 on Ethernet0, 35 seconds ago
  Routing Descriptor Blocks:
  * 131.108.6.7, from 131.108.6.7, 35 seconds ago, via Ethernet0
      Route metric is 1200, traffic share count is 1
      Total delay is 2000 microseconds, minimum bandwidth is 10000 Kbit
      Reliability 255/255, minimum MTU 1500 bytes
      Loading 1/255, Hops 0
This display is the result of the show ip route command without the network number:
Codes: I - IGRP derived, R - RIP derived, H - HELLO derived
       C - connected, S - static, E - EGP derived, B - BGP derived
       * - candidate default route

Gateway of last resort is 131.108.6.7 to network 131.119.0.0

I*Net 128.145.0.0 [100/1020300] via 131.108.6.6, 30 sec, Ethernet0
I Net 192.68.151.0 [100/160550] via 131.108.6.6, 30 sec, Ethernet0
I Net 128.18.0.0 [100/8776] via 131.108.6.7, 58 sec, Ethernet0
                            via 131.108.6.6, 31 sec, Ethernet0
E Net 128.128.0.0 [140/4] via 131.108.6.64, 130 sec, Ethernet0
C Net 131.108.0.0 is subnetted (mask is 255.255.255.0), 54 subnets
I     131.108.144.0 [100/1310] via 131.108.6.7, 78 sec, Ethernet0
C     131.108.91.0 is directly connected, Ethernet1
The output begins by showing the address of the gateway of last resort for this network. In the rest of the display:
The show ip traffic command displays IP protocol statistics. Enter this command at the EXEC prompt:
show ip trafficFollowing is sample output:
IP statistics:
  Rcvd:  98 total, 98 local destination
         0 format errors, 0 checksum errors, 0 bad hop count
         0 unknown protocol, 0 not a gateway
         0 security failures, 0 bad options
  Frags: 0 reassembled, 0 timeouts, 0 too big
         0 fragmented, 0 couldn't fragment
  Bcast: 38 received, 52 sent
  Sent:  44 generated, 0 forwarded
         0 encapsulation failed, 0 no route
ICMP statistics:
  Rcvd: 0 checksum errors, 0 redirects, 0 unreachable, 0 echo
        0 echo reply, 0 mask requests, 0 mask replies, 0 quench
        0 parameter, 0 timestamp, 0 info request, 0 other
  Sent: 0 redirects, 3 unreachable, 0 echo, 0 echo reply
        0 mask requests, 0 mask replies, 0 quench, 0 timestamp
        0 info reply, 0 time exceeded, 0 parameter problem
UDP statistics:
  Rcvd: 56 total, 0 checksum errors, 55 no port
  Sent: 18 total, 0 forwarded broadcasts
TCP statistics:
  Rcvd: 0 total, 0 checksum errors, 0 no port
  Sent: 0 total
EGP statistics:
  Rcvd: 0 total, 0 format errors, 0 checksum errors, 0 no listener
  Sent: 0 total
IGRP statistics:
  Rcvd: 73 total, 0 checksum errors
  Sent: 26 total
HELLO statistics:
  Rcvd: 0 total, 0 checksum errors
  Sent: 0 total
ARP statistics:
  Rcvd: 20 requests, 17 replies, 0 reverse, 0 other
  Sent: 0 requests, 9 replies (0 proxy), 0 reverse
Probe statistics:
  Rcvd: 6 address requests, 0 address replies
        0 proxy name requests, 0 other
  Sent: 0 address requests, 4 address replies (0 proxy)
        0 proxy name replies
In the display:
The show ip tcp header-compression command shows statistics on compression. Enter this command at the EXEC prompt:
show ip tcp header-compressionFollowing is sample output:
TCP/IP header compression statistics:
  Interface Serial1: (passive, compressing)
    Rcvd:    4060 total, 2891 compressed, 0 unknown type, 0 errors
             0 dropped, 1 buffer copies, 0 buffer failures
    Sent:    4284 total, 3224 compressed,
             105295 bytes saved, 661973 bytes sent
             1.15 efficiency improvement factor
    Connect: 16 slots, 1543 long searches, 2 misses, 99% hit ratio
             Five minute miss rate 0 misses/sec, 0 max misses/sec
In the display:
Use the EXEC show commands described in this section to obtain displays of activity on the SLIP line.
The show ip aliases command displays Internet addresses mapped to TCP ports (aliases) and SLIP addresses, which are treated similarly to aliases. Enter this command at the EXEC prompt:
show ip aliasesSample output follows:
  IP Address    Port
131.108.29.245  SLIP TTY1
The display lists the IP address and corresponding port number.
The show ip arp EXEC command displays the Address Resolution Protocol (ARP) cache, where SLIP addresses appear as permanent ARP table entries. To display the IP ARP cache, use the following EXEC command:
show ip arpAn Address Resolution Protocol establishes correspondences between network addresses (an IP address, for example) and LAN hardware addresses (MAC addresses). A record of each correspondence is kept in a cache for a predetermined amount of time and then discarded. Following is sample output. Table 1-9 describes the fields displayed.
Protocol  Address          Age (min)     Hardware Addr   Type      Interface
Internet  131.108.29.246           -     0000.0c00.6a19  ARPA      Ethernet0
Internet  131.108.29.245           -     0000.0c00.6a19  ARPA      Ethernet0
Internet  131.108.29.6             0     0000.0c01.0ec3  ARPA      Ethernet0
| Field | Description |
|---|---|
Protocol | Protocol for network address in Address field |
Address | The network address that corresponds to Hardware Addr |
Age (min) | Age, in minutes, of the last update of the cache entry |
Hardware Addr | LAN hardware (or MAC) address that corresponds to network address |
Type | Type of encapsulation: |
The show line EXEC command displays SLIP status for a line running in SLIP mode. Enter this command at the EXEC prompt:
show line line-numberThe argument line-number specifies the line.
Following is sample output:
 Tty Typ    Tx/Rx    A Modem  Roty AccO AccI  Uses    Noise Overruns
   0 CTY             -    -      -    -    -     0        1        0
S  1 AUX  9600/9600  -    -      -    -    -     0        0        0
*  2 VTY  9600/9600  -    -      -    -    -     4        0        0
*  3 VTY  9600/9600  -    -      -    -    -     1        0        0
   4 VTY  9600/9600  -    -      -    -    -     0        0        0
   5 VTY  9600/9600  -    -      -    -    -     0        0        0
   6 VTY  9600/9600  -    -      -    -    -     0        0        0
The show slip EXEC command displays the status of all lines configured for SLIP support. Enter this command at the EXEC prompt:
show slipFollowing is sample output:
Slip statistics:
  Rcvd: 465 packets, 0 bytes, 27 escapes
        0 format errors, 0 checksum errors, 0 overrun, 0 no buffer
  Sent: 316 packets, 0 bytes, 27 escapes, 45 dropped

Tty Mod   Address      Istate  Ostate   Qd InPack OutPac Inerr Dropped
MTU Qsz
*  1  -  131.108.29.245 RECV    IDLE      0    465    316     0     0 1524   2
Table 1-10 describes the fields displayed by this command.
| Field | Description |
|---|---|
Rcvd: | Statistics on packets received |
packets | Packets received |
bytes | Total number of bytes |
escapes | Count of escape characters received |
format errors | Packets with a bad IP header, even before the checksum is calculated |
checksum errors | Count of checksum errors |
overrun | Number of giants received |
no buffer | Number of packets received when no buffer was available |
Sent | Statistics on packets sent |
packets | Packets sent |
bytes | Total number of bytes |
escapes | Count of escape characters sent |
dropped | Number of packets dropped |
Tty mod | Type of modem control |
IState and OState | Used by Cisco engineers for troubleshooting |
Qd | Number of packets on hold queue (Qsz is max) |
InPack | Number of packets input for asynchronous line |
OutPac | Number of packets sent to asynchronous line |
Inerr | Number of total input errors; sum of format errors, checksum errors, overruns and no buffers |
Dropped | Number of packets received that would not fit on the hold queue |
* | A line currently in SLIP mode |
The show async-bootp EXEC command displays the parameters that have been configured for SLIP extended BootP requests. Enter this command at the EXEC prompt:
show async-bootpFollowing is sample output:
The following extended data will be sent in BOOTP responses:
bootfile (for address 128.128.1.1) "pcboot"
bootfile (for address 131.108.1.111) "dirtboot"
subnet-mask 255.255.0.0
time-offset -3600
time-server 128.128.1.1
The privileged-mode EXEC command ping allows the administrator to diagnose network connectivity by sending ICMP Echo Request messages and waiting for ICMP Echo Reply messages. The following sample session shows two ping command outputs for IP. The first ping command is the simplest form of the command (specified with the destination address inline with the ping command). This version sends 5, 100-byte ICMP echoes. The second version provides a complete prompt sequence in verbose mode.
gw#ping 131.108.62.102

Type escape sequence to abort.
Sending 5, 100-byte ICMP Echos to 131.108.62.102, timeout is 2 seconds:
.....
Success rate is 0 percent

gw# ping

Protocol [ip]:
Target IP address: 131.108.1.27

Repeat count [5]:
Datagram size [100]: 1000

Timeout in seconds [2]:
Extended commands [n]: yes

Source address:
Type of service [0]:
Set DF bit in IP header? [no]: yes

Data pattern [0xABCD]:
Loose, Strict, Record, Timestamp, Verbose[none]:
Type escape sequence to abort.
Sending 5, 1000-byte ICMP Echos to 131.108.2.27, timeout is 2 seconds:
..!!!
Success rate is 60 percent, round-trip min/avg/max = 4/6/12 ms
The ping command uses the notation shown in Table 1-11 to indicate the responses it sees:
| Char | Meaning |
|---|---|
! | Each exclamation point indicates receipt of a reply. |
. | Each period indicates the network server timed out while waiting |
U | Destination unreachable. |
N | Network unreachable. |
P | Protocol unreachable. |
Q | Source quench. |
M | Could not fragment. |
? | Unknown packet type. |
To abort a ping session, type the escape sequence (by default, type Ctrl-^, X, which is done by simultaneously pressing the Ctrl, Shift, and 6 keys, letting go then pressing the x key).
The IP ping command, in verbose mode, accepts a data pattern. The pattern is specified as a 16-bit hexadecimal number. The default pattern is 0xABCD. Patterns such as all ones or all zeros can be used to debug data sensitivity problems on CSU/DSUs.
You can also specify the router address to use as the source address for ping packets, which here is 131.108.105.62.
Sandbox#ping

Protocol [ip]:
Target IP address: 131.108.1.111

Repeat count [5]:
Datagram size [100]:
Timeout in seconds [2]:
Extended commands [n]: yes

Source address: 131.108.105.62

Type of service [0]:
Set DF bit in IP header? [no]:
Data pattern [0xABCD]:
Loose, Strict, Record, Timestamp, Verbose[none]:
Type escape sequence to abort.
Sending 5, 100-byte ICMP Echos to 131.108.1.111, timeout is 2 seconds:
!!!!!
Success rate is 100 percent, round-trip min/avg/max = 4/4/4 ms
The EXEC command trace allows you to discover the routing path your router's packets are taking through your network.
The trace command offers default and settable parameters for specifying a simple or extended trace mode.
The trace command works by taking advantage of the error messages generated by routers when a datagram exceeds its time-to-live (TTL) value.
The trace command starts by sending probe datagrams with a TTL value of one. This causes the first router to discard the probe datagram and send back an error message. The trace command sends several probes at each TTL level and displays the round trip time for each.
The trace command sends out one probe at a time. Each outgoing packet may result in one or two error messages. A time exceeded error message indicates that an intermediate router has seen and discarded the probe. A destination unreachable error message indicates that the destination node has received the probe and discarded it because it could not deliver the packet. If the timer goes off before a response comes in, trace prints an asterisk (*).
The trace command terminates when the destination responds, when the maximum TTL is exceeded, or when the user interrupts the trace with the escape sequence. By default, to invoke the escape sequence, type Ctrl-^, X—done by simultaneously pressing the Ctrl, Shift, and 6 keys, letting go then pressing the x key.
Due to bugs in the IP implementation of various hosts and routers, the trace command may behave in odd ways.
Not all destinations will correctly respond to a probe message by sending back an ICMP port unreachable message. A long sequence of TTL levels with only asterisks, terminating only when the maximum TTL has been reached, may indicate this problem.
There is a known problem with the way some hosts handle an ICMP TTL exceeded message. Some hosts generate an ICMP message but they re-use the TTL of the incoming packet. Since this is zero, the ICMP packets do not make it back. When you trace the path to such a host, you may see a set of TTL values with asterisks (*). Eventually the TTL gets high enough that the ICMP message can get back. For example, if the host is six hops away, trace will time out on responses 6 through 11.
When tracing IP routes, the following trace command parameters may be set:
Table 1-12 describes the output from the trace test.
| Char | Meaning |
|---|---|
nn msec | For each node, the round-trip time (in nn milliseconds) for the specified number of probes |
* | The probe timed out. |
? | Unknown packet type. |
H | Host unreachable. |
Q | Source quench. |
P | Protocol unreachable. |
N | Network unreachable. |
U | Port unreachable. |
The following is an example of the simple use of trace.
chaos#trace ABA.NYC.mil
Type escape sequence to abort.
Tracing the route to ABA.NYC.mil (26.0.0.73)
  1 DEBRIS.CISCO.COM (131.108.1.6) 1000 msec 8 msec 4 msec
  2 BARRNET-GW.CISCO.COM (131.108.16.2) 8 msec 8 msec 8 msec
  3 EXTERNAL-A-GATEWAY.STANFORD.EDU (192.42.110.225) 8 msec 4 msec 4 msec
  4 BB2.SU.BARRNET.NET (131.119.254.6) 8 msec 8 msec 8 msec
  5 SU.ARC.BARRNET.NET (131.119.3.8) 12 msec 12 msec 8 msec
  6 MOFFETT-FLD-MB.in.MIL (192.52.195.1) 216 msec 120 msec 132 msec
  7 ABA.NYC.mil (26.0.0.73) 412 msec 628 msec 664 msec
Following is an example of going through the extended dialog of the trace command.
chaos#trace
Protocol [ip]:
Target IP address: mit.edu
Source address:
Numeric display [n]:
Timeout in seconds [3]:
Probe count [3]:
Minimum Time to Live [1]:
Maximum Time to Live [30]:
Port Number [33434]:
Loose, Strict, Record, Timestamp, Verbose[none]:
Type escape sequence to abort.
Tracing the route to MIT.EDU (18.72.2.1)
  1 DEBRIS.CISCO.COM (131.108.1.6) 1000 msec 4 msec 4 msec
  2 BARRNET-GW.CISCO.COM (131.108.16.2) 16 msec 4 msec 4 msec
  3 EXTERNAL-A-GATEWAY.STANFORD.EDU (192.42.110.225) 16 msec 4 msec 4 msec
  4 NSS13.BARRNET.NET (131.119.254.240) 112 msec 8 msec 8 msec
  5 SALT_LAKE_CITY.UT.NSS.NSF.NET (129.140.79.13) 72 msec 64 msec 72 msec
  6 ANN_ARBOR.MI.NSS.NSF.NET (129.140.81.15) 124 msec 124 msec 140 msec
  7 PRINCETON.NJ.NSS.NSF.NET (129.140.72.17) 164 msec 164 msec 172 msec
  8 ZAPHOD-GATEWAY.JVNC.NET (128.121.54.72) 172 msec 172 msec 180 msec
  9 HOTBLACK-GATEWAY.JVNC.NET (130.94.0.78) 180 msec 192 msec 176 msec
 10 CAPITAL1-GATEWAY.JVNC.NET (130.94.1.9) 280 msec 192 msec 176 msec
 11 CHEESESTEAK2-GATEWAY.JVNC.NET (130.94.33.250) 284 msec 216 msec 200 msec
 12 CHEESESTEAK1-GATEWAY.JVNC.NET (130.94.32.1) 268 msec 180 msec 176 msec
 13 BEANTOWN2-GATEWAY.JVNC.NET (130.94.27.250) 300 msec 188 msec 188 msec
 14 NEAR-GATEWAY.JVNC.NET (130.94.27.10) 288 msec 188 msec 200 msec
 15 IHTFP.MIT.EDU (192.54.222.1) 200 msec 208 msec 196 msec
 16 E40-03GW.MIT.EDU (18.68.0.11) 196 msec 200 msec 204 msec
 17 MIT.EDU (18.72.2.1) 268 msec 500 msec 200 msec
Use the EXEC commands described in this section to troubleshoot and monitor the IP network transactions and lines in SLIP line mode. For each debug command there is an corresponding undebug command that turns the display off. In general, you need use these commands only during troubleshooting sessions with Cisco personnel, as display of debugging messages can impact the operation of the router.
The debug arp command enables logging of ARP protocol transactions.
The debug ip-icmp command enables logging of ICMP transactions. Refer to the ICMP section for an in-depth look at the various ICMP messages.
The debug ip-packet command enables logging of general IP debugging information as well as IPSO security transactions. IP debugging information includes packets received, generated, and forwarded. This command can also be used to debug IPSO security-related problems. Each time a datagram fails a security test in the system, a message is logged describing the cause of failure. An optional IP access list may be specified. If the datagram is not permitted by that access list, then the related debugging output is suppressed.
The debug ip-routing command enables logging of routing table events such as network appearances and disappearances.
The debug ip tcp command enables logging of significant TCP transactions such as state changes, retransmissions, and duplicate packets.
debug ip-tcp-packet list
The debug ip-tcp-packet command enables logging of each TCP packet that meets the permit criteria specified in the access list.
The debug ip-udp command enables logging of UDP-based transactions.
debug ip-tcp-header-compression
The debug ip-header-compression command enables logging of TCP header compression.
Debugging information, including information about HP Probe Proxy Requests, is available through debug probe.
The debug slip EXEC command enables logging of all SLIP activity. The high volume of SLIP debugging output, which amounts to several lines per packet, noticeably affects overall system performance.
debug slip-event
This section lists and summarizes commands you can use to configure your IP router. Commands are listed in alphabetical order.
[no] access-list list {permit|deny} source source-mask
Creates or removes an access list. The argument list is an IP list number from 1 to 99. The keywords permit and deny specify the security action to take. The argument source is a 32-bit, dotted decimal notation IP address to which the router compares the source address being tested. The argument source-mask is wildcard mask bits for the address in 32-bit, dotted decimal notation.
[no] access-list list {permit|deny} protocol source source-mask destination destination-mask [operator operand] [established]
Creates or removes an extended access list. The argument list is an IP list number from 100 to 199. The keywords permit and deny specify the security action to take. The argument protocol is one of the supported protocol keywords—ip, tcp, udp, icmp. The argument source is a 32-bit, dotted decimal notation IP address. The argument source-mask is mask bits for the source address in 32-bit, dotted decimal notation. The arguments destination and destination-mask are the destination address and mask bits for the destination address in 32-bit, dotted decimal notation. Using TCP and UDP, the optional arguments operator and operand can be used to compare destination ports, service access points, or contact names. The optional established keyword is for use in matching certain TCP datagrams (see "Configuring Extended Access Lists").
[no] arp internet-address hardware-address type [alias]
Installs a permanent entry in the ARP cache. The router uses this entry to translate 32-bit Internet Protocol addresses into 48-bit hardware addresses. The argument internet-address is the Internet address in dotted decimal format corresponding to the local data link address specified by the argument hardware-address. The argument type is an encapsulation description—arpa for Ethernet; snap for FDDI and Token Ring interfaces; or ultra for the UltraNet interfaces. The optional keyword alias indicates that the router should respond to ARP requests as if it were the owner of the specified IP address. The no version removes the specified entry from the ARP cache.
[no] async-bootp tag [:hostname] data ...
Specifies extended BootP requests defined in RFC 1084 (used in configuring the router for SLIP support). The argument tag is the item being requested, and is one of the following expressed as file name, integer, or IP dotted decimal address:
The optional argument :hostname indicates that this entry applies only to the host specified. The argument :hostname accepts both an IP address and logical host name. The argument data can be a list of IP addresses entered in dotted decimal notation or as logical host names, a number, or a quoted string. Use the no async-bootp command to clear the list.
[no] ip accounting-list ip-address mask
Specifies a set of filters to control the hosts for which IP accounting information is kept. The source and destination address of each IP datagram is logically ANDed with the mask and compared with ip-address. If there is a match, the information about the IP datagram will be entered into the accounting database. If there is no match, then the IP datagram is considered a transit datagram and will be counted according to the setting of the ip accounting-transits command.
[no] ip accounting-threshold threshold
Sets the maximum number of accounting entries to be created.
[no] ip accounting-transits count
Controls the number of transit records that will be stored in the IP accounting database. Transit entries are those that do not match any of the filters specified by ip accounting-list commands. If no filters are defined, no transit entries are possible. The default is zero (0), which is equivalent to the no version of the command.
[no] ip default-network network
Flags networks as candidates for default routes. The argument network specifies the network number.
[no] ip domain-list name
Defines a list of default domain names to complete unqualified host names. The argument name is the domain name.
[no] ip domain-lookup
Enables or disables IP Domain Name System-based host-name-to-address translation. Enabled by default.
[no] ip domain-name name
Defines the default domain name, which is specified by the argument name. The router uses the default domain name to complete unqualified domain names—names without a dotted domain name.
[no] ip forward-protocol spanning-tree
Permits IP broadcasts to be flooded throughout the internetwork in a controlled fashion. This command is an extension of the ip helper-address command, in that the same packets that may be subject to the helper address and forwarded to a single network may now be flooded. Use the no version of the command to prevent flooding of IP addresses.
[no] ip forward-protocol {udp|nd} [port]
Allows you to specify which protocols and ports the router will forward. The keyword nd is the ND protocol used by older diskless Sun workstations. The keyword udp is the UDP protocol. A UDP destination port can be specified to control which UDP services are forwarded. By default both UDP and ND forwarding are enabled if a helper address has been defined for an interface.
[no] ip host name [TCP-port-number] address1 [address2...address8]
Defines a static host-name-to-address mapping in the host cache. The argument name is the host name; the argument TCP-port-number is a TCP port number—Telnet by default (port 23); and the argument address1 [address2...address8] represents associated IP addresses (up to eight can be specified). The no version removes the name-to-address mapping.
[no] ip hp-host hostname ip-address
Enables or disables the use of the proxy service. You enter the hostname of the HP host into the host table, along with its IP address.
[no] ip ipname-lookup
Specifies or removes the IP IEN-116 Name Server host-name-to-address translation. This command is enabled by default; the no variation of the command restores the default.
[no] ip name-server server-address1 [server-address2. . . server-address6]
Specifies the address of the name server to use for name and address resolution. The arguments server-address are the Internet addresses of up to six name servers. By default, the router uses the all-ones broadcast address (255.255.255.255).
[no] ip routing
Controls the system's ability to do IP routing. If the system is running optional bridging-enabled software, the no ip routing subcommand will turn off IP routing when setting up a system to bridge (as opposed to route) IP datagrams. The default setting is to perform IP routing.
[no] ip source-route
Controls the handling of IP datagrams with source routing header options. The default behavior is to perform the source routing. The no keyword causes the system to discard any IP datagram containing a source-route option.
[no] ip subnet-zero
Enables or disables the ability to configure and route to "subnet zero" subnets. The default condition is disabled.
This section lists and summarizes all the commands in the interface subcommand list for your IP router. Preceding any of these commands with a no keyword undoes their effect or restores the default condition. Commands are listed in alphabetical order.
[no] arp {arpa|probe|snap}
Controls the interface-specific handling of IP address resolution into 48-bit Ethernet, FDDI, and Token Ring hardware addresses. The keyword arpa, which is the default, specifies standard Ethernet style ARP (RFC 826), probe specifies the HP Probe protocol for IEEE-802.3 networks, and snap specifies ARP packets conforming to RFC 1042.
[no] arp timeout seconds
Sets the number of seconds an ARP cache entry will stay in the cache. The value of the argument seconds is used to age an ARP cache entry related to that interface, and by default is set to14,400 seconds. A value of zero seconds sets no timeout.
[no] ip access-group list
Defines an access group. This subcommand takes a standard or extended IP access list number as an argument.
[no] ip accounting
Enables or disables IP accounting on an interface.
[no] ip address address mask [secondary]
Sets an IP address for an interface. The two required arguments are an IP address (address) and the subnet mask (mask) for the associated IP network. The subnet mask must be the same for all interfaces connected to subnets of the same network.
[no] ip broadcast-address address
Defines a broadcast address. The address argument is the desired IP broadcast address for a network. If a broadcast address is not specified, the system will default to a broadcast address of all ones or 255.255.255.255.
[no] ip directed-broadcast
Enables or disables forwarding of directed broadcasts on the interface. The default is to forward directed broadcasts.
[no] ip helper-address address
Defines a helper-address for a specified address. The helper address defines the selective forwarding of UDP broadcasts, including BootP, received on the interface. The address argument specifies a destination broadcast or host address to be used when forwarding such datagrams.
[no] ip mask-reply
Sets the interface to send ICMP Mask Reply messages. The default is not to send Mask Reply messages.
[no] ip mtu bytes
Sets the maximum transmission unit (MTU) or size of IP packets sent on an interface. The argument bytes is the number of bytes with a minimum of 128 bytes. The no form of the command restores the default.
[no] ip probe proxy
Enables or disables HP Probe Proxy support, which allows a router to respond to HP Probe Proxy Name requests. This is disabled by default.
[no] ip proxy-arp
Enables or disables proxy ARP on the interface. The default is to perform proxy ARP.
[no] ip redirects
Enables or disables sending ICMP redirects on the interface. ICMP redirects are normally sent.
[no] ip route-cache [cbus]
Controls the use of outgoing packets on a high-speed switching cache for IP routing. The cache is enabled by default and allows load-balancing on a per-destination basis. To enable load-balancing on a per-packet basis, use the no ip route-cache to disable fast-switching.
[no] ip security add
Adds a basic security option to all datagrams leaving the router on the specified interface.
[no] ip security arguments
Controls the use of the Internet IP security option.
[no] ip security dedicated level authority [authority...]
Sets or unsets the requested level of classification and authority on the interface. See Table 1-4 and Table 1-5 for the level and authority arguments.
[no] ip security extended-allowed
Allows or rejects datagrams with an extended security option on the specified interface.
[no] ip security-first
Prioritizes the presence of security options on a datagram.
[no] ip security ignore-authorities
Sets or unsets an interface to ignore the authority fields of all incoming datagrams.
[no] ip security implicit-labelling [level authority [authority...]]
In the simplest form, sets or unsets the interface to accept datagrams, even if they do not include a security option. With the arguments level and authority, a more precise condition is set. See Table 1-4 and Table 1-5 for the level and authority arguments.
ip security multilevel level1 [authority1...] to level2 authority2 [authority2...]
Sets or unsets the requested range of classification and authority on the interface. Traffic entering or leaving the system must have a security option that falls within the specified range. See Table 1-4 and Table 1-5 for the level and authority arguments.
[no] ip security strip
Removes any basic security option on all datagrams leaving the router on the specified interface. The no form of the command disables the function.
[no] ip tcp compression-connections number
Sets the maximum number of connections per interface that the compression cache can support. Default is 16; number can vary from 3 to 256.
[no] ip tcp header-compression [passive]
Enables TCP header compression. The no keyword disables (the default) compression. The optional keyword passive sets the interface to only compress outgoing traffic on the interface for a specific destination if incoming traffic is compressed.
[no] ip unnumbered interface-name
Enables IP processing on a serial interface, but does not assign an explicit IP address to the interface. The argument interface-name is the name of another interface on which the router has assigned an IP address. The interface may not be another unnumbered interface, or the interface itself.
[no] ip unreachables
Enables or disables sending ICMP unreachable messages on an interface. ICMP unreachables are normally sent.
transmit-interface interface-name
Assigns a transmit interface to a receive-only interface. When a route is learned on this receive-only interface, the interface designated as the source of the route is converted to interface-name.
Following is an alphabetically arranged list of SLIP line configuration subcommands and line configuration subcommands used to configure IP routing.
[no] access-class list {in|out}
Restricts incoming and outgoing connections between a particular virtual terminal line and the addresses in an access list. Serves to restrict connections on a line or group of lines to certain Internet addresses. The argument list is an integer from 1 through 99 that identifies a specific access list of Internet addresses. The keyword in applies to incoming connections; the keyword out applies to outgoing Telnet connections.
no slip
Cancels SLIP support on the line.
slip access-class number {in|out}
Configures an access list to be used on packets to or from the SLIP host. The argument number is the IP access list number.Keyword in configures list for packets from the SLIP host; keyword out compares the IP source address against the access list, and only those packets allowed by the access list are transmitted on the asynchronous line. The no version removes the specified list.
slip address internet-address
Specifies the Internet address assigned to the SLIP client at the other end of the serial line connection. The argument internet-address must be on the same network or subnet as the router's network interface.
slip address dynamic [IP-address]
Without an IP address, allows the IP address associated with a SLIP line to be assigned upon access. This feature is supported when a TACACS server is used.
With an IP address, allows a default address to be specified upon access.
slip dedicated
Places the line in SLIP mode permanently. The router will not create an EXEC on this line, so it is not available for normal interactive use.
slip hold-queue packets
Specifies the limit of the SLIP output queue, which stores packets received from the network waiting to be sent to the SLIP client. The argument packets is the maximum number of packets. Default is two packets.
slip interactive
Allows the line to be used in either SLIP mode or interactive mode. Hanging up the modem or clearing the line puts the line back into interactive mode.
slip mtu bytes
Specifies the size of the largest Internet packet that the SLIP support can handle. The argument bytes is the maximum number of bytes. Default is 1500 bytes.
speed baud
Sets the transmit and receive speeds for the line. The argument baud is 100, 1200, 2400, 4800, 9600, 19200, or 38400. Whether or not a higher baud rate improves performance depends on the SLIP client's ability to handle the interrupt load. The default is 9600.
![]()
![]()
![]()
![]()
![]()
![]()
![]()
![]()
Posted: Thu Oct 18 13:55:07 PDT 2001
All contents are Copyright © 1992--2001 Cisco Systems, Inc. All rights reserved.
Important Notices and Privacy Statement.