|
|

This chapter describes the Cisco Systems implementation of DECnet Phase IV for the Cisco network server product line. Topics and tasks described in this chapter include:
DECnet Phase V is equivalent to ISO CLNS, which is described in the chapter "Routing ISO CLNS." Support for DECnet Phase IV/Phase V conversion is discussed in this chapter.
Digital Equipment Corporation (DEC) designed the DECnet stack of protocols in the 1970s as part of its Digital Network Architecture (DNA). DECnet has been evolving through its lifetime to its present form known as Phase IV. DECnet support on a Cisco router includes local- and wide-area DECnet Phase IV routing over Ethernets, Token Ring, FDDI, and serial lines, with the following restrictions:
Cisco routers can support the Address Translation Gateway (ATG), which allows the router to participate in multiple, independent DECnet networks, and to establish a user-specified address translation table for selected nodes between networks.
DEC uses some non-routable protocols that are not part of the DECnet stack. Neither Cisco nor DEC routers can route protocols like MOP (discussed later in this chapter), and LAT, the DEC terminal server protocol. These protocols must be bridged; bridging concepts are described in the chapter "Configuring Transparent Bridging."
Cisco's DECnet Phase IV and V implementation is supported on Token Ring, provided certain implementation guidelines are met. See the sections "DECnet Phase IV to Phase V Conversion" and "Configuring DECnet on Token Ring" for more information. Since DEC has not defined a standard for running DECnet over Token Ring, all Token Ring DECnet routers on a ring must be from the same vendor.
DECnet Phase IV addresses are specified by area number and node number separated by a period. DECnet addresses are written as a dotted pair of area and node numbers. For example, 53.6 is node 6 in area 53.
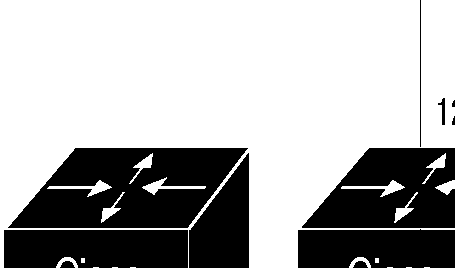
DECnet hosts exist as a node (host) in an area. Do not confuse the concept of area with an area defined by the IP, XNS, or other routing protocols. Unlike these protocols, DECnet allows for an area to span many routers, and for a single cable to have many areas attached to it. Therefore, if a host (such as a router) exists on many cables, it uses the same area/node for itself on all of them. Note how this differs from other routing protocols where each interface is given a different internetwork address. Figure 1-1 shows the DECnet approach.
The area number is six bits long (1 through 63); the node number is 10 bits long (1-1023). To determine the MAC address, the 16 bits of the DECnet address are converted into two binary-coded byte sections, then these bytes are translated into hexadecimal numbers and appended to the address AA 00.0400 in the following order: the first byte is placed last and the second byte next to last. This example illustrates how to convert the DECnet address 12.75:
These numbers are appended to the address AA00.0400, so the MAC address is then AA00.0400.4B30.
If all this seems confusing, you can also use the EXEC show interfaces command to obtain the MAC address once DECnet routing is enabled.
You do not have to set each interface address manually; the decnet routing global configuration command automatically assigns an address to each interface for which you entered a decnet cost configuration command. (These commands are described later in this chapter.)
The parameters in the Cisco Systems implementation of DECnet are a subset of the parameters you can modify in DEC's Network Control Program (NCP). Cisco Systems uses the same names, the same range of allowable values, and the same defaults wherever possible. Note that you must use the configuration commands to set DECnet parameters; the Cisco Systems DECnet implementation does not set parameters by communicating with NCP.
Follow these steps to start configuring your router for DECnet routing:
Step 1: Enable DECnet routing and specify which system-wide host address to use, use with the decnet routing global configuration command.
Step 2: After DECnet routing has been enabled, a cost must be assigned to each interface over which DECnet should run. This enables the interface. DECnet nodes route towards a destination using the lowest path cost, so you should base your cost values on interface throughput. Use the decnet cost interface subcommand to set a cost value for an interface.
Step 3: Next, specify with the decnet node-type command the node type, either an area router--Level 1 and Level 2--or a local router routing DECnet Phase IV at Level 1 only.
Step 4: You can alter the maximum node number and maximum area number with the optional decnet max-address and decnet max-area commands.
Step 5: Finally, you must specify several commands for either intra-area or inter-area routing. These commands and their parameters must be chosen carefully, as they are dependent on each other's values in many cases.
The following sections take you through these steps in detail, as well as all the optional commands for managing performance, security, Phase IV/V conversion, and so on. The section "DECnet Configuration Examples" shows complete configuration examples for many common situations.
To enable or disable DECnet routing, use the decnet routing global configuration command:
decnet routing decnet-addressThe argument decnet-address takes as its value an address in DECnet format X.Y, where X is the area number and Y is the node number. There is no default router address; you must specify this parameter for DECnet operation.
In the example below, DECnet routing is enabled for the router in area 21 with node number 456:
decnet routing 21.456
After DECnet routing has been enabled, you must assign a cost to each interface over which you want DECnet to run. (Assigning a cost in effect enables DECnet routing for an interface.) Most DECnet installations have an individualized routing strategy for using costs. Therefore, check the routing strategy used at your installation to ensure that costs you specify are consistent with those set for other hosts on the network.
The decnet cost interface subcommand sets a cost value for an interface:
decnet cost cost-valueThe argument cost-value is an integer from 1 to 63. There is no default cost for an interface, although a suggested cost for FDDI is 1, for Ethernets is 4 and for serial links is greater than 10. Use the no decnet cost subcommand to disable DECnet routing for an interface.
The example below establishes a DECnet routing process for the router at 21.456, then sets a cost of four for the Ethernet 0 interface.
decnet routing 21.456
interface ethernet 0
decnet cost 4
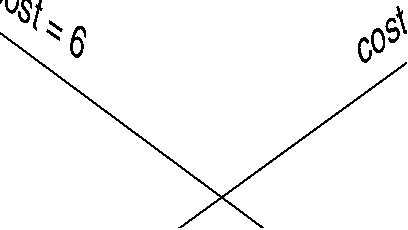
Figure 1-2 shows four routers, three Ethernet and the various routes linking them. Each link has a different cost associated with it. The least expensive route from router 7 to router 20 is via router 12.
Before you use many of the global and interface configuration commands, you must specify the node type with the decnet node-type global configuration command. The decnet node-type command specifies the node type for the router.
decnet node-type {routing-iv|area}The options are either area or routing-iv. If you specify area, the router participates in the DECnet routing protocol with other area routers, as described in the DEC documentation, and routes packets from and to routers in other areas. This is sometimes referred to as Level 2, or inter-area, routing. An area router does not just handle inter-area routing; it also acts as an intra-area or Level 1 router. If you specify routing-iv (the default), the router acts as an intra-area (standard DECnet Phase IV, Level 1 router) and ignores Level 2 routing packets. In this mode, it routes packets destined for other areas via the least-cost path to an inter-area router, exchanging packets with other end-nodes and routers in the same area.
DECnet routers do not have the concept of aging out a route. Therefore, all possible areas or nodes must be advertised as unreachable if they cannot be reached. Since it is best to keep routing updates small, you need to indicate the default maximum possible node and area numbers that can exist in the network. The default value for a node address to be given in an update is 1023.
You can use the decnet max-address global configuration command to configure the router with a different maximum node address, as follows:
decnet max-address valueThe argument value is a number, less than or equal to 1023, that represents the maximum node address possible on the network. In general, all routers on the network should use the same value for this parameter.
The example below configures a small network (spanning just a department). The desire is to keep routing updates as small as possible, so the maximum address value is set to 300 instead of the default of 1023.
decnet max-address 300
Use decnet max-area global configuration command to set the largest number of areas that the router can handle in its routing table. The syntax is as follows:
decnet max-area valueThe argument value is an area number from 1 to 63; the default is 63. Like the decnet max-address command value, this parameter controls the sizes of internal routing tables and of messages sent to other nodes. All routers on the network should use the same maximum address value.
In this example, the maximum number of areas that the router will save in its routing table is 45.
decnet max-area 45
The decnet area-max-cost global configuration command sets the maximum cost specification value for inter-area routing. The syntax of this command follows:
decnet area-max-cost valueThe argument value determines the maximum cost for a route to a distant area that the router may consider usable; the router treats as unreachable any route with a cost greater than the value you specify. A valid range for cost is from 1 to 1,022; the default is 1,022. This parameter is only valid for area routers. Make sure you've used the decnet node-type area command before using this command.
In this example, the node type is specified as area and the maximum cost is set to 500. Any route whose cost exceeds 500 will be considered unreachable by this router.
decnet node-type area
decnet area-max-cost 500
Use the decnet area-max-hops global configuration command to set the maximum hop count value for inter-area routing as follows:
decnet area-max-hops valueThe argument value determines the maximum number of hops for a usable route to a distant area. The router treats as unreachable any route with a count greater than the value you specify. A valid range for the hop count is from 1 to 30; the default is 30. This parameter is only valid for area routers. Make sure you've used the decnet node-type area command before using this command.
This example sets the node type to area, then sets a maximum hop count of 21. This was done because it is a small network with relatively few routers for inter-area routing, so a route with a large hop count is liable to represent a problem, not an efficient route.
decnet node-type area
decnet area-max-hops 21
The decnet max-cost global configuration command sets the maximum cost specification for intra-area routing. The router ignores routes within the router's local area that have a cost greater than the corresponding value of this parameter. The syntax for this command follows:
decnet max-cost valueThe argument value is a cost from 1 to 1,022 (the default).
In this example, the node type is specified as DECnet Phase IV and the maximum cost is set to 335. Any route whose cost exceeds 335 will be considered unreachable by this router.
decnet node-type routing-iv
decnet max-cost 335
Use the decnet max-hops global configuration command to set the maximum hop count specification value for intra-area routing, as follows:
decnet max-hops valueThe argument value is a hop count from 1 to 30 (the default). The router ignores routes that have a hop count greater than the corresponding value of this parameter.
This example sets the node type to DECnet Phase IV routing, then sets a maximum hop count of 2.
decnet node-type routing-iv
decnet max-hops 2
Use the decnet max-visits global configuration command to set the limit on the number of times a packet can pass through a router.
decnet max-visits valueThe value keyword can vary from 1 to 63 ( the default). If a packet exceeds value, the router discards the packet. DEC recommends that the value of the max-visits parameter be at least twice that of the max-hops parameter, to allow packets to still reach their destinations when routes are changing.
This example of intra-area routing configuration specifies Phase IV routing, a maximum hop count of 28, and maximum number of visits of 62 (which is more than twice 28).
decnet node-type routing-iv
decnet max-hops 28
decnet max-visits 62
Limiting the number of equal cost paths can save memory on routers with limited memory or very large configurations. Additionally, in networks with a large number of multiple paths, and end-systems with limited ability to cache out-of-sequence packets, performance may suffer when traffic is split between many paths.
Limiting the size of the routing table will not affect your router's ability to recover from network failures transparently provided that you do not make the maximum number of paths too small. If more than the specified number of equal cost paths exist and one of those paths suddenly becomes unusable, the router will discover an additional path from the paths it has been ignoring.
The first of the optional path global configuration commands, decnet max-paths, defines the maximum number of equal cost paths to a destination that the router will keep in its routing table, with the following syntax:
decnet max-paths valueThe argument value is a decimal number equal to the maximum number of equal cost paths the router will save. The highest value accepted is 31; the default value is 1.
In the following example, some destinations have six equal cost paths, so the example specifies that the router will save no more than three equal cost paths.
decnet max-paths 3
The decnet path-split-mode global configuration command also helps you make decisions about equal cost paths; it specifies how the router will split the routable packets between equal cost paths. This command has two forms, as shown:
decnet path-split-mode normalThe keyword normal selects normal mode (the default), where equal cost paths are selected on a round-robin basis. The keyword interim specifies that traffic for any particular (higher-layer) session is always routed over the same path. This mode supports older implementations of DECnet (VMS versions 4.5 and earlier) that do not support out-of-order packet caching. Other sessions may take another path, thus utilizing equal cost paths that a router may have for a particular destination.
In general, you need not modify the DECnet parameters. However, under special circumstances, or when using a specific configuration, you will see better performance if you alter some of the default parameters. This section will guide you through those special circumstances.
The router broadcasts HELLO messages on all interfaces with DECnet enabled. Other hosts on the network use the HELLO messages to identify the hosts with which they can communicate directly. The router sends HELLO messages every 15 seconds by default. On extremely slow serial lines, you may want to increase this value to reduce overhead on the line using the decnet hello-timer interface subcommand.
decnet hello-timer valueThe keyword value varies from 1 to 8,191 seconds; the default is 15 seconds.
The following example increases the HELLO interval to 2 minutes (120 seconds) on serial interface 1.
interface serial 1
decnet hello-timer 120
By default, Cisco's DECnet routing software implements fast switching of DECnet datagrams by the MCI network interface board. There are times when it makes sense to disable fast switching. This is especially important when using rates slower than T1.
Fast switching uses memory space on the MCI board. In situations where a high bandwidth interface is writing large amounts of information to a low bandwidth interface, additional memory could help avoid congestion on the slow interface (also known as big-pipe/little-pipe problems). Use the no decnet route-cache interface subcommand to turn off fast switching.
decnet route-cacheIn a network where changes occur very seldom or do not need to be responded to immediately (it is small and uncomplicated; applications are not particularly critical; slow serial links, and so on.), increasing the time between routing updates reduces the amount of unnecessary network traffic. The decnet routing-timer interface subcommand specifies how often the router sends routing updates that list all the hosts that the router can reach. Other routers use this information to construct local routing tables. DEC calls this parameter the broadcast routing timer because they have a different timer for serial lines; the Cisco Systems DECnet implementation does not make this distinction. The syntax for the decnet routing-timer interface subcommand follows:
decnet routing-timer valueThe argument value specifies a time from 1 to 65,535 seconds; the default is 40 seconds. The no decnet routing-timer command restores this default.
In the following example, a serial interface is set to broadcast routing updates every two minutes.
interface serial 0
decnet routing-timer 120
The designated router is that router to which all end nodes on an Ethernet communicate if they do not know where else to send a packet. The designated router is chosen through an election process in which the router with the highest priority gets the job. When two or more routers in a single area share the same, highest priority, the unit with the highest node number is elected. You can reset a router's priority to help ensure that it is elected designated router in its area.
Priority may be changed with the decnet router-priority interface subcommand, as shown below:
decnet router-priority valueThe argument value can range from zero through 127; the default priority is 64.
In the following example, interface Ethernet 1 is set to a priority of 110.
interface ethernet 1
decnet router-priority 110
The Cisco routers support DECnet on Token Ring interfaces. This protocol is fully supported between Cisco routers, including the Address Translation Gateway. Since DEC has not defined a standard for encapsulating DECnet Phase IV datagrams on Token Ring, it is unlikely that the Cisco implementation will operate with other DECnet implementations on Token Ring. The intent of the Cisco implementation is to use Token Ring as a transit network medium, especially for backbones.
Configuring a Cisco router for DECnet on Token Ring is very similar to configuring DECnet on Ethernet. The only difference is the specification of a Token Ring rather than an Ethernet interface. The syntax for the interface command in shown below:
interface tokenring numberThe parameter number refers to the interface number.
The example below sets interface Token Ring 0 for DECnet routing.
interface tokenring 0
decnet cost 4
There are two forms of DECnet access lists: one that specifies a single address (a standard list) and one that specifies two addresses (an extended list). See the section "Configuring IP Access Lists" in the chapter "Routing IP" for general information about setting up access lists.
Use the access-list global configuration command to create an access list:
access-list list {permit|deny} address maskThe argument list is an integer you choose between 300 and 399 that uniquely identifies the access list. The permit and deny keywords decide the access control action when a match happens with the address arguments.
The standard form of the DECnet access list has a DECnet address followed by a mask, also in DECnet address format, with bits set wherever the corresponding bits in the address should be ignored. DECnet addresses are written in the form area.node (for example, 50.4 is node 4 in area 50). All addresses and masks are in decimal.
This example sets up access list 300 to deny packets going out to the destination node 4.51 and permit packets destined to 2.31.
access-list 300 deny 4.51 0.0
access-list 300 permit 2.31 0.0
Use this global configuration command to create extended access lists:
access-list list {permit|deny} source source-mask destination destination-maskThe extended form of the DECnet access list has a source DECnet address and mask pair followed by a destination DECnet address and mask pair.
The argument list is an integer you choose between 300 and 399 that uniquely identifies the access list. The permit and deny keywords decide the access control action when a match happens with the address arguments.
In the example below, access list 301 is configured to allow traffic from any host in networks 1 and 3. It implies no other traffic will be permitted. (The end of a list contain an implicit "deny all else" statement.)
access-list 301 permit 1.0 0.1023 0.0 63.1023
access-list 301 permit 3.0 0.1023 0.0 63.1023
The decnet access-group interface subcommand applies an access list to an interface.
decnet access-group listThe argument list can be either a standard or extended DECnet access list. A standard DECnet access list applies to destination addresses in this case.
The following example applies access list 389 to interface Ethernet 1.
interface ethernet 1
decnet access-group 389
The decnet in-routing-filter interface subcommand provides access control to HELLO messages, or routing information received on this interface. Addresses that fail this test are treated as unreachable. The full syntax of the command follows.
decnet in-routing-filter listThe argument list is a standard DECnet access list.
The no decnet in-routing-filter command removes access control.
In the following example, interface Ethernet 0 is set up with a DECnet in-routing filter of 321, which means that any routing of HELLO messages sent from addresses that are denied in list 321 will be ignored. Additionally, all node addresses listed in received routing messages on this interface will be checked against the access list, and only routes passing the filter will be considered usable.
interface ethernet 0
decnet in-routing-filter 321
The decnet out-routing-filter interface subcommand provides access control to routing information being sent out on this interface. Addresses that fail this test are shown in the update message as unreachable.
decnet out-routing-filter listThe argument list is a standard DECnet access list.
The no decnet out-routing-filter command removes access control.
In the following example, interface Ethernet 1 is set up with a DECnet in-routing filter of 351, which means that any addresses that are denied in list 351 will not be sent out in routing updates on this interface.
interface ethernet 1
decnet out-routing-filter 351
DECnet Phase V is OSI-compatible and conforms to the ISO 8473 (CLNP/CLNS) and ISO 9542 (ES-IS) standards. See the chapter "Routing ISO CLNS" for an explanation of configuring OSI CLNP routing and for a review of the terminology. The following guidelines apply to the Phase IV/Phase V conversion:
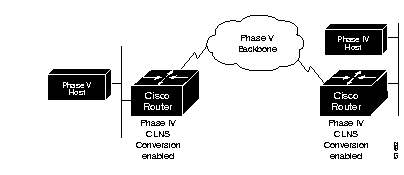
A process known as tunneling allows Phase IV packets to traverse a Phase V backbone and vice versa. Each Phase IV host that needs to tunnel must be behind a router that is running DECnet Phase IV and CLNS and that has DECnet conversion enabled, as shown in Figure 1-3. There must be a path of Cisco routers with CLNS enabled between each pair of Phase IV hosts that need to communicate. However, all of these routers do not need to be running Phase IV.
When a Phase IV ES HELLO message is received, the router makes a neighbor entry in both the Phase IV and Phase V ES databases. When a Phase IV packet comes in, the router looks in the Phase IV database for the destination address. If it cannot find it, it will look in the Phase V database. If it is in the Phase V database, it will be converted and sent across the backbone as a CLNS packet. Before the packet is sent on to its final destination, the router will check to see if the packet should be delivered as a CLNS or a Phase IV packet and do the conversion if needed. You may also tunnel Phase V packets across a Phase IV backbone. Phase V packets must conform to Phase IV addresses if you want to tunnel them across a Phase IV backbone. See the section "Phase V Addresses That Conform to Phase IV Addresses."
Use the decnet conversion igrp global configuration command to enable the conversion for the router.
decnet conversion igrp area-tagThe argument area-tag is an ISO CLNS area name you defined for the CLNS network. Check the chapter "Routing ISO CLNS" for more information on CLNS area tags.
To enable DECnet conversion on a Cisco router with the CLNS area tag Field, enter the following configuration commands:
decnet conversion igrp Field
Phase V addresses (in the form of Network Service Access Points or NSAPs) are interpreted in the following way:
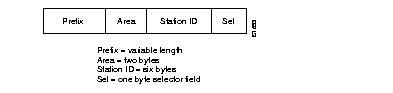
In order for a Phase V address to be Phase IV-conforming, it must obey the following restrictions:
When using DECnet Phase IV routing to configure a network and pure Phase IV routers (that is, non-Cisco routers, or Cisco routers that are not CLNS-configured) are in the path between two hosts (Phase IV or Phase V), the only addresses that can pass through the Phase IV router are Phase IV-conforming addresses.
An example of a configuration would look like this:
decnet routing 32.6
!
clns routing
clns router igrp willow net 47.0004.004d.0020.AA00.0400.0680.00
decnet conversion igrp willow
!
interface ethernet 0
decnet cost 10
clns router igrp willow
Remember to convert the DECnet area to a CLNS area. DECnet areas are in decimal; CLNS areas are in hexadecimal. In this example, a DECnet area of 32 translates into a hexadecimal area of 20. Use the no decnet conversion command to disable this feature.
This section includes configuration examples, showing many common DECnet configuration activities.
The configuration subcommands in the example below establish DECnet routing on a Cisco router. The first line establishes DECnet routing for a specific address. The second line sets the maximum address space at 1023 addresses. The second section sets a cost of 4 for the Ethernet 0 interface. The third section sets a cost of 10 for the serial 1 interface.
decnet routing 4.27
decnet max-address 1023
!
interface ethernet 0
decnet cost 4
!
interface serial 1
decnet cost 10
In the first part of this configuration, the router that is being set up with an area and node address in the first line, then it is being designated a Level 2 (area) router. In the lines that follow, the two Ethernet interfaces are given costs of four.
decnet routing 6.10
decnet node area
!
interface ethernet 0
decnet cost 4
interface ethernet 1
decnet cost 4
In the second example, you want the router to be the designated router, so assign it the highest possible node address. You designate it as an area router and you assign a cost of 4 and a router priority of 127 to the Ethernet, and a cost of 20 to the serial connection.
decnet routing 6.1023
decnet node area
!
interface ethernet 0
decnet cost 4
decnet router-priority 127
!
interface serial 0
decnet cost 20
In the third example, we want the router to be a Level 1 router and we need to give it an address in area 7. The serial link is slower than in the previous example (9.6 vs. 56 Kbps) so it has a higher cost.
decnet routing 7.12
decnet node routing-iv
!
interface ethernet 0
decnet cost 4
interface ethernet 1
decnet cost 4
interface serial 0
decnet cost 25
This example begins by enabling DECnet routing with a specific address of 54.6. It then specifies the area the name Field (as in Field Offices) with the clns router igrp command. Remember that this command must be typed on one line, with the complete address following the net keyword. You should already have a CLNS area named Field before you use this command. This is the last time you will have have to use the full hexadecimal address; from now on all your commands can simply specify Field as the area.
At this point you have set the stage for the decnet conversion command, which specifies that you will be using IGRP as the routing protocol in the area named Field.
After you have enabled the conversion, you need to name the specific interfaces that you want to route DECnet packets. In this example, the interface Ethernet 0 is enabled, with a cost of ten. The clns router igrp command with the Field area is needed to specify that the interface will be using IGRP and Phase V CLNS and that it is part of area Field.
You could follow this interface specification with other interface specifications such as Ethernet 1, serial 0, and so on, with the same three commands. You could also go on to specify access lists and other special commands for these specific interfaces.
decnet routing 54.6
clns router igrp Field NET 47.0006.02.000000.0000.0100.0036.AA00040006D8
decnet conversion igrp Field
interface ethernet 0
decnet cost 10
clns router igrp Field
The Address Translation Gateway (ATG) allows a Cisco router to route traffic for multiple independent DECnet networks and to establish a user-specified address translation for selected nodes between networks. This allows connectivity between DECnet networks which might be otherwise not connectable due to address conflicts between the networks. The ATG allows you to define multiple DECnet networks and map between them. This may be done over all media types.
The ATG configuration commands are basically a modification to the standard DECnet global configuration commands.
The general syntax of the DECnet ATG command follows:
decnet network-number keywordsThe argument network-number specifies the network number in the range 0 through 3, and the argument keywords is one of the configuration keywords (area-max-cost, for example). Commands without the network-number modifier apply to network 0.
You may also establish a translation entry to translate a virtual DECnet address to a real DECnet address by using this global configuration command:
decnet first-network map virtual-address second-network real-addressThe arguments first-network and second-network are DECnet network numbers in the range 0 through 3. The arguments virtual-address and real-address are specified as numeric DECnet addresses (10.5, for example).
In Figure 1-5, the Cisco router is connected to two DECnet networks using Ethernet. The examples following Figure 1-5 refer to the configuration in the figure.
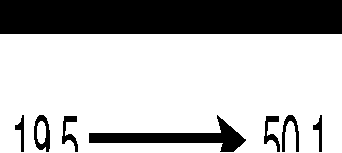
In Network 0, the router is configured at address 19.4 and is a Level 1 router. In Network 1, the router is configured at address 50.5 and is an area router. At this point, no routing information is exchanged between the two networks. Each network in the router has a separate routing table.
decnet 0 routing 19.4
decnet 0 node routing-iv
interface ethernet 0
decnet 0 cost 1
!
decnet 1 routing 50.5
decnet 1 node area
interface ethernet 1
decnet 1 cost 1
To establish a translation map, enter these commands:
decnet 0 map 19.5 1 50.1
decnet 0 map 19.6 1 19.1
decnet 1 map 47.1 0 19.1
decnet 1 map 47.2 0 19.3
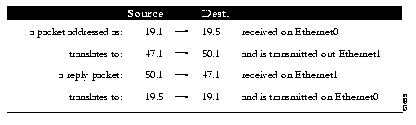
Packets in Network 0 sent to address 19.5 will be routed to Network 1 and the destination address will be translated to 50.1. Similarly, packets sent to address 19.6 in Network 0 will be routed to Network 1 as 19.1; packets sent to address 47.1 in Network 1 will be routed to Network 0 as 19.1; and packets sent to 47.2 in Network 1 will be sent to Network 0 as 19.3.
The following table depicts a packet exchange between nodes A and D:
Network 0 uses a block of addresses from its area to map the remote nodes. In network 0, the router will advertise nodes 19.5 and 19.6. These nodes must not already exist
in network 0.
Network 1 uses another area for the address translation. Since the router will be advertising the availability of area 47, that area should not already exist in network 1 because DECnet area fragmentation could occur.
Only nodes that exist in the maps on both networks will be able to communicate directly. Network 0 node 19.1 will be able to communicate with Network 1 node 50.1 (as 19.5), but will not be able to communicate directly with Network 1 node 60.1.
When naming nodes, use the appropriate address in each network. See the following lists for examples.
$ MCR NCP
define node 19.1 name A
define node 19.2 name B
define node 19.3 name C
define node 19.4 name GS
define node 19.5 name D
define node 19.6 name F
$ MCR NCP
define node 50.1 name D
define node 50.5 name GS
define node 60.1 name E
define node 19.1 name F
define node 47.1 name A
define node 47.2 name C
As an additional feature and security caution, DECnet Poor Man's Routing may be used between nodes outside of the translation map as long as those nodes have access to nodes that are in the map, so that a user on node B could issue the following VMS command:
$ dir A::D::E::
When a Poor Man's Routing connection is made between two networks, only the two adjacent nodes between the networks will have any direct knowledge about the other network. Application-level network access may then be specified to route through the connection.
Keep the following limitations in mind when configuring the Address Translation Gateway:
Use the EXEC commands described in this section to obtain displays of activity on the DECnet network.
Use the show decnet interface command to display the DECnet status and configuration for all interfaces. Enter this command at the EXEC prompt:
show decnet interface [interface unit]When the optional arguments interface and unit are specified, the relevant information for that particular interface are displayed.
In the following sample output, no specific interface was named, so you see information on all interfaces.
Global DECnet parameters for network 0:
  Local address is 19.15, node type is area
  Maximum node is 350, maximum area is 63, maximum visits is 63
  Maximum paths is 1, mode is normal
  Local maximum cost is 1022, maximum hops is 30
  Area maximum cost is 1022, maximum hops is 30
Ethernet 0 is up, line protocol is up
  Interface cost is 2, priority is 126, DECnet network: 0
  We are the designated router
  Sending HELLOs every 15 seconds, routing updates 40 seconds
  Smallest router blocksize seen is 576 bytes
  Routing input list is not set, output list is not set
  Access list is not set
  DECnet fast switching is enabled
Serial 0 is up, line protocol is up
  Interface cost is 5, priority is 126, DECnet network: 0
  Sending HELLOs every 15 seconds, routing updates 40 seconds
  Smallest router blocksize seen is 1498 bytes
  Routing input list is not set, output list is not set
  Access list is not set
  DECnet fast switching is enabled
Ethernet 1 is up, line protocol is up
  DECnet protocol processing disabled
Use the show decnet map command to display the address mapping information used by the DECnet Address Translation Gateway. Enter this command at the EXEC prompt:
show decnet mapUse the show decnet route command to display the DECnet routing table. Enter this command at the EXEC prompt:
show decnet route [decnet-address]The optional argument decnet-address is a DECnet address and, when specified, the first hop route to that address is displayed. This command may show several routes for a destination when equal cost paths have been set with the decnet max-paths command, and when there is more than one equal cost path to a destination. The currently selected route is indicated by an asterisk in the first column of the output. In interim mode, the selected route will never appear to change.
In the following sample output, a DECnet address name was not specified, so the entire routing table is displayed:
  Node       Cost  Hops   Next Hop to Node       Expires  Prio
*(Area)        0     0     (Local) ->19.15
*19.16         2     1   Ethernet0 ->19.16            44     64    V
*19.17         1     1   Ethernet2 ->19.17            31    125    VA
 19.17         2     1   Ethernet0 ->19.17            31    125    VA
*19.22         2     1   Ethernet0 ->19.22            41
In the displays:
The show decnet traffic command shows the DECnet traffic statistics, including datagrams sent, received, and forwarded. Enter this command at the EXEC prompt:
show decnet trafficFollowing is sample output:
Total: 92275748 received, 758 format errors, 0 unimplemented
       0 not a gateway, 0 no memory, 689 no routing vector
Hellos: 13113448 received, 26 bad, 15042 other area, 1842481 sent
Level 1 routing: 3919281 received, 0 bad, 580109 other area, 1485567 sent
Level 2 routing: 794130 received, 0 not primary router, 1140858 sent
Data: 73868022 received, 0 not long format, 68 too many visits
      73852256 forwarded, 0 mapped, 10880 returned, 0 converted
      0 access control failed, 10880 no route, 0 encapsulation failed
      0 inactive network, 0 incomplete map
In the displays:
Use the EXEC commands described in this section to troubleshoot and monitor the DECnet network transactions. For each debug command, there is a corresponding undebug command that turns the message logging off. Generally, you enter these commands with Cisco customer engineers during troubleshooting sessions.
The debug decnet-packets command enables logging of all DECnet routing updates and HELLO packets.
The debug decnet-routing command enables logging of all changes made to the DECnet routing table, that is, new routes, routes that change cost, routes that expire, and so on.
This section provides an alphabetically arranged summary of all the DECnet global interface commands. These commands may appear any place in the configuration file.
access-list list {permit|deny} address mask
no access-list
Creates an access lists. The argument list is an integer between 300 and 399 that uniquely identifies the access list. The permit and deny keywords decide the access control action when a match happens with the address arguments. The no form of the command deletes the access list.
decnet area-max-cost value
Sets the maximum cost specification value for inter-area routing. The argument value determines the maximum cost for a route to a distant area that the router may consider usable; the router treats as unreachable any route with a cost greater than the value you specify. A valid range for cost is from 1 to 1,022; the default is 1,022. This parameter is only valid for area routes.
decnet area-max-hops value
Sets the maximum hop count specification value for inter-area routing. The argument value determines the maximum number of hops for a route to a distant area that the router may consider usable; the router treats as unreachable any route with a count greater than the value you specify. A valid range for the hop count is from 1 to 30; the default is 30. This parameter is only valid for area routes
[no] decnet conversion igrp area-tag
Enables the DECnet Phase IV/Phase V conversion for the router. The argument area-tag is an ISO CLNS area name. The no form of the command disables conversion.
decnet network-number keywords
Specifies ATG. The argument network-number specifies the network number in the range 0 through 3, and the argument keywords is one of the configuration keywords. Commands without the network-number modifier apply to "network 0."
decnet first-network map virtual-address second-network real-address
Establishes a translation entry to translate a virtual DECnet address to a real DECnet address. The arguments first-network and second-network are DECnet network numbers in the range zero through three. The arguments virtual-address and real-address are specified as numeric DECnet addresses.
decnet max-address value
Determines the largest node number specification allowed in the current area. The argument value is a node number from 1 to 1,023; the default is 255. This parameter controls the sizes of internal routing tables and of messages sent to other nodes.
decnet max-area value
Sets the largest area number specification that the router can handle. The max-area keyword takes as its value an area number from 1 to 63; the default is 63.
decnet max-cost value
Sets the maximum cost specification for intra-area routing. The router ignores routes within the local area that have a cost greater than the corresponding value of this parameter. The argument value is a cost from 1 to 1,022; the default is 1,022.
decnet max-hops value
Sets the maximum hop count specification value for intra-area routing. The router ignores routes within the local area that have a hop count greater than the corresponding value of this parameter. The argument value is a hop count from 1 to 30; the default is 30.
decnet max-paths value
Defines the maximum number of equal cost paths to a destination that may be kept by the router. The argument value specifies the maximum number of equal cost paths, which is limited to 31. The default value is one, which specifies no multiple paths.
decnet max-visits value
Sets the limit on the number of times a packet can pass through a router. The argument value is a number from 1 to 63; the default value is 63.
decnet node-type {area|routing-iv}
Specifies the node type for the router. This command takes another keyword, area or routing-iv, as its value. If you specify area, the router exchanges traffic directly with routers in other areas, and participates in the inter-area (Level 2) routing protocol, as well as acting as a intra-area (Level 1) router for its local area. If you specify routing-iv (the default), the router acts as an intra-area router, and routes packets out of the area by taking the least cost path to an inter-area router.
decnet path-split-mode {normal|interim}
Sets the mode for splitting the routes between equal cost paths. The keyword normal selects the normal mode, where equal cost paths are selected on a round-robin basis. The normal mode is the default. The keyword interim selects an interim mode, where traffic for any particular higher level session is always routed over the same path. This mode supports older implementations of DECnet (VMS versions 4.5 and earlier) that do not support out-of-order packet caching.
[no] decnet routing decnet-address
Enables or disables DECnet routing. The argument decnet-address takes as its value an address in DECnet format X.Y, where X is the area number and Y is the node number. There is no default router address; you must specify this parameter for DECnet operation.
This section provides an alphabetically arranged summary of the DECnet interface subcommands. These commands follow an interface command.
[no] decnet access-group list
Applies or removes an access list. The argument list can be either a standard or extended DECnet access list. A standard DECnet access list applies to destination addresses in this case.
[no] decnet cost cost-value
Sets or removes a cost value for an interface. The argument cost-value is an integer from 1 to 63. There is no default cost for an interface, although a suggested cost for Ethernets is 4, and all hosts on the same cable must share the same value. Use the no decnet cost subcommand to disable DECnet routing for an interface.
[no] decnet hello-timer value
Specifies how often the router sends HELLO messages. This keyword takes as its value a time from 1 to 8,191 seconds; the default is 15 seconds. The no form of the command restores the default.
[no] decnet in-routing filter list
Provides access control to HELLO messages or routing information received on this interface. Addresses that fail this test are treated as unreachable. The argument list is a standard DECnet access list. The no form of the command removes access control.
[no] decnet out-routing-filter list
Provides access control to routing information being sent out on this interface. Addresses that fail this test are shown in the update message as unreachable. The argument list is a standard DECnet access list. The no form of the command removes access control.
[no] decnet route-cache
Fast switching and the route cache are normally enabled. If you want to disable fast switching, use the no form of the command.
[no] decnet router-priority value
Sets a priority value for use in determining the default router. Argument value is a number from 0 to 127; the default is 64. The no form of the command restores the default.
[no] decnet routing-timer value
Specifies how often the router sends routing messages. Argument values a time from 1 to 65,535 seconds; the default is 40 seconds. The no form of the command restores the default.
|
|