|
|

Table Of Contents
Configuring Authentication Proxy
How the Authentication Proxy Works
Using the Authentication Proxy
When to Use the Authentication Proxy
Applying the Authentication Proxy
Operation with One-Time Passwords
Compatibility with Other Security Features
Compatibility with AAA Accounting
Protection Against Denial-of-Service Attacks
Risk of Spoofing with Authentication Proxy
Comparison with the Lock-and-Key Feature
Prerequisites to Configuring Authentication Proxy
Authentication Proxy Configuration Task List
Configuring the Authentication Proxy
Verifying the Authentication Proxy
Monitoring and Maintaining the Authentication Proxy
Displaying Dynamic ACL Entries
Deleting Authentication Proxy Cache Entries
Authentication Proxy Configuration Examples
Authentication Proxy Configuration Example
Authentication Proxy, IPSec, and CBAC Configuration Example
Authentication Proxy, IPSec, NAT, and CBAC Configuration Example
AAA Server User Profile Example
Configuring Authentication Proxy
This chapter describes the Cisco IOS Firewall Authentication Proxy feature. Authentication proxy provides dynamic, per-user authentication and authorization, authenticating users against industry standard TACACS+ and RADIUS authentication protocols. Authenticating and authorizing connections by users provides more robust protection against network attacks.
For a complete description of the authentication proxy commands in this chapter, refer to the "Authentication Proxy Commands" chapter of the Cisco IOS Security Command Reference. To locate documentation of other commands that appear in this chapter, use the command reference master index or search online.
To identify the hardware platform or software image information associated with a feature, use the Feature Navigator on Cisco.com to search for information about the feature or refer to the software release notes for a specific release. For more information, see the "Identifying Supported Platforms" section in the chapter "Using Cisco IOS Software."
In This Chapter
This chapter contains the following sections:
•
Authentication Proxy Configuration Task List
•
•
About Authentication Proxy
The Cisco IOS Firewall authentication proxy feature allows network administrators to apply specific security policies on a per-user basis. Previously, user identity and related authorized access were associated with a user IP address, or a single security policy had to be applied to an entire user group or subnetwork. Now, users can be identified and authorized on the basis of their per-user policy. Tailoring of access privileges on an individual basis is possible, as opposed to applying a general policy across multiple users.
With the authentication proxy feature, users can log in to the network or access the Internet via HTTP, and their specific access profiles are automatically retrieved and applied from a CiscoSecure ACS, or other RADIUS, or TACACS+ authentication server. The user profiles are active only when there is active traffic from the authenticated users.
The authentication proxy is compatible with other Cisco IOS security features such as Network Address Translation (NAT), Context-based Access Control (CBAC), IP Security (IPSec) encryption, and Cisco Secure VPN Client (VPN client) software.
This section contains the following sections:
•
•
•
•
•
•
•
•
•
•
•
How the Authentication Proxy Works
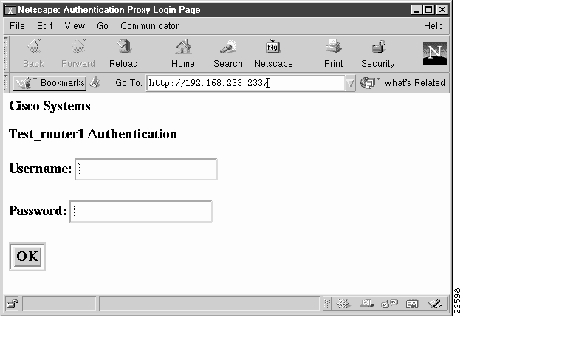
When a user initiates an HTTP session through the firewall, the authentication proxy is triggered. The authentication proxy first checks to see if the user has been authenticated. If a valid authentication entry exists for the user, the connection is completed with no further intervention by the authentication proxy. If no entry exists, the authentication proxy responds to the HTTP connection request by prompting the user for a username and password.
Figure 23 illustrates the authentication proxy HTML login page.
Figure 23 Authentication Proxy Login Page
Users must successfully authenticate themselves with the authentication server by entering a valid username and password.
If the authentication succeeds, the user's authorization profile is retrieved from the AAA server. The authentication proxy uses the information in this profile to create dynamic access control entries (ACEs) and add them to the inbound (input) access control list (ACL) of an input interface and to the outbound (output) ACL of an output interface, if an output ACL exists at the interface. This process enables the firewall to allow authenticated users access to the network as permitted by the authorization profile. For example, a user can initiate a Telnet connection through the firewall if Telnet is permitted in the user's profile.
If the authentication fails, the authentication proxy reports the failure to the user and prompts the user with multiple retries. If the user fails to authenticate after five attempts, the user must wait two minutes and initiate another HTTP session to trigger authentication proxy.
The login page is refreshed each time the user makes requests to access information from a web server.
The authentication proxy customizes each of the access list entries in the user profile by replacing the source IP addresses in the downloaded access list with the source IP address of the authenticated host.
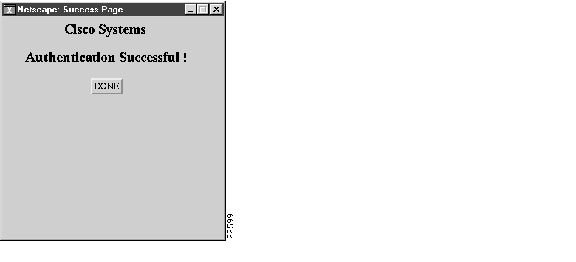
At the same time that dynamic ACEs are added to the interface configuration, the authentication proxy sends a message to the user confirming that the login was successful. Figure 24 illustrates the login status in the HTML page.
Figure 24 Authentication Proxy Login Status Message
The authentication proxy sets up an inactivity (idle) timer for each user profile. As long as there is activity through the firewall, new traffic initiated from the user's host does not trigger the authentication proxy, and authorized user traffic is permitted access through the firewall.
If the idle timer expires, the authentication proxy removes the user's profile information and dynamic access lists entries. When this happens, traffic from the client host is blocked. The user must initiate another HTTP connection to trigger the authentication proxy.
Secure Authentication
The authentication proxy uses JavaScript to help achieve secure authentication using the client browser. Secure authentication prevents a client from mistakenly submitting a username and password to a network web server other than the authentication proxy router.
This section contains the following sections:
•
Operation with JavaScript
Users should enable JavaScript on the browser prior to initiating an HTTP connection. With JavaScript enabled on the browser, secure authentication is done automatically, and the user sees the authentication message shown in Figure 24. The HTTP connection is completed automatically for the user.
Operation Without JavaScript
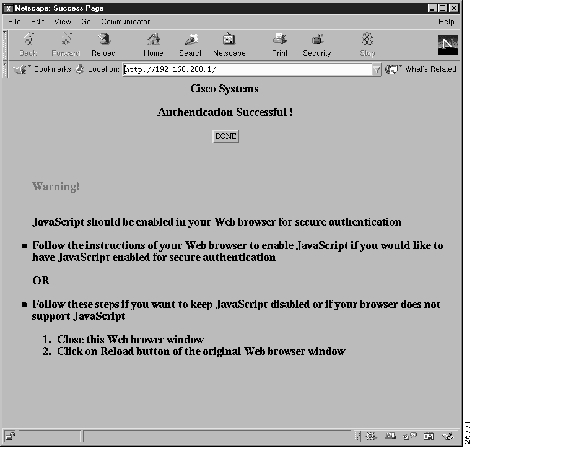
If the client browser does not support JavaScript, or if site security policy prevents users from enabling JavaScript, any login attempt generates a popup window with instructions for manually completing the connection. Figure 25 illustrates the authentication proxy login status message with JavaScript disabled on the browser.
Figure 25 Authentication Proxy Login Status Message with JavaScript Disabled
To close this window, click Close on the browser File menu.
After closing the popup window, the user should click Reload (Refresh for Internet Explorer) in the browser window in which the authentication login page is displayed. If the user's last authentication attempt succeeds, clicking Reload brings up the web page the user is trying to retrieve. If the user's last attempt fails, clicking Reload causes the authentication proxy to intercept the client HTTP traffic again, prompting the user with another login page that solicits the username and password.
If JavaScript is not enabled, it is strongly recommended that site administrators advise users of the correct procedure for closing the popup window as described in the section " Establishing User Connections Without JavaScript."
Using the Authentication Proxy
Unlike some Cisco IOS Firewall features that operate transparently to the user, the authentication proxy feature requires some user interaction on the client host. Table 21 describes the interaction of the authentication proxy with the client host.
Table 21 Authentication Proxy Interaction with the Client Host
Triggering on HTTP connections
If a user is not currently authenticated at the firewall router, any HTTP connection initiated by the user triggers the authentication proxy. If the user is already authenticated, the authentication proxy is transparent to the user.
Logging in using the login page
Triggering the authentication proxy generates an HTML-based login page.The user must enter a username and password to be authenticated with the AAA server. Figure 23 illustrates the authentication proxy login page.
Authenticating the user at the client
Following the login attempt, the authentication proxy action can vary depending on whether JavaScript is enabled in the browser. If JavaScript is enabled, and authentication is successful, the authentication proxy displays a message indicating the status of the authentication as shown in Figure 24. After the authentication status is displayed, the proxy automatically completes the HTTP connection.
If JavaScript is disabled, and authentication is successful, the authentication proxy generates a popup window with additional instructions for completing the connection. See Figure 25.
If authentication is unsuccessful in any case, the user must log in again from the login page.
When to Use the Authentication Proxy
Here are examples of situations in which you might use the authentication proxy:
•
•
•
•
•
•
Applying the Authentication Proxy
Apply the authentication proxy in the inbound direction at any interface on the router where you want per-user authentication and authorization. Applying the authentication proxy inbound at an interface causes it to intercept a user's initial connection request before that request is subjected to any other processing by the firewall. If the user fails to gain authentication with the AAA server, the connection request is dropped.
How you apply the authentication proxy depends on your security policy. For example, you can block all traffic through an interface and enable the authentication proxy feature to require authentication and authorization for all user initiated HTTP connections. Users are authorized for services only after successful authentication with the AAA server.
The authentication proxy feature also allows you to use standard access lists to specify a host or group of hosts whose initial HTTP traffic triggers the proxy.
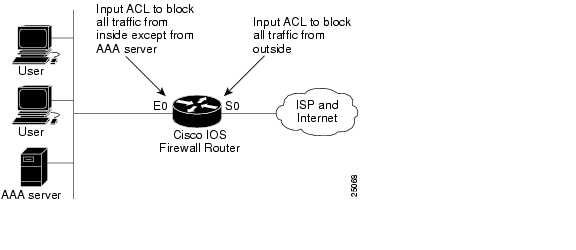
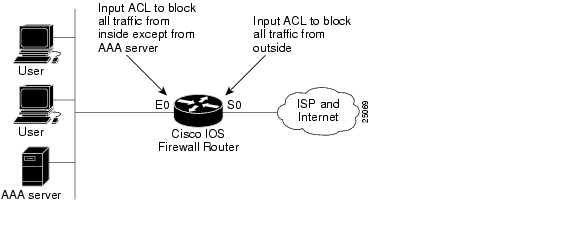
Figure 26 shows the authentication proxy applied at the LAN interface with all network users required to be authenticated upon the initial connection (all traffic is blocked at each interface).
Figure 26 Applying the Authentication Proxy at the Local Interface
Figure 27 shows the authentication proxy applied at the dial-in interface with all network traffic blocked at each interface.
Figure 27 Applying the Authentication Proxy at an Outside Interface
Operation with One-Time Passwords
Given a one-time password, the user enters the username and one-time password in the HTML login page as usual.
The user must enter the correct token password within the first three attempts. After three incorrect entries, the user must enter two valid token passwords in succession before authentication is granted by the AAA server.
Compatibility with Other Security Features
The authentication proxy is compatible with Cisco IOS software and with Cisco IOS security features:
•
•
•
•
•
The authentication proxy works transparently with the Cisco IOS Firewall IDS and IPSec encryption features. The following sections describe the relationship of the NAT, CBAC, and VPN client software features with the authentication proxy:
NAT Compatibility
The authentication proxy feature is compatible with NAT only if the ACL and authentication are completed prior to the NAT translation. Although NAT is compatible with the authentication proxy feature, NAT is not a requirement of the feature.
CBAC Compatibility
Although authentication proxy is compatible with CBAC security functions, CBAC is not required to use the authentication proxy feature.
Authentication proxy's authorization returns Access Control Entries (ACEs) that are dynamically prepended into a manually created ACL. Thereafter, apply the ACL to the "protected side" inbound interface, allowing or disallowing an authorized user's source IP address access to the remote networks.
VPN Client Compatibility
Using the authentication proxy, network administrators can apply an extra layer of security and access control for VPN client traffic. If a VPN client initiates an HTTP connection, the authentication proxy first checks for prior client authentication. If the client is authenticated, authorized traffic is permitted. If the client is not authenticated, the HTTP request triggers the authentication proxy, and the user is prompted for a username and password.
If the user authentication is successful, the authentication proxy retrieves the user profile from the AAA server. The source address in the user profile entries is replaced with the IP address of the authenticated VPN client from the decrypted packet.
Compatibility with AAA Accounting
Using the authentication proxy, you can generate "start" and "stop" accounting records with enough information to be used for billing and security auditing purposes. Thus, you can monitor the actions of authenticated hosts that use the authentication proxy service.
When an authentication proxy cache and associated dynamic access control lists are created, the authentication proxy will start to track the traffic from the authenticated host. Accounting saves data about this event in a data structure stored with the data of other users. If the accounting start option is enabled, you can generate an accounting record (a "start" record) at this time. Subsequent traffic from the authenticated host will be recorded when the dynamic ACL created by the authentication proxy receives the packets.
When an authentication proxy cache expires and is deleted, additional data, such as elapsed time, is added to the accounting information and a "stop" record is sent to the server. At this point, the information is deleted from the data structure.
The accounting records for the authentication proxy user session are related to the cache and the dynamic ACL usage.
Note
For more information on RADIUS attributes, refer to the appendix "RADIUS Attributes."
Protection Against Denial-of-Service Attacks
The authentication proxy monitors the level of incoming HTTP requests. For each request, the authentication proxy prompts the user's for login credentials. A high number of open requests could indicate that the router is the subject of a denial-of-service (DoS) attack. The authentication proxy limits the level of open requests and drops additional requests until the number of open requests has fallen below 40.
If the firewall is experiencing a high level of connection requests requiring authentication, legitimate network users may experience delays when making connections, or the connection may be rejected and the user must try the connection again.
Risk of Spoofing with Authentication Proxy
When the authentication proxy is triggered, it creates a dynamic opening in the firewall by temporarily reconfiguring an interface with user access privileges. While this opening exists, another host might spoof the authenticated users address to gain access behind the firewall. The authentication proxy does not cause the address spoofing problem; the problem is only identified here as a matter of concern to the user. Spoofing is a problem inherent to all access lists, and the authentication proxy does not specifically address this problem.
Comparison with the Lock-and-Key Feature
Lock-and-key is another Cisco IOS Firewall feature that uses authentication and dynamic access list to provide user access through the firewall. Table 22 compares the authentication proxy and lock-and-key features.
Use the authentication proxy in any network environment that provides a per-user security policy. Use lock-and-key in network environments that might benefit from local authentication and a limited number of router-based access control policies based on host addresses. Use lock-and-key in environments not using the Cisco Secure Integrated Software.
Restrictions
•
•
•
•
•
•
Prerequisites to Configuring Authentication Proxy
Prior to configuring authentication proxy, review the following:
•
–
–
•
•
•
Authentication Proxy Configuration Task List
To configure the authentication proxy feature, perform the following tasks:
•
•
•
•
For authentication proxy configuration examples using the commands in this chapter, refer to the section "Authentication Proxy Configuration Examples" at the end of this chapter.
Configuring AAA
You must configure the authentication proxy for AAA services. Use the following commands in global configuration mode to enable authorization and to define the authorization methods:
In addition to configuring AAA on the firewall router, the authentication proxy requires a per-user access profile configuration on the AAA server. To support the authentication proxy, configure the AAA authorization service auth-proxy on the AAA server as outlined here:
•
default authorization = permitkey = ciscouser = newuser1 {login = cleartext ciscoservice = auth-proxy{priv-lvl=15proxyacl#1="permit tcp any any eq 26"proxyacl#2="permit icmp any host 60.0.0.2"proxyacl#3="permit tcp any any eq ftp"proxyacl#4="permit tcp any any eq ftp-data"proxyacl#5="permit tcp any any eq smtp"proxyacl#6="permit tcp any any eq telnet"}}•
•
•
•
•
–
–
–
–
–
–
–
Refer to the section "AAA Server User Profile Example" for sample AAA server configurations.
Configuring the HTTP Server
To use authentication proxy, you must also enable the HTTP server on the firewall and set the HTTP server authentication method to use AAA. Enter the following commands in global configuration mode:
Step 1
router(config)# ip http server
Enables the HTTP server on the router. The authentication proxy uses the HTTP server to communicate with the client for user authentication.
Step 2
router(config)# ip http access-class access-list-number
Specifies the access list for the HTTP server. Use the standard access list number configured in the section " Interface Configuration Example."
Configuring the Authentication Proxy
Note
To configure the authentication proxy, use the following commands, beginning in global configuration mode:
Verifying the Authentication Proxy
Verifying the authentication proxy configuration can have several components:
•
•
•
Checking the Authentication Proxy Configuration
To check the current authentication proxy configuration, use the show ip auth-proxy configuration command in privileged EXEC mode:
router# show ip auth-proxy configuration
Displays the authentication proxy configuration.
In the following example, the global authentication proxy idle timeout value is set to 60 minutes, the named authentication proxy rule is "pxy", and the idle timeout value for this named rule is one minute. The display shows that no host list is specified, meaning that all connections initiating HTTP traffic at the interface are subject to the authentication proxy rule.
router# show ip auth-proxy configurationAuthentication cache time is 60 minutesAuthentication Proxy Rule ConfigurationAuth-proxy name pxyhttp list not specified auth-cache-time 1 minutesTo verify that the authentication proxy is successfully configured on the router, ask a user to initiate an HTTP connection through the router. The user must have authentication and authorization configured at the AAA server. If the user authentication is successful, the firewall completes the HTTP connection for the user. If the authentication is unsuccessful, check the access list and the AAA server configurations.
Display the user authentication entries using the show ip auth-proxy cache command in privileged EXEC mode:
The authentication proxy cache lists the host IP address, the source port number, the timeout value for the authentication proxy, and the state of the connection. If the authentication proxy state is HTTP_ESTAB, the user authentication was successful.
router# show ip auth-proxy cacheAuthentication Proxy CacheClient IP 192.168.25.215 Port 57882, timeout 1, state HTTP_ESTABWait for one minute, which is the timeout value for this named rule, and ask the user to try the connection again. After one minute, the user connection is denied because the authentication proxy has removed the user's authentication entry and any associated dynamic ACLs. The user is presented with a new authentication login page and must log in again to gain access through the firewall.
Establishing User Connections with JavaScript
To verify client connections using the authentication proxy with JavaScript enabled on the client browser, follow this procedure:
Step 1
Step 2
Step 3
A popup window appears indicating whether the login attempt succeeded or failed. If the authentication is successful, the connection is completed automatically. If the authentication fails, the authentication proxy reports the failure to the user and prompts the user with multiple retries.
Note
Establishing User Connections Without JavaScript
To ensure secure authentication, the authentication proxy design requires JavaScript. You can use the authentication proxy without enabling JavaScript on the browser, but this poses a potential security risk if users do not properly establish network connections. The following procedure provides the steps to properly establish a connection with JavaScript disabled. Network administrators are strongly advised to instruct users on how to properly establish connections using the procedure in this section.
Note
To verify client connections using the authentication proxy when JavaScript is not enabled on the client browser, follow this procedure:
Step 1
This generates the authentication proxy login page.
Step 2
Step 3
A popup window appears indicating whether the login attempt succeeded or failed. If the popup window indicates successful authentication, go to Step 7.
Step 4
Note
Step 5
Note
Step 6
If the authentication is successful, a window appears displaying a successful authentication message. If the window displays a failed authentication message, go to Step 4.
Step 7
Step 8
The authentication proxy completes the authenticated connection with the web server.
Monitoring and Maintaining the Authentication Proxy
This section describes how to view dynamic access list entries and how to manually remove authentication entries. This section contains the following sections:
•
•
Displaying Dynamic ACL Entries
You can display dynamic access list entries when they are in use. After an authentication proxy entry is cleared by you or by the idle timeout parameter, you can no longer display it. The number of matches displayed indicates the number of times the access list entry was hit.
To view dynamic access lists and any temporary access list entries that are currently established by the authentication proxy, use the show ip access-lists command in privileged EXEC mode:
router# show ip access-lists
Displays the standard and extended access lists configured on the firewall, including dynamic ACL entries.
Consider the following example where ACL 105 is applied inbound at the input interface where you configure authentication proxy. The initial display shows the contents of the ACLs prior to authentication. The second display shows the same displays after user authentication with the AAA server.
Note
For example, the following is a list of ACL entries prior to the authentication proxy:
Router# show ip access-lists...Extended IP access list 105deny tcp any any eq telnetdeny udp any anypermit tcp any any (28 matches)permit ip any anyThe following sample output shows a list of ACL entries following user authentication:
Router# show ip access-lists...Extended IP access list 105! The ACL entries following user authentication are shown below.permit tcp host 192.168.25.215 any eq 26permit icmp host 192.168.25.215 host 60.0.0.2permit tcp host 192.168.25.215 any eq telnetpermit tcp host 192.168.25.215 any eq ftppermit tcp host 192.168.25.215 any eq ftp-datapermit tcp host 192.168.25.215 any eq smtpdeny tcp any any eq telnetdeny udp any anypermit tcp any any (76 matches)permit ip any anyDeleting Authentication Proxy Cache Entries
When the authentication proxy is in use, dynamic access lists dynamically grow and shrink as authentication entries are added and deleted. To display the list of authentication entries, use the show ip auth-proxy cache command. To manually delete an authentication entry, use the clear ip auth-proxy cache command in privileged EXEC mode:
Authentication Proxy Configuration Examples
Configuring the authentication proxy feature requires configuration changes on both the router and the AAA server. The following sections provide authentication proxy configuration examples:
•
•
•
•
Throughout these examples, the exclamation point (!) indicates a comment line. Comment lines precede the configuration entries being described.
Authentication Proxy Configuration Example
The following examples highlight the specific authentication proxy configuration entries. These examples do not represent a complete router configuration. Complete router configurations using the authentication proxy are included later in this chapter.
This section contains the following examples:
•
•
•
AAA Configuration Example
aaa new-modelaaa authentication login default group tacacs group radius! Set up the aaa new model to use the authentication proxy.aaa authorization auth-proxy default group tacacs group radius! Define the AAA servers used by the router.aaa accounting auth-proxy default start-stop group tacacs+! Set up authentication proxy with accounting.tacacs-server host 172.31.54.143tacacs-server key ciscoradius-server host 172.31.54.143radius-server key ciscoHTTP Server Configuration Example
! Enable the HTTP server on the router.ip http server! Set the HTTP server authentication method to AAA.ip http authentication aaa! Define standard access list 61 to deny any host.access-list 61 deny any! Use ACL 61 to deny connections from any host to the HTTP server.ip http access-class 61Authentication Proxy Configuration Example
! Set the global authentication proxy timeout value.ip auth-proxy auth-cache-time 60! Apply a name to the authentication proxy configuration rule.ip auth-proxy name HQ_users httpInterface Configuration Example
! Apply the authentication proxy rule at an interface.interface e0ip address 10.1.1.210 255.255.255.0ip auth-proxy HQ_usersAuthentication Proxy, IPSec, and CBAC Configuration Example
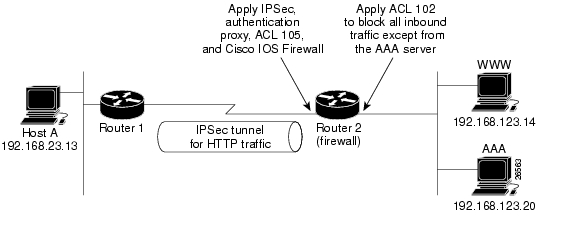
The following example shows a router configuration with the authentication proxy, IPSec, and CBAC features. Figure 28 illustrates the configuration.
Figure 28 Authentication Proxy, IPSec, and CBAC Configuration Example
In this example, Host A initiates an HTTP connection with the web server (WWW). The HTTP traffic between Router 1 and Router 2 is encrypted using IPSec. The authentication proxy, IPSec, and CBAC are configured at interface Serial0 on Router 2, which is acting as the firewall. ACL 105 blocks all traffic at interface Serial0. ACL 102 is applied at interface Ethernet0 on Router 2 to block all traffic on that interface except traffic from the AAA server.
When Host A initiates an HTTP connection with the web server, the authentication proxy prompts the user at Host A for a username and password. These credentials are verified with the AAA server for authentication and authorization. If authentication is successful, the per-user ACLs are downloaded to the firewall to permit services.
The following examples provide both the Router 1 and Router 2 configurations for completeness:
•
•
Router 1 Configuration Example
! Configure Router 1 for IPSec.version 12.0service timestamps debug uptimeservice timestamps log uptimeno service password-encryption!hostname Router1!logging buffered 4096 debuggingno logging consoleenable secret 5 $1$E0OB$AQF1vFZM3fLr3LQAOsudL/enable password junk!username Router2 password 0 welcomecrypto isakmp policy 1authentication pre-sharecrypto isakmp key cisco1234 address 10.0.0.2!crypto ipsec transform-set rule_1 ah-sha-hmac esp-des esp-sha-hmac!!crypto map testtag 10 ipsec-isakmpset peer 10.0.0.2set transform-set rule_1match address 155!interface Ethernet0/0ip address 192.168.23.2 255.255.255.0no ip directed-broadcastno ip route-cacheno ip mroute-cache!interface Serial3/1ip address 10.0.0.1 255.0.0.0no ip directed-broadcastencapsulation PPPip route-cacheno ip mroute-cacheno keepaliveno fair-queueclockrate 56000crypto map testtag!!ip classlessip route 192.168.123.0 255.255.255.0 10.0.0.2! Identify the IPSec specific traffic.access-list 155 permit tcp host 192.168.23.13 host 192.168.123.14 eq wwwaccess-list 155 permit tcp host 192.168.23.13 eq www host 192.168.123.14Router 2 Configuration Example
! Configure Router 2 as the firewall, using the authentication proxy, IPSec, and CBAC.version 12.0service timestamps debug uptimeservice timestamps log uptimeno service password-encryption!hostname Router2!logging buffered 4096 debuggingaaa new-modelaaa authentication login default group tacacsaaa authentication login console_line noneaaa authentication login special noneaaa authentication ppp default group tacacsaaa authorization exec default group tacacs! Configure AAA for the authentication proxy.aaa authorization auth-proxy default group tacacs+enable password junk!! Create the CBAC inspection rule HTTP_TEST.ip inspect name rule22 httpip inspect name rule22 tcpip inspect name rule22 ftpip inspect name rule22 smtp!! Create the authentication proxy rule PXY.ip auth-proxy name pxy http! Turn on display of the router name in the authentication proxy login page.ip auth-proxy auth-proxy-bannerip audit notify logip audit po max-events 100!! Configure IPSec.crypto isakmp policy 1authentication pre-sharecrypto isakmp key cisco1234 address 10.0.0.1!crypto ipsec transform-set rule_1 ah-sha-hmac esp-des esp-sha-hmac!crypto map testtag 10 ipsec-isakmpset peer 10.0.0.1set transform-set rule_1match address 155!! Apply the CBAC inspection rule and the authentication proxy rule at interface! Serial0/0.interface Serial0/0ip address 10.0.0.2 255.0.0.0ip access-group 105 inno ip directed-broadcastip inspect rule22 inip auth-proxy pxyencapsulation pppno ip route-cacheno ip mroute-cacheno keepaliveno fair-queuecrypto map testtag!interface Ethernet0/1ip address 192.168.123.2 255.255.255.0ip access-group 102 inno ip directed-broadcastip route-cacheno ip mroute-cache!no ip classlessip route 192.168.23.0 255.255.255.0 10.0.0.1ip route 192.168.50.0 255.255.255.0 16.0.0.1! Configure the HTTP server.ip http serverip http access-class 15ip http authentication aaa!! Create ACL 15 to block all traffic for the http server.access-list 15 deny any! Create ACL 102 to block all traffic inbound on interface Ethernet0/1 except for! traffic from the AAA server.access-list 102 permit tcp host 192.168.123.20 eq tacacs host 192.168.123.2access-list 102 deny tcp any anyaccess-list 102 deny udp any anyaccess-list 102 permit ip any any! Create ACL 105 to block all traffic inbound on interface Serial0/0. Permit only IP! protocol traffic.access-list 105 deny tcp any anyaccess-list 105 deny udp any anyaccess-list 105 permit ip any any! Identify the IPSec specific traffic.access-list 155 permit tcp host 192.168.123.14 host 192.168.23.13 eq wwwaccess-list 155 permit tcp host 192.168.123.14 eq www host 192.168.23.13!! Define the AAA server host and encryption key.tacacs-server host 192.168.123.14tacacs-server key cisco!line con 0exec-timeout 0 0login authentication specialtransport input noneline aux 0transport input allspeed 38400flowcontrol hardwareline vty 0 4password labAuthentication Proxy, IPSec, NAT, and CBAC Configuration Example
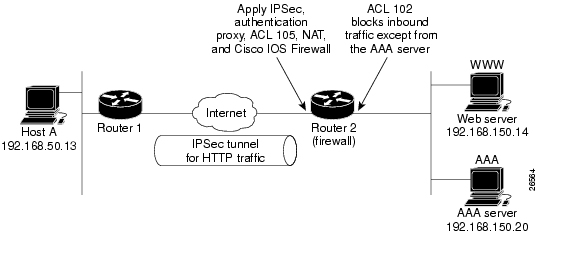
The following example provides a router configuration with the authentication proxy, IPSec, NAT, and CBAC features. Figure 29 illustrates the configuration.
Figure 29 Authentication Proxy, IPSec, and CBAC Configuration Example
In this example, Host A initiates an HTTP connection with the web server (WWW). The HTTP traffic between router 1 (interface BRI0) and router 2 (interface Serial2) is encrypted using IPSec. The authentication proxy is configured on router 2, which is acting as the firewall. The authentication proxy, NAT, and CBAC are configured at interface Serial2, which is acting as the firewall. ACL 105 blocks all traffic at interface Serial2. ACL 102 is applied at interface Ethernet0 on router 2 to block all traffic on that interface except traffic from the AAA server. In this example, the authentication proxy uses standard ACL 10 to specify the hosts using the authentication proxy feature.
When any host in ACL 10 initiates an HTTP connection with the web server, the authentication proxy prompts the user at that host for a username and password. These credentials are verified with AAA server for authentication and authorization. If authentication is successful, the per-user ACLs are downloaded to the firewall to permit services.
The following examples provide both the router 1 and router 2 configurations for completeness:
•
•
Router 1 Configuration Example
! Configure router 1 for IPSec.version 12.0service timestamps debug uptimeservice timestamps log uptimeno service password-encryption!hostname Router1!logging buffered 4096 debuggingno logging console!isdn switch-type basic-5ess!crypto isakmp policy 1authentication pre-sharecrypto isakmp key cisco1234 address 16.0.0.2crypto ipsec transform-set rule_1 ah-sha-hmac esp-des esp-sha-hmac!!crypto map testtag 10 ipsec-isakmpset peer 16.0.0.2set transform-set rule_1match address 155!!process-max-time 200!interface BRI0ip address 16.0.0.1 255.0.0.0no ip directed-broadcastencapsulation pppdialer idle-timeout 5000dialer map ip 16.0.0.2 name router2 broadcast 50006dialer-group 1isdn switch-type basic-5esscrypto map testtag!interface FastEthernet0ip address 192.168.50.2 255.255.255.0no ip directed-broadcast!ip classlessip route 192.168.150.0 255.255.255.0 16.0.0.2no ip http server! Identify the IPSec specific traffic.access-list 155 permit tcp host 192.168.50.13 host 192.168.150.100 eq wwwaccess-list 155 permit tcp host 192.168.50.13 eq www host 192.168.150.100dialer-list 1 protocol ip permit!line con 0exec-timeout 0 0transport input noneline aux 0line vty 0 4password labloginRouter 2 Configuration Example
! Configure router 2 as the firewall, using the authentication proxy, IPSec, NAT, and! CBAC.version 12.0service timestamps debug uptimeservice timestamps log uptimeno service password-encryption!hostname router2!logging buffered 4096 debuggingaaa new-modelaaa authentication login default group tacacs+aaa authentication login console_line noneaaa authorization exec default group tacacs+! Configure AAA for the authentication proxy.aaa authorization auth-proxy default group tacacs+!! Create the CBAC inspection rule "rule44."ip inspect name rule44 http java-list 5ip inspect name rule44 tcpip inspect name rule44 ftpip inspect name rule44 smtp!! Create the authentication proxy rule "pxy." Set the timeout value for rule! pxy to three minutes. Standard ACL 10 is applied to the rule.ip auth-proxy name pxy http list 10 auth-cache-time 3isdn switch-type primary-5ess!! Configure IPSec.crypto isakmp policy 1authentication pre-sharecrypto isakmp key cisco1234 address 16.0.0.1!!crypto ipsec transform-set rule_1 ah-sha-hmac esp-des esp-sha-hmac!!crypto map testtag 10 ipsec-isakmpset peer 16.0.0.1set transform-set rule_1match address 155!controller T1 2/0framing esflinecode b8zspri-group timeslots 1-24!! Apply ACL 102 inbound at interface Ethernet0/1 and configure NAT.interface Ethernet0/1ip address 192.168.150.2 255.255.255.0ip access-group 102 inno ip directed-broadcastip nat insideno ip mroute-cache!! Apply the authentication proxy rule PXY, CBAC inspection rule HTTP_TEST, NAT, and! and ACL 105 at interface Serial2/0:23.interface Serial2/0:23ip address 16.0.0.2 255.0.0.0ip access-group 105 inno ip directed-broadcastip nat outsideip inspect rule44 inip auth-proxy pxyencapsulation pppip mroute-cachedialer idle-timeout 5000dialer map ip 16.0.0.1 name router1 broadcast 71011dialer-group 1isdn switch-type primary-5essfair-queue 64 256 0crypto map testtag!! Use NAT to translate the Web server address.ip nat inside source static 192.168.150.14 192.168.150.100ip classlessip route 192.168.50.0 255.255.255.0 16.0.0.1! Configure the HTTP server.ip http serverip http access-class 15ip http authentication aaa!! Create standard ACL 5 to specify the list of hosts from which to accept java applets.! ACL 5 is used to block Java applets in the CBAC inspection rule named "rule44," which! is applied at interface Serial2/0:23.access-list 5 permit any! Create standard ACL 10 to specify the hosts using the authentication proxy. This ACL! used in the authentication proxy rule named "PXY", which is applied at interface! Serial2/0:23.access-list 10 permit any! Create ACL 15 to block all traffic for the http server.access-list 15 deny any! Create extended ACL 102 to block all traffic inbound on interface Ethernet0/1! except for traffic from the AAA server.access-list 102 permit tcp host 192.168.150.20 eq tacacs 192.168.150.2access-list 102 deny tcp any anyaccess-list 102 deny udp any anyaccess-list 102 permit ip any any! Create extended ACL 105 to block all TCP and UDP traffic inbound on interface! Serial2/0:23.access-list 105 deny tcp any anyaccess-list 105 deny udp any anyaccess-list 105 permit ip any any! Identify the IPSec specific traffic.access-list 155 permit tcp host 192.168.150.100 host 192.168.50.13 eq wwwaccess-list 155 permit tcp host 192.168.150.100 eq www host 192.168.50.13dialer-list 1 protocol ip permit! Define the AAA server host and encryption key.tacacs-server host 192.168.126.14tacacs-server key cisco!line con 0exec-timeout 0 0! Define the AAA server host and encryption key.login authentication console_linetransport input noneline aux 0line vty 0 4password lab!!endAAA Server User Profile Example
This section includes examples of the authentication proxy user profile entries on the AAA servers. The "proxyacl" entries define the user access privileges. After the user has successfully used the authentication proxy to log in, these entries are transferred to the firewall router. Each entry in the profile must specify "permit" access for the service or application. The source address in each entry is set to "any", which is replaced with the IP address of the authenticating host when the profile is downloaded to the firewall. The privilege level must be set to 15 for all AAA users.
This section contains the following sections:
•
•
CiscoSecure ACS 2.3 for Windows NT
This section describes how to configure authentication proxy on CiscoSecure ACS 2.3 for Windows NT. For detailed information about CiscoSecure ACS, refer to the documentation for that product.
The following sample configuration is for the TACACS+ service of CiscoSecure ACS for Windows NT.
Step 1
a.
b.
c.
d.
e.
Step 2
a.
b.
c.
Step 3
a.
b.
c.
d.
e.
f.
priv-lvl=15proxyacl#1=permit tcp any any eq 26proxyacl#2=permit icmp any host 60.0.0.2proxyacl#3=permit tcp any any eq ftpproxyacl#4=permit tcp any any eq ftp-dataproxyacl#5=permit tcp any any eq smtpproxyacl#6=permit tcp any any eq telnetg.
Step 4
a.
b.
c.
d.
e.
f.
Step 5
a.
b.
c.
d.
CiscoSecure ACS 2.3 for UNIX
This section describes how to configure authentication proxy on CiscoSecure ACS 2.3 for UNIX. For detailed information regarding CiscoSecure ACS, refer to the documentation for that product.
To manage the CiscoSecure ACS using the Administrator program, you need a web browser that supports Java and JavaScript. You must enable Java in the browser application. You can start the Java-based CiscoSecure Administrator advanced configuration program from any of the CiscoSecure ACS Administrator web pages.
The following sample configuration procedure is for the TACACS+ service of CiscoSecure ACS 2.3 for UNIX.
Step 1
The Java-based CiscoSecure Administrator advanced configuration program appears. It might require a few minutes to load.
Step 2
This displays the Create New Profile icon.
Step 3
•
•
Step 4
Step 5
Step 6
Step 7
Step 8
A list or dialog box that contains attributes applicable to the selected profile or service appears in the window at the bottom right of the screen. The information in this window changes depending on what you have selected in the Profile pane.
Step 9
Step 10
Step 11
Step 12
Step 13
Step 14
Step 15
priv-lvl=15Step 16
proxyacl#1="permit tcp any any eq 26"Repeat this step for each additional service or protocol to add:
proxyacl#2="permit icmp any host 60.0.0.2"proxyacl#3="permit tcp any any eq ftp"proxyacl#4="permit tcp any any eq ftp-data"proxyacl#5="permit tcp any any eq smtp"proxyacl#6="permit tcp any any eq telnet"Step 17
TACACS+ Server
default authorization = permitkey = ciscouser = Brian {login = cleartext ciscoservice = auth-proxy{priv-lvl=15proxyacl#1="permit tcp any any eq 26"proxyacl#2="permit icmp any host 60.0.0.2proxyacl#3="permit tcp any any eq ftp"proxyacl#4="permit tcp any any eq ftp-data"proxyacl#5="permit tcp any any eq smtp"proxyacl#6="permit tcp any any eq telnet"}}Livingston Radius Server
Bob Password = "cisco" User-Service-Type=Outbound-Usercisco-avpair = "auth-proxy:priv-lvl=15",cisco-avpair = "auth-proxy:proxyacl#1=permit tcp any any eq 26",cisco-avpair = "auth-proxy:proxyacl#2=permit icmp any host 60.0.0.2",cisco-avpair = "auth-proxy:proxyacl#3=permit tcp any any eq ftp",cisco-avpair = "auth-proxy:proxyacl#4=permit tcp any any eq ftp-data",cisco-avpair = "auth-proxy:proxyacl#5=permit tcp any any eq smtp",cisco-avpair = "auth-proxy:proxyacl#6=permit tcp any any eq telnet"Ascend Radius Server
Alice Password = "cisco" User-Service = Dialout-Framed-Usercisco-avpair = "auth-proxy:priv-lvl=15",cisco-avpair = "auth-proxy:proxyacl#1=permit tcp any any eq 26",cisco-avpair = "auth-proxy:proxyacl#2=permit icmp any host 60.0.0.2",cisco-avpair = "auth-proxy:proxyacl#3=permit tcp any any eq ftp",cisco-avpair = "auth-proxy:proxyacl#4=permit tcp any any eq ftp-data",cisco-avpair = "auth-proxy:proxyacl#5=permit tcp any any eq smtp",cisco-avpair = "auth-proxy:proxyacl#6=permit tcp any any eq telnet"
![]()
![]()
![]()
![]()
![]()
![]()
![]()
![]()
Posted: Mon Jul 24 02:05:40 PDT 2006
All contents are Copyright © 1992--2006 Cisco Systems, Inc. All rights reserved.
Important Notices and Privacy Statement.