|
|

Table Of Contents
Configuring Line Cards on the Cisco 7500 Series
Performing a Single Line Card Reload
Configuring Dual RSPs on Cisco 7500 Series Routers
Understanding Master and Slave Operation
Understanding Dual RSP Implementation Methods
Dual RSP Configuration Task List
Setting Environment Variables on the Master and Slave RSP
Manually Setting Environment Variables on the Slave RSP
Monitoring and Maintaining Dual RSP Operation
Overriding the Slave Image Bundled with the Master Image
Manually Synchronizing Configuration Files
Troubleshooting and Reloading a Failed RSP Card
Disabling Access to the Slave Console
Displaying Information About Master and Slave RSP Cards
Configuring Line Cards on the Cisco 7500 Series
This appendix describes software configuration commands needed to configure line cards with certain Cisco IOS software features for Cisco 7500 series routers.
Note
On the Cisco 7507 and Cisco 7513 routers, you can install two Route Switch Processor (RSP) cards in a single router to improve system availability. This feature was introduced in Cisco IOS Release 11.1(4) as the "High System Availability (HSA)" feature. Because High Availability (HA) has since come to apply to a variety of Cisco IOS hardware and software features that allow for 99.9999% uptime for Cisco devices, this feature is now referred to as the "Dual RSP" feature.
Note
The boot ROM is on a SIMM on the RSP2 and cannot be upgraded. You can identify the boot ROM version on your RSP2 by issuing the show version | begin ROM command in privileged EXEC mode.
Performing a Single Line Card Reload
The service single-slot-reload-enable global configuration command allows you to enable the Single Line Card Reload feature, a High Availability (HA) feature for Cisco 7500 series routers. When this feature is enabled, if a single line card crashes, only the line card that failed is reloaded. The physical lines and the routing protocols on the other line cards remain active (note that some packets may be dropped while the card reloads, but only packets that depend on the crashed card will be affected).
A single line card reload is substantially faster than the Cbus Complex process used in some early Cisco IOS releases.
The Cisco 7500 Single Line Card Reload feature works on all RSP images.
Note
Configuring Dual RSPs on Cisco 7500 Series Routers
To configure Dual RSP operation, you must have a Cisco 7507 or Cisco 7513 router containing two RSP processor cards. For Dual RSP compatibility, download a Cisco IOS software subset image that has a "v" in it. For example, rsp-jv-mz, rsp-ajv-mz, and rsp-pv-mz are all Dual RSP-compatible Cisco IOS subset images.
Two RSP cards in a router provide the most basic level of increased system availability through a "cold restart" feature. A "cold restart" means that when one RSP card fails, the other RSP card reboots the router. In this way, your router is never in a failed state for very long, thereby increasing system availability.
When one RSP card takes over operation from another, system operation is interrupted. This change is similar to issuing the reload EXEC command. The following events occur when one RSP card fails and the other takes over:
•
•
•
•
Note
Understanding Master and Slave Operation
A router configured for Dual RSP operation has one RSP card that is the master and one that is the slave. The master RSP card functions as if it were a single processor, controlling all functions of the router. The slave RSP card does nothing but actively monitor the master for failure.
A system crash can cause the master RSP to fail or go into a nonfunctional state. When the slave RSP detects a nonfunctional master, the slave resets itself and takes part in master-slave arbitration. Master-slave arbitration is a ROM monitor process that determines which RSP card is the master and which is the slave upon startup (or reboot).
If a system crash causes the master RSP to fail, the slave RSP becomes the new master RSP and uses its own system image and configuration file to reboot the router. The failed RSP card now becomes the slave. The failure state of the slave (formerly the master) can be accessed from the console via the show stacks EXEC command.
With Dual RSP operation, the following items are important to note:
•
•
•
•
•
Understanding Dual RSP Implementation Methods
There are two common ways to use the Dual RSP feature, as follows:
•
•
You can also use Dual RSPs for advanced implementations. For example, you can configure the RSP cards with the following implementations:
•
•
•
Note
Dual RSP Configuration Task List
To configure Dual RSP operation, perform the tasks described in the following sections. The first two and last two tasks are required for both implementations. The third and fourth tasks relates to simple hardware backup. The fifth task relates to software error protection only.
•
•
•
•
•
•
•
Specifying the Default Slave RSP
To specify the default slave RSP card, use the following command in global configuration mode:
Router(config)# slave default-slot processor-slot-number
Specifies the slave RSP card.
After specifying the default slave card, save the running configuration to the startup configuration using the copy running-config startup-config or copy system:running-config nvram:startup-config EXEC command. When the system is rebooted, the RSP specification will take effect (if both RSP cards are operational): The specified default slave becomes the slave RSP card and the other RSP card takes over as the master RSP card.
The router uses the default slave information when booting as follows:
•
•
If you do not specifically define the default slave RSP, the RSP card located in the higher number processor slot is the default slave. On the Cisco 7507 router, processor slot 3 contains the default slave RSP. On the Cisco 7513 router, processor slot 7 contains the default slave RSP.
The following example sets the default slave RSP to processor slot 2 on a Cisco 7507 router:
Router# configure terminalRouter (config)# slave default-slot 2Router (config)# endRouter# copy system:running-config nvram:startup-configEnsuring That Both RSP Cards Contain the Same Configuration File
With both the simple hardware backup and software error protection implementation methods, you always want your master and slave configuration files to match. To ensure that they match, turn on automatic synchronization. In automatic synchronization mode, the master copies its startup configuration to the slave's startup configuration when you issue a copy EXEC command that specifies the master's startup configuration (nvram:startup-config) as the target.
Automatic synchronization mode is on by default; in the event that you need to reenable the automatic synchronization, use the following commands in privileged EXEC mode:
Ensuring That Both RSP Cards Contain the Same System Image
For simple hardware backup, ensure that both RSP cards have the same system image.
To ensure that both RSP cards have the same system image, use the following commands in EXEC mode:
The following example shows the process of ensuring that both RSP cards have the same system image. Note that because no environment variables are set, the default environment variables are in effect for both the master and slave RSP. Therefore, the router will boot the image in slot 0.
Router# show bootvarBOOT variable =CONFIG_FILE variable =Current CONFIG_FILE variable =BOOTLDR variable does not existConfiguration register is 0x0current slave is in slot 7BOOT variable =CONFIG_FILE variable =BOOTLDR variable does not existConfiguration register is 0x0Router# dir slot0:-#- -length- -----date/time------ name1 3482498 May 4 1993 21:38:04 rsp-k-mz11.27993896 bytes available (1496 bytes used)Router# dir slaveslot0:-#- -length- -----date/time------ name1 3482498 May 4 1993 21:38:04 rsp-k-mz11.17993896 bytes available (1496 bytes used)Router# delete slaveslot0:rsp-k-mz11.1Router# copy slot0:rsp-k-mz11.2 slaveslot0:rsp-k-mz11.2Ensuring That Both RSP Cards Contain the Same Microcode Image
To ensure that interface processors will load the same microcode, regardless of which RSP is used, use the following commands in privileged EXEC mode:
The following example ensures that both RSP cards have the same microcode image. Notice that slots 0, 1, 4, 9, and 10 load microcode from the bundled software, as noted by the statement "software loaded from system." Slot 11, the Fast Serial Interface Processor (FSIP), does not use the microcode bundled with the system. Instead, it loads the microcode from slot0:pond/bath/rsp_fsip20-1. Thus, you must ensure that the slave RSP has a copy of the same FSIP microcode in the same location.
Router# show controller cbusMEMD at 40000000, 2097152 bytes (unused 416, recarves 3, lost 0)RawQ 48000100, ReturnQ 48000108, EventQ 48000110BufhdrQ 48000128 (2948 items), LovltrQ 48000140 (5 items, 1632 bytes)IpcbufQ 48000148 (16 items, 4096 bytes)3571 buffer headers (48002000 - 4800FF20)pool0: 28 buffers, 256 bytes, queue 48000130pool1: 237 buffers, 1536 bytes, queue 48000138pool2: 333 buffers, 4544 bytes, queue 48000150pool3: 4 buffers, 4576 bytes, queue 48000158slot0: EIP, hw 1.5, sw 20.00, ccb 5800FF30, cmdq 48000080, vps 4096software loaded from systemEthernet0/0, addr 0000.0ca3.cc00 (bia 0000.0ca3.cc00)gfreeq 48000138, lfreeq 48000160 (1536 bytes), throttled 0rxlo 4, rxhi 42, rxcurr 0, maxrxcurr 2txq 48000168, txacc 48000082 (value 27), txlimit 27.........slot1: FIP, hw 2.9, sw 20.02, ccb 5800FF40, cmdq 48000088, vps 4096software loaded from systemFddi1/0, addr 0000.0ca3.cc20 (bia 0000.0ca3.cc20)gfreeq 48000150, lfreeq 480001C0 (4544 bytes), throttled 0rxlo 4, rxhi 165, rxcurr 0, maxrxcurr 0txq 480001C8, txacc 480000B2 (value 0), txlimit 95slot4: AIP, hw 1.3, sw 20.02, ccb 5800FF70, cmdq 480000A0, vps 8192software loaded from systemATM4/0, applique is SONET (155Mbps)gfreeq 48000150, lfreeq 480001D0 (4544 bytes), throttled 0rxlo 4, rxhi 165, rxcurr 0, maxrxcurr 0txq 480001D8, txacc 480000BA (value 0), txlimit 95slot9: MIP, hw 1.0, sw 20.02, ccb 5800FFC0, cmdq 480000C8, vps 8192software loaded from systemT1 9/0, applique is Channelized T1gfreeq 48000138, lfreeq 480001E0 (1536 bytes), throttled 0rxlo 4, rxhi 42, rxcurr 0, maxrxcurr 0txq 480001E8, txacc 480000C2 (value 27), txlimit 27.......slot10: TRIP, hw 1.1, sw 20.00, ccb 5800FFD0, cmdq 480000D0, vps 4096software loaded from systemTokenRing10/0, addr 0000.0ca3.cd40 (bia 0000.0ca3.cd40)gfreeq 48000150, lfreeq 48000200 (4544 bytes), throttled 0rxlo 4, rxhi 165, rxcurr 1, maxrxcurr 1txq 48000208, txacc 480000D2 (value 95), txlimit 95.........slot11: FSIP, hw 1.1, sw 20.01, ccb 5800FFE0, cmdq 480000D8, vps 8192software loaded from flash slot0:pond/bath/rsp_fsip20-1Serial11/0, applique is Universal (cable unattached)gfreeq 48000138, lfreeq 48000240 (1536 bytes), throttled 0rxlo 4, rxhi 42, rxcurr 0, maxrxcurr 0txq 48000248, txacc 480000F2 (value 5), txlimit 27...........Router# dir slot0:pond/bath/rsp_fsip20-1-#- -length- -----date/time------ name3 10242 Jan 01 1995 03:46:31 pond/bath/rsp_fsip20-1Router# dir slaveslot0:pond/bath/rsp_fsip20-1No such file4079832 bytes available (3915560 bytes used)Router# copy slot0:pond/bath/rsp_fsip20-1 slaveslot0:4079704 bytes available on device slaveslot0, proceed? [confirm]Router# dir slaveslot0:pond/bath/rsp_fsip20-1-#- -length- -----date/time------ name3 10242 Mar 01 1993 02:35:04 pond/bath/rsp_fsip20-14069460 bytes available (3925932 bytes used)Specifying Different Startup Images for the Master and Slave RSPs
For software error protection, the RSP cards should have different system images.
When the factory sends you a new Cisco 7507 or Cisco 7513 router with two RSPs, you receive the same system image on both RSP cards. For the software error protection method, you need two different software images on the RSP cards. Thus, you copy a desired image to the master RSP card and modify the boot system global configuration commands to reflect booting two different system images. Each RSP card uses its own image to boot the router when it becomes the master.
To specify different startup images for the master and slave RSP, use the following commands beginning in EXEC mode:
Step 1
Router# dir {bootflash: | slot0: | slot1:}
Verifies the location and version of the master RSP software image.
Step 2
Router# dir {slavebootflash: | slaveslot0: | slaveslot1:}
Determines if the slave RSP contains the same software image in the same location.
Step 3
Router# copy source-url {bootflash: | slot0: | slot1:}
Copies a different system image to the master RSP.
Step 4
Router# configure terminal
Enters configuration mode from the terminal.
Step 5
Router(config)# boot system flash bootflash:[filename]
Router(config)# boot system flash slot0:[filename]
Router(config)# boot system flash slot1:[filename]
From global configuration mode, configures the master RSP to boot the new image from the appropriate location.
Step 6
Router(config)# boot system flash
Router(config)# bootflash:[filename]
Router(config)# boot system flash slot0:[filename]
Router(config)# boot system flash slot1:[filename]
Also, add a boot system command that specifies the slave's boot image and location. This is the boot image that the slave uses when it becomes the master RSP and boots the system. Note that because the slave will boot this image when the slave is actually the new master RSP, the command syntax does not use a "slave" prefix.
Step 7
Router(config)# boot system {rcp | tftp | ftp} [filename] [ip-address]
(Optional) Configures the master RSP to boot from a network server.
Step 8
Router(config)# config-register value1
Sets the configuration register to enable the system to load the system image from a network server or from Flash.
Step 9
Router(config)# end
Exits configuration mode.
Step 10
Router# copy system:running-config nvram:startup-config
OR
Router# copy running-config startup-config
Saves the configuration file to the master's startup configuration. Because automatic synchronization is turned on, this step saves the boot system commands to the master and slave startup configuration.
Step 11
Router# reload
Resets the router with the new configuration information.
1 Refer to the "Modifying the Configuration Register Boot Field" section on page 229 for more information on systems that can use this command to modify the software configuration register.
Upgrading to a New Software Version Example
In this example, assume the following:
•
•
•
Figure 31 illustrates the software error protection configuration for this example. The configuration commands for this configuration follow the figure.
Figure 31 Software Error Protection: Upgrading to a New Software Version
Because you always view the environment from the master RSP perspective, in the following command you view the master's slot 0 to verify the location and version of the master's software image:
Router# dir slot0:-#- -length- -----date/time------ name1 3482496 May 4 1993 21:38:04 rsp-k-mz11.17993896 bytes available (1496 bytes used)Now view the slave's software image location and version:
Router# dir slaveslot0:-#- -length- -----date/time------ name1 3482496 May 4 1993 21:38:04 rsp-k-mz11.17993896 bytes available (1496 bytes used)Because you want to run the Release 12.0 system image on one RSP card and the Release 11.1 system image on the other RSP card, copy the Release 12.0 system image to the master's slot 0:
Router# copy tftp: slot0:rsp-k-mz12.0Enter global configuration mode and configure the system to boot first from a Release 12.0 system image and then from a Release 11.1 system image:
Router# configure terminalRouter (config)# boot system flash slot0:rsp-k-mz12.0Router (config)# boot system flash slot0:rsp-k-mz11.1With this configuration, when the slot 6 RSP card is master, it looks first in its PCMCIA slot 0 for the system image file rsp-k-mz11.2 to boot. Finding this file, the router boots from that system image. When the slot 7 RSP card is master, it also looks first in its slot 0 for the system image file rsp-k-mz12.0 to boot. Because that image does not exist in that location, the slot 7 RSP card looks for the system image file rsp-k-mz11.1 in slot 0 to boot. Finding this file in its PCMCIA slot 0, the router boots from that system image. In this way, each RSP card can reboot the system using its own system image when it becomes the master RSP card.
Configure the system further with a fault-tolerant booting strategy:
Router (config)# boot system tftp rsp-k-mz11.1 192.168.1.25Set the configuration register to enable loading of the system image from a network server or from Flash and save the changes to the master and slave startup configuration file:
Router (config)# config-register 0x010FRouter (config)# endRouter# copy system:running-config nvram:startup-configReload the system so that the master RSP uses the new Release 12.0 system image:
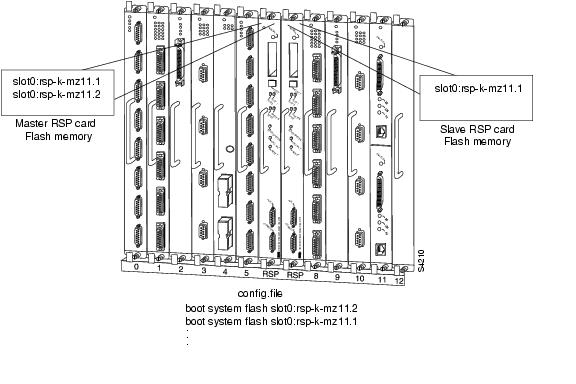
Router# reloadDual RSP: Backing Up with an Older Software Version Example
In the following example, assume the following:
•
•
•
In this scenario, you begin with the configuration shown in Figure 32.
Figure 32 Software Error Protection: Backing Up with an Older Software Version, Part I
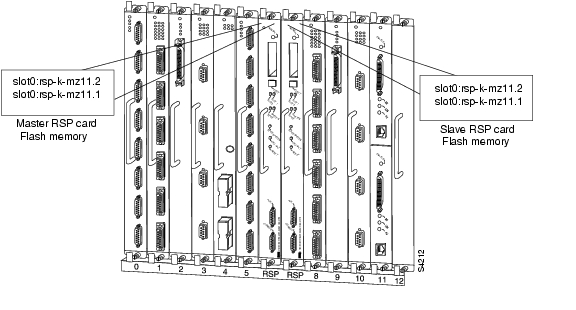
First, copy the rsp-k-mz11.1 image to the master and slave RSP card, as shown in Figure 33.
Figure 33 Software Error Protection: Backing Up with an Older Software Version, Part 2
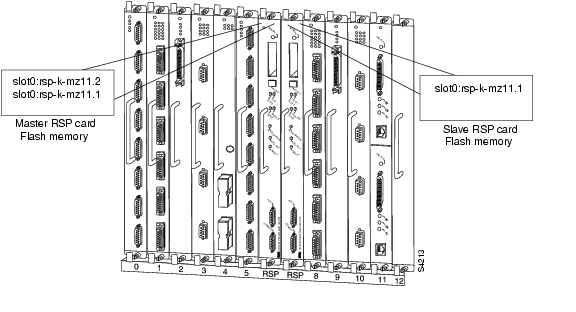
Next, you delete the rsp-k-mz11.2 image from the slave RSP card. The final configuration is shown in Figure 34.
Figure 34 Software Error Protection: Backing Up with an Older Software Version, Part 3
The following commands configure software error protection for this example scenario.
View the master and slave slot 0 to verify the location and version of their software images:
Router# dir slot0:-#- -length- -----date/time------ name1 3482498 May 4 1993 21:38:04 rsp-k-mz11.27993896 bytes available (1496 bytes used)Router# dir slaveslot0:-#- -length- -----date/time------ name1 3482498 May 4 1993 21:38:04 rsp-k-mz11.27993896 bytes available (1496 bytes used)Copy the Release 11.1 system image to the master and slave slot 0:
Router# copy tftp: slot0:rsp-k-mz11.1Router# copy tftp: slaveslot0:rsp-k-mz11.1Delete the rsp-k-mz11.2 image from the slave RSP card:
Router# delete slaveslot0:rsp-k-mz11.2Configure the system to boot first from a Release 11.2 system image and then from a Release 11.1 system image:
Router# configure terminalRouter (config)# boot system flash slot0:rsp-k-mz11.2Router (config)# boot system flash slot0:rsp-k-mz11.1Configure the system further with a fault-tolerant booting strategy:
Router (config)# boot system tftp rsp-k-mz11.1 192.168.1.25Set the configuration register to enable loading of the system image from a network server or from Flash and save the changes to the master and slave startup configuration file:
Router (config)# config-register 0x010FRouter (config)# endRouter# copy system:running-config nvram:startup-config
Note
Setting Environment Variables on the Master and Slave RSP
You can set environment variables on both RSP cards in a Cisco 7507 and Cisco 7513 router.
Note
You set environment variables on the master RSP just as you would if it were the only RSP card in the system. Refer to the following sections for more information on these steps:
•
•
•
You can set the same environment variables on the slave RSP card, manually or automatically. The following sections describe these two methods:
•
•
Automatically Setting Environment Variables on the Slave RSP
With automatic synchronization turned on, the system automatically saves the same environment variables to the slave's startup configuration when you set the master's environment variables and save them.
Note
To set environment variables on the slave RSP when automatic synchronization is on, set the environment variables as described in the "Rebooting" chapter of this book. You can verify the boot variable using the show bootvar EXEC mode command.
Manually Setting Environment Variables on the Slave RSP
If you disable automatic synchronization of configuration files, you must manually synchronize the slave's configuration file to the master's configuration file to store environment variables on the slave RSP.
Once you set the master's environment variables, you can manually set the same environment variables on the slave RSP card using the slave sync config EXEC command.
To manually set environment variables on the slave RSP, perform the following procedure:
Step 1
Step 2
Step 3
Step 4
Monitoring and Maintaining Dual RSP Operation
To monitor and maintain Dual RSP operation, complete the following tasks in the following sections:
•
•
•
•
•
Overriding the Slave Image Bundled with the Master Image
To override the slave image that is bundled with the master image, use the following command in global configuration mode:
Router(config)# slave image {system | file-url}
Specifies which image the slave runs.
Manually Synchronizing Configuration Files
To manually synchronize configuration files and ROM monitor environment variables on the master and slave RSP card, use the following command in privileged EXEC mode:
Router(config)# slave sync config
Manually synchronizes the master and slave configuration files.
Caution
The slave sync config command is also a useful tool for more advanced implementation methods not discussed in this chapter.
Troubleshooting and Reloading a Failed RSP Card
When a new master RSP card takes over mastership of the router, it automatically reboots the failed RSP card as the slave RSP card. You can access the state of the failed RSP card in the form of a stack trace from the master console using the show stacks EXEC command.
The debug oir command is used to debug the online insertion and removal (OIR) feature (which is also known as hot-swapping or power-on servicing). The debug oir command often is useful in debugging problems related to OIR, including single line card reloading.
You can also manually reload a failed, inactive RSP card from the master console. This task returns the card to the active slave state. If the master RSP fails, the slave will be able to become the master. To manually reload the inactive RSP card, use the following command in global configuration mode:
Disabling Access to the Slave Console
The slave console does not have enable password protection. Thus, a user connected to the slave console port can enter privileged EXEC mode and view or erase the configuration of the router. Use the no slave terminal global configuration command to disable slave console access and prevent security problems. When the slave console is disabled, users cannot enter commands.
If slave console access is disabled, the following message appears periodically on the slave console:
%%Slave terminal access is disabled. Use "slave terminal" command in master RSP
configuration mode to enable it.
Displaying Information About Master and Slave RSP Cards
To display information about both the master and slave RSP cards, use the following commands in EXEC mode, as needed:
![]()
![]()
![]()
![]()
![]()
![]()
![]()
![]()
Posted: Tue Oct 5 11:43:27 PDT 2004
All contents are Copyright © 1992--2004 Cisco Systems, Inc. All rights reserved.
Important Notices and Privacy Statement.